Graphite 58G953 Manuale del proprietario
- Categoria
- Motoseghe
- Tipo
- Manuale del proprietario
Questo manuale è adatto anche per

1
G.1021
PILARKA ŁAŃCUCHOWA SPALINOWA
GASOLINE CHAIN SAW
KETTENSÄGE M.
VERBRENNUNGSMOTOR
MOTOROS LÁNCFŰRÉSZ
FERESTRĂU CU LANŢ CU MOTOR
MOTOROVÁ ŘETĚZOVÁ PILA BENZÍNOVÁ
BENZÍNOVÁ REŤAZOVÁ PÍLA
BENCINSKA VERIŽNA ŽAGA
58G953 58G954
GRANDININIS BENZININIS PJŪKLAS
BENZĪNA ĶĒŽU ZĀĢIS
KETTSAAG BENSIINIGA
LANČANA BENZINSKA PILA
BENZINSKA LANČANA TESTERA
ΒΕΝΖΙΝΟΚΙΝΗΤΟ ΑΛΥΣΟΠΡΙΟΝΟ
ES MOTOSIERRA
MOTOSEGA A CATENA
FR TRONÇONNEUSE A ESSENCE
* Części zamienne do tego produktu kupisz w gtxservice.pl przez min. 10 lat od jego zakupu.
Sklep gtxservice.pl realizuje min. 95% zamówień w skali roku.

2
SL
ES
NL
FR
INSTRUKCJA ORYGINALNA OBSŁUGI ................................................. 5
TRANSLATION OF THE ORIGINAL INSTRUCTIONS ............................. 11
ÜBERSETZUNG DER ORIGINALBETRIEBSANLEITUNG ....................... 16
...................................... 23
............................................... 29
EREDETI HASZNÁLATI UTASÍTÁS FORDÍTÁSA ................................... 36
TRADUCERE A INSTRUCIUNILOR ORIGINALE .................................. 42
PŘEKLAD PŮVODNÍHO NÁVODU K POUŽÍVÁNÍ ................................. 48
PREKLAD PÔVODNÉHO NÁVODU NA POUŽITIE ................................ 54
PREVOD IZVIRNIH NAVODIL ............................................................... 60
ORIGINALIOS INSTRUKCIJOS VERTIMAS............................................ 65
INSTRUKCIJU TULKOJUMS NO ORIĢINĀLVALODAS ......................... 71
ALGUPÄRASE KASUTUSJUHENDI TÕLGE ........................................... 76
.................................... 82
PRIJEVOD ORIGINALNIH UPUTA ......................................................... 89
PREVOD ORGINALNOG UPUTSTVA .................................................... 94
ΜΕΤΑΦΡΑΣΗ ΤΟΥ ΠΡΤΟΤΥΠΟΥ ΤΝ ΟΗΓΙΝ ΧΡΗΣΗΣ.............. 100
TRADUCCIÓN DEL MANUAL ORIGINAL ............................................ 107
TRADUZIONE DELLE ISTRUZIONI ORIGINALI .................................. 113
TRADUCTION DE LA NOTICE ORIGINALE .........................................119

3
1
12
11 10 98
7
2
345
6
13
14
15
17
18
1920
21
22
16
6
21
A
20
10
6
a
c
b
19
B
14
2
1
11
C
D
16
17
13
G
T
L H
E
35cm
H
M
A
X
MIN
9
F

4
21
3÷4
mm
20
I
J
K
L
II
II
I
I
P
d
T
g
15
X
H
2,5H
M
II
I
II
I
R
22
20
e
U
h
18
Y
II
I
1/3
N
I
II
III
S
20 f
22
21
W
i
Z
O

5
INSTRUKCJA ORYGINALNA
OBSŁUGI
PILARKA ŁAŃCUCHOWA SPALINOWA
58G953/58G954
UWAGA: PRZED PRZYSTĄPIENIEM DO UŻYTKOWANIA PILARKI
ŁAŃCUCHOWEJ SPALINOWEJ NALEŻY UWAŻNIE PRZECZYTAĆ
NINIEJSZĄ INSTRUKCJĘ I ZACHOWAĆ JĄ DO DALSZEGO
WYKORZYSTANIA.
SZCZEGÓŁOWE PRZEPISY BEZPIECZEŃSTWA
BEZPIECZEŃSTWO UŻYTKOWANIA PILAREK ŁAŃCUCHOWYCH
SPALINOWYCH
Ostrzeżenie!
•Osobom nie zaznajomionym z tekstem instrukcji nie wolno
posługiwać się pilarką łańcuchową.
•Pilarkę łańcuchową wolno stosować wyłącznie do przecinania
drewna.
•Użytkownik ponosi całkowite ryzyko innego wykorzystania pilarki,
mając świadomość, że może ono być niebezpieczne.
•Producent nie ponosi odpowiedzialności za szkody wynikłe z
niewłaściwego użytkowania pilarki łańcuchowej.
MIEJSCE PRACY
a. W miejscu pracy należy utrzymywać porządek i zapewnić dobre
oświetlenie. Nieporządek i złe oświetlenie przyczynia się do wypadków
zwłaszcza z użyciem pilarek łańcuchowych.
b. Nie należy dopuszczać dzieci i obserwatorów do miejsca pracy.
Rozproszenie uwagi operatora może spowodować utratę kontroli nad
urządzeniem.
BEZPIECZEŃSTWO OSOBISTE
a. Należy stosować wyposażenie ochronne takie jak kombinezon
wierzchni, okulary ochronne, obuwie ochronne, kask
ochronny, ochronniki słuchu oraz rękawice skórzane. Używanie
w odpowiednich warunkach wyposażenia ochronnego zmniejsza ryzyko
obrażeń ciała.
b. Nie należy przeceniać swoich możliwości. Należy cały czas stać
pewnie i w równowadze. Umożliwi to lepszą kontrolę nad pilarką w
sytuacjach nieprzewidywalnych.
c. Nie należy nosić luźnego ubrania lub biżuterii. Należy
utrzymywać swoje włosy, ubranie i rękawice z dala od części
ruchomych. Luźne ubrania, biżuteria lub długie włosy mogą zostać
zaczepione przez części ruchome.
TRANSPORT I PRZECHOWYWANIE
a. Przenosząc pilarkę należy zgasić silnik, nałożyć osłonę łańcucha
tnącego i załączyć hamulec łańcucha. Przenoszenie uruchomionej i
nie zabezpieczonej pilarki może doprowadzić do uszkodzenia ciała.
b. Przenoszenie pilarki jest możliwe tylko trzymając ją za uchwyt
przedni. Inne miejsca mogą nie zapewnić pewnego uchwytu a nawet
doprowadzić do zranienia.
c. Pilarkę należy kontrolować. Należy sprawdzać prostoliniowość
lub mocowanie części ruchomych, pęknięcia części i wszystkie
inne czynniki, które mogą mieć wpływ na pracę pilarki. Jeżeli
stwierdzi się uszkodzenia, należy pilarkę przed użyciem
naprawić. Przyczyną wielu wypadków jest niewłaściwy sposób
konserwacji urządzenia.
d. Łańcuch tnący powinien być naostrzony i czysty. Odpowiednie
utrzymanie ostrych krawędzi tnących łańcucha zmniejsza
prawdopodobieństwo zakleszczenia i ułatwia obsługę.
UŻYTKOWANIE I TROSKA O PILARKĘ
a. Należy, co jakiś czas sprawdzić prawidłowe działanie hamulca
pilarki. Niesprawny hamulec może doprowadzić do nie odłączenia
przesuwu łańcucha tnącego w sytuacji zagrożenia.
b. Każdorazowo po zakończeniu pracy należy dokładnie oczyścić
urządzenie, dodatkowo oczyścić używane środki ochrony
osobistej i przeprowadzić konserwację wrażliwych podzespołów.
PRACA
•Przed zwolnieniem hamulca łańcucha należy wyłączyć silnik pilarki.
•Należy zachować szczególną ostrożność pod koniec przecinania
gdyż pilarka nie mając oporu w postaci materiału ciętego opada siłą
bezwładności, co może być przyczyną urazów.
•Podczas długotrwałej pracy u operatora może wystąpić zjawisko
mrowienia bądź odrętwienia palców i dłoni. Należy wówczas
zaprzestać pracy gdyż odrętwienie zmniejsza precyzję w
posługiwaniu się pilarką.
•Zabrania się używania otwartego ognia , palenia papierosów.
•Napełnianie zbiornika paliwa pilarki mieszanką benzynowo olejową
należy wykonywać przy wyłączonym silniku i po jego ostygnięciu,
gdyż istnieje ryzyko rozlania i zapalenia się paliwa od gorących
elementów pilarki.
•Jeżeli stwierdzono nieszczelności lub wyciek paliwa to nie należy
uruchamiać pilarki gdyż grozi to pożarem.
•W czasie pracy pilarka znacznie się nagrzewa, należy być ostrożnym
i nie dotykać nieosłoniętymi częściami ciała gorących elementów
pilarki.
•Pilarkę może obsługiwać jednocześnie wyłącznie jedna osoba.
Wszystkie inne osoby powinny znajdować się z dala od obszaru
działania pilarki łańcuchowej. Szczególnie z dala od miejsca pracy
muszą znajdować się dzieci i zwierzęta.
•Podczas uruchamiania pilarki łańcuch tnący nie może być oparty o
materiał przeznaczony do cięcia lub dotykać czegokolwiek.
•W czasie pracy pilarką należy ją trzymać pewnie obiema rękami z
wykorzystaniem obu uchwytów. Zachować pewną postawę.
•Pilarką nie mogą posługiwać się dzieci lub osoby młodociane.
Pilarkę można powierzać wyłącznie osobom dorosłym, które wiedzą
jak się nią posługiwać. Udostępniając pilarkę łańcuchową należy
udostępniać także niniejszą instrukcję obsługi.
•Jeśli pojawią się objawy zmęczenia, należy natychmiast zaprzestać
pracy pilarką łańcuchową.
•Przed rozpoczęciem cięcia zawsze należy odpowiednio ustawić
dźwignię hamulca łańcucha (przyciągnąć do siebie). Jest ona
jednocześnie osłoną dłoni.
•Pilarkę łańcuchową odsuwa się od materiału przecinanego wyłącznie
przy pracującym łańcuchu tnącym.
•Przy cięciu tarcicy przetworzonej lub cienkich konarów należy
stosować podporę (koziołek). Nie wolno ciąć kilku desek jednocześnie
(ułożonych jedna na drugiej) lub materiału trzymanego przez drugą
osobę czy też przytrzymywanego nogą.
•Długie elementy przecinane powinny być odpowiednio
unieruchomione.
•W terenie pochyłym zawsze należy wykonywać cięcie będąc
zwróconym ku górze.
•Podczas przecinania na wskroś zawsze należy wykorzystywać szpon
przypory jako punkt podparcia. Trzymając pilarkę za uchwyt tylny
prowadzić za pomocą uchwytu przedniego.
•W przypadku braku możliwości wykonania cięcia za jednym razem
należy odciągnąć pilarkę nieco do tyłu, przestawić szpon przypory i
kontynuować cięcie unosząc nieco uchwyt tylny.
•Przy przecinaniu poziomym należy ustawić się pod kątem najmniej
odbiegającym od 90º względem linii cięcia. Taka operacja wymaga
natężenia uwagi.
•W przypadku zakleszczenia się łańcucha podczas przecinania górną
częścią łańcucha może wystąpić tzw. odrzut skierowany w kierunku
operatora. Z tego powodu tam gdzie to jest możliwe należy dążyć do
przecinania dolną częścią łańcucha gdyż wówczas przy zakleszczeniu
łańcucha efekt odrzutu zostanie skierowany w kierunku od ciała
operatora.
•Należy zachować szczególną uwagę przy przecinaniu drewna
rozłupującego się. Odcięte kawałki drewna mogą być odrzucane w
dowolnym kierunku (ryzyko uszkodzenia ciała!).
•Obcinanie gałęzi drzew powinno być wykonywane przez osoby
przeszkolone! Niekontrolowany upadek ściętej gałęzi drzewa
grozi ryzykiem uszkodzenia ciała!
•Nie wolno ciąć wierzchołkiem prowadnicy łańcucha (ryzyko
odrzutu).
•Zwrócić szczególną uwagę na gałęzie znajdujące się pod naprężeniem.
Nie wolno odcinać od dołu gałęzi swobodnie zwisających.
•Zawsze należy stać z boku przewidzianej linii kierunku upadku
drzewa, które ma być ścięte.
•Gdy drzewo jest powalane istnieje ryzyko łamania się i spadania gałęzi
drzewa lub drzew znajdujących się w pobliżu. Należy zachować
szczególną ostrożność gdyż istnieje ryzyko uszkodzenia ciała.
•Na zboczach operator powinien stać na wyżej położonej części
zbocza względem ścinanego drzewa, nigdy poniżej.
•Uważać na pnie, które mogą staczać się ku operatorowi. Odskoczyć!
•Pracująca pilarka ma skłonność do obrócenia się, gdy wierzchołek

6
prowadnicy łańcucha dotyka materiału obrabianego. W takim
przypadku pilarka w sposób niekontrolowany może przesunąć się w
kierunku operatora (ryzyko uszkodzenia ciała!).
•Ścinka drzew musi być poprzedzona przygotowaniem miejsca pracy
, polegającym na usunięciu dolnych przeszkadzających gałęzi oraz
oczyszczeniu powierzchni wokół pnia drzewa .
•Nie wolno pracować podczas silnego wiatru, który może wpływać na
zmianę założonego kierunku obalenia drzewa lub powodować jego
niekontrolowane obalenie.
•Nie wolno wykonywać ścinki w warunkach ograniczonej widoczności
panujących w czasie mgły, opadów deszczu lub śniegu .
•Nie wolno używać pilarki powyżej wysokości ramion lub stojąc na
drzewie, drabinie, rusztowaniu, pniu itp.
•W pobliżu miejsca pracy powinna znajdować się dobrze doposażona
apteczka pierwszej pomocy.
Aby zapobiec odrzutowi pilarki należy przestrzegać poniższych
wskazówek:
•Nigdy nie rozpoczynać ani nie prowadzić cięcia wierzchołkiem
prowadnicy łańcucha!
•Zawsze należy rozpoczynać przecinanie pilarką już uruchomioną!
•Upewnić się czy łańcuch tnący jest odpowiednio naostrzony.
•Nigdy nie wolno jednocześnie przecinać więcej niż jedną gałąź.
Podczas odcinania zwrócić uwagę na gałęzie sąsiadujące. Podczas
przecinania drzewa na wskroś należy uważać na pnie drzew stojących
w pobliżu.
OBJAŚNIENIE ZASTOSOWANYCH PIKTOGRAMÓW
1. Uwaga zachowaj szczególne środki ostrożności
2. Zagrożenia pożaru
3. Zagrożenie zatrucia spalinami
4. Używaj rękawic ochronnych
5. Wyłączyć silnik i ściągnąć przewód z świecy zapłonowej przed
rozpoczęciem czynności obsługowych lub naprawczych
6. Przeczytaj instrukcję obsługi, przestrzegaj ostrzeżeń i warunków
bezpieczeństwa w niej zawartych!
7. Używaj środki ochrony głowy, wzroku i słuchu
8. Zagrożenie na skutek odrzutu
9. Używaj odzieży ochronnej
10. Używaj obuwia ochronnego
11. Nie zbliżaj kończyn do elementów tnących
BUDOWA I ZASTOSOWANIE
Spalinowa pilarka łańcuchowa jest urządzeniem typu ręcznego. Jest
ona napędzana dwusuwowym silnikiem spalinowym chłodzonym
powietrzem. Tego typu urządzenie jest przeznaczone do wykonywania
prac w ogrodzie przydomowym. Pilarka może służyć do ścinania drzew,
obcinania gałęzi, przygotowywania drewna opałowego, drewna do
kominka i do innych zastosowań wymagających przecinania drewna.
Nie wolno stosować urządzenia niezgodnie z jego przeznaczeniem.
OPIS STRON GRAFICZNYCH
Poniższa numeracja odnosi się do elementów urządzenia
przedstawionych na stronach gracznych niniejszej instrukcji.
1. Blokada dźwigni przepustnicy
2. Cięgno ssania
3. Pokrętło pokrywy ltra powietrza
4. Pokrywa ltra powietrza
5. Uchwyt przedni
6. Dźwignia hamulca
7. Nakrętki mocowania prowadnicy
8. Śruba regulacji naciągu łańcucha
9. Wkręt regulacji ilości oleju
10. Obudowa
11. Dźwignia przepustnicy
12. Rękojeść zasadnicza
13. Linka rozruchowa
14. Włącznik zapłonu
15. Korek wlewu paliwa
16. Wkręty regulacyjne gaźnika L i H
17. Wkręt regulacji wolnych obrotów T
18. Korek wlewu oleju
19. Szpon przypory
20. Prowadnica
21. Łańcuch
22. Koło łańcuchowe prowadnicy
* Mogą występować różnice między rysunkiem a wyrobem.
OPIS UŻYTYCH ZNAKÓW GRAFICZNYCH
UWAGA
OSTRZEŻENIE
MONTAŻ/USTAWIENIA
INFORMACJA
WYPOSAŻENIE I AKCESORIA
1. Osłona prowadnicy – 1 szt.
2. Prowadnica – 1 szt.
3. Łańcuch – 1 szt.
4. Szpon przypory + śruby – 1 kpl.
5. Pojemnik na mieszankę benzynowo-olejową – 1 szt.
6. Klucz do świec z wkrętakiem – 1 szt.
7. Wkrętak – 1 szt.
8. Klucz sześciokątny – 2 szt.
9. Pilnik – 1 szt.
PRZYGOTOWANIE DO PRACY
PRZENOSZENIE PILARKI ŁAŃCUCHOWEJ
Przed przystąpieniem do przeniesienia pilarki łańcuchowej należy
zawsze nasunąć osłonę łańcucha na prowadnicę i łańcuch. Pilarkę
łańcuchową należy przenosić za uchwyt przedni. Nie wolno
przenosić pilarki chwytając za rękojeść zasadniczą. Jeśli zachodzi
potrzeba wykonania kolejno kilku operacji przecinania, to pomiędzy
operacjami pilarka powinna być wyłączana za pomocą włącznika
zapłonu.
MONTAŻ SZPONU PRZYPORY
Ze względów bezpieczeństwa szpon przypory powinien być
zawsze zamontowany do pilarki. Stanowi on punkt podparcia, oraz
zmniejsza ryzyko wystąpienia zjawiska odrzutu.
•Przykręcić szpon przypory (19) do obudowy pilarki (śruby w
wyposażeniu).
MONTAŻ PROWADNICY I ŁAŃCUCHA PILARKI
Do regulacji napięcia łańcucha służą sworzeń oraz śruba regulacyjna.
Bardzo ważne jest, aby podczas montażu prowadnicy sworzeń
umieszczony na śrubie regulacyjnej wszedł do otworu w prowadnicy.
Poprzez obracanie śruby regulacyjnej można przesuwać sworzeń
do przodu i w tył. Elementy te należy właściwie ustawić przed
rozpoczęciem montażu prowadnicy w pilarce.
Prowadnica łańcucha i łańcuch pilarki są dostarczane osobno.
•Dźwignia hamulca (6) musi znajdować się w położeniu górnym
(pionowym) (rys. A).
•Odkręcić nakrętki mocowania prowadnicy (7) i zdjąć obudowę (10).
•Założyć łańcuch (21) na koło łańcuchowe napędzające umieszczone
za sprzęgłem.
•Założyć prowadnicę (20) (wsuwając za sprzęgło) na śruby prowadzące
(c) i dosunąć w kierunku koła łańcuchowego napędzającego (rys. B).
•Założyć łańcuch (21) od dołu na koło łańcuchowe prowadnicy (22).
•Przesunąć prowadnicę (20) w kierunku od koła łańcuchowego

7
napędzającego tak, aby ogniwa prowadzące łańcucha znalazły się w
rowku prowadnicy.
•Sprawdzić czy sworzeń (a) na śrubie regulacji naciągu łańcucha (8)
znajduje się pośrodku dolnego otworu (b) prowadnicy (20), (jeśli
trzeba dokonać regulacji) (rys. B).
•Umieścić obudowę (10) na swoim miejscu i przykręcić delikatnie
nakrętkami mocowania prowadnicy (7).
•Naciągnąć odpowiednio łańcuch pilarki śrubą regulacji naciągu
łańcucha (8). Właściwy naciąg łańcucha jest wtedy, jeśli łańcuch
daje się unieść na 3 – 4 mm w środku prowadnicy znajdującej się w
położeniu poziomym.
•Pewnie dokręcić nakrętki mocowania prowadnicy (7) podtrzymując
zarazem wierzchołek prowadnicy.
Przed zmontowaniem prowadnicy i łańcucha należy sprawdzić
właściwe usytuowanie ostrzy tnących łańcucha (właściwe
umieszczenie łańcucha na prowadnicy pokazano na wierzchołku
prowadnicy). Aby zapobiec skaleczeniu przez ostre krawędzie
podczas sprawdzania i montowania łańcucha zawsze należy mieć
założone rękawice ochronne.
Nowy łańcuch pilarki wymaga okresu rozruchu, trwającego około
5 minut. Na tym etapie bardzo ważne jest smarowanie łańcucha.
Po okresie rozruchu sprawdzić naciąg łańcucha i poprawić go, jeśli
trzeba.
Dość często trzeba sprawdzać i regulować jego naciąg, gdyż luźny
łańcuch łatwo może spaść z prowadnicy, ulec szybkiemu zużyciu lub
spowodować szybkie zużycie prowadnicy.
NAPEŁNIANIE OLEJEM ZBIORNIKA PILARKI
Nowa pilarka ma pusty zbiornik oleju. Dlatego też przed pierwszym
użyciem należy napełnić zbiornik olejem.
•Odkręcić korek wlewu oleju (18).
•Wlać olej w ilości max. 260 ml (należy uważać, aby w czasie
napełniania zbiornika do jego wnętrza nie przedostało się żadne
zanieczyszczenie).
•Zakręcić korek wlewu oleju (18).
Nie wolno stosować oleju zużytego lub regenerowanego, gdyż może
to spowodować uszkodzenie pompy olejowej. Należy stosować olej
w gatunku SAE 10W/30 przez cały rok lub latem olej SAE 30W/40, a
zimą SAE 20W/30.
NAPEŁNIANIE ZBIORNIKA PALIWA
Podczas napełniania paliwem należy przestrzegać poniższych zasad:
•Silnik nie może pracować.
•Nie można dopuścić do rozlania paliwa.
Zmieszać benzynę (bezołowiową o liczbie oktanowej 95) z dobrej
jakości olejem silnikowym do silników dwusuwowych według niżej
podanych tabeli.
Zalecana proporcja mieszanki
Warunki pracy Benzyna : olej
Pierwsze 20 h pracy 20 : 1
Po 20 h pracy 25 : 1
•Odkręcić korek wlewu paliwa (15).
•Nalać wcześniej przygotowaną mieszankę paliwową (max. 550 ml).
•Zakręcić korek wlewu paliwa (15).
Większość kłopotów z silnikami spalinowymi pośrednio lub
bezpośrednio jest związana z zastosowanym paliwem. Należy
szczególnie uważać, aby do mieszanki nie użyć oleju silnikowego
przeznaczonego dla silników 4-suwowych.
PRACA / USTAWIENIA
URUCHAMIANIE SILNIKA
Podczas pracy należy trzymać pilarkę łańcuchową obiema rękami.
•Sprawdzić napełnienie zbiornika paliwa i zbiornika oleju.
•Sprawdzić czy dźwignia hamulca (6) znajduje się w pozycji załączenia
(przesunięta do przodu).
•Przy zimnym silniku wyciągnąć cięgno ssania (2).
•Napompować paliwo do silnika przez kilkukrotne pociągnięcie za
linkę rozruchową (13).
•Przestawić włącznik zapłonu (14) w położenie włączony (rys. C).
•Umieścić pilarkę na stabilnym podłożu (ziemi).
•Trzymając pewnie pilarkę opartą o ziemię pociągnąć za linkę
rozruchową (13) najpierw powoli do usłyszenia zazębienia się
sprzęgła a następnie pociągnąć ją silnie (rys. D).
•Należy pociągać za linkę rozruchową (13) aż pilarka uruchomi się na
chwilę i zgaśnie.
•Następnie trzeba wcisnąć blokadę dźwigni przepustnicy (1) i lekko
dźwignię przepustnicy (11) w celu wyłączenia ssania (cięgno ssania
zostanie automatycznie wsunięte w pozycję wyłączenia).
•Już z wyłączonym ssaniem należy ponownie pociągnąć za linkę
rozrusznika (13), aż do uruchomienia silnika (może być konieczne
kilkukrotne szarpnięcie).
•Zezwolić na rozgrzanie silnika. Jeśli to konieczne zwiększyć obroty
poprzez lekkie naciśnięcie dźwigni przepustnicy (11).
•Przestawić dźwignię hamulca (6) w położenie wyłączenia (przesunięta
do tyłu).
•Wykonać cięcie.
Nie wolno uruchamiać silnika trzymając pilarkę w ręce. Podczas
rozruchu pilarka musi być oparta o ziemię i pewnie przytrzymywana.
Należy sprawdzić, czy łańcuch może się obracać swobodnie bez
dotykania jakichkolwiek przedmiotów. Nie wolno ciąć żadnych
materiałów, gdy cięgno ssania jest wyciągnięte.
ZATRZYMYWANIE SILNIKA
• Zwolnić dźwignię przepustnicy (11), aby silnik mógł popracować
parę minut na biegu jałowym.
•Ustawić włącznik zapłonu (14) w położenie (STOP).
SPRAWDZANIE SMAROWANIA ŁAŃCUCHA
Przed rozpoczęciem pracy sprawdzić smarowanie łańcucha pilarki
i poziom oleju w zbiorniku. Włączyć pilarkę i trzymać ją nad ziemią.
Jeśli dadzą się zauważyć zwiększające się ślady oleju to znaczy, że
smarowanie łańcucha działa właściwie (rys. E). Jeśli w ogóle nie ma
żadnych śladów oleju lub są minimalne należy dokonać regulacji
wykorzystując wkręt regulacji ilości oleju (9). W przypadku braku reakcji
na regulację należy oczyścić wylot oleju, górny otwór naciągu łańcucha
i kanał olejowy lub skontaktować się z serwisem.
Regulację należy przeprowadzić na wyłączonym urządzeniu z
zachowaniem środków ostrożności i nigdy nie dopuścić do tego,
aby prowadnica zetknęła się z ziemią. Ze względu bezpieczeństwa
zawsze należy zachować odstęp od ziemi, co najmniej 20 cm.
Za pomocą wkrętu regulacji ilości oleju (9) ustawić ilość podawanego
oleju według wymaganych warunków pracy.
•Położenie „MIN” – dopływ oleju zmniejsza się.
•Położenie „MAX” – dopływ oleju wzrasta (rys. F).
Przy przecinaniu drewna twardego i suchego i przy wykorzystywaniu
do cięcia całej roboczej długości prowadnicy, należy ustawić wkręt
regulacyjny (9) w położenie „MAX”.
Przy cięciu drewna miękkiego i wilgotnego lub, gdy wykorzystuje
się tylko częściowo roboczą długość prowadnicy można zmniejszyć
ilość wydawanego oleju obracając wkręt regulacyjny (9) w kierunku
położenia „MIN”.
Zbiornik oleju powinien być prawie pusty w tym samym czasie jak
opróżni się zbiornik paliwa. Przy nalewaniu paliwa należy pamiętać o
napełnieniu zbiornika oleju.
ŚRODKI DO SMAROWANIA ŁAŃCUCHA
Trwałość łańcucha i prowadnicy pilarki w dużej mierze zależy od jakości
zastosowanego czynnika smarującego. Należy używać wyłącznie środki
smarujące przeznaczone dla pilarek łańcuchowych.
Nigdy nie wolno stosować zużytego lub regenerowanego oleju do
smarowania łańcucha pilarki.
PROWADNICA ŁAŃCUCHA
Prowadnica (20) jest narażona na szczególnie intensywne zużycie w
części przedniej i spodniej. Aby zapobiec jednostronnemu zużyciu
wskutek tarcia przy okazji każdego ostrzenia łańcucha zaleca się
obracać prowadnicę. Przy tej samej okazji należy oczyścić rowek
w prowadnicy i otwory olejowe. Rowek prowadnicy ma kształt
prostokątny. Kontrolować rowek pod kątem zużycia. Przyłożyć liniał
do listwy prowadzącej i powierzchni zewnętrznej zęba łańcucha. Jeśli
zostanie zaobserwowana szczelina między nimi to znaczy, że rowek
jest w normie. W przeciwnym przypadku prowadnicę należy uznać za
zużytą i należy ją wymienić.
KOŁO ŁAŃCUCHOWE
Koło łańcuchowe napędzające jest elementem szczególnie narażonym
na zużycie. Jeśli zostaną zauważone wyraźne oznaki zużycia na zębach
koła łańcuchowego należy je wymienić. Zużyte koło łańcuchowe
dodatkowo skraca trwałość łańcucha pilarki. Koło łańcuchowe powinno
zostać wymienione przez autoryzowany warsztat serwisowy.

8
REGULACJA GAŹNIKA
Gaźnik pilarki został wyregulowany fabrycznie, ale może wymagać
dokładnego wyregulowania przy zmianie warunków pracy. Przed
przystąpieniem do regulacji gaźnika należy się upewnić czy
zamontowany zostały nowy ltr powietrza i paliwa oraz czy nalano
odpowiedniej mieszanki paliwowej.
Regulację gaźnika przeprowadza się z zamontowaną prowadnicą i
łańcuchem.
•Wkręcić oba wkręty regulacyjne (L i H) (16) do oporu (nie dokręcać
zbyt mocno) (rys. G).
•Początkowo odkręcić oba wkręty regulacyjne (16) jak podano poniżej:
-Wkręt L: 1 1/4 obrotu
-Wkręt H: 1 3/8 obrotu
•Uruchomić silnik i zezwolić na rozgrzanie przy wciśniętej do połowy
dźwigni przepustnicy (11).
•Po rozgrzaniu silnika zwolnić nacisk na dźwignię przepustnicy (11) i
zezwolić, aby silnik pracował na wolnych obrotach.
•Obracać powoli wkręt (L) w prawo, aż do położenia, w którym wolne
obroty będą maksymalne a następnie cofnąć w lewo o 1/4 obrotu.
•Obracać wkręt regulacji wolnych obrotów (T) (17) w lewo dotąd, aż
łańcuch przestanie się poruszać. Jeśli wolne obroty okażą się zbyt
niskie, obrócić wkręt w prawo (rys. G).
Należy unikać dotykania tłumika. Gorący tłumik może spowodować
poważne oparzenia.
HAMULEC ŁAŃCUCHA
Opisywana pilarka jest wyposażona w hamulec automatyczny, który
zatrzymuje ruch łańcucha w przypadku wystąpienia zjawiska odbicia
podczas cięcia pilarką. Hamulec działa automatycznie w wyniku
oddziaływania siły bezwładności na ciężarek zamocowany we wnętrzu
obudowy hamulca. Hamulec łańcucha może zostać także uruchomiony
ręcznie, jeśli dźwignia hamulca (6) zostanie przesunięta w kierunku
prowadnicy (20). Uruchomienie hamulca łańcucha zatrzymuje ruch
łańcucha w ciągu 0,12 s.
KONTROLA FUNKCJI HAMOWANIA
Przed każdym użyciem pilarki należy skontrolować działanie hamulca
•Umieścić pracującą pilarkę na ziemi i wprowadzić silnik pilarki w
najwyższą prędkość obrotową przy pełnym otwarciu przepustnicy na
okres 1–2 sekund.
•Popchnąć dźwignię hamulca (6) do przodu. Łańcuch powinien
natychmiast zatrzymać się.
•Jeśli łańcuch zatrzymuje się powoli lub nie zatrzymuje się to należy
wymienić taśmę hamulca i bęben sprzęgła przed ponownym
użyciem pilarki.
•Aby zwolnić hamulec należy odciągnąć dźwignię hamulca
(6) w kierunku rękojeści zasadniczej (12) aż do usłyszenia
charakterystycznego dźwięku zaskoczenia blokady.
Sprawdzenie działania hamulca łańcucha oraz tego, czy łańcuch
jest ostry przed każdym użyciem pilarki jest rzeczą bardzo ważną
pozwalającą na utrzymanie ewentualnego zjawiska odbicia na
bezpiecznym poziomie.
KONTROLA AKTYWACJI HAMULCA
Podczas wykonywania tej kontroli silnik pilarki powinien być wyłączony.
•Unieść pilarkę trzymając za uchwyt przedni (5) i rękojeść zasadniczą
(12) na około 35 cm nad elementem drewnianym.
•Puścić uchwyt przedni (5) i zezwolić, aby prowadnica przechyliła
się do przodu pod wpływem własnego ciężaru i dotknęła elementu
drewnianego (rys. H).
•Przy dotknięciu elementu drewnianego powinien włączyć się
hamulec pilarki (dźwignia hamulca (6) zostanie samoczynnie
przesunięta do przodu w pozycję załączenia).
Przed przystąpieniem do pracy należy sprawdzić czy hamulec
łańcucha działa sprawnie. W przypadku, gdy hamulec nie działa
skutecznie należy przed przystąpieniem do pracy dokonać regulacji
lub naprawy w autoryzowanym serwisie.
Jeśli silnik będzie pracował z wysoką prędkością obrotową przy
włączonym hamulcu łańcucha to spowoduje przegrzanie sprzęgła
pilarki. Gdy zadziała hamulec łańcucha w czasie, kiedy silnik pracuje
należy natychmiast zwolnić dźwignię przepustnicy i utrzymać silnik
na wolnych obrotach.
NACIĄGANIE ŁAŃCUCHA PILARKI
W czasie pracy pilarką łańcuch tnący wydłuża się w wyniku nagrzewania.
Rozciągnięty łańcuch luzuje się, co grozi zsunięciem z prowadnicy.
•Poluzować nakrętki mocowania prowadnicy (7).
•Upewnić się czy łańcuch (21) znajduje się w rowku prowadzącym
prowadnicy (20).
•Posługując się wkrętakiem obracać w prawo śrubę naciągu łańcucha
(8) dopóki łańcuch nie zostanie naciągnięty w sposób właściwy
(delikatnie przytrzymując prowadnicę w poziomie).
•Sprawdzić naciąg łańcucha ponownie (łańcuch powinno dać się unieść
w środku prowadnicy na wysokość około 3–4mm) (rys. I).
•Pewnie dokręcić nakrętki mocowania prowadnicy (7).
Nie można naciągnąć łańcucha nazbyt silnie. Regulacja
przeprowadzona na silnie rozgrzanym łańcuchu może doprowadzić
do jego nadmiernego naprężenia w miarę stygnięcia.
PRACA PILARKĄ ŁAŃCUCHOWĄ
•Przed przystąpieniem do wykonania zamierzonej pracy należy
zapoznać się z punktem zawierającym zasady bezpiecznej pracy
pilarką łańcuchową. Zaleca się najpierw nabyć wprawy przecinając
zbędne kawałki drewna. Umożliwia to także bliższe zapoznanie się z
możliwościami pilarki.
•Zawsze należy przestrzegać przepisów bezpieczeństwa.
•Pilarka łańcuchowa może być wykorzystywana wyłącznie do
przecinania drewna. Zabrania się przecinać nią innych materiałów.
•Natężenie drgań i zjawisko odrzutu zmieniają się podczas przecinania
różnych gatunków drzew.
•Nie wolno wykorzystywać pilarki łańcuchowej jako dźwigni
służącej do unoszenia, przesuwania lub rozdzielania obiektów. W
przypadku zakleszczenia się łańcucha należy wyłączyć silnik i wbić w
drewno plastikowy lub drewniany klin, aby uwolnić pilarkę (rys. J).
Ponownie uruchomić urządzenie i jeszcze raz ostrożnie przystąpić do
przecinania.
•Nie wolno mocować jej do stanowisk stacjonarnych.
•Zabronione jest podłączanie do jej napędu innych urządzeń, które nie
są wymienione przez producenta pilarki.
•Podczas przecinania nie ma potrzeby dociskania pilarki z dużą siłą.
Trzeba wywrzeć tylko niewielki docisk, gdy silnik pracuje przy pełnym
otwarciu przepustnicy.
Gdy w czasie cięcia pilarka zostanie zakleszczona w rzazie nie wolno
wyciągać jej siłą. Grozi to utratą kontroli nad pilarką i zranieniem
operatora oraz/lub uszkodzeniem pilarki.
Przed rozpoczęciem pracy hamulec łańcucha musi być zwolniony.
•Naciśnij przycisk blokady dźwigni przepustnicy (1) i dźwignię
przepustnicy (11) (przed rozpoczęciem cięcia zaczekaj, aż silnik
osiągnie pełną prędkość).
•Przez cały czas utrzymuj pełną prędkość.
•Pozwól, aby łańcuch przecinał drewno. Lekko przyciskaj pilarkę do
dołu (rys. K).
•Aby nie stracić kontroli pod koniec operacji przecinania należy
przestać naciskać na pilarkę.
•Po zakończeniu przecinania zwolnij dźwignię przepustnicy (11)
pozwalając, aby silnik pracował na biegu jałowym.
•Przed odstawieniem pilarki należy wyłączyć silnik.
Utrzymywanie wysokich obrotów pilarki bez przecinania drewna
prowadzi do zbędnych strat i zużycia części.
OCHRONA PRZED ZJAWISKIEM ODRZUTU
Przez odrzut rozumie się ruch prowadnicy łańcucha pilarki łańcuchowej
ku górze i/lub do tyłu, który może się zdarzyć, gdy łańcuch pilarki swoim
fragmentem znajdującym się na wierzchołku prowadnicy napotka na
przeszkodę.
•Należy upewnić się czy materiał przecinany jest unieruchomiony w
sposób pewny.
•Korzystać z zacisków, aby unieruchomić materiał.
•Podczas uruchamiania i pracy pilarkę należy trzymać obiema rękami.
•W czasie odbicia pilarka zachowuje się w sposób niekontrolowany,
następuje poluzowanie łańcucha (rys. L).
•Łańcuch niewłaściwie naostrzony zwiększa ryzyko wystąpienia
odbicia.
•Nigdy nie wolno wykonywać przecinania powyżej wysokości ramion.
Należy unikać przecinania wierzchołkiem prowadnicy, gdyż może
to spowodować gwałtowny odrzut pilarki do tyłu, ku górze. Podczas
pracy pilarką łańcuchową zawsze należy stosować kompletne
wyposażenie pilarki oraz odpowiednie ubranie robocze.
Demontaż zabezpieczeń, niewłaściwa obsługa, konserwacja lub
niewłaściwie dokonana wymiana prowadnicy lub łańcucha mogą
przyczynić się do zwiększenia ryzyka uszkodzenia ciała przy
ewentualnym zjawisku

9
odrzutu. Nigdy nie wolno dokonywać jakichkolwiek przeróbek
pilarki. W przypadku posługiwania się pilarką samowolnie
przerobioną, użytkownik traci wszelkie prawa związane z gwarancją.
Utratę gwarancji powoduje także użytkowanie pilarki niezgodnie z
informacjami zawartymi w niniejszej instrukcji.
PRZECINANIE KAWAŁKÓW DREWNA
Podczas przecinania kawałka drewna należy przestrzegać wskazówek
dotyczących bezpieczeństwa pracy i postępować w sposób następujący:
•Upewnić się czy kawałek materiału nie może się przesunąć.
•Krótkie kawałki materiału przed rozpoczęciem cięcia unieruchomić za
pomocą zacisków.
•Wolno przecinać wyłącznie drewno lub materiały drewnopochodne.
•Przed przecinaniem upewnić się, że pilarka nie zetknie się z
kamieniami lub gwoździami, gdyż to mogłoby spowodować
wyrwanie pilarki i uszkodzenie łańcucha.
•Unikać sytuacji, w których pracująca pilarka mogłaby zetknąć się z
drucianym ogrodzeniem lub ziemią.
•Przy obcinaniu gałęzi, na ile to możliwe podeprzeć pilarkę i nie
przecinać wierzchołkiem prowadnicy łańcucha pilarki.
•Uważać na przeszkody takie jak wystające pniaki, korzenie,
zagłębienia i dziury w ziemi gdyż mogą one być przyczyną wypadku.
POWALANIE DRZEWA
Ustalić kierunek upadku drzewa, uwzględniając wiejący wiatr,
pochylenie drzewa, położenie ciężkich gałęzi, łatwość wykonania pracy
po powaleniu i inne czynniki.
•Podczas oczyszczania miejsca wokół drzewa trzeba pamiętać o
zapewnieniu sobie dobrej przyczepności do gruntu oraz miejsca
odejścia w czasie upadku drzewa.
•Należy wcześniej przewidzieć i oczyścić dwie trasy ucieczki pod
kątem około 450 od linii przeciwnej do przewidywanego kierunku
upadku drzewa. Na trasach tych nie powinno być żadnych przeszkód
(rys. M).
•Wykonać wcięcie wstępne na jedną trzecią grubości pnia po stronie
upadku (rys. N).
•Wykonać wcięcie powalające po przeciwnej stronie w stosunku do
wcięcia wykonanego uprzednio i na nieco wyższym poziomie niż
dolna powierzchnia wcięcia wstępnego.
•We właściwym momencie wkładać kliny celem uniknięcia
zakleszczenia łańcucha pilarki.
•Drzewo należy powalać poprzez podkładanie klina, a nie poprzez
przecinanie pnia na wskroś.
Przy ścinaniu drzew należy przestrzegać wszelkich zasad
bezpieczeństwa i postępować w sposób następujący:
• Jeśli nastąpi zakleszczenie się łańcucha pilarki, to należy
wyłączyć pilarkę i uwolnić łańcuch posługując się klinem. Kliny
powinny być wykonane z drewna lub plastiku. Nigdy nie wolno
stosować klinów stalowych lub żeliwnych.
• Upadające drzewo może pociągnąć za sobą inne drzewa.
• Strefa niebezpieczna jest równa 2,5 długości drzewa powalanego
(rys. M).
• Jeśli operator jest osobą początkującą lub niedoświadczoną
to nie należy nabierać doświadczenia samemu, lecz odbyć
szkolenie.
Nie wolno ścinać drzew w przypadku:
• Jeśli nie można ustalić warunków w obrębie strefy niebezpiecznej
wskutek mgły, deszczu, opadów śniegu lub zmroku.
• Jeśli nie można pewnie ustalić kierunku upadku drzewa wskutek
wiatru lub podmuchów wiatru.
PRZECINANIE PNI DRZEW
•Docisnąć szpon przypory (19) do materiału i wykonać cięcie (rys. O).
•Jeśli nie udało się zakończyć cięcia pomimo wyczerpania możliwości
przesuwu pilarki to należy:
•Wycofać prowadnicę do tyłu na pewną odległość z przecinanego
materiału (przy ruchomym łańcuchu tnącym), przesunąć nieco
rękojeść zasadniczą (12) w dół i podeprzeć szpon przypory (19).
Dokończyć cięcie unosząc nieco rękojeść zasadniczą (12).
PRZECINANIE PNIA LEŻĄCEGO NA ZIEMI
• Zawsze trzeba mieć pewną przyczepność stóp do gruntu. Nie
wolno stawać na pniu.
• Uważać na możliwość obrócenia się powalonego pnia.
• Przestrzegać wskazówek instrukcji dotyczących bezpiecznej
pracy, aby uniknąć odbicia pilarki
• Zawsze należy kończyć cięcie od strony występowania
naprężenia rozciągającego celem nie dopuszczenia do
zakleszczenia łańcucha pilarki w rzazie.
•Przed rozpoczęciem pracy sprawdzić kierunek działania naprężenia
w pniu, który będzie przecinany, aby uniknąć zakleszczenia łańcucha
pilarki.
•Pierwsze cięcie należy wykonać po stronie poddanej naprężeniom
rozciągającym, aby je wyeliminować.
•Przy przecinaniu pnia leżącego na ziemi najpierw dokonać cięcia
na głębokość równą 1/3 jego średnicy, następnie obrócić pień i
zakończyć przecinanie po przeciwnej stronie.
•Przy przecinaniu pnia leżącego na ziemi, nie wolno dopuścić do
zagłębienia się łańcucha tnącego w grunt, znajdujący się pod pniem.
Zaniedbanie tego może spowodować natychmiastowe uszkodzenie
łańcucha.
•Przy przecinaniu pni leżących na zboczu operator zawsze powinien
znajdować się na stoku powyżej pnia.
PRZECINANIE PNIA UNIESIONEGO NAD ZIEMIĄ
W przypadku pni podpartych lub umieszczonych na stabilnych
koziołkach w zależności od miejsca przecinania zawsze należy dokonać
wcięcia na jedną trzecią grubości pnia od strony występowania
naprężenia ściskającego i zakończyć cięcie po przeciwnej stronie (rys.
P i R).
PRZYCINANIE / OBCINANIE GAŁĘZI DRZEW I KRZEWÓW
•Obcinanie gałęzi powalonego drzewa należy rozpocząć przy
podstawie ściętego drzewa i kontynuować w stronę szczytu. Małe
gałązki należy obcinać jednym cięciem.
•Najpierw sprawdzić, w którą stronę jest gałąź odgięta. Następnie
wykonać cięcie wstępne od strony wygięcia i zakończyć przecinanie
od strony przeciwnej. Uważać na możliwość odskoczenia gałęzi
odcinanej.
•Podczas przycinania gałęzi drzew zawsze powinno się ciąć z góry do
dołu umożliwiając swobodne opadnięcie odcinanej gałęzi. Niekiedy
może być jednak przydatne podcięcie gałęzi od spodu (rys. S).
•Należy zachować szczególną uwagę podczas przecinania gałęzi,
która może być naprężona. Taka gałąź może po odcięciu odskoczyć
i uderzyć operatora.
Gałęzi nie wolno obcinać wspinając się na drzewo. Nie wolno stawać
na drabinach, platformach, kłodach lub w innych pozycjach, które
mogą spowodować utratę równowagi i kontroli nad pilarką. Nie
wolno dokonywać przecinania powyżej wysokości ramion. Pilarkę
zawsze trzeba trzymać obiema rękami.
OBSŁUGA I KONSERWACJA
Przed przystąpieniem do czyszczenia, sprawdzania czy naprawy
pilarki należy mieć pewność, że silnik urządzenia został zatrzymany
i jest zimny. Odłączyć przewód od świecy zapłonowej, aby zapobiec
przypadkowemu uruchomieniu silnika.
PRZECHOWYWANIE
•Przed skierowaniem urządzenia do przechowywania na dłużej niż
miesiąc należy opróżnić całkowicie układ paliwowy.
•Spuścić paliwo ze zbiornika paliwa, uruchomić silnik i zezwolić, aby
przestał pracować z powodu braku paliwa.
•Co sezon stosuj świeże paliwo. Nigdy nie wolno do zbiornika
paliwa stosować żadnych środków czyszczących, ponieważ może to
spowodować uszkodzenie silnika.
•Należy zwrócić szczególna uwagę, aby otwory wentylacyjne
obudowy silnika były drożne.
•Do czyszczenia elementów plastikowych należy stosować łagodny
detergent i gąbkę.
•Przy pilarce mogą być przeprowadzane wyłącznie zabiegi
konserwacyjne opisane w niniejszej instrukcji. Wszelkie inne
czynności mogą być wykonywane tylko przez autoryzowany serwis.
•Nie wolno dokonywać jakichkolwiek zmian w konstrukcji pilarki.
•Pilarka, gdy nie jest użytkowana powinna być przechowywana
w stanie czystym, na płaskiej powierzchni, w suchym miejscu,
niedostępnym dla dzieci.
Jest rzeczą ważną, aby w czasie przechowywania nie dopuścić
do gromadzenia się osadu z cząsteczek gumy w podstawowych
elementach układu paliwowego, takich jak gaźnik, ltr paliwa,
przewód paliwowy lub zbiornik paliwa. Paliwa z domieszką alkoholu
(etylowego lub metylowego) mogą pochłaniać wilgoć, co w czasie
przechowywania prowadzi do separacji składników mieszanki
paliwowej i tworzenia się kwasów. Zakwaszona benzyna może

10
doprowadzić do uszkodzenia silnika.
FILTR POWIETRZA
Zabrudzony ltr powietrza powoduje obniżenie wydajności silnika
spalinowego oraz zwiększenie zużycia paliwa. Filtr powietrza należy
czyścić po każdych 5 godzinach pracy pilarki.
•Oczyścić pokrywę ltra powietrza (4) i okolice, aby przy jej zdjęciu
brud nie wniknął do komory gaźnika.
•Odkręcić pokrętło pokrywy ltra powietrza (3) i zdemontować
pokrywę ltra powietrza (4).
•Wyjąć ltr powietrza (d) (rys. T).
•Umyć ltr powietrza w wodzie z mydłem, przepłukać czystą wodą i
wysuszyć.
•Zamontować ltr powietrza upewniając się, że rowki na krawędzi
ltra powietrza dobrze pasują do występów na pokrywie ltra
powietrza (4).
•Przy montowaniu pokrywy ltra powietrza (4) upewnić się czy
przewód świecy zapłonowej i przelotki wkrętów regulacyjnych
gaźnika znajdują się na właściwych miejscach.
Aby uniknąć zagrożenia pożarem lub powstania niebezpiecznych
oparów, ltra powietrza nie wolno myć w benzynie ani w innych
łatwopalnych rozpuszczalnikach.
UŻEBROWANIE CYLINDRA
Pył gromadzący się na użebrowaniu cylindra może spowodować
przegrzanie silnika. Okresowo kontrolować i czyścić użebrowanie
cylindra podczas czynności obsługowych ltra powietrza.
PROWADNICA I ŁAŃCUCH
Po każdych 5 godzinach pracy należy skontrolować stan prowadnicy i
łańcucha.
•Przestawić włącznik zapłonu (14) w pozycję wyłączony.
•Poluzować i odkręcić nakrętki mocowania prowadnicy (7).
•Zdjąć obudowę (10) i zdemontować prowadnicę (20) i łańcuch (21).
•Oczyścić otwory olejowe oraz rowek (e) w prowadnicy (20) (rys. U).
•
Nasmarować przednie koło łańcuchowe prowadnicy (22) poprzez
otwór (f) znajdujący się na wierzchołku prowadnicy (rys. W)
•Sprawdzić stan łańcucha (21).
OSTRZENIE ŁAŃCUCHA PILARKI
Narzędziom tnącym należy poświęcać odpowiednią uwagę. Narzędzia
tnące powinny być ostre i czyste, co zapewnia sprawne i bezpieczne
wykonanie pracy. Praca pilarką z tępym łańcuchem powoduje
przyspieszenie zużycia łańcucha, prowadnicy i koła napędu łańcucha,
a w skrajnym przypadku może doprowadzić do zerwania łańcucha.
Dlatego jest rzeczą ważną, aby na czas poddać łańcuch ostrzeniu.
Ostrzenie łańcucha jest skomplikowaną operacją. Samodzielne
ostrzenie łańcucha wymaga zastosowania specjalnych narzędzi
jak również umiejętności. Zaleca się czynność ostrzenia łańcucha
powierzyć osobom wykwalikowanym.
FILTR PALIWA
•Odkręcić korek wlewu paliwa (15).
•Za pomocą haczyka z drutu wyjąć ltr paliwa (g) przez otwór wlewu
paliwa (rys. X).
•Zdemontować ltr paliwa i umyć go w benzynie lub wymienić na
nowy.
•Zamontować ltr paliwa w zbiorniku.
•Dokręcić korek wlewu paliwa (15).
Po wymontowaniu ltra paliwa użyć haczyka z drutu, aby
przytrzymać koniec przewodu zasysającego.
Przy montażu ltra paliwa uważać, aby do przewodu zasysającego
nie dostały się jakiekolwiek zanieczyszczenia.
FILTR OLEJU
•Odkręcić korek wlewu oleju (18).
•Za pomocą haczyka z drutu wyjąć ltr oleju (h) przez otwór wlewu
oleju (rys. Y).
•Umyć ltr oleju w benzynie lub wymienić na nowy.
•Usunąć wszelki brud ze zbiornika.
•Zamontować ltr oleju w zbiorniku.
•Dokręcić korek wlewu oleju (18).
Przy wkładaniu ltra oleju do zbiornika należy upewnić się, że
dociera on do przedniego prawego naroża.
ŚWIECA ZAPŁONOWA
W celu niezawodnego działania urządzenia należy okresowo sprawdzać
stan świecy zapłonowej.
•Zdemontować pokrywę ltra powietrza (4).
•Wyjąć ltr powietrza (d).
•Zdjąć przewód (i) ze świecy zapłonowej.
•Założyć klucz do świec (w wyposażeniu) i odkręcić świecę zapłonową
(rys. Z).
•Oczyścić i wyregulować odstęp styków (0,65 mm) (wymienić świecę
zapłonową, jeśli trzeba).
INNE WSKAZÓWKI
Sprawdzić czy nie ma wycieków paliwa, poluzowanych zamocowań
i uszkodzeń części zasadniczych, szczególnie połączeń rękojeści
oraz zamocowania prowadnicy. Jeśli zostaną wykryte jakiekolwiek
uszkodzenia, to przed ponownym użyciem należy mieć pewność, że
pilarka została naprawiona.
Wszelkiego rodzaju usterki powinny być usuwane przez autoryzowany
serwis producenta.
PARAMETRY TECHNICZNE
DANE ZNAMIONOWE
Pilarka łańcuchowa spalinowa
Parametr znamionowy Wartość
Pojemność silnika 52 cm3
Długość prowadnicy 58G953 - 16 ‚’ (400 mm)
58G954 - 18 ‚’ (450 mm)
Moc silnika 2 kW (2,7 KM)
Max. prędkość obrotowa silnika z układem
tnącym
10500 min-1
Prędkość obrotowa na biegu jałowym 3000 min-1
Paliwo: mieszanka o składzie Benzyna /
olej (do 2-suwów)
25 : 1
Pojemność zbiornika paliwa 550 cm3
Pojemność zbiornika oleju łańcuchowego 260 ml
System zapłonu CDI
Świeca zapłonowa L7T, BPM7A, CJ6Y
System podawania oleju łańcuchowego Pompa automatyczna z
regulatorem
Koło łańcuchowe (zęby x podziałka) 7T x 8,255mm
Wymiary bez prowadnicy (LxWxH) 270x235x225mm
Masa (bez prowadnicy i łańcucha) 5,53 kg
Prowadzenie łańcucha w prowadnicy Łożyskowane koło zębate
Podziałka łańcucha 0,325” (8,255mm)
Grubość łańcucha 0,058” (1,47 mm)
Prędkość układu tnącego 4000 min-1
Zużycie paliwa 1,63 l/h
Gaźnik typu przepustnicowego MP16
Typ łańcucha .325 0.058
Rok produkcji 2021
58G953/58G954 oznacza zarówno typ oraz określenie maszyny
DANE DOTYCZĄCE HAŁASU I DRGAŃ
Poziom cisnienia akustycznego LPA = 96,7 dB (A) K=3dB (A)
Poziom mocy akustycznej LWA = 110 dB(A) K=3dB(A)
Wartość przyśpieszeń drgań (uchwyt
przedni) ah = 7,907 m/s2 K=1,5 m/s2
Wartość przyśpieszeń drgań (uchwyt tylny) ah = 6,879 m/s2 K=1,5 m/s2
Informacje na temat hałasu i wibracji
Poziom emitowanego hałasu przez urządzenie opisano poprzez:
poziom emitowanego ciśnienia akustycznego LpA oraz poziom mocy
akustycznej LwA (gdzie K oznacza niepewność pomiaru). Drgania
emitowane przez urządzenie opisano poprzez wartość przyśpieszeń
drgań ah (gdzie K oznacza niepewność pomiaru).
Podane w niniejszej instrukcji: poziom emitowanego ciśnienia
akustycznego LpA, poziom mocy akustycznej LwA oraz wartość
przyśpieszeń drgań ah zostały zmierzone zgodnie z EN 60335-1:2012; EN
50636. Podany poziom drgań ah może zostać użyty do porównywania
urządzeń oraz do wstępnej oceny ekspozycji na drgania.
Podany poziom drgań jest reprezentatywny jedynie dla podstawowych
zastosowań urządzenia. Jeżeli urządzenie zostanie użyte do innych
zastosowań lub z innymi narzędziami roboczymi, poziom drgań
może ulec zmianie. Na wyższy poziom drgań będzie wpływać
niewystarczająca czy zbyt rzadka konserwacja urządzenia. Podane
powyżej przyczyny mogą spowodować zwiększenie ekspozycji na
drgania podczas całego okresu pracy.

11
Aby dokładnie oszacować ekspozycję na drgania, należy
uwzględnić okresy kiedy urządzenie jest wyłączone lub kiedy
jest włączone ale nie jest używane do pracy. Po dokładnym
oszacowaniu wszystkich czynników łączna ekspozycja na drgania
może okazać się znacznie niższa.
W celu ochrony użytkownika przed skutkami drgań należy wprowadzić
dodatkowe środki bezpieczeństwa, takie jak: cykliczna konserwacja
urządzenia i narzędzi roboczych, zabezpieczenie odpowiedniej
temperatury rąk oraz właściwa organizacja pracy.
OCHRONA ŚRODOWISKA
Produktów zasilanych silnikiem spalinowym nie należy wyrzucać
wraz z domowymi odpadkami, lecz oddać je do utylizacji w
odpowiednich zakładach. Informacji na temat utylizacji udzieli
sprzedawca produktu lub miejscowe władze. Zużyty sprzęt
zawiera substancje nieobojętne dla środowiska naturalnego.
Sprzęt niepoddany recyclingowi stanowi potencjalne zagrożenie
dla środowiska i zdrowia ludzi.
* Zastrzega się prawo dokonywania zmian.
„Grupa Topex Spółka z ograniczoną odpowiedzialnością” Spółka komandytowa z
siedzibą w Warszawie, ul. Pograniczna 2/4 (dalej: „Grupa Topex”) informuje, iż wszelkie
prawa autorskie do treści niniejszej instrukcji (dalej: „Instrukcja”), w tym m.in. jej tekstu,
zamieszczonych fotograi, schematów, rysunków, a także jej kompozycji, należą
wyłącznie do Grupy Topex i podlegają ochronie prawnej zgodnie z ustawą z dnia 4
lutego 1994 roku, o prawie autorskim i prawach pokrewnych (tj. Dz. U. 2006 Nr 90 Poz
631 z późn. zm.). Kopiowanie, przetwarzanie, publikowanie, modykowanie w celach
komercyjnych całości Instrukcji jak i poszczególnych jej elementów, bez zgody Grupy
Topex wyrażonej na piśmie, jest surowo zabronione i może spowodować pociągnięcie
do odpowiedzialności cywilnej i karnej.
GWARANCJA I SERWIS
Warunki gwarancji oraz opis postępowania w przypadku reklamacji
zawarte są w załączonej Karcie Gwarancyjnej.
Serwis Centralny
GTX Service
Ul. Pograniczna 2/4 tel. +48 22 364 53 50
02-285 Warszawa e-mail ser[email protected]
Sieć Punktów Serwisowych do napraw gwarancyjnych i
pogwarancyjnych dostępna na platformie internetowej gtxservice.pl
GRAPHITE zapewnia dostępność części zamiennych oraz materiałów
eksploatacyjnych dla urządzeń i elektronarzędzi. Pełna oferta na
platformie internetowej gtxservice.pl
Zeskanuj QR kod i wejdź na gtxservice.pl
TRANSLATION OF
THE ORIGINAL INSTRUCTIONS
PETROL CHAIN SAW
58G953/58G954
CAUTION: BEFORE USING THE PETROL CHAIN SAW READ THIS MANUAL
CAREFULLY AND KEEP IT FOR FUTURE REFERENCE.
DETAILED SAFETY REGULATIONS
SAFE USE OF PETROL CHAIN SAW
Warning!
• Persons unfamiliar with instruction manual are not allowed to
use chain saw.
• Use the chain saw for cutting wood only.
• Other use of the chain saw is the sole responsibility of the user
who should bear in mind that it may be dangerous.
• The manufacturer is not responsible for losses and damages
resulting from unintended use of the chain saw.
WORKPLACE
a. Keep your workplace tidy and ensure it is well lit. Untidiness and
insucient illumination contribute to accidents especially when chain
saws are in use.
b. Keep children and bystanders away from the workplace.
Distraction may cause loss of control over the tool.
PERSONAL SAFETY
a. Use safety equipment, such as work suit, protective glasses,
protective shoes, protective helmet, earmu protection and
leather gloves. Using safety equipment in appropriate conditions
reduces risk of body injury.
b. Do not overestimate your abilities. Stand rmly and keep
your balance at all times. It enables better control over the saw in
unpredicted situations.
c. Do not wear loose clothing or jewellery. Keep your hair, clothes
and gloves away from moving parts. Loose clothing, jewellery or long
hair may be caught by moving parts.
TRANSPORTATION AND STORING
a. When carrying the chain saw switch o the engine, put on the
chain cover and switch on the chain brake. Carrying unsecured and
operating chain saw may cause body injury.
b. Carrying the chain saw is possible only when holding its front
handle. Other parts may not ensure appropriate grip and even cause
injury.
c. Inspect your chain saw. Check alignment and xing of moving
parts, check against part cracks and all other factors that may
aect operation of the saw. Repair the saw before use if it is found
damaged. Many accidents are caused by improper maintenance of tool.
d. Cutting chain should be clean and sharp. Proper maintenance of
sharp cutting edges of chain reduces the risk of jamming and makes
operation easier.
POWER TOOL USE AND CARE
a. Check proper operation of the saw brake regularly. In emergency
situation, non-operational brake may make chain disengagement
impossible.
b. When work with the chain saw is completed, the tool must be
cleaned carefully as well as used personal protective equipment,
while the sensitive components must be maintained.
OPERATION
•Switch o the chain saw engine before releasing the chain brake.
•Be very careful at the end of a cut, because the saw having no support
in processed material falls down due to its inertia, which may cause
injuries.
•When working for a long time, the saw operator may experience
formication and numbness in ngers and hands. Stop working in
such case, because numbness reduces precision in saw use.
•Fill the fuel tank of the saw with petrol and oil blend when the engine
is o and cooled down, otherwise there is risk of spilling the blend
and ignition from hot parts of the saw.
•It is forbidden to use open ame and smoke cigarettes.
•Do not start the saw when leakage is found, it may cause re.
•The saw heats considerably during operation. Be careful and do not
touch hot parts of the saw with unprotected parts of your body.
•Only one person can operate the chain saw at a time. All other
persons shall be away from working area of the chain saw. Especially
children and animals should be away from working area.
•When starting the saw, its chain must not rest on the processed
material or touch anything else.
•When working with the chain saw hold it with both hands by both
handles. Keep rm body position.
•Children and juveniles cannot operate the chain saw. Allow access
to the saw only to adults who know how to handle the tool. This
instruction manual should be given with the chain saw.
•Stop working with the chain saw with rst signs of fatigue.
•Before starting to cut set the chain brake lever in appropriate position
(pull it to yourself). It is also hand guard.
•Move chain saw away from the material being cut only when the
cutting chain is working.
•When cutting processed sawn wood or thin branches use support
(sawing horse). Do not cut several boards at the same time (placed one
on top of another), or material held by other person or held with foot.
•Long objects should be rmly xed before cutting.
•In uneven, sloping terrain proceed with your work when facing
upwards.

12
•When cutting through always use the bumper spike as a point of support.
Hold the saw by the rear handle and guide with the front handle.
•In case the cut cannot be completed in one run, pull the saw a little
back, put the bumper spike in another place and continue the cut
lifting rear handle slightly.
•When cutting in horizontal plane, position yourself at an angle as
close to 90º from cutting line as possible. Such operation requires
concentration.
•When the chain is pinched when cutting with the tip of the bar, the
saw may recoil towards operator. Because of this eect cut with
the straight part of the chain whenever possible. Then, in case of
pinching, the recoil eect changes direction away from the operator.
•Be very careful when cutting wood when there is the risk of splitting.
Pieces of wood that are cut o can be ung in any direction (risk of
body injury!).
•Only trained persons should cut tree branches! Uncontrolled fall of a
tree branch constitutes a risk of body injury!
•Do not cut with tip of the guide bar (risk of recoil).
•Pay special attention to branches under strain. Do not cut branches,
which hangs freely, from below.
•Always stand to the side of predicted fall line of the tree that is to
be cut.
•During a tree fell there is a risk that branches of the tree, or trees in
proximity, will break and fall. Be very careful, otherwise a body injury
may occur.
•On a sloped terrain the operator should stay on upper part of the
slope with respect to the tree being cut, never lower.
•Watch out for logs that may roll down towards you. Jump away!
•Operating saw tends to rotate when tip of the chain guide bar touches
processed material. In such case the saw may get out of control and
move towards the operator (risk of body injury!).
•The tree cuttings should be preceded with preparation of the work
place consisting of the removal of lower interfering branches and
clearing the area around the tree trunk.
•Do not work in strong wind, which may inuence the predicted tree
falling direction and cause its uncontrolled felling.
•Do not carry out cuttings in conditions of limited visibility, when it is
foggy, rains or snows.
•Do not overreach and do not cut above your shoulder height, or
when standing on a tree, ladder, scaold, trunk, etc.
•A well-equipped rst aid kit should be available near the work place.
To prevent saw recoil follow below instructions:
•Never start or guide a cut with the tip of the guide bar!
•Always start cutting with saw previously switched on!
•Ensure the cutting chain is sharp.
•Never cut more than one branch at a time. When cutting o, watch
out for surrounding branches. When cutting a tree through, watch
out for nearby tree trunks.
Explanation of used symbols
1. Caution, use precaution measures
2. Fire hazard
3. Exhaust gas poisoning hazard
4. Use protective gloves
5. Switch o the engine and remove wire from the ignition plug
before commencing any maintenance or repair
6. Read instruction manual, observe warnings and safety conditions
therein!
7. Use head, eyes and ears protection
8. Danger of recoil
9. Use protective clothes
10. Use protective shoes
11. Do not put your hands or legs close to cutting parts
CONSTRUCTION AND USE
Petrol chain saw is a hand-held tool. It is driven by an air cooled, two-
stroke combustion engine. Tool of this type is designed for tasks in
home garden. The saw can be used for cutting down trees, cutting
branches, rewood, wood for replace and other tasks where cutting
wood is necessary.
Use the device according to the manufacturer’s instructions only.
DESCRIPTION OF DRAWING PAGES
Below enumeration refers to the device elements depicted on the
drawing pages of this manual.
1. Throttle lever lock
2. Choke cable
3. Knob for air lter lid
4. Air lter lid
5. Front handle
6. Brake lever
7. Guide bar xing nuts
8. Chain tension adjustment screw
9. Oil feed adjustment screw
10. Casing
11. Throttle lever
12. Main handle
13. Starter line
14. Ignition switch
15. Fuel ller plug
16. Carburettor adjustment screws, L and H
17. Low speed adjustment screw T
18. Oil ller plug
19. Bumper spike
20. Guide bar
21. Chain
22. Guide bar chain wheel
* Dierences may appear between the product and drawing.
MEANING OF SYMBOLS
CAUTION
WARNING
ASSEMBLY/SETTINGS
INFORMATION
EQUIPMENT AND ACCESSORIES
1. Guide bar guard - 1 pc
2. Guide bar - 1 pc
3. Cutting chain - 1 pc
4. Bumper spike + bolts - 1 set
5. Fuel and oil mix tank - 1 pc
6. Sparking plug wrench with screwdriver - 1 pc
7. Screwdriver - 1 pc
8. Hexagonal key - 2 pcs
9. File - 1 pc
PREPARATION FOR OPERATION
CARRYING THE CHAIN SAW
Prior to carrying the chain saw slide chain cover onto guide bar and
chain. When carrying the chain saw, hold it by front handle. Do not
carry the saw when holding main handle. If several cuttings are to
be made, switch o the chain saw with the ignition switch between
consecutive tasks.
INSTALLING THE BUMPER SPIKE
The bumper spike should be attached to the chain saw at all times
due to safety reasons. The bumper spike is a support point and
reduces the kickback risk.

13
•Fasten the bumper spike (19) to the chain saw case using bolts
(included).
INSTALLATION OF GUIDE BAR AND SAW CHAIN
Prior to guide bar installation remove plastic transport spacer, placed
on guide xing screws under the guard. Use pin and adjustment
screw for adjustment of chain tension. It is very important that the
bolt located on adjustment screw falls into hole in the guide bar
during installation of the guide bar.
You can move the bolt to the front and back by turning the
adjustment screw. Those parts must be set appropriately prior to
starting guide bar installation in the saw.
Guide bar and chain are supplied separately.
•Brake lever (6) must be in the upper (vertical) position (g. A).
•Unscrew the guide bar xing nuts (7) and remove the casing (10).
•Put the chain (21) onto driving chain wheel located behind the clutch.
•Install the guide bar (20) (slide it behind the clutch) onto guiding
screws (c) and push towards driving chain wheel (g. B).
•Put the chain (21) onto guide bar chain wheel (22) from below.
•Move the guide bar (20) away from the driving chain wheel, so chain
guiding links are placed in the guide bar groove.
•Ensure the pin (a) of the chain tension adjustment screw (8) is in
the middle of the lower hole (b) of the guide bar (20), adjust when
necessary (g. B).
•Place the casing (10) in its place and x by slightly tightening guide
bar xing nuts (7).
•Strain the chain appropriately using the chain tension adjustment
screw (8). Chain tension is appropriate when the chain can be lifted
by 3 to 4 mm in the middle of the guide bar in horizontal position.
•Firmly tighten guide bar xing screws (7) while holding the guide bar
tip.
Prior to guide bar and chain installation ensure that position of
chain cutting blades is appropriate (correct position of the chain
on the guide bar is shown on the tip of the guide bar). Always wear
protective gloves during checks and installation of the chain to
prevent cuts from sharp edges of the chain.
New chain requires start-up period, which lasts approximately 5
minutes. Chain lubrication is very important in this phase. Check
chain tension after start-up period and readjust if necessary.
Check and adjust the chain tension frequently. Too loose chain can
easily slide o the guide bar, quickly wear out or quickly wear out
the guide bar.
FILLING SAW TANK WITH OIL
Oil tank in new chain saw is empty. Fill the tank with oil prior to rst use.
•Unscrew oil ller plug (18).
•Pour in maximally 260 ml of oil (be careful to avoid contamination of
oil during lling of the tank).
•Screw oil ller plug (18).
Do not use oil that has been already used or regenerated, as this may
damage the oil pump. Use SAE 10W/30 oil for the whole year, or SAE
30W/40 in summer and SAE 20W/30 in winter.
FILLING THE FUEL TANK
When lling the fuel, follow these rules:
• Engine must not work,
• You must not spill the fuel.
Accordingly to the below table, mix petrol (lead-free with octane
number 95) with good quality engine oil for two stroke engines.
RECOMMENDED FUEL BLEND RATIO
Working conditions Petrol : oil
First 20 hours of operation 20 : 1
After 20 hours of operation 25 : 1
•Unscrew fuel ller plug (15).
•Pour in previously prepared fuel blend (max. 550 ml).
•Screw fuel ller plug (15).
Most problems with combustion engines result directly or indirectly
from fuel used. You must not use oil designed for four-stroke engines
to prepare fuel blend.
OPERATION / SETTINGS
STARTING THE ENGINE
Hold the chain saw with both hands during operation.
•Check level of the fuel tank and the oil tank.
•Make sure the brake lever (6) is in the switched on position (shifted
to the front).
•When the engine is cold, pull out the choke cable (2).
•Pull the starter line (13) a few times to pump the fuel into the engine.
•Set the ignition switch (14) to switched on position (g. C).
•Place the saw on stable ground.
•While holding the saw pressed against ground, pull the starter line
(13). First slowly so to hear the clutch gears, then pull it strongly (g.
D).
•Keep pulling the starter line (13) until the saw starts for a moment
and goes out.
•Then press the throttle lever lock (1) and throttle lever (11) slightly
to turn o the choke (the choke cable will retract automatically to
switched o position).
•With the choke o, pull the starter line (13) again until the engine
starts (you may need to pull a few times).
•Allow the engine to warm up. If necessary, increase the speed by
pushing the throttle lever (11) slightly.
•Move the brake lever (6) to switched o position (shifted to the back).
•Make a cut.
Do not start the engine while holding the saw in hands. During start
up the chain saw must rest on ground and be held rmly. Ensure the
chain is free to move without contacting any object. Do not cut any
material with the choke cable pulled out.
STOPPING THE ENGINE
• Release the throttle lever (11) and allow the engine to run idle for a
few minutes.
•Set the ignition switch (14) to STOP position.
CHECKING CHAIN LUBRICATION
Check lubrication of the chain and oil level in the tank before starting to
work. Switch on the saw and hold it above ground. If you see enlarging
oil marks, the chain lubrication works well (g. E). If there are no oil
marks or they are very small, use oil feed adjustment screw (9) to make
appropriate adjustments. In case the adjustment brings no eects, clean
oil outlet, upper hole of chain tension and oilway, or contact service.
Make adjustments when the saw is switched o, observe precaution
measures and do not allow the guide bar to touch ground. Operate
the tool safely and maintain at least 20 cm distance from ground.
Use oil feed adjustment screw (9) to set amount of supplied oil
accordingly to respective operating conditions.
•MIN position – oil ow decreases.
•MAX position – oil ow increases (g. F).
When cutting hard and dry wood and using whole length of the guide
bar when making a cut, set the oil feed adjustment screw (9) to the MAX
position.
You can reduce amount of oil supplied by turning oil feed adjustment
screw (9) to MIN position, when cutting soft and damp wood, or when
only part of the working length of the guide bar is used.
Oil tank should be almost empty when the fuel tank is emptied. When
lling the fuel remember about lling oil tank as well.
CHAIN LUBRICANTS
Durability of chain and guide bar depends heavily on quality of
lubricant. Use only lubricants, which are designed for chain saws.
Never use regenerated or previously used oil for chain lubrication.
CHAIN GUIDE BAR
Guide bar (20) is exposed to heavy wear especially in tip and bottom
part. To prevent side wear due to friction, it is recommended to turn
over the guide bar every time the chain is sharpened. Clean the
guide bar groove and oil holes on that occasion. Guide bar groove is
rectangular. Check the groove against wear. Put rule to guiding strip
and outer surface of a chain tooth. If you observe distance between,
the groove is correct. Otherwise the guide bar is worn out and needs
to be replaced.
CHAIN WHEEL
Driving chain wheel is subject to especially heavy wear. Replace the
chain wheel when you observe clear signs of wear of wheel teeth.
Worn chain wheel additionally reduces durability of chain. Chain wheel
should be replaced by authorised service workshop.
ADJUSTMENT OF CARBURETTOR
Chain saw carburettor is factory set, however it may require precise
adjustment when operating conditions change. Before starting to

14
adjust the carburettor ensure new air lter and fuel lter are installed
and tank is lled with appropriate fuel blend.
Adjust the carburettor with guide bar and chain installed.
•Screw in both adjustment screws (L and H) (16) until stop (do not
overtighten) (g. G).
•First, unscrew two adjustment screws (16) as specied below:
-L screw: by 1 1/4 of a turn
-H screw: by 1 3/8 of a turn
•Start up the engine and allow it to heat up while holding throttle lever
(11) pressed in half.
•After the engine has been heated, release pressure on the throttle
lever (11) and allow the engine to run slowly.
•Turn the screw (L) slowly clockwise until idle run achieves its
maximum speed, then turn the screw counter-clockwise by 1/4 of a
turn.
•Turn low speed adjustment screw (T) (17) counter-clockwise until the
chain stops moving. When slow speed appears to be too low, turn the
screw clockwise (g. G).
Avoid touching the muer. Hot muer may cause severe burns.
CHAIN BRAKE
The saw features automatic brake, which stops the chain in case of recoil
during chain saw operation. The brake engages automatically when
force of inertia is applied to a weight located inside the brake casing.
The chain brake can also be switched on manually, when the brake lever
(6) is moved towards the guide bar (20). Switching the chain brake stops
the chain movement in 0.12 sec.
BRAKING CHECK
Ensure the brake operates correctly before each use of the saw.
•Put operating saw on the ground and open the throttle fully for 1 – 2
seconds to allow the saw engine to operate at its maximum speed.
•Push the brake lever (6) forward. The chain should stop immediately.
•In case the chain stops slowly or does not stop at all, replace the brake
band and clutch drum before using the chain saw again.
•To release the brake, pull the brake lever (6) towards the main handle
(12) so you can hear sound typical of blockade snapping.
Ensure the chain brake operates correctly and the chain is sharp. It is
very important for keeping potential recoil at a safe level.
CHECKING BRAKE ENGAGEMENT
During this check the saw engine should be switched o.
•Lift the saw while holding the front handle (5) and main handle (12)
approximately 35 cm above wooden object.
•Let the front handle (5) go and allow the guide bar to tilt under its
own weight and touch the wooden object (g. H).
•At the contact with the wooden object, the chain brake should
engage (brake lever (6) moves forward to the ON position).
Ensure the chain brake operates correctly before starting any task.
In case the brake does not operate eciently, adjust it or repair in
authorized service site.
In case the engine operates at high speed with the chain brake
switched on, the saw clutch will overheat. When the chain brake
engages during operation of the engine, release the throttle lever
immediately and keep engine speed at low level.
CHAIN TENSION ADJUSTMENT
Cutting chain tends to lengthen during operation due to higher
temperature. Longer chain loosens and may slip o the guide bar.
•Loosen the guide bar xing nuts (7).
•Ensure the chain (21) remains in the guiding groove of the guide bar
(20).
•Use a screwdriver to turn the chain tension adjustment screw (8)
clockwise, until the chain is strained appropriately (it should slightly
hold the guide bar in horizontal position).
•Check the chain tension again (it should be possible to lift the chain
by approximately 3 – 4 mm in the middle of the guide bar) (g. I).
•Tighten rmly the guide bar xing nuts (7).
Do not over-tension the chain. Adjustment of overly heated chain
may lead to excessive tension when cooling down.
OPERATING THE CHAIN SAW
•Before starting any planned task, familiarize yourself with section
describing safe rules for chain saw operation. It is recommended to
gain experience by cutting waste wood pieces. It will also allow to
nd out the chain saw possibilities.
•Always observe safety regulations.
•Use the chain saw only for cutting wood. Cutting other materials is
forbidden.
•Intensity of vibrations and recoil change depending on the type of
wood being cut.
•Do not use the chain saw as a lever to lift, move or split objects. When
the chain is pinched in wood, switch o the engine and drive wooden
or plastic wedge into the processed piece to release the chain saw
(g. J). Start the tool again and commence cutting carefully.
•Do not x the saw to a stationary work station.
•Attaching other devices, which are not allowed by the chain saw
manufacturer, to the chain saw drive is forbidden.
•It is not necessary to apply big force to the chain saw when using
the tool. Apply light pressure only while the engine operates with the
throttle fully opened.
When the chain saw is pinched in kerf during cutting, do not remove
it forcefully. It may cause loss of control over the chain saw, operator
injury and/or damage to the chain saw.
Release the chain brake before starting to work.
•Press the throttle lever lock (1) and throttle lever (11) (wait until
engine reaches its full speed before starting to cut).
•Keep maximum speed for the whole time.
•Allow the chain to cut wood. Press down the saw lightly (g. K).
•Stop pressing the saw at the end of the cut to avoid loosing control
over the tool.
•When the cutting has been nished release the throttle lever (11) and
allow the engine to run idle.
•Switch o the engine before putting the chain saw away.
Keeping high speed of the engine when not cutting wood causes
unnecessary losses and wear of parts.
PROTECTION AGAINST RECOIL
Recoil is movement of the guide bar of the chain saw up and/or
back, which happens when the part of the chain on the guide bar tip
encounters an obstacle.
•Ensure the processed material is rmly xed.
•Use clamps to x the material.
•Hold the chain saw with both hands when starting up and during
operation.
•During recoil the chain saw cannot be controlled and the chain is
loosened (g. L).
•Incorrectly sharpened chain increases risk of recoil.
•Do not cut above level of your shoulders.
Avoid cutting with guide bar tip, it may cause sudden recoil – to the
back and up. Always use complete safety equipment and appropriate
working clothes when operating the chain saw.
Disassembly of protections, inappropriate operation, maintenance,
improper guide bar or chain replacement may contribute to increase
of risk of body injury in case of a recoil. Never modify the saw in any
way. By using modied chain saw, the user looses all warranty rights.
Warranty voids also when the chain saw is used inaccordingly to
information contained in this manual.
CUTTING PIECES OF WOOD
When cutting wood follow guidelines for safety of work and do as
follows:
•Ensure the wood piece cannot be moved.
•Use clamps to x short pieces of material before cutting.
•Cut wood or wood-like materials only.
•Before cutting ensure the chain saw will not come into contact with
stones or nails, as it could cause pulling the saw out and damage to
the chain.
•Avoid situations when working saw might touch wired fence or
ground.
•When cutting branches support the saw as much as possible and do
not cut with the tip of the guide bar.
•Watch out for obstacles such as protruding stumps, roots, hollows and
holes in the ground, as they may be cause of an accident.
FELLING A TREE
Dene the tree fall line. Consider wind, lean of the tree, location of heavy
branches, complexity of work after tree fall and other factors.
•When tidying area around the tree remember to ensure proper
ground grip and escape path to use when the tree falls.
•Predict and tidy up two escape paths at 450 angle, counting from
the line opposite to expected line of the tree fall. There must be no
obstacles on these paths (g. M).

15
•Make a notch at the side of the fall, one third of the trunk diameter
deep (g. N).
•Make a felling cut at the side opposite to the previously made felling
notch, and a little higher than lower surface of the notch.
•Insert wedges on time to avoid pinching of the saw chain.
•Fell the tree by driving a wedge rather than cutting through the
whole trunk.
When felling trees observe all safety rules and do as follows:
• When the chain is pinched, switch o the chain saw and release
the chain with a wedge. Wedge should be made of wood or
plastic. Never use steel or cast iron wedge.
• Falling tree may pull other trees.
• Danger zone radius is 2.5 height of the falling tree (g. M).
• If the operator is inexperienced or amateur it is recommended
to have a training rather than gaining the experience without
supervision.
Do not fell trees when:
• Conditions in danger zone cannot be determined due to fog, rain,
snow or darkness.
• Line of tree felling cannot be determined due to wind or wind
blows.
CUTTING THROUGH TRUNKS
•Press the bumper spike (19) against the material and make a cut (g.
O).
•If the cutting cannot be nished even after the chain saw range is fully
utilized, do as follows:
•Move the guide bar back from the cut material to a certain distance
(with cutting chain still operating) and move the main handle (12) a
little down, support the bumper spike (19) and nish the cut by lifting
the main handle (12) a little.
CUTTING A TRUNK LYING ON THE GROUND
• Always keep good feet and ground grip. Do not stand on the trunk.
• Watch out for possibility of the trunk rotation.
• Observe manual guidelines related to work safety to avoid the
chain saw recoil.
• Always nish cutting at the side opposite to compressive stress
to avoid pinching the chain in kerf.
•Before starting to work check the stress direction in the trunk that is
to be cut, to avoid pinching chain of the saw.
•To eliminate stress, the rst cut should be made at the tension side.
•When cutting a trunk that is lying on the gound, rst make a cut deep
1/3 of the trunk diameter, then turn the trunk over and nish cutting
at the opposite side.
•When cutting a trunk that is lying on the ground, do not allow to sink
the cutting chain into the ground under the trunk. Negligence may
cause immediate damage to the chain.
•When cutting trunk that is lying on the slope, the operator should
always be at the slope side above the trunk.
CUTTING A TRUNK LIFTED ABOVE THE GROUND
In case the log is supported or placed on stable sawing horse,
depending on the place of operation, make the cut 1/3 of the trunk
diameter deep on the side under tension and nish cutting on the
opposite side (g. P and R).
TRIMMING / CUTTING BUSHES AND TREE BRANCHES
•Start cutting branches of a felled tree at its base and continue towards
top of the tree. Do small branches with a single cut.
•First, check which way the branch bends. Then make a cut from the
inside of the bend and nish cutting on the opposite side. Be careful,
the branch being cut may spring back.
•When trimming tree branches, always cut downward to enable free
fall of cut branch. However, sometimes undercutting the branch from
the bottom may be helpful (g. S).
•Be very careful when cutting a branch that may be under stress. Such
branch may spring aside and hit the operator.
Do not cut branches when climbing up the tree. Do not stand on
ladder, platforms, logs or positions that may cause loss of balance
and control over the chain saw. Do not cut above level of your
shoulders. Always hold the chain saw with both hands.
OPERATION AND MAINTENANCE
Ensure the engine is switched o and is cold before cleaning,
checking or repairing the chain saw. Disconnect wire from the
ignition plug to prevent accidental start up of the engine.
STORAGE
•Empty the fuel system before deciding to store the tool for more than
one month.
•Drain fuel from the fuel tank, start the engine and allow it to use all
remaining fuel and stop working.
•Use new fuel each season. Never use any cleaning agents on fuel tank,
it may damage the engine.
•Pay special attention to keep the ventilation holes of the engine
casing pervious.
•Clean plastic parts with mild detergent and a sponge.
•You can proceed with maintenance actions only described within
this instruction manual. Any other action can be carried out only by
authorized service.
•Do not make any changes in chain saw construction.
•When not in use, chain saw should be stored clean, on at surface, in
dry place and beyond reach of children.
When storing it is important to avoid deposition of rubber particles in
basic parts of the fuel system, such as carburettor, fuel lter, fuel line
and fuel tank. Fuels with alcohol additives (ethanol or methanol) may
absorb moisture, and that during storing causes separation of fuel
blend ingredients and formation of acids. Acidic petrol may damage
the engine.
AIR FILTER
Dirty air lter reduces eciency of combustion engine and causes
increase of fuel consumption. Clean the air lter after each 5 hours of
the saw operation.
•Clean the air lter lid (4) and its surroundings, so the dirt does not get
into carburettor chamber after the lid is removed.
•Unscrew knob for air lter lid (3) and remove air lter lid (4).
•Remove air lter (d) (g. T).
•Use water with soap to clean the lter, wash with clean water and dry
thoroughly.
•Install air lter. Ensure the grooves on the air lter rim match
protrusions on the air lter lid (4).
•When installing the air lter lid (4) make sure to properly place ignition
plug wire and access sleeves for carburettor adjustment screws.
Do not wash the air lter in petrol or any other ammable solvent to
avoid re hazard or appearance of dangerous vapours.
CYLINDER FINNING
Dust deposition on the cylinder nning may cause motor overheating.
Check regularly and clean the cylinder nning when carrying out
maintenance of the air lter.
GUIDE BAR AND CHAIN
Check condition of the guide bar and chain every 5 hours of the saw
operation.
•Set the ignition switch (14) to o position.
•Loosen and unscrew the guide bar xing nuts (7).
•Remove the casing (10) and disassemble guide bar (20) and chain
(21).
•Clean oil holes and groove (e) in the guide bar (20) (g. U).
•Lubricate tip chain wheel of the guide bar (22) through the hole (f)
located on the guide bar tip (g. W).
•Check condition of the chain (21).
CHAIN SHARPENING
Pay attention to cutting tools. Cutting tools should be sharp and clean, it
allows ecient and safe operation. Operating the saw with blunt chain
causes quick wear of the chain, guide bar and driving chain wheel,
and breaking the chain in the worst case. That is why it is important to
sharpen the chain on time.
Chain sharpening is a complex operation. Sharpening the chain by
yourself requires use of special tools and skills. It is recommended to
entrust sharpening the chain to qualied persons.
FUEL FILTER
•Unscrew the fuel ller plug (15).
•Use wire hook to remove the fuel lter (g) through the fuel ller hole
(g. X).
•Disassemble the fuel lter and wash it in petrol or replace with a new
one.
•Install the fuel lter in the tank.
•Tighten the fuel ller plug (15).
When the lter has been dismantled use the wire hook to hold up the
end of the suction line.

16
Be careful during fuel lter installation to prevent contamination
from getting into the suction line.
OIL FILTER
•Unscrew oil ller plug (18).
•Use wire hook to remove the oil lter (h) through the oil ller hole
(g. Y).
•Wash the oil lter in petrol or replace with a new one.
•Remove dirt from the tank.
•Install the oil lter in the tank.
•Tighten oil ller plug (18).
When putting the oil lter into the tank make sure it reaches front
right corner.
IGNITION PLUG
To maintain reliable operation of the device, check condition of the
ignition plug on a regular basis.
•Remove air lter lid (4).
•Remove air lter (d).
•Remove wire (i) from the ignition plug.
•Put on plug key (included) and unscrew the ignition plug (g. Z).
•Clean and adjust spacing between contacts (0.65 mm) (replace
ignition plug when necessary).
OTHER INSTRUCTIONS
Ensure there are no fuel leaks, loosened joints or damages of main parts,
especially main handle joints and guide bar xing. When you nd any
damage, make sure it is repaired before next use of the chain saw.
All faults should be repaired by service workshop authorized by the
manufacturer.
TECHNICAL PARAMETERS
RATED PARAMETERS
Petrol Chain Saw
Rated parameter Value
Engine displacement 52 cm3
Guide bar working length 58G953 - 16 ‚’ (400 mm)
58G954 - 18 ‚’ (450 mm)
Engine power 2 kW (2,7 KM)
Engine speed with cutting system
(maximum)
10500 min-1
Idle rotational speed 3000 min-1
Fuel Petrol / oil (for 2-stroke engines) 25:1
Fuel tank capacity 550 ml
Chain oil tank capacity 260 ml
Ignition system Spark
Ignition plug L7T, BPM7A, CJ6Y
Oil feed system Automated pump with
controller
Chain wheel (teeth x pitch) 7T x 8,255 mm
Chain pitch 0,325” (8,255mm)
Chain thickness 0,058” (1,47 mm)
Dimensions (LxWxH) (w/o guide bar) 270x235x225mm
Weight (w/o guide bar and chain) 5,53 kg
Chain guiding in guide bar Bearing mounted toothed
wheel
Cutting system speed 4000 min-1
Fuel consumption 1,63 l/h
Throttle-type carburetor MP16
Chain type .325 0.058
Year of production 2021
58G953/58G954 denes type and indication of the device
NOISE LEVEL AND VIBRATION PARAMETERS
Sound pressure LPA = 96,7 dB (A) K=3dB (A)
Sound power LWA = 110 dB(A) K=3dB(A)
Vibration acceleration (front handle) ah = 7,907 m/s2 K=1,5 m/s2
Vibration acceleration (rear handle) ah = 6,879 m/s2 K=1,5 m/s2
Noise and vibration information
Noise produced by the device is dened with: level of produced sound
pressure LpA and level of sound power LwA (where K is measurement
uncertainty). Vibrations produced by the device are dened with
vibration acceleration value ah (where K is measurement uncertainty).
Sound pressure LpA, sound power LwA and vibration acceleration ah
specied in this manual have been measured in accordance with the
standard EN ISO 11681-1A:2011. Specied vibration level ah can be used
to compare tools and for initial evaluation of exposition to vibrations.
Specied vibration level is typical only for the main applications of the
device. When the device is used for other purposes or with dierent
working tools, the vibration level may change. Insucient or too rare
maintenance may increase vibration level. The abovementioned factors
may lead to higher exposure to vibrations during whole working time.
To precisely dene exposure to vibrations, include periods when
the device is switched o and when it is switched on but not used
for working. Once all factors have been carefully considered, total
exposition to vibrations may be signicantly lower.
To protect the user from results of exposure to vibrations, use additional
safety measures such as: device and working tool periodic maintenance,
proper hand temperature conditions, good work organisation.
ENVIRONMENT PROTECTION
Do not dispose of combustion engine driven products with
household wastes, they should be utilized in proper plants.
Obtain information on waste utilization from your seller or local
authorities. Worn out equipment contains substances active
in natural environment. Unrecycled equipment constitutes a
potential risk for environment and human health.
* Right to introduce changes is reserved.
“Grupa Topex Spółka z ograniczoną odpowiedzialnością” Spółka komandytowa with
seat in Warsaw at ul. Pograniczna 2/4 (hereinafter Grupa Topex) informs, that all
copyrights to this instruction (hereinafter Instruction), including, but not limited to,
text, photographies, schemes, drawings and layout of the instruction, belong to Grupa
Topex exclusively and are protected by laws accordingly to Copyright and Related
Rights Act of 4 February 2004 (ustawa o prawie autorskim i prawach pokrewnych, Dz.
U. 2006 No 90 item 631 with later ammendments). Copying, processing, publishing,
modications for commercial purposes of the entire Instruction or its parts without
written permission of Grupa Topex are strictly forbidden and may cause civil and legal
liability.
ÜBERSETZUNG DER
ORIGINALBETRIEBSANLEITUNG
MOTORKETTENSÄGE
58G953/58G954
ACHTUNG: LESEN SIE VOR DER INBETRIEBNAHME DER
MOTORKETTENSÄGE GRÜNDLICH DIE VORLIEGENDE
BETRIEBSANLEITUNG DURCH UND BEWAHREN SIE SIE AUF.
DETAILLIERTE SICHERHEITSVORSCHRIFTEN
DER SICHERE GEBRAUCH VON MOTORKETTENSÄGEN
Warnung!
• Personen, die sich mit der Betriebsanweisung nicht vertraut
gemacht haben, dürfen mit der Motorkettensäge nicht arbeiten.
• Die Motorkettensäge darf ausschließlich zum Schneider von Holz
verwendet werden.
• Der Benutzer haftet voll für das Risiko des anderweitigen
Gebrauchs der Motorkettensäge mit dem Bewusstsein, dass dies
gefährlich sein kann.
•
Der Hersteller haftet für keine Schäden, die aus dem nicht
ordnungsmäßigen Gebrauch der Motorkettensäge resultieren.
ARBEITSPLATZ
a. Achten Sie auf einen aufgeräumten Arbeitsplatz und sorgen
für eine ausreichende Beleuchtung des Arbeitsplatzes. Der
unaufgeräumte Arbeitsplatz und die schlechte Beleuchtung tragen zu
Arbeitsunfällen beim Gebrauch von Motorkettensägen bei.
b. Halten Sie Kinder und Beobachter vom Einsatzort fern. Die
Ablenkung der Aufmerksamkeit beim Bediener kann zum Verlust der
Kontrolle über das Gerät führen.
PERSONENSICHERHEIT
a. Die persönliche Schutzausrüstung wie Uniform, Schutzbrille,

17
Schutzschuhwerk, Kopfschutzhaube, Gehörschutz und
Schutzhandschuhe aus Leder ist zu tragen. Das Tragen der
persönlichen Schutzausrüstung unter geeigneten Bedingungen
verringert das Risiko der Körperverletzung.
b. Überdehnen Sie nicht Ihren Standbereich. Achten Sie jederzeit
auf sicheren Stand und Gleichgewicht. Dies wir Ihnen bessere
Kontrolle über das Gerät in unberechenbaren Situationen ermöglichen.
c. Tragen Sie keine weiten Kleidungsstücke oder Schmuck. Halten
Sie Ihre Haare, Kleidung und Handschuhe von beweglichen
Teilen des Gerätes fern. Weite Kleidungsstücke, Schmuck oder langes
Haar können in beweglichen Teilen des Elektrowerkzeugs verfangen.
TRANSPORT UND AUFBEWAHRUNG
a. Schalten Sie beim Tragen der Motorkettensäge den Motor aus,
bringen Sie die Abdeckung der Sägenkette an und legen Sie
die Bremse ein. Das Tragen der laufenden und nicht abgedeckten
Kettensäge kann zur Körperverletzungen führen.
b. Die Motorkettensäge darf nur am vorderen Haltegri getragen
werden. Andere Stellen können keinen sicheren Gri sichern und sogar
zum Verletzen führen.
c. Die Motorkettensäge muss kontrolliert werden. Prüfen Sie das
Gerät auf Gradlinigkeit oder Spannung von beweglichen Teilen,
gebrochene Teile und alle Faktoren, die den Betrieb des Gerätes
beeinussen können. Bei Beschädigungen soll das Gerät vor
dem Betrieb repariert werden. Für viele Unfälle ist die unrichtige
Wartung des Gerätes ursächlich.
d. Achten Sie auf scharfe und saubere Sägenkette. Eine geeignete
Pege von scharfen Schneidekanten der Sägenkette verringert die
Wahrscheinlichkeit der Verklemmung und erleichtert die Bedienung des
Gerätes.
GEBRAUCH UND PFLEGE DES GERÄTS
a. Die Funktionsweise der Sägenbremse ist regelmäßig zu
überprüfen. Bei der nicht funktionstüchtigen Sägenbremse kann der
Vorschub der Sägenkette in einer Notsituation nicht ausgeschaltet
werden.
b. Nach dem Gebrauch ist das Gerät immer gründlich zu reinigen.
Zusätzlich sind die persönliche Schutzausrüstung zu reinigen
und die sensiblen Baugruppen zu warten.
BETRIEB
•Vor dem Lösen der Bremse ist der Sägenmotor einzuschalten.
•Gehen Sie besonders vorsichtig beim Ende des Schneidens vor, denn
die Motorkettensäge hat keinen Widerstand des Werkstücks mehr
und fällt willkürlich herunter, was zu Körperverletzungen führen
kann.
•
Bei einem längeren Betrieb können beim Bediener eingeschlafene
Finger und Hände auftreten. In einem solchen Fall list die Arbeit zu
unterbrechen, denn die eingeschlafenen Körperteile die Präzision bei
der Bedienung der Motorkettensäge reduzieren.
•Keine oenen Feuerquellen verwenden. Nicht rauchen.
•Der Brennstotank ist mit der Benzin-Öl-Mischung beim
ausgeschalteten und abgekühlten Motor nachzufüllen, denn es
besteht das Risiko, dass der Brennsto verschüttet und durch heiße
Sägenelemente angezündet wird.
•Wird eine Undichtheit des Brennstotanks bzw. Leckage des
Brennstos festgestellt, so darf die Motorkettensäge nicht
eingeschaltet werden, denn dies kann zum Brand führen.
•Die Motorkettensäge wird stark heiß beim Betrieb. Daher gehen Sie
dabei vorsichtig um und berühren Sie keine heißen Sägenteile mit
nicht abgedeckten Körperteilen.
•Die Motorkettensäge darf gleichzeitig nur von einer Person
bedient werden. Alle anderen Personen müssen vom Einsatzort der
Motorkettensäge ferngehalten werden. Achten Sie besonders darauf,
dass Kinder und Tiere vom Einsatzort ferngehalten werden.
•Beim Einschalten der Motorkettensäge darf die Sägenkette nicht
an das Werkstück angelehnt werden bzw. andere Gegenstände
berühren.
•Beim Gebrauch der Motorkettensäge halten Sie das Gerät mit beiden
Händen an beiden Haltegrien fest. Achten Sie jederzeit auf sicheren
Stand.
•Die Motorkettensäge darf von Kindern bzw. Minderjährigen nicht
bedient werden. Die Motorkettensäge darf nur von Erwachsenen
gebraucht werden, die wissen, wie man das Gerät bedient. Falls Sie
die Motorkettensäge an andere Personen überlassen, geben Sie stets
die vorliegende Betriebsanleitung mit.
•Beim Auftreten der Müdigkeit unterbrechen Sie sofort die Arbeit mit
der Motorkettensäge.
•Vor der Schnittausführung stellen Sie den Hebel der Kettenbremse
entsprechend (zu sich) ein. Der Hebel dient zusätzlich als Handschutz.
•Die Motorkettensäge wird vom Werkstück nur bei der laufenden
Sägenkette weggehalten.
•Beim Durchschneiden von Schnittholz oder dünnen Ästen ist ein
Bock zu verwenden. Mehrere (gestapelte) Holzbretter oder das von
einer anderen Person bzw. mit dem Bein gehaltene Werkstück dürfen
nicht geschnitten werden.
•Lange Werkstücke müssen beim Durchschneiden entsprechend
unbeweglich gemacht werden.
•Bei der Arbeit auf einem Hügel führen Sie den Schnitt stets auf, wenn
sie bergauf gerichtet sind.
•Beim Längsschneiden verwenden Sie die Stützklaue als einen
Anhaltspunkt. Halten Sie die Motorkettensäge mit dem hinteren
Haltegri und führen sie mit dem vorderen Haltegri.
•Falls der Schnitt in einem Arbeitsgang nicht ausgeführt werden kann,
ziehen Sie die Motorkettensäge etwas nach hinten, stellen Sie die
Stützklaue um und fahren fort, indem Sie den hinteren Haltegri
etwas anheben.
•Beim Schneiden in der horizontalen Ebene stellen Sie sich unter dem
Winkel, der vom Winkel von 90º gegenüber der Schnittlinie möglichst
wenig abweicht. Solche Arbeitsweise verlangt hohe Konzentration
vom Bediener.
•Beim Einklemmen der Sägenkette beim Durchschneiden mit der
oberen Kettenteil kann es zu einem Rückschlag zum Bediener hin
kommen. Aus diesem Grund soll man möglichst mit dem Unterteil
der Sägenkette durchschneiden, denn dann beim Einklemmen der
Sägenkette der Rückschlag nach unten, vom Bediener weg, gerichtet
wird.
•Achten Sie besonders beim Durchschneiden von Holz, das zum
Zerspalten neigt. Die abgeschnittenen Holzstücke können in eine
beliebige Richtung weggeworfen werden (es besteht das Risiko der
Körperverletzung!).
•Das Abschneiden von Ästen darf nur von eingeschulten Personen
ausgeführt werden! Ein unkontrolliertes Herunterfallen eines
abgeschnittenen Asts kann Körperverletzungen verursachen!
•Mit der Spitze der Kettenführung darf nicht geschnitten werden (es
besteht das Rückschlagrisiko).
•Achten Sie besonders auf Äste, die gespannt sind. Schneiden Sie
keine frei hängenden Äste von unten.
•Stellen Sie sich immer seitlich der geplanten Falllinie des zu fällenden
Baumes.
•Beim Fällen eines Baumes besteht das Risiko, dass Äste des
gefällten Baumes oder der benachbarten Bäume gebrochen und
herunterfallen werden. Gehen Sie dabei besonders vorsichtig um,
denn es besteht das Risiko der Körperverletzung.
•Auf Hügeln soll der Bediener stets über dem zu fällenden Baum, nie
unterhalb, stehen.
•Achten Sie auf Baumstümpfe, die zum Bediener hin gerollt werden
können. Springen Sie weg!
•
Die eingeschaltete Motorkettensäge neigt zum Umdrehen, wenn die
Spitze der Kettenführung das Werkstück berührt. In einem solchen Fall
kann die Motorkettensäge unkontrolliert zum Bediener hin rücken (es
besteht das Risiko der Körperverletzung!).
•Vor der Fällung den Arbeitsplatz vorbereiten. Dafür untere, störende
Äste entfernen und oraz die Fläche um den Baumstamm räumen.
•Beim windigen Wetter darf nicht gearbeitet werde, denn der Wind
kann die angenommene Richtung der Fällung ändern oder den Baum
unkontrolliert fallen lassen.
•Die Fällung darf nicht erogen, wenn wegen des Nebels, Regen- bzw.
Schneefalls die Sicht eingeschränkt ist.
•Die Kettensäge darf nicht über die Schulternhöhe oder wenn man
auf dem Baum, der Leiter, dem Gerüst, Baumstumpf usw. steht,
gebraucht werden.
•In der Nähe des Arbeitsplatzes muss eine komplett ausgestattete
Erste-Hilfe-Box vorhanden sein.
Um den Rückschlag der Motorkettensäge zu verhindern, sind
folgende Hinweise zu beachten:
•Mit der Spitze der Kettenführung nie mit dem Schneiden beginnen
oder das Schneiden ausführen!
•Mit dem Schneiden stets mit der eingeschalteten Motorkettensäge
beginnen!

18
•Sicher stellen, dass die Sägenkette entsprechend scharf ist.
•Nie mehr als einen Ast gleichzeitig durchschneiden. Beim
Abschneiden die benachbarten Äste beachten. Beim Längsschneiden
eines Baumes die benachbarten Baumstümpfe beachten.
Erläuterung zu den eingesetzten Piktogrammen.
1. Achtung! Besondere Sicherheitsvorkehrungen beachten
2. Brandgefahr
3. Vergiftungsgefahr durch Abgase
4. Schutzhandschuhe tragen
5. Vor der Bedienung bzw. Instandsetzung den Motor ausschalten
und die Leitung von der Zündkerze abziehen
6. Die Betriebsanleitung durchlese und die darin enthaltenen
Warnhinweise und Sicherheitshinweise beachten!
7. Kopf-, Augen- und Gehörschutz verwenden
8. Rückschlaggefahr
9. Schutzkleidung verwenden
10. Schutzschuhwerk verwenden
11. Keine Extremitäten den Schneideelementen nähern
AUFBAU UND ANWENDUNG
Die Motorkettensäge ist das manuell bediente Gerät. Die
Motorkettensäge wird mit einem Zweitakt-Verbrennungsmotor mit
Luftkühlung angetrieben. Das Gerät ist für die Ausführung von Arbeiten
im Hausgarten bestimmt. Mit der Motorkettensäge dürfen Bäume
gefällt, Äste geschnitten, Brenn-, Heizholz sowie Holz für andere Zwecke
vorbereitet werden.
Nichtbestimmungsgemäße Verwendung des Gerätes ist nicht
zugelassen.
BESCHREIBUNG DER SEITEN MIT GRAPHIKEN
Die unten angeführte Nummerierung bezieht sich auf die Elemente des
Gerätes, die auf den Seiten mit Graphiken dargestellt werden.
1. Sperre des Hebels der Brennstodrossel
2. Starterzug
3. Einstellring für Luftlterabdeckung
4. Luftlterabdeckung
5. Vorderer Handgri
6. Bremshebel
7. Mutter zur Befestigung der Führung
8. Einstellschraube für Kettenspannung
9. Einstellschraube für Ölmenge
10. Gehäuse
11. Hebel der Brennstodrossel
12. Haupthaltegri
13. Anlassseil
14. Zündungsschalter
15. Tankdeckel
16. Einstellschrauben für Vergaser L und H
17. Einstellschraube für niedrige Drehzahl T
18. Öltankdeckel
19. Stützklaue
20. Führung
21. Sägenkette
22. Kettenrad für Führung
* Es können Unterschiede zwischen der Abbildung und dem Produkt auftreten.
BESCHREIBUNG FÜR VERWENDETE GRAPHISCHE ZEICHEN
ACHTUNG
WARNUNG
MONTAGE/EINSTELLUNGEN
INFORMATION
AUSSTATTUNG UND ZUBEHÖR
1. Abdeckung der Führung - 1 St.
2. Führung - 1 St.
3. Sägenkette - 1 St.
4. Stützklaue + Schrauben - 1 Satz
5. Behälter für Benzin-Öl-Mischung - 1 St.
6. Kerzenschlüssel mit Schraubendreher - 1 St.
7. Schraubendreher - 1 St.
8. Sechskantschlüssel - 2 St.
9. Feile - 1 St.
BETRIEBSVORBEREITUNG
MOTORKETTENSÄGE TRAGEN
Bevor Sie die Motorkettensäge tragen, schieben Sie die
Kettenabdeckung auf die Führung und Kette. Die Motorkettensäge
soll am vorderen Haltegri getragen werden. Die Motorkettensäge
darf am Haupthaltegri nicht getragen werden. Werden mehrere
Schnittoperationen nacheinander nötig, soll die Motorkettensäge
zwischen den einzelnen Schritten mit dem Zündungsschalter
ausgeschaltet werden.
STÜTZKLAUE MONTIEREN
Aus Sicherheitsgründen muss die Stützklaue an die Kettensäge
montiert sein. Sie bildet einen Stützpunkt und mindert das Risiko des
Rückschlages.
•Die Stützklaue (19) an das Gehäuse der Kettensäge mit Schrauber
(mitgeliefert) montieren.
FÜHRUNG UND SÄGENKETTE MONTIEREN
Zur Regulierung der Kettenspannung dienen ein Stift und eine
Einstellschraube. Es ist sehr wichtig, dass bei der Montage der sich in
der Einstellschraube bendende Stift in die Önung in der Führung
hineinkommt.
Durch das Drehen der Einstellschraube kann der Stift hin und zurück
geschoben werden. Diese Elemente sollen richtig vor der Montage
der Führung in der Motorkettensäge eingestellt werden.
Die Kettenführung und Sägenkette werden getrennt geliefert.
•Der Bremshebel (6) muss in der oberen (vertikalen) Position sein
(Abb. A).
•Die Mutter zur Befestigung der Führung (7) lösen und das Gehäuse
(10) entfernen.
•Die Kette (21) auf das Kettenantriebsrad auegen, das sich hinter der
Kupplung bendet.
•Die Führung (20) auf die Führungsschrauben (c) (mit der Kupplung
einschiebend) aufsetzen und zum Kettenantriebsrad (Abb. B) hin
schieben.
•Die Kette (21) von unten auf das Kettenrad der Führung (22)
aufsetzen.
•Die Führung (20) zum Kettenantriebsrad so schieben, dass die
Kettengleider sich in der Nut in der Führung benden.
•Prüfen, dass der Stift (a) in der Einstellschraube für Kettenspannung
(8) sich in der Mitte der unteren Önung (b) der Führung (20)
bendet (ggf. regulieren) (Abb. B).
•Das Gehäuse (10) anbringen und leicht mit den Muttern zur
Befestigung der Führung (7) anziehen.
•Die Sägenkette entsprechend mit der Einstellschraube für
Kettenspannung (8) spannen. Die richtige Kettenspannung besteht
dann, wenn die Kette in der Mitte der Führung in der horizontalen
Lage sich für 3 bis 4 mm anheben lässt.
•Die Mutter zur Befestigung der Führung (7) festziehen und dabei die
Spitze der Führung festhalten.
Vor der Montage der Führung und Kette prüfen Sie die Ketten-
Schneidekanten auf festen Sitz (die richtige Lage der Kette in der
Führung ist auf der Spitze der Führung gezeigt). Um die Verletzung

19
mit scharfen Kanten beim Prüfen und Montieren der Kette zu
verhindern, tragen Sie stets Schutzhandschuhe.
Die neue Sägenkette bedarf einer Anlaufzeit von ca. 5 Minuten. Auf
dieser Etappe ist das Schmieren der Kette von großer Bedeutung.
Nach der Anlaufzeit prüfen Sie die Kettenspannung und ggf.
korrigieren.
Prüfen Sie häug und regulieren die Sägenkette, denn lockere Kette
kann leicht von der Führung wegrutschen, schnell verschleißen oder
den vorzeitigen Verschleiß der Führung bewirken.
ÖLBEHÄLTER NACHFÜLLEN
Die neue Motorkettensäge wird mit leerem Ölbehälter geliefert.
Deswegen ist der Ölbehälter vor der Inbetriebnahme mit Öl zufüllen.
•Den Ölbehälterdeckel (18) abschrauben.
•Max. 260 ml Öl einschütten (achten Sie dabei, dass beim Füllen des
Behälters keine Verunreinigungen in den Behälter hineindringen).
•Den Ölbehälterdeckel (18) abschrauben.
Verwenden Sie kein gebrauchtes oder regeneriertes Öl, denn dies
kann die Beschädigung der Ölpumpe bewirken. Verwenden Sie Öl
mit der Klasse SAE 10W/30 das ganze Jahr lang oder im Sommer SAE
30W/40 und im Winter SAE 20W/30.
BRENNSTOFFTANK NACHFÜLLEN
Beim Auüllen mit Brennsto sind folgende Regeln einzuhalten:
• der Motor darf nicht laufen,
• die Verschüttung des Brennstos ist zu verhindern.
Vermischen die das Benzin (bleifrei mit 95 Oktanen) mit dem
hochwertigen Motoröl für Zweitaktmotoren gemäß den unten
angeführten Tabellen.
DAS EMPFOHLENE MISCHUNGSVERHÄLTNIS
Betriebsbedingungen Benzin : Öl
Die ersten 20 Betriebsstunden 20 : 1
Nach 20 Betriebsstunden 25 : 1
•Den Brennstotankdeckel (15) abschrauben.
•Die früher vorbereitete Brennstomischung (max. 550 ml)
einschütten.
•Den Brennstotankdeckel (15) abschrauben.
Die meisten Probleme mit Verbrennungsmotoren hängen direkt oder
indirekt mit dem eingesetzten Brennsto zusammen. Es ist dabei
besonders zu beachten, dass zur Vorbereitung der Mischung kein
Motoröl für Viertaktmotoren verwendet wird.
BETRIEB / EINSTELLUNGEN
MOTOR STARTEN
Beim Betrieb ist die Motorkettensäge mit beiden Händen
festzuhalten.
•Prüfen Sie den Füllstand im Brennstotank und Ölbehälter.
•Prüfen Sie, dass der Bremshebel (6) sich in der Schaltposition (nach
vorne geschoben) bendet.
•Beim kalten Motor den Starterzug (2) ziehen.
•Den Kraftsto durch mehrmaliges Ziehen des Starterseil (13) in den
Motor pumpen.
•Den Zündungsschalter (14) in die eingeschaltete Position
(Abb. C) umschalten.
•Die Motorkettensäge auf der stabilen Grundlage (Grund) stellen.
•Halten Sie die auf den Boden angelehnte Motorkettensäge fest und
ziehen Sie das Anlassseil (13) zuerst leicht bis die Kupplung hörbar
einrastet, und dann stark (Abb. D).
•Das Starterseil (13) ziehen bis die Säge für einen Moment startet und
dann wieder erlöscht.
•Die Sperre des Hebels der Brennstodrossel (1) und die
Brennstodrossel (11) leicht drücken, um die Kaltstartvorrichtung
abzuschalten (der Starterzug wird automatisch in die ausgeschaltete
Position gebracht).
•Mit der eingeschalteten Kaltstartvorrichtung das Starterseil (13)
erneut ziehen bis der Motor gestartet wird (mehrmaliges Ziehen
kann nötig sein).
•Den Motor aufwärmen lassen. Falls nötig, die Drehzahl durch leichtes
Drücken der Brennstodrossel (11) erhöhen.
•Den Bremshebel (6) in die ausgeschaltete Position (verschoben nach
hinten) bringen.
•Den Schnitt ausführen.
Starten Sie nie die Motorkettensäge, wenn Sie das Gerät in den
Händen halten. Beim Starten muss die Motorkettensäge am Boden
angelehnt und fest gehalten werden. Prüfen Sie, dass die Kette sich
frei bewegen kann und keine Gegenstände berührt. Schneider Sie
keine Werkstücke, wenn der Starterzug ausgezogen ist.
MOTOR STOPPEN
• Den Hebel der Brennstodrossel (11) loslassen, damit der Motor ein
Paar Minuten leer laufen kann.
•Den Zündungsschalter (14) in die (STOPP)-Position bringen.
KETTENSCHMIERUNG PRÜFEN
Vor dem Arbeitsbeginn prüfen Sie die Kettenschmierung und den
Füllstand im Ölbehälter. Schalten Sie die Motorkettensäge ein und
halten Sie das Gerät über dem Boden. Falls immer größere Ölecken
zu sehen sind, zeugt das davon, dass die Kettenschmierung richtig
funktioniert (Abb. E). Falls gar keine bzw. geringe Ölecken zu sehen
sind, nehmen Sie die Regulierung mit der Einstellschraube für Ölmenge
(9) vor. Wird es keine Reaktion auf diese Regulierung geben, so ist der
Ölausgang, die obere Önung der Kettenspannung und das Ölkanal zu
reinigen oder der Kundendienst zu benachrichtigen.
Die Regulierung ist beim ausgeschalteten Gerät unter Einhaltung von
Sicherheitsmaßnahmen durchzuführen. Lassen Sie nie zu, dass die
Führung mit dem Grund in Kontakt kommt. Aus Sicherheitsgründen
behalten Sie stets einen sicheren Abstand zum Grund von
mindestens 20 cm.
Stellen Sie mit der Einstellschraube für Ölmenge (9) die Menge des
zugeführten Öls gemäß den geeigneten Betriebsbedingungen ein.
•„MIN”-Lage – die Ölzuführung wird kleiner.
•„MAX”-Lage – die Ölzuführung wird größer (Abb. F).
Wird hartes und trockenes Holz durchgeschnitten bzw. wenn zum
Schneiden die volle Schnittlinie der Führung eingesetzt wird, ist die
Einstellschraube für Ölmenge (9) in die „MAX”-Lage zu bringen.
Wird weiches und feuchtes Holz durchgeschnitten oder falls die
Arbeitsschnittlinie der Führung nur teilweise eingesetzt wird, so
kann die Menge des zugeführten Öls reduzieren, indem man die
Einstellschraube (9) zur „MIN”-Lage hin dreht.
Der Ölbehälter soll gleichzeitig mit dem Brennstotank fast leer
werden. Beim Nachfüllen von Benzin ist gleichzeitig der Ölbehälter
nachzufüllen.
SCHMIERMITTEL ZUR KETTENSCHMIERUNG
Die Lebensdauer der Kette und Führung hängt sehr von der Qualität
des eingesetzten Schmiermittels ab. Verwenden Sie ausschließlich
Schmiermittel, die für Motorkettensägen bestimmt sind.
Verwenden Sie kein gebrauchtes oder regeneriertes Öl zum
Schmieren der Sägenkette.
KETTENFÜHRUNG
Die Kettenführung (20) ist der besonderen Abnutzung in dem vorderen
und unteren Teil ausgesetzt. Um den einseitigen Verschleiß durch
Reiben zu verhindern, drehen Sie bei jedem Schärfvorgang die Kette
um. Gleichzeitig reinigen Sie die Nut in der Kettenführung und die
Ölönungen. Die Nut in der Kettenführung ist rechteckig. Prüfen Sie die
Nut auf den Verschleiß. Legen Sie das Lineal an die Führungsleiste und
die äußere Fläche der Kettenverzahnung. Falls ein Spalt zwischen denen
zu beobachten ist, heißt es, die Nut ist ordnungsmäßig. Falls nicht, ist die
Führung als abgenutzt zu behandeln und gegen neue auszutauschen.
KETTENRAD
Das Kettenantriebsrad ist ein Element, das besondert der Abnutzung
ausgesetzt ist. Falls deutliche Abnutzungszeichen auf der Verzahnung
des Kettenrads zu sehen sind, ist der Austausch nötig. Das abgenutzte
Kettenantriebsrad verringert ebenfalls die Lebensdauer der Sägenkette.
Mit dem Austausch des Kettenantriebsrads ist eine autorisierte
Kundendienstwerkstatt zu beauftragen.
VERGASER REGULIEREN
Der Vergaser der Motorkettensäge wird werkseitig eingestellt, aber
beim Wechsel der Betriebsbedingungen kann eine Regulierung nötig
sein. Vor der Regulierung des Vergasers stellen Sie sicher, dass ein neuer
Luft- und Brennstolter montiert und geeignete Brennstomischung
nachgefüllt worden ist.
Die Regulierung des Vergasers erfolgt mit der montierten Kettenführung
und Kette.
•Beide Einstellschrauben (L und H) (16) bis zum Anschlag einschrauben
(nicht zu stark einschrauben) (Abb. G).
•Am Anfang beide Einstellschrauben (16) wie unten angegeben
abschrauben:

20
-Schraube L: 1 1/4 Umdrehung
-Schraube H: 1 3/8 Umdrehung
•Den Motor starten und bei halb eingedrücktem Hebel der
Brennstodrossel (11) laufen lassen.
•Wenn der Motor aufgewärmt ist, lassen den Hebel der
Brennstodrossel (11) loslassen und den Motor leer laufen lassen.
•Die Schraube (L) nach rechts drehen bis die Position erreicht ist, in
der der Leerlauf maximal ist, und dann um 1/4 Drehung nach links
zurückdrehen.
•Die Einstellschraube für niedrige Drehzahl (T) (17) nach links solange
drehen, bis die Kette sich zu bewegen aufhört. Wird die niedrige
Drehzahl zu niedrig, ist die Einstellschraube nach rechts zu drehen
(Abb. G).
Vermeiden Sie, den Auspudämpfer zu berühren. Der heiße
Auspudämpfer kann seriöse Verbrennungen verursachen.
KETTENBREMSE
Die beschriebene Motorkettensäge ist mit einer automatischen
Bremse ausgestattet, die die Bewegung der Sägenkette stoppt,
falls es zum Rückschlag beim Durchschneiden kommt. Die Bremse
arbeitet automatisch durch die Wirkung der Trägheitskraft auf das im
Bremsgehäuse montierten Gewicht. Die Kettenbremse kann ebenfalls
manuell betätigt werden, falls der Bremshebel (6) zur Kettenführung
(20) hin verschoben wird. Die Betätigung der Kettenbremse stoppt die
Kettenbewegung innerhalb von 0,12 s.
BREMSFUNKTION PRÜFEN
Vor jedem Gebrauch der Motorkettensäge ist die Kettenbremse auf die
Funktion zu prüfen.
•Die eingeschalteten Motorkettensäge auf den Boden stellen und den
Motor mit der Höchstdrehzahl bei voll geöneter Brennstodrossel
für 1 bis 2 Sekunden laufen lassen.
•Den Hebel der Brennstodrossel (6) nach vorne schieben. Die Kette
soll sofort stoppen.
•Kommt die Kette langsam oder gar nicht zum Stillstand, so ist das
Bremsband und die Kupplungstrommel vor dem Neustart der Säge
auszutauschen.
•Um die Bremse freizugeben, den Hebel der Brennstodrossel (6)
zum Haupthaltegri (12) hin wegziehen bis ein deutlich hörbares
Einrasten der Sperre aufgetreten ist.
Prüfen Sie die Kettenbremse auf die Funktion und die Kette auf
Schärfe vor jedem Gebrauch der Motorkettensäge. Dies ist von
großer Bedeutung, damit der eventuelle Rückschlag auf einem
sicheren Niveau gehalten werden kann.
BREMSENAKTIVIERUNG PRÜFEN
Bei dieser Prüfung soll der Sägenmotor ausgeschaltet werden.
•Die Motorkettensäge am vorderen Haltegri (5) und Haupthaltegri
(12) für ca. 35 cm über das Werkstück anheben.
•Den vorderen Haltegri (5) loslassen und abwarten bis die
Kettenführung nach vorne unter dem Eigengewicht schwenkt und
das Werkstück (Abb. H) berührt.
•Bei der Berührung des Werkstücks soll die Sägenbremse einschalten
(der Bremshebel (6) wird selbsttätig nach vorne in die eingeschaltete
Position gebracht).
Vor dem Gebrauch prüfen Sie die Kettenbremse auf richtige Funktion.
Falls die Kettenbremse nicht richtig arbeitet, nehmen Sie vor dem
gebrauch die Regulierung vor oder beauftragen Sie eine autorisierte
Kundendienstwerkstatt mit der Reparatur.
Wird der Motor mit der hohen Drehzahl bei der eingeschalteten
Kettenbremse laufen, wird dies zum Überhitzen der Sägenkupplung
führen. Wird die Kettenbremse beim Lauf des Motors aktiviert, lassen
Sie den Hebel der Brennstodrossel los und lassen den Motor mit
niedriger Drehzahl laufen.
SÄGENKETTE SPANNEN
Beim Betrieb der Motorkettensäge kommt es zur Dehnung der Kette
durch Aufwärmen. Die gedehnte Kette wird locker und kann von der
Kettenführung wegrutschen.
•Die Mutter zur Befestigung der Führung (7) lösen.
•Sicherstellen, dass die Kette (21) sich in der Nut, die zur Führung (20)
führt, bendet.
•Mit dem Schraubendreher die Einstellschraube für Kettenspannung
(8) rechts drehen bis die Kette richtig gespannt wird (dabei die
Kettenführung in der horizontaler Ebene leicht festhalten).
•Die Kettenspannung Ernest prüfen (es soll möglich sein, die Kette in
der Mitte der Kettenführung für ca. 3 bis 4 mm anzuheben (Abb. I).
•Die Mutter zur Befestigung der Führung (7) festziehen.
Die Kette darf nicht zu stark gespannt werden. Die beim zu heißen
Motor durchgeführte Regulierung kann zu starke Spannung der
Kette beim Abkühlen verursachen.
GEBRAUCH DER MOTORKETTENSÄGE
Vor dem Arbeitsbeginn machen Sie sich vertraut mit dem Abschnitt mit
den Sicherheitshinweisen für den sicheren Betrieb der Motorkettensäge.
Um die Bedienung der Motorkettensäge zu beherrschen, wird
es empfohlen, einige Schnittversuche mit dem Abfallmaterial
durchzuführen. Dadurch können Sie ebenfalls die Möglichkeiten der
Motorkettensäge kennen lernen.
•Beachten Sie stets die Sicherheitsvorschriften.
•Die Motorkettensäge kann ausschließlich zum Durchschneiden
von Holz eingesetzt werden. Andere Stoe dürfen damit nicht
durchgeschnitten werden.
•Die Schwingungsintensität und der Rückschlag variieren je nach der
zu schneidenden Holzart.
•Die Motorkettensäge darf als kein Hebel zum Anheben, Schieben
oder Trennen von Gegenständen verwendet werden. Bei Einklemmen
der Kette schalten Sie den Motor aus und schlagen ins Holz einen
Kunststo- oder Holzkeil, um die Säge zu befreien (Abb. J). Das Gerät
neu starten und vorsichtig mit dem Durchschneiden beginnen.
•Die Motorkettensäge darf an stationäre Stände nicht montiert
werden.
•Es ist untersagt, das Gerät an den Antrieb der anderen Geräte, die
vom Hersteller der Motorkettensäge nicht genehmigt werden,
anzuschließen.
•Beim Durchschneiden ist das starke Andrücken der Säge nicht nötig.
Ein leichter Andruck ist nötig, wenn der Motor bei voll geöneter
Brennstodrossel läuft.
Falls die Motorkettensäge beim Durchschneiden eingeklemmt wird,
darf das Gerät mit Gewalt nicht zurückgezogen werden. Dadurch
kann der Bediener die Kontrolle über das Gerät verlieren und verletzt
werden, die Motorkettensäge kann dabei beschädigt werden.
Vor dem Arbeitsbeginn muss die Kettenbremse freigelassen werden.
•Die Sperre des Hebels der Brennstodrossel (1) und den Hebel der
Brennstodrossel (11) drücken (bevor Sie mit dem Durchschneiden
anfangen, warten Sie ab, bis der Motor die volle Drehzahl erreicht).
•Halten Sie die volle Drehzahl die ganze Zeit.
•Lassen Sie, dass die Kette Holz durchschneidet. Drucker Sie die
Motorkettensäge nach unten (Abb. K).
•Um die Kontrolle über das Gerät am Ende des Schnittvorgangs nicht
zu verlieren, hören Sie auf, die Säge anzudrücken.
•Nach dem Beenden des Schnittvorgangs lassen Sie den Hebel der
Brennstodrossel (11) los, damit der Motor leer laufen kann.
•Vor dem Ablegen der Motorkettensäge schalten Sie den Motor aus.
Hohe Drehzahl der Säge, wenn Holz nicht durchgeschnitten wird,
führt zu unnötigen Verlusten und Teileverschleiß.
SCHUTZ GEGEN DEN RÜCKSCHLAG
Unter dem Rückschlag versteht man die Bewegung der Kettenführung
der Motorkettensäge nach oben und/oder nach hinten, die auftreten
kann, falls die Sägenkette mit der Führungsspitze auf ein Hindernis trit.
•Prüfen Sie, dass das Werksto auf schere befestigt ist.
•Zur Befestigung des Werkstücks verwenden Sie die Klemmen.
•Beim Start und Betrieb soll man die Motorkettensäge in beiden
Händen halten.
•Bei dem Rückschlag arbeitet die Motorkettensäge unkontrolliert, die
Kette wird locker (Abb. L).
•Die nicht richtig geschärfte Kette erhöht das Risiko des Rückschlags.
•Führen Sie keine Schnittvorgänge oberhalb der Schulterhöhe aus.
Das Durchschneiden mit der Führungsspitze ist zu vermeiden,
denn dies kann zum gewaltsamen Rückschlag nach hinten bzw.
oben führen. Beim Betrieb der Motorschnittsäge sind stets die
komplette Ausrüstung der Motorkettensäge und entsprechende
Arbeitskleidung einzusetzen
Die Demontage von Sicherheitsvorrichtungen, nicht richtige
Bedienung, Wartung oder der nicht richtig ausgeführte Wechsel
der Kettenführung oder der Kette können das Risiko der
Körperverletzung bei dem eventuellen Rückschlag erhöhen.
Nehmen Sie keine Modizierungen der Motorkettensäge vor. Beim
Gebrauch der eigenständig modizierten Motorkettensäge verliert
der Benutzer jegliche Garantieansprüche. Der Garantieanspruch
geht ebenfalls verloren, falls die Motorkettensäge nicht gemäß den
La pagina sta caricando ...
La pagina sta caricando ...
La pagina sta caricando ...
La pagina sta caricando ...
La pagina sta caricando ...
La pagina sta caricando ...
La pagina sta caricando ...
La pagina sta caricando ...
La pagina sta caricando ...
La pagina sta caricando ...
La pagina sta caricando ...
La pagina sta caricando ...
La pagina sta caricando ...
La pagina sta caricando ...
La pagina sta caricando ...
La pagina sta caricando ...
La pagina sta caricando ...
La pagina sta caricando ...
La pagina sta caricando ...
La pagina sta caricando ...
La pagina sta caricando ...
La pagina sta caricando ...
La pagina sta caricando ...
La pagina sta caricando ...
La pagina sta caricando ...
La pagina sta caricando ...
La pagina sta caricando ...
La pagina sta caricando ...
La pagina sta caricando ...
La pagina sta caricando ...
La pagina sta caricando ...
La pagina sta caricando ...
La pagina sta caricando ...
La pagina sta caricando ...
La pagina sta caricando ...
La pagina sta caricando ...
La pagina sta caricando ...
La pagina sta caricando ...
La pagina sta caricando ...
La pagina sta caricando ...
La pagina sta caricando ...
La pagina sta caricando ...
La pagina sta caricando ...
La pagina sta caricando ...
La pagina sta caricando ...
La pagina sta caricando ...
La pagina sta caricando ...
La pagina sta caricando ...
La pagina sta caricando ...
La pagina sta caricando ...
La pagina sta caricando ...
La pagina sta caricando ...
La pagina sta caricando ...
La pagina sta caricando ...
La pagina sta caricando ...
La pagina sta caricando ...
La pagina sta caricando ...
La pagina sta caricando ...
La pagina sta caricando ...
La pagina sta caricando ...
La pagina sta caricando ...
La pagina sta caricando ...
La pagina sta caricando ...
La pagina sta caricando ...
La pagina sta caricando ...
La pagina sta caricando ...
La pagina sta caricando ...
La pagina sta caricando ...
La pagina sta caricando ...
La pagina sta caricando ...
La pagina sta caricando ...
La pagina sta caricando ...
La pagina sta caricando ...
La pagina sta caricando ...
La pagina sta caricando ...
La pagina sta caricando ...
La pagina sta caricando ...
La pagina sta caricando ...
La pagina sta caricando ...
La pagina sta caricando ...
La pagina sta caricando ...
La pagina sta caricando ...
La pagina sta caricando ...
La pagina sta caricando ...
La pagina sta caricando ...
La pagina sta caricando ...
La pagina sta caricando ...
La pagina sta caricando ...
La pagina sta caricando ...
La pagina sta caricando ...
La pagina sta caricando ...
La pagina sta caricando ...
La pagina sta caricando ...
La pagina sta caricando ...
La pagina sta caricando ...
La pagina sta caricando ...
La pagina sta caricando ...
La pagina sta caricando ...
La pagina sta caricando ...
La pagina sta caricando ...
La pagina sta caricando ...
La pagina sta caricando ...
La pagina sta caricando ...
La pagina sta caricando ...
La pagina sta caricando ...
La pagina sta caricando ...
La pagina sta caricando ...
La pagina sta caricando ...
-
 1
1
-
 2
2
-
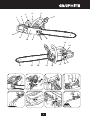 3
3
-
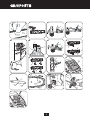 4
4
-
 5
5
-
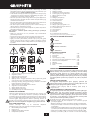 6
6
-
 7
7
-
 8
8
-
 9
9
-
 10
10
-
 11
11
-
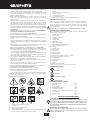 12
12
-
 13
13
-
 14
14
-
 15
15
-
 16
16
-
 17
17
-
 18
18
-
 19
19
-
 20
20
-
 21
21
-
 22
22
-
 23
23
-
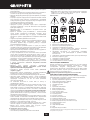 24
24
-
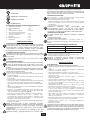 25
25
-
 26
26
-
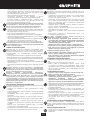 27
27
-
 28
28
-
 29
29
-
 30
30
-
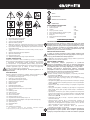 31
31
-
 32
32
-
 33
33
-
 34
34
-
 35
35
-
 36
36
-
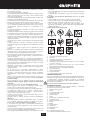 37
37
-
 38
38
-
 39
39
-
 40
40
-
 41
41
-
 42
42
-
 43
43
-
 44
44
-
 45
45
-
 46
46
-
 47
47
-
 48
48
-
 49
49
-
 50
50
-
 51
51
-
 52
52
-
 53
53
-
 54
54
-
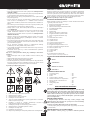 55
55
-
 56
56
-
 57
57
-
 58
58
-
 59
59
-
 60
60
-
 61
61
-
 62
62
-
 63
63
-
 64
64
-
 65
65
-
 66
66
-
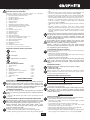 67
67
-
 68
68
-
 69
69
-
 70
70
-
 71
71
-
 72
72
-
 73
73
-
 74
74
-
 75
75
-
 76
76
-
 77
77
-
 78
78
-
 79
79
-
 80
80
-
 81
81
-
 82
82
-
 83
83
-
 84
84
-
 85
85
-
 86
86
-
 87
87
-
 88
88
-
 89
89
-
 90
90
-
 91
91
-
 92
92
-
 93
93
-
 94
94
-
 95
95
-
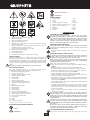 96
96
-
 97
97
-
 98
98
-
 99
99
-
 100
100
-
 101
101
-
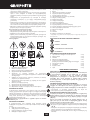 102
102
-
 103
103
-
 104
104
-
 105
105
-
 106
106
-
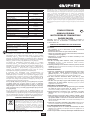 107
107
-
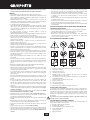 108
108
-
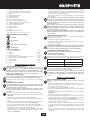 109
109
-
 110
110
-
 111
111
-
 112
112
-
 113
113
-
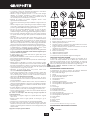 114
114
-
 115
115
-
 116
116
-
 117
117
-
 118
118
-
 119
119
-
 120
120
-
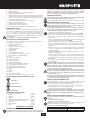 121
121
-
 122
122
-
 123
123
-
 124
124
-
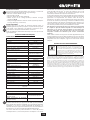 125
125
-
 126
126
-
 127
127
-
 128
128


Graphite 58G953 Manuale del proprietario
- Categoria
- Motoseghe
- Tipo
- Manuale del proprietario
- Questo manuale è adatto anche per
in altre lingue
- slovenčina: Graphite 58G953 Návod na obsluhu
- română: Graphite 58G953 Manualul proprietarului
Altri documenti
-
 Oleo-Mac 932 C Manuale del proprietario
-
 IKRA Mogatec PC 26 TL Operating Instructions Manual
-
Scheppach CSE2400 Manuale utente
-
Sparky Group TV 2040 Manuale utente
-
Efco MTTH 2400 Manuale del proprietario
-
Dolmar ES-38 A Manuale del proprietario
-
Efco GSH 510 Manuale del proprietario
-
Efco MT 4510 Manuale del proprietario
-
Efco MTT 2500 Manuale del proprietario
-
Raider Garden Tools RD-GCS22 Manuale utente

