La pagina si sta caricando...

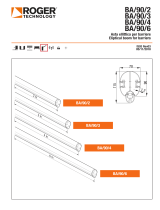
BA/68/3 - BA/68/4
Asta elittica in alluminio per barriere BIONIK4
Elliptical aluminium boom for BIONIK4 barriers
IS168 Rev.01
16/11/2018
ROGER TECHNOLOGY
Via S. Botticelli 8 • 31021 Bonisiolo di Mogliano Veneto (TV) • ITALIA
P.IVA 01612340263 • Tel. +39 041.5937023 • Fax. +39 041.5937024
info@rogertechnology.com • www.rogertechnology.com
E
A
B
C
D
F
~200 mm
G
H
4x TCEI M8x20

IT
FR
EN
ES
DE
PT
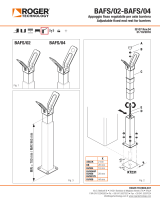
Installazione supporto e asta - Support and boom installation
Installation von Halterung und Schlagbaum - Installation support et barre
Instalación del soporte y del asta - Instalação de suporte e haste
1. Sbloccare la barriera.
2. In base al senso di apertura della barriera, ruotare il bilanciere fino a raggiungere
la battuta sul finecorsa meccanico, nella posizione in cui è possibile installare l’asta
orizzontalmente.
3. Bloccare nuovamente la barriera.
4. Svitare le viti [A] TCC 4,2x13 e togliere il tappo [B].
5. Svitare le viti [C] TCC 2,9x19. Sfilare il supporto [D], la gomma antiurto [E] e il profilo [F]
di almeno 200 mm.
6. Infilare l’asta sul supporto [G] e fissarla con le viti in dotazione TCEI M8x20 [H] (complete
di rondelle).
7. Riposizionare il profilo [F], la gomma antiurto [E] e il supporto in plastica [D] e fissarli con
le viti [C] TCC 2,9x19.
8. Fissare il tappo [B] con le viti [A] TCC 4,2x13.
9. Fissare il coprisupporto in plastica con le viti autofilettanti TCC 4,2x19.
1. Débloquer la barrière.
2. En fonction du sens d’ouverture, tourner le balancier jusqu’en butée sur le fin de course
mécanique, dans la position permettant d’installer la barre horizontalement.
3. Bloquer à nouveau la barrière.
4. Dévisser les vis [A] TCC 4,2x13 et retirer le bouchon [B].
5. Dévisser les vis [C] TCC 2,9x19. Défiler le support [D], le caoutchouc antichoc [E] et le
profil [F] d’au moins 200 mm.
6. Enfiler la barre sur le support [G] et la fixer avec les vis fournies TCEI M8x20 [H] (avec
rondelles).
7. Replacer le profil [F], le caoutchouc antichoc [E] et le support en plastique [D] et les fixer
avec les vis [C] TCC 2,9x19.
8. Fixer le bouchon [B] avec les vis [A] TCC 4,2x13.
9. Fixer le cache-support en plastique avec les vis auto-taraudeuses TCC 4,2x19.
1. Unlock the barrier.
2. Based on the opening direction of the barrier, turn the linkage lever until reaching the
stop on the mechanical limit switch, in the position in which it is possible to install the
boom horizontally.
3. Lock the barrier.
4. Unscrew the screws [A] TCC 4.2x13 and remove the cap [B].
5. Unscrew the screws [C] TCC 2.9x19. Remove the support [D], shock-resistant rubber [E]
and the profile [F] at least 200 mm.
6. Insert the boom in the support [G] and fasten it with the provided screws TCEI M8x20
[H] (complete with washers).
7. Reposition the profile [F], the shock-resistant rubber [E] and the plastic support [D] and
fasten them with the screws [C] TCC 2.9x19.
8. Fasten the cap [B] with the screws [A] TCC 4.2x13.
9. Fasten the plastic support cover with the self-tapping screws TCC 4.2x19.
1. Desbloquee la barrera.
2. De acuerdo con la dirección de apertura de la barrera, gire el balancín hasta alcanzar el
tope mecánico, en la posición en la se puede instalar el asta horizontal.
3. Vuelva a bloquear la barrera.
4. Afloje los tornillos [A] CCH 4,2x13 y retire el tapón [B].
5. Afloje los tornillos [C] CCH 2,9x19. Extraiga el soporte [D], el tope de goma [E] y el perfil
de [F] al menos 200 mm.
6. Introduzca la varilla en el soporte [G] y fíjelo con los tornillos suministrados CCH M8x20
[H] (con arandelas).
7. Reemplace el perfil [F], el tope de goma [E] y el soporte de plástico [D] y fíjelos con los
tornillos [C] CCH 2,9x19.
8. Fije el tapón [B] con los tornillos [A] CCH 4,2x13.
9. Coloque la cubierta del soporte de plástico con los tornillos autorroscantes 4,2x19 CCH.
1. Die Schranke freigeben.
2. Entsprechend der Öffnungsrichtung der Schranke den Kipphebel bis zum Anschlag auf
dem mechanischen Endschalter in die Position drehen, in der man den Baum horizontal
montieren kann.
3. Die Schranke wieder blockieren.
4. Die Schrauben [A] TCC 4,2x13 abschrauben und den Deckel [B] entfernen.
5. Die Schrauben [C] TCC 2,9x19 abschrauben. Die Halterung [D], den Gummi, um Stöße
abzufangen [E] und das Profil [F] um mindestens 200 mm abstreifen.
6. Den Schlagbaum auf der Halterung [G] einsetzen und mit den mitgelieferten Schrauben
TCEI M8x20 [H] (mit Unterlegscheiben) befestigen.
7. Das Profil [F], den Gummi, um Stöße abzufangen [E] und die Kunststoffhalterung [D]
wieder anbringen und mit den Schrauben [C] TCC 2,9x19 befestigen.
8. Den Deckel [B] mit den Schrauben [A] TCC 4,2x13 befestigen.
9. Die Halterungsabdeckung aus Kunststoff mit den Blechschrauben TCC 4,2x19 befestigen.
1. Desbloqueie a barreira.
2. De acordo com o sentido de abertura da barreira, rode o balanceiro, até atingir o
batente no fim de curso mecânico, na posição em que é possível instalar a haste
horizontalmente.
3. Bloqueie de novo a barreira.
4. Desenrosque os parafusos [A] TCC 4,2x13 e retire a tampa [B].
5. Desenrosque os parafusos [C] TCC 2,9x19. Desenfie o suporte [D], a borracha para-
choques [E] e o perfil [F] pelo menos 200 mm.
6. Enfie a haste no suporte [G] e fixe-a com os parafusos fornecidos TCEI M8x20 [H]
(com arruelas).
7. Volte a posicionar o perfil [F], a borracha para-choques [E] e o suporte de plástico [D]
e fixe-os com os parafusos [C] TCC 2,9x19.
8. Fixe a tampa [B] com os parafusos [A] TCC 4,2x13.
9. Fixe a cobertura do suporte de plástico com os parafusos autorroscantes TCC 4,2x19.
1/2