
Thank you for purchasing the CANDY induction hob. Please read this instruction manual
carefully before using the hob and keep it in a safe place for future reference.
UK
ENGLISH
FRENCH
CECK
DANISH
ITALIAN
SPANISH
FINN
GERMAN
NORWEGLIAN
POLISH
RUSSIAN
SWEDISH
DUTCH
PORTUGUESE
SLOVENIAN
Návod k použití pro indukþní varnou desku
Instruction Manual For Induction Hob
Brugervejledning til induktionskogetop
Manuale di istruzioni per piano cottura a
induzione
Manual de instrucciones para encimera de
inducción
Induktiokeittotason ohjekirja.
Gebrauchsanleitung für Induktions-Kochfeld
Bruksanvisning for induksjonsplatetopp
Instrukcja uĪytkowania indukcyjnej páyty
grzejnej
Ɋɭɤɨɜɨɞɫɬɜɨ ɩɨ ɷɤɫɩɥɭɚɬɚɰɢɢ ɢɧɞɭɤɰɢɨɧɧɨɣ
ɜɚɪɨɱɧɨɣ ɩɚɧɟɥɢ
Instruktionshandbok för induktionshäll
Gebruiksa
anwijzing inductiekookplaat
Manual de Instruções da placa de indução
þ
Navodila za uporabo indukcijskih kuhalnih
ploš
Table De Cuisson Induction
CIE3637B
1
2
3
CIE3640B3
CIE3640X
CIE4630B3
CIE4630B
1
2
3
1
2
3
1
2
3
4
1
2
3
4
CIE363
1
2
3

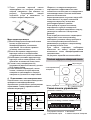
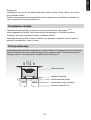
Manufactured with specially imported materials, the induction hob is extremely user-friendly,
durable and safe.
Dear Customer:
Thank you for purchasing the CANDY induction hob. We hope it will give many years of good
service.
Please read this instruction manual carefully before using the hob and keep it in a safe place
for future reference.
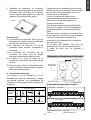
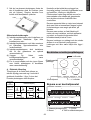
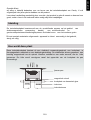
Product Introduction
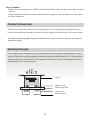
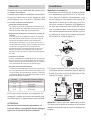
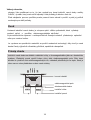
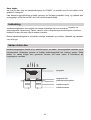
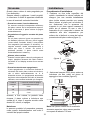
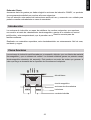
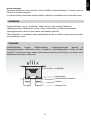
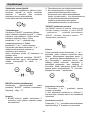
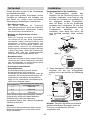
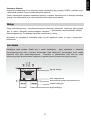
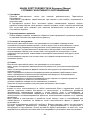
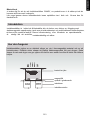
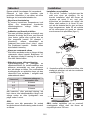
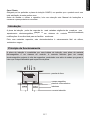
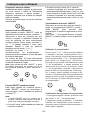
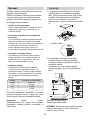
Working Principle
The induction hob comprises a coil, a hotplate made of ferromagnetic material and a control
system. Electrical current generates a powerful magnetic field through the coil. This produces
a large number of vortices which in turn generate heat which is then transmitted through the
cookingzone to the cooking vessel.
magnetic circuit
ceramic glass plate
iron pot
induction coil
Induced currents
2
\eh jeZWo
-
i \Wc_bo3
R^[
_dZkYj_ed ^eX YWj[hi \eh Wbb a_dZ e\ Yeea_d]1m_j^ _ji
[b[YjhecW]d[j_Y
_j j^[ _Z[Wb Y^e_Y[
Yeea_d]ped[i1 WdZ
_ji c_Yhe2Yecfkj[h_i[Z Yedjhebi WdZ ckbj_2\kdYj_edi1 cWa_d]

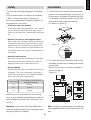
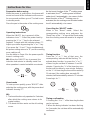
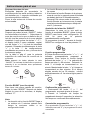
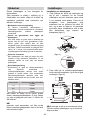
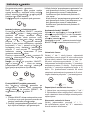
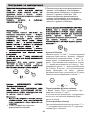
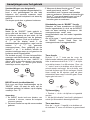
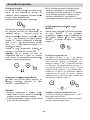
Protection from over-heating
A sensor monitors the temperature in the cooking
zones. When the temperature exceeds a safe
level, the cooking zone is automatically switched
off.
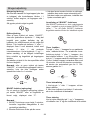
Detection of small or non-magnetic items
When a pan with a diameter of less than 80mm,or
some other small item(e.g.knife,fork,key) or a non-
magnetic pan( e.g. aluminium) has been left on
the hob, a buzzer sounds for approximately one
minute,after which the hob goes automatically on
to standby.
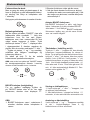
Residual heat warning
When the hob has been operating for some time,
there will be some residual heat. The letter “H”
appears to warn you to keep away from it.
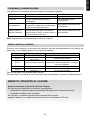
Auto shutdown
Another safety feature of the induction hob is auto
shutdown. This occurs whenever you forget to
switch off a cooking zone. The default shutdown
times are shown in the table below:
Power level
The heating zone shut down
automatically after
1~3
4~6
7~9
8 hours
4 hours
2 hours
When the pan is removed from the cooking
zone, it stops heating immediately and switches
itself off after the buzzer has sounded for one
minute.
Warning: Anyone who has been fitted with a
heart pacemaker should consult a doctor before
using the induction hotplate.
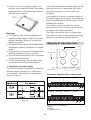
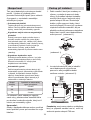
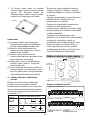
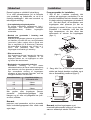
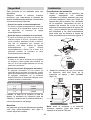
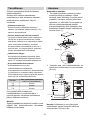
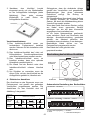
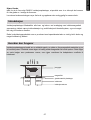
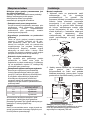
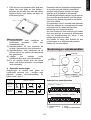
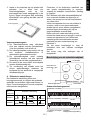
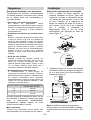
1. Cut a hole in the worktop of the dimension
shown in the diagram below. A minimum of
50 mm space should be left around the hole.
The worktop should be at least 30 mm thick
and made of heat-resistant material.
As shown in Figure (1)
NB: For safety, the gap between the hob and
any cupboard above it should be at least 760
mm.
This hob was specially designed for domestic
use.
In its constant search to improve its products,
CANDY reserves the right to modify any
technical, programme or aesthetic aspects of
the appliance at any time.
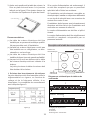
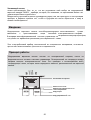
2. It is essential that the induction hob is well
ventilated and that the air intake and exit are
not blocked.
Make sure the hob is correctly installed as
shown in Figure 2.
Figure (2)
Figure (2)
mini 3 cm
mini 5 mm
mini 2 cm
Air intake
Air exit
Safety
Installation
3
UK
ENGLISH
F_]kh[ .6/

Warnings:
The induction hob must be installed by a
properly qualified person. We have our own
qualified installers. Never try to install the
appliance yourself.
The induction hob must not be installed above
refrigerators, freezers, dishwashers or tumble
dryers.
The induction hob should be installed so that
optimum radiation of heat is possible.
The wall and the area above the hob should
be able to withstand heat.
To avoid any damage, the sandwich layer
and adhesive should be heat-resistant.
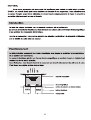
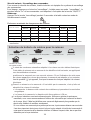
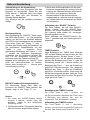
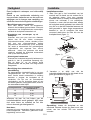
4. Connection to power supply
The socket should be connected in compliance
with the relevant standard, to a single-pole
circuit breaker. The method of connection is
shown in Figure 3.
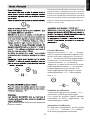
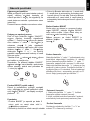
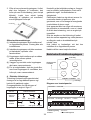
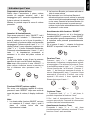
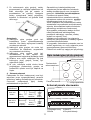
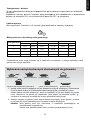
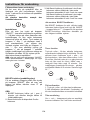
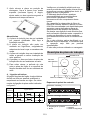
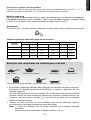
Schematic diagram of the control panel
4.Childproof lock key
3.ON/OFF
1.Power/Timer regulating key
2.Boost
Figure (3)
3. Fix the hob to the worktop using the four
brackets on the base of the hob. The position
of the brackets can be adjusted according to
the thickness of the top.
Diagram of induction hob:
If the cable is damaged or needs replacing, this
should be done by an after-sales technician
using the proper tools, so as to avoid any
accidents.
If the appliance is being connected directly to
the mains supply, an omnipolar circuit breaker
must be installed with a minimum gap of 3 mm
between the contacts.
The installer must ensure that the correct
electrical connection has been made and that
it complies with safety regulations.
The cable must not be bent or compressed.
The cable must be checked regularly and only
replaced by a properly qualified person.
(1)
(2)
(3)
(4)
(5)
4
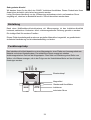
Control panel
Air vent
Ceramic plate
Air entry
1
4 2 3
1
4 2 3
CIE3637B
CIE3640B3
CIE3640X
CIE4630B3
CIE4630B
50/60Hz
50/60Hz
CIE363

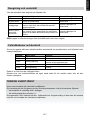
Preparation before using:
When the power is switched on, the buzzer will
sound once and all the indicators will come on
for one second and then go out. The hob is now
in standby mode.
Place the pan in the centre of the cooking zone.
Operating instructions
When the ON/OFF key is pressed, all the
indicators show
"
-
"
. Select the power level by
pressing the
"
+
"
or
"
-
"
key for the relevant
hotplate. To begin with the indicator shows
"
5
"
.
Adjust up or down by pressing the
"
+
"
or
"
-
"
key.
If you press the
"
+
"
and
"
-
"
keys simultaneously,
the power setting returns to
"
0
"
,and the cooking
zone switches off.
See the table on Page 6 for the power specific
to each cooking zone.
NB: When the ON/OFF key is pressed, the
induction hob returns to standby mode if no
other operation is carried out within one minute.
Boost mode
To heat up more quickly, press
"
BOOST
"
after
selecting the cooking zone, with the power level
indicator showing
"
P
".
NB:
1. The boost function only operates for 5 minutes,
after which the cooking zone returns to its
orginal setting.
2. The boost function works on the all cooking
zones.
Cancelling the
"
BOOST
"
mode
When in the " Boost " mode, Select the
corresponding cooking zone and press the
"
Boost
"
key or the "-" to cancel the Boost mode,
then the cooking zone will revert to its original
setting.
Timing function
Press the "+" or "-" key of that zone, the
corresponding indicator will be flashing. To
activate timer function by press the "+" or "-"
of timer key,the set time is between 1 and 99
minutes. Pressing the "+" of the timer key once
the time will increase by one minute. Keeping
on the "+" of timer key,the time will increase by
10 minutes,If the setting time exceeds 99
minutes,it will automatically return to "0" minutes.
Same logic for "-".
Timing confirmation
1.Pressing the "+" or "-" of the timer key,the time
can be set now.
2.When the timing indicator has been flashing
for 5 seconds, the set time will be automatically
confirmed.
Instructions for Use
5
UK
ENGLISH
Aj k_\ Yffjk ]leZk`fe f] k_\ 6
jk
Zffb`e^ qfe\
`j XZk`mXk\[1 k_\ 7
e[
Zffb`e^ qfe\ `j c`d`k\[
le[\i c\m\c 7 XlkfdXk`ZXccp1 m`Z\ m\ijX3 Aj k_\
Yffjk ]leZk`fe f] k_\ 8
i[
Zffb`e^ qfe\ `j
XZk`mXk\[1 k_\ 9
k_
Zffb`e^ qfe\ `j c`d`k\[ le[\i
c\m\c 7 XlkfdXk`ZXccp1 m`Z\ m\ijX3

Timer cancellation
If pressing the
"
-
"
and
"
+
"
keys simultaneously, the indicator will display
"
0
"
.and the the timer will
be cancel.
Unlocking
Hold down the
"
Interlock
"
key for 3 seconds and the hob will return to normal working.
Safety mode
To ensure the safety of children, the induction hob is fitted with an interlock device.
To lock: hold down the
"
Interlock
"
; the hob then goes into
"
Interlock
"
mode, the timer shows
"
Lo
"
and the rest of the keys are disabled except the "ON/OFF"key.
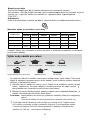
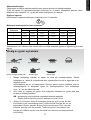
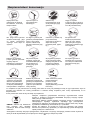
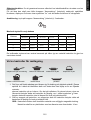
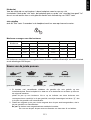
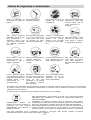
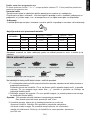
Iron oil frying pan Stainless steel pot Iron pan
Enamel stainless
steel kettle
Enamel cooking
utensil
Iron kettle
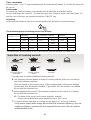
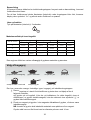
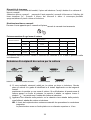
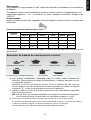
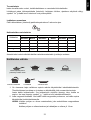
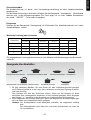
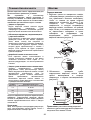
You may have a number of different cooking vessels
This induction hob can identify a variety of cooking vessels, which you can test by
one of the following methods:
Place the vessel on the cooking zone. If the corresponding cooking zone displays
a power level, then the vessel is suitable. If
" "
flashes, then the vessel is not suitable
for use with the induction hob.
Hold a magnet to the vessel. If the magnet is attracted to the vessel, it is suitable
for use with the induction hob.
NB: The base of the vessel must contain magnetic material.
It must have a flat bottom with a diameter of more than 14 cm.
2
The above may vary according to the size of the pan and the material it is made from
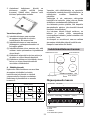
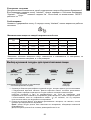
The maximum power of cooking zones is as follows:
Iron plate
Selection of cooking vessels
6
Heating zone
1
2
3
Boost
1200
2300
1200
1500
Normal
4
3000
2300
3000
1500
Boost
1200
--------
3000
4000
Normal
-------
2300
2600
1500
Normal
Boost
--------
-------
Use pans whose diameter is as large as the graphic of the zone selected.
6
Using a pot a slightly wider energy will be used at its maximum efficiency.If you use
smaller pot efficiency could be less than expected.Pot less than 140 mm could be
undetected by the hob.
CIE3637B
CIE3640B3
CIE3640X
CIE4630B3
CIE4630B
1200
3000
3700
2300
2600
1500
CIE363

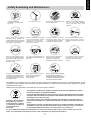
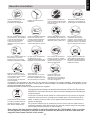
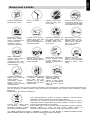
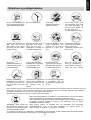
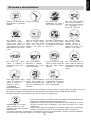
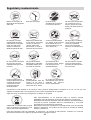
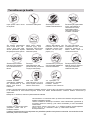
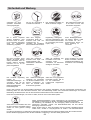
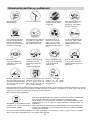
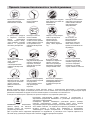
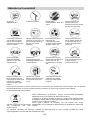
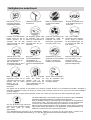
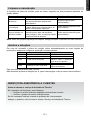
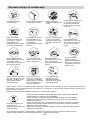
Clean the induction hob
regularly to stop foreign objects
from getting into the fan and
preventing the appliance from
working properly.
Do not store detergents or
flammable materials beneath
the hob.
Always open sealed containers,
such as cans, before heating
them, otherwise they may
explode.
Never have the induction
hotplate to work without food
inside, otherwise its operational
performance may be affected
and danger may happen.
Do not place rough or uneven
vessels on the hob, as they
may damage the ceramic
surface.
If the surface of the hob is
cracked, switch off the
appliance to avoid any
possibility of electric shocks.
Do not leave metallic objects,
such as knives, forks, spoons
and lids on the hob as they may
get hot.
A dedicated power
protection air switch must
be used.
Never wash the induction hob
directly with water.
Never use the induction hob
near another appliance which
generates a high temperature,
such as a gas cooker or a
paraffin heater.
DISPOSAL: Do not dispose
this product as unsorted
municipal waste. Collection
of such waste separately for
special treatment is
necessary.
This appliance is labelled in compliance with European directive 2002/96/EC for Waste
Electrical and Electronic Equipment (WEEE).
By ensuring that this appliance is disposed of correctly, you will help prevent any possible
damage to the environment and to human health, which might otherwise be caused if it
were disposed of in the wrong way.
The symbol on the product indicates that it may not be treated as normal household
waste. It should be taken to a collection point for the recycling of electrical and electronic
goods.
This appliance requires specialist waste disposal. For further information regarding the
treatment, recovery and recycling of this product please contact your local council, your
household waste disposal service, or the shop where you purchased it.
For more detailed information about treatment, recovery and recycling of this product, please contact your local city
office, your household waste disposal service or the shop where you purchased the product.
When a cooking zone has been
on for a long time the surface
remains hot for some time
afterwards - so do not touch
the ceramic surface.
From time to time check that
nothing (e.g. glass, paper, etc.)
is obstructing the air intake
beneath the induction hob.
Keep children or infirm persons
away from the appliance.
Never let them use it
unsupervised.
For indoor use only.
Safety Reminding and Maintenance:
7
UK
ENGLISH
If the supply cord is damaged,
it must be replaced by the
manufacturer,its service agent
or similary qualified person in
in order to avoid a hazard.
This appliance is not intended for use by persons (including children) with reduced physical, sensory or mental capabilities, or lack
of experience and knowledge, unless they have been given supervision or instruction concerning use of the appliance by a person
responsible for their safety.
Children should be supervised to ensure that they do not play with the appliance.

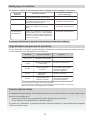
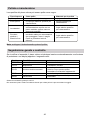
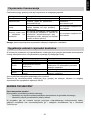
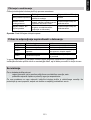
If any abnormality occurs, the induction hob will automatically go into protective mode and display
one of the following codes:
E3/E4
Abnormal
temperature
Check the pan
The above table shows how to assess and check common faults.
Do not dismantle the appliance yourself, otherwise you may damage the induction
hob.
F0/F1/F2
E1/E2
E5/E6
Fan failure
Contact the supplier
Temperature
sensor failure
Contact the supplier
Abnormal voltage in
power supply
Check if power supply is
normal.
Power on after power supply
returns to normal.
Poor heat radiation
in cooking zone
Restart when cooking
zone cools down
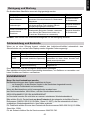
Light Immerse in hot water and wipe dry Cleaning sponge
Rings and lime
scale
Sweetmeat, melted
aluminium or
plastics
Apply white vinegar to the area, wipe with
a soft cloth or use a commercially
available product
Use a special scraper for ceramic glass
to remove residue (a silicon product is
best)
Special adhesive for ceramic
glass
Special adhesive for ceramic
glass
The surface of the induction hob may be easily cleaned in the following way:
NB: Disconnect the power supply before cleaning.
F3-F8
Type of contam-
ination
Method of cleaning
Cleaning materials
Cleanness and Maintenance
Failure Display and Inspection
Fault Possible cause Solutions
If a fault should occur, before calling After Sales Service, please do the following:
-Check that the appliance is correctly plugged in
-Read the failure and display table above
If you are still unable to resolve the problem, switch off the appliance, do not try to dismantle it,
and call
After Sales Service.
Customer Care Service
8

The contents of this manual have been carefully checked. However, the
company cannot be held responsible for any misprints or omissions.
Also, any technical modifications may be included in a revised version of
the manual without notice. The appearance and colour of the appliance in
this manual may differ from the actual one.
Special DecIaration
9
UK
ENGLISH

10

JdafWUf[a` S`f[0egdUZSgXXW
Sd YWfj[kh Yedjhzb[ bW j[cfwhWjkh[ s b-_djwh_[kh Z[ bW
jWXb[ Z[ Yk_iied3 Q-_b h[bvl[ kd[ Y^Wb[kh [nY[ii_l[1 bW
jWXb[ Z[ Yk_iied i-wj[_dZhW WkjecWj_gk[c[dj3
L[Y`S^[eSf[a` V,aT\Wfe W` Ua`fSUf ShWU ^S fST^W VW
Ug[eea`
Q_ leki fei[p1 ikh bW jWXb[ Z[ Yk_iied1 kd kij[di_b[
Zedj b[ Z_Wcvjh[ i[hW_j _d\wh_[kh s =5 cc ek gk_ d[
i[hW_j fWi YecfWj_Xb[ .Yecc[ fWh [n[cfb[ b[i
YWii[heb[i [d Wbkc_d_kc ek [d l[hh[/ ek [dYeh[1 i_
leki bW_ii[p Z[i Yekj[Wkn1 Z[i \ekhY^[jj[i1 Z[i f_dY[i
ek Z[i Ybwi1 kd i_]dWb iedeh[ i[ ZwYb[dY^[hW
WkjecWj_gk[c[dj [j h[j[dj_hW f[dZWdj [dl_hed kd[
c_dkj[3 C[ i_]dWb leki _dZ_gk[hW gk[ bW jWXb[ d[
\edYj_edd[ fWi [j gk|[bb[ i[ c[jjhW WkjecWj_gk[c[dj
[d l[_bb[3
E`V[USf[a` VW UZS^Wgd
Kehigk[ b-kj_b_iWj_ed Z[ bW jWXb[ Z[ Yk_iied i[ fhebed][
ZWdi b[ j[cfi1 bW j[cfwhWjkh[ Z[ bW ped[ Z[ Yk_iied
i|wbvl[3 DWdi Y[ YWi1 b[ jwce_d bkc_d[kn ,G, i-Wbbkc[1
leki Wl[hj_iiWdj W_di_ Z[ leki [d j[d_h wbe_]dw3
LoUgd[fo Wjf[`Uf[a` Sgfa_Sf[cgW
K-[nj_dYj_ed WkjecWj_gk[ [ij kd[ \edYj_ed Z[ iwYkh_jw
Z[ lejh[ jWXb[ _dZkYj_ed3 Ebb[ i-wj[_dj WkjecWj_gk[c[dj
i_ leki b-ekXb_[p Wbehi gk-[bb[ [ij [d cWhY^[3 K-[nj_dYj_ed
WkjecWj_gk[ Zwf[dZ Zk d_l[Wk Z-_dj[di_jw kj_b_iw1 Yecc[
b[ cedjh[ b[ jWXb[Wk Y_2Z[iieki?
M_l[Wk
Z-_dj[di_jw
KW ped[ Z[ Yk_iied i-wj[_dj
WkjecWj_gk[c[dj Wfhvi
6q8
9q;
<q>
=
^[kh[i
9
^[kh[i
7
^[kh[i
Ed \_d Z[ Yk_iied1 behigk[ leki ZwfbWY[p bW
YWii[heb[1 bW jWXb[ Z[ Yk_iied d[ Y^Wk\\[ fbki
[j i-wj[_dj Wfhvi kd i_]dWb iedeh[ Z-kd[ c_dkj[3
>MMBHMEIH=
^We bWdea``We badfS`f g` bSUW_S]Wd `W
bWghW`f gf[^[eWd UWf SbbSdW[^ o^WUfda_o`SYWd
cgW eage ^W Ua`fdq^W VW ^Wgd _oVWU[`1
GaVS^[foe V,[`efS^^Sf[a`
F_]kh[ .6/
DwYekf[h kd[ ekl[hjkh[ ikh b[ fbWd Z[ jhWlW_b
Wkn Z_c[di_edi ifwY_\_w[i ikh b[ iY^wcW3
Oekh fekle_h b-_dijWbb[h Yehh[Yj[c[dj1 leki
Z[l[p Z_ifei[h Z-kd [ifWY[ Z-Wk ce_di :5
cc [djh[ b[ XehZ Z[ bW ZwYekf[ [j b[ ckh
[j4ek b[i c[kXb[i3 Q-Wiikh[h gk[ b-wfW_ii[kh
Zk fbWd Z[ jhWlW_b ie_j Z-Wk ce_di 85 cc [j
gk[ b[ cWjwh_Wk Zedj _b [ij \W_j ie_j hwi_ijWdj
Wkn ^Wkj[i j[cfwhWjkh[i W\_d Z-wl_j[h gk-_b d[
i[ Zw\ehc[ s YWki[ Z[ bW Y^Wb[kh fhel[dWdj
Z[ bW jWXb[ Z[ Yk_iied .\_]kh[ 6/3
Rek`ekhi i-Wiikh[h gk[ bW jWXb[ Z[ Yk_iied
wb[Yjh_gk[ [ij X_[d [dYWijhw[ ZWdi b[ fbWd Z[
jhWlW_b [j gk-[bb[ [ij X_[d l[dj_bw[ fWh Z[ b-W_h
[djhWdj [j iehjWdj3 .\_]kh[ 7/3
>ffW`f[a`= _b Ze_j o Wle_h kd [ifWY[ Z-Wk ce_di
<;5 cc [djh[ bW jWXb[ Z[ Yk_iied [j b[ XWi Z[i
c[kXb[i ikif[dZki i[ jheklWdj Wk2Z[iiki Z[
bW jWXb[3
Meki Wledi Yeduk Y[jj[ jWXb[ Z[ Yk_iied fekh
kd kiW][ Zec[ij_gk[3
Cecc[ deki l[_bbedi s Wcwb_eh[h dei fheZk_ji1
deki deki hwi[hledi b[ Zhe_j Z-Wffehj[h Z[i
ceZ_\_YWj_edi gk_ ik_lhW_[dj Z-wl[djk[bb[i
dekl[bb[i WlWdYw[i j[Y^d_gk[i3
F_]kh[ .7/
POQO J PP
POQO H NP
[djhw[ Z-W_h
iehj_[ Z-W_h
63
73
LoUgd[fo
E`efS^^Sf[a`
FRENCH
11
Joint
mini 3 cm

KWUa__S`VSf[a`e
KW jWXb[ Z[ Yk_iied wb[Yjh_gk[ Ze_j xjh[
_dijWbbw[ fWh kd f[hiedd[b j[Y^d_gk[ gkWb_\_w3
M[ fWi fheYwZ[h i[kb s b-_dijWbbWj_ed3
KW jWXb[ Z[ Yk_iied wb[Yjh_gk[ d[ Ze_j fWi
xjh[ _dijWbbw[ ikh kd hw\h_]whWj[kh1 kd bWl[2
lW_ii[bb[ ek kd bWl[2b_d][3
KW jWXb[ Z[ Yk_iied wb[Yjh_gk[ Ze_j xjh[
_dijWbbw[ Z[ \Wued s fekle_h ]WhWdj_h iW \_WX_b_jw3
KW fWhe_ [j bW ped[ Wk2Z[iieki Z[ bW jWXb[
Z[ Yk_iied wb[Yjh_gk[ Ze_l[dj hwi_ij[h s bW
Y^Wb[kh3
K[ `e_dj gk_ [djekh[ bW jWXb[ Z[ Yk_iied Ze_j
xjh[ hwi_ijWdj s bW Y^Wb[kh3
RWXb[Wk Z[
YeccWdZ[
Qehj_[ Z[ b-W_h
Qkh\WY[ [d
l_jheYwhWc_gk[
Edjhw[ Z[ b-W_h
|{v|xx
Pw]bW][ Z[ bW fk_iiWdY[
BbeYW][ Z[i YeccWdZ[i
93 LUZo_S VWe TdS`UZW_W`fe o^WUfd[cgWe
KW fh_i[ wb[Yjh_gk[ Ze_j xjh[ XhWdY^w[ i[bed bW
hw]b[c[djWj_ed [d l_]k[kh1 [d \edYj_ed Zk
lebjW][ [j Z[ bW \hwgk[dY[ kj_b_iwi1 s kd
_dj[hhkfj[kh3 K[i ceZWb_jwi Z[ hWYYehZ[c[dj
iedj _dZ_gkw[i \_]kh[ 8?
A[SYdS__W eUZo_Sf[cgW Vg fST^WSg VW
Ua__S`VW
F_]kh[ .8/
Afhvi Wle_h fei_j_eddw bW jWXb[ Z[ Yk_iied1 bW
\_n[h Wk fbWd Z[ jhWlW_b Wl[Y 9 l_i .Yecc[
_dZ_gkw ikh bW \_]kh[/3 Ok_i W`kij[h Y^Wgk[ l_i
[d \edYj_ed Z[ b-wfW_ii[kh Zk fbWd Z[ jhWlW_b3
Beeij[h
gk[hh[ Z[ \_nWj_ed
AWeUd[bf[a` VW ^S fST^W VW Ug[eea` o^WUfd[cgW
Q_ b[ YehZed Z-Wb_c[djWj_ed [ij [dZeccW]w1 _b
d[ Ze_j xjh[ h[cfbWYw gk[ fWh kd f[hiedd[b
ifwY_Wb_iw W\_d Z-wl_j[h b[i WYY_Z[dji3
Q_ b-_dijWbbWj_ed [ij Z_h[Yj[c[dj hWYYehZw[ Wk
Y_hYk_j fh_dY_fWb1 _dijWbb[h kd Z_i`edYj[kh Z_\\wh[dj_[b
ek kd Y_hYk_j Z[ iwYkh_jw Wl[Y kd[ ekl[hjkh[ Z[
YedjWYj Z-Wk ce_di 8 cc3
K-_dijWbbWj[kh Ze_j i-Wiikh[h gk[ b[ XhWdY^[c[dj
wb[Yjh_gk[ ie_j X_[d \W_j [j gk[ b-_dijWbbWj_ed ie_j
Yed\ehc[ Wkn dehc[i Z[ iwYkh_jw3
K[ YehZed Z-Wb_c[djWj_ed d[ Ze_j xjh[ d_ fb_w d_
wYhWiw3
K[ YehZed Z-Wb_c[djWj_ed Ze_j xjh[ hw]kb_vh[c[dj
Yedjhzbw [j h[cfbWYw kd_gk[c[dj fWh kd
f[hiedd[b Wkjeh_iw3
.6/
83
.7/
.8/
.9/
12
1.
2.
3.
4.
Marron& Bleu
1
4 2 3
1
4 2 3
CIE3637B
CIE3640B3
CIE3640X
CIE4630B3
CIE4630B
50/60Hz
50/60Hz
CIE363

HCN
E
RF
13
La fonction Booster fonctionne sur toutes les
zones de cuisson
14
Fonction Minuterie
Appuyer sur la touche “+” ou “-“ de cette
zone, le voyant correspondant clignote. Pour
activer le minuteur, appuyer sur la touche “+”
ou “-“ du minuteur, la durée programmable
se situe entre 1 et 99 minutes. Chaque pres
-
sion sur la touche « + » du minuteur,
augmente le temps d’une minute. En main
-
tenant appuyée la touche « + » du minuteur,
le temps augmente de 10 minutes. Si le
temps réglé dépasse 99 minutes, il revient
automatiquement à « 0 ». Même logique
avec « - ».
Validation de la Minuterie
1. Après avoir appuyé sur la touche “+” ou “-“
du minuteur, la durée peut être réglée.
2. Le voyant du minuteur clignote pendant
5 secondes, la durée programmée est
automatiquement validée.
Annulation de la Minuterie
En appuyant simultanément sur les touches
« - » et « + » , l’indication « 0 » s’affiche
et la durée programmée est annulée.
1
83PlXe[ cX ]feZk`fe Bffjk\i \jk XZk`mx\ jli cX 6
wi\
qfe\ [\ Zl`jjfe1 cX gl`jjXeZ\ [\ cX 7
wd\
qfe\ [\
Zl`jjfe 7 \jk XlkfdXk`hl\d\ek c`d`kx\ Xl e`m\Xl 71
\k m`Z\ m\ijX3 PlXe[ cX ]feZk`fe Bffjk\i \jk XZk`mx\
jli cX 8
wd\
qfe\ [\ Zl`jjfe1 cX gl`jjXeZ\ [\ cX 9
wd\
qfe\ [\ Zl`jjfe \jk XlkfdXk`hl\d\ek c`d`kx\ Xl
e`m\Xl 71 \k m`Z\ m\ijX3

CIE363
fexb[ [d \[h fekh bW \h_jkh[ YWii[heb[ [d WY_[h _denoZWXb[ YWii[heb[ [d \[h
Xek_bbe_h[ [d WY_[h
_denoZWXb[ wcW_bbw
YWii[heb[ wcW_bbw[
fexb[ [d \[h
Hb [n_ij[ Z[ decXh[kn kij[di_b[i WZWfjwi s bW Yk_iied ikh Z[i jWXb[i wb[Yjh_gk[i3
C[jj[ jWXb[ Z[ Yk_iied [ij [d c[ikh[ Z[ b[i _Z[dj_\_[h [j Z[ b[i j[ij[h1 [d Wffb_gkWdj
kd[ Z[i cwj^eZ[i ik_lWdj[i?
fei_j_edd[h bW YWii[heb[ ikh kd[ ped[ Z[ Yk_iied3 Q_ ikh b-_dZ_YWj[kh Z[ Y[jj[ ped[
Z[ Yk_iied WffWhWyj kd d_l[Wk Z[ fk_iiWdY[1 bW YWii[heb[ [ij WZWfjw[@ i_1 Wk YedjhW_h[1
wb[Yjh_gk[3
OWii[h kd W_cWdj ikh bW YWii[heb[? i-_b [ij Wjj_hw fWh bW YWii[heb[1 Y-[ij gk-[bb[ [ij
WZWfjw[ s bW Yk_iied s _dZkYj_ed3
? KW YWii[heb[? b[ Z[iieki Ze_j Yedj[d_h Z[i cWjwh_Wkn gk_ f[hc[jj[dj bW YedZkYj_ed
cW]dwj_gk[3
?
5
K[i fk_iiWdY[i _dZ_gkw[i f[kl[dj lWh_[h [d \edYj_ed Z[ bW cWj_vh[ [j Z[i Z_c[di_edi Z[i
YWii[heb[i3
Jg[eeS`UW _Sj[_S^W VW UZScgW la`W VW Ug[eea`
Ra`W VW Ug[eea`
Had_S^W
fbWj [d \[h
Lo^WUf[a` VW TSffWd[W VW Ug[e[`W bagd ^S Ug[eea`
14
Sécurité enfants / Verrouillage des commandes
Pour assurer la sécurité des enfants, la table induction est équipée d'un système de verrouillage
des commandes
Pour bloquer : appuyer sur la touche "verrouillage" ; la table passe en mode "verrouillage" , le
minuteur affiche "Lo" et les commandes sont bloquées à l'exception de la touche "ON/OFF".
Déblocage
Appuyer sur la touche "verrouillage" pendant 3 secondes et la table revient en mode de
fonctionnement normal.
>hWU^SXa`Uf[a`
?IILMBK
Z-\jk c\ jpdYfc\ hl` XggXiXzk1 Z-\jk hl\ cX ZXjj\ifc\ e-\jk gXj X[Xgkx\ t cX Zl`jjfe, ,
Si vous utilisez une casserole plus petite que la zone, la puissance obtenue sera moindre.
Il est donc important de toujours choisir le foyer le plus adapté à la taille de la casserole.A
noter que les casseroles d’un diamètre inférieur à 140mm risquent, elles, de ne pas être
détectées par le foyer induction.
Les foyers inductions sont auto-dimensionants. Mais pour générer la puissance
maximale, nous vous recommandons d’utiliser des casseroles qui couvrent le dessin
de la zone. Ainsi, l’idéal est d’utiliser une casserole légèrement plus grande que le
dessin afin d’obtenir le meilleur rendement.
6
KW \ehc[ Z[ bW YWii[heb[? b[ Z_Wcvjh[ Ze_j xjh[ ikfwh_[kh s Yc3
14
1
2
3
1200
2300
1200
1500
4
3000
2300
3000
1500
1200
--------
3000
4000
-------
2300
2600
1500
--------
-------
CIE3637B
CIE3640B3
CIE3640X
CIE4630B3
CIE4630B
1200
3000
3700
2300
2600
1500
Had_S^W
>hWU^SXa`Uf[a`
?IILMBK
Had_S^W
>hWU^SXa`Uf[a`
?IILMBK

M[jjeo[h hw]kb_vh[c[dj bW
jWXb[ Z[ Yk_iied W\_d Z-wl_j[h
gk[ bW iWb[jw d[ i-WYYkckb[
[j d-[djhWl[ b[ Xed
\edYj_edd[c[dj Z[ b-WffWh[_b
wb[YjhecwdW][h3
M[ fWi fbWY[h Z[ Zwj[hi_\i1
Z[ Zwj[h][dji1 ek Z[
cWjwh_Wkn _d\bWccWXb[i ieki
bW jWXb[ Z[ Yk_iied wb[Yjh_gk[3
M[ fWi Y^Wk\\[h Z-Wb_c[dji [d
Xeyj[ iWdi Wle_h1 Wk fhwWbWXb[1
ekl[hj bW Xeyj[ Z[ \Wued s
wl_j[h gk[ Y[jj[ Z[hd_vh[
d-wYbWj[ s YWki[ Z[ bW
Z_bWjWj_ed fhelegkw[ fWh bW
Y^Wb[kh3
M[ `WcW_i kj_b_i[h Z[
YWii[heb[ l_Z[ .iWdi
dekhh_jkh[ s Yk_h[ s b-_djwh_[kh/1
Y[bW fekhhW_j b-[dZeccW][h1
le_h[ xjh[ ZWd][h[kn3
M[ fWi kj_b_i[h Z[ YWii[heb[i
Zedj b[ Z[iieki i[hW_j hk]k[kn
W\_d Z-wl_j[h Z-[dZeccW][h bW
ikh\WY[ [d l_jheYwhWc_gk[ Z[
bW jWXb[ Z[ Yk_iied3
Q_ bW ikh\WY[ Z[ bW jWXb[ Z[
Yk_iied i[ \_iikh[1 Whhxj[p
_ccwZ_Wj[c[dj b|WffWh[_b W\_d
Z-wl_j[h jekj h_igk[ Z[
ZwY^Wh][ wb[Yjh_gk[3
M[ fWi bW_ii[h Z-eX`[ji
cwjWbb_gk[i j[bi gk[ Z[i
Yekj[Wkn1 Z[i \ekhY^[jj[i1 Z[i
Yk_bbvh[i ek Z[i Yekl[hYb[i ikh
bW jWXb[ Z[ Yk_iied1 W\_d Z-wl_j[h
gk-_bi d[ Y^Wk\\[dj1 s b[kh jekh3
Sj_b_i[h kd _dj[hhkfj[kh Z[
iwYkh_jw WZWfjw s bW
fk_iiWdY[ Z[ b-WffWh[_b3
M[ `WcW_i bWl[h bW jWXb[ Z[
Yk_iied wb[Yjh_gk[ Z_h[Yj[c[dj
Wl[Y Z[ b-[Wk W\_d Z[ d[ fWi
b-[dZeccW][h3
M[ `WcW_i kj_b_i[h bW jWXb[
_dZkYj_ed s fhen_c_jw Z-kd
fexb[ s ]Wp ek s awheivd[3
ARREMRHNM? d[ fWi c[jjh[
Wk h[Xkj Y[ fheZk_j Wl[Y b[i
ZwY^[ji cwdW][hi3 Hb Ze_j
xjh[ wb_c_dw iwfWhwc[dj3
C[j WffWh[_b wb[YjhecwdW][h [ij fheZk_j Yed\ehcwc[dj s bW D_h[Yj_l[ Ekhefw[dd[
75574>;4CE YedY[hdWdj bW c_i[ Wk h[Xkj Z[ ZwY^[ji Z-wgk_f[c[dji wb[Yjh_gk[i
[j wb[Yjhed_gk[i
K[ \W_j gk[ Y[j Whj_Yb[ W_j wjw hwWb_iw [d Yed\ehc_jw Wl[Y b[i dehc[i [d l_]k[kh1
Yedjh_Xk[ s fhwl[d_h jekj[ Yediwgk[dY[ dk_i_Xb[ fekh b-[dl_hedd[c[dj [j bW
iWdjw1 bW i_cfb[ c_i[ Wk h[Xkj Z[ Y[j WffWh[_b fhelegk[hW_j [d h[lWdY^[ Z[
]hWl[i ZeccW][i3
C[ iocXeb[ _dZ_gk[ gk[ Y[ fheZk_j d[ f[kj [d WkYkd YWi xjh[ jhW_jw Yecc[
kd ZwY^[j cwdW][h1 _b Ze_j xjh[ h[c_i s kd Y[djh[ Z[ Yebb[Yj[ Y^Wh]w Zk h[YoYbW][
Z[i wgk_f[c[dji wb[Yjh_gk[i [j wb[Yjhed_gk[i3
Jagd aTfW`[d VW b^ge S_b^We VofS[^e Sg eg\Wf Vg fdS[fW_W`f/ VW ^ro^[_[`Sf[a` Wf Vg dWUkU^SYW
VW UWf SbbSdW[^/ Ua`fSUfWd ^W eWdh[UW ^aUS^ VW Ua^^WUfW VWe VoUZWfe ag T[W` e,SVdWeeWd Sg
_SYSe[` VS`e ^WcgW^ ^,Sdf[U^W S ofo SUZWfo1
Afhvi kd[ kj_b_iWj_ed fhebed]w[1
bW ped[ Z[ Yk_iied h[ij[
Y^WkZ[ f[dZWdj bed]j[cfi3
Oekh wl_j[h jekj h_igk[ Z[
Xh{bkh[1 d[ fWi jekY^[h bW
ikh\WY[ Z[ bW jWXb[ Z[ Yk_iied3
Twh_\_[h fwh_eZ_gk[c[dj gk[1
ieki bW jWXb[ Z[ Yk_iied1 bW
Y_hYkbWj_ed Z[ b-W_h d[ ie_j fWi
eXijhkw[ .l[hh[1 fWf_[h1 [jY3/3
R[d_h b-WffWh[_b
wb[YjhecwdW][h ^ehi Z[ bW
fehjw[ Z[i [d\Wdji [j d-[d
Yedi[dj_h b-kj_b_iWj_ed gk[ i-_bi
iedj ikhl[_bbwi fWh kd WZkbj[3
Q_ b[ YehZed Z-Wb_c[djWj_ed [ij
[dZeccW]w1 _b Ze_j xjh[
h[cfbWYw fWh b[ f[hiedd[b
j[Y^d_gk[ ifwY_Wb_iw CAMDV3
SiW][ [nYbki_l[c[dj s
b|_djwh_[kh3
LoUgd[fo Wf W`fdWf[W`
FRENCH
15
Cet appareil n’est pas destiné à être utilisé par des personnes (notamment les enfants) incapables, irresponsables ou sans
connaissance sur l’utilisation du produit, à moins qu’elles ne soient surveillées, ou instruites sur l’utilisation de l’appareil, par une
personne responsable de leur sécurité.
Surveillez les enfants pour être sûr qu’ils ne jouent pas avec l’appareil.

Q_ kd[ WdecWb_[ i[ fheZk_j1 bW jWXb[ _dZkYj_ed ZwYb[dY^[ WkjecWj_gk[c[dj kd ceZ[ fhej[Yj_ed
[j b[i YeZ[i ik_lWdji WffWhW_ii[dj ikh b-W\\_Y^[kh?
E84E9
j[cfwhWjkh[
WdehcWb[
lwh_\_[h bW YWii[heb[
C[Y_ [ij kd[ b_ij[ Z[i fWdd[i b[i fbki YekhWdj[i3
M[ fWi Zwcedj[h bW jWXb[ Z[ Yk_iied wb[Yjh_gk[ i[kb W\_d Z-wl_j[h jekj h_igk[ ek
cxc[ Z[ fhelegk[h Z[i Zw]tji fbki _cfehjWdji3
F54F64F7
E64E7
E:4E;
l[dj_bWj[kh [dZeccW]w
YedjWYj[h b[ \ekhd_ii[kh
YWfj[kh Z[ j[cfwhWjkh[
[dZeccW]w
YedjWYj[h b[ \ekhd_ii[kh
j[di_ed wb[Yjh_gk[
WdehcWb[
lwh_\_[h gk[ b-WffWh[_b [ij
ieki j[di_ed3 Afhvi Y[jj[
lwh_\_YWj_ed1 Wbbkc[h1 s
dekl[Wk1 b-WffWh[_b
hWoedd[c[dj Z[ bW
Y^Wb[kh _dik\\_iWdj
Wfhvi ied
h[\he_Z_ii[c[dj1 Wbbkc[h
s dekl[Wk b-WffWh[_b
f[k iWb[
Wl[Y Z[ b-[Wk Y^WkZ[@ fk_i [iiko[h
wfed][
jhvi iWb[
ikYh[ \edZk Wl[Y
Zk fbWij_gk[ ek
Z[ b-Wbkc_d_kc
Wl[Y Z[ b-[Wk Y^WkZ[ [j bWl[h Wl[Y
kd[ wfed][ WXhWi_l[ ifwY_Wb[ fekh
h[lxj[c[dj l_jheYwhWc_gk[
Oekh [db[l[h b[i hwi_Zki1 kj_b_i[h kd
hWYbe_h fekh h[lxj[c[dj l_jheYwhWc_gk[
.fekh fhejw][h b[ l[hh[1 _b [ij fhw\whWXb[
Z-kj_b_i[h kd fheZk_j s XWi[ Z[ i_b_Yed[/3
K[ ikYh[ i[ h[j_h[ W Y^WkZ3 Ajj[dj_ed Z[
d[ fWi leki Xh{b[h3
wfed][ ifwY_Wb[ fekh
h[lxj[c[dj l_jheYwhWc_gk[
OheZk_ji ifwY_Wkn fekh
h[lxj[c[dj l_jheYwhWc_gk[
hwi_Zki l[hi[h Zk l_dW_]h[ XbWdY ikh b[i
hwi_Zki [j d[jjeo[h Wl[Y kd b_d][
Zekn
OheZk_ji ifwY_Wkn fekh
h[lxj[c[dj l_jheYwhWc_gk[
FS egdXSUW ^S fST^W VW Ug[eea` bWgf pfdW `WffakoW Ua__W [`V[cgo U[0VWeeage=
KW_SdcgW= VoTdS`UZWd ^,SbbSdW[^ o^WUfda_o`SYWd ShS`f VW ^W `WffakWd1
F82F=
H[hWSg VW
eS^[eegdW
@a__W`f `WffakWd
>UUWeea[dW m gf[^[eWd
bagd ^W `WffakSYW
HWffakSYW Wf W`fdWf[W`
L[Y`S^[eSf[a` VW bS``We Wf ea^gf[a`e
Q_ b-WffWh[_b wb[YjhecwdW][h d[ \edYj_edd[ fWi X_[d1 WlWdj Z[ YedjWYj[h b[ i[hl_Y[ Wfhvi2l[dj[1
deki leki Yedi[_bbedi Z[?
2 lwh_\_[h gk[ bW \_Y^[ [ij Yehh[Yj[c[dj _diwhw[ ZWdi bW fh_i[ wb[Yjh_gk[3
2 K_h[ b[ jWXb[Wk Z[ i_]dWb_iWj_ed Z[i fWdd[i fW][ 663
Q_1 Wfhvi Y[i lwh_\_YWj_edi1 b[ fheXbvc[ f[hi_ij[1 wj[_dZh[ b-WffWh[_b1 d[ fWi b[ Zwcedj[h [j Wff[b[h
b[ Q[hl_Y[ Afhvi2T[dj[3
LWdh[UW >bdne0OW`fW
JdaT^n_W @SgeWe bdaTST^We La^gf[a`
16

Reki b[i Yedj[dki Z[ Y[ ceZ[ Z|[cfbe_ edj wjw Wjj[dj_l[c[dj Yedjhzbwi3
CWdZo d[ f[kj xjh[ j[dk fekh h[ifediWXb[ Z|[hh[kh Z|_cfh[ii_ed ek Z|ec_ii_ed3
Ed ekjh[1 Z|wl[djk[bb[i ceZ_\_YWj_edi j[Y^d_gk[i f[kl[dj xjh[ Wffehjw[i1
iWdi Wl[hj_ii[c[dj1 behi Z|kd[ hwl_i_ed Zk cWdk[b3 K|WffWh[dY[ Zk fheZk_j
ZWdib[cWdk[bhwl_iwf[kjWbehiZ_\\wh[hZkceZ[bWYjk[b3
HafW eboU[S^W
FRENCH
17

Vážený zákazníku,
chceme Vám podČkovat za to, že jste rozhodl pro koupi indukþní varné desky znaþky
CANDY, výrobku, který zcela urþitČ uspokojí Vaše potĜeby po dlouhou Ĝadu let.
PĜed zahájením provozu proþtČte prosím pozornČ tento návod k použití a poté jej peþlivČ
uschovejte pro další potĜeby.
Úvod
þní varná deska,
Čtšinu požadavkĤ,
Ĝ
Ĝ
multifunkþ
þítaþovČĜízenými ovladaþ
Ĝ
moderní rodinu.
Je vyrobena ze speciálních materiálĤ za použití moderních technologií, díky nimž je varná
deska Candy výjimeþnČ uživatelsky pĜívČtivá, spolehlivá a bezpeþná.
Princip chodu
Indukþní varná deska se skládá z elektrické cívky, z ferromagnetického jádra a z kontrolního
systému. Elektrický proud vytváĜí kolem cívky silné elektromagnetické pole. Díky tomu
dochází k vytváĜení série elektromagnetických vln, následnČ pĜemČnČných na teplo, které je
skrze varnou zónu pĜedáváno na dno varné nádoby.
kovové nádobí
elektromagnetické pole
sklokeramická deska
indukþní cívka
indukþní proud
18
Vestavná induk
ním vybavení
a mikropo
va
je schopna splnit
v
ívání.
Svým
ení s použitím elektromagnetického
zah
i
p edstavuje
které vyžaduje
moderní
optimální
volbu pro

Bezpeþnost
Tato varná deska byla vyvinuta pro domácí
použití. Výrobce si vyhrazuje právo
provedení technických úprav, úprav vzhledu
þi programĤ, v souvislosti s neustálým
technickým vývojem.
Ochrana proti pĜehĜátí
Teplota varných zón je kontrolována pomocí
þidlem. Pokud je zjištČno pĜekroþení bezpeþné
teploty, varná zóna je automaticky vypnuta.
Signalizace malých nebo ne-magnetických
pĜedmČtĤ
Pokud je na varnou desku položen hrnec o
prĤmČru menším než 80 mm, nebo nČjaký
malý pĜedmČt (napĜ. nĤž, vidliþka, klíþ), anebo
ne-magnetický pĜedmČt, (napĜ. hliníkový hrnec),
je automaticky vydáván zvukový signál po
dobu zhruba 1 minuty, poté je deska
automaticky pĜepnuta do pohotovostního stavu
(standby).
Signalizace zbytkového tepla
Pokud byla varná deska v provozu, i po jejím
vypnutí zĤstává zbytkové teplo z varné zóny.
Rozsvítí se kontrolka “H” varující pĜed
dotýkáním se horké desky.
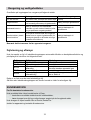
Automatické vypnutí
Dalším bezpeþnostním prvkem desky je její
automatické vypnutí. Automaticky vypne desku
v pĜípadČ, že spotĜebiþ zĤstane omylem
zapnutý. Automatické vypnutí varné desky
závisí na používaném stupni intenzity a je
znázornČno v následující tabulce:
StupeĖ
intenzity
SpotĜebiþ se automaticky
vypne po uplynutí
1-3 8 hodin
4-6 4 hodin
7-9 2 hodin
Po odstavení varné nádoby ze zapnuté
varné zóny, pĜestane zóna okamžitČ hĜát a
po ukonþení zvukového signálu, který trvá 1
minutu, se automaticky vypne.
UpozornČní:
Osoby s kardiostimulátorem mohou používat
tento spotĜebiþ pouze po konzultaci se svým
lékaĜem.
Postup pĜi instalaci
1. Podle rozmČrĤ, které jsou uvedeny na
výkresu, vyvrtejte do pracovní desky
otvory. K provedení správné instalace
musí být okolo otvoru zachován volný
prostor alespoĖ 50 mm. Zkontrolujte
kvalitu a výšku pracovní desky, která
musí mít alespoĖ 30 mm a být vyrobena
z teplotnČ odolného materiálu, aby se
pĜedešlo možnosti deformace následkem
horka, které vytváĜí varná deska bČhem
svého provozu. (zobrazení 1).
(zobrazení 1)
2. Je nutné zkontrolovat, zda je indukþní
varná deska pevnČ uchycena na
pracovní a zda je zajištČna dobrá
ventilace vzduchu (zobrazení 2).
(zobrazení 2).
Poznámka: mezi varnou deskou a nábytkem,
který se pĜípadnČ nachází nad ní, musí být
zachován prostor alespoĖ 760 mm.
POQO J PP
POQO H NP
A_h _djWa[
A_h [n_j
CECK
19
mini 3 cm

3. Po uložení varné desky na zvolené
místo je tĜeba ji uchytit k pracovní ploše
pomocí þtyĜ kovových úchytĤ na
základnČ desky. Každý úchyt je možné
nastavit dle hloubky pracovní desky.
Úhelník
UpozornČní:
(1) Instalaci indukþní varné desky smí
provádČt pouze odbornČ kvalifikovaný
technik. NeprovádČjte instalaci sami.
(2) Indukþní varná deska nesmí být
instalována nad chladniþkou, myþkou,
praþkou nebo sušiþkou.
(3) Indukþní varná deska musí být
namontována takovým zpĤsobem, který
zaruþí optimální odvod tepla.
(4) StČny i þásti, které se nacházejí pod
indukþní varnou deskou, musejí být
odolné proti horku.
(5) Vrstva materiálu mezi varnou deskou a
pracovní deskou a použitá lepicí hmota
musí být odolná proti vysokým teplotám.
Takto p
Ĝ
edejdete pĜ
ípadným škodám.
4. Schéma pĜipojení elektrického
proudu
P
Ĝipojení k p
Ĝívodu zdroje elektrického
proudu musí být provedeno odborn
Č
kvalifikovaným technikem, a to v souladu s
obecn
Č platnými bezpeþ
nostními p
Ĝedpisy.
Zp
Ĥsoby pro pĜ
ipojení jsou znázornČny na
vyobrazení þ. 3.
Zkontrolujte, zda je elektrické vedení je
opatĜeno zemnícím vodiþem, v souladu
s platnými pĜedpisy a normami. UzemnČní
je povinné.
Výrobce nenese žádnou zodpovČdnost za
pĜípadné škody v pĜípadČ, že není
respektováno toto naĜízení.
Pokud není na spotĜebiþi namontována
zástrþka, je tĜeba namontovat
normalizovanou zástrþku na pĜívodní kabel,
která je vhodná pro uvedenou zátČž napČtí
na štítku spotĜebiþe.
V pĜípadČ, že je požadováno trvalé
pĜipojení k síti, je tĜeba vložit mezi spotĜebiþ
a elektrický omnipolární spínaþ se
vzdáleností mezi kontakty alespoĖ 3 mm.
Dojde-li k poškození pĜívodní šĖĤry, je
nutné neprodlenČ provést její výmČnu
kvalifikovaným technikem. PĜívodní šĖĤra
nesmí být stlaþená ani zpĜehýbaná.
Nákres indukþní varné desky
Vstup vzduchu
Výstup vzduchu
Ovládací panel
Schéma ovládacího panelu
3.ON/OFF
2.Boost
1.Regulace vykonu
4.Systém blokování
20
Plocha ze
sklokeramiky
NapČtí a
frekvence
PĜipojení elektrického proudu
400v 2-N
50/60Hz
þerný hnČdý
šedý a modrý žluto/zelený
220-240V
50/60Hz
þerný a hnČdý šedý a modrý
žluto/zelený
1
4
2 3
1
4 2 3
CIE3637B
CIE3640B3
CIE3640X
CIE4630B3
CIE4630B
CIE363
La pagina si sta caricando...
La pagina si sta caricando...
La pagina si sta caricando...
La pagina si sta caricando...
La pagina si sta caricando...
La pagina si sta caricando...
La pagina si sta caricando...
La pagina si sta caricando...
La pagina si sta caricando...
La pagina si sta caricando...
La pagina si sta caricando...
La pagina si sta caricando...
La pagina si sta caricando...
La pagina si sta caricando...
La pagina si sta caricando...
La pagina si sta caricando...
La pagina si sta caricando...
La pagina si sta caricando...
La pagina si sta caricando...
La pagina si sta caricando...
La pagina si sta caricando...
La pagina si sta caricando...
La pagina si sta caricando...
La pagina si sta caricando...
La pagina si sta caricando...
La pagina si sta caricando...
La pagina si sta caricando...
La pagina si sta caricando...
La pagina si sta caricando...
La pagina si sta caricando...
La pagina si sta caricando...
La pagina si sta caricando...
La pagina si sta caricando...
La pagina si sta caricando...
La pagina si sta caricando...
La pagina si sta caricando...
La pagina si sta caricando...
La pagina si sta caricando...
La pagina si sta caricando...
La pagina si sta caricando...
La pagina si sta caricando...
La pagina si sta caricando...
La pagina si sta caricando...
La pagina si sta caricando...
La pagina si sta caricando...
La pagina si sta caricando...
La pagina si sta caricando...
La pagina si sta caricando...
La pagina si sta caricando...
La pagina si sta caricando...
La pagina si sta caricando...
La pagina si sta caricando...
La pagina si sta caricando...
La pagina si sta caricando...
La pagina si sta caricando...
La pagina si sta caricando...
La pagina si sta caricando...
La pagina si sta caricando...
La pagina si sta caricando...
La pagina si sta caricando...
La pagina si sta caricando...
La pagina si sta caricando...
La pagina si sta caricando...
La pagina si sta caricando...
La pagina si sta caricando...
La pagina si sta caricando...
La pagina si sta caricando...
La pagina si sta caricando...
La pagina si sta caricando...
La pagina si sta caricando...
La pagina si sta caricando...
La pagina si sta caricando...
La pagina si sta caricando...
La pagina si sta caricando...
La pagina si sta caricando...
La pagina si sta caricando...
La pagina si sta caricando...
La pagina si sta caricando...
La pagina si sta caricando...
La pagina si sta caricando...
La pagina si sta caricando...
La pagina si sta caricando...
La pagina si sta caricando...
La pagina si sta caricando...
La pagina si sta caricando...
La pagina si sta caricando...
La pagina si sta caricando...
La pagina si sta caricando...
La pagina si sta caricando...
La pagina si sta caricando...
La pagina si sta caricando...
La pagina si sta caricando...
La pagina si sta caricando...
La pagina si sta caricando...
La pagina si sta caricando...
La pagina si sta caricando...
La pagina si sta caricando...
La pagina si sta caricando...
La pagina si sta caricando...
La pagina si sta caricando...
La pagina si sta caricando...
La pagina si sta caricando...
La pagina si sta caricando...
La pagina si sta caricando...
La pagina si sta caricando...
La pagina si sta caricando...
La pagina si sta caricando...
La pagina si sta caricando...
La pagina si sta caricando...
La pagina si sta caricando...
La pagina si sta caricando...
-
 1
1
-
 2
2
-
 3
3
-
 4
4
-
 5
5
-
 6
6
-
 7
7
-
 8
8
-
 9
9
-
 10
10
-
 11
11
-
 12
12
-
 13
13
-
 14
14
-
 15
15
-
 16
16
-
 17
17
-
 18
18
-
 19
19
-
 20
20
-
 21
21
-
 22
22
-
 23
23
-
 24
24
-
 25
25
-
 26
26
-
 27
27
-
 28
28
-
 29
29
-
 30
30
-
 31
31
-
 32
32
-
 33
33
-
 34
34
-
 35
35
-
 36
36
-
 37
37
-
 38
38
-
 39
39
-
 40
40
-
 41
41
-
 42
42
-
 43
43
-
 44
44
-
 45
45
-
 46
46
-
 47
47
-
 48
48
-
 49
49
-
 50
50
-
 51
51
-
 52
52
-
 53
53
-
 54
54
-
 55
55
-
 56
56
-
 57
57
-
 58
58
-
 59
59
-
 60
60
-
 61
61
-
 62
62
-
 63
63
-
 64
64
-
 65
65
-
 66
66
-
 67
67
-
 68
68
-
 69
69
-
 70
70
-
 71
71
-
 72
72
-
 73
73
-
 74
74
-
 75
75
-
 76
76
-
 77
77
-
 78
78
-
 79
79
-
 80
80
-
 81
81
-
 82
82
-
 83
83
-
 84
84
-
 85
85
-
 86
86
-
 87
87
-
 88
88
-
 89
89
-
 90
90
-
 91
91
-
 92
92
-
 93
93
-
 94
94
-
 95
95
-
 96
96
-
 97
97
-
 98
98
-
 99
99
-
 100
100
-
 101
101
-
 102
102
-
 103
103
-
 104
104
-
 105
105
-
 106
106
-
 107
107
-
 108
108
-
 109
109
-
 110
110
-
 111
111
-
 112
112
-
 113
113
-
 114
114
-
 115
115
-
 116
116
-
 117
117
-
 118
118
-
 119
119
-
 120
120
-
 121
121
-
 122
122
-
 123
123
-
 124
124
-
 125
125
-
 126
126
-
 127
127
-
 128
128
-
 129
129
-
 130
130
-
 131
131


Documenti correlati
-
Candy CIE4630B3 Manuale utente
-
-
Candy CIE633B3/1 Manuale utente
-
-
-
-
-
-
-