Dell LCD TV W3706C Manuale del proprietario
- Categoria
- TV LCD
- Tipo
- Manuale del proprietario

www.dell.com | support.dell.com
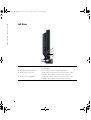
Dell™ LCD TV
Owner’s Manual
Model W3202MC and W3706MC
W3202 3706MC_EMEA_e0.book Page 1 Sunday, October 2, 2005 6:06 PM

Notes, Notices, and Cautions
NOTE: A NOTE indicates important information that helps you make better use of your TV.
NOTICE: A NOTICE indicates either potential damage to hardware or loss of data and tells you how to avoid the
problem.
CAUTION: A CAUTION indicates a potential for property damage, personal injury, or death.
____________________
Information in this document is subject to change without notice.
© 2005 Dell Inc. All rights reserved.
Reproduction in any manner whatsoever without the written permission of Dell Inc. is strictly forbidden.
Trademarks used in this text: Dell, the DELL logo, Dimension, OptiPlex, Inspiron, Latitude, Dell Precision, DellNet, TrueMobile, PowerApp,
PowerEdge, PowerConnect, and PowerVault are trademarks of Dell, Inc.; TruSurround XT, SRS, and symbol are trademarks
of SRS Labs, Inc. EMC is a registered trademark of EMC Corporation.
Other trademarks and trade names may be used in this document to refer to either the entities claiming the marks and names or their products.
Dell Inc. disclaims any proprietary interest in trademarks and trade names other than its own.
August 2005 Rev. A00
W3202 3706MC_EMEA_e0.book Page 2 Sunday, October 2, 2005 6:06 PM

Contents 3
Contents
1 About Your TV
Front View . . . . . . . . . . . . . . . . . . . . . . . . . . . . . . . . . . . . . . . . . . . . . . 5
Left View
. . . . . . . . . . . . . . . . . . . . . . . . . . . . . . . . . . . . . . . . . . . . . . . 6
Bottom View
. . . . . . . . . . . . . . . . . . . . . . . . . . . . . . . . . . . . . . . . . . . . 7
Package Contents
. . . . . . . . . . . . . . . . . . . . . . . . . . . . . . . . . . . . . . . . . 8
Caring for Your TV
. . . . . . . . . . . . . . . . . . . . . . . . . . . . . . . . . . . . . . . . . 10
2 Setting Up Your TV
Proper Location for Your TV . . . . . . . . . . . . . . . . . . . . . . . . . . . . . . . . . . 11
Connecting Your TV
. . . . . . . . . . . . . . . . . . . . . . . . . . . . . . . . . . . . . . . . 12
Connecting Your Speakers
. . . . . . . . . . . . . . . . . . . . . . . . . . . . . . . . . . . 19
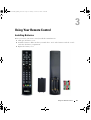
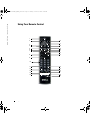
3 Using Your Remote Control
Installing Batteries . . . . . . . . . . . . . . . . . . . . . . . . . . . . . . . . . . . . . . . . 23
Using Your Remote Control
. . . . . . . . . . . . . . . . . . . . . . . . . . . . . . . . . . . 24
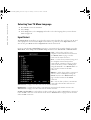
Using Your TV With a Universal or Learning Remote Control
. . . . . . . . . . . . . 26
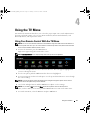
4 Using the TV Menu
Using Your Remote Control With the TV Menu . . . . . . . . . . . . . . . . . . . . . . 27
Selecting Your TV Menu Language
. . . . . . . . . . . . . . . . . . . . . . . . . . . . . . 28
Input Select
. . . . . . . . . . . . . . . . . . . . . . . . . . . . . . . . . . . . . . . . . . . . . 28
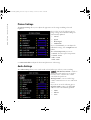
Picture Settings
. . . . . . . . . . . . . . . . . . . . . . . . . . . . . . . . . . . . . . . . . . 30
Audio Settings
. . . . . . . . . . . . . . . . . . . . . . . . . . . . . . . . . . . . . . . . . . . 30
PIP/POP/PBP
. . . . . . . . . . . . . . . . . . . . . . . . . . . . . . . . . . . . . . . . . . . . 31
W3202 3706MC_EMEA_e0.book Page 3 Sunday, October 2, 2005 6:06 PM

4 Contents
Size . . . . . . . . . . . . . . . . . . . . . . . . . . . . . . . . . . . . . . . . . . . . . . . . . . 32
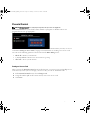
Parental Control
. . . . . . . . . . . . . . . . . . . . . . . . . . . . . . . . . . . . . . . . . . 33
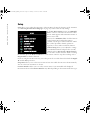
Setup
. . . . . . . . . . . . . . . . . . . . . . . . . . . . . . . . . . . . . . . . . . . . . . . . . 34
5 Troubleshooting Your TV
Troubleshooting Tips . . . . . . . . . . . . . . . . . . . . . . . . . . . . . . . . . . . . . . . 35
General Problems
. . . . . . . . . . . . . . . . . . . . . . . . . . . . . . . . . . . . . . . . . 36
TV Menu Messages
. . . . . . . . . . . . . . . . . . . . . . . . . . . . . . . . . . . . . . . . 40
Remote Control Problems
. . . . . . . . . . . . . . . . . . . . . . . . . . . . . . . . . . . . 40
Using the Self-Test Feature when Connected to a Computer
. . . . . . . . . . . . . 41
Problems When Using the TV as a Monitor
. . . . . . . . . . . . . . . . . . . . . . . . 41
6 Specifications for Your TV
Contacting Dell . . . . . . . . . . . . . . . . . . . . . . . . . . . . . . . . . . . . . . . . . . 47
Index. . . . . . . . . . . . . . . . . . . . . . . . . . . . . . . . . . . . . . . . . . . . . . . . . . . 65
W3202 3706MC_EMEA_e0.book Page 4 Sunday, October 2, 2005 6:06 PM

About Your TV 5
1
About Your TV
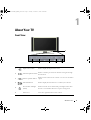
Front View
1 Input Source button Push to display the Input Select menu
2
Channel up/down button
Push to select the previous/next channel or navigate through
the TV Menu
3
Volume up/down button
Push to increase/decrease the volume or to select an TV Menu
option
4 Menu/OK button Push to display the TV Menu or to confirm your selection
5
Power button and light
(LED)
Push to turn the TV on and off The power light is blue when
the TV is on and amber when it is in power saving mode
6
IR receiver Senses the signal from the remote control
6
12
3
45
W3202 3706MC_EMEA_e0.book Page 5 Sunday, October 2, 2005 6:06 PM

6 About Your TV
www.dell.com | support.dell.com
Left View
1 S-Video connector Connect devices such as a video game system, a digital camera,
or a DVD player
2 Composite video connector Connect devices such as a VCR or DVD player
3 Audio connector (Left) Use this connector if you have connected a device to the
composite video connector or the S-Video connector
4 Audio connector (Right) Use this connector if you have connected a device to the
composite video connector or the S-Video connector
1
2
3
4
W3202 3706MC_EMEA_e0.book Page 6 Sunday, October 2, 2005 6:06 PM

About Your TV 7
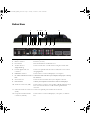
Bottom View
1 TV Speaker out connectors Connect speakers
2 RS232 connector For factory use only
3 CI Card slot Insert CI module for conditional access
4 TV IN connector
(Digital/Analog)
Connect an antenna or a cable TV box using the coaxial cable
5 Coaxial digital audio out
connector
Connect an optional audio decoder or audio/video receiver when
using Digital TV
6 HDMI IN connector Connect devices such as a DVD player or set-top box
7 PC Audio connector for VGA or
DVI
Connect the audio cable from your computer, DVD player or Set-top
box to the TV
8 VGA connector Connect to the VGA cable from your computer to the TV
9 DVI connector Connect your computer or video devices such as a DVD player
10 Audio-out connectors (L/R) Connect devices such as a stereo speaker or Hi-Fi equipment if you
have connected an antenna or cable TV through the TV IN
connector
11 Subwoofer audio out connector
(SUB)
Connect an optional powered subwoofer to the TV
12 Component audio and video
connectors (AV3 IN)
Connect devices such as a DVD player, set-top box, or cable TV
box
1 25467912
810
14 15
11 13 173
16
W3202 3706MC_EMEA_e0.book Page 7 Sunday, October 2, 2005 6:06 PM

8 About Your TV
www.dell.com | support.dell.com
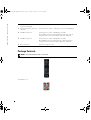
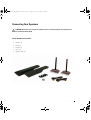
Package Contents
NOTE: If you need additional cables, contact Dell.
13 Composite video and audio
connectors (AV1 IN)
Connect devices such as a VCR or DVD player
14 S-Video and audio connectors
(AV2 IN)
Connect devices such as a video game system or a DVD player
15 SCART 1 connector Connect devices such as a DVD player or VCR.
The SCART connector supports RGB in, composite video in,
composite video out, stereo audio in and stereo audio out.
16 SCART 2 connector Connect devices such as a DVD player or VCR.
The SCART connector supports Y/C in, composite video in,
composite video out, stereo audio in and stereo audio out.
17 Power connector Connect your power cord
Remote control
AAA batteries (3)
W3202 3706MC_EMEA_e0.book Page 8 Sunday, October 2, 2005 6:06 PM

About Your TV 9
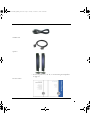
Antenna (coaxial) cable
SCART cable
Speakers
*
To connect speakers to your TV, see "
Connecting Your Speakers"
on page 19
.
Documentation
W3202 3706MC_EMEA_e0.book Page 9 Sunday, October 2, 2005 6:06 PM

10 About Your TV
www.dell.com | support.dell.com
Caring for Your TV
CAUTION: Only a licensed technician should service the TV. Do not disassemble the TV.
CAUTION: Before cleaning the TV, unplug it from the electrical outlet.
• To clean the surface of the panel, lightly dampen a soft, clean, lint-free cloth with water.
• To clean the TV cabinet, use a cloth lightly dampened with a mild detergent.
• Do not use chemicals such as benzene, thinner, ammonia, or any type of abrasive cleaner.
• Do not use compressed air to clean the TV.
W3202 3706MC_EMEA_e0.book Page 10 Sunday, October 2, 2005 6:06 PM

Setting Up Your TV 11
2
Setting Up Your TV
CAUTION: Before you begin any of the setup procedures described in this section, follow the basic
safety instructions located in the
Product Information Guide
.
Proper Location for Your TV
Consider the following environmental factors when you are deciding where to put your TV:
• Ensure you allow adequate ventilation.
• Do not store or use the TV in locations that are exposed to high heat, high humidity, dusty
environment, direct sunlight, or extreme cold.
• Avoid moving the TV between locations with extreme temperature differences. For more
information, see
Specifications
on page 43.
• Do not subject the TV to severe vibration or high impact conditions. Do not place the TV
inside a car trunk.
• Do not place the TV in a location where water or other liquids could spill on or into the TV.
W3202 3706MC_EMEA_e0.book Page 11 Sunday, October 2, 2005 6:06 PM

12 Setting Up Your TV
www.dell.com | support.dell.com
Connecting Your TV
The tables below provide a description of the connectors on your TV to help you decide which
connectors to use for your various video devices.
NOTE: Before you connect your TV , ensure you have all the proper cables. Some cables may come with
the device you are connecting. For a list of cables that came with your TV, see Package Contents on
page 8. To order additional cables, contact Dell.
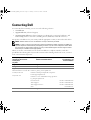
Connecting Your Cable TV Box or Antenna
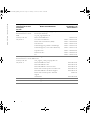
Connecting Your Video Devices
Quality Cable and Connector When to Use
Good Coaxial cable / TV IN Coaxial (RF) cable carries the analog/digital
video and audio signal from the antenna or
cable connector to your TV. The coaxial
connector is labeled TV IN (Digital/Analog).
To locate the TV IN connector, see "Bottom
View" on page 7.
Quality Cable and Connector When to Use
Good Composite cable / AV1 IN (Bottom)
Video, Left, Right (Left)
The composite connector carries the video
signal through a single pin. If you are using a
composite video connector, you also need to
connect composite audio cables. To locate the
composite connectors, see "Left View" on
page 6 and "Bottom View" on page 7.
W3202 3706MC_EMEA_e0.book Page 12 Sunday, October 2, 2005 6:06 PM

Setting Up Your TV 13
Better S-Video cable / AV2 IN (Bottom)
S-Video, Left, Right (Left)
The S-Video connector splits the video signal
into two signals, black-and-white and color. If
you are using the S-Video connector, you also
need to connect the audio cables. To locate the
S-Video connectors, see "Left View" on page 6
and "Bottom View" on page 7.
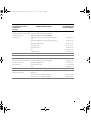
Best Component (YPbPr) cable / AV3 IN The component connectors split the video
signal into three signals, two color and one
black-and-white. If you are using the
component connectors, you also need to
connect the audio cables. To locate the
component connectors, see "Bottom View" on
page 7.
Excellent HDMI cable / HDMI IN HDMI (High Definition Multimedia Interface)
assures that the best video signal is always sent
from source (HDTV signal, DVD player) to the
TV. This is achieved by allowing uncompressed
video and multi-channel audio data to be sent
to the display device through a single cable. To
locate the connector, see "Bottom View" on
page 7.
Quality Cable and Connector When to Use
W3202 3706MC_EMEA_e0.book Page 13 Sunday, October 2, 2005 6:06 PM

14 Setting Up Your TV
www.dell.com | support.dell.com
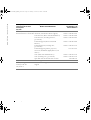
Using the TV IN Connector (Coaxial)
1
Turn off the TV and unplug the power cord.
2
Connect the coaxial cable to the TV IN connector on the TV.
3
Plug in the power cord for the TV and turn on the TV.
4
Enter the TV Menu and select
TV
or
Digital TV
. See "
Input Select
" on page 28 for more
information.
Using the Composite Connector
1
Turn off the TV and unplug the power cord.
NOTE: If you are connecting a device that you want to be able to remove, such as a video game system
or a camcorder, use the composite connector on the left side of the TV (see "Left View" on page 6).
2
Connect your device to the TV using the audio and video cable.
3
Plug in the power cords for the TV and devices and turn them on.
4
Enter the TV Menu and select
AV1 (Composite 1)
or
AV4
(Composite 2)
. See "
Input Select
"
on page 28 for more information.
W3202 3706MC_EMEA_e0.book Page 14 Sunday, October 2, 2005 6:06 PM

Setting Up Your TV 15
Using the S-Video Connector
1
Turn off the TV and unplug the power cord.
NOTE: If you are connecting a device that you want to be able to remove, such as a video game system,
or a camera, use the S-Video connector on the left side of the TV (see "Left View" on page 6).
2
Connect your device using the S-Video and audio cables.
3
Plug in the power cords for the TV and devices and turn them on.
4
Enter the TV Menu and select
AV2 (S-Video 1)
or
AV5
(S-Video 2)
. See "
Input Select
" on
page 28 for more information.
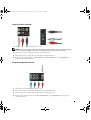
Using the Component Connectors
1
Turn off the TV and unplug the power cord.
2
Connect your device using the component video and audio cables.
3
Plug in the power cords for the TV and devices and turn them on.
4
Enter the TV Menu and select the
AV3 (Component)
. See "
Input
Select
" on page 28 for
more information.
W3202 3706MC_EMEA_e0.book Page 15 Sunday, October 2, 2005 6:06 PM

16 Setting Up Your TV
www.dell.com | support.dell.com
Using the HDMI Connector
1
Turn off the TV and unplug the power cord.
2
Connect your device using the HDMI connector.
3
Plug in the power cords for the TV and devices and turn them on.
4
Enter the TV Menu and select the
HDMI
. See "
Input Select
" on page 28 for more
information.
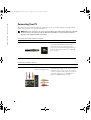
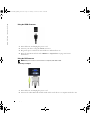
Using the DVI Connector
NOTE: Only one connector can be used for a computer, either VGA or DVI.
1
Turn off the TV and unplug the power cord.
2
Connect the white DVI cable and the audio cables to the device or computer and to the TV.
Connecting a Computer
W3202 3706MC_EMEA_e0.book Page 16 Sunday, October 2, 2005 6:06 PM

Setting Up Your TV 17
NOTE: Some cable TV boxes may have DVI connectors, but do not support using a DVI connection. For
more information, contact your cable TV company.
3
Plug in the power cords for the TV and devices and turn them on.
4
Enter the TV Menu and select
DVI
. See "
Input Select
" on page 28 for more information.
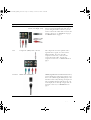
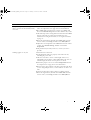
Using the VGA Connector
NOTE: Only one connector can be used for a computer, either VGA or DVI.
1
Turn off the TV and unplug the power cord.
2
Connect the blue VGA cable to your TV and to your computer.
3
Connect the green audio cable to the connector on the TV and to your computer.
4
Plug in the power cords for the TV and devices and turn them on.
5
Enter the TV Menu and select the
VGA
.
See "
Input Select
" on page 28 for more information.
W3202 3706MC_EMEA_e0.book Page 17 Sunday, October 2, 2005 6:06 PM

18 Setting Up Your TV
www.dell.com | support.dell.com
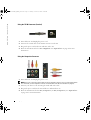
Using the SCART Connector
1
Turn off the TV and unplug the power cord.
2
Connect your device using the SCART cable.
3
Plug in the power cords for the TV and devices and turn them on.
4
Enter the TV Menu and select the
SCART1
or
SCART2
.
See "
Input Select
" on page 28 for more
information.
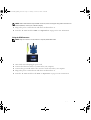
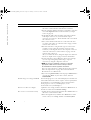
Using the CI Card Slot
Insert CI module into the CI card slot for watching TV programmes from Service Provider.
W3202 3706MC_EMEA_e0.book Page 18 Sunday, October 2, 2005 6:06 PM

Setting Up Your TV 19
Connecting Your Speakers
CAUTION: Before you set up and operate your Dell™ device, read and follow the safety instructions in
the
Product Information Guide
.
List of standard accessories
•speaker (2)
•stand (2)
•bracket (4)
•screw (2)
•speaker cable (2)
W3202 3706MC_EMEA_e0.book Page 19 Sunday, October 2, 2005 6:06 PM

20 Setting Up Your TV
www.dell.com | support.dell.com
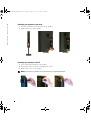
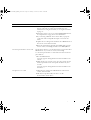
Installing your speakers to the stand
1
Insert the stand into the bottom hole of the speaker.
2
Tighten the screw on the speaker.
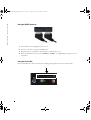
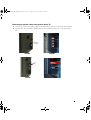
Installing your speakers to the TV
1
Loosely attach the brackets to the speakers.
2
Attach the brackets to the TV and tighten the screws.
3
Tighten the screws on the speaker.
NOTE: You may use a screwdriver to ensure all screws are completely tightened..
W3202MC
W3706MC
W3202 3706MC_EMEA_e0.book Page 20 Sunday, October 2, 2005 6:06 PM
La pagina si sta caricando...
La pagina si sta caricando...
La pagina si sta caricando...
La pagina si sta caricando...
La pagina si sta caricando...
La pagina si sta caricando...
La pagina si sta caricando...
La pagina si sta caricando...
La pagina si sta caricando...
La pagina si sta caricando...
La pagina si sta caricando...
La pagina si sta caricando...
La pagina si sta caricando...
La pagina si sta caricando...
La pagina si sta caricando...
La pagina si sta caricando...
La pagina si sta caricando...
La pagina si sta caricando...
La pagina si sta caricando...
La pagina si sta caricando...
La pagina si sta caricando...
La pagina si sta caricando...
La pagina si sta caricando...
La pagina si sta caricando...
La pagina si sta caricando...
La pagina si sta caricando...
La pagina si sta caricando...
La pagina si sta caricando...
La pagina si sta caricando...
La pagina si sta caricando...
La pagina si sta caricando...
La pagina si sta caricando...
La pagina si sta caricando...
La pagina si sta caricando...
La pagina si sta caricando...
La pagina si sta caricando...
La pagina si sta caricando...
La pagina si sta caricando...
La pagina si sta caricando...
La pagina si sta caricando...
La pagina si sta caricando...
La pagina si sta caricando...
La pagina si sta caricando...
La pagina si sta caricando...
La pagina si sta caricando...
La pagina si sta caricando...
-
 1
1
-
 2
2
-
 3
3
-
 4
4
-
 5
5
-
 6
6
-
 7
7
-
 8
8
-
 9
9
-
 10
10
-
 11
11
-
 12
12
-
 13
13
-
 14
14
-
 15
15
-
 16
16
-
 17
17
-
 18
18
-
 19
19
-
 20
20
-
 21
21
-
 22
22
-
 23
23
-
 24
24
-
 25
25
-
 26
26
-
 27
27
-
 28
28
-
 29
29
-
 30
30
-
 31
31
-
 32
32
-
 33
33
-
 34
34
-
 35
35
-
 36
36
-
 37
37
-
 38
38
-
 39
39
-
 40
40
-
 41
41
-
 42
42
-
 43
43
-
 44
44
-
 45
45
-
 46
46
-
 47
47
-
 48
48
-
 49
49
-
 50
50
-
 51
51
-
 52
52
-
 53
53
-
 54
54
-
 55
55
-
 56
56
-
 57
57
-
 58
58
-
 59
59
-
 60
60
-
 61
61
-
 62
62
-
 63
63
-
 64
64
-
 65
65
-
 66
66


Dell LCD TV W3706C Manuale del proprietario
- Categoria
- TV LCD
- Tipo
- Manuale del proprietario
in altre lingue
- English: Dell LCD TV W3706C Owner's manual