Aeg-Electrolux ENL60710X Manuale utente
- Categoria
- Frigo-congelatori
- Tipo
- Manuale utente
Questo manuale è adatto anche per

side by side
user manual
notice d’utilisation
benutzerinformation
libretto di istruzioni
refrigeration
réfrigération
kühlung
frigoriferi

2 electrolux contents / notice d’utilisation / benutzerinformation / libretto di istruzioni
Contents
• Information on disposal for users 2
• General Warnings 3
• Compact side by side with standard features 4
• Large side by side with ice and water features 5
• General Installation 6
• Initial start-up 8
• Electronic display panel 9
• Food compartment features 12
• Changing the water filter 16
• LED Lighting 17
• Cleaning your refrigerator 17
• Energy consumption 17
• Safety 18
• Helpful hints 18
• Troubleshooting 19
• Ice maker troubleshooting 20
Notice d’utilisation
• En matière de protection de l’environnement 21
• Compact jumelé avec fonctions standard 22
• Grand jumelé avec fonctions eau et glaçons 23
• Avertissements généraux 24
• Installation générale 25
• Mise en marche initiale 27
• Panneau d’affichage électronique 28
• Fonction du compartiment des aliments 31
• Remplacement du filtre à eau 35
• Éclairage 36
• Nettoyage du réfrigérateur 36
• Consommation d’énergie 37
• Sécurité 38
• Conseils utiles 38
• En cas d’anomalie de fonctionnement 39
Benutzerinformation
• Umwelttipps 41
• Kompakte Side-by-Side-Kombination mit
Standardausstattung 42
• Große Side-by-Side-Kombination mit Eis- und
Wasserspender 43
• Allgemeine Warnhinweise 44
• Allgemeine Montage 45
• Inbetriebnahme 47
• Elektronisches Display 48
• Kühl- und Gefriergutfächer 51
• Wechseln des Wasserfilters 55
• LED-Beleuchtung 56
• Reinigung des Kühlschranks 56
• Energieverbrauch (Stromkosten) 57
• Sicherheit 58
• Praktische Tipps 58
• Kleine Störungen selbst beheben 59
Libretto di istruzioni
• Considerazioni ambientali 61
• Side by side compatto con funzioni standard 62
• Grande side by side con funzioni ghiaccio e acqua 63
• Avvertenze generali 64
• Istruzioni generali per l’installazione 65
• Prima accensione 67
• Display elettronico 68
• Funzioni del comparto alimenti 71
• Sostituzione del filtro dell’acqua 75
• Illuminazione LED 76
• Pulizia del frigorifero 76
• Consumo energetico 77
• Sicurezza 78
• Suggerimenti utili 78
• Risoluzione dei problemi 79
environmental tip
Information on disposal for users
• Most of the packing materials are recyclable. Please dispose of
those materials through your local recycling depot or by placing
them in appropriate collection containers.
• If you wish to discard this product, please contact your local
authorities and ask for the correct method of disposal.
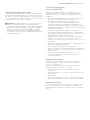
before you call
Please ensure you read the instruction manual fully before you
call for service, or a full service fee could
be applicable.

electrolux side by side refrigeration user manual 3
Read the following carefully to avoid damage or injury.
This symbol indicates never to do this
This symbol indicates always do this
It is important to use your refrigerator safely. Check these safety
points before using your refrigerator.
The appliance must be plugged into its own dedicated 220-
240V, 50Hz AC electrical outlet.
Ensure that the electric outlet is properly earthed to
ground. Consult a qualified electrician if you are unsure.
If the power cord is damaged, it should be replaced
by a service technician or a qualied person.
Check the power cord can reach the power point. Don’t
plug your refrigerator into an extension cord
or double adaptor.
Unplug the appliance before cleaning and before changing
the light bulb to avoid electric shock.
Choose a location that is not too cold – the ambient
temperature should be above 10°C.
Put the refrigerator in a dry place avoiding areas of high
moisture or humidity.
In order to avoid a fire, the appliance must be kept clean.
Keep ventilation openings, in the appliance enclosure or in
the built-in structure, clear of obstruction.
Young children should be supervised to ensure they do not
play with this appliance.
Never unplug the appliance by pulling on the power cord.
Always grip the plug firmly, and pull straight out
of the receptacle to prevent damaging the power cord.
Don’t plug your refrigerator into a timer tted to
the power point.
This appliance is not suitable for use by young children or
infirm persons, without supervision.
Do not put the refrigerator in frosty or unprotected areas, for
example in a garage or on a veranda.
Do not put the refrigerator in direct sunlight, near stoves,
fires or heaters.
Do not put the refrigerator on an uneven surface.
Do not store flammable materials on or under the appliance,
eg. aerosols.
Never let children play with the refrigerator.
Never store zzy drinks in the freezer compartment.
Never try to repair the refrigerator yourself.
Never use electric heaters or dryers to defrost the freezer
because you can receive an electric shock.
Never use electrical appliances inside the
refrigerator or freezer.
Note: You must read these warnings carefully before installing
or using the refrigerator. If you need assistance, contact your
Customer Care Department. The manufacturer will not accept
liability, should these instructions or any other
safety instructions incorporated in this book be ignored.
General Warnings
Please read the user manual carefully and store in a
handy place for later reference. Pass the user manual
on to possible new owners of the refrigerator.
The symbols you will see in this booklet have these meanings:
warning
This symbol indicates information concerning your
personal safety
caution
This symbol indicates information on how to avoid damaging the
refrigerator
tips and information
This symbol indicates tips and information about use
of the refrigerator
environmental tip
This symbol indicates tips and information about economical and
ecological use of the refrigerator
warning
• If pressurised aerosol containers bear the word
‘ammable’ and/or a small ame symbol,
do not store them inside any refrigerator or
freezer. If you do so you may cause an explosion.
• When you dispose of your old refrigerators and freezers,
remove any doors. Children can suffocate if they get trapped
inside.
• This appliance contains insulation formed with ammable
blowing gases. Avoid safety hazards by carefully disposing
of this appliance.
• This appliance is not intended for use by persons (including
children) with reduced physical, sensory or
mental capabilities, or lack of experience and knowledge,
unless they have been given supervision or instruction
concerning use of the appliance by a person responsible for
their safety. Children should be supervised to ensure that they
do not play with the appliance.
• Don’t use a steam cleaner. If live components come into
contact with condensing steam, they may short-circuit or
cause an electric shock.
• Do not use mechanical devices or other means to accelerate
the defrosting process other than those recommended by the
manufacturer.
R600a refrigerant warning
This appliance contains a small quantity of environmentally friendly,
but ammable, non-synthetic R600a refrigerant:
• Ensure that the tubing of the refrigerant circuit is not damaged
during transportation and installation.
• Leaking refrigerant may cause eye injuries or ignite.
• The room for installing appliance must be at least 1m3 per 8g
of refrigerant. The amount of refrigerant in the appliance can be
found on the rating plate inside the appliance.

4 electrolux side by side refrigeration user manual
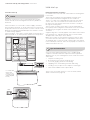
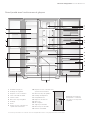
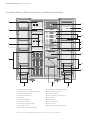
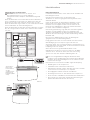
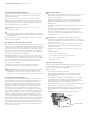
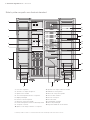
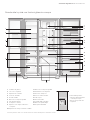
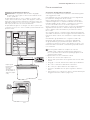
Compact side by side with standard features
1 Freezer lighting
2 Ice cube trays & storage drawer
3 Slideout glass shelves
4 Freezer temperature sensor
5 Wine Rack
6 Freezer baskets with clear fascia
7 Adjustable door bins
8 Electronic temperature controls
9 Locker compartment
10 Spill-safe slide-away glass shelf
11 Spill-safe slide-out glass shelves
12 Fridge lighting
13 Adjustable door bins
14 Sensor & deodoriser
15 Deli compartment
16 Crisper bins
17 Bottle twist holder
18 Bottle bins
19 Crisper humidity controls
1
2
3
4
5
6
7
8
9
10
11
13
12
14
15
16
17
1819
Features may vary depending on model. Not all models will have features listed.

electrolux side by side refrigeration user manual 5
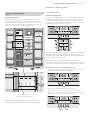
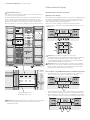
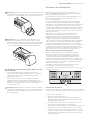
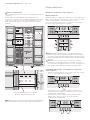
Large side by side with ice and water features
2
3
4
5
1
6
7
8
9
10
11
12
14
13
15
17
17
18
1819
16
1 Ice maker unit
2 Freezer lighting
3 Slideout glass shelves
4 Modular wine caddy
5 Roll out baskets
6 Adjustable door bins
7 Feature light
8 Locker compartment
9 Spill-safe slide-away glass shelf
10 Spill-safe slide-out glass shelves
11 Adjustable door bins
12 Fridge lighting
13 Deli compartment
14 Sensor and deodoriser
15 Water lter
16 Crisper bins
17 Bottle twist holder
18 Bottle bins
19 Humidity controls
Electronic temperature
controls + ice and
water controls on
freezer door
Features may vary depending on model. Not all models will have features listed.

6 electrolux side by side refrigeration user manual
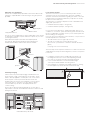
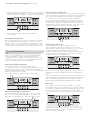
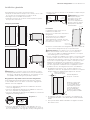
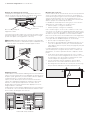
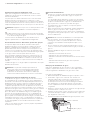
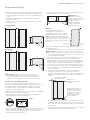
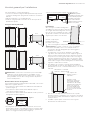
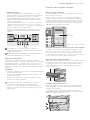
When correctly installed, your refrigerator should:
• have adequate clearance to the back, sides and top
for air circulation.
• be aligned to the surrounding cupboards
• have doors that will self close from a partially open position
Compact Side by Side 610L
898mm
1754mm
1736mm
18mm
754mm
736mm
8mm
890mm
1115mm
718mm
600mm
90mm
90°
Side by Side 700L
1000mm
1754mm
1736mm
18mm
1000mm
4mm
6mm
mm
992mm
1206mm
718mm
600mm
90mm
90°
caution
Automatic aerosol systems (such as insect conrtol) should not be
located adjacent to the product as the spray may cause long term
damage to the external plastics of the appliance.
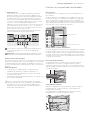
Clearances around your refrigerator
Your Side by Side Refrigerator can be installed between
cupboards or xtures but you must allow for the following spaces
around the cabinet.
• allow a minimum of 5 millimetres clearance on both sides (refer
to diagram 1).
• allow a minimum of 10 millimetres clearance above hinge
covers (refer to diagram 1).
• allow a minimum of 50 millimetres at the back of the
refrigerator (refer to diagram 1).
898mm
17 m
17 mm
1 mm
28mm
10mm
mm
m
6
90
90°
50mm
5mm
5mm
Recommended
airspace
CABINET
DOORS
Diagram 1
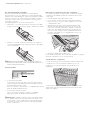
• allow a 200 or 350 millimetres clearance on the hinge side of the
doors, if you place the refrigerator next to
the wall. This will make cleaning easier (refer to diagram 2).
• make sure that cupboards or xtures do not stick out further than
the refrigerator cabinet.
Freezer
Door
Fridge
Door
200mm
350mm
CABINE
T
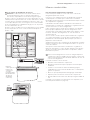
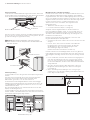
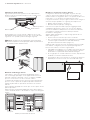
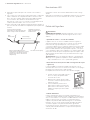
Installation
The refrigerator should arrive with the
front rollers wound down.
We recommend that the refrigerator
be tilted backwards by about 10
to 15 millimetres, this will allow
the doors to self close providing
a consistent door seal. To do this
follow the instructions below.
When you want to install your
refrigerator, take the
following steps.
1. Roll the refrigerator into it’s nal position.
warning
The rollers are designed for forward or backward
movement only. They are not castors. Moving the
refrigerator sideways may damage your floor and the
rollers.
2. If the refrigerator is not tilted back you can adjust the two front
rollers by adjusting the large plastic roller nut (refer page 7).
You may need two people, one to adjust rollers and one to tilt
the refrigerator slightly back to take the weight of the appliance
off the front rollers.
This will increase or decrease the height of the rollers. One
turn of the nut will change the tilt of the refrigerator by
approximately 10mm.
3. If the cabinet is level, then the side walls should be plumb
or vertical. If the cabinet is built in or partly built in check the
alignment of the cabinet side against the cupboard.
aligned to cupboard –
even gap
Top of refrigerator
is level – horizontal
Adjust front rollers for
unevenness of floor.
eg. adjust this roller down.
Packing may be required
underneath the rear roller
to ensure stability.
4. If the appliance now rocks from one corner to the opposite
rear corner, this means that the oor is uneven; you will need
to put some packing under one of the rear rollers.
5. You may now need to ne-tune the installation by adjusting the
front rollers once again.
General Installation
10-15mm
Fixed rear
rollers
Height adjustable
front rollers
Note: Doors are designed
to sit proud of cabinetry
(not flush). The clearances
shown above are the
recommended minimum
clearances.
Diagram 2

electrolux side by side refrigeration user manual 7
Ice and water models
The water connection to your ice and water product should
only be done by a licensed refrigeration mechanic, plumber or
electrician. All relevant information regarding the water connection
is detailed in the water kit provided with your product for use by
the professional installer only.
The automatic ice and water dispenser needs a drinkable water
supply with a pressure of:
• minimum 206 kPa (30 psi, 2.11 kgf/cm2)
• maximum 689 kPa (100 psi, 7.04 kgf/cm2)
In some areas water pressure is signicantly higher due to local
conditions. In such areas a pressure reducing valve must be used.
Ensure your plumber or installer checks your local water pressure
when installing your refrigerator.
If you are using your refrigerator for the rst time, or if you have not
used the dispenser for some time:
• discard the rst seven or eight cups of water
• discard any ice that the ice maker produces in the
rst 24 hours (contaminants could have settled in the water
pipes)
(see page 14 for more information)
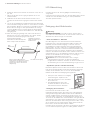
The water tap can be anywhere and there is no limit to the amount
of pipe between the tap and the refrigerator, however some points
to note are:
1. It is better to have the tap accessible without having to roll
the refrigerator forward, so we recommend putting it outside
the cavity as shown by the taps in the diagram below.
2. It is recommended, but not essential that the height
of the tap should be 400mm from the ground.
3. If the refrigerator is required to be pulled forward for cleaning,
the water pipe may need to be removed from the tap.
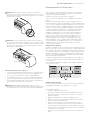
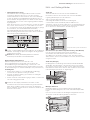
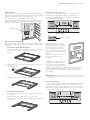
Adjusting door alignment
Each door is independently adjustable in the vertical direction by
turning the adjustable bolts under the hinges using the spanner
provided.
Large plastic roller nut
Front Roller
Adjusting Bolt
The doors can be adjusted up or down. Depending on the amount
of adjustment required it may be sufcient to adjust only one door.
(see Diagrams below)
Note: When the height of the rollers and adjusting bolts
are correctly adjusted the refrigerator will stand firmly on
the floor and the doors will be in line with one another.
Spanner
Spanner
Internal packaging
Please remove any internal packaging material before use.
There may be a strip of foam taped to the door bins. There
will also be tape applied to several parts such as the locker.
There may be a sheet of protective lm attached to the
multi-ow duct at the rear of the refrigerator section, please
remove this prior to operation as it may obstruct airow.
Protective lm may also be on the display tted to the
control housing.
Please remove all internal packaging before use. Any glue or
tape residue or the like should be removed with a solution of mild
detergent and water.
Door bins
model 610L side by side shown
Door binsMulti-flow duct

8 electrolux side by side refrigeration user manual
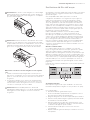
Ice maker start-up
caution
The water connection to your ice and water product should
only be done by a licensed refrigeration mechanic, plumber or
electrician.
If the ice maker is not connected to a water supply, check that
the ice maker is turned off. To do this remove the ice cream shelf
and put the switch in the ‘OFF’ position. If you don’t do this a loud
buzzing noise will be heard intermittently if the icemaker is on but
no water is being supplied.
If the ice maker is connected to a water supply, check that the ice
maker is turned on. To do this put the switch in the ‘ON’ position.
ice cream shelf
remove this
shelf to access
Ice make on/off
switch (diagram
below)
OFF ON
TEST
Refrigerator/freezer operation
It is normal for the rear, sides and centre mullion of the refrigerator
to feel warm.
These areas are warm because the refrigerator transfers heat
from food placed inside the refrigerator to the outside air.
There is a cooling coil located behind the rear wall of the freezer
section. This coil cools and removes moisture from the air. A
fan at the rear of the freezer section then circulates cold, dry air
throughout the refrigerator.
This forced air circulation means that foods are refrigerated far
more quickly than in refrigerators where there is less air circulation.
Avoid placing food against air outlets as this will affect air
circulation.
A light frosting will occasionally appear on the interior of the freezer
if the freezer door is opened frequently. This is normal and will
disappear after a few days in most climates.
Make sure you fully close the freezer and fresh food doors after
you load or remove food from these compartments. If the doors
are left partly open, a heavy frost will coat the inside of the freezer.
If a frost develops, remove it. Take care to properly close the doors
and the frost will not reoccur.
tips and information
Your new energy efcient refrigerator uses a variable speed
compressor and other efcient components that may produce
different noises to your old refrigerator. These sounds are normal
and include:
• compressor running noise
• air movement noise from the small fan motor
• occasional gurgling, similar to water boiling
• a popping noise, heard during automatic defrosting
• a clicking noise, just prior to the compressor starting up
• a motorised air bafe used to adjust airow
These noises are normal and are no cause for alarm. (further
details can be found on page 19)
Initial start-up

electrolux side by side refrigeration user manual 9
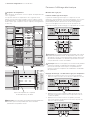
Ice and water models
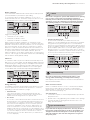
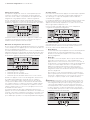
Electronic display panel
The electronic display panel consists of an LCD display with white
backlighting and 6 push buttons. When the power is rst turned
on, you will see the default settings, with the white backlighting.
If no buttons have been pressed and the fridge door is closed the
backlighting will turn off after 30 seconds.
Note: The Electronic Display Panel varies according to the model
of refrigerator purchased. The above and following diagrams are
only representative of the different types of panels available. Not all
models will have all features listed.
NOTE: If no buttons have been pressed for approximately 60
seconds, there may be a delay of up to 2 seconds before the display
reacts. This is normal and is to prevent accidental changes to settings.
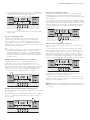
Setting the clock – ice and water models only
1. Press and hold the clock button down for two seconds. Hours
and minutes will then appear on the display.
2. Press the fast freeze button to advance the hours.
(Hold the button down for continuous and fast advance).
3. Press the eco/vacation button to advance the minutes. (Hold the
button down for continuous and fast advance).
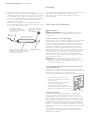
tips and information
Electronic display panel
Temperature sensors
Avoid loading food against your freezer temperature sensor.
Doing so may adversely affect freezer temperatures. If warm
food is inadvertently loaded against the sensor, it may also set off
the freezer temperature alarm up to 50 minutes after the food is
loaded against the sensor (see Diagrams below).
freezer temperature sensor
model 610L side by side shown
Note: Product illustrations demonstrate features that
may not be completely in line with all current products.

10 electrolux side by side refrigeration user manual
4. The clock can be switched between 24 hour or 12 hour formats
by pressing the drinks chill button. In 12 hour format the indicator
will switch between am and pm accordingly (see diagram below).
5. Once the time has been set press the clock button to
save the setting.
Controlling the temperature
We recommend that when you start your refrigerator for the rst
time, the temperature for the refrigerator is set to 3°C and the
freezer to -18°C. If you want to change the temperatures, use the
instructions below. You should make only small adjustments and
wait 24 hours to see whether you need to make further changes.
tips and information
When you set a temperature, you set an average temperature
for the whole appliance cabinet. Temperatures inside each
compartment may vary, depending on how much food you store
and where you place it. High or low room temperature may also
affect the actual temperature inside the appliance.
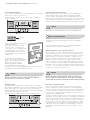
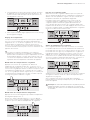
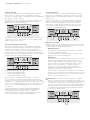
Changing the freezer temperature
Press the freezer button to make the freezer colder in
1°C steps. Once -23°C is reached the display will return to -14°C
with the next button press. You’ll notice that the bar graph gets
smaller with colder freezer settings. If you set –14ºC, the bar graph
will ash continuously to warn that it
is not cold enough for long term storage of frozen food.
Changing the refrigerator temperature
Press the fridge button to make the fridge colder in 1°C steps.
Once 0°C is reached the display will return to 7°C with the next
button press. The bar graph gets smaller with colder settings.
Fast freeze (quick chill) function
Use the fast freeze (quick chill) function when you add a large amount
of food to the freezer compartment. This freezes the food quickly but
does not affect the temperature in the refrigerator compartment.
To use this function, press the fast freeze (quick chill) button
once. An animated icon will light up. The fast freeze (quick chill)
function will now operate for 90 minutes. If you want to turn the
fast freeze (quick chill) function off before 90 minutes have passed,
simply press the fast freeze (quick chill) button again. The icon will
disappear and the freezer will return to normal operation.
Freezer temperature alarm
If the freezer becomes too warm a buzzer will sound.
The icon adjacent to the alarm reset button (on non-ice and
water models) or above the alarm reset button (on ice and water
models), the freezer set temperature and the bar graph
will all ash until the alarm reset button is pressed. Once pressed,
the alarm disable icon will illuminate for 50 minutes, or until the
temperature reaches an acceptable level.
Make sure nothing is holding the freezer door open and move any
warm food away from the temperature sensor (see diagrams on
page 9).
If the freezer is still too warm after 50 minutes the alarm will sound
again, indicating that something may be wrong with your appliance.
Note: The freezer temperature alarm can be reset for 12 hours
by pressing the alarm reset button continuously for 10 seconds.
Door alarm
If the refrigerator door is left open for longer than 2 minutes a
buzzer will sound and an arrow pointing to an open door will ash.
The refrigerator temperature settings and bar graph will also ash.
If you want to leave the door open while you load the fridge, you
can turn the alarm off for 8 minutes by pressing the alarm reset
button.
If the alarm is sounding for no apparent reason, check whether
anything is holding the door open. Closing the door resets the
alarm for a further 2 minutes.

electrolux side by side refrigeration user manual 11
Drinks chill timer
If you set the drinks chill timer it will sound an alarm to remind you that
you have left drinks in your freezer for quick chilling.
To use the timer, press the drinks chill button once to set a 5
minute time limit, twice for 10 minutes and up to 6 times for a 30
minute time limit. Press 7 times to turn the timer off.
Suggested chilling times:
• 10 minutes for cans of drink
• 20 minutes for bottles of wine
• 30 minutes for bottles of soft drink
When you press the drinks chill button, an animated icon will
appear beside the drinks chill button with a countdown timer. The
timer will count down in 1 minute increments; you can change the
time or turn the timer off even after the countdown has started.
When the countdown is nished a buzzer will sound and the icon
beside the alarm will ash until the alarm reset button is pressed.
To stop the alarm and turn off the drinks chill timer, press the
Alarm reset button. If your drink is chilled, take it out of the freezer.
If it is not cold enough, reset the drinks chill function (remembering
that the drink is already partially chilled).
Child lock
To activate the child lock, press the cubed/crushed and lamp on/off
buttons for 2 seconds together. This will disable the display to prevent
accidental changes to settings. The key icon will appear on the electronic
display when child lock is activated. To turn off the child lock press and
hold cubed/crushed and lamp on/off buttons for 2 seconds together.
For standard models use the freezer temp and fridge temp buttons.
Energy efficiency
Your appliance has been designed with energy efciency in mind
and can operate in any of three modes (normal, eco, vacation),
depending on the level of efciency sought.
• Normal mode
This is the mode which is entered automatically when the
appliance is rst turned on. Normal mode is the mode most
suitable when the refrigerator door is opened often.
• Eco mode
Eco mode is a more efcient mode than normal mode and can
be entered in two ways. Either by manually pressing the eco/
vacation button once when in normal mode, or automatically
after 30 hours if the refrigerator door has not been opened.
The leaf icon will appear on the electronic display when eco
mode is activated. If eco mode is entered automatically, the
appliance will revert to normal mode once the refrigerator door
is opened. If eco mode is entered manually, door openings will
not cause the display to revert to normal mode. To exit eco
mode, press the eco/vacation button twice (or until there are
no icons displayed).
caution
Eco mode is designed to operate with minimum door opening
(e.g. if used as a long term storage fridge). If turned on
manually, it won’t switch off automatically and frequent door
opening in eco mode could lead to food spoilage. If frequent
door opening is likely to occur switch back to normal mode.
• Vacation (holiday) mode
Vacation mode is suitable if you will be away from your
appliance for an extended period, take advantage of maximum
energy efciency by pressing press the eco/vacation button
twice in succession just before you leave (do this while in normal
mode). The appliance will then enter vacation mode, as indicated
by the aeroplane symbol. Press eco/vacation button again to cycle
between ‘normal’, ‘eco’ and ‘vacation’ modes. (If in eco mode a
single button press is all that is required to enter vacation mode).
Vacation mode is exited automatically once the refrigerator
door is opened and normal mode resumes.
environmental tip
Eco and vacation modes minimise defrosting to save
energy, while maintaining your temperature settings.
Note: Opening the freezer door has no effect on the operation of
Eco and Vacation Modes
Other electronic features
Other Ice and Water functions are also controlled via the display
panel, these include cube and crushed ice, and turning the
dispenser light on and off. Both of these functions are detailed
later in this manual (refer page 14).
Your refrigerator:
• controls the compressor and fan independently to provide the
best performance
• provides extra cooling depending on the number of door openings
• automatically defrosts during periods when the door is not
being opened frequently
tips and information
If you find that the display malfunctions, this may be due to
brief power supply interruptions. If this is the problem, you
simply need to turn the refrigerator off at the power point
and wait 5 minutes, then turn the refrigerator on again at
the power point.

12 electrolux side by side refrigeration user manual
Door storage bins
Both the refrigerator and freezer have door storage bins. You can
adjust the door bins to meet different storage needs. All the door
bins are completely removable for cleaning. If you want to remove
or adjust a bin in all freezers and in the fridge of the compact side
by side, lift it over the support lugs on the inner door panel. Push
the bin down over the support lugs to lock it in place.
Compact Side by Side shown
coin slot
lift bin to remove
Store safe compartment (Compact Side x Side only)
The store safe compartment (diagram above) is a coin-lockable
compartment. To lock, rotate the coin slot clockwise until the slot
is vertical. To unlock, turn the coin slot anti-clockwise until the slot
is horizontal.
Door storage bins (shelves)
Flexi-door shelving is used on the door of the large side by side.
If you want to remove or adjust a bin, lift and tilt to remove. To
replace, t top and push bin down until support lugs to lock it in
place.
Dairy compartment
Use the dairy compartment (Compact Side by Side models
only) to store foods like butter, margarine and cheeses. The
compartment is slightly warmer than the rest of the refrigerator
compartment, while the lid provides protection against odours.
Food compartment features
Bottle twist holder operation
The bottle twist holder is used to prevent bottles from falling
over. The twist holder consists of two parts, a sliding front, and a
rotating retainer ring. The retainer ring can be rotated through 360°
but has positive locations for horizontal and vertical positions.
The bottle twist holder can be used in two positions:
• Horizontal – when the bottle twist holder ring is horizontal, any
item that ts within the ring can simply be placed inside it.
• Vertical – when the bottle twist holder ring is vertical, it is
possible to simply slide the bottle twist holder along the bottle
retainer bar until it is pushed up against a bottle.
Note: The bottle should be constrained on the other side
by either the end of the bin or other adjacent bottles.
Crisper bin(s)
more humid
humidity control
• Storing vegetables
You can use the crisper bin to store vegetables, fruit or
smallgoods. You can change the humidity inside the bin by
sliding the humidity control.
You should store vegetables in the crisper bin remembering to
set the humidity control to more humid.
• Storing fruit & smallgoods
You can also store fruit & smallgoods in the crisper bin
remembering to set the humidity control to less humid.
caution
To clean a crisper cover with telescopic extension slides, simply
wipe with a damp cloth and warm soapy water. Never immerse
the cover in water, as this could affect the operation of the slide.

electrolux side by side refrigeration user manual 13
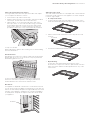
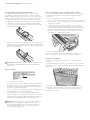
Telescopic freezer bins and crispers
For large side by sides with telescopic freezer bins and crispers
you can replace the drawer as follows:
1. Push the telescopic slides in all the way.
2. Slide the drawer into place over the slides and push the bin in
until it stops. The bin will not be closed all the way.
3. Open the bin to access the nger tabs at the ends of the
telescopic slides, on each side of the bin. Using your thumb
and forenger, lift the bin over the end of the slide and clip
in place. If the drawer is not fully engaged on the slide, it’s
possible the drawer won’t stay on the slide if fully extended.
The end of slide must
be clipped into place
4. Fully close the bin.
When replacing the drawers after cleaning, we recommend tting
the lower drawer rst.
Freezer baskets
Wire baskets are used in the compact side by side model. All the
baskets pull out for easy access and have a stop to prevent the
basket being pulled out too far.
To remove the basket, pull it out until it hits the stop then lift
the front to unhook the stop while continuing to pull forward,
until the basket is free of the runners under the shelf.
Deodoriser
Your appliance is tted with a deodoriser to assist with the removal
of food odours inside your appliance. (Refer pages 4 and 5 item 14).
Odours are removed by absorption through the lter by the normal
operation of the appliance. Keeping food covered and wrapping
food with plastic wrap will also help to reduce the odours inside
your appliance.
deodoriser
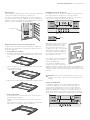
Slide away glass shelf
This shelf can be used either as a full depth shelf or when tall items
need to be stored at the front of the appliance it can be collapsed
to half its original depth.
• To collapse the shelf:
1. To release the front half of the shelf, pull the front section of the
shelf forward whilst pushing the rear edge of the front section up.
2. Pull the shelf forward and allow the rear to drop into the side
channels.
hook detail
3. Push the front shelf backwards until it reaches the rear stops.
• Repositioning:
To reposition shelf, pull forward until shelf reach stops.
Lift shelf clear of stops and continue to pull forwards. Once the
shelf is clear of the cabinet it can be repositioned onto any of the
other runners.

14 electrolux side by side refrigeration user manual
How the water dispenser works
After the refrigerator is connected to the water supply, ll the
water tank by holding a glass against the dispenser paddle.
You may need to hold the glass against the paddle for up to 2
minutes before water begins to ow. Continue to draw water for a
further 3 minutes to rid the tank and plumbing connections of any
impurities, the tank will automatically rell as you dispense water.
caution
Remember, do not drink this water as it may have impurities in it!
tips and information
The water connection to your ice and water product should
only be done by a licensed refrigeration mechanic, plumber or
electrician.
The water dispenser water tank is located behind the upper
crisper bin in the refrigerator compartment.
Normal Operation – For cool water, add ice.
To provide the convenience of ltered water in the same location
as the ice dispenser, it is necessary to route the tubes from the
refrigerator compartment. This means the rst half glass of water
will not be quite as cold as the following 3 or 4 glasses. If you
require cool water from the rst glass, we recommend that you
rst add crushed or cubed ice to your glass then the water.
In times of high use, water may be dispensed before it has time
to cool. Once this occurs, the dispensed water temperature will
be similar to that of your normal tap water until the tank has had a
chance to cool. The addition of cubed or crushed ice will allow you
to still enjoy cool water should this occur.
caution
Chemicals from a malfunctioning softener can damage
the ice maker. If the ice maker is connected to soft water,
ensure that the softener is maintained and working properly.
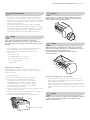
How the ice dispenser works
The ice maker and ice container are located in the top of the
freezer compartment. After the refrigerator is installed properly
and has cooled for several hours, the ice maker can begin making
ice and the rst batch will be ready within 24 hours. A full tray of
ice may not be created for the rst few batches, due to air in the
refrigerator’s new plumbing lines.
To begin ice production pull out the icecream shelf and switch to the
ON position (“I”) then replace shelf. If no ice is dispensed it will take
about 2 days to ll the storage container. The ice maker turns off
automatically when the ice container is full. To stop ice production,
turn the switch to the OFF position (“O”) (See diagrams on page
4). The rst batches of ice cubes may be discoloured or have an
odd avour, due to the refrigerator’s new plumbing connections.
Discard this ice until batches are free of discolouration or taste
problems.
Ice and water dispenser
The ice and water dispenser conveniently dispenses cool, ltered
water and ice cubes or crushed ice.
To operate the ice dispenser, select an ice option using the
electronic display.
crushed ice
cubed ice
Press a glass against the dispensing
paddle. Hold the top
of the glass as close as possible
to the ice outlet, so that you will
catch all the ice. To stop dispensing
ice, pull the glass away from the
dispensing paddle. Do not remove
the glass until the ice has nished
coming out.
To operate the water dispenser,
press a glass against the dispensing
paddle. To stop dispensing water,
pull the glass away from the
dispensing paddle. A drip tray
located at the base of the dispenser
(see page 17) will catch small spills and allow them to evaporate.
The drip tray is removable and dishwasher safe.
caution
Do not pour water or excess cubes into the drip tray
because it is not connected to a drain.
Dispenser lamp
The dispenser has a light which can be turned on and off by
pressing the Lamp button on the electronic display (see Diagram
below). The lamp is also activated for 6 seconds whenever a
dispensing paddle is pressed. The light comes from 6 ultra bright
LEDs (Light emitting diodes), which are
part of the electronic display and are not customer replaceable.

electrolux side by side refrigeration user manual 15
tips and information
• Ice cubes stored too long may develop an odd avour.
Remove the ice container and discard the ice cubes. When
replacing the tray, ensure that the wire signal arm (see diagram
bottom left) sits within the ice cube container. The ice maker
will then start producing ice.
• Occasionally shake the ice container to keep ice separated.
• After you take delivery of the refrigerator, keep the ice maker
switch in the “OFF” position until the refrigerator is connected
to the water supply. The switch should also be kept in the
“OFF” position whenever the water supply is turned off.
caution
If the dispensing paddle is pushed for more than
4 minutes, the dispenser motor may overload and stop.
The overload protector will reset automatically after 3 or 4
minutes.
• If a large quantity of ice is needed at one time, it is best to
remove cubes directly from the ice cube container
• When the ice maker is operating, it is normal to hear
the sound of:
– the motor running.
– ice dropping into the ice container.
– the water valve opening or closing.
– ice loosening in the tray.
– running water.
Cleaning the ice dispenser
Clean the dispenser and ice container at regular intervals,
particularly before you take a vacation or move, also clean the
dispenser if it sticks.
To clean the dispenser:
1. Switch the ice maker switch to the “OFF” position.
2. Remove the ice container by lifting it up and
out. Empty and carefully clean the container with
mild detergent. Rinse carefully ensuring no traces
of detergent remain. Do not use harsh or abrasive
cleaners. Allow the ice container to dry completely
before replacing it in the freezer.
3. Remove ice chips from the shelf and chute that support the ice
container; clean these areas.
4. Replace the ice container. Ensure the wire arm sits within the
ice cube container. (see diagram below)
5. Turn the ice maker switch back to the “ON” position.
wire arm
ice cube container
warning
Do not use the ice chute as a handle when removing or
replacing the ice storage bin. Do not put fingers up ice
chute. Surfaces there may be sharp.
caution
When removing or replacing the ice bin do not rotate the
auger in the ice bin. If the auger is accidentally turned, you
must realign the auger by turning it in
90° turns until the ice bin fits into place with the
drive mechanism
auger
Remove and empty the ice storage bin if:
1. An extended power failure (one hour or longer) causes ice
cubes in the ice storage bin to melt and freeze together and
jam the dispenser mechanism.
2. If the ice dispenser is not used frequently, ice cubes will freeze
together in the bin and jam the dispenser mechanism. If this
happens remove the ice storage bin and shake it to loosen the
cubes.
caution
NEVER use an ice pick or similar sharp instrument to break
up the ice. This could damage the ice storage bin and
dispenser mechanism.

16 electrolux side by side refrigeration user manual
If you purchased a refrigerator with a water lter (ice and water
models), please read the following care and use information.
An external water lter and connection kit has been supplied for
use with your ice & water refrigerator.
The external lter design allows more space within the refrigerator
and provides double the life of previous lters reducing the cost of
replacement. The lter is designed to signicantly reduce chlorine,
taste, odour, heavy metals, turbidity ( cloudiness) and scale
build up. The included plastic (LLDPE) water tube allows quick
connection to the lter and is designed for high durability and kink
resistance.
This lter is designed only to be used with a potable water supply.
It should not be used on water that is micro biologically unsafe or
with water of unknown quality. The lter should be replaced every
12 months. The service life of the lter may be reduced in water
supplies that contain an excess of particles or other impurities.
Reduced ow rate is an indication that a new lter is required.
Failure to replace the lter when required can affect the function of
the ice maker. Service calls caused by a failure to replace the lter
are not covered by warranty (see page 20).
When to change the filter
Water conditions vary throughout the world, but changing the
water lter every 12 months will ensure the highest possible water
quality. The electronics in your refrigerator will track the amount
of water usage and advise on when the lter should be replaced.
If the lter has not been in use for a while (because of a move for
example), change the lter before you reinstall the refrigerator.
Replacement lters can be purchased from the nearest Service
Centre (see page 20 for contact details). The lter change interval
can be reset by pressing the clock button.
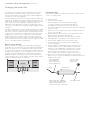
Changing the filter
Turn off water supply at the tap. Ensure that the ice maker switch
is in the “O” (OFF) position.
To change the lter:
1. Turn off the water supply.
2. Release the pressure in the water lines by holding
a container against the water dispenser paddle on
the refrigerator until the pressure has been released.
3. Turn off the refrigerator at the power point and remove the plug
from the socket.
4. Depress the collet (see illustration below) and pull the tube out
of each end of the lter.
5. Ret the tubes into the new lter to the stops (about 15mm).
Ensure that you observe the ow direction.
Write the tment date in the space provided on the lter.
6. Gently pull back on the tube to ensure that it is secure.
7. Turn the water supply back on and check for leaks.
8. Plug the unit back in and turn the power supply back
on to the refrigerator.
9. Purge and dispose of approximately 5 litres of water through
the water dispenser to condition the lter and clear the
water lines of air and impurities. It may take up to a minute
to get a full ow of water from the dispenser. Do not be
alarmed if there is an initial black colour to the water.
This is residual carbon dust from the lter and is non-toxic.
10. Once the lines have been purged, dispose of the rst few
batches of ice to ensure that impurities have been flushed from
this part of the system.
External water filter – installed
between fridge and water supply.
(Usually situated within kitchen
cupboard under sink or surrounds).
Tube supplied with
filter installation kit.
Cut to fit as per your
kitchen requirements.
From water supply
Flow directionTo fridge
Collet (blue ring).
There is a collet
at both ends.
Changing the water lter

electrolux side by side refrigeration user manual 17
LED Lighting
Your refrigerator is tted with long life LED lighting.
In the unlikely event the LED lights should ever fail, then the
LED lights need to be serviced by a qualied technician. Contact
your Customer Care Department.
Cleaning your refrigerator
warning
BEFORE CLEANING: Turn the refrigerator off at the power
point and unplug the cord to prevent any chance of
electrocuting yourself.
• Doors and exterior – stainless steel
Your stainless steel appliance is manufactured from a mark
resistant stainless steel. This stainless steel has a special advanced
protective coating that eases the removal of marks such as nger
prints and water spots. To keep your stainless steel appliance
looking at its best, you should clean it regularly. You should only
clean the stainless steel doors with luke-warm soapy water and a
soft cloth, rinsing with clean water and then wipe the surface with
clean water and a soft clean cloth to remove soap residue.
It is important to wipe in the direction of the grain of the
stainless steel to avoid undue marking of the surface.
caution
Do not use abrasive pads or other cleaners as they are
likely to scratch the surface. Damage to this product after
installation is not covered by your warranty.
Drip Tray (Ice & Water models only)
Water may accumulate in the sump located under the drip tray.
If this occurs the sump can be sponged out to prevent water
overowing down the front of the door.
For cleaning, remove the tray as described below:
1. opening in drip tray
1. Insert a lever (e.g. spoon handle) in the
opening in the drip tray.
2. Whilst holding the front of tray, lever the
back upwards.
3. To ret, position the front of the tray into
the front of the sump then lower the back
of the tray.
Cleaning the interior
You should clean the refrigerator interior regularly. It will be easiest
to clean when the food supply is low. Wash the interior with a
soft cloth and use an unscented mild soap with lukewarm water.
Thoroughly dry all surfaces and removable parts. Avoid getting
water on refrigerator controls. If you have taken out any removable
parts, replace them and switch the power on before restocking
the refrigerator with food. You should keep the interior of your
refrigerator hygienic by promptly and thoroughly wiping up any
food spills.
Keep door seals clean
Take care to keep door seals clean. Sticky food and drink can
cause seals to stick to the cabinet and tear when you open the
door. Wash the seal with a mild detergent and warm water. Rinse
thoroughly with clean water and dry.
caution
Never use hot water, solvents, commercial kitchen cleaners,
aerosol cleaners, metal polishes, caustic or abrasive
cleaners, or scourers to clean this appliance as they will
damage it.
Many commercially available cleaning products and
detergents contain solvents that will damage your
refrigerator. When cleaning, use only a soft cloth
with an unscented mild soap and lukewarm water.
Energy consumption
(electricity costs)
The following guide will help you reduce the running cost of your
new refrigerator. This will save you money and help conserve our
valuable energy resources.
1. If you keep your old refrigerator, save power by switching it off
when not in use.
2. Do not set your freezer temperature too low. After 24 hours,
ice cream should be rm but able to be scooped out with a
spoon without bending the handle. If ice cream is rmer than
this (or too soft), adjust the freezer temperature controls (see
‘Controlling the Temperatures’, page 10).
3. Ensure that the refrigerator doors seal properly as you close
them.
4. Before you open the refrigerator doors, decide what you want
to put in or take out. This will minimize the time you have the
doors open.
5. It is best to have the refrigerator in a place that is out of direct
sunlight and away from heating appliances of any kind. For
example, do not place the refrigerator next to
a cooker, stove or dishwasher.
6. Allow hot foods to cool to room temperature before you put
them in your freezer.
7. Thaw frozen food in the refrigerator section.
8. If you keep the freezer compartment lled to capacity, your
food mass will help maintain the freezer temperature when you
open the door.
9. Do not block air vents. Doing so may cause the refrigerator to
run longer and use more energy.
Switching off the refrigerator
If you are leaving for a short holiday, there is no need to turn off
your refrigerator – use eco/vacation or eco mode (page 11).
If you are going on a long holiday and want to turn the refrigerator
off, follow the steps below.
1. Take all the food out of the refrigerator and freezer
compartments.
2. Switch off the refrigerator and remove the electric cord from
the power point.
3. Clean the inside.
4. Leave the doors open. This prevents bacteria from growing
and causing smells in the refrigerator.
Power failure
If there is a power failure in your area, keep the door to the freezer
closed. Most foods in your freezer will stay frozen for 24 hours.

18 electrolux side by side refrigeration user manual
Safety
Safety
It is important to use your appliance safely. This means you need
to supervise young children and inrm persons when they use it.
You need to make sure that young children do not play with the
appliance. Follow the tips below.
always do this
Check the power point is properly earthed -
if you are not sure get an electrician to check it.
Switch off the appliance at the power point before
you clean or move it.
If the supply cord is damaged you should have
it replaced by the manufacturer, it’s service agent
or similarly qualified person.
If the LED lights fail you should have it serviced
by the manufacturer, it’s service agent or similarly
qualified person.
never do this
Never let children play with the appliance.
Never store spray cans, explosive liquids or
flammable liquids in the refrigerator.
Never store zzy drinks in the freezer compartment.
Never lick icy foods when they rst come out of the
freezer. This can freeze burn your lips and mouth.
Never try to repair the appliance yourself.
Never use electric heaters or dryers to defrost the
freezer because you can receive an electric shock.
Never use electrical appliances inside the food
storage areas.
This appliance contains insulation formed with
ammable blowing gases. For safety reasons, take
care when you dispose of it.
Do not damage the appliance circuit.
Do not damage the refrigerant circuit.
Do not use mechanical devices or other means to
accelerate the defrosting process, other than those
recommended by the manufacturer.
warning
When you dispose of your old refrigerator or freezer, remove
any doors. Children can suffocate if they get trapped inside.
Helpful hints
Helpful hints for storing food
always do this
Buy the freshest, best quality food and put it in the
refrigerator as soon as possible.
Cover food with plastic wrap or foil to stop it drying
out and to help prevent bad smells.
Rinse and wrap fish and poultry before you put them
in the refrigerator.
Minimise bacteria by removing stuffing from poultry
before you put it in the refrigerator.
When you store eggs in the refrigerator
compartment, store them with the pointed end down.
never do this
Store bananas, avocados or mangoes in the
refrigerator. This can cause them to go black or
to go soft.
Put hot or warm food in the refrigerator. Allow it to
cool first.
Helpful hints for freezing food
You can use the freezer to store food which you buy in bulk when
prices are low. You can also cook extra food and freeze it for later
use.
always do this
Buy the freshest, best quality food and put it in the
freezer as soon as possible.
Place food in plastic bags or plastic wrap before you
put it in the freezer.
Squeeze the air out of plastic bags as this
prevents frost.
When you buy frozen foods in the supermarket,
keep them in their packaging when you store them.
Defrost food, especially chicken and sh, in the
refrigerator compartment. This stops bacteria
from growing.
Leave food in its wrapping while it defrosts.
Use defrosted food immediately.
never do this
Never refreeze defrosted food.

electrolux side by side refrigeration user manual 19
Troubleshooting
If you think something may be wrong with your refrigerator, you
can carry out some easy checks before calling for service. You
may locate the problem, sparing yourself any inconvenience and
saving time and money.
problem solution
When your appliance
is not operating
• Check that the power cord is plugged
into the power outlet properly and that the
outlet is switched ‘ON’.
• Try running another appliance from the
power outlet. If no power is coming from
the outlet you may have blown a fuse
or tripped a circuit of your household
power supply.
• Try adjusting the temperature control to
a slightly “colder” position.
• It is normal for the freezer fan NOT to
operate during the automatic defrost
cycle, or for a short time after the
appliance is switched on.
When there is
refrigerator/freezer
noise
Modern refrigerators/freezers with
increased storage capacity use high
speed compressors. These can provide a
seemingly high level of sound which is quite
normal. Normal operational sounds include:
• Occasional gurgling, similar to water
boiling.
• Air ow noise (air circulates because of a
small fan).
• A popping noise heard during automatic
defrost.
• A clicking noise heard just before
the compressor starts (this is merely
the automatic switching action of
the temperature control, turning the
compressor on or off).
Other strange sounds may mean that
you need to check and take action.
For example, noises may mean that:
• The cabinet is not level.
• The oor is uneven or weak.
• Bottles are badly placed and rattling.
• There are vibrations from an object on top
of or behind or beside the refrigerator.
• The back of the refrigerator cabinet is
touching the wall.
Remember it is quite normal for noise to
seem louder just after the refrigerator starts
operating.
If there are odours
inside the appliance
• The interior may need cleaning.
• Some foods produce odours.
• Some containers and wrapping can
cause odours.
• Ask yourself if the odour started about
the same time you started storing
something unusual.
problem solution
When the motor
seems to run more
than expected
Your new appliance provides you with large
capacities in both the refrigerator section
and the separate freezer. It is normal for the
motor to operate frequently. However, to
keep operation to a minimum, check the
following:
• Are doors kept open too long or too often?
• Are controls set too cold? See “Controlling
temperature” (refer page 10).
• Have large amounts of warm food just
recently been stored? Summer, festive
seasons and holidays usually mean a lot
more work for your appliance.
• If the day is hot or the room is very warm,
the appliance will need to run more than
normal.
• The appliance will run more that normal
just after you install it or when it has been
turned off for a long time.
If the temperature
in the refrigerator
is too warm
• Check that the appliance has enough
clearance at the sides, back and top.
Refer to the installation Instructions at
the front of this booklet.
• Refer to “Controlling the temperature”
(refer page 10).
• You may have kept the door open too
long or too frequently.
• Food containers or packaging may be
holding a door open.
If the temperature
in the refrigerator
is too cold
• Refer to “Controlling the temperature”
(refer page 10).
• Increase the temperature to avoid high
energy consumption.
If heavy frosting
occurs in the freezer
Make sure you fully close the freezer and
fridge doors. If the doors are left partly
open a heavy frost will coat the inside of the
freezer. If a frost develops, remove it. Take
care to properly close the doors and the
frost will not reoccur.
If water drips on
the floor
The defrost water tray, (located at the back
or underneath of the cabinet), may not be
properly positioned, or the drain tube may
not be properly positioned to direct water
into this tray. You may need to pull the
refrigerator away from the wall to check
the tray and tube.
Fridge does not exit
vacation mode
Turn appliance off at the powerpoint. Leave
off for ve (5) minutes for the memory to
clear, then turn back on.
if your electronic
display does not
respond.
If no buttons have been pressed for
approx. 60 seconds there may be a
delay of up to 2 seconds before the
display reacts. This is normal and is
to prevent accidental changes to the
settings.

20 electrolux side by side refrigeration user manual
Troubleshooting
Ice maker problem checklist
problem possible causes solution
automatic ice-maker
The ice maker is not
making any ice
• Ice maker is in the OFF position • Put switch in the ON position
• Water tap is turned off • Turn on the water tap
• The freezer is not cold enough • See the PROBLEM section: “IF THE TEMPERATURE
IN THE REFRIGERATOR IS TOO WARM.” on page 19
• The water dispenser may not be dispensing water • If it isn’t, the ice & water lter cartridge may be clogged
or restricted by foreign material, and will need to
be replaced
• Filter may be blocked • Check and/or change lter
The ice-maker is not
making enough ice
• The ice maker is producing less ice than you expect • The ice maker should produce approximately
2–3 kilograms of ice every 24 hours
• The freezer is not cold enough • See section ‘Controlling Temperatures’ on page 10
• Household water tap is not open • Open the household water tap
• The water dispenser is dispensing slower than normal • Replace the water lter cartridge
Ice cubes are hollow
or smaller than normal
• Restricted water ow to the ice maker • Replace the lter cartridge, as the water lter cartridge
may be clogged.
The ice has a bad
odour and taste
• The ice has picked up odour or avour from strongly
flavoured food stored in the refrigerator or freezer
• Cover foods tightly. Discard stale ice. The ice maker will
produce a fresh supply
• Change ice monthly
• The water running into the ice maker has poor taste
or colour
• Add a lter to water supply line. Consult a water
purifying company
• Ice not used frequently enough • Discard stale ice monthly
ice dispenser
The dispenser will not
dispense ice
• The ice storage container is empty • When the rst supply of ice drops into the container,
the dispenser should operate.
• Household water tap is not open • Open the household water tap. Allow sufcient time for
the ice to be made. When ice is made the dispenser
should operate
• The wire signal arm is either held or jammed • Remove jam or free arm
• Ice maker switch is in OFF position • See ice maker section in user manual. Turn switch to
ON position
The ice dispenser is
jammed
• Ice has melted and frozen around the auger due to
infrequent use, temperature uctuations, and/or
power outages
• Remove the ice container and empty it’s contents.
Clean and dry the container and replace to its proper
position. When new ice is made, the dispenser
should operate
• Ice cubes are jammed between the ice maker and back
of ice container
• Remove ice cubes that are jamming dispenser
• Ice cubes are frozen together • Use the dispenser often so that cubes do not
freeze together
• Discard ice monthly
• Ice cubes are hollow or smaller than normal • The water lter cartridge could be clogged.
Cartridge may need replacing
If you still require service
If you have a problem, and the problem persists after you have
made the checks mentioned above, contact your nearest
approved Service Centre or dealer from whom you bought the
refrigerator. Be ready to quote the model number and 8-digit serial
number, which is stated
on the label inside the refrigerator compartment.
La pagina sta caricando ...
La pagina sta caricando ...
La pagina sta caricando ...
La pagina sta caricando ...
La pagina sta caricando ...
La pagina sta caricando ...
La pagina sta caricando ...
La pagina sta caricando ...
La pagina sta caricando ...
La pagina sta caricando ...
La pagina sta caricando ...
La pagina sta caricando ...
La pagina sta caricando ...
La pagina sta caricando ...
La pagina sta caricando ...
La pagina sta caricando ...
La pagina sta caricando ...
La pagina sta caricando ...
La pagina sta caricando ...
La pagina sta caricando ...
La pagina sta caricando ...
La pagina sta caricando ...
La pagina sta caricando ...
La pagina sta caricando ...
La pagina sta caricando ...
La pagina sta caricando ...
La pagina sta caricando ...
La pagina sta caricando ...
La pagina sta caricando ...
La pagina sta caricando ...
La pagina sta caricando ...
La pagina sta caricando ...
La pagina sta caricando ...
La pagina sta caricando ...
La pagina sta caricando ...
La pagina sta caricando ...
La pagina sta caricando ...
La pagina sta caricando ...
La pagina sta caricando ...
La pagina sta caricando ...
La pagina sta caricando ...
La pagina sta caricando ...
La pagina sta caricando ...
La pagina sta caricando ...
La pagina sta caricando ...
La pagina sta caricando ...
La pagina sta caricando ...
La pagina sta caricando ...
La pagina sta caricando ...
La pagina sta caricando ...
La pagina sta caricando ...
La pagina sta caricando ...
La pagina sta caricando ...
La pagina sta caricando ...
La pagina sta caricando ...
La pagina sta caricando ...
La pagina sta caricando ...
La pagina sta caricando ...
La pagina sta caricando ...
La pagina sta caricando ...
La pagina sta caricando ...
La pagina sta caricando ...
La pagina sta caricando ...
La pagina sta caricando ...
-
 1
1
-
 2
2
-
 3
3
-
 4
4
-
 5
5
-
 6
6
-
 7
7
-
 8
8
-
 9
9
-
 10
10
-
 11
11
-
 12
12
-
 13
13
-
 14
14
-
 15
15
-
 16
16
-
 17
17
-
 18
18
-
 19
19
-
 20
20
-
 21
21
-
 22
22
-
 23
23
-
 24
24
-
 25
25
-
 26
26
-
 27
27
-
 28
28
-
 29
29
-
 30
30
-
 31
31
-
 32
32
-
 33
33
-
 34
34
-
 35
35
-
 36
36
-
 37
37
-
 38
38
-
 39
39
-
 40
40
-
 41
41
-
 42
42
-
 43
43
-
 44
44
-
 45
45
-
 46
46
-
 47
47
-
 48
48
-
 49
49
-
 50
50
-
 51
51
-
 52
52
-
 53
53
-
 54
54
-
 55
55
-
 56
56
-
 57
57
-
 58
58
-
 59
59
-
 60
60
-
 61
61
-
 62
62
-
 63
63
-
 64
64
-
 65
65
-
 66
66
-
 67
67
-
 68
68
-
 69
69
-
 70
70
-
 71
71
-
 72
72
-
 73
73
-
 74
74
-
 75
75
-
 76
76
-
 77
77
-
 78
78
-
 79
79
-
 80
80
-
 81
81
-
 82
82
-
 83
83
-
 84
84


Aeg-Electrolux ENL60710X Manuale utente
- Categoria
- Frigo-congelatori
- Tipo
- Manuale utente
- Questo manuale è adatto anche per
in altre lingue
- English: Aeg-Electrolux ENL60710X User manual
- français: Aeg-Electrolux ENL60710X Manuel utilisateur
- Deutsch: Aeg-Electrolux ENL60710X Benutzerhandbuch
Documenti correlati
Altri documenti
-
Whirlpool 5GI6FARAF Guida utente
-
Electrolux EN6084MOX Manuale utente
-
Electrolux EN6084JOX Manuale utente
-
Electrolux EN6086MOX Manuale utente
-
-
-
-
-
-
Electrolux END52820X Manuale utente