Aeg-Electrolux S85582DT-RAEN Manuale utente
- Tipo
- Manuale utente

REFRIGERATION
CARE AND USE
INSTRUCTIONS
English
S85582DT
S85528KG

1 - Introduction
Important Safety Instructions .....................................3
Location .....................................................................3
Clearances around your refrigerator ..........................3
2 - Features at a glance
Top Mount (TM) Freezer models ...............................
4
Bottom Mount (BM) Freezer models ......................... 5
3 - Installation
Installing your new refrigerator .................................
6
Ice Station Assembly installation ..............................7
Top freezer models ............................................7
Bottom freezer models ......................................7
4 - Operating your refrigerator
Initial start up ............................................................8
Controlling the Temperature
Electronic (Digital Display) Models ...........................
9
Adjusting temperatures ..........................................9
Changing the freezer temperature .........................9
Changing the refrigerator temperature ..................9
Fast freeze function ...............................................9
Door alarm ...........................................................10
Freezer temperature alarm ...................................10
Vacation mode .....................................................10
Child Lock ............................................................10
Drinks (wine) chill timer ........................................10
Normal Mode .......................................................10
Eco Mode .............................................................10
Vacation Mode .....................................................10
Manual (rotary controlled models) ..........................11
Top freezer models ..............................................11
Bottom freezer models ........................................11
Dairy compartment .................................................13
Door storage bins ...................................................12
Crisper Bin ..............................................................12
Storing vegetables ..........................................12
Storing fruit and small goods ..........................12
Crisper bin and shelf removal .........................12
Sliding shelf deli-bin ...............................................13
Split glass shelf .......................................................13
Deodoriser ..............................................................13
Bottle Snugger .......................................................13
Freezer baskets (bottom freezer model only) .........14
Changing the Light Bulb
Food Compartment .........................................14
Freezer Compartment .....................................14
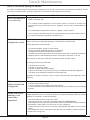
5 - Care & Maintenanc
e
Cleaning the refrigerator .........................................
15
Exterior ............................................................ 15
Cabinet ....................................................... 15
Doors - painted .......................................... 15
Doors - stainless steel ................................ 15
Interior ............................................................. 15
Keep the door seals clean ............................... 15
Safety ...................................................................... 15
What to do before calling for service ...................... 16
Warranty Information .............................................. 18
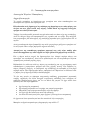
All rights in this publication are reserved and no part may be reproduced without the prior written permission
of Electrolux Home Products Pty Ltd (“Electrolux”). The contents of this publication are believed to be correct
at the time of publication but any information, products or services mentioned may be modified, supplemented
or withdrawn at any time. Due to its’ policy of continuous product development and improvement Electrolux
reserves the right in its’ sole discretion to change products specification and materials without notice.
Use & Care - contents
Page 2
Anti+bac
Several items in your new Electrolux refrigerator have been manufactured with an anti-bacterial additive.
The advantages of the anti+bac additive are:
• Provides Antimicrobial protection.
• Kills harmful bacteria.
• Reduce odours by killing odour causing bacteria.
• Is safe and harmless for humans and animals.
• Works continuously to protect from harmful bacteria and germs.
• Helps protect against cross contamination (the most common cause of food borne illness).
• Protection that’s built in during the manufacturing process, it won’t wash or wear off. It lasts the life of the product.
• Anti+bac is not a substitute for good hygiene practices.

Use & Care - contents
1 - Introduction
Dear Customer
Congratulations on the purchase of your new
refrigerator.
We at Electrolux Home Products are very proud of our
product and we are completely committed to providing
you with the best service possible.
Please read this Use & Care Manual very carefully. It
contains valuable information on how to properly maintain
your new refrigerator. We know you’ll enjoy your new
refrigerator and thank you for choosing our product. We
hope you will consider us for future purchases.
Follow the instructions below to ensure that you install it
safely and that it runs efficiently.
PLEASE READ AND SAVE THESE INSTRUCTIONS
This Use & Care Manual provides specific operating
instructions for your model. Use your refrigerator only as
instructed in this manual. These instructions are not meant
to cover every possible condition and situation that may
occur. Common sense and caution must be practiced
when installing, operating and maintaining any appliance.
Important:- Before you install your refrigerator, PLEASE
CHECK FOR ANY DAMAGE OR MARKS. If you find that
the refrigerator is damaged or marked, you must report
this within 7 days if you wish to claim for damage / marks
under the manufacturers warranty. This does not affect
your statutory rights.
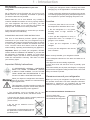
Important Safety Instructions
IF PRESSURISED AEROSOL CONTAINERS
BEAR THE WORD ‘FLAMMABLE’ AND/OR
A SMALL FLAME SYMBOL, DO NOT STORE
THEM INSIDE ANY REFRIGERATOR. IF YOU
DO SO YOU MAY CAUSE AN EXPLOSION
When you dispose of refrigerators and freezers,
remove any doors. Children can suffocate if they
get trapped inside.
This refrigerator contains insulation formed with
flammable blowing gases. Avoid safety hazards
by carefully disposing of this appliance.
• The refrigerator must be plugged into its own
dedicated 220-240 Volt, 50 Hz., AC electric outlet.
• Ensure that the electric outlet is properly earthed to
ground. Consult a qualified electrician if
you are unsure.
• Do not use an extension cord or
adapter plug.
• If the power cord is damaged, it should
be replaced by a service technician or a
qualified person .
• Unplug the refrigerator before cleaning and before
changing any of the light bulbs to avoid electric shock.
• Never unplug the refrigerator by pulling on the power
cord. Always grip the plug firmly, and pull straight out of
the receptacle to prevent damaging the power cord.
Location
• Choose a place that is not too cold -
the temperature should be above 10°C.
• Put the refrigerator in a dry place,
avoiding areas of high moisture or
humidity.
• Don’t put the refrigerator in frosty or
unprotected areas, for example in a
garage or on a veranda.
• Don’t put the refrigerator in direct
sunlight.
• Don’t put the refrigerator near stoves,
fires or heaters.
When correctly installed, your refrigerator should:
• have adequate clearance to the back and sides for air
circulation.
• be aligned to the surrounding cupboards.
• have doors that will self-close from a partially open
position.
• have the stability foot in place (see Diagram 4 on page 6)
to prevent the refrigerator falling forward when a door with
heavy food load is opened.
Clearances around your refrigerator.
Before you move your refrigerator into the place where it
will operate check that it will have adequate clearance.
Clearance is required for air circulation and too little
clearance may affect your refrigerators performance.
We recommend minimum clearances of:
• 3cm on each side.
• 9cm above the refrigerator.
• 5cm behind the refrigerator.
Page 3

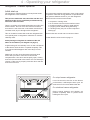
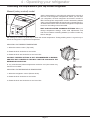
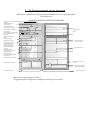
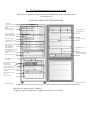
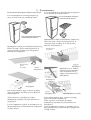
2 - Features at a glance
Please look at the diagram below before reading about how to care for your refrigerator
TOP FREEZER MODELS (TM)
Model shown: N520J
Features may vary according to model
Page 4

2 - Features at a glance
2 - Features at a glance
Please look at the diagram below before reading about how to care for your refrigerator
BOTTOM FREEZER MODELS (BM)
Model shown: NB430J
Features may vary according to model
Page 5

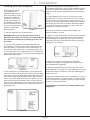
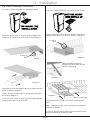
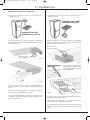
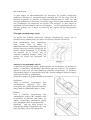
3 - Installation
Installing your new refrigerator.
The refrigerator should
arrive with the front
adjustable rollers wound
down to tilt the top of the
refrigerator backwards
by about 10-15mm from
upright (See Diagram 1).
The stability foot should
also be wound fully up so
it will not interfere with the
operation of the rollers
(See Diagram 2).
1. Roll the refrigerator into its final position.
WARNING: The rollers are designed for forward or
backward movement only. They are not castors. Moving
the refrigerator sideways may damage
your floor and
the rollers.
2. The top of the refrigerator should be tilted back by
approximately 10-15mm. This will allow the doors to self-
close providing a consistent door seal. (See Diagram 1)
It is normal for the freezer door to momentarily open and
re-close when the food compartment door is closed firmly.
If the freezer stays open you will need to tilt the refrigerator
backwards a little further.
3. If the refrigerator is not tilted back, you can adjust the
two front rollers by turning the large, plastic roller nut (See
Diagram 2). This will increase the height of the rollers. One
turn of the nut will tilt the refrigerator back approximately
10mm. If you have difficulty turning the roller nut you can
have someone tilt the refrigerator back, so that you have
better access. Alternatively, you can access the rollers from
the side, using a flat screwdriver to help you turn the nut
(see Diagram 2).
4. Check the alignment of the refrigerator to the
surrounding cupboards. The top of the refrigerator should
be level from side to side (see Diagram 3). If you need to
adjust the level, use the adjustable rollers as discussed in
Step 3.
5. If the refrigerator now rocks from one corner to the
opposite rear corner, this means that the floor is uneven;
you will need to put some packing under one of the rear
rollers.You could use thin pieces of solid material, such as
thin board, vinyl floor tiles or laminate. Place the packing
so that it will sit under one of the rear rollers when the
refrigerator is rolled into position.
6.You may now need to fine-tune the installation by
repeating Steps 3, 4 and 5.
7. When you have the refrigerator in final position wind the
stabilising foot down until it just makes contact with the
floor (see Diagram 4). Whenever you need to move the
refrigerator, be sure to wind the foot back up so that the
refrigerator can roll freely.
8. Clean your refrigerator thoroughly following the
instructions on page 15 and wipe off any dust that has
accumulated during shipping.
9. Plug the refrigerator into the power point. Don’t use a
double adaptor. If you need to roll the refrigerator out to get
at the power point, remember to raise the stabilizing foot
before you do so.
10.We recommend that you let your refrigerator run for two
to three hours before you put any food in it. This will allow
you to check that it is operating properly and that enough
cool air is going to the freezer.
Congratulations! You have successfully installed your
refrigerator.
Diagram 1
Diagram 2
Diagram 3
Diagram 4
Page 6

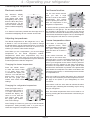
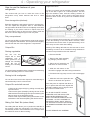
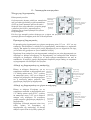
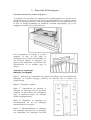
Ice Station Assembly Installation
To fit the Ice station assembly to a top freezer model;
Fit the Ice Station carrier to the wire shelf by alligning the
outside of the carrier to the wires as shown in diagram 1.
Then push down in the middle of the carrier until it clips into
place as shown in diagram 2
Finally, slide the ice cube trays or storage bin into position
as shown in diagram 2
To remove, take out the ice cube trays and storage bin and
simply lift the carrier off the wire shelf.
To fit the Ice station assembly to a bottom freezer model;
Fit the Ice Station carrier to the wire shelf by alligning the
outside of the carrier to the wires as shown in diagram 1.
Make sure the four clips are
engaged onto the central wire (as
shown in diagram 2)
Then push up in the middle of the carrier until it clips into
place
Finally, slide the ice cube trays or storage bin into position
as shown in diagram 3
To remove, take out the ice cube trays and storage bin and
simply pull the carrier off the wire shelf.
3 - Installation
Page 7
Diagram 1
Diagram 1
Diagram 2
Diagram 3
To rear of
shelf
To front of
shelf
Diagram 2
(Some models only)

4 - Operating your refrigerator
Initial start up
The refrigerator transfers heat from food placed inside
the refrigerator to the outside air.
This process makes the rear, the sides and the area
adjacent to the doors, particularly at initial start up,
feel warm. This is normal.
There is a cooling coil located behind the rear wall of the
freezer section. This coil cools and removes moisture
from the air. A fan at the rear of the freezer section then
circulates cold, dry air throughout the refrigerator.
This air circulation means that foods are refrigerated far
more quickly than in refrigerators where the air remains
relatively static.
Avoid placing food against air outlets as this will
affect air circulation. (see diagram
on page 5)
A light frosting will occasionally occur on the cold interior
of the freezer when the door is opened frequently. This
is normal and will disappear after a few days in most
climates.
Make sure you fully close the freezer and fresh food
doors after you load or remove food from these
compartments. If the doors are left partly open, a heavy
frost will coat the inside of the freezer. If a frost develops,
remove it. Take care to properly close the doors and the
frost will not reoccur.
Your new energy efficient refrigerator uses a high-speed
compressor and other energy efficient components that
may produce different noises to your old refrigerator.
These sounds are normal and include:
• compressor running noise.
• air movement noise from the small fan motor.
• occasional gurgling, similar to water boiling.
• a popping noise, heard during defrosting.
• a clicking noise, just prior to the compressor
starting up.
These noises are normal and not cause for alarm.
Further details can be found on page 17.
Refrigerator / Freezer operation
On a top freezer refrigerator
If food is forward of the ribs on the bottom
of the freezer, it will keep the door open. So
make sure food is stored behind the ribs.
On a bottom freezer refrigerator
Ensure freezer baskets and shelves are
pushed completely back to prevent them
holding the door open.
Page 8

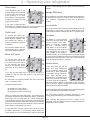
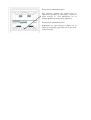
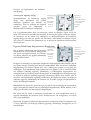
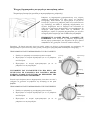
Electronic models
The electronic display
panel consists of an
LCD display with white
backlighting and 6 push
buttons. When the power
is first turned on, you will
see the default settings,
with the white backlighting
on.
If no buttons have been pressed and the fridge door is
closed the backlighting will turn off after 30 seconds.
Adjusting temperatures
The default temperature for the refrigerator is 3°C, with
a default of -18°C for the freezer. If you want to change
the temperatures, use the instructions below. You should
make only small adjustments and wait 24 hours to see
whether you need to make further changes.
Note: When you set a temperature, you set an average
temperature for the whole refrigerator cabinet.
Temperatures inside each compartment may vary,
depending on how much food you store and where you
place it. High or low room temperature may also affect the
actual temperature inside the refrigerator.
Changing the freezer temperature
Press the freezer button
to make the freezer colder
in 1°C steps. Once -23°C
is reached the display will
return to -14°C with the next
button press. You’ll notice
that the bar graph gets
smaller with colder freezer
settings.
Changing the refrigerator temperature
Press the fridge button to
make the fridge colder in
1°C steps. Once 0.0°C is
reached the display will
return to 7.0°C with the
next button press. The
bar graph gets smaller
with colder settings.
Note: Testing ice cream is a good way to test the freezer
temperature. Testing drinking water is a good way to
check the refrigerator compartment temperature.
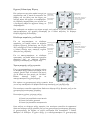
Fast freeze function.
Use the fast freeze function
when you add a large
amount of food to the freezer
compartment. This freezes
the food quickly but does not
affect the temperature in the
refrigerator compartment.
To use this function, press the
fast freeze button once. An
animated icon will light up. The fast freeze function will
now operate for 90 minutes. If you want to turn the fast
freeze function off before 90 minutes have passed, simply
press the fast freeze button again. The icon will disappear
and the refrigerator will return to normal operation.
Freezer temperature alarm.
If the alarm is sounding for
no apparent reason, check
whether anything is holding the
door open. Closing the door
resets the alarm for a further 2
minutes.
If the freezer becomes too
warm due to the freezer door
being left open or warm food being placed too close to
the temperature sensor in the freezer (see page 4 & 5,
Parts of your refrigerator for the sensor location). A buzzer
will sound, the icon adjacent to the alarm reset button,
the freezer set temperature and bar graph will all flash
until the alarm reset button is pressed. Once pressed the
alarm disable icon adjacent to the alarm reset button will
illuminate for 50 minutes, or until the temperature reaches
an acceptable level.
Make sure nothing is holding the freezer door open and
move any warm food away from the temperature sensor.
See page 5 & 6 (Parts of your Refrigerator) for more
information.
If the freezer is still too warm after 50 minutes the alarm
will sound again, indicating that something may be wrong
with your refrigerator.
Note: The freezer temperature alarm can be reset for 12
hours by pressing the alarm reset button continuously for
10 seconds.
4 - Operating your refrigerator
Controlling the temperature
Page 9
4 - Operating your refrigerator
Page 8

Door alarm.
If the refrigerator door is left
open for longer than 2 minutes
a buzzer will sound and an
arrow pointing to an open
door will flash. The refrigerator
temperature settings and bar
graph will also flash.
If you want to leave the door
open while you load the fridge, you can turn the alarm off
for 8 minutes by pressing the alarm reset button.
Child Lock
To activate the child lock,
press the alarm reset and fast
freeze buttons together. This
will disable the display to
prevent accidental changes
to settings.
To turn off the child lock press
and hold the alarm reset and
fast freeze buttons together.
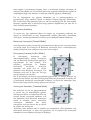
Wine chill timer.
To use the timer, press the
wine chill button once to set
a 10 minute time limit, twice
for 20 minutes and three
times for 30 minutes. Press
four times to turn the timer
off.
If you set the wine chill timer it will sound an alarm to
remind you that you have left drinks in your freezer for
quick chilling.
An animated icon appears beside the wine chill button
with a countdown timer.
Suggested chilling times:
10 minutes for cans of drink
20 minutes for bottles of wine
30 minutes for bottles of soft drink.
When you press the wine chill button, an animated icon
will appear beside the wine chill button with a countdown
timer. The timer will count down in 1 minute increments;
you can change the time or turn the timer off even after the
countdown has started. When the countdown is finished a
buzzer will sound and the icon beside the alarm will flash
until the alarm reset button is pressed.
To stop the alarm and turn off the wine chill timer, press
the Alarm reset button. If your drink is chilled, take it out
of the freezer. If it is not cold enough, reset the wine chill
function (remembering that the drink is already partially
chilled).
Energy Efficiency
Your refrigerator has been designed with energy efficiency
in mind and can operate in any of three modes (Normal,
Eco, Vacation), depending on the level of efficiency
sought.
Normal Mode
This is the mode which is entered automatically when the
refrigerator is first turned on. Normal Mode is the mode
most suitable when the refrigerator door is opened often.
Eco Mode
Eco Mode is a more efficient
mode than Normal Mode and
can be entered in two ways.
Either by manually pressing
the Eco / Vacation button
once when in Normal Mode,
or automatically after 30 hours
if the refrigerator door has not
been opened. If Eco Mode is
entered manually, door openings will not cause the display
to revert to Normal Mode, however if Eco Mode is entered
automatically, the refrigerator will revert to Normal Mode
once the refrigerator door is opened.
Vacation Mode
If you think that you will be
away from your refrigerator
for an extended period and
would like to take advantage
of maximum energy efficiency.
Then, from Normal Mode,
press the Eco / Vacation button
twice in succession just before
you leave and the refrigerator
will enter Vacation Mode, as indicated by the aeroplane
symbol. (If in Eco Mode a single button press is all that is
required to enter Vacation Mode).
Vacation Mode is exited automatically once the refrigerator
door is opened and Normal Mode resumes.
Eco and Vacation Modes minimise defrosting to save
energy, while maintaining your temperature settings.
Note: Opening the freezer door has no effect on the
operation of Eco and Vacation Modes, except if the freezer
temperature alarm sounds.
4 - Operating your refrigerator
Page 10

4 - Operating your refrigerator
Controlling the temperature in your top freezer refrigerator
Manual (rotary control) model
Set the temperature by using the main temperature controls at
the rear of the refrigerator compartment. When you first start
your refrigerator, set both refrigerator and freezer controls to
MID. The refrigerator temperature control is affected by altitude
and it is recommended that it be set warmer to compensate. E.g.
At 1000 metres above sea level set the refrigerator temperature
control to one setting warmer than MID.
WAIT 24 HOURS AFTER CHANGING SETTINGS: When you
change temperature settings, make small adjustments and
wait 24 hours before assessing whether you need to make any
further changes.
NB: Testing ice cream is a good way to check the freezer temperature. Testing drinking water is a good way to
check the refrigerator compartment temperature.
ADJUSTING THE FREEZER TEMPERATURE
1. Select the freezer control. (Top knob).
2. Rotate the knob clockwise to set Colder.
3. Rotate the knob anti-clockwise to set Less Cold.
COLDEST FREEZER SETTING IS NOT RECOMMENDED IN NORMAL
AND VERY HOT CLIMATES AS THIS WILL LIMIT THE COOLING TO THE
REFRIGERATOR SECTION.
In very cold climates (where temperatures are below 10°C) the freezer may
need to be set colder.
ADJUSTING THE REFRIGERATOR TEMPERATURE
1. Select the refrigerator control. (Bottom knob).
2. Rotate the knob clockwise to set Colder.
3. Rotate the knob anti-clockwise to set Less Cold.
4 - Operating your refrigerator
Page 11

How to use the features of your
refrigerator
This section tells you how to make the most of the
refrigerators many useful features and how to clean
them.
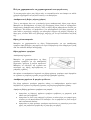
Door storage bins (shelves)
Both the refrigerator and freezer have door storage bins.
You can adjust the refrigerator bins to meet different
storage needs. All the door bins are completely removable
for cleaning. If you want to remove or adjust a bin, lift it
over the support lugs on the inner door panel. Push the
bin down over the support lugs to lock it in place.
Dairy compartment
You can use the Dairy compartment to store foods such as
butter, margarine and cheeses. The compartment is slightly
warmer than the rest of the refrigerator compartment.
Crisper Bin
Storing vegetables
You can use the
crisper bin to store
vegetables, fruit or
small goods.You can
change the humidity
inside the bin by
rotating the humidity
control.
You should store vegetables in the crisper bin remembering
to set the humidity control to more humid.
Storing fruit & smallgoods
You can also store fruit in the crisper bin remembering to
set the humidity control to less humid.
Crisper Bin and shelf removal
• Remove the crisper bin(s) by pulling forward, then
up and forward.
• Remove the glass (if fitted) by flexing the rear of the
shelf backward to disengage the clip and allowing the
glass to drop out of the plastic frame.
• Remove the crisper shelf by lifting the catches on the
underside of the shelf and pulling the shelf forward.
Sliding Deli Shelf/ Bin (where fitted)
The sliding deli bin allows you to position the deli-bin in
any position within the refrigerator. This allows you to
conveniently locate it around stored food or to align it with
the multi flow vents for direct cooling.
Usage Instructions:
In order to correctly use the deli bin it should be located
fully on the left or right or in a central position. This will
align the multiflow vents with the ducting surfaces at
the rear of the deli bin. One or both of the vents can be
opened to allow cooler air to pass over foodstuffs stored
in the deli.
The air from these vents can be very cold, which is useful
for the fast chilling of food and drinks. However, items
may freeze if left near the vents. To prevent freezing, move
items away from the vents after chilling.
Cleaning: The sliding deli shelf can be removed for ease
of cleaning. In order to do so a flexible locking mechanism
has been incorporated into the rear shelf rail.
• Remove Deli Bin
• Remove the shelf assembly
by pulling it past the stops.
• Place the full assembly up
side down on a flat surface.
• Slide the sub frame to the
left until it engages with the locking mechanism.
• Pull the thumb tag away from the rail to disengage
it.
• Slide the sub frame past this and
allow it to flex back into position.
Clean the parts as required and allow to
dry. To replace the sub frame repeat this
procedure making sure to align the front
lip on the front shelf recess.
ALL GLASS IS SAFETY GLASS.
HOWEVER CAUTION SHOULD BE
TAKEN WHEN REMOVING THE
SHELF FOR REPOSITIONING OR FOR
CLEANING. AS THE ASSEMBLY IS
RELATIVELY HEAVY AND IF HELD IN
THE VERTICAL POSITION (AS SHOWN)
THE RUNNER ASSEMBLY MAY DROP
DOWN.
DO NOT REMOVE ANY SCREWS!
4 - Operating your refrigerator
Page 12
4 - Operating your refrigerator

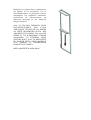
Spill safe glass shelves (where fitted)
Spill safe glass shelves keep spills on the shelf. A shelf
retaining system minimizes accidental movement of shelves.
The shelves can be adjusted to many different heights. Spill
safe glass shelves are not to be used as slide out shelves.
Split Glass Shelf (where fitted)
This shelf can be used either as a full depth shelf or when tall
items need to be stored at the front of the refrigerator it can
be collapsed to half its original depth.
To collapse the shelf:
• Pull the front half of the shelf
forward (1), then, from the
underside, lift the front half of
the shelf by raising the rear edge
over the recessed hook detail (2).
• Pull the shelf forward and allow the rear to drop into
the side channels.
• Push the front shelf backwards (3,4) until it reaches the
rear stops.
Repositioning:
The shelf can be repositioned within the refrigerator unit by
pulling the whole assembly out until the side panels are free
to pivot down, then pivoting the rear of the shelf until the
shelf is free from the liner runners. The shelf can then be
positioned in any of the runners – this is a very useful feature
if your appliance door happens to have limited access.
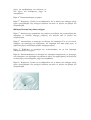
Deodoriser
Your refrigerator is fitted with a catalysing deodoriser to assist
with the removal of food odours inside your refrigerator.
It is located at the air
return so odours are
removed by adsorbtion
through the filter by the
normal operation of the
refrigerator (see diagram
1). Keeping food covered
and wrapping food with
plastic wrap will also help
to reduce the odours
inside your refrigerator.
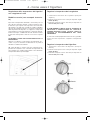
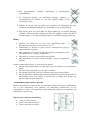
Bottle Snugger operation (where fitted)
The bottle snugger is used to prevent bottles from falling
over. The snugger consists of two parts, a sliding front,
and a rotating retainer ring. The retainer ring can be rotated
through 360° but has positive locations for horizontal and
vertical positions.
The snugger can be used in two positions:
Horizontal
When the snugger ring is
horizontal (A), any item that fits
within the ring can simply be
placed inside it.
Vertical
When the snugger ring is
vertical (B), it is possible to
simply slide the snugger along
the bottle retainer bar until it
is pushed up against a bottle.
Note: the bottle should be
constrained on the other side
by either the end of the bin or
other adjacent bottles.
4 - Operating your refrigerator
Page 13
Diagram 1
A
B
Front of shelf

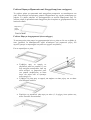
Freezer Baskets (where fitted)
Freezer baskets and a freezer shelf are fitted to bottom freezer
refrigerators. Wire baskets are used to provide easy visibility
of the contents. Both the baskets and the shelf pull out for
easy access and have a stop to prevent the basket and shelf
being pulled out to far.
To remove the basket
or shelf, pull it out until
it hits the stop then lift
the front to unhook the
stop whilke continuing
to pull forward,
Changing the Light Bulb
Food Compartment
Step 1. Switch off the power at the power point and remove
the refrigerator’s power cord from the power point.
Step 2. Remove shelves.
Step 3. Carefully unclip the light cover. You do this by pulling
the upper part of the cover towards the front of the cabinet.
(See Diagram below).
Step 4. Unscrew the light bulb
and replace it with a bulb that
is the same as the original.
Step 5. Replace the light cover
by hooking the light cover lugs
into the bottom of the housing
and pressing the upper part of
the cover until it clips in.
Step 6. Replace shelves.
Step 7. Wait 5 minutes to ensure
pressures in the refrigeration
system are equalized. Then
turn the refrigerator on at the
power point.
Freezer Compartment (where fitted)
Step 1. Switch off the power at the power point and remove
the refrigerator’s power cord from the power point.
Step 2. Carefully unclip the light cover. You do this by pulling
the light cover tab at the rear towards the front of the cabinet.
(See Diagram below)
Step 3. Unscrew the light bulb and replace it with a bulb that
is the same as the original.
Step 4. Replace the light cover by hooking the light cover lugs
into the front of the housing and pressing the rear of the cover
up until it clips in.
Step 5. Wait 5 minutes to ensure pressures in the refrigeration
system are equalized. Then turn the refrigerator on at the
power point.
5 - Care & Maintenance
Page 14

5 - Care & Maintenance
Cleaning the refrigerator
BEFORE CLEANING:- REMOVE THE POWER
CORD FROM THE POWER SOCKET. THIS
WILL MAKE SURE THERE IS NO CHANCE OF
GETTING AN ELECTRIC SHOCK.
Exterior
Cabinet
It is a good idea to polish the cabinet at least once a year,
using a high grade wax like the one you use on your car.
After that, an occasional wipe over with a clean, damp cloth
will help remove finger marks.
NOTE: Do not wax plastic parts or decorative trim.Wash these
in warm (not hot) water using an unscented detergent.
Doors - painted
Clean as described above for the cabinet.
Doors - stainless steel
Your stainless steel appliance is manufactured from a mark
resistant stainless steel. This stainless steel has a special
advanced protective coating that eases the removal of
marks such as finger prints and water spots. To keep your
stainless steel refrigerator looking at its best, you should
clean it regularly. You should only clean the stainless steel
doors with luke-warm soapy water and a soft cloth, rinsing
with clean water and then wipe the surface with clean water
and a soft clean cloth to remove soap residue.
It is important to wipe in the direction of the grain of the
stainless steel to avoid undue marking of the surface.
DO NOT USE STAINLESS STEEL CLEANERS,
ABRASIVE PADS OR OTHER CLEANERS
AS THEY ARE LIKELY TO SCRATCH THE
SURFACE.
DAMAGE TO THIS PRODUCT
AFTER DELIVERY IS NOT COVERED BY
YOUR WARRANTY
Interior
You should clean the refrigerator interior regularly. It will be
easiest to clean when the food supply is low.Wash the interior
with a soft cloth and use an unscented mild soap with luke-
warm water. Thoroughly dry all surfaces and removable parts.
Avoid getting water on refrigerator controls. If you have taken
out any removable parts, replace them and switch the power
on before re-stocking the refrigerator with food. Naturally,
you should keep the interior of your refrigerator hygienic by
promptly and thoroughly wiping up any food spills.
Keep the door seals clean
Take care to keep door seals clean. Sticky food and drink
can cause seals to stick to the cabinet and tear when you
open the door.Wash seal with a mild detergent and warm
water. Rinse thoroughly and dry.
WARNING:- Never use hot water, solvents, commercial
kitchen cleaners, aerosol cleaners, metal polishes,
caustic or abrasive cleaners, or scourers to clean this
appliance, as they will damage it. Many commercially
available cleaning products and detergents contain
solvents that will damage your refrigerator. When
cleaning, use only a soft cloth with an unscented mild
soap and luke warm water.
General Information
Safety
It is important to use your refrigerator safely. This means you
need to supervise young children and infirm persons when
they use it. You need to make sure that young children do
not play with the refrigerator. Follow the tips below.
DOs
• Check the power point is properly grounded - if you are
not sure get an electrician to check it.
• Switch off the refrigerator at the power point before you
clean or move it.
• If the supply cord is damaged you should have it replaced
by the manufacturer, it’s service agent or similarly qualified
person. This will prevent a safety hazard.
DON’Ts
•Never let children play with the refrigerator.
•Never store spray cans, explosive liquids
or flammable liquids in the refrigerator.
•Never store fizzy drinks in the freezer
compartment.
•Never lick icy foods when they first come
out of the freezer. This can freeze burn your
lips and mouth.
•Never try to repair the refrigerator yourself.
•Never use electric heaters or dryers to
defrost the freezer because you can receive
an electric shock.
• Never use electrical appliances inside the
food storage areas.
• This refrigerator contains insulation formed
with flammable blowing gases. For safety
reasons, take care when you dispose of it.
• Do not damage the refrigeration circuit.
WARNING:- When you dispose of your old
refrigerator, remove any doors. Children
can suffocate if they get trapped inside.
Page 15

Care & Maintenance
Page 16
What to do before calling for service
If you think something may be wrong with your refrigerator, you can carry out some easy checks before calling for service.
You may locate the problem, sparing yourself from inconvenience and saving time and money.
Problem Solution
When your appliance
is not operating
• Check that the power cord is plugged into the power outlet properly and that the
outlet is switched ‘ON’.
• Try running another appliance from the power outlet. If no power is coming from
the outlet you may have blown a fuse or tripped a circuit of your household power
supply.
• Try adjusting the temperature control to a slightly “colder” position.
• It is normal for the freezer fan NOT to operate during the automatic defrost cycle, or
for a short time after the refrigerator is switched on.
When there is
refrigerator noise
Modern refrigerator/ freezers with increased storage capacity use high speed compressors.
These can provide a seemingly high level of sound which is quite normal.
Normal operational sounds include:
• occasional gurgling, similar to water boiling.
• air flow noise (air circulates because of a small fan).
• a popping noise heard during automatic defrost.
• a clicking noise heard just before the compressor starts (this is merely the automatic
switching action of the temperature control, turning the compressor on or off).
Other strange sounds may mean that you need to check and take action.
For example, noises may mean that:
• the cabinet is not level.
• the floor is uneven or weak.
• bottles are badly placed and rattling.
• there are vibrations from an object on top of or behind or beside the refrigerator.
• the back of the refrigerator cabinet is touching the wall.
Remember it is quite normal for noise to seem louder just after the refrigerator starts
operating.
If there are
odours inside the
refrigerator
• the interior may need cleaning.
• some foods produce odours.
• some containers and wrapping can cause odours.
• ask yourself if the odour started about the same time you started storing something
unusual.
When the motor
seems to run
more than
expected
Your new refrigerator provides you with large capacities in both the refrigerator section
and the separate freezer. It is normal for the motor to operate frequently. However, to keep
operation to a minimum, check the following:
• Are doors kept open too long or too often?
• Are controls set too cold? See “CONTROLLING THE TEMPERATURE”.
• Have large amounts of warm food just recently been stored? Summer, festive seasons
and holidays usually mean a lot more work for your refrigerator.
• If the day is hot or the room is very warm, the refrigerator will need to run more than
normal.
• The refrigerator will run more that normal just after you install it or when it has been
turned off for a long time.

Care & Maintenance
Care & Maintenance
Problem Solution
If the temperature
in the refrigerator
is too warm
• Check that the refrigerator has enough clearance at the sides, back and top.
Refer to the installation Instructions at the front of this booklet.
• refer to “CONTROLLING THE TEMPERATURE”.
• you may have kept the door open too long or too frequently.
• food containers or packaging may be holding a door open.
If the temperature
in the refrigerator
is too cold
• refer to “CONTROLLING THE TEMPERATURE”.
• increase the temperature to avoid high energy consumption.
If the doors will
not close
• check whether the top of the refrigerator is tilted back 10-15mm to allow the
doors to self close.
• check whether something is holding the door open.
It is normal for the freezer door to momentarily open and re-close, when the food
compartment door is being closed. If the freezer stays open it indicates that the
refrigerator cabinet needs to be tilted backwards a little further. If you call a service
person to solve this problem you will be charged for the cost of the service call, as
this is not a warranty fault.
If heavy frosting
occurs in the
freezer
Make sure you fully close the freezer and fresh food doors after you load or remove
food from these compartments. If the doors are left partly open a heavy frost will coat
the inside of the freezer. If a frost develops, remove it. Take care to properly close the
doors and the frost will not reoccur.
If water drips on
the floor.
The defrost water tray, (located on the compressor at the back of the cabinet), may
not be properly positioned. Otherwise, the drain tube may not be properly positioned
to direct water into this tray. You may need to pull the refrigerator away from the wall
to check the tray and tube.
If you still require service
If you have a problem, and the problem persists after you have made the checks mentioned above, contact your nearest
Service Centre or the dealer you bought the refrigerator from. Be ready to quote the model number, which is stated on
the label on the refrigerator section inner plastic compartment liner wall.
Important Notice
Before Calling a Service Technician please check carefully the operating instructions, service booklet and the warranty
Page 17

Page 18
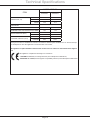
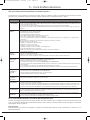
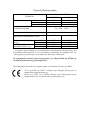
Technical Specifications
ITEM
MODEL GROUP
S85582DT S85528KG
DIMENSIONS (cm)
HEIGHT 172.0 172.0
WIDTH 80.2 80.2
DEPTH 74.3 74.3
POWER SUPPLY VOLTAGE AND
FREQUENCY
220-240v 50Hz
TOTAL POWER ABSORBED (W)
*AVERAGE DAILY UNITS ELECTRICITY (kWh)
1.07 1.19
GROSS CAPACITY (litres)
FRIDGE 395.7 348.7
FREEZER 121.4 156.3
STORAGE CAPACITY (litres)
FRIDGE 377.3 330.6
FREEZER 98.4 132.7
*This figure is based on standard test results in accordance with European Standard EN 153. Actual consump
-
tion will depend on how the appliance is used and where it is located.
This appliance complies with E.E.C Directive No. 87/308 of 2-6-87 relative to radio interference suppres
-
sion
This appliance complies the following E.E.C Directives:
- 73/23 EEC of 19.2.73 (Low Voltage Directive) and subsequent modifications;
- 89/336 EEC of 3-5-89 (Electromagnetic Compatibility Directive) and subsequent modifications

S85582DT
S85528KG
ISTRUZIONI PER LA
MANUTENZIONE
E L’USO
Istr S85582DT S85528KG 2-02-2005 17:21 Pagina 1

Manutenzione & uso - indice
3
1 - Introduzione
Importanti istruzioni sulla sicurezza ..............................4
Luogo di installazione ...................................................4
Distanze intorno al frigorifero........................................5
2 - Componenti del frigorifero
MODELLI CON CONGELATORE IN ALTO (TM) ............6
MODELLI CON CONGELATORE IN BASSO (BM) ........7
3 - Installazione
Installazionde del frigorifero..........................................9
Montare il cassetto per il ghiaccio ..............................12
Congelatore in alto (TM)..............................................12
Congelatore in basso (BM)..........................................12
4 - Come usare il frigorifero
Prima messa in funzione .............................................13
Regolazione della temperatura ...................................15
Modelli elettronici........................................................15
Regolare le temperature..............................................15
Modificare la temperatura del congelatore .................15
Modificare la temperatura del frigorifero.....................15
Funzione di congelamento rapido “Fast freeze”.........15
Allarme temperatura congelatore................................15
Allarme porta...............................................................17
Opzione “blocco bambini” ..........................................17
Funzione di raffreddamento rapido bevande e vino
“Wine chill”..................................................................17
Efficienza energetica ...................................................17
Modalità “Normal”.......................................................17
Modalità “Eco” ............................................................17
Modalità “Vacation” ....................................................17
Modello manuale (con manopola termostato) ............18
Cassetti sulla porta (ripiani).........................................19
Contenitore formaggi (se in dotazione).......................19
Cassetto verdura.........................................................19
Conservare le verdure .................................................19
Conservare frutta e prodotti di piccole dimensioni.....19
Rimuovere il cassetto verdura ed il ripiano.................19
Cassetti “Store safe” (se in dotazione)............................
Cassetto “Deli” (se in dotazione).....................................
Ripiani di vetro anti spandimento (se in dotazione) ....20
Ripiano in vetro pieghevole (se in dotazione)..................
Cestelli del congelatore (se in dotazione) ...................21
5 - Cura & Manutenzione
Cambiare la lampadina ...............................................22
Scomparto alimenti.....................................................22
Vano congelatore (se in dotazione) .............................22
Pulire il frigorifero ........................................................23
Esterno........................................................................23
Mobile .........................................................................23
Porte - verniciate.........................................................23
Porte - acciaio inossidabile.........................................23
Interno.........................................................................23
Tenere pulite le guarnizioni della porta........................23
Sicurezza.....................................................................23
Che cosa fare prima di contattare l’assistenza tecnica 25
Dati tecnici ..................................................................28
Tutti i diritti relativi a questa pubblicazione sono riservati. Nessuna parte di essa potrà essere riprodotta senza il previo
consenso scritto di Electrolux Home Products Pty Ltd (“Electrolux”). Il contenuto di questo libretto si ritiene corretto al
momento della pubblicazione ma informazioni, prodotti o servizi qui menzionati potranno essere modificati, integrati o
ritirati in qualsiasi momento. Lavorando per il continuo sviluppo e miglioramento dei suoi prodotti Electrolux si riserva
il diritto, a propria totale discrezione, di modificare le specifiche del prodotto ed i materiali senza darne alcun preavvi-
so alla clientela.
Istr S85582DT S85528KG 2-02-2005 17:21 Pagina 3
La pagina si sta caricando...
La pagina si sta caricando...
La pagina si sta caricando...
La pagina si sta caricando...
La pagina si sta caricando...
La pagina si sta caricando...
La pagina si sta caricando...
La pagina si sta caricando...
La pagina si sta caricando...
La pagina si sta caricando...
La pagina si sta caricando...
La pagina si sta caricando...
La pagina si sta caricando...
La pagina si sta caricando...
La pagina si sta caricando...
La pagina si sta caricando...
La pagina si sta caricando...
La pagina si sta caricando...
La pagina si sta caricando...
La pagina si sta caricando...
La pagina si sta caricando...
La pagina si sta caricando...
La pagina si sta caricando...
La pagina si sta caricando...
La pagina si sta caricando...
La pagina si sta caricando...
La pagina si sta caricando...
La pagina si sta caricando...
La pagina si sta caricando...
La pagina si sta caricando...
La pagina si sta caricando...
La pagina si sta caricando...
La pagina si sta caricando...
La pagina si sta caricando...
La pagina si sta caricando...
La pagina si sta caricando...
La pagina si sta caricando...
La pagina si sta caricando...
La pagina si sta caricando...
La pagina si sta caricando...
La pagina si sta caricando...
La pagina si sta caricando...
La pagina si sta caricando...
La pagina si sta caricando...
La pagina si sta caricando...
La pagina si sta caricando...
La pagina si sta caricando...
La pagina si sta caricando...
La pagina si sta caricando...
-
 1
1
-
 2
2
-
 3
3
-
 4
4
-
 5
5
-
 6
6
-
 7
7
-
 8
8
-
 9
9
-
 10
10
-
 11
11
-
 12
12
-
 13
13
-
 14
14
-
 15
15
-
 16
16
-
 17
17
-
 18
18
-
 19
19
-
 20
20
-
 21
21
-
 22
22
-
 23
23
-
 24
24
-
 25
25
-
 26
26
-
 27
27
-
 28
28
-
 29
29
-
 30
30
-
 31
31
-
 32
32
-
 33
33
-
 34
34
-
 35
35
-
 36
36
-
 37
37
-
 38
38
-
 39
39
-
 40
40
-
 41
41
-
 42
42
-
 43
43
-
 44
44
-
 45
45
-
 46
46
-
 47
47
-
 48
48
-
 49
49
-
 50
50
-
 51
51
-
 52
52
-
 53
53
-
 54
54
-
 55
55
-
 56
56
-
 57
57
-
 58
58
-
 59
59
-
 60
60
-
 61
61
-
 62
62
-
 63
63
-
 64
64
-
 65
65
-
 66
66
-
 67
67
-
 68
68
-
 69
69


Aeg-Electrolux S85582DT-RAEN Manuale utente
- Tipo
- Manuale utente
Documenti correlati
-
Aeg-Electrolux S85528KG-RAEN Manuale utente
-
-
AEG Electrolux S85582DT-RAEN Manuale utente
-
Aeg-Electrolux S85582DT Manuale utente
-
-
-
-
Altri documenti
-
Rex-Electrolux RC510SNF-RUER Manuale utente
-
-
-
Electrolux ENL60810X Manuale utente
-
-
Dometic C20G Istruzioni per l'uso
-
Hoover HP 510WL Manuale utente
-
-
-