Ohaus V41PWE3T Manuale utente
- Categoria
- Bilance da cucina
- Tipo
- Manuale utente
Questo manuale è adatto anche per

Valor™ 4000W Series
Instruction Manual
Serie Valor™ 4000W
Manual de instrucciones
Série Valor™ 4000W
Manuel d’instructions
Valor™ 4000W Serie
Bedienungsanleitung
Serie Valor™ 4000W
Manuale di istruzioni


Valor™ 4000W Series EN-1
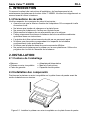
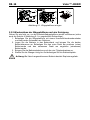
1. INTRODUCTION
This manual contains installation, operation and maintenance instructions for the
Valor™ 4000W Series. Please read the manual completely before using the scale.
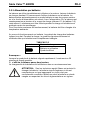
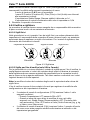
1.1 Safety Precautions
Please follow these safety precautions:
Verify that the AC Adapter input voltage matches the local AC power supply.
Do not drop loads on the platform.
Do not place the scale upside down on the platform.
Disconnect the scale from power supply when cleaning.
Operate the scale only under ambient conditions specified in these
instructions.
Service should be performed only by authorized personnel.
Only use weights within the scale’s capacity as specified in these instructions.
Do not operate the scale in hostile environments.
Do not carry the scale by the pan or sub-platform. Use the handholds on the
side of the scale housing.
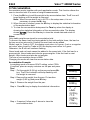
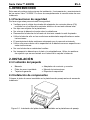
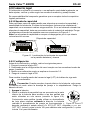
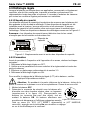
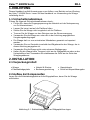
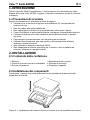
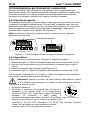
2. INSTALLATION
2.1 Package Contents
Scale
Stainless Steel Pan
Power Adapter & Plug
Instruction Manual
Warranty Card
Capacity Label
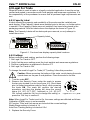
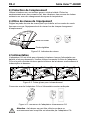
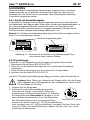
2.2 Installing Components
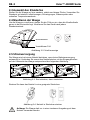
Place the stainless steel pan onto the weighing platform before turning the scale on.
Figure 2-1. Install the Stainless Steel Pan onto the weighing platform

EN-2 Valor™ 4000W Series
2.3 Selecting the Location
Use the scale on a clean, firm and flat surface. Avoid locations with excessive air
current, vibrations, heat sources, or rapid temperature changes.
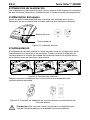
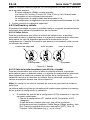
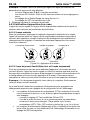
2.4 Leveling the Equipment
Adjust the leveling feet so the bubble is centered in the circle. Be sure the
equipment is level each time its location is changed.
Figure 2-2. Level Indicator
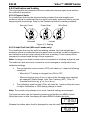
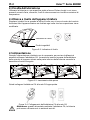
2.5 Power
The AC Adapter is used to power the scale when battery power is not needed.
First connect the AC Adapter plug to the scale input jack located at the bottom of
the scale according to the description below.
Figure 2-3. Slide to plug in
Then connect the AC adapter to the proper AC supply.
Figure 2-4. Connecting the AC adapter to AC supply
Caution: The scale can only be used in a dry environment when
powered by the AC adapter.
Level Bubble
Adjustable Feet

Valor™ 4000W Series EN-3
2.5.1 Battery Power:
The scale can be used on AC power immediately. Allow the battery to charge
for 12 hours before using the scale on battery power. The scale will
automatically switch to battery operation if there is a power failure or the power
cord is removed. With AC power, the scale is constantly charging, so the
battery charge indicator (see item 11 in table 3-2) will remain lit. The scale can
be operated during charging, and the battery is protected against overcharging.
For maximum operating time, the battery should be charged at room
temperature.
During battery operation, the battery symbol indicates the battery charging
status. When charging, the symbol will blink slowly and when fully charged the
symbol will stop blinking.
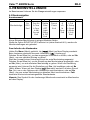
TABLE 2-1
Symbol
Charge Level
Battery in use:
Symbol displayed
Notes:
When battery symbol blinks fast, approximately 30 minutes working time is left.
When [Lo.bAt] is displayed, the scale will shut off.
Charging the scale must be performed in a dry environment.
CAUTION: Battery is to be replaced only by an authorized
OHAUS service dealer. Risk of explosion can occur if the
rechargeable battery is replaced with the wrong type or if it is
not properly connected. Dispose of the lead acid battery
according to local laws and regulations.

EN-4 Valor™ 4000W Series
3. OPERATION
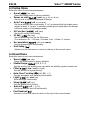
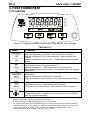
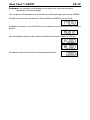
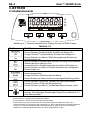
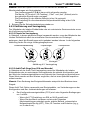
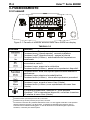
3.1 Controls
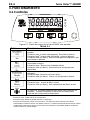
Figure 3-1. Front Control Panel Valor 4000W with display
TABLE 3-1
Button
Functions
Short Press
1
(when on): Sets display to zero
Short Press (when off): Turns scale on
Long Press
2
(when on): Turns the scale off
Short Press (in Menu): Selects / accepts displayed setting
Short Press: Accumulates the weight or displays the
accumulated information at 0 load.
Long Press: Toggles through active Units
Short Press (in Menu): Toggles through available settings
Short Press: Initiates an application mode specific response
Long Press: Selects active Mode
Short Press (in Menu): returns to previous settings
Short Press: Enter / clear a Tare value
Long Press: Enters User Menu
Short Press (in Menu): Quickly exit User Menu
IR Sensor
3
can be programmed to act as “touchless” button.
See the User Menu section 4.3 for the available settings.
Notes:
1
Short Press: Press less than 2.5 seconds.
2
Long Press: Press and hold for more than 2.5 seconds.
3
The IR sensor can be activated by a hand or other object that is placed at a specified height (see
section 4.3) from the sensor. The sensor activation distance will vary based on the reflective nature
of the object. If unwanted activations occur due to unique situations the sensor can be turned off.

Valor™ 4000W Series EN-5
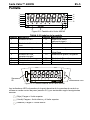
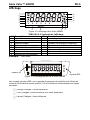
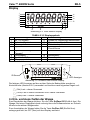
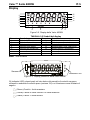
Display
TABLE 3-2 Display Symbols
Item
Description
Item
Description
1
NET symbol
9
Calibration / Menu Mode symbol
2
Center of Zero symbol
10
Dynamic symbol*
3
Negative symbol
11
Battery charge symbol
4
Stable weight symbol
12
Pound, Ounce, Pound:Ounce symbol
5
Preset Tare symbol*
13
Gram, Kilogram symbols
6
Pointer symbols
14
Pieces symbol*
7
IR Sensor symbol
15
Percent symbol
8
Accumulation symbol
Note: * Not Used
Figure 3-3. Valor 4000W Rear display.
The colored LED indicators on the right side of the control panels are used in
Checkweigh mode (section 3.6) and will light up according to the following rules:
(Red) Loads > Upper limit
(Green) Loads ≥ Lower limit and ≤ Upper limit
(Yellow) Loads < Lower limit
1
1
IR Sensor
Figure 3-2. Valor 4000W Display
1
2
1
3
1
4
1
5
1
6
1
7
1
8
1
9
1
10
1
11
1
12
1
13
1
14
1
15
LED Indicators

EN-6 Valor™ 4000W Series
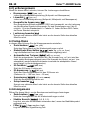
3.2 Turning Scale On/Off
To turn the scale on, press the On/Zero Off button. The scale performs a display
test, momentarily displays the software version, and then enters the active weighing
mode.
To turn the scale off, press and hold the On/Zero Off button until OFF is displayed.
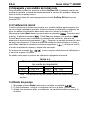
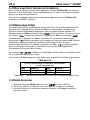
3.3 Initial Calibration
When the scale is first installed it should be calibrated to ensure accurate results.
Before performing the calibration, be sure to have the appropriate calibration
weights as listed in table 3-3.
Press and hold Menu until [mMeNU] (Menu) is displayed. When the button is released,
the display will display [C.A.L]. Press Yes to accept, [SpaN] will then be shown. Press
Yes again to begin the span calibration. [--C--] blinks while zero reading is stored.
Next, the display shows the calibration weight value. Place the specified calibration
mass on the pan and press Yes. [--C--] blinks while the reading is stored. The scale
returns to the previous application mode and is ready for use.
The message [Err 3.0 CAl] will be displayed if these calibration steps were not
followed or if the wrong weight was used.
The calibration process can be aborted by turning the scale off.
TABLE 3-3
Required Span Calibration Mass (sold separately)
Max
Mass
1
Max
Mass
1
1500g
1.5kg / 3lb
6000g
6kg / 15lb
3000g
3kg / 6lb
15000g
15kg / 30lb
Note:
1
Pound masses are used when calibrating in the lb unit.
3.4 Weigh Mode
1. Press and hold Mode until [wJeIGH] (Weigh) is displayed.
2. If required, place an empty container on the pan and press Tare.
3. Add sample to the pan or container. The display shows the weight of the
sample.

Valor™ 4000W Series EN-7
3.5 Percent Mode
This mode measures the weight of a sample as a percentage of a reference weight.
1. Press and hold Mode until [PerCNt] is displayed. [Clr.ref] (clear reference) will
then display.
Notes: Press Function to view the current reference weight.
If there is no reference data stored, [Set.ref] is displayed. Press Yes to
set reference data.
2. Press No to use the stored reference weight and proceed to step 6.
3. If required, place an empty container on the pan and press Tare. Press Yes to
establish a new reference. Scale will now display [PUt.ref].
4. Add the desired reference material to the container. Press Yes to store the
reference weight. The display shows 100%.
5. Remove the reference material. If required, place an empty container on the
pan and press Tare.
6. Add the sample material. The display shows the percentage of the sample
compared to reference weight.
7. To clear the stored reference data press and hold Mode until [PerCNt] is
displayed. Press Yes when [Clr.ref] is displayed.
3.6 Checkweigh Mode
This mode sets low and high weight limits for portion control processes.
1. Press and hold Mode until [CHeCk] (Check) is displayed. [CLr.ref] (clear
references) will then display.
Notes: Press Function to view the low and high reference weight limits.
If there is no reference data stored, [Set.ref] is displayed. Press Yes to
set reference data.
2. Press No to use the stored reference weight limits and proceed to step 5.
3. Press Yes to establish new reference values. The scale will then display [Set.
LO]. Press Yes to view the “Low” limit value. Press Yes to accept or No to edit
the “Low” limit value. The stored value then displays with the first digit
highlighted [000.000 kg]. Repeatedly press No until the desired number
appears. Press Yes to accept and highlight the next digit. Repeat until all the
digits are correct. Press Yes to accept the “low” limit value, [Set. HI] will be
displayed.
4. Repeat the same procedure to accept or edit the “high” value.
5. If required, place an empty container on the pan and press Tare. Place
sample material on the pan or in the container. If the sample weight is under
the target weight range, the yellow LED will light. If the sample is within the
target weight range, the green LED will light. If the sample is over the target
weight range, the red LED will light.
6. To clear the stored reference values press and hold Mode until [CHeCk] is
displayed. Press Yes when [Clr.ref] is displayed.

EN-8 Valor™ 4000W Series
3.7 Accumulation
Accumulation works together with each application mode. This function allows the
user to store the total of a series of weight measurements.
1. Press the M+ key to add the weight to the accumulation data. The Σ icon will
keep flashing until the weight is removed.
Note: When Accumulate is set to AUTO in the setup menu, it is not
necessary to press the M+ key.
2. When the pan is cleared, press the M+ key to display the statistical information
of the accumulation data.
3. To clear the accumulation data press the Tare key when the display is
showing the statistical information of the accumulation data. The display
shows [Clr.aCC]. Press the Yes key to clear the stored data and return to
current mode.
Notes:
Only stable weights are stored to accumulation total.
To prevent the same load from being added to the total multiple times, the load on
the pan must be returned to 0 before the next load can be added.
When Legal for Trade is OFF, the display must return to 0 gross, 0 net or a negative
net value; when Legal for Trade is ON, the display must return to 0 gross.
Otherwise, the Σ icon will continue flashing.
Gross loads and net loads cannot be added to the same total. If the first load is a
gross weight, future loads must also be gross weights. If the first load is a net
weight, future loads must also be net weights.
The max of accumulation times is 9999.
Changing the mode will clear the accumulation data.
Accumulation Example:
In weighing mode; sub menu ACCUmM setting, select mMaNU:
If required, place an empty container on the pan and press
Tare.
Step i. Put the weight (0.04 kg) on the pan and press M+
key. The Σ icon indicator will keep flashing until
the weight is removed.
Step ii. Remove the weight from the pan. Put another
weight (0.03 kg) and press M+ key:
Step iii. Remove the weight from the pan:
Step iv. Press M+ key to display the statistical information:
Step v. If required, follow step 3 above to clear the
accumulation data.
N 2
tOtal
0.070 kg
mMIN
0.030 kg
mMax
0.040 kg
mMaNU
*
0.040 kg
*
0.030 kg
*
0.000 kg

Valor™ 4000W Series EN-9
4. MENU SETTINGS
The User Menu allows the customizing of scale settings.
4.1 Menu Navigation
User Menu:
Menu:
C.A.L
S.E.t.U.P
r.E.A.d
M.O.d.E
U.n.i.t
L.O.C.k
E.n.d
Menu
Items:
Span
Lin
GEO
End
Reset
Pwr.Un
A.Tare
Ir.Func
Ir.Adj
Accum
End
Reset
Stable
Filter
AZT
Light
Sleep
A.Off
End
Reset
Percnt
Check
End
kg
g
oz
lb
lb:oz
End
Reset
L.Cal
L.Setup
L.Read
L.Mode
L.Unit
End
Notes:
Some Units/Modes may not be available in all models.
When LEGAL FOR TRADE is set to ON (see section 4.9), the menu settings are
affected.
To Enter the Menu Mode
Press and hold Menu until [mMeNU] (Menu) is displayed. When released the first sub-
menu [C.a.l] (Cal) will be shown.
Press Yes to enter the displayed sub-menu or press No to advance to the next.
Selecting a sub-menu will display the first menu item. Press Yes to view the menu
item setting or press No to move to the next menu item. When viewing the setting,
press Yes to accept the setting, or press No to change the setting. When [End] is
displayed, press Yes to return to the sub-menu selections or No to return to the first
item in the current menu. Bold indicates factory default setting.
Note: The Calibration / Menu Mode indicator is displayed when in the Menu Mode.
4.2 Cal Menu
Enter this menu to perform calibrations.
Span [SpaN] (yes, no)
Initiates a span calibration procedure (zero and span).
Lin [LIN] (yes, no)
Initiates a linearity calibration procedure (zero, mid-point and span).
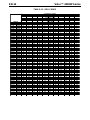
GEO [GEO]
Geographical Adjustment Factor (GEO) is used to adjust the calibration
based on the current location. Settings from 0 to 31 are available with 12
being the default. Refer to table 4-1 to determine the GEO factor that
corresponds to your location.
End Cal [End]
Advance to the next menu or return to the top of the current menu.

EN-10 Valor™ 4000W Series
4.3 Setup Menu
Enter this menu to set scale parameters.
Reset [reset] (no, yes)
Reset the Setup menu to factory defaults.
Power on unit [pwWr.UN] (auto, kg, g, lb, oz, lb:oz)
Set the unit of measure displayed at startup
Auto Tare [A.tArE] (off, on, on-acc)
Set the automatic tare functionality. If “on” is selected the first stable gross
weight is tared. If “on-acc” is selected, stable gross loads within the accept
limits are tared (in Checkweigh mode)
IR Function [Ir.FUNC] (off, tare)
Set the IR sensor functionality.
IR Adj [Ir.adj] (hi, low)
Set the detecting level for the IR sensor.
(For reference: Hi: ~ 100 mm / 4 inches; Low: ~ 50mm / 2 inches)
Accumulation [aCCUmM] (off, auto, manu)
Set the accumulation functionality.
End Setup [End]
Advance to the next menu or return to the top of the current menu.
4.4 Read Menu
Enter this menu to set user preferences.
Reset [reset] (no, yes)
Reset the Read menu to factory defaults.
Stable Range [Stable] (0.5, 1, 2, 5)
Set the amount the reading can vary while the stability symbol remains on.
Filter [FILtEr] (low, medium, high)
Set the amount of signal filtering.
Auto-Zero Tracking [AZt] (off, 0.5, 1, 3)
Set the automatic zero tracking functionality.
Light [LIGHt] (hi, med, low)
Sets backlight functionality.
Sleep [SLEEP] (off, on)
Set the display shut off time.
Auto off [A.OFF] (off, 1, 5, 10)
Set the automatic shut off functionality.
End Readout [End]
Advance to the next menu or return to the top of the current menu.

Valor™ 4000W Series EN-11
4.5 Mode Menu
Enter this menu to activate modes so they will be available for use with the Mode
button. Weigh mode is always active by default.
Reset [reset] (no, yes)
Reset the Mode menu to factory defaults.
Percent [PerCNt] (off, on)
Set the status.
Check [CHECk] (off, on)
Set the sub-mode.
End Mode [End]
Advance to the next menu or return to the top of the current menu.
4.6 Unit Menu
Enter this menu to activate units so they will be accessible with the Units button.
The units in the menu must be turned “on” to be active.
Note: Available units vary by model and local regulations.
4.7 Lock Menu
The Lock Menu is a software controlled option which can lock Menu settings to
prevent tampering.
Reset [reset] (no, yes)
Reset the Lock menu to factory defaults.
Lock Cal [l.CAL] (off, on)
Set the status.
Lock Setup [l.SEtUP] (off, on)
Set the status.
Lock Read [l.rEAD] (off, on)
Set the status.
Lock Mode [l.mMOdE] (off, on)
Set the status.
Lock Unit [l.UNIt] (off, on)
Set the status.
End Lock [End]
Advance to the next menu or return to the top of the current menu.
4.8 End Menu
Press ‘Yes’ to advance to the Calibration menu. Press ‘No’ to exit the menu and
return to the current application mode.

EN-12 Valor™ 4000W Series
TABLE 4-1. GEO CODES
0 325 650 975 1300 1625 1950 2275 2600 2925 3250
325 650 975 1300 1625 1950 2275 2600 2925 3250 3575
0 1060 2130 3200 4260 5330 6400 7460 8530 9600 10660
1060 2130 3200 4260 5330 6400 7460 8530 9600 10660 11730
0°00' 5°46' 5 4 4 3 3 2 2 1 1 0 0
5°46' 9°52' 5 5 4 4 3 3 2 2 1 1 0
9°52' 12°44' 6 5 5 4 4 3 3 2 2 1 1
12°44' 15°06' 6 6 5 5 4 4 3 3 2 2 1
15°06' 17°10' 7 6 6 5 5 4 4 3 3 2 2
17°10' 19°02' 7 7 6 6 5 5 4 4 3 3 2
19°02' 20°45' 8 7 7 6 6 5 5 4 4 3 3
20°45' 22°22' 8 8 7 7 6 6 5 5 4 4 3
22°22' 23°54' 9 8 8 7 7 6 6 5 5 4 4
23°54' 25°21' 9 9 8 8 7 7 6 6 5 5 4
25°21' 26°45' 10 9 9 8 8 7 7 6 6 5 5
26°45' 28°06' 10 10 9 9 8 8 7 7 6 6 5
28°06' 29°25' 11 10 10 9 9 8 8 7 7 6 6
29°25' 30°41' 11 11 10 10 9 9 8 8 7 7 6
30°41' 31°56' 12 11 11 10 10 9 9 8 8 7 7
31°56' 33°09' 12 12 11 11 10 10 9 9 8 8 7
33°09' 34°21' 13 12 12 11 11 10 10 9 9 8 8
34°21' 35°31' 13 13 12 12 11 11 10 10 9 9 8
35°31' 36°41' 14 13 13 12 12 11 11 10 10 9 9
36°41' 37°50' 14 14 13 13 12 12 11 11 10 10 9
37°50' 38°58' 15 14 14 13 13 12 12 11 11 10 10
38°58' 40°05' 15 15 14 14 13 13 12 12 11 11 10
40°05' 41°12' 16 15 15 14 14 13 13 12 12 11 11
41°12' 42°19' 16 16 15 15 14 14 13 13 12 12 11
42°19' 43°26' 17 16 16 15 15 14 14 13 13 12 12
43°26' 44°32' 17 17 16 16 15 15 14 14 13 13 12
44°32' 45°38' 18 17 17 16 16 15 15 14 14 13 13
45°38' 46°45' 18 18 17 17 16 16 15 15 14 14 13
46°45' 47°51' 19 18 18 17 17 16 16 15 15 14 14
47°51' 48°58' 19 19 18 18 17 17 16 16 15 15 14
48°58' 50°06' 20 19 19 18 18 17 17 16 16 15 15
50°06' 51°13' 20 20 19 19 18 18 17 17 16 16 15
51°13' 52°22' 21 20 20 19 19 18 18 17 17 16 16
52°22' 53°31' 21 21 20 20 19 19 18 18 17 17 16
53°31' 54°41' 22 21 21 20 20 19 19 18 18 17 17
54°41' 55°52' 22 22 21 21 20 20 19 19 18 18 17
55°52' 57°04' 23 22 22 21 21 20 20 19 19 18 18
57°04' 58°17' 23 23 22 22 21 21 20 20 19 19 18
58°17' 59°32' 24 23 23 22 22 21 21 20 20 19 19
59°32' 60°49' 24 24 23 23 22 22 21 21 20 20 19
60°49' 62°90' 25 24 24 23 23 22 22 21 21 20 20
62°90' 63°30' 25 25 24 24 23 23 22 22 21 21 20
63°30' 64°55' 26 25 25 24 24 23 23 22 22 21 21
64°55' 66°24' 26 26 25 25 24 24 23 23 22 22 21
66°24' 67°57' 27 26 26 25 25 24 24 23 23 22 22
67°57' 69°35' 27 27 26 26 25 25 24 24 23 23 22
69°35' 71°21' 28 27 27 26 26 25 25 24 24 23 23
71°21' 73°16' 28 28 27 27 26 26 25 25 24 24 23
73°16' 75°24' 29 28 28 27 27 26 26 25 25 24 24
75°24' 77°52' 29 29 28 28 27 27 26 26 25 25 24
77°52' 80°56' 30 29 29 28 28 27 27 26 26 25 25
80°56' 85°45' 30 30 29 29 28 28 27 27 26 26 25
85°45' 90°00' 31 30 30 29 29 28 28 27 27 26 26
Elevation in meters
Elevation in feet
GEO value
Latitude

Valor™ 4000W Series EN-13
4.9 Legal For Trade
When the scale is used in trade or a legally controlled application it must be set up,
verified and sealed in accordance with local weights and measures regulations. It is
the responsibility of the purchaser to ensure that all pertinent legal requirements are
met.
4.9.1 Capacity Label
A label showing the capacity and readability of the scale must be installed near
each display. If the Capacity Labels were installed prior to delivery, no further action
is needed. If the Capacity Labels were not installed, they have been placed in the
packaging material. Affix the labels above the displays as shown in Figure 4-1.
Note: The Capacity Labels will be destroyed upon removal, so only attempt to
install them once.
Figure 4-1. Front and rear display capacity label locations
4.9.2 Settings
Before verification and sealing, perform the following steps:
1. Set Legal For Trade to OFF.
2. Verify that the menu settings meet the local weights and measures regulations.
3. Perform a calibration as explained in Section 3.3.
4. Set Legal For Trade to ON.
To change the scale’s Legal For Trade (LFT) setting, follow this procedure:
Caution: When accessing the bottom of the scale, avoid placing the scale
upside down on the pan or sub-platform. Place the scale on its side.
1. Turn the scale OFF.
2. Remove the Security Cover under the scale to access
the two pins located in a slot (see figure 4-2). Short these
pins (a slotted screwdriver may be used), while powering
the scale ON. The scale will perform the start-up
procedure, and then the display will show the current
status [lft OFF] (LFT OFF, unlocked) or [lft ON] (LFT
ON, locked); press the ‘No’ key to change this setting, or
press the ‘Yes’ key to confirm it.
Note: When Legal For Trade is set to On, the menu settings are affected as follows:
Calibration (C.A.L) menu is not accessible
IR Function, Filter and Unit menus are locked at the current settings.
Stable Range setting is locked at 1d
Auto-Zero Tracking setting is locked at 0.5d
3. Replace the Security Cover.
Capacity Label
Figure 4-2. LFT pins.

EN-14 Valor™ 4000W Series
4.9.3 Verification and Sealing
The local weights and measures official or authorized service agent must perform
the verification procedure.
4.9.3.1 Physical Seals
For jurisdictions that use the physical sealing method, the local weights and
measures official or authorized service agent must apply a security seal to prevent
tampering with the settings. Refer to the illustrations below for sealing methods.
Unlocked Locked
Figure 4-3. Sealing
4.9.3.2 Audit Trail Seal (USA and Canada only)
For jurisdictions that use the audit trail sealing method, the local weights and
measures official or authorized service agent must record the current configuration
and calibration event counter values at the time of sealing. These values will be
compared to values found during a future inspection.
Note: A change to an event counter value is equivalent to breaking a physical seal.
The audit trail uses two event counters to record changes to configuration and
calibration settings.
The configuration event counter (CFG) will index by 1 under the following
conditions:
- When the LFT setting is changed from ON to OFF.
- When exiting the menu if one or more of the following menu settings
are changed: Stable Range, Auto Zero Tracking (AZT), Filter, IR
Function and Units (kg, g, oz, lb or lb:oz).
The calibration event counter (CAL) will index by 1 when exiting the menu
if a Span Calibration or GEO setting change is made.
Note: The counter only indexes once, even if several settings are changed.
The event counters can be viewed by pressing and holding the MENU button.
While the button is held, the display will show MENU followed by Audit.
Release the button when Audit is displayed to view the audit trail information.
Wire Seal
Paper Seal
Security Cover

Valor™ 4000W Series EN-15
The audit trail information is displayed in the format CFGxxx and CALxxx.
The scale then returns to normal operation.
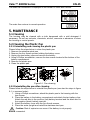
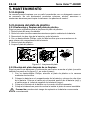
5. MAINTENANCE
5.1 Cleaning
The housing may be cleaned with a cloth dampened with a mild detergent if
necessary. Do not use solvents, chemicals, alcohol, ammonia or abrasives to clean
the housing or control panels.
5.2 Cleaning the Plastic Pan
5.2.1 Uninstalling and cleaning the plastic pan
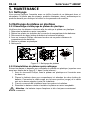
Please follow the steps below to clean the plastic pan:
1. Remove the stainless steel pan
2. Remove the four thumb screws holding the battery cover.
3. Unplug the two battery clips and remove the battery.
4. Using a Phillips screwdriver, remove the two screws located at the bottom of the
battery compartment.
5. Remove the plastic pan.
6. Clean the plastic pan.
6
3
1
2
4
5
Figure 5-1. Pan cleaning
5.2.2 Reinstalling the pan after cleaning
Please follow the steps below to reinstall the plastic pan (see also the steps in figure
5-1, in reversed order):
1. Using a Phillips screwdriver, attach the plastic pan to the housing with the
two screws.
2. Place the battery in the battery compartment and attach the two battery clips.
Attach the red wire to the positive (red) battery terminal and the black wire to
the negative (black) battery terminal.
3. Attach the battery cover with the four thumb screws.
4. Place the scale upright and install the stainless steel pan.
Caution: Risk of explosion can occur if the battery is not properly
connected.

EN-16 Valor™ 4000W Series
5.3 Troubleshooting
The following table lists common problems and possible causes and remedies.
If the problem persists, contact OHAUS or your authorized dealer.
TABLE 5-1
Symptom
Possible Cause
Remedy
Cannot turn on
No power to scale
Battery discharged
Verify connections, power source
and battery charge status.
Poor accuracy
Improper calibration
Unstable environment
Perform calibration
Move scale to suitable location
Cannot calibrate
Unstable environment
Incorrect calibration weight
Move the scale to suitable location
Use correct calibration weight
Cannot access mode
Mode not enabled
Enter menu and enable mode
Cannot access unit
Unit not enabled
Enter menu and enable unit
LO ref
Reference weight is too low
Increase reference weight.
Err 3.0 Cal
Incorrect calibration weight
See table 3-3 for correct weights
Err 8.1 ˉLOadˉ
Power on zero range exceeded
Clear pan
Err 8.2 _LOad_
Power on zero under range
Install pan
Err 8.3 ˉLOadˉ
Overload
Load exceeds scale maximum
capacity
Err 8.4 _LOad_
Under load
Reading below min. range - Re-
install pan.
Err 8.5 ˉtareˉ
Tare out of range
Tare value exceeds maximum.
Err 9 Data
Internal data error.
Contact an authorized service agent
Err13 mMEmM
Fail to write EEPROM.
Contact an authorized service agent
Err 53 C.SUmM
Invalid checksum data
Contact an authorized service agent
Lo.Bat
Battery is discharged
Connect the power and charge the
battery
NO.ACC
Gross and net weights cannot be
accumulated together
Accumulate only gross or net
weights.
Battery fails to charge
fully
Battery is defective
Have battery replaced by OHAUS
authorized service dealer.
5.4 Service Information
If the troubleshooting section does not resolve or describe your problem, contact
your authorized OHAUS service agent. Please visit our web site, www.ohaus.com
to locate the OHAUS office nearest you. An OHAUS product service specialist will
be available to provide assistance.
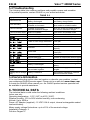
6. TECHNICAL DATA
The technical data is valid under the following ambient conditions:
Indoor use only
Operating temperature: -10ºC (14ºF) to 40ºC (104ºF)
Relative humidity: 10% to 90% relative humidity, non-condensing
Altitude: Up to 2000 m
Power: AC Adapter (supplied) - 12 VDC 0.84 A output, internal rechargeable sealed
lead-acid battery
Mains supply voltage fluctuations: up to ±10% of the nominal voltage
Installation Category: II
Pollution Degree: 2

Valor™ 4000W Series EN-17
6.1 Specifications
TABLE 6-1
MODEL
V41PWE1501T
V41XWE1501T
V41PWE3T
V41XWE3T
V41PWE6T
V41XWE6T
V41PWE15T
V41XWE15T
Capacity x Readability
(Max x d non-approved)
1.5 kg x 0.0002 kg
1500 g x 0.2 g
3 lb x 0.0005 lb
48 oz x 0.01 oz
3 kg x 0.0005 kg
3000 g x 0.5 g
6 lb x 0.001 lb
96 oz x 0.02 oz
6 kg x 0.001 kg
6000 g x 1 g
15 lb x 0.002 lb
240 oz x 0.05 oz
15 kg x 0.002 kg
15000 g x 2 g
30 lb x 0.005 lb
480 oz x 0.1 oz
Maximum Displayed Resolution
7500
6000
6000
7500
Capacity X Readability
(Max x e approved)
1.5 kg x 0.0005 kg
1500 g x 0.5 g
3 lb x 0.001 lb
48 oz x 0.02 oz
3 kg x 0.001 kg
3000 g x 1 g
6 lb x 0.002 lb
96 oz x 0.05 oz
6 kg x 0.002 kg
6000 g x 2 g
15 lb x 0.005 lb
240 oz x 0.1 oz
15 kg x 0.005 kg
15000 g x 5 g
30 lb x 0.01 lb
480 oz x 0.2 oz
Approved Resolution
3000
3000
3000
3000
Repeatability
0.0005 kg
0.001 kg
0.002 kg
0.005 kg
Linearity
± 0.0005kg
± 0.001kg
± 0.002kg
± 0.005kg
Weighing Units*
Non-Approved models: g, kg, lb, oz, lb:oz
EC and OIML Approved models: g, kg
Measurement Canada and NTEP Approved models: g, kg, lb, oz
Tare Range
To capacity by subtraction
Stabilization Time
≤ 0.5 seconds
Safe Overload Protection
150 % of scale capacity
Weight Display
2 x Red LED (front and rear)
6-digit 7-segment, 20.5 mm / 0.8 in characters
Keyboard
Four buttons
Application Modes
Weighing, Percent, Check Weighing (each with Accumulate function)
Battery Operating Time (at 20ºC)
Typically 50 hours with 12-hour full charge
Construction
V41PW: ABS housing with 304 Stainless Steel Platform
V41XW: ABS bottom housing with 304 stainless steel top housing and platform
Ingress Protection
IPX8
Pan Dimensions
190 x 242 mm / 7.5 x 9.5 in
Approval Class
III
Net Weight
V41PW: 3.0 kg / 6.6 lb; V41XW: 3.9 kg / 8.6 lb
Shipping Weight
V41PW: 4.0 kg / 8.8 lb; V41XW: 4.9 kg / 10.8 lb
Shipping Dimensions
410 x 370 x 220 mm / 16.1 x 14.6 x 8.7 in
Note: Turn off lb:oz unit with LFT ON
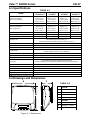
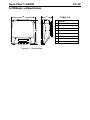
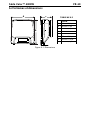
6.2 Drawings and Dimensions
V41PW
A
256 mm / 10.1 in.
B
280 mm / 11.0 in.
C
121 mm / 4.8 in.
V41XW
A
256 mm / 10.1 in.
B
288 mm / 11.3 in.
C
124 mm / 4.9 in.
A
C
B
TABLE 6-2
Figure 6-1. Dimensions

EN-18 Valor™ 4000W Series
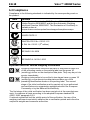
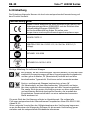
6.3 Compliance
Compliance to the following standards is indicated by the corresponding mark on
the product.
Mark
Standard
This product conforms to the EMC Directive 2004/108/EC, the Low
Voltage Directive 2006/95/EC and the Non-Automatic Weighing
Instrument Directive 2009/23/EC. The Declaration of Conformity is
available online at
europe.ohaus.com/europe/en/home/support/compliance.aspx.
AS/NZS CISPR 11
CAN/CSA-C22.2 No. 61010-1-12
UL Std. No. 61010-1 (3
rd
edition)
NSF/ANSI 169–2009
NSF/ANSI/3-A 14159-1-2010
Important notice for verified weighing instruments
Weighing Instruments verified at the place of manufacture bear one
of the preceding marks on the packing label and the green ‘M’
(metrology) sticker on the descriptive data plate. They may be put into
service immediately.
Weighing Instruments to be verified in two stages have no green ‘M’
(metrology) on the descriptive data plate and bear one of the
preceding identification marks on the packing label. The second
stage of the initial verification must be carried out by an authorized
and certified service organization established within the European
Community or by the National Notified Body.
The first stage of the initial verification has been carried out at the manufacturers
work. It comprises all tests according to the adopted European standard EN
45501:1992, paragraph 8.2.2.
If national regulations limit the validity period of the verification, the user of the
weighing instrument must strictly observe the re-verification period and inform the
respective weights and measures authorities.
La pagina si sta caricando...
La pagina si sta caricando...
La pagina si sta caricando...
La pagina si sta caricando...
La pagina si sta caricando...
La pagina si sta caricando...
La pagina si sta caricando...
La pagina si sta caricando...
La pagina si sta caricando...
La pagina si sta caricando...
La pagina si sta caricando...
La pagina si sta caricando...
La pagina si sta caricando...
La pagina si sta caricando...
La pagina si sta caricando...
La pagina si sta caricando...
La pagina si sta caricando...
La pagina si sta caricando...
La pagina si sta caricando...
La pagina si sta caricando...
La pagina si sta caricando...
La pagina si sta caricando...
La pagina si sta caricando...
La pagina si sta caricando...
La pagina si sta caricando...
La pagina si sta caricando...
La pagina si sta caricando...
La pagina si sta caricando...
La pagina si sta caricando...
La pagina si sta caricando...
La pagina si sta caricando...
La pagina si sta caricando...
La pagina si sta caricando...
La pagina si sta caricando...
La pagina si sta caricando...
La pagina si sta caricando...
La pagina si sta caricando...
La pagina si sta caricando...
La pagina si sta caricando...
La pagina si sta caricando...
La pagina si sta caricando...
La pagina si sta caricando...
La pagina si sta caricando...
La pagina si sta caricando...
La pagina si sta caricando...
La pagina si sta caricando...
La pagina si sta caricando...
La pagina si sta caricando...
La pagina si sta caricando...
La pagina si sta caricando...
La pagina si sta caricando...
La pagina si sta caricando...
La pagina si sta caricando...
La pagina si sta caricando...
La pagina si sta caricando...
La pagina si sta caricando...
La pagina si sta caricando...
La pagina si sta caricando...
La pagina si sta caricando...
La pagina si sta caricando...
La pagina si sta caricando...
La pagina si sta caricando...
La pagina si sta caricando...
La pagina si sta caricando...
La pagina si sta caricando...
La pagina si sta caricando...
La pagina si sta caricando...
La pagina si sta caricando...
La pagina si sta caricando...
La pagina si sta caricando...
La pagina si sta caricando...
La pagina si sta caricando...
La pagina si sta caricando...
La pagina si sta caricando...
La pagina si sta caricando...
La pagina si sta caricando...
La pagina si sta caricando...
La pagina si sta caricando...
La pagina si sta caricando...
La pagina si sta caricando...
La pagina si sta caricando...
La pagina si sta caricando...
La pagina si sta caricando...
La pagina si sta caricando...
La pagina si sta caricando...
La pagina si sta caricando...
La pagina si sta caricando...
La pagina si sta caricando...
La pagina si sta caricando...
La pagina si sta caricando...
La pagina si sta caricando...
La pagina si sta caricando...
La pagina si sta caricando...
La pagina si sta caricando...
La pagina si sta caricando...
La pagina si sta caricando...
-
 1
1
-
 2
2
-
 3
3
-
 4
4
-
 5
5
-
 6
6
-
 7
7
-
 8
8
-
 9
9
-
 10
10
-
 11
11
-
 12
12
-
 13
13
-
 14
14
-
 15
15
-
 16
16
-
 17
17
-
 18
18
-
 19
19
-
 20
20
-
 21
21
-
 22
22
-
 23
23
-
 24
24
-
 25
25
-
 26
26
-
 27
27
-
 28
28
-
 29
29
-
 30
30
-
 31
31
-
 32
32
-
 33
33
-
 34
34
-
 35
35
-
 36
36
-
 37
37
-
 38
38
-
 39
39
-
 40
40
-
 41
41
-
 42
42
-
 43
43
-
 44
44
-
 45
45
-
 46
46
-
 47
47
-
 48
48
-
 49
49
-
 50
50
-
 51
51
-
 52
52
-
 53
53
-
 54
54
-
 55
55
-
 56
56
-
 57
57
-
 58
58
-
 59
59
-
 60
60
-
 61
61
-
 62
62
-
 63
63
-
 64
64
-
 65
65
-
 66
66
-
 67
67
-
 68
68
-
 69
69
-
 70
70
-
 71
71
-
 72
72
-
 73
73
-
 74
74
-
 75
75
-
 76
76
-
 77
77
-
 78
78
-
 79
79
-
 80
80
-
 81
81
-
 82
82
-
 83
83
-
 84
84
-
 85
85
-
 86
86
-
 87
87
-
 88
88
-
 89
89
-
 90
90
-
 91
91
-
 92
92
-
 93
93
-
 94
94
-
 95
95
-
 96
96
-
 97
97
-
 98
98
-
 99
99
-
 100
100
-
 101
101
-
 102
102
-
 103
103
-
 104
104
-
 105
105
-
 106
106
-
 107
107
-
 108
108
-
 109
109
-
 110
110
-
 111
111
-
 112
112
-
 113
113
-
 114
114
-
 115
115
-
 116
116


Ohaus V41PWE3T Manuale utente
- Categoria
- Bilance da cucina
- Tipo
- Manuale utente
- Questo manuale è adatto anche per
in altre lingue
- français: Ohaus V41PWE3T Manuel utilisateur
- español: Ohaus V41PWE3T Manual de usuario
- Deutsch: Ohaus V41PWE3T Benutzerhandbuch
Documenti correlati
-
Ohaus Valor 1000 (12351-02) Manuale del proprietario
-
-
Ohaus SD75 Manuale utente
-
Ohaus CR2200 Manuale utente
-
-
Ohaus ES series Manuale del proprietario
-
-
-
Ohaus NV422 Manuale utente
-
Altri documenti
-
Sammic L-EQ 8 Manuale del proprietario
-
Vernier OHAUS Scout 420 g Manuale utente
-
 Acculab 98648-013-61 Istruzioni per l'uso
-
Rothenberger Refrigerant scale ROSCALE 120 Manuale utente
-
Steinberg Systems 10030128 Manuale utente
-
Adam Equipment GFK 75 Manuale utente
-
Mettler Toledo ICS241- Guida d'installazione
-
-
