Hoover HOV 4050 BAV Manuale utente
- Categoria
- Microonde
- Tipo
- Manuale utente
Questo manuale è adatto anche per

OVENS
USER INSTRUCTIONS
GB
FORNI
ISTRUZIONI PER L’USO
IT
TROUBY
NÁVOD K OBSLUZE
CZ
USINES DE ROSIÈRES - 30, rue Y. LACELLE - Rosières - 18400 - Lunery - France

CONTENUTO
Indicazioni Di Sicurezza
Dichiarazione Di Conformità
Informazioni Sulla Sicurezza
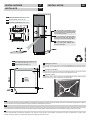
Installazione
Inserimento Del Mobile
Importante
Allacciamento Elettrico
Dotazione Del Forno (secondo Modello)
Griglie Forno - Sistema Di Arresto
La Cottura Al Grıll
2.3 Forno Autopulente Catalitico
2.4 Pulızıa E Manutenzıone
5 Servizio Assistenza Clienti
Contamınutı
1
2 R
4. Istruzioni Per L’uso
5. Tabella Tempi Di Cottura
1. Avvertenze Generali
1.1
1.2
1.3
1.4
1.5
1.6
1.7
2. Consıglı Utili
2.1
2.2
2.
3.
3. Uso Del Programmatore Analogico
3. egolazione Dell'orario
IT
...................................................................03
.......................................................................03
..........................................................03
..........................................................04
....................................................................................04
....................................................................04
.....................................................................................04
..................................................................04
.......................................04
...................................................................................05
...................................................05
............................................................................05
..........................................................05
..................................................................05
.............................................................05
........................................................................................06
................................................06
...................................................................06
............................................................................07
..............................................................08-09
CONTENTS
Safety Instructions
1. General Warnings
1.1 Declaration Of Compliance
1.2 Safety Hints
1.3 Installation
1.4 Fitting The Oven Into The Kitchen Unit
1.5 Important
1.6 Connecting To The Power Supply
1.7 Oven Equipment (according To The Model)
2. Useful Tips
2.1 Shelf Safety System
2.2 Grilling
2.3 Cooking Time
2.4 Cleaning And Maintenance
2.5 Service Centre
3. Timer
3.1 Use Of Analogue Clock/programmer
3.2 Setting The Correct Time of Day
4. Operating Instructions
5. Tables Of Cooking Times
GB
.............................................................................10
............................................................................10
...........................................................10
....................................................................................11
.....................................................................................11
.........................................11
......................................................................................11
..................................................11
.................................11
......................................................................................12
.....................................................................12
...........................................................................................12
................................................................................12
............................................................12
..............................................................................12
................................................................................................13
..............................................13
....................................................13
......................................................................14
............................................................15-16
OBSAH
BEZPEČNOSTNÍ POKYNY
1. Všeobecná Upozornění
1.1 Prohlášení O Shodě
1.2 Bezpečnostní Tipy
1.3 Instalace
1.4 Vestavění Trouby Do Kuchyňské Linky
1.5 Důležité
1.6 Připojení K Elektrické Síti
1.7 Vybavení Trouby ( Podle Modelu)
2. Užitečné Tipy
2.1 Bezpečnostní Systém Roštu
2.2 Grilování
2.3 Doba Přípravy
2.4 Čištění A Údržba
2.5 Servisní Středisko
3. Časoměřič
3.5 Použití Analogových Hodin
3.6 Nastavení Přesného Času
4. Pokyny K Použití
5. Tabulky Časů Přípravy
CZ
...............................................................17
...................................................................18
.......................................................................18
.........................................................................18
........................................................................................18
.........................................18
.........................................................................................18
...............................................................18
................................................18
..................................................................................19
..........................................................19
..........................................................................................19
.................................................................................19
..........................................................................19
.........................................................................19
....................................................................................20
...........................................................20
.............................................................20
...........................................................................21
.............................................................22-23

INDICAZIONI DI SICUREZZA
03 IT
1- AVVERTENZE GENERALI
Dichiarazione di conformità: questo apparacchio, nelle parti progettate per venire a contatto con cibi, è conforme con le regolamentazioni
espresse nelle direttive EEC 89/109.
Apponendo la marcatura su questo prodotto, dichiariamo, sotto la nostra responsabilità, di ottemperare a tutti i requisiti relativi alla
tutela di sicurezza, salute e ambiente previsti dalla legislazione europea in essere per questo prodotto.
1.1. DICHIARAZIONE DI CONFORMITÀ

1.6 ALLACCIAMENTO ELETTRICO
04 IT
1.2 INFORMAZIONI SULLA SICUREZZA
1.3 INSTALLAZIONE
1.7 DOTAZIONE DEL FORNO (secondo modello)
1.4 INSERIMENTO DEL MOBILE
1.5 IMPORTANTE
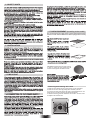
Pizza set é l'idéale per la cottura delle pizze. Il
set deve essere utilizzato in abbinamento alla
funzione Pizza.
Gli accessori devono essere tolti dal forno se non vengono utilizzati.

05 IT
2- CONSIGLI UTILI
Alle pagine 8-9 riportiamo una tabella indicativa dove sono indicati
tempi e temperature consigliati per le prime cotture.Ad esperienza
acquisita potrete variare a vostro piacimento i valori riportati nella
tabella stessa.
2.3 TEMPI DI COTTURA
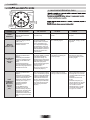
1. Svitare in senso antiorario i dadi zigrinati
2. Rimuovere le griglie tirandole verso se stessi
3. Pulire le griglie lavandole in lavastoviglie o con una spugna
bagnata e asciugandole subito dopo
4. Dopo aver pulito le griglie, installarle nuovamente
5. Fissare i dadi zigrinati
A

FUNZIONE
COME ATTIVARLA COME DISATTIVARLA
06 IT
3.2 REGOLAZIONE DELL'ORARIO
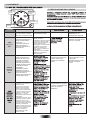
MANUALE
TEMPO DI
COTTURA
max 24 H
"DUR"
• Può essere impostata solo
con una funzione di cottura
attiva. Non si imposta l'orario.
• La prima operazione è
quella di selezionare la
funzione di cottura e la
temperatura richiesta.
• Premere una volta il
bottone di impostazione.
Il display mostrerà "DUR"
e la durata di cottura
lampeggerà.
• Impostare la durata
desiderata ruotando il
bottone di impostazione. Il
tempo rimanente è
mostrato and the Duration
indicator light is lit up.
• Mantenere la manopola
sulla posizione di Stop.
• Il forno si può utilizzare. • Cucinare la ricetta
desiderata con un
funzionamento manuale.
TIMER
max 90 min.
"BEL”
• Premere due volte il
bottone di impostazione. Il
display mostrerà "BEL"
seguito da "---".
• Impostare il tempo di
cottura attraverso la
rotazione del bottone di
impostazione.
• Durante il conto alla rovescia,
il display mostra in
continuazione il tempo residuo
in minuti ed in secondi. Alla
fine del conto alla rovescia , il
display mostrerà "000"
lampeggiante e verrà emesso
un segnale sonoro di fine
cotttura. Per terminare il
suono, premere il bottone di
impostazione.
In ogni momento è possibile
modificare o cancellare il
tempo impostato.
• Può essere utilizzato per
impostare un tempo anche
se il forno è spento.
• Permette di
preselezionare il tempo di
cottura necessarioe
specifico per l'alimento
scelto.
• Alla fine del tempo di
cottura impostato, il forno
si spegnerà
automaticamente e verrà
emesso un segnale
sonoro.
• Innanzitutto slezionare la
temperatura e la funzione di
cottura richiesta.
•Premere una volta per la
durata. Seguire le stesse
istruzioni come paragrafo
sopra "Tempo Cottura-DUR"
•Premere una seconda volta,
il display mostrerà "PAU"
seguito da "---", la luce
dell'indicatore STAR inizierà a
lampeggiare.
-Impostare il tempo di pausa
prima di far partire la cottura.
Durante la puasa, il forno
mostrerà in modo continuo il
tempo rimanente della pausa,
entrambi gli indicatori di
START e STOP sono accesi.
Quando il conto alla rovescia
finirà, il forno inizierà al
cottura e la sola luce
dell'indicatore di STOP
rimarrà accessa.
• Permette la
programmazione del forno
in modo che l'alimento sia
pronto al momento
desiderato.
Luce
indicazione
durata
Luce
indicazione
d'avvio
Pulsante
impostazioni
Visualizzazione
comandi
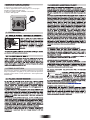
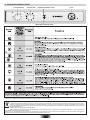
3. CONTAMINUTI

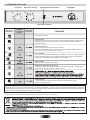
4. ISTRUZIONI PER L’USO
07 IT
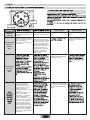
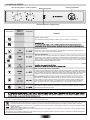
Accende la luce interna.
Scongelamento
Questa posizione permette di far circolare l’aria a temperatura ambiente intorno al cibo
surgelato facendolo così scongelare in pochi minuti senza modificare od alterare il
contenuto proteico.
Convezione naturale
Sono in funzione le resistenze superiore e inferiore.
È la cottura tradizionale, ottima per arrostire cosciotti, selvaggina, ideale per biscotti,
mele al forno e per rendere i cibi molto croccanti
Forno ventilato
L’aria calda, viene ripartita sui diversi ripiani; è l’ideale per cuocere contemporaneament
e diversi tipi di cibo (carne, pesce), senza miscelare sapori e odori. Cottura delicata -
indicata per pan di Spagna, torte Margherita, pasta sfoglia, ecc...
Suola ventilata
Adatta per cotture delicate (torte-soufflè).
Grigliatura tradizionale a porta chiusa
In questa posizione viene inserita la resistenza del grill. Ottima nella cottura di carni di
medie e piccolo spessore (salsicce, costine, bacon).
Funzione pizza
Il calore avvolgente in questa funzione ricrea un ambiente simile a quello
dei forni a legna di pizzeria.
* Programma di prova secondo CENELEC
** Programma di prova secondo CENELEC EN 60350-1 utilizzato per la definizione della classe energetica.
EN 60350-1
Manopola
commutatore
Temperatura
proposta
e regolazione
(Type A)
Manopola
termostato
FUNZIONE
Livello 4
1 ÷ 4
(a) SU ALCUNI MODELLI - Funzione con VARIO FAN : Vano Fan é l'esclusivo sistema di funzionamento sviluppato da Candy per ottimizzare i
risultati di cottura, la gestione della temperatura e la gestione dell'umidità. Il sistema Vario Fan modifica automaticamente la velocità di
rotazione della ventola per tutte le cotture in multifunzione. Questo sistema si attiva automaticamente tutte le volte che viene selezionata una
funzione all'interno dell'area tratteggiata sul pannello di controllo.
Selettore di funzione
Termostato
Contaminuti
Spia regolazione temperatura
Spia forno in funzione

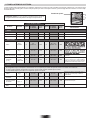
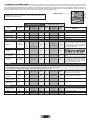
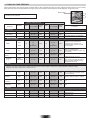
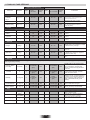
5. TABELLA TEMPI DI COTTURA
I tempi suggeriti nelle seguenti tabelle sono indicativi, infatti possono variare secondo la qualità, la freschezza, la dimensione e lo spessore degli
alimenti e secondo il vostro gusto. Lasciare sempre riposare per alcuni minuti prima di servire, perché tutti gli alimenti continuano a cuocere dopo
averli tolti dal forno.
CONSIGLIO UTILE: Per non rendere le superfici troppo secche è
consigliato abbassare la temperatura e allungare i tempi di cottura.
Posizione ripiani
4
3
2
1
08 IT
Forno elettrico statico Forno elettrico ventilato
2 2
• Pasta
2 2
2 2
2 2
11
21
22
33
22
21
2
2
Pietanza
Quantità
Ripiano
Tempo
di cottura
in minuti
Tempe-
ratura
forno
Ripiano
Tempo
di cottura
in minuti
Tempe-
ratura
forno
Osservazioni
Inserire le lasagne nel forno freddo
Disponete 24 vol au vent nella leccarda
e cuocete.
Preriscaldate per 15 min., ungere la teglia
del forno, disporre le 4 focacce oliate e
salate prima di infornare, lasciare lievitare
a temperatura ambiente per almeno 2 ore
Disporre la carne in una teglia Pirex a
bordo alto con sale pepe. Voltare a
metà cottura
Cuocere come sopra
Cuocere come sopra
Cuocere come sopra
Inserire i cannelloni nel forno freddo
Lasagne
Cannelloni
Pasta al forno
• Paste salate
Pane
Pizze
Pasta sfoglia
Vol au vent (Surgelati)
Focaccia
(n° 4)
• Carne
Tutte le carni possono essere cotte in recipiente con bordo basso o bordo alto.
È consigliabile coprire il recipiente a bordo basso con un coperchio per evitare di sporcare il forno con schizzi del condimento.
Le carni coperte risultano più morbide e succose, mentre quelle scoperte risultano più croccanti.
I tempi indicati valgono per cotture con recipiente coperto o scoperto.
Roastbeef
intero
Arrosto di maiale
arrotolato
Arrosto di vitello
arrotolato
Arrosto di manzo
filetto
Kg 3,5
Kg 1,8
Kg 2,5
Kg 1
di pasta
Kg 1
n° 24
gr. 200
di pasta cad
Kg 1
Kg 1
Kg 1,3
Kg 1
70 ÷ 75
50 ÷ 60
55 ÷ 60
35
prerisc.10
25 ÷ 35
30 ÷ 35
25 ÷ 30
220
220
220
200
190
220
200
60 ÷ 65
40 ÷ 50
45 ÷ 50
30 ÷ 35
prerisc.10
20 ÷ 25
25 ÷ 30
20 ÷ 25
200
200
200
180
190
200
180
70 ÷ 80
100 ÷ 110
90 ÷ 110
80 ÷ 90
220
220
220
220
50 ÷ 60
80 ÷ 90
90 ÷ 100
80 ÷ 90
200
200
200
200
Inserire la pasta al forno nel forno freddo

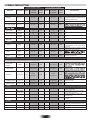
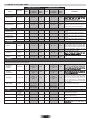
09 IT
• Pollame, Coniglio
Forno elettrico statico Forno elettrico ventilato
Pietanza
Quantità
Ripiano
Tempo
di cottura
in minuti
Tempe-
ratura
forno
Tempo
di cottura
in minuti
Tempe-
ratura
forno
Osservazioni
Sistemare la faraona in teglia Pirex o
ceramica a bordo alto condita con aromi
naturali e pochissimo olio.
Come per la faraona
In teglia per torte Ø 22. Prerisc. per 10
min.
In teglia per torte Ø 22. Prerisc. per 10
min.
In teglia per torte Ø 22. Prerisc. per 10
min.
In teglia per torte Ø 22. Prerisc. per 10
min.
Disponete i finocchi tagliati in 4 parti e
coperti in teglia di Pirex con burro e sale
e possibilmente con la parte interna
verso l’alto
Affettate le zucchine e cuocete in teglia
Pirex coperte con burro e sale
Tagliate le carote a fettine, copritele e
cuocetele in teglia Pirex.
Disporre le fette bene sotto l’azione del grill
e voltarle due volte.
Condite con aromi naturali e voltatele ogni
tanto.
La cottura con il grill deve essere eseguita ponendo il cibo sotto il grill elettrico. Attenzione: durante il funzionamento il grill diventa di colore rosso vivo. La
leccarda deve essere inserita sotto la griglia per raccogliere i sughi.
Ripiano
Faraona
Pollo
Coniglio a pezzi
Kg 1-1,3
Kg 1,5-1,7
Kg 1-1,2
2 2
60 ÷ 70
2 2
100 ÷ 110
2 2
50 ÷ 60
60 ÷ 80
110 ÷ 120
55 ÷ 65
220
220
220
200
200
200
Torta cacao
Scatola
Scatola
Scatola
1
1
1
1
1
50
55
180
160
Torta margherita
Torta di carote
Torta crostata
albicocca
700 gr
55
65
40
175
180
200
1
1
2
40 ÷ 45
50 ÷ 60
30 ÷ 35
160
160
180
• Verdura
Finocchi
Zucchine
Patate
Carote
800 gr
800 gr
800 gr
800 gr
1
1
2
1
70 ÷ 80
70
60 ÷ 65
80 ÷ 85
220
220
220
220
1
1
2
1
60 ÷ 70
60 ÷ 70
60 ÷ 65
70 ÷ 80
200
200
200
200
• Cottura a grill
Pane carrè
tostato
Toasts farciti
Salsiccie
Costate di manzo
Coscie di pollo
4 fette
4
n°6 / Kg 0,9
n°4 / Kg 1,5
n°4 / Kg 1,5
4 4
3 3
4 4
4 4
3 3
5 (5 prerisc.)
10 (5 prerisc.)
25/30
(5 prerisc.)
25
(5 prerisc.)
50/60
(5 prerisc.)
Grill Grill
Grill Grill
Grill Grill
Grill Grill
Grill Grill
5 (10 prerisc.)
5/8
(10 prerisc.)
15/20
(10 prerisc.)
15/20
(10 prerisc.)
50/60
(10 prerisc.)
• Fish
22
22
22
22
Cuocere le trote coperte con olio, sale e
cipolle in teglia Pirex.
Cuocere il salmone non coperto in teglia
Pirex con sale, pepe e olio.
Cuocete la sogliola con sale e un
cucchiaio d’olio.
Cuocere in recipiente coperto le orate con
olio e sale
Trota
• Pesci
Salmone
Sogliola
Orata
3 intere/Kg 1
700 g a fette
2,5 cm s.p.
Filetti / Kg 1
2 intere
40 ÷ 45
30 ÷ 35
40 ÷ 45
40 ÷ 45 220
220
220
220
35 ÷ 40
30 ÷ 25
35 ÷ 40
35 ÷ 40
200
200
200
200
Cuocere la frutta in teglia di Pirex o ceramica
non coperta. Lasciare raffreddare in forno.
Come sopra
Come sopra
• Frutta
Mele intere
Pere
Pesche
Kg 1
Kg 1
Kg 1
1
1
1
45 ÷ 55
45 ÷ 55
45 ÷ 55
220
220
220
2
2
2
45 ÷ 55
45 ÷ 55
45 ÷ 55
200
200
200

10 GB
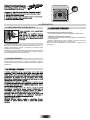
Thank you for choosing one of our products. To get the most out of your oven we recommend that you:
• Read the notes in this manual carefully: they contain important instructions on how to install, use and service this oven safely.
• Keep this booklet in a safe place for easy, future reference.
All accessible parts are hot when the appliance is in operation, take care to not touch these elements.
When the oven is first switched on it may give out acrid smelling fumes. This is because the bonding agent for insulating panels around the oven
has been heated up for the first time.
This is a completely normal, if it does occur you merely have to wait for the fumes to clear before putting the food into the oven.
An oven by its very nature becomes very hot. Especially the glass of the oven door.
This equipment, in the parts intended to come into contact with food, complies with the regulations laid down in EEC directives 89/109.
By placing the mark on this product, we are confirming compliance to all relevant European safety, health and environmental requirements
which are applicable in legislation for this product.
1.1 DECLARATION OF COMPLIANCE
When you have unpacked the oven, make sure that it has not been damaged in any way. If you have any doubts at all, do not use it: contact a
professionally qualified person. Keep packing materials such as plastic bags, polystyrene, or nails out of the reach of children because they are
dangerous for children.

11 GB
1.2 SAFETY HINTS
1.3 INSTALLATION
It is necessary to do an initial cleaning of the equipment before the
first use of each of them.Wash them with a sponge. Rinse and dry
off.
1.7 OVEN EQUIPMENT (according to the model)
1.4 FITTING THE OVEN INTO THE KITCHEN UNIT
1.5 IMPORTANT
The pizza set is designed for pizza cooking.
In order to obtain the best results the set
must be used together with Pizza function.
Removing and cleaning wire racks
1- Remove the knurled nuts by turning them counter clockwise.
2- Remove the wire racks by pulling them towards yourself.
3- To clean the wire racks either put them in the dishwasher or use
a wet sponge, ensuring that they are dried afterwards.
4- After the cleaning process install the wire racks in reverse order.
5- Replace the knurled nuts.
A

12 GB
2. USEFUL TIPS
2.2 GRILLING
Grilling makes it possible to give food a rich brown colour quickly.
For browning we recommend that you insert the grill onto the
fourth level, depending on the proportions of the food (see fig.
page 14).
Almost all food can be cooked under the grill except for very lean
game and meat rolls.
Meat and fish that are going to be grilled should first be lightly
doused with oil.
2.3 COOKING TIME
2.4 CLEANING AND MAINTENANCE
Before calling the Service Centre
If the oven is not working, we recommend that:
you check that the oven is properly plugged into the power supply.
If the cause of the fault cannot be detected:
disconnect the oven from the mains, do not touch the oven and call
the after sales service.
Before calling the Service Centre remember to make a note of
the serial number on the specifications plate (see fig. On last
page).
The oven is supplied with a guarantee certificate that ensures that
it will be repaired free of charge by the Service Centre

13 GB
FUNCTION
WHAT IT DOES WHAT IT IS FOR
MANUAL
FUNCTION
COOKING TIME
maxi 24 H
DISPLAY
"DUR"
• It can be set only with a
cooking mode. No setting on
the timer.
• Turn back to the stop
position the control knobs.
• It allows you to operate the
oven.
• For cooking the desired
recipes.
MINUTE MINDER
maxi 90 min.
DISPLAY
"BEL”
• Press two times the setting
button, the display will show
"BEL" followed by "---".
• Set a time by turning the
setting button.
• During the countdown, the
display shows continuously
the remaining time in minute
and then in seconds. At the
end of the countdown, the
display shows "000" flashing
and the buzzer emits the
end signal. To silence it,
press the setting button. At
any time, it is possible to
modify or to cancel the
minute minder.
• Allows you to use the oven
as alarm even if the oven is
switch off.
• It allows you to preset the
cooking time required for
the recipe chosen.
• First of all, select the
temperature and the
cooking function required.
• Press one time to set a
duration. Follow the
instructions above "Cooking
time - Dur”
• Press a second time, the
display shows "PAU"
followed by "---", the Start
indicator light flashes.
- Set the pause time before
starting the oven. During the
pause, the oven does not
cook, the display shows
continuously the remaining
pause length, both the Start
and Stop indicator lights are
lit-up. When the countdown
expires, the oven will start to
cook, only the Stop indicator
light is lit-up.
• Allows you to programme
the oven so that the recipe
is ready at the desired
time.
Duration
indicator
light
Start
indicator
light
Setting
button
Display of the
commands
3.TIMER

14 GB
* Tested in accordance with the CENELEC .
** Tested in accordance with the CENELEC EN 60350-1 used for definition of energy class.
EN 60350-1
4. OPERATING INSTRUCTIONS
This appliance is marked according to the European directive 2012/19/EU on Waste Electrical and Electronic Equipment (WEEE). WEEE
contains both polluting substances (which can cause negative consequences for the environment) and basic components (which can be re-
used). It is important to have WEEE subjected to specific treatments, in order to remove and dispose properly all pollutants, and recover and
recycle all materials. Individuals can play an important role in ensuring that WEEE does not become an environmental issue; it is essential to
follow some basic rules:
• WEEE shall not be treated as household waste.
• WEEE shall be handed over to the relevant collection points managed by the municipality or by registered companies. In many countries, for
large WEEE, home collection could be present.
• When you buy a new appliance, the old one may be returned to the retailer who has to collect it free of charge on a one-to-one basis, as long as the
equipment is of equivalent type and has the same functions as the supplied equipment.
Function Dial
Thermostat Dial
Timer
Regulation indicator lamp
Main supply indicator lamp

5. TABLES OF COOKING TIMES
The overall suggested cooking times set out below are intended as a rough guide only. They may in fact vary according to the quality, the freshness,
the size and the thickness of the food cooked and of course cooking time is also partly a matter of taste. Let the food stand for a few minutes before
serving because the ingredients continue cooking after they have been removed from the oven.
HANDY TIP: Lower the temperature so as to avoid the surface of the
food becoming hard and dry.
Shelf position
4
3
2
1
15 GB
Static electric oven
Electric fan oven
2 2
• Pasta
2 2
2 2
2 2
11
21
22
33
22
21
22
Food
Quantity
Shelf
Time
of cooking
in minutes
Oven
tempe-
rature
Shelf
Time
of cooking
in minutes
Oven
tempe-
rature
Remarks
Put the lasagne into an unheated oven
Put the oven baked pasta into an
unheated oven
Form the dough into a loaf and make a
cross with a knife on top of the dough
leave the dought to rise for at least 2
hours. Grease the baking tin and put the
dough in the middle of it.
Place 24 vol au vents in the oven and
bake.
Warm the oven for 15 minutes, grease
the baking tray, season the 4 focaccia
with oil and salt and leave them to rise at
room temperature for at least 2 hours
before put ting them in the oven.
Put the meat into a deep Pyrex dish and
season with salt and pepper; turn the
meat half way through cooking.
Cook the meat in a covered Pyrex dish
with herbs, spice, oil and butter.
Cook as indicated above
Cook as indicated above.
Lasagne
Cannelloni
Oven baked
pasta
• Baking (not cakes)
Bread
Pizza
Pastry (frozen)
vol au vents
Focaccia
(n° 4)
• Meat
All meats can be roasted in shallow or deep roasting trays.
It is advisable to cover the shallow trays to avoid splattering the sides of the oven with grease.
The roasting times are the same whether the meat has been covered up or not.
Whole joint of
beef
Joint of
deboned
Joint of
deboned veal
Joint of
fillet of beef
Kg 3,5
Kg 1,8
Kg 2,5
Kg 1
di pasta
Kg 1
n° 24
gr. 200 of
dough each
Kg 1
Kg 1
Kg 1,3
Kg 1
70 ÷ 75
50 ÷ 60
55 ÷ 60
35
10
(pre-heating)
25 ÷ 35
30 ÷ 35
25 ÷ 30
220
220
220
200
190
220
200
60 ÷ 65
40 ÷ 50
45 ÷ 50
30 ÷ 35
10
(pre-heating)
20 ÷ 25
25 ÷ 30
20 ÷ 25
200
200
200
180
190
200
180
70 ÷ 80
100 ÷ 110
90 ÷ 110
80 ÷ 90
220
220
220
220
50 ÷ 60
80 ÷ 90
90 ÷ 100
80 ÷ 90
200
200
200
200
Put the cannelloni into an unheated oven
Bake the fruit in an open Pyrex or earthen-
ware dish. Leave it to cool inside the oven.
Follow procedure above.
Follow procedure above.
• Fruit
Whole apples
Pears
Peaches
Kg 1
Kg 1
Kg 1
1
1
1
45 ÷ 55
45 ÷ 55
45 ÷ 55
220
220
220
2
2
2
45 ÷ 55
45 ÷ 55
45 ÷ 55
200
200
200

5. TABLES OF COOKING TIMES
16 GB
• Rabbits and Poultry
Static electric oven
Electric fan oven
Food
Quantity
Shelf
Time
of cooking
in minutes
Oven
tempe-
rature
Time
of cooking
in minutes
Oven
tempe-
rature
Remarks
Follow the procedure for cooking the
guinea fowl.
Put all the pieces of the same size in the
glazed tray.Season with herbs and spices.
Turn the pieces as and when required.
Use a tin that is 22 cm deep. Pre-heat for
10 mins.
Use a tin that is 22 cm deep. Pre-heat for
10 mins.
Use a tin that is 22 cm deep. Pre-heat for
10 mins.
Use a tin that is 22 cm deep. Pre-heat for
10 mins.
Cut the fennel into four pieces, add
butter, salt and potatoes if required and
place in a Pyrex face up. Cover the dish.
Slice the courgettes, place in a Pyrex
dish and add butter and salt.
Slice the carrots, place in a Pyrex dish and
cook.
Cut the sausages in half and lay them face
down on the grill. Half way through grilling
turn them over. Every so often, check that
they are being cooked equally all over. (If
this is not happening, turn and reposition
the ones being cooked ether less or more
than the others.
Make sure that the ribs of beef are exposed
to the full effect on the main grill.
Turn them over twice during grilling
Place the food to be grilled underneath the infra-red grill. Warning: When the grill is on it takes on a bright red colour. Place the tray underneath the grill to
collect juices and fat from the food being grilled.
Shelf
Guinea fowl
Chicken
Rabbit pieces
Kg 1-1,3
Kg 1,5-1,7
Kg 1-1,2
2 2
60 ÷ 70
2 2
100 ÷ 110
2 2
50 ÷ 60
60 ÷ 80
110 ÷ 120
55 ÷ 65
220
220
220
200
200
200
Coconut cake
baked in a tin
1
1
1
1
1
50
55
180
160
• Cakes
Sponge cake
Carrot cake
baked in a tin
Apricot pie
700 gr
55
65
40
175
180
200
1
1
2
40 ÷ 45
50 ÷ 60
30 ÷ 35
160
160
180
• Vegetable
Fennel
Courgettes
Potatoes
Carrots
800 gr
800 gr
800 gr
800 gr
1
1
2
1
70 ÷ 80
70
60 ÷ 65
80 ÷ 85
220
220
220
220
1
1
2
1
60 ÷ 70
60 ÷ 70
60 ÷ 65
70 ÷ 80
200
200
200
200
• Grilling
Squares of
bread for
toasting
Toasted
sandwiches
Sausages
Ribs of beef
Chicken legs
4 pieces
4
n°6 / Kg 0,9
n°4 / Kg 1,5
n°4 / Kg 1,5
4 4
3 3
4 4
4 4
3 3
5
(5 to heat up
grill)
10
(10 to heat up
grill)
25/30
(5 to heat up
grill)
25 (5 to
heat up grill)
50/60 (5 to
heat up grill)
Grill Grill
Grill Grill
Grill Grill
Grill Grill
Grill Grill
5
(10 to heat up
grill)
5/8
(10 to heat up
grill)
15/20
(10 to heat up
grill)
15/20 (10 to
heat up grill)
50/60 (10 to
heat up grill)
• Fish
22
22
22
22
Cover the trout with salt, oil and onions
and cook in a Pyrex dish.
Cook the salmon in an open Pyrex dish
with salt, pepper and oil.
Cook the sole with salt and a spoonful
of oil.
Trout
• Fish
Salmon
Sole
Bream
3 whole trout
or / Kg 1
700 g
2,5 cm slice
Kg 1
2 whole ones
40 ÷ 45
30 ÷ 35
40 ÷ 45
40 ÷ 45 220
220
220
220
35 ÷ 40
30 ÷ 25
35 ÷ 40
35 ÷ 40
200
200
200
200

17 CZ
BEZPEČNOSTNÍ POKYNY

1.6 PŘİPOJENÍ K ELEKTRİCKÉ SÍTİ
18 CZ
1.7 VYBAVENÍ TROUBY ( Podle modelu)
1.4 VESTAVĚNÍ TROUBY DO KUCHYŇSKÉ LİNKY
1.5 DŮLEŽİTÉ
1. VŠEOBECNÁ UPOZORNĚNÍ
Přečtěte si pozorně tyto pokyny pro maximální využití trouby. Odložte si tyto pokyny na bezpečném místě pro instalaci a použití v budoucnosti a před
instalací trouby si poznačte sériové číslo pro případ pomoci servisního střediska. Po vybalení trouby se ujistěte, zda není žádným způsobem
poškozená. Pokud máte nějaké pochybnosti, nepoužívejte ji.
Kontaktujte kvalifikovaného servisního technika. Uložte obalové materiály jako jsou plastové sáčky a polystyrén mimo dosah dětí, neboť představují
možné riziko.
Výrobce neodpovídá za nedodržení pokynů v návodu k použití.
Poznámka: Právo na změnu funkcí, vlastností a příslušenství trouby se může měnit v závislosti od modelu.
1.1 PROHLÁŠENÍ O SHODĚ
1.2 BEZPEČNOSTNÍ TIPY
1.3 INSTALACE
Odkapávací plech zachycuje šťávu z
grilovaných pokrmů.
Tento spotřebič přicházející do kontaktu s potravinami vyhovuje
předpisům směrnice EEC 89/109.
Umístěním značky na produkt deklarujeme na vlastní
zodpovědnost shodu se všemi požadavky EU týkajícími se
bezpečnosti, zdraví a životního prostředí, které jsou zakotveny v
legislativě a týkají se daného produktu.

19 CZ
2. UŽİTEČNÉ TİPY
2.1 BEZPEČNOSTNÍ SYSTÉM ROŠTU
2.2 GRİLOVÁNÍ
Grilování umožňuje dodat jídlu rychle bohatou zlatavou barvu. Pro
opečení doporučujeme, abyste v závislosti od vlastností jídla
umístili gril do čtvrté úrovně.
Téměř všechny druhy jídel můžete připravovat pod grilem, kromě
velmi tenkých plátků a masových rolek. Maso a ryby pro grilování
je vhodné před přípravou namočit do oleje.
Pro doporučené časy přípravy a teploty viz tabulky v návodu.
Potom můžete měnit tyto časy a nastavení podle vašich vlastních
zkušeností.
2.3 DOBA PŘÍPRAVY
Dříve než budete kontaktovat servis.
Pokud trouba nefunguje, doporučujeme:
• Zkontrolujte, zda je trouba správně připojena k elektrické síti.
V případě, že závadu nelze odstranit:
• Odpojte troubu od elektrické sítě, nedotýkejte se ji a kontaktujte
servisní středisko.
Seznam autorizovaných míst je uveden na našich webových
stránkách, www.candy-hoover.cz v sekci servis.
Dříve než budete kontaktovat servis, poznačte si sériové číslo
spotřebiče.
A

20 CZ
3.2 NASTAVENÍ PŘESNÉHO ČASU
FUNKCE JAK AKTIVOVAT JAK VYPNOUT
CO DĚLÁ POUŽITÍ
RUČNÍ
NASTAVENÍ
ČAS PŘÍPRAVY
maxi 24 h
Zobrazení
„DUR„
• Lze nastavit pouze v režimu
přípravy. Bez nastavení
časovače.
• Nejdříve zvolte funkci
přípravy a požadovanou
teplotu.
• Stiskněte jednou tlačítko
nastavení. Displej zobrazí
„DUR„ a kontrolka trvání
bliká.
• Nastavte čas přípravy
otočením tlačítka nastavení.
Zobrazí se zbývající doba a
kontrolka trvání svítí.
• Otočte volič funkce trouby
do pozice stop.
• Umožňuje vám ovládat
troubu.
• Pro přípravu požadovaných
receptů.
MINUTKA
max. 90 min.
Zobrazení „BEL“
• Stiskněte dvakrát tlačítko
nastavení, displej zobrazí
„BEL“ poté „--“.
• Nastavte čas otočením
tlačítka nastavení.
• Během odpočítávání displej
zobrazuje nepřetržitě
zbývající dobu v minutách
a poté v sekundách. Na
konci odpočítávání displej
zobrazí blikající „000“ a zní
akustický signál. K ztlumení
stiskněte tlačítko nastavení.
Kdykoliv lze upravit nebo
zrušit minutku.
• Na konci nastavené doby
zní akustický signál.
• Umožňuje použít troubu
jako budík, i když je trouba
vypnutá.
• Na konci nastaveného času
se zobrazí „END“, kontrolka
trvání bliká a trouba se
vypne automaticky. Zní
akustický signál. K ztlumení
stiskněte tlačítko nastavení.
Stiskněte opět, pokud
chcete restartovat přírpavu.
Nastavte knoflíky do
vypnuté pozice.
Během provozu trouby lze
upravit trvání přípravy.
• Umožňuje vám nastavit
čas přípravy potřebný pro
zvolený recept.
• Na konci nastaveného
času přípravy se trouba
vypne automaticky a zazní
zvukový signál.
PLNĚ
UTOMATICKÁ
PŘÍPRAVA
Maxi Pause
Čas 24 h
Displej
„PAU„
• Nejdříve zvolte funkci
přípravy a požadovanou
teplotu.
• Stiskněte jednou tlačítko
nastavení. Postupujte podle
výše uvedených pokynů.
• Stiskněte podruhé, displej
zobrazí „PAU“ a poté „---“,
kontrolka start bliká.
• Nastavte čas před
spuštěním
trouby. Během pauzy
trouba není v provozu,
displej zobrazuje zbývající
dobu pauzy, kontrolky start
a stop svítí. Po uplynutí
odpočítávání trouba začne
hřát a svítí pouze kontrolka
stop.
• Na konci nastaveného
času se trouba automaticky
vypne. Zní akustický signál.
K ztlumení stiskněte tlačítko
nastavení. Stiskněte opět,
pokud chcete restartovat
přírpavu. Nastavte knoflíky
do vypnuté pozice. Během
provozu trouby lze upravit
trvání pauzy nebo dobu
přípravy.
• Umožňuje vám nastavit čas
přípravy tak, že recept je
hotový ve stanovenou dobu.
Příklad: čas dne je 10 hodin.
Pokrm se připravuje 45 minut
a musí být hotov ve 12 hodin.
1. Zvolte požadovanou funkci
a teplotu.
2. Nastavte 45 minutové
trvání.
3. Nastavte čas pauzy 75
minut (10H/11H15). Trouba
bude v pauze od 10 hodin
do 11 hodin 15 minut.
Spustí přípravu v 11 hodin
a 15 minut a automaticky
se vypne ve 12 hodin.
Kontrolka
trvání
Kontrolka
startu
Tlačítko
nastavení
Zobrazení
příkazů
3. ČASOMĚŘİČ
La pagina si sta caricando...
La pagina si sta caricando...
La pagina si sta caricando...
La pagina si sta caricando...
-
 1
1
-
 2
2
-
 3
3
-
 4
4
-
 5
5
-
 6
6
-
 7
7
-
 8
8
-
 9
9
-
 10
10
-
 11
11
-
 12
12
-
 13
13
-
 14
14
-
 15
15
-
 16
16
-
 17
17
-
 18
18
-
 19
19
-
 20
20
-
 21
21
-
 22
22
-
 23
23
-
 24
24


Hoover HOV 4050 BAV Manuale utente
- Categoria
- Microonde
- Tipo
- Manuale utente
- Questo manuale è adatto anche per
Documenti correlati
Altri documenti
-
Candy ACOM609XM CLG64SPX Manuale utente
-
Zerowatt ZFFS100N/E Manuale utente
-
-
-
-
-
-
-
ROSIERES LBRILS120H/C Manuale utente
-