Güde GMK 350 T 40532 Manuale del proprietario
- Tipo
- Manuale del proprietario

GMK 350 T
#40532
Deutsch D 4
Originalbetriebsanweisung
METALLKREISSÄGE
English GB 8
Translation of original operating instructions
METAL SAW
Français F 12
Traduction du mode d’emploi d’origine
SCIE A MÈTAUX
Čeština CZ 16
Překlad originálního návodu k provozu
PILA NA KOV
Slovenčina SK 20
Preklad originálneho návodu na prevádzku
PÍLA NA KOV
Nederlands NL 24
Vertaling van de originele gebruiksaanwijzing
METAALAFKORTZAAG
Italiano I 28
Traduzione del Manuale d’Uso originale
SEGA PER I METALLI
Magyar H 32
Az eredeti használati utasítás fordítása
FÉM FŰRÉSZEK
Hrvatski HR 36
Prijevod originalnih uputa za uporabu
PILA ZA METAL
Slovenščina SLO 40
Prevod originalnih navodil za uporabo
ŽAGA ZA KOVINE
Български BG 44
Превод на оригиналната инструкция
НОЖОВКА ЗА МЕТАЛ
EG-KONFORMITÄTSERKLÄRUNG 48
EC-DECLARATION OF CONFORMITY • DECLARATION CE DE
CONFORMITÉ • PROHLÁŠENÍ O SHODĚ EU • VYHLÁSENIE O
ZHODE EÚ • EG-CONFORMITEITVERKLARING • DICHARAZIONE
DI CONFORMITÁ CE • EU AZONOSSÁGI NYILATKOZAT • IZJAVA
O ISTOVETNOSTI EU • ДЕКЛАРАЦИЯ ЗА СХОДСТВО С ЕС
© Güde GmbH & Co. KG - Birkichstrasse 6 - D-74549 Wolpertshausen - Deutschland

1
7
4 5
6
2
3

8
9 10
I
11

D
Wir bedanken uns für den Kauf einer Güde Metallkreissäge GMK 350 T und das von Ihnen entgegengebrachte
Vertrauen in unser Sortiment.
!!! Lesen Sie bitte diese Bedienungsanleitung sorgfältig durch,
bevor Sie das Gerät in Betrieb nehmen!!!
Sie haben technische Fragen? Eine Reklamation? Benötigen Ersatzteile oder eine Bedienungsanleitung?
Auf unserer Homepage www.guede.com im Bereich Service helfen wir Ihnen schnell und unbürokratisch weiter. Bitte
helfen Sie uns Ihnen zu helfen. Um Ihr Gerät im Reklamationsfall identifizieren zu können benötigen wir die Seriennummer
sowie Artikelnummer und Baujahr. Alle diese Daten finden Sie auf dem Typenschild. Um diese Daten stets zur Hand zu
haben, tragen Sie diese bitte unten ein.
Seriennummer: Artikelnummer: Baujahr:
Tel.: +49 (0) 79 04 / 700-360 Fax: +49 (0) 79 04 / 700-51999 E-Mail: support@ts.guede.com
A.V. 2 Nachdrucke, auch auszugsweise, bedürfen der Genehmigung. Technische Änderungen vorbehalten. Abbildungen
beispielhaft!
Kennzeichnung:
Produktsicherheit:
Produkt ist mit den
einschlägigen Normen der
Europäischen Gemeinschaft
konform
Verbote:
Verbotszeichen, allgemein Nicht in das Sägeblatt
greifen
Gerät nicht bei Nässe
verwenden Am Kabel ziehen verboten
Verbot von weiter Kleidung
und Schmuck
Warnung:
Warnung/Achtung Warnung vor gefährlicher
elektrischer Spannung
Sicherheitsabstand einhalten
Gebote:
Bedienungsanleitung lesen! Gehörschutz und
Augenschutz benutzen
Schutzhandschuhe benutzen!
Umweltschutz:
Abfall nicht in die Umwelt
sondern fachgerecht
entsorgen.
Verpackungsmaterial aus
Pappe kann an den dafür
vorgesehen Recycling-
Stellen abgegeben werden.
Schadhafte und/oder zu
entsorgende elektrische oder
elektronische Geräte müssen
an den dafür vorgesehen
Recycling-Stellen abgegeben
werden.
Verpackung:
Vor Nässe schützen Packungsorientierung Oben
Technische Daten:
Motorleistung Anschluß
Sägeblattdrehzahl Sägeblatt
Schnittleistung Schallleistungspegel
Gewicht
Gerät
Metallkreissäge GMK 350 T
Diese Metallkreissäge ist das ideale Gerät zum trocken
schneiden von allen Rohren, Profilen und Vollmaterialien aus
Stahl (kein Edelstahl!), Aluminium, Kupfer, PVC im Winkel
von 45° bis 90°.
Gerätebeschreibung (Abb. 1)
1. Arbeitsgriff
2. Sicherheitsschalter
3. Sicherheitsblende.
4. Sägeblattschutzabdeckung
5. Sägeblatt
6. Griff
7. Handrad
8. Gummifüsse
4

9. Spannvorrichtung
10. Grundplatte
11. Bürstendeckel
12. Motor
13. Motorgehäuse
14. Entriegelungsknopf
Gewährleistung
Die Gewährleistungszeit beträgt 12 Monate bei gewerblicher
Nutzung, 24 Monate für Verbraucher und beginnt mit dem
Zeitpunkt des Kaufs des Gerätes.
Die Gewährleistung erstreckt sich ausschließlich auf Mängel,
die auf Material- oder Herstellungsfehler zurückzuführen
sind. Bei Geltendmachung eines Mangels im Sinne der
Gewährleistung ist der Kaufbeleg - der das Verkaufsdatum
auszuweisen hat - mit Verkaufsdatum beizufügen.
Von der Gewährleistung ausgeschlossen sind
unsachgemäße Nutzung, wie z. B. Überlastung des Gerätes,
Gewaltanwendung, Beschädigungen durch
Fremdeinwirkung, Fremdkörper, sowie Nichtbeachtung der
Gebrauchs- und Aufbauanlei¬tung und normaler Verschleiß.
Wichtige grundlegende Sicherheitshinweise
Bevor Sie mit dem Gerät arbeiten, lesen Sie die
nachstehenden Sicherheitsvorschriften und die
Bedienungsanleitung aufmerksam durch. Falls Sie das
Gerät an andere Personen übergeben sollten, händigen
Sie die Bedienungsanleitung bitte mit aus. Bewahren Sie
die Bedienungsanleitung immer gut auf!
Verpackung: Ihr Gerät befindet sich zum Schutz vor
Transportschäden in einer Verpackung. Verpackungen
sind Rohstoffe und somit wiederverwendungsfähig oder
können dem Rohstoffkreislauf zurückgeführt werden.
Bitte lesen Sie die Gebrauchsanweisung sorgfältig durch
und beachten Sie deren Hinweise. Machen Sie sich
anhand dieser Gebrauchsanweisung mit dem Gerät, dem
richtigen Gebrauch sowie den Sicherheitshinweisen
vertraut. Bitte bewahren Sie die Hinweise für späteren
Gebrauch sicher auf.
• Führen Sie vor jeder Benutzung eine Sichtprüfung
des Gerätes durch. Benutzen Sie das Gerät nicht,
wenn Sicherheitsvorrichtungen beschädigt oder
abgenutzt sind. Setzen Sie nie
Sicherheitsvorrichtungen außer Kraft.
• Verwenden Sie das Gerät ausschließlich
entsprechend dem in dieser Gebrauchsanweisung
angegebenen Verwendungszweck.
• Arbeiten Sie stets aufmerksam. Beobachten Sie Ihre
Arbeit. Gehen Sie vernünftig vor. Verwenden Sie den
Metallkreissäge nicht, wenn Sie unkonzentriert sind.
• Sie sind für die Sicherheit im Arbeitsbereich
verantwortlich.
• Lassen Sie das Gerät nie unbeaufsichtigt.
• Benutzen Sie das Gerät nie bei Regen oder in
feuchter, nasser Umgebung.
• Benutzen Sie Elektrowerkzeuge nicht in der Nähe von
brennbaren Flüssigkeiten oder Gasen.
• Schalten Sie das Gerät nicht ein, wenn es umgedreht
ist bzw. wenn es nicht in der Arbeitsstellung ist.
• Halten Sie das Gerät von anderen Personen,
insbesondere Kindern und auch von Haustieren fern.
Lassen Sie andere Personen nicht das Werkzeug
oder Kabel berühren,
• Ziehen Sie nach dem Gebrauch den Netzstecker und
überprüfen Sie die Maschine auf Beschädigung.
• Wenn Sie das Gerät nicht benutzen, bewahren Sie es
an einem trockenen und für Kinder unzugänglichen
Ort auf.
• Reparaturen dürfen nur von einem Elektrofachmann
durchgeführt werden.
• Vor Inbetriebnahme der Maschine und nach
irgendwelchem Aufprall, prüfen Sie sie auf Anzeichen
von Verschleiß oder Beschädigung, und lassen Sie
notwendige Reparaturen durchführen.
• Benutzen Sie nie Ersatz- und Zubehörteile, die vom
Hersteller nicht vorgesehen oder empfohlen sind.
• Benutzen Sie die Maschine nur bei Tageslicht oder
mit ausreichender künstlicher Beleuchtung.
• Legen Sie während der gesamten Zeit der
Ausführung der Arbeiten die der jeweiligen Umgebung
angemessene Schutzkleidung an und treffen Sie der
Umgebung angemessene Vorkehrungen zum
Unfallschutz.
• Zweckentfremden Sie nicht das Kabel. Tragen Sie
das Werkzeug nicht am Kabel und benützen Sie es
nicht, um den Stecker aus der Steckdose zu ziehen.
Schützen Sie das Kabel vor Hitze, Öl und scharfen
Kanten.
• Pflegen Sie Ihre Werkzeuge mit Sorgfalt. Halten Sie
Ihre Werkzeuge sauber, um gut und sicher zu
arbeiten. Kontrollieren Sie regelmäßig den Stecker
und das Kabel und lassen Sie dieses bei
Beschädigung von einem anerkannten Fachmann
erneuern. Kontrollieren Sie Verlängerungskabel
regelmäßig und ersetzen Sie beschädigte Kabel
durch einen Fachmann.
• Verlängerungskabel im Freien. Verwenden Sie im
Freien nur dafür zugelassene und entsprechend
gekennzeichnete Verlängerungskabel (bis 20 m ∅1,5
mm², 20-50 m ∅ 2,5 mm²)
• Trennen Sie das Gerät vom Netz
- vor jeder Reinigung
- nach jedem Gebrauch
• Personen, die aufgrund ihrer physischen,
sensorischen oder geistigen Fähigkeiten oder Ihrer
Unerfahrenheit oder Unkenntniss nicht in der Lage
sind, das Gerät zu bedienen, dürfen das Gerät nicht
benutzen.
• Wenn das Gerät sichtbare Beschädigungen
aufweist, darf das Gerät nicht in Betrieb genommen
werden.
• Wenn die Netzanschlussleitung dieses Geräts
beschädigt wird, muß sie durch den Hersteller oder
einen Elektrofachmann ersetzt werden.
• Reparaturen an diesem Gerät dürfen nur von einem
Elektrofachmann durchgeführt werden. Durch
unsachgemäße Reparaturen können erhebliche
Gefahren entstehen.
• Für die Zubehörteile gelten die selben
Vorschriften.
Güde GmbH & Co. KG übernimmt keine Haftung für
Schäden aufgrund folgender Punkte:
• Beschädigungen am Gerät durch mechanische
Einflüsse und Überspannungen.
• Veränderungen am Gerät
• Verwendung für andere als die in der Anleitung
beschriebenen Zwecke.
• Beachten Sie unbedingt sämtliche
Sicherheitshinweise um Verletzungen und
Schäden zu vermeiden.
Wichtige Sicherheitshinweise
ACHTUNG: Lesen und beachten Sie nachfolgende
Sicherheitsvorschriften sorgfältig, bevor Sie das Gerät
benutzen, hiermit verhindern Sie, dass Sie sich
verletzen oder einen Brand auslösen.
• Berühren Sie niemals das Sägeblatt während dem
Schneiden
• Körperberührung mit geerdeten Teilen z. B.: Rohren,
Heizkörpern, Herden und Kühlschränken vermeiden.
• Verwenden Sie immer eine Schutzbrille. Normale
Brillen sind kein Ersatz für Schutzbrillen. Bei staubigen
Arbeiten Schutzmaske tragen. Sowie einen
Gehörschutz (Ohrenstöpsel oder Ohrenschalen) bei
langandauender Arbeit.
• Maschine nicht überlasten.
• Keine zu schwachen Werkzeuge für schwere Arbeiten
verwenden.
5

• Keine weite Kleidung oder Schmuck tragen.
• Anschlusskabel vor Hitze und scharfen Kanten
schützen und nur vom Fachmann auswechseln lassen
• Säge sicher auf einer Arbeitsplatte befestigen.
• Stumpfe Sägeblätter rechtzeitig auswechseln.
• Die Maschine muss über eine Fehlerstrom-Schutz-
Einrichtung mit einem Bemessungsfehlerstrom von
nicht mehr als 30 mA versorgt werden.
• Das Gerät erfüllt die Anforderungen der EN 61000-3-
11 und unterliegt Sonderanschlußbedingungen. Das
heißt, dass eine Verwendung an beliebigen frei
wählbaren Anschlusspunkten nicht zulässig ist.
• Das Gerät kann bei ungünstigen Netzverhältnissen zu
vorübergehenden Spannungsschwankungen führen.
• Das Gerät ist ausschließlich zur Verwendung an
Anschlußpunkten vorgesehen, die eine maximale
zulässige Netzimpedanz von Zmax = 0,233 Ω nicht
überschreiten.
• Sie müssen als Benutzer sicherstellen, wenn nötig in
Rücksprache mit Ihrem
Energieversorgungsunternehmen, dass Ihr
Anschlusspunkt, an dem Sie das Gerät betreiben
möchten, die oben genannte Anforderung erfüllt.
Verhalten im Notfall
Leiten Sie die der Verletzung entsprechend notwendigen
Erste Hilfe Maßnahmen ein und fordern Sie schnellst
möglich qualifizierte ärztliche Hilfe an.
Bewahren Sie den Verletzten vor weiteren Schädigungen
und stellen Sie diesen ruhig.
Bestimmungsgemäße Verwendung
Leistungsstarke Metallkappsäge für Trockenschnitt, geeignet
für Voll- und Hohlmaterial, schwenkbarer Schraubstock bis
45°. Leistungsfähiges Sägeblatt für schnelle Schnitte. Das
Material wird während dem Schnittvorgang kaum erhitzt
somit kann das frisch geschnittene Material sofort
weiterverarbeitet werden, ferner entsteht keine
Funkenbildung. Durch das Trockenschnittverfahren ist keine
Kühlflüssigkeit notwendig, dadurch entsteht auch kein
lästiges Spritzen der Kühlflüssigkeit. Inkl.
Sicherheitsschalter, Endanschlag, schwenkbarer
Schraubstock und Längsanschlag, komplett mit Sägeblatt.
• Empfohlenes Zubehör:
Universal - Hartmetall Sägeblatt 72 Zähne für
dickwandige Rohre und Profile, Vollmaterial bis zirka 20
mm Durchmesser
Entsorgung
Die Entsorgungshinweise ergeben sich aus den
Piktogrammen die auf dem Gerät bzw. der Verpackung
aufgebracht sind.
Anforderungen an den Bediener
Der Bediener sollte vor Gebrauch des Gerätes aufmerksam
die Bedienungsanleitung gelesen haben.
Qualifikation
Außer einer ausführlichen Einweisung durch eine
sachkundige Person ist keine spezielle Qualifikation für den
Gebrauch des Gerätes notwendig.
Mindestalter
Das Gerät darf nur von Personen betrieben werden, die das
16. Lebensjahr vollendet haben.
Eine Ausnahme stellt die Benutzung als Jugendlicher dar,
wenn die Benutzung im Zuge einer Berufsausbildung zur
Erreichung der Fertigkeit unter Aufsicht eines Ausbilders
erfolgt.
Schulung
Die Benutzung des Gerätes bedarf lediglich einer
entsprechenden Unterweisung durch eine Sachkundige
Person bzw. die Bedienungsanleitung. Eine spezielle
Schulung ist nicht notwendig.
Technische Daten
Sägeblattdurchmesser: 355 mm
Zähnezahl: 72 Zähne
Sägeblatt Bohrung: 25,4 mm
Schraubstock schwenkbar: 0-45°
Motorleistung: 2300 Watt
Anschluss: 230 Volt
Leerlaufdrehzahl: 1300 U/min
Max. Schnittleistung 90°
Rundmaterial:
Quadratisch:
Rechteck:
120 mm
120 x 120 mm
180 x 80 mm
Max. Schnittleistung 45°
Rundmaterial:
Quadratisch:
Rechteck:
90 mm
90 x 90 mm
120 x 90 mm
Transport und Lagerung
Bei der Einlagerung ist zu beachten, dass das
Gerät an einem trockenen, für Kinder und
Unbefugte unzugängigen Ort aufbewahrt wird.
Reinigen Sie das Gerät vor längerer
Nichtbenutzung gründlich.
Montage (Abb. 2 und 3)
Die Metallkappsäge verfügt über ein Schnellspannsystem.
Um Werkstücke in den Spansstock zu klemmen ist lediglich
die Klappe der Zuhaltung (Abb. 2) zu drücken. Jetzt kann die
Gewindespindel auf die gewünschte Werkstückgröße
voreingestellt werden.
Nach Voreinstellung wird die Klappe arretiert, nun kann das
Werkstück gespannt werden.
Einstellung des Einspannsystems:
Der Gehrungswinkel kann von 0° bis 45° eingestellt werden.
Bitte beachten Sie (Abb. 3).
Das Einspannen des Werkstückes und das Einstellen des
Gehrungswinkels erfolgt in zwei Arbeitsgängen.
Abb. 3:
A: Arretierschraube
B: Grad Einteilungsskala
Lösen Sie die Arretierschraube (A). Wenn Sie mit einem
Winkel von 0° bis 45° arbeiten wollen, stellen Sie die
Spannvorrichtung (B) von Hand so ein, dass der gewünschte
Winkel genau auf die Pfeilmarkierung zeigt.
Bedienung Abb. 4, 5 und 6)
Abb. 4:
A: Ein/Aus – Schalter
B: Arretierknopf für Blattwechsel
C: Entriegelungsknopf
D: Arm
Entriegelungsknopf (C) drücken und Maschinenknopf am
Arm (D) , vorsichtig und mit Druck, nach ten bewegen. Der
Sicherheitsschalter (A) ist eine Schutzvorrichtung. Drücken
sie den Ein/Aus - Schalter (A) hinunter, und lassen Sie ihn
erst wieder los, wenn Sie das Gerät wieder ausschalten
wollen.
Abb. 5:
A: Werkstück
B: Block
6

Beim Einspannen ist das Werkstück (A) mit einem Block (B)
zu unterlegen, der ein bisschen kleiner als das Werkstück
sein sollte. (Abb.5)
• Vermeiden Sie es, beim Schneidevorgang zu viel Druck
auf das Sägeblatt auszuüben
• Stoppen Sie das Sägeblatt nie manuell, denn das
verkürzt die Lebensdauer Ihres Motors
• Dank des Tragegriffs (Abb. 6), kann die Maschine
problemlos transportiert werden
Sicherheitshinweise für die Bedienung
• Sicheres und exaktes Arbeiten ist nur nach einer
sorgfältigen Montage aller Teile möglich
• Niemals ohne Sägeblattschutzabdeckung arbeiten
• Zu Wartungs- und Pflegearbeiten immer Netzstecker
ziehen
• Bevor Sie das Gerät an den Stromkreis anschließen,
sollten Sie überprüfen, ob das Sägeblatt sachgemäß -
gemäß Gebrauchsanweisung - montiert wurde. Ziehen
sie nach dem Sägeblattwechsel die Schrauben sorgfältig
an, damit das Sägeblatt nicht springt
• Bevor Sie das Sägeblatt in Betrieb nehmen, sollten Sie
überprüfen ob es funktionstüchtig ist und weder Sprünge
noch Risse aufweist
• Bei Beginn des Schneidevorgangs sollte der Kontakt
zwischen dem Sägeblatt und dem Werkstück behutsam
hergestellt werden, da das Sägeblatt bei zu großer
Belastung verhaken und brechen könnte
• Das Sägeblatt sollte die volle Rotationsgeschwindigkeit
erreicht haben, bevor Sie zu schneiden anfangen
• Um Unfälle zu vermeiden, sollten Sie nach dem
Auswechseln des Sägeblatts überprüfen, ob alle
Schrauben wieder fest angezogen sind. Dasselbe
gilt, wenn Sie Werkstückreste aus dem Spanner
entfernen.
• Nur einwandfreie Sägeblätter benutzen.
Stumpfe Sägeblätter rechtzeitig auswechseln.
Vermeiden Sie es unbedingt, beim Schneidvorgang
zu viel Druck auf das Sägeblatt auszuüben!
DIES KANN ZU EINEM BRUCH DES SÄGEBLATTES
FÜHREN!
Erdung:
• Im Falle eines Defekts am Gerät oder eines
Isolationsfehlers ist die Erdung für den Strom der Weg
des geringsten Widerstandes und verhindert, dass Sie
mit Strom in Berührung kommen. Ihre Maschine ist mit
einem Kabel ausgestattet, das mit einem Erdungsleiter
und einem Erdungsstecker versehen ist. Der Stecker
sollte an einen speziell dafür konzipierten Anschluss
angeschlossen werden, der gemäß lokaler Normen und
Bestimmungen installiert und geerdet ist
• Stecker, die nicht mit dem Anschluss übereinstimmen,
sollten nur vom Elektriker verändert werden. Dasselbe
gilt für die Installation des Anschlusses
• Ist der Erdungsleiter unsachgemäß angeschlossen,
setzen Sie sich der Gefahr eines Stromstosses aus.
Der Erdungsleiter ist ein grünes oder grüngelb
gestreiftes Kabel. Verwenden Sie nur beim Hersteller
bezogene Netzkabel mit Quetschverbindung zum
Sicherheitsschalter
• (Anschlussart M, siehe Ersatzteilliste Nr.222). Wenn
Sie das Netzkabel Ihrer Maschine auswechseln
müssen, dürfen Sie auf keinen Fall das
Erdungsleiterkabel als Stromleiterkabel benutzen
• Sollte bei den Anweisungen für den Anschluss der
Erdung etwas unklar sein, oder Sie nicht sicher sind, ob
ihre Maschine fachgerecht geerdet ist, sollten Sie Ihren
Elektriker um Rat fragen
• Verwenden Sie nur drei drahtige Verlängerungskabel
und dreipolige Steckdosen, die zum Stecker Ihrer
Maschine passen
• Defekte oder abgenutzte Netzkabel sollten unverzüglich
repariert oder ausgewechselt werden
Wartung und Pflege
• Ziehen Sie immer den Stecker aus der Steckdose,
bevor Sie das Sägeblatt oder die Bürsten auswechseln,
die Maschine ölen oder andere
Wartungsvorbereitungen vornehmen.
• Die Einstellung des Gehrungswinkels oder andere
Veränderungen sollten nie bei laufendem Motor
vorgenommen werden
• Nach jedem Gebrauch sollte überprüft werden, ob das
Gerät noch voll funktionstüchtig ist. Um die
Kohlebürsten zu überprüfen, müssen Sie den
Bürstendeckel mit einem Schraubenzieher entfernen.
Die Bürsten sollten ausgewechselt werden, wenn die
Abnutzung die Markierung (6mm) überschritten hat
oder wenn Teilchen abgesplittert sind (Abb.7+8)
Nach der Benutzung:
• Lösen Sie die Schraube und ziehen Sie das Spänefach
heraus. Leeren Sie dieses, schieben Sie es wieder in
die dafür vorgesehene Öffnung, und ziehen Sie die
Schraube wieder an. (Abb.9)
Ölen des Geräts:
Einmal im Monat sollte die Maschine an folgenden Stellen
geölt werden. Damit verlängern Sie die Lebensdauer
Ihres Gerätes!
• rotierendes Teil der Welle
• rotierendes Teil des Handrads
• Gleitfläche der Spannvorrichtung
Sägeblattwechsel:
Abb. 10 und 11:
A: Welle
B: Arretierknopf (am Handgriff)
C: Spannring
D: Sechskantschraube
E: Sicherungsring
F: Unterlagscheibe
G: Flansch
H: Sägeblatt
I: Flügelmutter
• Vor dem Sägeblattwechsel ziehen Sie den Netzstecker.
Demontieren Sie die Abdeckung indem Sie die
Flügelmutter (Abb. 11) lösen. Mit dem Arretierknopf
(Abb. 4 und 10/B) arretieren Sie die Welle (Abb. 10/A).
• Mit einem Innensechskantschlüssel lösen Sie die
Blattschraube (Abb. 10/D).
• Sägeblatt (Abb. 10/H) vorsichtig entnehmen -
(ACHTUNG: Schutzhandschuhe tragen!)
• Flansch (Abb. 10/G) auf die Welle schieben.
• Das neue Sägeblatt montieren und dabei darauf achten,
dass die Zähne gegen den fixen Anschlag zeigen.
• Spannring (Abb. 10/C), Flansch (Abb. 10/G),
Unterlagscheibe (Abb. 10/F), Sicherungsring (Abb.
10/E) und die Sechskantschraube (Abb. 10/D)
montieren.
• Die Welle (Abb. 10/A) mit dem Arretierknopf (Abb. 4
und 10/B) blockieren und die Blattschraube gut
festziehen
• Bevor Sie den Netzstecker wieder einstecken, muss die
Festhaltestange und der Gabelschlüssel wieder entfernt
und die Verschalung montiert werden!!! (Abb. 10 und
11)
7

Marking:
Product safety:
Product corresponds to
appropriate standards of the
EU
Prohibitions:
General prohibition mark Do not touch rotating parts
Using the appliance when wet
prohibited! Don’t pull the cable
Prohibition of further clothing
and jewellery
Warning:
Warning/attention
Beware of hazardous
voltage
Keep safety distance
Commands:
Read the Operating
Instructions!
Wear PPE (ear protection
aids, eye protection
Wear safety gloves!
Environment protection:
Dispose waste professionally
so as not to harm the
environment.
Packing cardboard material
may be delivered to
collecting centres for
recycling
Any damaged or disposed
electric or electronic devices
must be delivered to
appropriate collection centres.
Package:
Protect against humidity This side up
Technical data:
Engine power Connector
Idle speed sawblade
average power Noise value
Weight
Appliance
Metal saw GMK 350 T
This metal trimming saw is an ideal tool to dry-cut any tubes,
sections and solids of steel (not high-grade steel),
aluminium, copper and PVC at an angle of 45° - 90°.
Appliance description (pic. 1)
1. Control handle
2. Safety switch
3. safety screen
4. Disk protection cover
5. Disk
6. Handle
7. Hand wheel
8. Rubber blocks
9. Lock device
10. Base plate
11. Brushes lid
12. Motor
13. Motor box
GB
!!! Please read carefully the Operating Instructions
before putting the appliance into operation!!!
Do you have any questions? A claim? Do you need spare parts or the Operating Instructions?
You will be helped quickly and without needless bureaucracy at our web pages www.guede.com in the Services part.
Please help us be able to assist you. To be able to identify your appliance when claimed, we need to know its serial No.,
order No. and the year of production. All these details can be found on the type label. Enter the details below for future
reference:
Serial No. Order No. Year of production:
Tel.: +49 (0) 79 04 / 700-360 Fax: +49 (0) 79 04 / 700-51999 E-Mail: support@ts.guede.com
A.V. 2 Any reprints, even partial, are subject to approval. Technical changes reserved. Pictures are just for illustration
8

14. Tripping pin
Guarantee
A warranty period of 12 months applies to commercial use
and 24 months apply to private use and commences on the
day of purchase of the device.
Warranty applies exclusively to failures due to defective
material or workmanship. An original sale slip with indication
of date of sale must be presented in case of claiming for the
warranty rights.
Warranty does not cover unprofessional use such as device
overload, violent use, damage caused by third party or
foreign materials, failure to comply with operations and
assembly manual, and normal wear and tear.
Important basic safety instructions
Before you start working with the appliance please read
carefully the following safety regulations and Operating
Instructions. If any other person is to handle the appliance
provide him/her with the Operating Instructions. Keep the
Operating Instructions for future reference!
Package: The appliance has been put in a package to
prevent any damage during transport. Packages are raw
materials so they can be reused or recycled.
Please read carefully the Operating Instructions and follow
them. Use these Operating Instructions to get acquainted
with the appliance, its corresponding use and safety
instructions. Keep the Instructions for future reference.
• Perform a visual control of the product before you put
it into operation each time. Do not use this product, if
safety devices are damaged or worn off. Never
deactivate safety devices.
• Use this product only according to the intended use
specified in this user manual.
• Be always careful when working. Watch your activity.
Proceed carefully. Do not use the metal saw if you are
not concentrated.
• You are responsible for the safety in the work area.
• Never leave the product unsupervised.
• Never use the product in wet or moist conditions or if
it rains.
• Do not use electric tools near flammable liquids or
gases.
• Do not switch on the product, if it is turned upside
down or if it is not in the operating position.
• Keep the product away from other people, especially
from children and also pets.
• After you finish working with the appliance, pull the
plug out of socket and check if the appliance is not
damaged
• If you do not use the product, keep it at a dry place,
which is not accessible for children.
• Repairs may be only carried out by a professional
electrician.
• Before putting the machine into operation and after
impact of any kind, check it for sign of wear or
damage and arrange repairs if necessary.
• Never use spare parts and accessories, which are not
specified or recommended by the manufacturer.
• Use the machine only under daylight or with sufficient
artificial lighting.
• Wear protective clothing suitable for the given
environment the whole time you work and take
suitable preventive measures to prevent accidents.
• Do not use the cable for any other purpose than
specified. Do not wear the cable by its cable and do
not use the cable for pulling the plug out of socket.
Protect the cable against excessive temperatures, oil
and sharp edges.
• Be very careful of your appliance. Keep it clean so
that working with it is fine and safe. Regularly check
the plug and cable and have them repaired by an
authorised specialist if damaged. Regularly check the
extension cables and have any damaged cable
replaced by a specialist.
• Extension cables to be used outdoors only. For
outdoor work, use extension cables adequately
marked and approved for that purpose (within 20 m
∅1.5 mm², 20-50 m ∅ 2.5 mm²)
• Unplug the appliance
- before every cleaning
after each use
• Persons unable to operate the appliance due to
their physical, sensory or mental abilities or their
inexperience or lack of knowledge must not operate
it.
• If the appliance show any sign of visible damage
the appliance must not be put into operation.
• If the feeder cable of the appliance is damaged it
needs to be replaced by the producer or an
electrician.
• Repairs of the appliance can only be executed by
an electrician. There might be significant risks as a
result of unauthorised repairs.
• The same regulations apply for accessories.
Güde GmbH & Co. KG does not answer for damages
caused by:
• Appliance damage by mechanical influences and
overloading.
• Any changes to the appliance.
• Use for any other purpose than that described in
the Operating Instructions.
• Unconditionally follow all safety instructions to
prevent accidents and damage.
Important product-specific safety instructions
Caution: Before using the machine on a regular basis,
read the safety regulations below carefully and abide by
the same. It is your way to prevent injuries and fire.
• Never touch the disk when cutting is in progress.
• Avoid any bodily contact with grounded parts, such as
tubes, radiators, cookers and refrigerators
• Always wear goggles. Regular glasses cannot stand
for goggles. Wear a respirator when working in a dusty
area. Wear ear protectors (plugs) when working for
long periods of time.
• Do not overload the machine.
• Do not use a low output machine/tool for demanding
jobs.
• Do not wear loose-fitting garments and jewels
• Protect the power cable against excessive
temperatures and sharp edges. Have it replaced only
at a specialist’s
• Fix the saw to the work table as appropriate
• Replace any blunt disks on time.
• The machine should be supplied with current of
maximum value 30 mA via stray current protection (FI)
• The appliance meets EN 61000-3-11 requirements and
is subject to special connection conditions. That means
that use on optionally selected connection points is
inadmissible.
• The appliance can lead to occasional voltage
fluctuations under unfavourable power conditions.
• The appliance is only designated to be used for
connection points not exceeding the maximum allowed
impedance of Zmax = 0,233 Ω.
• As a user, you must make sure your connection point
on which you want to use the appliance meets the
above-mentioned requirements – after agreement with
your electricity supplier if necessary.
Behavior in case of emergency
Perform necessary first aid measures according to the injury
and call for medical attendance as soon as possible.
Prevent the injured against any further injuries and calm him
down.
9

Intended use
High-power metal trimming saw for dry cutting, fit to cut solid
and hollow pieces, vice capable of deflection up to 45°.
Efficient disk for fast cuts. In the cutting process, the material
will hardly get warmed, therefore, just cut material may be
processed further immediately. No sparkling. Owing to the
dry-cut method, no cooling fluid is necessary, and the
annoying splashes of the fluid are avoided. .
Included is a safety switch, terminal stop, vice capable of
deflection and a longitudinal stop in a set with the disk.
• Recommended accessories:
Universal disk of hard metal with 72 teeth to cut thick-
wall tubes and sections, solids up to diameter ca 20
mm
Disposal
The disposal instructions are based on icons on the
appliance or its package..
Handling requirements
The operating staff must carefully read the Operating
Instructions before using the appliance.
Qualification
Apart from the detailed instruction by a professional no
special qualification is necessary for using the appliance.
Minimum age
Only persons over 16 years of age can work with the
appliance. An exception includes youngsters if they work
within their professional education the purpose of which is to
obtain knowledge supervised by a trainer.
Training
Using the appliance only requires corresponding training by
a professional or following of the Operating Instructions. No
special training is necessary.
Technical Data :
Disk diameter: 355 mm
Number of teeth: 72
Blade bore: 25,4 mm
Vise swivel: 0-45°
Motor power: 2300 W
Power input: 230 Volt
Speed: 1300 rpm
Max Cutting Capacity 90°
Rounds:
Squares:
Flats:
120 mm
120 x 120 mm
180 x 80 mm
Max Cutting Capacity 45°
Rounds:
Squares:
Flats:
90 mm
90 x 90 mm
120 x 90 mm
Transport and storage
When storing, it is necessary that the appliance is
put to a dry place, inaccessible to children and
unauthorised persons. Clean the appliance thoroughly
before longer putting out of operation.
Installation (pic. 2, 3)
Metal trimming saw has a fast-acting clamp system. It is
enough to push the clamp shutter (Fig. 2) to vice the
piece). The threaded spindle may be then set to the
required size of the piece.
After setting up, the shutter is locked and the piece may
be vised.
Clamp System Setting
The bevel angle may be set from 0° to 45°. Please, observe
(Fig. 3). Clamping the piece and setting the bevel angle is
done in two steps.
Pic. 3:
A: Lock screw
B: grade on the scale
Loosen the lock screw (A). If you wish to work at an angle of
0° - 45°, set the clamping unit (B) with hand so that the
required angle points to the arrow.
Operation (pic. 4, 5, 6)
Pic. 4:
A: ON/OFF switch
B: Locking knob for disk replacement
C: Tripping button
D: Arm
Push the tripping button (C) and push the knob on the arm
(D) down with care. Safety switch (A) is a protection device.
Push the ON/OFF switch down (A) and do not let it go until
you want to switch the machine off again.
Pic. 5:
A: Piece to cut
B: Block
For clamping, the piece (A) has to be supported with a block
(B), slightly smaller than the piece (Fig. 5)
• Never force too much on the disk in the course of
cutting.
• Never stop the disk with hand, that will shorten the
service life of the motor.
• The saw should not be operated close to any easily
ignitable materials
• It is easy to transport the machine thanks to carrying
handles. (Fig. 6)
Safety instructions for the operation
• Safe and precise work is not possible unless every part
is carefully fitted in.
• Never work without the disk protection cover in place.
• Always unplug the machine before any maintenance
and treatment.
• You should make sure that the disk is fitted in correctly
any time before plugging the machine. Correct fitting -
proper assembly in conformity with the user manual.
Take care to tighten the screws after replacement of the
disk so that disk break is avoided.
• Before putting the disk in operation, it is necessary to
check it for any cracks and fissures and to make sure
that it is in good working condition.
• A contact of the disk and the piece to be cut should be
made with care at the beginning of the job as the disk –
if loaded excessively – could get caught and broken.
• The disk should reach full speed before cutting is
started.
To avoid accidents, check whether all the screws
are tightened as appropriate following the disk
replacement. The same applies to taking the remaining
parts of the piece from the clamp.
Use only impeccable disks. Replace any blunt
disks on time. Avoid exerting excessive force on the
disk during the work! It might result in breaking the disk!
Grounding:
• In case of a defect or with defective insulation, the
grounding is line of least resistance and is to prevent
10

any contact of your body with the current. Your
machine has a cable with a grounding conductor and a
grounding plug. The plug should be connected to a
specifically designed connection installed and grounded
in compliance with local standards and provisions.
• Any alterations on the plug not complying with the
connection should be done by an electrician. The same
applies to the connection installation.
• If the grounding conductor installation is not correct, an
electrical shock hazard is imminent. Grounding
conductor is a green or green/yellow striped cable. Use
only manufacturer-delivered power cables with
compressed connection with the safety switch.
• (M type connection, see No. 222 in the list of spares). If
it is necessary to replace power cable of your machine,
never use the grounding conductor as a power cable.
• Should you have any queries regarding the grounding
connection and should you be uncertain about proper
grounding of your machine, consult an electrician.
• Use only three-wire extension cables and three-pole
sockets matching the plug of your machine.
• Any defective or worn power cables should be repaired
or replaced immediately.
Maintenance and care
• Always unplug the machine prior to the disk or brushes
replacement, lubrication with oil or other pre-
maintenance operations
• Never set the bevel angle or do other modifications with
the motor running.
• It is necessary to make sure after any use whether or
not the machine is still in full working condition. To
check the carbon brushes, the brushes lid needs to be
removed using a screwdriver. The brushes need
replacement if wear-and-tear has reached above the
mark (6mm) or if small particles have split off (Fig.
7+8)
After the use:
• Loosen the screw, pull the cuts-collecting box out.
Empty the box, put it back in the opening and tighten
the screw again (Fig.9)
Machine Lubrication with Oil
• Once in a month, the machine has to lubricated with oil
on the spots shown below. It will make service life of
your machine longer.
- Spindle rotating part
- Hand wheel rotating part
- Clamp sliding surface area
Disk Replacement:
Pic. 10 and 11:
A: Spindle
B: Locking knob (on the handle)
C: Retaining ring
D: Hexagon screw
E: Seeger ring
F: Washer
G: Flange
H: Disk
• Before replacing the disk, unplug the machine. Loosen
the wing-nut (Fig. 11) and remove the cover. Lock the
spindle (10/A), (Fig. 11) using locking knob (B, Fig. 4)
• Loosen the disk screw (10/D) using an inner-hexagon
wrench
• Remove the disk (10/H) with care - (CAUTION: wear
safety gloves)
• Slide the flange (10/G) on the spindle
• Install the disk and make sure that the teeth point to the
solid stop.
• Install the retaining ring (10/C), flange (10/G), washer
(10/F), Seeger ring (10/E) and hexagon screw (10/D)
• Lock the spindle (10/A) with the lock knob (4/B) and
tighten the disk screw as required.
• Before you plug the machine, remove the retaining rod
and forked wrench and fit the cover in place!!! (Fig. 10+
11)
11

F
!!! Avant de mettre l’appareil en marche,
veuillez lire attentivement ce mode d’emploi!!!
Vous avez des questions techniques ? Une réclamation ? Vous avez besoin de pièces détachées ou d’un mode
d’emploi ?
Nous vous aiderons rapidement et sans bureaucratie inutile par l’intermédiaire de nos pages Web www.guede.com dans la
rubrique Service. Aidez-nous pour que nous puissions vous aider. Pour identifier votre appareil en cas de réclamation, nous
avons besoins du numéro de série, numéro de produit et l’année de fabrication. Toutes ces informations se trouvent sur la
plaque signalétique. Pour avoir ces informations toujours à porté de main, veuillez les inscrire ici :
Numéro de série: Numéro de produit: Année de fabrication:
Tél.: +49 (0) 79 04 / 700-360 Fax: +49 (0) 79 04 / 700-51999 E-Mail: support@ts.guede.com
A.V. 2 Toute réimpression, même partielle, nécessite une autorisation. Modifications techniques réservées. Images
d‘illustration
Symboles:
Sécurité du produit:
Produit répond aux normes
correspondantes de la CE
Interdictions:
Marque d’interdiction, générale Ne pas toucher les parties
en rotation
Défense d’utiliser l’appareil
sous la pluie.
Interdiction de tirer sur le
câble
Interdiction de vêtements et de
bijoux en outre
Avertissement:
Avertissement/attention
Attention: tension électrique
dangereuse
Respectez une distance de
sécurité
Consignes:
Lisez le mode d’emploi avant
l’utilisation.
Portez des accessoires
pour la protection de l’ouïe,
de la vue et de la tête
Portez des gants de sécurité
Protection de l’environnement:
Liquidez les déchets de
manière à ne pas nuire à
l’environnement.
Déposez l’emballage en
carton au dépôt pour
recyclage.
Déposez les appareils
électriques ou électroniques
défectueux et/ou destinés à
liquidation au centre de
ramassage correspondant.
Emballage:
Protégez de l‘humidité Sens de pose
Caractéristiques techniques:
Puissance du moteur Fiche
Vitesse de broche Blade
Capacité de coupe Niveau de puissance
acoustique
Poids
Appareil
Circular metal saw GMK 350 T
Cette scie radiale est l’appareil idéal pour la coupe à sec de
toute sorte de tubes, profils et matériaux pleins en acier
(sauf acier fin!), aluminium, cuivre, PVC, sous l’angle allant
de 45° à 90°.
Description de l’appareil (fig. 1)
1. Poignée de travail
2. Interrupteur de sûreté
3. Écran de protection
4. Capot de protection de la lame de scie
5. Lame de scie
6. Manette
7. Roue à main
8. Pattes en caoutchouc
9. Dispositif de serrage
12

10. Embase
11. Capot des balais
12. Moteur
13. Armoire du moteur
14. Bouton de déblocage
Garantie
La durée de la garantie est de 12 mois en cas d’une
utilisation industrielle et de 24 mois pour le consommateur
final. La période de garantie commence à courir à compter
de la date d’achat de l’appareil.
La garantie s’applique exclusivement sur les défauts de
matériel ou des défauts de fabrication. En cas de
réclamation pendant la durée de la garantie, veuillez joindre
l’original du justificatif d’achat comportant la date d’achat.
La garantie ne couvre pas une utilisation incompétente, telle
que surcharge de l’appareil, utilisation de force,
endommagement par une personne étrangère ou un objet
étranger, non-respect du mode d’emploi et du mode de
montage et usure normale.
Consignes générales de sécurité
Avant de commencer à travailler avec l’appareil, lisez
attentivement les consignes de sécurité indiquées ci-
dessous et le mode d’emploi. Si vous passez l’appareil à
d’autres personnes, veuillez lui transmettre également le
mode d’emploi. Conservez bien le mode d’emploi !
Emballage : L’appareil est emballé pour le protéger des
dommages lors du transport. Les emballages sont des
matières premières pouvant être recyclées, vous pouvez
donc les déposer dans un centre de ramassage.
Veuillez lire attentivement ce mode d’emploi et respectez
toutes les consignes y indiquées. Utilisez le mode d’emploi
pour vous familiariser avec son utilisation correcte et les
consignes de sécurité. Conservez le mode d’emploi pour
une utilisation ultérieure.
• Effectuer un contrôle visuel avant chaque mise en
marche de l’appareil. Ne jamais utiliser l’appareil si
ses dispositifs de sécurité sont abîmés ou usés. Ne
jamais désactiver les dispositifs de sécurité.
• Usage de l’appareil conforme aux inscriptions du
guide d’utilisation obligatoire.
• Soyez attentifs. Surveillez votre travail. Procédez
avec prudence. N’utilisez pas le Circular metal saw si
vous n’êtes pas concentré.
• Vous êtes responsable de la sécurité sur toute la
zone d’opération.
• Ne jamais laisser l’appareil hors surveillance.
• Conserver l’appareil à un endroit sûr en cas
d’interruption de l’opération.
• N’utilisez pas des outils électriques à proximité des
liquides ou gaz inflammables.
• Ne jamais mettre en marche un appareil renversé ou
hors position d’opération.
• Eloigner l’appareil des autres personnes, surtout des
enfants et leurs animaux domestiques.
• Conserver l’appareil dans un endroit sec et
inaccessible aux enfants.
• Réparation par un technicien professionnel
obligatoire.
• Contrôler les signes d’endommagement ou d’usure
avant toute utilisation de l’appareil ou après tout choc,
et engager des réparations si nécessaire.
• Aucune pièce ni aucun accessoire de rechange non
recommandé par le fabricant ne doit être utilisé.
• Utiliser l’appareil uniquement en plein jour ou sous
éclairage suffisant.
• Pendant toute la durée de réalisation des travaux,
portez une tenue de protection adéquate pour
l’environnement en question et adoptez des mesures
de prévention des accidents convenant à cet
environnement.
• N’utilisez pas le câble dans un autre but. Ne portez
pas l’appareil par le câble et n’utilisez pas le câble
pour retirer la fiche de la prise. Protégez le câble des
températures excessives et des bords tranchants.
• Prenez soin de votre appareil. Maintenez le propre
pour une utilisation correcte et sûre. Contrôlez
régulièrement la fiche et le câble et en cas
d’endommagement, faites réparer le câble par un
spécialiste agréé. Contrôlez régulièrement les
rallonges et faites remplacez les câbles endommagés
par un spécialiste.
• Rallonges pour l’utilisation extérieure. Utilisez à
l’extérieur seulement des rallonges prévues à cet effet
et marquées de façon adéquate (jusqu‘à 20 m ∅1,5
mm², 20-50 m ∅ 2,5 mm²)
• Débranchez l’appareil du secteur
- Avant tout nettoyage
- Après chaque utilisation
• L’utilisation de l’appareil est interdite aux
personnes avec capacités sensorielles ou mentales
réduites ou aux personnes ignorant le
fonctionnement de l’appareil.
• Si l’appareil ou le câble d’alimentation présente des
dommages visibles, il est interdit de le mettre en
marche.
• En cas d’endommagement du câble d’alimentation
de cet appareil, il est nécessaire de le faire
remplacer immédiatement par le fabricant ou un
électricien qualifié.
• Les réparations de cet appareil doivent être
confiées uniquement à un électricien qualifié. Une
réparation non compétente peut engendrer des
dommages conséquents.
• Ces consignes sont valables également pour les
accessoires.
Güde GmbH & Co. KG décline toute responsabilité en
cas de dommages provoqués par :
• Endommagement de l’appareil suite aux influences
mécaniques et surcharge.
• Modifications de l’appareil
• Utilisation dans un autre but que celui décrit dans
le mode d’emploi.
• Pour éviter les blessures et dommages, respectez
toutes les consignes de sécurité.
Consignes de sécurité importantes de produit-
spécifique
Attention: Avant d’utilisez l’appareil, lisez attentivement
les consignes de sécurité indiquées ci-dessous et
respectez-les, vous éviterez ainsi l’apparition des
blessures ou d’incendie.
• Lors de la coupe, ne touchez jamais la lame de scie.
• Évitez le contact du corps avec les pièces mises à la
terre, par exemple, tuyaux, corps de chauffage,
cuisinières et réfrigérateurs.
• Utilisez toujours des lunettes de protection. Les
lunettes normales ne remplacent pas les lunettes de
protection. Si vous travaillez dans un endroit
poussiéreux, portez un masque respiratoire. Lors
d’une utilisation prolongée, portez une protection de
l’ouïe (bouchons ou casque).
• Ne surchargez pas l’appareil.
• Keine zu schwachen Werkzeuge für schwere Arbeiten
verwenden
• Ne portez ni vêtements larges ni bijoux.
• Protégez le câble d’amenée des températures
excessives et bords tranchants, faites le remplacer par
un spécialiste.
• Fixez la scie d’une façon sûre sur la table de travail.
• Remplacez sans délai les lames de scie émoussées.
• L’appareil doit être alimenté par un courant de défaut
d’une valeur maximale de 30 mA à travers le dispositif
de protection contre le courant de défaut (FI).
• La machine répond aux exigences de EN 61000-3-11 et
est soumis aux conditions particulières de branchement.
13

Cela signifie que l’utilisation sur des points de
branchement choisis librement est interdite.
• Lors des conditions défavorables, la machine peut
engendrer des variations de tensions temporaires.
• La machine est destinée uniquement à l’utilisation sur
des points de branchement qui ne dépassent pas
l’impédance maximale autorisée Zmax = 0,233 Ω.
• En tant qu’utilisateur, vous devez assurer,
éventuellement après accord avec votre fournisseur
d’énergie, que le point sur lequel vous souhaitez
utiliser la machine, réponde à l’exigence indiquée ci-
dessus.
En cas d’urgence
Pratiquer les gestes de permiers secours nécessaries en
fonction de la blessure et appeler les urgences
immédiatement.
Calmer le blessé sur qui tout nouveau dégât est à éviter.
Usage recommandé
Scie radiale d’une grande performance pour les coupes à
sec, convenant aux matériaux pleins et creux, équipée d’un
étau avec possibilité d’inclinaison jusqu’à 45°. Lame de scie
performante pour coupes rapides. Le matériau ne chauffe
pas lors de la coupe, il est donc possible de continuer à
l’usiner immédiatement après la coupe. Pas de formation
d’étincelles. Grâce à la méthode de coupe à sec, le liquide
de refroidissement n’est pas nécessaire, par conséquent, on
évite les projections désagréables du liquide de
refroidissement.
Interrupteur de sûreté, butée terminale, étau avec possibilité
d’inclinaison et butée de longueur, ensemble avec une
lame de scie.
• Accessoires recommandés :
Lame de scie universelle en métal dur avec 72 dents
pour la coupe de tubes à paroi épaisse et profils,
matériau plein jusqu’au diamètre d’environ 20 mm.
Liquidation
Les consignes de liquidation résultent des pictogrammes
indiqués sur l’appareil ou sur l’emballage. La description des
significations individuelles se trouve dans le chapitre
« Indications sur l’appareil ».
Opérateur
L’opérateur doit lire attentivement la notice avant d’utiliser
l’appareil.
Qualification
Mis à part l’instruction détaillée par un spécialiste, aucune
autre qualification spécifique n’est requise.
Âge minimal
L’appareil peut être utilisé uniquement par des personnes de
plus de 16 ans. Exception faite des adolescents manipulant
l’appareil dans le cadre de l’enseignement professionnel
sous la surveillance du formateur.
Formation
L’utilisation de l’appareil nécessite uniquement l’instruction
par un spécialiste, éventuellement par la notice. Une
formation spéciale n’est pas nécessaire.
Caractéristiques techniques
Diamètre de la lame de scie: 355 mm
Nombre de dents: 72
Blade alésage: 25,4 mm
Étau pivotant: 0-45°
Puissance motrice: 2300 W
Tension d’utilisation: 230 Volt
Rotations: 1300 t. /min
Rendement de coupe max. 90°
Matériel rond:
matériel carré:
matériel plat:
120 mm
120 x 120 mm
180 x 80 mm
Rendement de coupe max. 45°
Matériel rond:
matériel carré:
matériel plat:
90 mm
90 x 90 mm
120 x 90 mm
Transport et stockage
Veillez lors du stockage à ce que l’appareil soit placé
dans un endroit sec, non accessible aux enfants et
personnes non autorisées. Si vous n’utilisez pas
l’appareil pendant une longue durée, nettoyez-le
soigneusement.
Montage (fig. 2 et 3)
La scie radiale est équipée d’un système à serrage rapide.
Pour fixer une pièce dans l’étau, il suffit d’appuyer sur le
clapet du dispositif (image 2). Préréglez l’axe de filetage à la
dimension de la pièce usinée.
Après le préréglage, bloquez le clapet et fixez la pièce
travaillée.
Réglage du système de serrage
Il est possible de régler l’angle de biseautage de 0° à 45°. Á
respecter, s’il vous plaît (image 3).
La fixation de la pièce travaillée et le réglage de l’angle de
biseautage s’effectuent en deux étapes :
Fig. 3:
A: Vis de blocage
B: Degré sur l‘échelon
Desserrez la vis de blocage (A). Si vous souhaitez travailler
sous un angle allant de 0° à 45°, réglez le dispositif de
serrage (B) manuellement de façon à ce que l’angle choisi
indique précisément vers la flèche.
Mise en marche (Fig. 4, 5 et 6)
Fig. 4:
A: Interrupteur ON/OFF
B: Bouton de blocage pour le remplacement de la lame de
scie
C: Bouton de déblocage
D: Bras
Appuyez sur le bouton de déblocage (C) et baissez
doucement le bouton situé sur le bras (D) en exerçant une
pression. L’interrupteur de sûreté (A) est un dispositif de
protection. Enclenchez l’interrupteur ON/OFF (A) et lâchez-le
lorsque vous souhaitez arrêter l’appareil.
Fig. 5:
A: Pièce usinée
B: Cale
Il est nécessaire de bloquer la pièce travaillée (A) avec une
cale (B) un peu plus petite que la pièce usinée (image 5).
• Évitez de développer une pression trop importante sur
la lame de scie.
• N’arrêtez jamais la lame de scie à la main, par ce geste
vous réduisez la longévité du moteur.
• Il est interdit d’utilisez la scie à proximité des matériaux
facilement inflammables.
• La poignée de transport (image 6) facilite le transport
de l’appareil.
Consignes de sécurité pour utilisation
• Pour un travail sûr est précis, toutes les pièces doivent
être minutieusement montées.
14

• Ne travaillez jamais sans le capot de protection de la
lame de scie.
• Avant tout entretien ou intervention, retirez la fiche de la
prise.
• Avant de brancher l’appareil au réseau, vérifiez que la
lame de scie est montée correctement – selon la notice.
Après avoir remplacé la lame de scie, serrez
soigneusement les vis afin d’éviter la fissure de la lame
de scie.
• Avant de mettre la lame de scie en marche, vérifiez
qu’elle est fonctionnelle et qu’elle n’est pas fissurée ou
crevassée.
• Au début de la coupe, le contact entre la lame de scie
et la pièce travaillée doit être établi avec précaution,
afin d’éviter l’accrochage et la rupture de la lame de
scie provoqués par une surcharge importante.
• Avant de commencer à couper, la lame de scie doit
atteindre la pleine vitesse de rotation.
• Afin d’éviter des accidents, vérifiez après le
remplacement de la lame de scie que toutes les vis
sont correctement serrées. Il en est de même
lorsque vous retirez les restes de la pièce usinée du
dispositif de serrage.
• N’utilisez que des lames de scie sans défaut.
Remplacez sans délai les lames de scie
émoussées. Évitez de développer une pression
excessive sur la lame de scie pendant la coupe !
CECI PEUT ENGENDRER LA FRACTURE DE LA
LAME DE SCIE !
Mise à la terre :
• Dans le cas d’un défaut ou d’une mauvaise isolation, la
mise à la terre empêchera le contact avec le courant.
Votre appareil possède un câble équipé d’un
conducteur et d’une fiche froids. La fiche doit être
branchée à une prise spécialement conçue, installée et
mise à la terre selon les normes et les décrets locaux.
• Les fiches qui ne correspondent pas à la prise ne
peuvent être modifiées que par un électricien. Ceci est
valable également pour l’installation de la prise.
• Si le conducteur froid est branché par une personne
incompétente, vous vous exposez à un risque de choc
par courant électrique. Le conducteur froid est un câble
rayé vert ou vert jaune. N’utilisez que des câbles de
réseau en provenance du fabricant, équipés d’une
connexion à compression vers l’interrupteur de sûreté
• (modèle de la connexion M, voir liste des pièces
détachées n° 222). Si vous devez remplacer le câble de
votre appareil, vous ne pouvez pas utiliser le câble du
conducteur froid en guise de câble du conducteur
électrique.
• Si vous ne comprenez pas les instructions pour le
raccord de la mise à la terre ou si vous avez un doute
concernant la mise à la terre correcte de votre appareil,
contactez votre électricien.
• N’utilisez que des câbles de rallonge à trois fils et les
prises tripolaires correspondant à la fiche de votre
appareil.
• Faites réparer ou remplacer sans délai les câbles de
réseau défectueux ou usés.
Maintenance et entretien
• Avant de procéder au remplacement de la lame de scie
ou des balais, avant le graissage de l’appareil à l’huile
ou aux autres produits d’entretien, retirez la fiche de la
prise.
• N’effectuez jamais le réglage de l’angle de biseautage
lorsque le moteur est en marche.
• Après chaque intervention, vérifiez que l’appareil
fonctionne correctement. Pour contrôler les balais de
charbon, il est nécessaire de retirer le capot des balais.
Les balais doivent être remplacés lorsque l’usure
dépasse le repère (6 mm) ou lorsque de petites pièces
se sont détachées (images 7+8).
Après utilisation :
• Desserrez la vis et retirez le collecteur de copeaux.
Videz le, réinsérez le dans l’orifice et resserrez la vis
(image 9).
Graissage de l’appareil à l’huile :
Graissez une fois par mois les parties de l’appareil indiqués
ci-dessous. Ainsi vous augmenterez sa longévité!
• Partie de l’arbre en rotation
• Partie de la roue à main en rotation
• Glissière du dispositif de serrage
Remplacement de la lame de scie :
Fig. 10 et 11:
A: Arbre
B: Bouton de blocage (sur la poignée)
C: Anneau de serrage
D: Vis à six pans
E: Anneau Seeger
F: Rondelle
G: Bride
H: Lame de scie
• Avant le remplacement de la lame de scie, retirez la
fiche de réseau. Desserrez l’écrou ailé (image 11) et
retirez le capot. Bloquez l’arbre (image 4 + 10/A),
(image 11) à l’aide du bouton de blocage (B, image 10).
• Desserrez la vis de la lame de scie (10/D) à l’aide d’une
clé à six pans intérieur.
• Retirez avec précaution la lame de scie (10/H).
(ATTENTION : portez des gants de protection !)
• Enfilez la bride (10/G) sur l’arbre.
• Montez la nouvelle lame de scie en veillant à ce que les
dents indiquent contre la butée fixe.
• Montez l’anneau de serrage (10/C), la bride (10/G), la
rondelle (10/F), Anneau Seeger (10/E) et la vis à six
pans (10/D).
• Bloquez l‘arbre (10/A) à l’aide du bouton de blocage
(image 4 + 10/B) et serrez bien la vis de la lame.
• Avant de rebrancher la fiche, enlevez la barre de
maintien et la clé à fourche et fixez le capot !!! (images
10 +11).
15

CZ
!!! Dříve než uvedete přístroj do provozu,
pročtěte si prosím pečlivě tento návod k obsluze !!!
Máte technické otázky? Reklamaci? Potřebujete náhradní díly nebo návod k obsluze?
Na naší domovské stránce www.guede.com Vám v oddílu Servis pomůžeme rychle a nebyrokraticky. Prosím pomožte
nám pomoci Vám. Aby bylo možné Váš přístroj v případě reklamace identifikovat, potřebujeme sériové číslo, objednací číslo
a rok výroby. Všechny tyto údaje najdete na typovém štítku. Abyste měli tyto údaje vždy po ruce, zapište si je prosím dole.
Sériové číslo: Objednací číslo: Rok výroby:
Tel.: +49 (0) 79 04 / 700-360 Fax: +49 (0) 79 04 / 700-51999 E-Mail: support@ts.guede.com
A.V. 2 Dotisky, a to i částečné, vyžadují schválení.Technické změny vyhrazeny. Ilustrační obrázky
Označení:
Bezpečnost produktu:
Produkt odpovídá příslušným
normám EU
Zákazy:
Zákazová značka, všeobecná Nesahejte do pilového
kotouče
Přístroj nepoužívejte za deště Je zakázáno tahat za kabel
Zákaz nošení širokého
oblečení a šperků
Výstraha:
Výstraha/pozor
Výstraha před
nebezpečným elektrickým
napětím
Dodržujte bezpečnou
vzdálenost
Příkazy:
Přečtěte si návod k obsluze! Noste pomůcky na ochranu
slu-chu a zraku
Noste bezpečnostní rukavice!
Ochrana životního prostředí:
Odpad zlikvidujte odborně tak,
abyste neškodili životnímu
prostředí.
Obalový materiál z lepenky
lze odevzdat za účelem
recyklace do sběrny.
Vadné a/nebo likvidované
elektrické či elektronické
přístroje musí být odevzdány
do příslušných sběren.
Obal:
Chraňte před vlhkem Obal musí směřovat nahoru
Technické údaje:
Výkon motoru Přípojka
Otáčky pilového kotouče Pilový kotouč
Řezný výkon Hladina akustického výkonu
Hmotnost
Přístroj
Kotoučová pila na kov GMK 350 T
Tato kotoučová pila na kov je ideálním přístrojem pro suché
řezání všech trubek, profilů a plných materiálů z oceli (ne
ušlechtilá ocel!), hliníku, mědi, PVC v úhlu 45° až 90°.
Popis přístroje (obr. 1)
1. Pracovní rukojeť
2. Pojistný spínač
3. Pojistná clona
4. Ochranný kryt pilového kotouče
5. Pilový kotouč
6. Rukojeť
7. Ruční kolo
8. Gumové patky
9. Upínací zařízení
10. Základová deska
11. Víko kartáčů
12. Motor
13. Skříň motoru
14. Odjišťovací knoflík
Záruka
Záruční doba činí 12 měsíců při průmyslovém použití, 24
měsíců pro spotřebitele a začíná dnem nákupu přístroje.
Záruka se vztahuje výhradně na nedostatky způsobené
vadou materiálu nebo výrobní vadou. Při reklamaci v záruční
16

době je třeba přiložit originální doklad o koupi s datem
prodeje.
Do záruky nespadá neodborné použití jako např. přetížení
přístroje, použití násilí, poškození cizím zásahem nebo
cizími předměty, nedodržení návodu k použití a montáži a
normální opotřebení.
Důležité základní bezpečnostní pokyny
Než začnete pracovat s přístrojem, přečtěte si pozorně
následující bezpečnostní pokyny a tento návod k obsluze.
Pokud máte přístroj předat jiným osobám, předejte jim
prosím i návod k obsluze. Návod k obsluze vždy dobře
uschovejte!
Obal: Váš přístroj se kvůli ochraně před poškozením při
přepravě nachází v obalu. Obaly jsou suroviny a proto
mohou být znovu použity nebo je lze recyklovat.
Přečtěte si prosím pečlivě návod k použití a dodržujte v
něm obsažené pokyny. Pomocí tohoto návodu k použití se
seznamte s přístrojem, jeho správným použitím a
bezpečnostními pokyny. Tyto pokyny si prosím bezpečně
uschovejte pro pozdější použití.
• Před každým použitím přístroj vizuálně zkontrolujte.
Přístroj nepoužívejte, je-li bezpečnostní zařízení
poškozené nebo opotřebované. Nikdy nedeaktivujte
bezpečnostní zařízení.
• Přístroj používejte výhradně jen k účelu použití,
uvedenému v tomto návodu k použití.
• Pracujte vždy pozorně. Sledujte svou práci.
Postupujte obezřetně. Kotoučovou pilu na kov
nepoužívejte, jste-li nesoustředění.
• Jste odpovědní za bezpečnost na pracovišti.
• Přístroj nenechávejte nikdy bez dozoru.
• Přístroj nepoužívejte nikdy za deště nebo ve vlhkém a
mokrém prostředí.
• Elektrické nářadí nepoužívejte v blízkosti hořlavých
kapalin či plynů.
• Přístroj nezapínejte, pokud je vzhůru nohama, nebo
pokud není v pracovní poloze.
• Přístroj držte mimo dosah jiných osob, zejména dětí,
a také domácích zvířat. Nedovolte jiným osobám, aby
se dotýkaly přístroje nebo kabelu.
• Po použití vytáhněte zástrčku a zkontrolujte stroj
z hlediska poškození.
• Pokud přístroj nepoužíváte, uložte jej na suché místo,
které není přístupné pro děti.
• Opravy smí provádět pouze elektrikář.
• Před uvedením do provozu a po jakémkoliv nárazu
zkontrolujte stroj z hlediska opotřebení či poškození a
nechte provést nutné opravy.
• Nikdy nepoužívejte náhradní díly a příslušenství, které
nejsou uvedeny nebo doporučeny výrobcem.
• Stroj používejte pouze za denního světla nebo s
dostatečným umělým osvětlením.
• Po celou dobu provádění prací noste pro dané
prostředí vhodný ochranný oděv a přijměte pro dané
prostředí vhodná opatření pro prevenci nehod.
• Kabel nepoužívejte k jinému než předepsanému
účelu. Přístroj nenoste za kabel a kabel nepoužívejte
ani k tomu, abyste vytáhli zástrčku ze zásuvky. Kabel
chraňte před nadměrnými teplotami, olejem a ostrými
hranami.
• O svůj přístroj se pečlivě starejte. Udržujte jej v
čistotě, aby se s ním dalo dobře a bezpečně pracovat.
Pravidelně kontrolujte zástrčku a kabel a v případě
poškození nechte kabel vyměnit autorizovaným
odborníkem. Kontrolujte pravidelně prodlužovací
kabely a poškozené kabely nechte vyměnit
odborníkem.
• Prodlužovací
kabely pro venkovní použití. Venku
používejte jen pro tento účel schválené a
odpovídajícím způsobem označené prodlužovací
kabely (do 20 m ∅1,5 mm², 20-50 m ∅ 2,5 mm²)
• Přístroj odpojte ze sítě
- před každým čištěním
- po každém použití
• Osoby, které díky svým fyzickým, smyslovým či
duševním schopnostem nebo své nezkušenosti či
neznalosti nejsou schopny přístroj obsluhovat,
nesmí přístroj používat.
• Pokud přístroj vykazuje viditelné poškození, nesmí
být uveden do provozu.
• Je-li poškozen napájecí kabel tohoto přístroje, musí
jej vyměnit výrobce nebo elektrikář.
• Opravy na tomto přístroji smí provádět jen
elektrikář. V důsledku neodborných oprav mohou
vznikat značná rizika.
• Pro příslušenství platí tytéž předpisy.
Güde GmbH & Co. KG neručí za škody způsobené:
• poškozením přístroje v důsledku mechanických
vlivů a přetížení.
• změnami přístroje
• použitím k jiným účelům, než jaké jsou popsány v
návodu.
• Dodržujte bezpodmínečně všechny bezpečnostní
pokyny, abyste zabránili úrazům a škodám.
Důležité bezpečnostní pokyny
Pozor: Dříve než začnete přístroj používat, přečtěte si
pečlivě níže uvedené bezpečnostní předpisy a
dodržujte, zabráníte tak úrazům či požáru.
• Během řezání se nikdy nedotýkejte pilového kotouče
• Vyhněte se tělesnému kontaktu s uzemněnými díly,
např. trubky, topná tělesa, sporáky a chladničky
• Používejte vždy ochranné brýle. Normální brýle
nenahrazují ochranné brýle. Při pracích v prašném
prostředí noste respirátor. Při dlouhotrvající práci
noste chrániče uší (špunty do uší či sluchátka)
• Přístroj nepřetěžujte.
• Pro náročné práce nepoužívejte nářadí s nízkým
výkonem.
• Nenoste široký oděv a šperky.
• Přívodní kabel chraňte před nadměrnými teplotami a
ostrými hranami a nechte jej vyměnit jen odborníkem.
• Pilu připevněte bezpečně na pracovní desku.
• Tupé pilové kotouče včas vyměňte.
• Přístroj musí být pomocí ochranného vypínače
chybového proudu (FI) napájen dimenzovaným
chybovým proudem o maximální hodnotě 30 mA.
• Přístroj splňuje požadavky EN 61000-3-11 a podléhá
zvláštním podmínkám pro zapojení. To znamená, že
použití na libovolných volně zvolených bodech připojení
je nepřípustné.
• Přístroj může při nevýhodných podmínkách sítě vést k
dočasným výkyvům napětí.
• Přístroj je určen výhradně k použití na bodech připojení,
jež nepřekračují maximálně přípustnou impedanci Zmax =
0,233 Ω.
• Jako uživatel musíte zajistit, v případě potřeby po
dohodě s Vaším dodavatelem elektřiny, aby Váš bod
připojení, na kterém chcete přístroj používat, splňoval
výše uvedený požadavek.
Chování v případě nouze
Zaveďte úrazu odpovídající potřebnou první pomoc a
vyzvěte co možná nejrychleji kvalifikovanou lékařskou
pomoc.
Chraňte zraněného před dalšími úrazy a uklidněte jej.
Použití v souladu s určením
Vysoce výkonná kapovací pila na kov pro suché řezání,
vhodná pro plný i dutý materiál, svěrák s možností vychýlení
do 45°. Výkonný pilový kotouč pro rychlé řezy. Materiál se
během řezání sotva zahřeje, čerstvě uříznutý materiál lze
tudíž ihned dále zpracovávat, dále rovněž nedochází
k tvorbě jisker. Díky metodě suchého řezání není nutná
chladicí kapalina, v důsledku čehož nedochází
k nepříjemnému stříkání chladicí kapaliny.
17

Včetně pojistného spínače, koncové zarážky, svěráku
s možností vychýlení a podélné zarážky,
v kompletu s pilovým kotoučem.
• Doporučené příslušenství:
Univerzální pilový kotouč z tvrdokovu se 72 zuby pro
tlustostěnné trubky a profily, plný materiál do průměru
cca 20 mm
Likvidace
Pokyny pro likvidaci vyplývají z piktogramů umístěných na
přístroji resp. obalu.
Požadavky na obsluhu
Obsluha si musí před použitím přístroje pozorně přečíst
návod k obsluze.
Kvalifikace
Kromě podrobného poučení odborníkem není pro používání
přístroje nutná žádná speciální kvalifikace.
Minimální věk
Na přístroji smí pracovat jen osoby, jež dosáhly 16 let.
Výjimku představuje využití mladistvých, pokud se toto děje
během profesního vzdělávání za účelem dosažení
dovednosti pod dohledem školitele.
Školení
Používání přístroje vyžaduje pouze odpovídající poučení
odborníkem resp. návodem k obsluze. Speciální školení není
nutné.
Technické údaje
Průměr pilového kotouče: 355 mm
Počet zubů: 72 zubů
Vrtání pilového kotouče: 25,4 mm
Svěrák s možností vychýlení: 0-45°
Výkon motoru: 2300 W
Přípojka: 230 V
Počet otáček: 1300 ot./min.
Max. řezný výkon 90°
kruh. materiál:
čtverc. materiál:
plochý materiál:
120 mm
120 x 120 mm
180 x 80 mm
Max. řezný výkon 45°
kruh. materiál:
čtverc. materiál:
plochý materiál:
90 mm
90 x 90 mm
120 x 90 mm
Přeprava a skladování
Při uskladnění je třeba dbát, aby byl přístroj uložen
na suchém místě, nepřístupném pro děti a
nepovolané osoby.
Pokud přístroj nebudete dlouhodobě používat,
důkladně jej vyčistěte.
Montáž (obr. 2 a 3)
Kapovací pila na kov má rychloupínací systém. K upnutí
obrobků do svěráku stačí pouze stlačit klapku
přidržovače (obr. 2). Nyní lze závitové vřeteno
přednastavit na požadovanou velikost obrobku.
Po přednastavení se klapka zaaretuje, nyní lze obrobek
upnout.
Nastavení upínacího systému:
Úhel zkosení lze nastavit od 0° do 45°. Dodržujte prosím
(obr. 3). Upnutí obrobku a nastavení úhlu zkosení se
provádí ve dvou pracovních krocích.
Obr. 3:
A: Aretační šroub
B: Stupeň na stupnici
Povolte aretační šroub (A). Chcete-li pracovat s úhlem 0° až
45°, nastavte upínací zařízení (B) rukou tak, aby
požadovaný úhel ukazoval přesně na šipku.
Obsluha (obr. 4, 5 a 6)
Obr. 4:
A: Spínač ON/OFF
B: Aretační knoflík pro výměnu kotouče
C: Odjišťovací knoflík
D: Rameno
Zmáčkněte odjišťovací knoflík (C) a knoflík přístroje na
rameni (D) dejte opatrně a tlakem dolů. Pojistný spínač (A) je
ochranné zařízení. Spínač ON/OFF (A) stlačte dolů a pusťte
jej až tehdy, když budete chtít přístroj zase vypnout.
Obr. 5:
A: Obrobek
B: Blok
Při upnutí je třeba obrobek (A) podložit blokem (B), který
musí být trochu menší než obrobek. (obr.5)
• Vyhněte se tomu, abyste při řezání vyvíjeli příliš velký
tlak na pilový kotouč
• Pilový kotouč nezastavujte nikdy rukou,
neboť se zkracuje životnost Vašeho motoru
• Díky rukojeti na nošení (obr.6)
lze přístroj bez problému přepravovat
Bezpečnostní pokyny pro obsluhu
• Bezpečná a přesná práce je možná jen po pečlivé
montáži všech dílů
• Nepracujte nikdy bez ochranného krytu pilového
kotouče
• Před údržbou a ošetřováním vytáhněte vždy síťovou
zástrčku
• Dříve než zapojíte přístroj do sítě, musíte zkontrolovat,
zda byl pilový kotouč namontován odborně – podle
návodu k použití. Po výměně pilového kotouče pečlivě
utáhněte šrouby, aby pilový kotouč nepraskl
• Dříve než uvedete pilový kotouč do provozu, musíte
zkontrolovat, zda je funkční a nevykazuje trhliny a
praskliny
• Při zahájení řezání musí být opatrně vytvořen kontakt
mezi pilovým kotoučem a obrobkem, neboť by se pilový
kotouč při příliš velkém zatížení mohl zachytit a zlomit
• Dříve než začnete řezat, musí pilový kotouč dosáhnout
plné rotační rychlosti
• Aby se zabránilo nehodám, musíte po výměně
pilového kotouče zkontrolovat, zda jsou všechny
šrouby opět pevně utaženy. Totéž platí, když
odstraňujete zbytky obrobku z upínadla.
• Používejte jen bezvadné pilové kotouče. Tupé
pilové kotouče včas vyměňte. Zabraňte
bezpodmínečně tomu, aby byl při řezání vyvíjen
nadměrný tlak na pilový kotouč! MŮŽE TO VÉST KE
ZLOMENÍ PILOVÉHO KOTOUČE!
Uzemnění:
• V případě defektu na přístroji či při vadné izolaci je
uzemnění pro proud cestou nejmenšího odporu a brání
tomu, abyste se dostali do kontaktu s proudem. Váš
přístroj je vybaven kabelem, který je opatřen zemnicím
vodičem a zemnicí zástrčkou. Zástrčka musí být
připojena ke speciálně koncipované přípojce, která je
nainstalována a uzemněna podle místních norem a
ustanovení
• Změny na zástrčkách, které neodpovídají přípojce,
musí provést jen elektrikář. Totéž platí pro instalaci
přípojky
• Je-li zemnicí vodič zapojen neodborně, vystavujete se
nebezpečí úderu elektrickým proudem. Zemnicí vodič je
18

zelený či zelenožlutý pruhovaný kabel. Používejte jen
síťové kabely odebrané u výrobce se stlačovacím
spojením k pojistnému spínači
• (typ přípojky M, viz seznam náhradních dílů č. 222).
Pokud musíte vyměnit kabel Vašeho přístroje, nesmíte
kabel zemnicího vodiče použít v žádném případě jako
kabel elektrického vodiče
• Pokud Vám bude u pokynů pro přípojku uzemnění něco
nejasné či si nebudete jisti tím, zda je Váš přístroj
odborně uzemněn, musíte se poradit s Vaším
elektrikářem
• Používejte jen třídrátové prodlužovací kabely a
třípólové zásuvky, které se hodí k zástrčce Vašeho
přístroje
• Vadné či opotřebované síťové kabely musí být
neprodleně opraveny či vyměněny
Údržba a péče
• Před výměnou pilového kotouče či kartáčů, mazáním
přístroje olejem či jinými přípravami na údržbu
vytáhněte vždy zástrčku ze zásuvky
• Nastavení úhlu zkosení či jiné změny se nesmí nikdy
provádět při puštěném motoru
• Po každém použití musíte zkontrolovat, zda je přístroj
ještě plně funkční. Ke kontrole uhlíkových kartáčů
musíte pomocí šroubováku sejmout víko kartáčů.
Kartáče musí být vyměněny, pokud opotřebení
přesáhlo značku (6mm) nebo pokud jsou odštípnuty
malé části (obr. 7+8)
Po použití:
• Povolte šroub a vytáhněte nádobu na špony. Vysypte ji,
vsuňte ji opět do daného otvoru a šroub opět utáhněte.
(obr.9)
Mazání přístroje olejem:
Jednou měsíčně musí být přístroj namazán olejem na níže
uvedených místech. Tím prodloužíte životnost Vašeho
přístroje!
• rotující díl hřídele
• rotující díl ručního kola
• kluzná plocha upínacího zařízení
Výměna pilového kotouče:
obr. 10 a 11:
A: Hřídel
B: Aretační knoflík (na rukojeti)
C: Upínací kroužek
D: Šestihranný šroub
E: Seegerova pojistka
F: Podložka
G: Příruba
H: Pilový kotouč
I: Křídlová matice
• Před výměnou pilového kotouče vytáhněte síťovou
zástrčku. Povolte křídlovou matici (obr. 11) a sejměte
kryt. Pomocí aretačního knoflíku (obr. 4 + 10/B)
zaaretujte hřídel (obr. 10/A).
• Pomocí klíče s vnitřním šestihranem povolte šroub
kotouče (obr. 10/D).
• Pilový kotouč (obr. 10/H) opatrně vyjměte -
(POZOR: noste ochranné rukavice!)
• Na hřídel nasuňte přírubu (obr. 10/G)
• Namontujte nový pilový kotouč a přitom dbejte na to,
aby zuby ukazovaly proti pevné zarážce.
• Namontujte upínací kroužek (obr. 10/C), přírubu (obr.
10/G), podložku (obr. 10/F), Seegerovu pojistku (obr.
10/E) a šestihranný šroub (obr. 10/D).
• Hřídel (obr. 10/A) zablokujte aretačním knoflíkem (obr.
4 a 10/B) a šroub kotouče dobře utáhněte
• Dříve než síťovou zástrčku opět zastrčíte, musíte
odstranit přidržovací tyč a rozvidlený klíč a namontovat
kryt!!! (obr. 10 a 11)
19

SK
!!! Skôr ako uvediete prístroj do prevádzky,
prečítajte si, prosím, starostlivo tento návod na obsluhu !!!
Máte technické otázky? Reklamáciu? Potrebujete náhradné diely alebo návod na obsluhu?
Na našej domovskej stránke www.guede.com vám v oddiele Servis pomôžeme rýchlo a nebyrokraticky. Pomôžte nám,
prosím, aby sme mohli pomôcť vám. Aby bolo možné váš prístroj v prípade reklamácie identifikovať, potrebujeme sériové
číslo, objednávacie číslo a rok výroby. Všetky tieto údaje nájdete na typovom štítku. Aby ste mali tieto údaje vždy poruke,
zapíšte si ich, prosím, dole.
Sériové číslo: Objednávacie číslo: Rok výroby:
A.V. 2 Dotlače, a to i čiastočné, vyžadujú schválenie. Technické zmeny vyhradené. Ilustračné obrázky !
Označenia:
Bezpečnosť produktu:
Produkt zodpovedá príslušným
normám EÚ
Zákazy:
Zákazová značka, všeobecná Nesiahajte do rotujúcich
častí
Zákaz používania prístroja za
dažďa! Zákaz ťahania za kábel
Zákaz ďalšieho oblečenia a
šperkov
Výstraha:
Výstraha/pozor
Výstraha pred
nebezpečným elektrickým
napätím
Dodržiavať bezpečnú
vzdialenosť
Príkazy:
Prečítajte si návod na obsluhu! Noste pomôcky na ochranu
slu-chu, zraku a hlavy
Noste bezpečnostné rukavice!
Ochrana životného prostredia:
Odpad zlikvidujte odborne tak,
aby ste neškodili životnému
prostrediu.
Obalový materiál z lepenky
je možné odovzdať s
cieľom recyklácie do
zberne.
Chybné a/alebo likvidované
elektrické či elektronické
prístroje musia byť odovzdané
do príslušných zberní.
Obal:
Chráňte pred vlhkom Obal musí smerovať hore
Technické údaje:
Výkon motora Prípojka
Otáčky vretena Blade
Řezná kapacita Hodnoty hluku
Hmotnosť
Prístroj
Okružná píla na kov GMK 350 T
Táto kapovacia píla na kov je ideálnym prístrojom na suché
rezanie všetkých rúrok, profilov a plných materiálov z ocele
(nie ušľachtilá oceľ!), hliníka, medi, PVC v uhle 45° až 90°.
Popis prístroja (obr. 1)
1. Pracovná rukoväť
2. Poistný spínač
3. Poistná clona
4. Ochranný kryt pílového kotúča
5. Pílový kotúč
6. Rukoväť
7. Ručné koleso
8. Gumové pätky
9. Upínacie zariadenie
10. Základová doska
11. Veko kefiek
12. Motor
13. Skriňa motora
20
La pagina si sta caricando...
La pagina si sta caricando...
La pagina si sta caricando...
La pagina si sta caricando...
La pagina si sta caricando...
La pagina si sta caricando...
La pagina si sta caricando...
La pagina si sta caricando...
La pagina si sta caricando...
La pagina si sta caricando...
La pagina si sta caricando...
La pagina si sta caricando...
La pagina si sta caricando...
La pagina si sta caricando...
La pagina si sta caricando...
La pagina si sta caricando...
La pagina si sta caricando...
La pagina si sta caricando...
La pagina si sta caricando...
La pagina si sta caricando...
La pagina si sta caricando...
La pagina si sta caricando...
La pagina si sta caricando...
La pagina si sta caricando...
La pagina si sta caricando...
La pagina si sta caricando...
La pagina si sta caricando...
La pagina si sta caricando...
La pagina si sta caricando...
La pagina si sta caricando...
La pagina si sta caricando...
La pagina si sta caricando...
-
 1
1
-
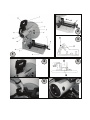 2
2
-
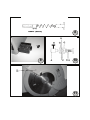 3
3
-
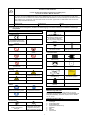 4
4
-
 5
5
-
 6
6
-
 7
7
-
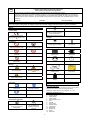 8
8
-
 9
9
-
 10
10
-
 11
11
-
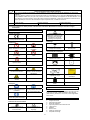 12
12
-
 13
13
-
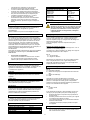 14
14
-
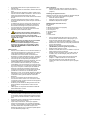 15
15
-
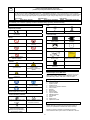 16
16
-
 17
17
-
 18
18
-
 19
19
-
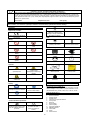 20
20
-
 21
21
-
 22
22
-
 23
23
-
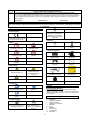 24
24
-
 25
25
-
 26
26
-
 27
27
-
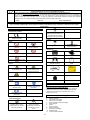 28
28
-
 29
29
-
 30
30
-
 31
31
-
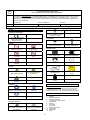 32
32
-
 33
33
-
 34
34
-
 35
35
-
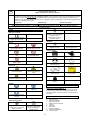 36
36
-
 37
37
-
 38
38
-
 39
39
-
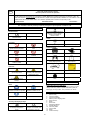 40
40
-
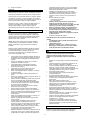 41
41
-
 42
42
-
 43
43
-
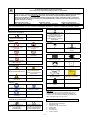 44
44
-
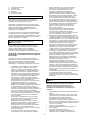 45
45
-
 46
46
-
 47
47
-
 48
48
-
 49
49
-
 50
50
-
 51
51
-
 52
52


Güde GMK 350 T 40532 Manuale del proprietario
- Tipo
- Manuale del proprietario
in altre lingue
- français: Güde GMK 350 T 40532 Le manuel du propriétaire
- Deutsch: Güde GMK 350 T 40532 Bedienungsanleitung
- slovenčina: Güde GMK 350 T 40532 Návod na obsluhu
Documenti correlati
Altri documenti
-
Kompernass KH 3160 CIRCULAR SAW BENCH Operation and Safety Notes
-
Scheppach 5801804903 Translation Of Original Operating Manual
-
Peugeot EnergySaw 254DB Operating Instructions Manual
-
Parkside PTK 2000 D3 Translation Of The Original Instructions
-
-
EINHELL Expert TE-CC 2025 UF/S; EX; UK; CH Manuale utente
-
 Status CP110U Manuale del proprietario
-
Makita 4131 Manuale del proprietario
