
Druck.com
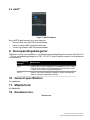
DPI 620 Genii
Advanced Modular Calibrator
Safety Instructions and User Guide
English 1 – 6
Čeština 7 – 12
Dansk 13 – 18
Deutsch 19 – 24
Español 25 – 30
Français 31 – 36
Italiano 37 – 42
Latviešu 43 – 48
Lietuvių 49 – 54
Magyar 55 – 60
Nederlands 61 – 66
Norsk 67 – 72
Polski 73 – 78
Português 79 – 84
Română 85 – 90
Svenska 91 – 96
Türkçe 97 – 102
Ελληνικά 103 – 108
Русский 109 – 114
中文 115 – 120
日本語 121 – 126


Copyright 2013 Baker Hughes Company.
English–DPI 620G Safety Instructions | 1
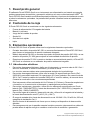
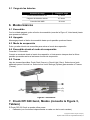
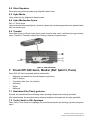
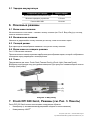
1. Overview
The Druck DPI620 Genii is a battery-powered instrument for electrical measure and source
operations and HART® communications. The Druck DPI 620 Genii also supplies the power and
user interface functions for all optional items. The touch-screen displays up to six different
parameters.
2. Equipment in the Box
The following items are supplied with the Druck DPI 620 Genii:
• DC power supply/battery charger unit.
• Li-polymer battery.
• Set of six test leads.
• AC Probe.
• Quick Start Guide.
• Stylus.
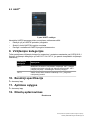
3. Optional Items
The items that follow are optional items which can be used with the Druck DPI 620 Genii:
• Pressure Module Carrier, MC 620, this attaches directly to the Druck DPI 620 Genii to make
a fully integrated pressure instrument.
• Pressure Module, PM 620, this attaches to the pressure module carrier (MC 620) or a
pressure station (PV 62X) to enhance the pressure measurement functionality.
• Pressure Stations, PV 62X, if the Druck DPI 620 Genii is installed in a pressure station, it
becomes a fully integrated pressure calibrator.
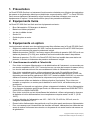
3.1 Electrical Warnings
• To prevent electrical shocks or damage to the instrument, do not connect more than 30V
CAT I between the terminals, or between the terminals and the ground (earth).
• External circuits should have appropriate insulation to the mains.
• To prevent electrical shocks, use only the Druck specified AC probe (Part: IO620-AC) to
measure AC voltages that are more than 20 Vrms. Do not connect more than 300V CAT II
between the IO620-AC leads, or between the leads and the ground (earth). Attach it to the
specified connections only.
• This instrument uses a Lithium-Polymer (Li-Polymer) battery pack. To prevent an explosion
or fire, do not short circuit, do not disassemble, and keep it safe from damage.
• To prevent an explosion or fire, use only the Druck specified battery (Part: IO620-
BATTERY), power supply (Part: IO620-PSU) and battery charger (Part: IO620-CHARGER).
• To prevent battery leakage or heat generation, only use the battery charger and power
supply in the temperature range 0 to 40°C (32 to 104°F).
• The power supply input range is 100 – 240Vac, 50 to 60Hz, 250mA, installation category
CAT II.
• Position the power supply so not to obstruct the supply disconnecting device.
• To make sure the display shows the correct data, disconnect the test leads before power is
set to on or change to another measure or source function.
• To prevent a dangerous release of pressure, make sure that all the related pipes, hoses and
equipment have the correct pressure rating, are safe to use and are correctly attached.

Copyright 2013 Baker Hughes Company.
2 | DPI 620G Safety Instructions–English
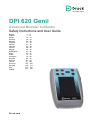
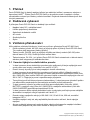
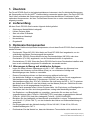
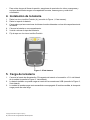
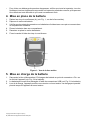
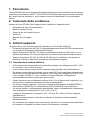
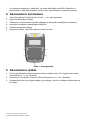
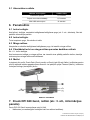
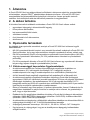
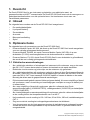
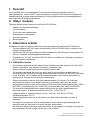
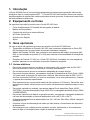
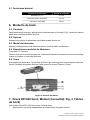
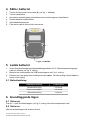
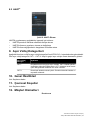
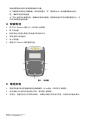
4. Install the Battery
1. Remove the five Pozidriv screws (A) (Ref: Fig 1, Rear View).
2. Remove the battery cover.
3. Check the connections on the battery line up with the connections in the battery
compartment.
4. Place the battery in the battery compartment.
5. Replace the battery cover.
6. Secure the cover with the five Pozidriv screws.
Figure 1: Rear View
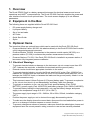
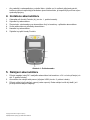
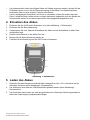
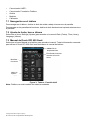
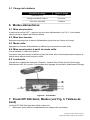
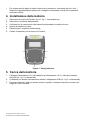
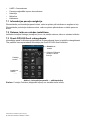
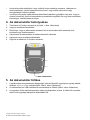
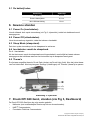
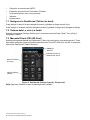
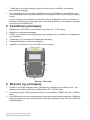
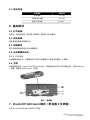
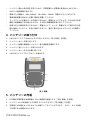
5. Charge the Battery
1. Connect the DC power supply/battery charger unit in to the +5VDC connection on the side of
the unit (Ref: Fig 2 Side View).
2. The battery can also be charged using the USB connections (Ref: Fig 2 Side View).
3. The unit can be On or Off when charging. Charging times maybe longer if charging when the
unit is On.
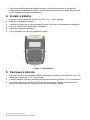
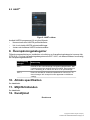
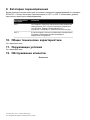
5.1 Battery Charging
6. Basic Modes
6.1 Power On
From OFF – press the power button (Ref: Fig 2, Side View) until the dashboard is displayed.
Charging Connection Charge Time
DC Power Supply 6.5 Hours
External Battery Charger 6.5 Hours
Mini USB Connection 13 Hours.

Copyright 2013 Baker Hughes Company.
English–DPI 620G Safety Instructions | 3
6.2 Power Off
Press and hold power button until the screen is blank.
6.3 Sleep Mode
Press and release power for sleep mode.
6.4 Power up from Sleep Mode
Ref: 6.1 Power On.
When powered-up from sleep mode the instrument always opens the last screen shown before
going into sleep mode.
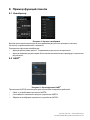
6.5 Themes
Two themes are available Druck Dark and Druck Light, select the correct theme for the light level.
Select the Settings icon to access Themes.
Figure 2: Side View
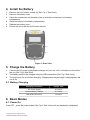
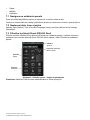
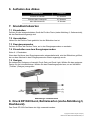
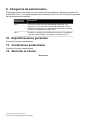
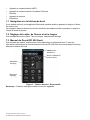
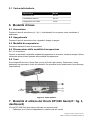
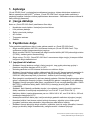
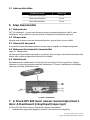
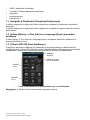
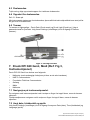
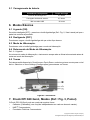
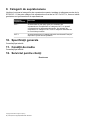
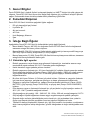
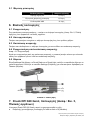
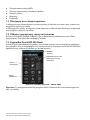
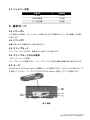
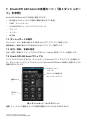
7. Druck DPI 620 Genii, Modes (Ref: Fig 3, Dashboard)
The Druck DPI 620 Genii can be used as follows:
• Calibrator (with independent functions on each of six channels).
• HART® Communicator
• Foundation Field-bus Communicator
• Scope
• Meter
• Calibrator
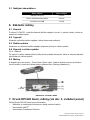
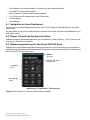
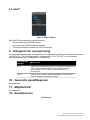
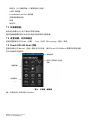
7.1 The Dashboard Navigation
The dashboard is navigated by swiping a finger from top to bottom while touching the screen.
Functions screens are navigated by swiping a finger from right to left while touching the screen.
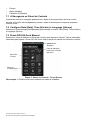
7.2 Set Date, Time and Language
Select the Settings icon to access Date, Time and Language menus.

Copyright 2013 Baker Hughes Company.
4 | DPI 620G Safety Instructions–English
7.3 Druck DPI 620 Genii Manual
Select the Manual icon on the Dashboard to access the manual. All the information required to
operate the Druck DPI 620 Genii is in the manual section of the Dashboard.
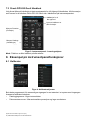
Figure 3: Dashboard - Touch Screen
Note: Field-bus is not installed on all units.
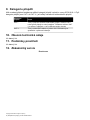
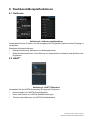
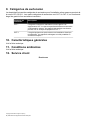
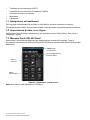
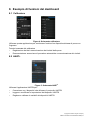
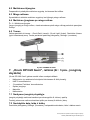
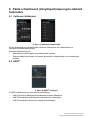
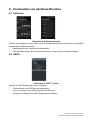
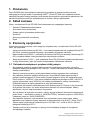
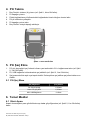
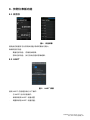
8. Example Dashboard Functions
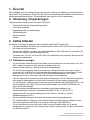
8.1 Calibrator
Figure 4: Calibration Screens
Use this application to compare the output of a test device/system with the input.
Advanced calibrator features
• Data logging capabilities. Store test results.
• Documenting capabilities. Perform automatic procedures and store the results.

Copyright 2013 Baker Hughes Company.
English–DPI 620G Safety Instructions | 5
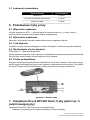
8.2 HART®
Figure 5: HART® Screen
Use the HART® application to do the following:
• Communicate with HART® protocol devices
• Read and change HART® device settings
• Trim and calibrate HART® device variables.
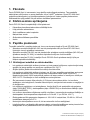
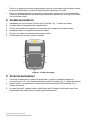
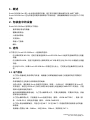
9. Over-voltage Categories
The following summary of installation and measurement over-voltage categories come from
IEC61010-1. The four over-voltage categories, are CAT I to CAT IV, which indicate the severity
of an over-voltage transient.
10. General Specification
Refer to Data Sheet.
11. Environmental Conditions
Refer to Data Sheet.
12. Customer Service
Druck.com
Over-voltage
Category Description
CAT I This is the least severe over-voltage transient. CAT I equipment
cannot be directly connected to the mains power. An example of
CAT I equipment is a process loop powered device.
CAT II This is for single phase electrical installation. Examples are
appliances and portable tools.

Copyright 2013 Baker Hughes Company.
6 | DPI 620G Safety Instructions–English

Copyright 2013 Baker Hughes Company.
čeština–Bezpečnostní pokyny pro DPI 620G | 7
1. Přehled
Druck DPI620 Genii je baterií napájený přístroj pro elektrické měření, operace se zdrojem a
komunikaci HART®. Přístroj Druck DPI 620 Genii se kromě toho stará o napájení a funkce
uživatelského rozhraní pro všechny volitelné součásti. Dotyková obrazovka zobrazuje až šest
různých parametrů.
2. Dodávané vybavení
S přístrojem Druck DPI 620 Genii se dodávají tyto součásti:
• Napájecí zdroj DC / nabíječka baterií
• Lithium-polymerový akumulátor
• Sada šesti zkušebních vodičů
• AC sonda
• Stručná příručka
• Stylus
3. Volitelné příslušenství
Níže uvádíme volitelné příslušenství, které lze používat s přístrojem Druck DPI 620 Genii:
• Držák na tlakový modul, MC 620, který se připojuje přímo k přístroji Druck DPI 620 Genii.
Tím vznikne plně integrovaný tlakový přístroj.
• Tlakový modul, PM 620, který se připojuje k držáku na tlakový modulu (MC 620) nebo
tlakové stanici (PV 62X). Rozšiřuje funkce měření tlaku.
• Tlakové stanice, PV 62X – je-li přístroj Druck DPI 620 Genii nainstalován v tlakové stanici,
stává se plně integrovaným kalibrátorem tlaku.
3.1 Varování týkající se elektrického proudu
• V rámci prevence úrazu elektrickým proudem nebo poškození přístroje nepřipojujte mezi
svorky nebo mezi svorky a uzemnění více než 30 V CAT I.
• Externí obvody by měly být od zdroje napájení vhodně odizolovány.
• V rámci prevence úrazu elektrickým proudem používejte k měření střídavého napětí o
hodnotách vyšších než 20 Vrms pouze AC sondu specifikovanou společností Druck (číslo
dílu: IO620-AC). Mezi vodiče IO620-AC nebo mezi vodiče a uzemnění nepřipojujte více než
300 V CAT II. Připojujte je pouze k specifikovaným připojením.
• Tento přístroj používá lithium-polymerové akumulátory. V rámci prevence výbuchu či požáru
tyto akumulátory nezkratujte ani nerozebírejte a chraňte je před poškozením.
• V rámci prevence výbuchu a požáru používejte pouze akumulátor (číslo dílu: IO620-
BATTERY), napájecí zdroj (číslo dílu: IO620-PSU) a nabíječku akumulátorů (číslo dílu:
IO620-CHARGER) specifikované společností Druck.
• V rámci prevence úniku náplně akumulátorů nebo tvorby tepla používejte pouze nabíječku
akumulátorů a napájecí zdroj při teplotách od 0 do 40 °C.
• Rozsah vstupu napájecího zdroje je 100–240 V AC, 50 až 60 Hz, 250 mA, montážní
kategorie CAT II.
• Umístěte napájecí zdroj tak, aby nepřekážel přerušovacímu zařízení, které odpojuje
napájení.
• Aby se na displeji zobrazovaly správné údaje, odpojte před zapnutím napájení zkušební
vodiče nebo přepněte na jinou funkci měření či zdrojovou funkci.

Copyright 2013 Baker Hughes Company.
8 | Bezpečnostní pokyny pro DPI 620G–čeština
• Aby nedošlo k nebezpečnému uvolnění tlaku, ujistěte se, že veškeré připojené potrubí,
hadice a zařízení odpovídají příslušnému jmenovitému tlaku, je bezpečné je používat a jsou
správně připojeny.
4. Instalace akumulátoru
1. Odstraňte pět šroubů Pozidriv (A) (viz obr. 1, pohled zezadu).
2. Sejměte kryt akumulátoru.
3. Zkontrolujte, zda konektory na akumulátoru lícují s konektory v přihrádce akumulátoru.
4. Vložte akumulátor do přihrádky akumulátoru.
5. Nasaďte kryt akumulátoru.
6. Zajistěte kryt pěti šrouby Pozidriv.
Obrázek 1: Pohled zezadu
5. Nabíjení akumulátoru
1. Připojte napájecí zdroj DC / nabíječku akumulátorů do konektoru +5 V DC z boku přístroje (viz
obr. 2, pohled z boku).
2. Akumulátor lze nabíjet také pomocí připojení USB (viz obr. 2, pohled z boku).
3. Přístroj může být při nabíjení vypnutý nebo zapnutý. Doba nabíjení může být delší, je-li
přístroj během nabíjení zapnutý.

Copyright 2013 Baker Hughes Company.
čeština–Bezpečnostní pokyny pro DPI 620G | 9
5.1 Nabíjení akumulátoru
6. Základní režimy
6.1 Zapnutí
Z režimu VYPNUTO – podržte stisknuté tlačítko napájení (viz obr. 2, pohled z boku), dokud se
nezobrazí ovládací panel.
6.2 Vypnutí
Stiskněte a přidržte tlačítko napájení, dokud obrazovka nezčerná.
6.3 Režim spánku
Stisknutím a uvolněním tlačítka napájení přepnete přístroj do režimu spánku.
6.4 Zapnutí z režimu spánku
Viz 6.1 Zapnutí.
Při zapnutí z režimu spánku přístroj vždy otevře poslední obrazovku, která se zobrazovala před
přechodem do režimu spánku.
6.5 Motivy
K dispozici jsou dva motivy – Druck Dark a Druck Light. Vyberte vhodný motiv pro příslušnou
úroveň světla. K motivům získáte přístup výběrem ikony Settings (Nastavení).
Obrázek 2: Pohled z boku
7. Druck DPI 620 Genii, režimy (viz obr. 3, ovládací panel)
Přístroj Druck DPI 620 Genii lze používat takto:
• Kalibrátor (s nezávislými funkcemi pro každý ze šesti kanálů)
• Komunikátor HART®
• Komunikátor Foundation Field-bus
Zdroj nabíjení Doba nabíjení
Napájecí zdroj DC 6,5 hod.
Externí nabíječka akumulátorů 6,5 hod.
Konektor mini USB 13 hod.
+5 V DC

Copyright 2013 Baker Hughes Company.
10 | Bezpečnostní pokyny pro DPI 620G–čeština
• Radar
• Měřidlo
• Kalibrátor
7.1 Navigace na ovládacím panelu
Panel se ovládá přejížděním prstem po obrazovce ve směru odshora dolů.
Funkce na obrazovkách se ovládají přejížděním prstem po obrazovce ve směru zprava doleva.
7.2 Nastavení data, času a jazyka
Nabídky Date (Datum), Time (Čas) and Language (Jazyk) otevřete výběrem ikony Settings
(Nastavení).
7.3 Příručka k přístroji Druck DPI 620 Genii
Příručku otevřete výběrem ikony Manual (Příručka) na ovládacím panelu. Veškeré informace
potřebné k provozování přístroje Druck DPI 620 Genii najdete v části Příručka na ovládacím
panelu.
Obrázek 3: Ovládací panel – dotyková obrazovka
Poznámka: Sběrnice Field-bus není nainstalována ve všech přístrojích.
Nabídka
funkcí
Nabídka
nastavení
Indikace
posuvu
Kontrolka označuje
aktivní funkci

Copyright 2013 Baker Hughes Company.
čeština–Bezpečnostní pokyny pro DPI 620G | 11
8. Příklady funkcí ovládacího panelu
8.1 Kalibrátor
Obrázek 4: Obrazovky kalibrace
Pomocí této aplikace porovnáte výstup testovacího zařízení / systému se vstupem.
Pokročilé funkce kalibrátoru
• Funkce protokolování dat, uložení výsledků testů
• Funkce dokumentování, provedení automatických postupů a uložení výsledků
8.2 HART®
Obrázek 5: Obrazovka HART®
Pomocí aplikace HART® lze provádět tyto činnosti:
• Komunikace se zařízeními protokolu HART®
• Načtení a změna nastavení zařízení HART®
• Úprava a kalibrace proměnných zařízení HART®

Copyright 2013 Baker Hughes Company.
12 | Bezpečnostní pokyny pro DPI 620G–čeština
9. Kategorie přepětí
Níže uvedený přehled instalace a měření kategorií přepětí vychází z normy IEC61010-1. Čtyři
kategorie přepětí jsou CAT I až CAT IV, jež indikují závažnost krátkodobého přepětí.
10. Obecné technické údaje
Viz datový list.
11. Podmínky prostředí
Viz datový list.
12. Zákaznický servis
Druck.com
Kategorie
přepětí Popis
CAT I Toto je nejméně závažné krátkodobé přepětí. Zařízení CAT I
nelze přímo připojit ke zdroji napájení. Příkladem zařízení CAT
I je zařízení napájené v rámci obsluhovaného obvodu.
CAT II Toto je elektrická instalace s jedinou fází. Příkladem jsou
spotřebiče a přenosné nástroje.

Copyright 2013 Baker Hughes Company.
Dansk–DPI 620G-sikkerhedsanvisninger | 13
1. Oversigt
Druck DPI620 Genii er et batteridrevet produkt til elektrisk måling og kildefunktion samt HART®-
kommunikation. Druck DPI 620 Genii leverer også strøm og brugergrænsefladefunktioner til alt
ekstraudstyr. Berøringsskærmen viser op til seks forskellige parametre.
2. Udstyr i kassen
Følgende genstande leveres sammen med Druck DPI 620 Genii:
• DC-strømforsyning/batterioplader
• Litiumpolymerbatteri
• Et sæt med seks testledninger
• AC-sonde
• Startvejledning
• Stylus
3. Ekstraudstyr
Følgende genstande er ekstraudstyr, som kan bruges sammen med Druck DPI 620 Genii:
• Trykmodulkonsol, MC 620. Denne fastgøres direkte til Druck DPI 620 Genii, og tilsammen
udgør de en fuldt integreret trykmåler.
• Trykmodul, PM 620. Denne fastgøres til trykmodulkonsollen (MC 620) eller en trykstation
(PV 62X) for at forbedre trykmålingsfunktionen.
• Trykstationer, PV 62X. Hvis Druck DPI 620 Genii installeres i en trykstation, bliver den en
fuldt integreret trykkalibrator.
3.1 Elektriske advarsler
• For at undgå elektrisk stød eller skader på produktet må der ikke tilsluttes mere end 30 V
CAT I mellem klemmerne eller mellem klemmerne og jord.
• Perifere kredsløb skal være korrekt isoleret fra lysnettet.
• For at undgå elektrisk stød må der kun anvendes den AC-sonde, der er specificeret af Druck
(del: IO620-AC) til at måle vekselspændinger på mere end 20 Vrms. Der må ikke tilsluttes
mere end 300 V CAT II mellem IO620-AC-ledningerne eller mellem ledningerne og jord.
Tilslut kun til de angivne tilslutninger.
• Dette produkt anvender en litiumpolymerbatteripakke (Li-Polymer). For at undgå eksplosion
eller brand må batteripakken ikke kortsluttes, skilles ad eller beskadiges.
• For at undgå eksplosion eller brand må der kun anvendes et batteri som specificeret af Druck
(del: IO620-BATTERY), strømforsyning (del: IO620-PSU) og batterioplader (del: IO620-
CHARGER).
• For at undgå batterilækage eller generering af varme må batteriopladeren og
strømforsyningen kun anvendes i temperaturområdet 0-40 °C.
• Strømforsyningsområdet er 100-240 VAC, 50-60 Hz, 250 mA, installationskategori CAT II.
• Anbring strømforsyningen, så den ikke blokerer for strømafbryderen.
• For at være sikker på, at displayet viser de korrekte data, skal testledningerne afbrydes, før
der tændes for strømmen, eller før der ændres til en anden målings- eller kildefunktion.
• For at undgå farlig frigivelse af tryk skal det sikres, at alle tilhørende rør, slanger og alt udstyr
har den korrekte trykklassificering, er sikkert at anvende og korrekt monteret.

Copyright 2013 Baker Hughes Company.
14 | DPI 620G-sikkerhedsanvisninger–Dansk
4. Installer batteriet
1. Fjern de fem Pozidriv-skruer (A) (ref: fig. 1, set bagfra).
2. Fjern batteridækslet.
3. Kontroller, at tilslutningerne på batteriet passer sammen med tilslutningerne i batterirummet.
4. Anbring batteriet i batterirummet.
5. Sæt batteridækslet på plads.
6. Fastgør dækslet med de fem Pozidriv-skruer.
Figur 1: set bagfra
5. Oplad batteriet
1. Tilslut DC-strømforsyningen/batteriopladeren til +5 VDC-tilslutningen på siden af enheden
(ref: fig. 2, set fra siden).
2. Batteriet kan også oplades ved hjælp af USB-forbindelserne (ref: fig. 2, set fra siden).
3. Enheden kan være tændt eller slukket under opladning. Opladningstiden kan forlænges,
hvis enheden oplades, mens den er tændt.
4. Opladning af batteri
6. Grundlæggende indstillinger
6.1 Tænd.
Fra OFF – tryk på afbryderknappen (ref: fig. 2, set fra siden), indtil betjeningspanelet vises.
6.2 Sluk.
Tryk på afbryderknappen, og hold den nede, indtil skærmen er tom.
Opladningsforbindelse Opladningstid
DC-strømforsyning 6,5 time
Ekstern batterioplader 6,5 time
USB-minitilslutning 13 timer

Copyright 2013 Baker Hughes Company.
Dansk–DPI 620G-sikkerhedsanvisninger | 15
6.3 Dvaletilstand.
Tryk på afbryderknappen og slip den igen for at gå i dvaletilstand.
6.4 Tænd fra dvaletilstand.
Ref: 6.1 Tænd.
Den sidste skærm, der blev vist før dvaletilstand, åbnes altid igen, når produktet tændes fra
dvaletilstand.
6.5 Temaer
Der er to tilgængelige temaer: Druck Dark og Druck Light. Vælg det korrekte tema til
belysningsniveauet. Vælg ikonet Settings (Indstillinger) for at få adgang til Themes (Temaer).
Figur 2: set fra siden
7. Druck DPI 620 Genii, tilstande (ref: fig. 3,
betjeningspanel)
Druck DPI 620 Genii kan bruges som følger:
• Kalibrator (med uafhængige funktioner på hver af seks kanaler)
• HART®-kommunikator
• Foundation Fieldbus-kommunikator
• Område
• Måler
• Kalibrator
7.1 Navigation på betjeningspanelet
Der navigeres på betjeningspanelet ved at stryge med en finger fra øverst til nederst, mens
skærmen berøres.
Der navigeres på funktionsskærmene ved at stryge med en finger fra højre til venstre, mens
skærmen berøres.
7.2 Indstilling af dato, klokkeslæt og sprog
Vælg ikonet Settings (Indstillinger) for at få adgang til menuerne Date (Dato), Time (Klokkeslæt)
og Language (Sprog).
+5 VDC

Copyright 2013 Baker Hughes Company.
16 | DPI 620G-sikkerhedsanvisninger–Dansk
7.3 Druck DPI 620 Genii Manual
Vælg ikonet Manual på betjeningspanelet for at få adgang til manualen. Alle de oplysninger, der
er nødvendige for at betjene Druck DPI 620 Genii, findes i sektionen Manual på
betjeningspanelet.
Figur 3: Betjeningspanel – berøringsskærm
Bemærk: Fieldbussen er ikke installeret på alle enheder.
8. Eksempel på funktioner på betjeningspanelet
8.1 Kalibrator
Figur 4: Kalibratorskærme
Brug denne applikation til at sammenligne output fra testenhed/-system med input.
Avancerede kalibreringsfunktioner
• Dataoptegnelsesfunktioner. Gem testresultater.
• Dokumenteringsfunktioner. Udfør automatiske procedurer, og gem resultaterne.
Funktions
-menu
Indstillings
-menu
Rullepanel
Indikatorlys, der viser
den aktive funktion

Copyright 2013 Baker Hughes Company.
Dansk–DPI 620G-sikkerhedsanvisninger | 17
8.2 HART®
Figur 5: HART®-skærm
Brug HART®-applikationen til at gøre følgende:
• Kommunikere med HART®-protokolenheder
• Læse og skifte HART®-enhedsindstillinger
• Justere og kalibrere HART®-enhedsvariabler.
9. Overspændingskategorier
Følgende oversigt over installations- og målingsoverspændingskategorier kommer fra IEC61010-
1. De fire overspændingskategorier er CAT I til CAT IV, hvilket angiver styrken af en forbigående
overspænding.
10. Generel specifikation
Se databladet.
11. Miljøforhold
Se databladet.
12. Kundeservice.
Druck.com
Overspænding
Kategori Beskrivelse
CAT I Dette er den mindste forbigående overspænding. CAT I-udstyr
kan ikke sluttes direkte til netspændingen. Et eksempel på CAT
I-udstyr er en enhed med processløjfestrøm.
CAT II Dette er for enfaset elektrisk installation. Nogle eksempler på
dette er apparater og bærbart værktøj.

Copyright 2013 Baker Hughes Company.
18 | DPI 620G-sikkerhedsanvisninger–Dansk
La pagina si sta caricando...
La pagina si sta caricando...
La pagina si sta caricando...
La pagina si sta caricando...
La pagina si sta caricando...
La pagina si sta caricando...
La pagina si sta caricando...
La pagina si sta caricando...
La pagina si sta caricando...
La pagina si sta caricando...
La pagina si sta caricando...
La pagina si sta caricando...
La pagina si sta caricando...
La pagina si sta caricando...
La pagina si sta caricando...
La pagina si sta caricando...
La pagina si sta caricando...
La pagina si sta caricando...
La pagina si sta caricando...
La pagina si sta caricando...
La pagina si sta caricando...
La pagina si sta caricando...
La pagina si sta caricando...
La pagina si sta caricando...
La pagina si sta caricando...
La pagina si sta caricando...
La pagina si sta caricando...
La pagina si sta caricando...
La pagina si sta caricando...
La pagina si sta caricando...
La pagina si sta caricando...
La pagina si sta caricando...
La pagina si sta caricando...
La pagina si sta caricando...
La pagina si sta caricando...
La pagina si sta caricando...
La pagina si sta caricando...
La pagina si sta caricando...
La pagina si sta caricando...
La pagina si sta caricando...
La pagina si sta caricando...
La pagina si sta caricando...
La pagina si sta caricando...
La pagina si sta caricando...
La pagina si sta caricando...
La pagina si sta caricando...
La pagina si sta caricando...
La pagina si sta caricando...
La pagina si sta caricando...
La pagina si sta caricando...
La pagina si sta caricando...
La pagina si sta caricando...
La pagina si sta caricando...
La pagina si sta caricando...
La pagina si sta caricando...
La pagina si sta caricando...
La pagina si sta caricando...
La pagina si sta caricando...
La pagina si sta caricando...
La pagina si sta caricando...
La pagina si sta caricando...
La pagina si sta caricando...
La pagina si sta caricando...
La pagina si sta caricando...
La pagina si sta caricando...
La pagina si sta caricando...
La pagina si sta caricando...
La pagina si sta caricando...
La pagina si sta caricando...
La pagina si sta caricando...
La pagina si sta caricando...
La pagina si sta caricando...
La pagina si sta caricando...
La pagina si sta caricando...
La pagina si sta caricando...
La pagina si sta caricando...
La pagina si sta caricando...
La pagina si sta caricando...
La pagina si sta caricando...
La pagina si sta caricando...
La pagina si sta caricando...
La pagina si sta caricando...
La pagina si sta caricando...
La pagina si sta caricando...
La pagina si sta caricando...
La pagina si sta caricando...
La pagina si sta caricando...
La pagina si sta caricando...
La pagina si sta caricando...
La pagina si sta caricando...
La pagina si sta caricando...
La pagina si sta caricando...
La pagina si sta caricando...
La pagina si sta caricando...
La pagina si sta caricando...
La pagina si sta caricando...
La pagina si sta caricando...
La pagina si sta caricando...
La pagina si sta caricando...
La pagina si sta caricando...
La pagina si sta caricando...
La pagina si sta caricando...
La pagina si sta caricando...
La pagina si sta caricando...
La pagina si sta caricando...
La pagina si sta caricando...
La pagina si sta caricando...
La pagina si sta caricando...
La pagina si sta caricando...
La pagina si sta caricando...
-
 1
1
-
 2
2
-
 3
3
-
 4
4
-
 5
5
-
 6
6
-
 7
7
-
 8
8
-
 9
9
-
 10
10
-
 11
11
-
 12
12
-
 13
13
-
 14
14
-
 15
15
-
 16
16
-
 17
17
-
 18
18
-
 19
19
-
 20
20
-
 21
21
-
 22
22
-
 23
23
-
 24
24
-
 25
25
-
 26
26
-
 27
27
-
 28
28
-
 29
29
-
 30
30
-
 31
31
-
 32
32
-
 33
33
-
 34
34
-
 35
35
-
 36
36
-
 37
37
-
 38
38
-
 39
39
-
 40
40
-
 41
41
-
 42
42
-
 43
43
-
 44
44
-
 45
45
-
 46
46
-
 47
47
-
 48
48
-
 49
49
-
 50
50
-
 51
51
-
 52
52
-
 53
53
-
 54
54
-
 55
55
-
 56
56
-
 57
57
-
 58
58
-
 59
59
-
 60
60
-
 61
61
-
 62
62
-
 63
63
-
 64
64
-
 65
65
-
 66
66
-
 67
67
-
 68
68
-
 69
69
-
 70
70
-
 71
71
-
 72
72
-
 73
73
-
 74
74
-
 75
75
-
 76
76
-
 77
77
-
 78
78
-
 79
79
-
 80
80
-
 81
81
-
 82
82
-
 83
83
-
 84
84
-
 85
85
-
 86
86
-
 87
87
-
 88
88
-
 89
89
-
 90
90
-
 91
91
-
 92
92
-
 93
93
-
 94
94
-
 95
95
-
 96
96
-
 97
97
-
 98
98
-
 99
99
-
 100
100
-
 101
101
-
 102
102
-
 103
103
-
 104
104
-
 105
105
-
 106
106
-
 107
107
-
 108
108
-
 109
109
-
 110
110
-
 111
111
-
 112
112
-
 113
113
-
 114
114
-
 115
115
-
 116
116
-
 117
117
-
 118
118
-
 119
119
-
 120
120
-
 121
121
-
 122
122
-
 123
123
-
 124
124
-
 125
125
-
 126
126
-
 127
127
-
 128
128
-
 129
129
-
 130
130


in altre lingue
- português: Druck DPI 620 GENII Guia de usuario
- română: Druck DPI 620 GENII Manualul utilizatorului
Documenti correlati

Altri documenti
-
Omega DPI620G-QS Manuale del proprietario
-
Team Losi Racing TLR03017 Manuale del proprietario
-
-
-
Culligan Mark 59 Guida utente
-
Sharp MX-B350WE Istruzioni per l'uso
-
Perixx PERIDUO-406A Wired Mini Ergonomic Split Keyboard and Vertical Mouse Combo Manuale utente
-
Modine EG Technical Manual