Electrolux EHD6670P Manuale utente
- Categoria
- Piani cottura
- Tipo
- Manuale utente

Ceramic glass induction hob
Èíäóêöèîííàÿ ñòåêëîêåðàìè÷åñêàÿ
âàðî÷íàÿ ïîâåðõíîñòü
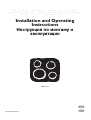
Installation and Operating
Instructions
Èíñòðóêöèÿ ïî ìîíòàæó è
ýêñïëóàòàöèè
EHD 6670 P
822 924 222-A-050603-01
u
g

2
Dear customer,
Please read these operating instructions carefully.
Pay particular attention to the section “Safety infor-
mation” on the first few pages. Please retain these
operating instructions for later reference. Pass them
on to possible new owners of the appliance.
The following symbols are used in the
text:
1 Safety instructions
Warning: Information concerning your per-
sonal safety.
Important: Information on how to avoid dam-
aging the appliance.
3 Information and practical tips
2 Environmental information
1. These numbers indicate step by step how to use
the appliance.
2. …
3. …
These operating instructions contain information on
steps you can take yourself to rectify a possible mal-
function. Refer to the section “What to do if...”.

3
Contents
Operating Instructions . . . . . . . . . . . . . . . . . . . . . . . . . . . . . . . . . . . . . . . . . . . . . . . . . . . . . . . . . . . . . 4
Safety . . . . . . . . . . . . . . . . . . . . . . . . . . . . . . . . . . . . . . . . . . . . . . . . . . . . . . . . . . . . . . . . . . . . . . . . . . . . . . . 4
Disposal . . . . . . . . . . . . . . . . . . . . . . . . . . . . . . . . . . . . . . . . . . . . . . . . . . . . . . . . . . . . . . . . . . . . . . . . . . . . . 6
The Key Features of Your Appliance . . . . . . . . . . . . . . . . . . . . . . . . . . . . . . . . . . . . . . . . . . . . . . . . . . . . . . 7
Description of the Appliance . . . . . . . . . . . . . . . . . . . . . . . . . . . . . . . . . . . . . . . . . . . . . . . . . . . . . . . . . . . . 8
Cooking zones and control panel . . . . . . . . . . . . . . . . . . . . . . . . . . . . . . . . . . . . . . . . . . . . . . . . . . . . . . . . . . 8
Function and the Way the Induction Cooking Zone Works . . . . . . . . . . . . . . . . . . . . . . . . . . . . . . . . . . . . . .9
The Digital Displays . . . . . . . . . . . . . . . . . . . . . . . . . . . . . . . . . . . . . . . . . . . . . . . . . . . . . . . . . . . . . . . . . . . . 9
Cooking Zone Safety Cut-out. . . . . . . . . . . . . . . . . . . . . . . . . . . . . . . . . . . . . . . . . . . . . . . . . . . . . . . . . . . . . 9
Suitable Kitchenware for Induction Cooking Zones . . . . . . . . . . . . . . . . . . . . . . . . . . . . . . . . . . . . . . . . . . . . 10
Pots and pans for rapid-glowing standard cooking zones. . . . . . . . . . . . . . . . . . . . . . . . . . . . . . . . . . . . . . . 10
Before Using for the First Time . . . . . . . . . . . . . . . . . . . . . . . . . . . . . . . . . . . . . . . . . . . . . . . . . . . . . . . . . . 11
Initial Cleaning. . . . . . . . . . . . . . . . . . . . . . . . . . . . . . . . . . . . . . . . . . . . . . . . . . . . . . . . . . . . . . . . . . . . . . . . . 11
Operating the Hob. . . . . . . . . . . . . . . . . . . . . . . . . . . . . . . . . . . . . . . . . . . . . . . . . . . . . . . . . . . . . . . . . . . . . 11
Touch Control Sensor Field. . . . . . . . . . . . . . . . . . . . . . . . . . . . . . . . . . . . . . . . . . . . . . . . . . . . . . . . . . . . . . . 11
Switching On the Appliance . . . . . . . . . . . . . . . . . . . . . . . . . . . . . . . . . . . . . . . . . . . . . . . . . . . . . . . . . . . . . . 11
Switching Off the Appliance . . . . . . . . . . . . . . . . . . . . . . . . . . . . . . . . . . . . . . . . . . . . . . . . . . . . . . . . . . . . . . 11
Cooking Zone Selection . . . . . . . . . . . . . . . . . . . . . . . . . . . . . . . . . . . . . . . . . . . . . . . . . . . . . . . . . . . . . . . . . 12
Heat Setting Selection . . . . . . . . . . . . . . . . . . . . . . . . . . . . . . . . . . . . . . . . . . . . . . . . . . . . . . . . . . . . . . . . . . 12
Activating the power function . . . . . . . . . . . . . . . . . . . . . . . . . . . . . . . . . . . . . . . . . . . . . . . . . . . . . . . . . . . . . 13
Switching the double ring zone on and off . . . . . . . . . . . . . . . . . . . . . . . . . . . . . . . . . . . . . . . . . . . . . . . . . . . 14
Switching off a Cooking Zone. . . . . . . . . . . . . . . . . . . . . . . . . . . . . . . . . . . . . . . . . . . . . . . . . . . . . . . . . . . . . 14
Cooking with the Automatic Heating-Up Function . . . . . . . . . . . . . . . . . . . . . . . . . . . . . . . . . . . . . . . . . . . . . 15
Cooking without the Automatic Heating-Up Function . . . . . . . . . . . . . . . . . . . . . . . . . . . . . . . . . . . . . . . . . . 16
Residual Heat Indicator. . . . . . . . . . . . . . . . . . . . . . . . . . . . . . . . . . . . . . . . . . . . . . . . . . . . . . . . . . . . . . . . . . 16
Locking/Unlocking the Control Panel . . . . . . . . . . . . . . . . . . . . . . . . . . . . . . . . . . . . . . . . . . . . . . . . . . . . . . . 17
Timer . . . . . . . . . . . . . . . . . . . . . . . . . . . . . . . . . . . . . . . . . . . . . . . . . . . . . . . . . . . . . . . . . . . . . . . . . . . . . . . . 18
Uses, Tables and Tips. . . . . . . . . . . . . . . . . . . . . . . . . . . . . . . . . . . . . . . . . . . . . . . . . . . . . . . . . . . . . . . . . . 20
Advice on Cooking with and without Automatic Warm up . . . . . . . . . . . . . . . . . . . . . . . . . . . . . . . . . . . . . . .20
Chart for Setting the Cooking Zones . . . . . . . . . . . . . . . . . . . . . . . . . . . . . . . . . . . . . . . . . . . . . . . . . . . . . 21
Chart for the Automatic Heating-Up Feature. . . . . . . . . . . . . . . . . . . . . . . . . . . . . . . . . . . . . . . . . . . . . . . 22
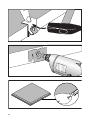
Cleaning and Care . . . . . . . . . . . . . . . . . . . . . . . . . . . . . . . . . . . . . . . . . . . . . . . . . . . . . . . . . . . . . . . . . . . . 23
Advantages for Cleaning and Caring for the Induction Cooking Zone . . . . . . . . . . . . . . . . . . . . . . . . . . . . . . 23
Hob . . . . . . . . . . . . . . . . . . . . . . . . . . . . . . . . . . . . . . . . . . . . . . . . . . . . . . . . . . . . . . . . . . . . . . . . . . . . . . . . . 23
What to do if … . . . . . . . . . . . . . . . . . . . . . . . . . . . . . . . . . . . . . . . . . . . . . . . . . . . . . . . . . . . . . . . . . . . . . . . 25
Rectifying faults . . . . . . . . . . . . . . . . . . . . . . . . . . . . . . . . . . . . . . . . . . . . . . . . . . . . . . . . . . . . . . . . . . . . . 25
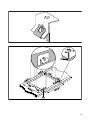
Installation Instructions . . . . . . . . . . . . . . . . . . . . . . . . . . . . . . . . . . . . . . . . . . . . . . . . . . . . . . . . . . . . 26
Technical Data. . . . . . . . . . . . . . . . . . . . . . . . . . . . . . . . . . . . . . . . . . . . . . . . . . . . . . . . . . . . . . . . . . . . . . . . . 26
Regulations, Standards, Directives. . . . . . . . . . . . . . . . . . . . . . . . . . . . . . . . . . . . . . . . . . . . . . . . . . . . . . . . . 26
Safety Instructions for the Installer . . . . . . . . . . . . . . . . . . . . . . . . . . . . . . . . . . . . . . . . . . . . . . . . . . . . . . . . . 27
Electrical Connection . . . . . . . . . . . . . . . . . . . . . . . . . . . . . . . . . . . . . . . . . . . . . . . . . . . . . . . . . . . . . . . . . . . 28
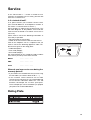
Service. . . . . . . . . . . . . . . . . . . . . . . . . . . . . . . . . . . . . . . . . . . . . . . . . . . . . . . . . . . . . . . . . . . . . . . . . . . . . 29
Rating Plate. . . . . . . . . . . . . . . . . . . . . . . . . . . . . . . . . . . . . . . . . . . . . . . . . . . . . . . . . . . . . . . . . . . . . . . . . . . 29
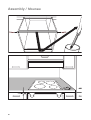
Assembly . . . . . . . . . . . . . . . . . . . . . . . . . . . . . . . . . . . . . . . . . . . . . . . . . . . . . . . . . . . . . . . . . . . . . . . . . . 60

4
Operating Instructions
1 Safety
The safety aspects of this appliance comply with ac-
cepted technical standards and the German Appli-
ance Safety Law. However, as manufacturers we
also believe it is our responsibility to familiarise you
with the following safety instructions.
Electrical Safety
• The installation and connection of the new appli-
ance must only be carried out by qualified person-
nel.
• Repairs to the appliance are only to be carried out
by approved service engineers. Repairs carried out
by inexperienced persons may cause injury or seri-
ous malfunctioning. If your appliance needs repair-
ing, please contact your local customer center or
your dealer.
3 Please follow these instructions, otherwise the
warranty will not cover any damage that may
occur.
• Flush-mounted appliances may only be operated
following installation in suitable installation cabi-
nets and workplaces which conform to the relevant
standards. This ensures sufficient protection
against contact for electrical units as required by
the VDE [Association of German Electrical Engi-
neers].
• If your appliance malfunctions or if fractures,
cracks or splits appear:
– switch off all cooking zones,
– disconnect the hob from the electricity supply.
Child Safety
The cooking zones will become hot when you cook.
Therefore, always keep small children away from the
appliance.
Safety During Use
• This appliance may only be used for normal cook-
ing and frying in the home. It is not designed for
commercial or industrial purposes.
• Do not use the hob to heat the room.
• Take care when plugging electric appliances into
mains sockets near the hob. Connection leads
must not come into contact with the hot surface.
• Overheated fats and oils catch fire quickly. You
should supervise cooking when preparing foods in
fat or oil (e.g. chips).
• Switch off the cooking zones after use.
Special Notes on Induction Cook-
ing Zones
• Scientific studies have shown that patients who
are fitted with implanted pacemakers are not nor-
mally affected or put at risk by our induction cook-
ing zones.
The distance between the body and the cooking
zone should, however, never be less than 30 cm!
• Electromagnetic fields can affect electronic circuits
and interfere with portable transistor radios.
• Do not put magnetically rechargeable objects (e.g.,
credit cards, cassettes) on the ceramic glass sur-
face while one or more induction cooking zones
are in use!
• Do not put any metallic objects (e.g., spoons, pan
lids) on the induction surface as they can be
warmed up when the induction surface is in use.
3 Some cookware can produce noises when
used on induction cooking zones. This is not a
fault in the hob and its function will not be im-
paired in any way as a result.
Safety When Cleaning
• For safety reasons do not clean the appliance with
a steam jet or high pressure cleaner.
• Clean the hob in accordance with the maintenance
and cleaning instructions in this manual.

5
How to avoid damage to the appli-
ance
• Do not use the cooking area as a worktop or stor-
age space.
• The frameless edge of the glass ceramic surface is
susceptible to knocks. Please be careful when
moving pots and pans around.
• Do not have the cook zones on with empty pans,
or with no pots or pans on them.
• Ceramic glass is very tough, and impervious to
sharp temperature changes, but is not unbreaka-
ble. It can be damaged if particularly hard or sharp
objects fall on to it.
• Do not use pots made of cast iron, or which have
damaged bases with rough edges or burrs. Moving
these around may cause scratches.
• If sugar or a mixture containing sugar falls onto a
hot cooking zone and melts, remove immediately,
while still hot, using a kitchen scraper. If left to cool
down, it may damage the surface when removed.
• Keep objects or materials liable to melt away from
the ceramic glass surface, for example, artificial
materials, aluminium foil, or cooking wraps. If any
other materials or foodstuffs are melting on the ce-
ramic glass surface, these should also be cleaned
away immediately, using a kitchen scraper.

6
2 Disposal
Disposing of the packaging
material
All materials used can be fully recycled.
Plastics are marked as follows:
• >PE< for polyethylene, as used for the outer wrap-
ping and the bags inside.
• >PS< for polystyrene foam, e.g., as used for the
padding materials. They are completely free of
CFCs.
Disposal of old appliances
1 Warning: Before disposing of old appliances
please make them inoperable so that they
cannot be the source of danger.
To do this, disconnect the appliance from
the mains supply and remove the mains
lead.
To protect the environment, it is important that worn
out appliances are disposed of in the correct man-
ner.
• The appliance must not be disposed of with
household rubbish.
• You can obtain information about collection dates
or public refuse disposal sites from your local
refuse department or council.

7
The Key Features of Your Appliance
• Ceramic glass cooking surface: The appliance
has a ceramic glass cooking surface including two
rapid-heating cooking zones with special high-per-
formance radiant elements, and two induction
cooking zones. With the induction method, the
base of the cooking vessel is heated first, not the
ceramic glass.
• Sensor fields: Your appliance is operated using
Touch Control sensor fields.
• Cleaning: The advantage of the ceramic glass
cooking surface and the sensor fields is their ac-
cessibility for cleaning. The smooth, flat surface is
easy to clean.
• On/Off sensor field: The “On/Off” sensor field
provides the appliance with a separate mains
switch. Touching this switches the power supply
on or off completely.
• Control and function indicators: Digital indica-
tors or control lamp provide information about set-
tings made, functions activated, as well as any
residual heat of the corresponding cooking zone.
• Safety cut-out: A safety cut-out ensures that all
cooking zones switch off automatically after a peri-
od of time if the setting has not been changed.
• Power device: With this device the power for the
appropriate cooking rings can be temporarily in-
creased.
• Keep warm setting: 1 is the setting for keeping
foods warm.
• Residual heat indicator: An h for residual heat is
shown in the display if the cooking zone becomes
so hot that there is a risk of burning.
• Double-ring cooking zone: The cooking surface
possesses a double-ring cooking zone. This pro-
vides the appliance with a cooking zone with a var-
iable size, for instance for smaller pots. This is a
saving in energy.
• Timer: All zones can be automatically switched off
using the integrated timer. When the end of the
cooking time has been reached, the cooking zone
switches off.

8
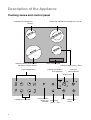
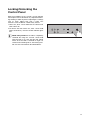
Description of the Appliance
Cooking zones and control panel
Radiated heat cooking zone
1200 W
Induction cooking zone 2200 W
with power function 3000 W
Touch-Control-Panel
Double ring radiated heat cooking zone 1700 W
Induction cooking zone 1400 W
Power function/
double-ring
activation
Mains button
On/Off
Heat setting
selector + and -
Lock with
control indicator
Display Timer
Heat setting displays
Cooking zone selection
Timer
Cooking zone displays
Timer operation

9
Function and the Way the
Induction Cooking Zone
Works
A copper wire induction coil is beneath the ceramic
glass cooking surface. This generates electromag-
netic fields, which act directly on the base of the
pots and pans and not, as with other heating up
methods, first heating the ceramic glass. This means
that the base of the pan is immediately heated up,
which saves time and energy.
Since the heat required for cooking is generated di-
rectly in the base of the pan the cooking zone itself
hardly warms up. It only receives the reflected heat
from the pan base.
Note:
If there is no pot or pan on the cooking zone there is
no energy transfer (heating up) and therefore gives
protection against the cooking zones being switched
on accidentally.
3 A cooling fan is an integral part of this hob and
comes on automatically depending on the
temperature of the induction cooking zone.
The cooling fan works in two speed levels de-
pending on usage. The cooling fan will contin-
ue to run for a short period after the cooking
zone has been switched off.
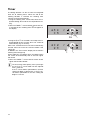
The Digital Displays
Digits 1 to 9 and four different letters can appear in
the display.
• The digits show the cooking stage set:
1= Lowest capacity
9 = Highest capacity
• The following letters and functions are displayed
for all cooking zones:
1 h = Residual Heat Display
Danger! Cooking zone still hot; it extinguishes
when the cooking zone has cooled down. This
display appears only if the cooking zone is
switched off.
a = Automatic heating-up (possible for all cook-
ing zones)
is lit, if the cooking zone is set to automatic heating-
up; (is lit until the automatic feature switches over to
the set continued cooking stage).
_ = Lights up when the automatic switch-off func-
tion has been activated (also see “What to do if ...?”).
The following letters and functions are displayed only
with the two induction cooking zones.
1 f = Error display
flashes if the cooking zone is activated and
– no pan is on the cooking zone or
– unsuitable pots and pans are used
p = Power function
lights up when the Power function is activated.
The Power function supplies extra-high heating ca-
pacity. It can be activated for the front left cooking
zone.
1 Cooking Zone Safety
Cut-out
If one of the cooking zones is not switched off after a
certain time or if the heat setting is not changed, the
corresponding cooking zone switches itself off auto-
matically.
h appears in the ring display for all rings that are
switched on, and _ after they have cooled down.
The rings are switched off at:
3 If one or more cooking zones switch off before
the times indicated see section “What to do
if …”.
Cancelling the Safety Cut-out
To cancel the activated safety cut-out the appliance
must be switched off and then on again using the
ON/OFF I sensor field. After this the cooking zones
are again ready for use.
Switching Off for Other Reasons
Liquid that boils over onto the control panel causes
all cooking zones to switch off immediately.
If you place a wet cloth on the control panel it has
the same effect. In both cases the appliance has to
be switched on again using the mains switch I after
removing the liquid or cloth.
• Heat setting 1 - 2 after 6 hours
• Heat setting 3 - 4 after 5 hours
• Heat setting 5 after 4 hours
• Heat setting 6 - 9 after 1.5 hours

10
Suitable Kitchenware for
Induction Cooking Zones
Pots and Pans
• In principle all pots and pans with magnetic bases
are suitable. These are steel, steel-enamel as well
as cast-iron pots and pans.
• High grade steel pans with a mixed metal base
(sandwich base, e.g. Tefal with an aluminium/cop-
per base) are suitable for induction only if the man-
ufacturer has expressly marked them as such. In
that case they have a ferromagnetic percentage in
the base.
• If you wish to use a special type of pan (e.g. a pres-
sure cooker, simmering pan, wok, etc.), please ob-
serve the manufacturer's instructions.
• Aluminium, copper, brass, stainless steel pots and
pans (unless specifically designated as suitable for
induction), glass, ceramic or porcelain are not suit-
able for induction cooking zones. The cooking
zone reacts as if it were being used without a pot
or pan: Error code f.
Look for the label: Suitable for induction!
Suitability Test
If you are not sure if a pot or pan is suitable for cook-
ing or frying on the induction cooking zone you can
check this as follows:
• Place a pot filled with a little water (3-5 mm filling
height) on the cooking zone.
Switch the cooking zone to full power (switch set-
ting 9).
Caution: The pan base of suitable kitchenware
heats up within a few seconds!
• You can also check this with a magnet. If it remains
fixed to the base the pan is suitable for induction
cooking zones.
Pan Size
Up to a certain limit the induction cooking zone
adapts itself to the size of the pan base diameter.
However, the pan base diameter must be of a mini-
mum size, depending on the size of the cooking
zone.
Diameter of the cooking zone 14,5 cm:
Diameter of the pan base at least 12 cm
Diameter of the cooking zone 18 cm:
Diameter of the pan base at least 14,5 cm
Diameter of the cooking zone 21 cm:
Diameter of the pan base at least 18 cm
Note:
Please note the diameter of the pan base when
buying new pans, since the manufacturers usually
specify the top edge diameter of their pans.
Automatic Pan Sensing
The induction cooking zone does not function when
unsuitable pans are used.
If the cooking zone is switched on without a suit-
able pan on it f flashes in the digital display of
the cooking zone.
After about 10 minutes the cooking zone switches it-
self off automatically. _ appears in the digital dis-
play.
Also when overheating occurs (e.g. heating up a pan
that is empty) or with faults in the electronics the dis-
play _ is lit. The cooking zone switches itself off au-
tomatically.
To be able to use it again the cooking zone must
have been first switched off and then reset to the re-
quired heat setting.
Pots and pans for rapid-
glowing standard cooking
zones
• On principle all pots and pans with level bases are
suitable for radiant heat cooking zones. You can
recognise good quality pans by the base of the
pan, and not from the material from which the pan
is made.
• The base should be as thick and flat as possible.
Rough bases (e.g. cast iron pots) scratch the hob
surfaces when they are slid about.
• Pots with aluminium or copper bases can cause
metallic discolouring on the ceramic glass surface,
which is very difficult or impossible to remove.
• The saucepan base and cooking zone should be
the same size.
1 Attention! Avoid letting enamel saucepans
and frying pans boil dry.
The base could be damaged and then scratch
the cooking surface when slid. Saucepans and
frying pans with sharp edges and burrs will
also scratch.

11
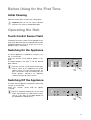
Before Using for the First Time
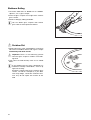
Initial Cleaning
Wipe the ceramic glass surface with a damp cloth.
1 Important: Do not use any caustic, abrasive
cleaners! The surface could be damaged.
Operating the Hob
Touch Control Sensor Field
To operate the Touch Control sensor field place your
finger from above flat onto the required field until the
appropriate displays come on or go out or the re-
quired function is carried out.
Switching On the Appliance
The entire appliance is switched on using the “On/
Off” I sensor field.
Touch the “On/Off” sensor field for approx. 2 sec-
onds.
The digital displays will show _ and the decimal
point will flash.
3 Once the “On/Off” sensor field has been oper-
ated to switch on the appliance, one of the
cooking zones must be selected within ap-
prox. 10 seconds using the cooking zone se-
lection buttons. Otherwise the appliance
switches off again for safety reasons.
Switching Off the Appliance
To switch off the appliance completely activate the
“On/Off” I sensor field.
Touch the “On/Off” sensor field for approx.
1second.
3 When an individual cooking zone or the entire
hob is switched off, any residual heat is shown
with an h (for “Hot”) in the digital display for
the appropriate cooking zones.

12
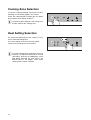
Cooking Zone Selection
To select the required cooking zone touch the corre-
sponding sensor field for approx. one second.
A zero with a decimal point will light up in the appro-
priate cooking zone display window 0.
3 The decimal point indicates that settings may
only be made for this cooking zone.
Heat Setting Selection
For setting and adjusting the heat setting (1 to 9 )
for the selected cooking zone.
Use sensor field + to increase the heat setting.
Lower the heat setting with sensor field -.
3 If several cooking zones are being used simul-
taneously, the required cooking zone must be
selected by touching the appropriate sensor
field before adjusting the heat setting. The
decimal point in the display shows which
cooking zone has been selected.

13
Activating the power function
In order to switch on the power function (front left
cooking zone only), the cooking zone must be se-
lected (decimal point in the display). Touch the
”Power function” sensor field. p appears in the dis-
play and the power function has now been activated.
3 The power function will be activated for a
maximum of 10 minutes. Following this the
cooking zone will automatically switch to heat
level 9.
The power function can be switched off in the follow-
ing way:
• Touching the ”Power function” sensor field.
• Touching the sensor field -.
1 While the power function of the front left cook-
ing zone is active, the front right induction
cooking zone can be operated at a maximum
heat setting of 7.
If a higher setting than 7 (e.g., 8, 9 or A) is set for the
front right cooking zone, the heat setting display will
alternately show the heat setting selected and 7. As
soon as the power function has ended (max. 10 min-
utes), the front right cooking zone will change auto-
matically to the previously set heat setting.

14
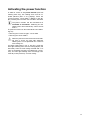
Switching the double ring
zone on and off
1. Select the appropriate cooking zone.
2. Set the desired cooking setting.
3. To switch the double ring zone on or off, place your
finger flat on the “Switching” Touch-Control sensor
field until the indicator light goes on or off.
Switching off a Cooking
Zone
1. Select the required cooking zone with the cooking
zone sensor fields.
2. Touch sensor fields + and - simultaneously to
switch off or turn sensor field - back to zero.
3 A cooking zone may only be switched off
when the decimal point is on in the cooking
zone display.

15
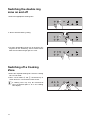
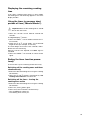
Cooking with the Automatic
Heating-Up Function
All four cooking zones of the cooking field can be
controlled in nine stages and have an automatic
heating-up function:
– 1, Lowest heat setting
– 9, Highest heat setting
– a, Heating-up function.
With the automatic heating-up function (a), the
cooking zone operates for a certain time at full ca-
pacity and then automatically switches back to the
heat setting selected for further cooking.
The duration of the automatic heating-up function
depends on the heat setting selected for further
cooking.
1. Select the required cooking zone with the cooking
zone sensor fields. The decimal point in the associ-
ated display field illuminates.
2. With the + or - sensor fields select heat setting
9. Stop briefly and touch the + sensor field again.
a lights up in the heat setting display.
3. Next, touch the sensor field - and set the required
continued heat setting 1 to 8. The heat setting se-
lected for further cooking then is displayed.
After 5 seconds, a appears in the display again in-
stead of heat setting selected for further cooking.
The heat setting is displayed again after the heating-
up time has ended.
3 If you select a higher heat setting when the au-
tomatic function is in operation, e.g. from 3 to
5, the previous heating-up time is taken into
account. If you select a lower setting, then the
automatic function is brought to an immediate
end. If you start cooking again on a cooking
zone that is still warm, the automatic heating-
up function uses the residual heat. This saves
time and energy.

16
Cooking without the Auto-
matic Heating-Up Function
1. For heating up/browning, select a high power.
2. As soon as steam forms or the fat is hot, switch
back to the required heat setting for the remainder
of the cooking time.
3. Reset to zero in order to end cooking.
2 Note:
When cooking with the induction cooking
zone you should take into account that
– the heating-up times are reduced by the direct en-
ergy transfer to the pan!
– the cooking process stops immediately after the
cooking zone is switched off (no boiling over!)
Residual Heat Indicator
When an individual cooking zone or
the entire hob is switched off, any re-
sidual heat is shown with an h (for
“Hot”) in the digital display for the ap-
propriate cooking zones.
Even after the cooking zone has been switched off,
the residual heat indicator only goes out when the
cooking zone is cold.
2 You can use the residual heat for melting and
keeping food warm.
1 Important! As long as the residual heat indi-
cator is illuminated, there is a risk of burns.
1 Important! If the power supply is interrupted
the h symbol will also go out and information
about residual heat will no longer be available.
However, it may still be possible to burn your-
self. This can be avoided by taking care when
near the hob.

17
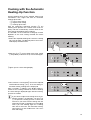
Locking/Unlocking the
Control Panel
With the exception of the “On/Off” sensor field the
control panel can be locked at any required time dur-
ing cooking in order to prevent adjusting the settings
such as when wiping over with a cloth. This
function is also suitable as a child safety feature.
1. Touch the „lock“ sensor field until the control indi-
cator comes on.
2. To release the lock touch the „lock“ sensor field
again continuously until the control indicator goes
out.
3 Child safety feature! If the hob is completely
switched off using the “On/Off” sensor field
while the lock is on, then the lock will still be
active when the hob is switched on again. To
reactivate the cooking zones, the locking func-
tion must be cancelled as described above.

18
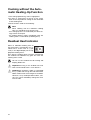
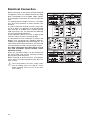
Timer
A cooking duration can be set with the integrated
timer for all cooking zones. When the end of the
cooking duration is reached, the cooking zone
switches itself off automatically.
1. Using the cooking zone sensor field, select the re-
quired cooking zone and set the required heat set-
ting.
2. Touch the TIMER W sensor field to activate the tim-
er function for this cooking zone.
00 will appear in
the display
.
3. Using the + or - sensor fields set or adjust the re-
quired period of time until the zone is to switch off
automatically (eg. 15 minutes).
After a few seconds the timer will start automatically
and will show how much time remains before it will
switch off.
In addition, the “Timer active” display for the relevant
cooking zone will light up.
At the end of the set cooking time, the cooking zone
will switch off automatically and an acoustic signal
will sound.
4. Touch the TIMER W sensor field to switch off the
signal and control indicator.
3 To set the timer more quickly, leave your finger
on the + or - sensor field until the required
time is reached.
If the - sensor field is operated first, the time
setting will begin at 99 minutes; if the + sen-
sor field is operated first, the time setting will
begin at 1 minute.

19
Displaying the remaining cooking
time
If you select a cooking zone which is in timer mode,
the cooking time still remaining appears in the timer
display window.
Using the timer to measure short
periods of time (“Minute Minder”).
1 Important! None of the cooking zones should
be set with the Timer!
1. Touch the "On/Off" sensor field for around two
seconds.
The digital display _ flashes.
2. Touch the TIMER W sensor field to activate the Ti-
mer function.
3. Using the + or - sensor fields, set the desired
length of time (for example, 20 minutes).
The Timer begins to run after a few seconds, and in-
dicates the time remaining.
When the set time has elapsed, an audible signal is
sounded.
4. Touch the TIMER W sensor field, to switch off the
signal.
Ending the timer function prema-
turely
There are two ways of switching off the timer early:
Switching off the cooking zone and timer
simultaneously
1. Select the desired cooking zone using the cooking
zone buttons.
2. Touch the + and - buttons simultaneously: The
cooking zone and timer will switch off.
Switching off the timer - leaving the
cooking zone active
1. Select the desired cooking zone using the cooking
zone buttons.
2. Touch the “Timer” button again.
3. Touch the + and - buttons simultaneously:
– Only the timer will switch off.
– The cooking zone will stay on.

20
Uses, Tables and Tips
Advice on Cooking with
and without Automatic
Warm up
The automatic warm up function is suita-
ble for:
• dishes that start off cold, are heated up at high
power and do not need to be continually watched
when cooking on the selected heat setting,
• dishes that are put in a hot frying pan.
The automatic warm up function is not
suitable for:
• goulash, beef olives and similar braised dishes that
need continual turning until browned correctly,
have liquid added and are then braised until
cooked,
• dumplings, pasta dishes with large amounts of liq-
uid,
• cooking with pressure cookers,
• very large quantities of soup/stew with more than
2 litres of liquid.
General notes:
• When cooking without the automatic warm up
function, we recommend the use of a high heat
setting to warm up the food (using the - button)
and then leave the dish to finish cooking at an ap-
propriate lower heat setting.
• Take special note of the results when you first use
the appliance! You can then decide which heat set-
ting is the best for "your dishes" in the "quantities
you are accustomed to preparing" with "your
pans". You will then quickly appreciate the advan-
tages of the automatic function and will feel re-
laxed about using your new hob.
• You can use the 1 heat setting for keeping food
warm.
Tip when cooking with induction cooking
zones:
• In order to obtain an even cooking result, the diam-
eter of the bottom of the pan used should not be
greater than that of the cooking area indicated on
the glass ceramic.
La pagina sta caricando ...
La pagina sta caricando ...
La pagina sta caricando ...
La pagina sta caricando ...
La pagina sta caricando ...
La pagina sta caricando ...
La pagina sta caricando ...
La pagina sta caricando ...
La pagina sta caricando ...
La pagina sta caricando ...
La pagina sta caricando ...
La pagina sta caricando ...
La pagina sta caricando ...
La pagina sta caricando ...
-
 1
1
-
 2
2
-
 3
3
-
 4
4
-
 5
5
-
 6
6
-
 7
7
-
 8
8
-
 9
9
-
 10
10
-
 11
11
-
 12
12
-
 13
13
-
 14
14
-
 15
15
-
 16
16
-
 17
17
-
 18
18
-
 19
19
-
 20
20
-
 21
21
-
 22
22
-
 23
23
-
 24
24
-
 25
25
-
 26
26
-
 27
27
-
 28
28
-
 29
29
-
 30
30
-
 31
31
-
 32
32
-
 33
33
-
 34
34


Electrolux EHD6670P Manuale utente
- Categoria
- Piani cottura
- Tipo
- Manuale utente
in altre lingue
- English: Electrolux EHD6670P User manual
Documenti correlati
Altri documenti
-
Siemens ELECTRIC COOKTOP Manuale utente
-
AEG 96901KFE-N90G Manuale utente
-
Aeg-Electrolux 76331K-MN Manuale utente
-
AEG HD634170NB Manuale utente
-
-
AEG 76301K-MN60I Manuale utente
-
-
Eurotech EDI604NF Manuale utente
-
Siemens EZ907KZY1E Manuale utente
-