
HEDI INSTRUCTIONS MANUAL

INSTRUCTION MANUAL FOR MIYOTA WATCH MOVEMENT
CALIBER NO. 0S11
CHRONOGRAPH FUNCTION:
CENTER SECOND HAND CHRONOGRAPH 1/1
sec. Timing
up to 59 minutes 59 seconds
BATTERY: SR927W

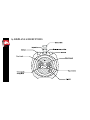
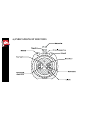
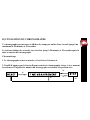
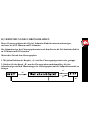
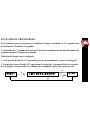
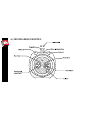
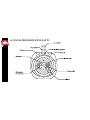
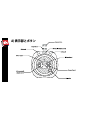
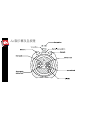
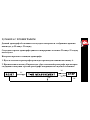
A) DISPLAYS AND BUTTONS
B) SETTING THE TIME
C) SETTING THE DATE
D) USING THE CHRONOGRAPH
E) CHRONOGRAPH RESET (INCL. AFTER REPLACING BATTERY)

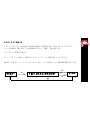
A) DISPLAYS AND BUTTONS

B) SETTING THE TIME
1. Pull the crown out to the 2nd position.
2. Turn the crown to set hour and minute hands.
3. When the crown is pushed back to the normal
position, small second hand begins to run.

C) SETTING THE DATE
1. Pull the crown out to the 1st position.
2. Turn the crown counter-clockwise to set the date.
*If the date is set between the hours of around 9:00 PM and 1:00 AM, the date may not
change on the following day.
3. After the date has been set, push the crown back to the normal position.

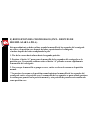
D) USING THE CHRONOGRAPH
This chronograph is able to measure and display time in 1/1 second united
up to maxinum of 59 minutes 59 seconds.
The chronograph 1/1 second hand keeps continuously for 59 minutes 59 seconds
after starting.
Measuring time with the chronograph
1. The chronograph can be started and stopped each time button «A» is pressed.
2. Pressing button «B» resets the chronograph and the chronograph second hand
and chronograph minute hand return to zero position.
"A"
"A"
"A"
"B"
"B"

E) CHRONOGRAPH RESET (INCL. AFTER REPLACING BATTERY)
This procedure shoud be performed when the chronograph second hand does not return to
zero position
after the chronograph has been reset, and including after the battery has been replaced.
1. Pull the crown out to the 2nd position.
2. Press button «A» to set the chronograph second hand to the zero position.
The chronograph hand can be advanced rapidly by continuously pressing button «A».
3. Once the hand have been zeroed, return the crown to the normal position.
* Do not push crown to normal position while the chronograph second hand returns to zero
position. It stops on the way when crown are returned to normal position and its position is
recognized as zero position.

MANUEL D’INSTRUCTIONS DE LA HEDI

MODE D’EMPLOI DU MOUVEMENT DE
MONTRE MIYOTA
CALIBRE : NO. OS11
Fonction de chronographe :
Chronomètre avec trotteuse au centre 1/1
(seconde comme unité)
Chronométrage jusqu’à 59 minutes 59 secondes.
Pile : SR927W

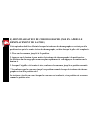
A) INDICATIONS ET BOUTONS
B) RÉGLAGE DE L’HEURE
C) RÉGLAGE DE LA DATE
D) UTILISATION DU CHRONOGRAPHE
E) RÉINITIALISATION DU CHRONOGRAPHE
(PAR EX. APRÈS LE REMPLACEMENT DE LA PILE)

A) INDICATIONS ET BOUTONS

B) RÉGLAGE DE L’HEURE
1. Tirez la couronne
2. Tournez la couronne pour régler les aiguilles des heures
et des minutes.
3. Lorsque vous renfoncez la couronne jusqu’à sa position
normale, la petite trotteuse se met à tourner.

C) RÉGLAGE DE LA DATE
1. Tirez la couronne jusqu’à la 1e position.
2. Tournez la couronne dans le sens antihoraire pour
régler la date.
*Si la date est réglée entre 9:00 du soir et 1:00 du matin
environ, elle ne changera peut-être pas le jour
suivant.
3. Lorsque la date a été réglée, renfoncez la couronne
jusqu’à sa position normale.

D) UTILISATION DU CHRONOGRAPHE
Ce chronographe peut mesurer et afcher des temps par unités d’une seconde jusqu’à un
maximum de 59 minutes et 59 secondes.
La trotteuse indique les secondes sans s’arrêter jusqu’à 59 minutes et 59 secondes après la
mise en marche du chronographe.
Chronométrage
1. Le chronographe se met en marche et s’arrêt avec le bouton A.
2. Il suft d’appuyer sur le bouton B pour remettre le chronographe à zéro, et à ce moment
la trotteuse et l’aiguille des minutes du chronographe reviennent à la position zéro.
"A"
"A"
"A"
"B"
"B"

E) RÉINITIALISATION DU CHRONOGRAPHE (PAR EX. APRÈS LE
REMPLACEMENT DE LA PILE)
Cette opération doit être effectuée lorsque la trotteuse du chronographe ne revient pas à la
position zéro après la remise à zéro du chronographe, ou bien lorsque la pile a été remplacée.
1. Tirez sur la couronne jusqu’à la 2e position.
2. Appuyez sur le bouton A pour mettre la trotteuse du chronographe à la position zéro.
La trotteuse du chronographe avancera plus rapidement si vous appuyez en continu sur le
bouton A.
3. Lorsque l’aiguille a été remise à zéro, renfoncez la couronne jusqu’à sa position normale.
* Ne renfoncez pas la couronne jusqu’à sa position normale lorsque la trotteuse du chrono-
graphe revient à la position zéro.
La trotteuse s’arrête en cours lorsque la couronne est renfoncée, et sa position est reconnue
comme la position zéro.

GEBRAUCHSANWEISUNG DER HEDI

BEDIENUNGSANLEITUNG FÜR MIYOTA
UHRWERK
KALIBER NR. 0S11
Messfunktion des Chronographen:
Chronograph mit mittlerem Sekundenzeiger 1/1
(1-Sekunden-Einheiten)
Zeitnehmung bis zu 59 Minuten und 59 Sekunden.
Batterie: SR927W

A) DISPLAY UND KNÖPFE
B) EINSTELLUNG DER ZEIT
C) EINSTELLUNG DES DATUMS
D) VERWENDUNG DES CHRONOGRAPHEN
E) RÜCKSTELLUNG DES CHRONOGRAPHEN
(EINSCHLIEßLICH NACH DEM AUSTAUSCHEN DER BATTERIE)

A) DISPLAY UND KNÖPFE
La pagina si sta caricando...
La pagina si sta caricando...
La pagina si sta caricando...
La pagina si sta caricando...
La pagina si sta caricando...
La pagina si sta caricando...
La pagina si sta caricando...
La pagina si sta caricando...
La pagina si sta caricando...
La pagina si sta caricando...
La pagina si sta caricando...
La pagina si sta caricando...
La pagina si sta caricando...
La pagina si sta caricando...
La pagina si sta caricando...
La pagina si sta caricando...
La pagina si sta caricando...
La pagina si sta caricando...
La pagina si sta caricando...
La pagina si sta caricando...
La pagina si sta caricando...
La pagina si sta caricando...
La pagina si sta caricando...
La pagina si sta caricando...
La pagina si sta caricando...
La pagina si sta caricando...
La pagina si sta caricando...
La pagina si sta caricando...
La pagina si sta caricando...
La pagina si sta caricando...
La pagina si sta caricando...
La pagina si sta caricando...
La pagina si sta caricando...
La pagina si sta caricando...
La pagina si sta caricando...
La pagina si sta caricando...
La pagina si sta caricando...
La pagina si sta caricando...
La pagina si sta caricando...
La pagina si sta caricando...
La pagina si sta caricando...
La pagina si sta caricando...
La pagina si sta caricando...
La pagina si sta caricando...
La pagina si sta caricando...
La pagina si sta caricando...
La pagina si sta caricando...
La pagina si sta caricando...
La pagina si sta caricando...
La pagina si sta caricando...
La pagina si sta caricando...
La pagina si sta caricando...
-
 1
1
-
 2
2
-
 3
3
-
 4
4
-
 5
5
-
 6
6
-
 7
7
-
 8
8
-
 9
9
-
 10
10
-
 11
11
-
 12
12
-
 13
13
-
 14
14
-
 15
15
-
 16
16
-
 17
17
-
 18
18
-
 19
19
-
 20
20
-
 21
21
-
 22
22
-
 23
23
-
 24
24
-
 25
25
-
 26
26
-
 27
27
-
 28
28
-
 29
29
-
 30
30
-
 31
31
-
 32
32
-
 33
33
-
 34
34
-
 35
35
-
 36
36
-
 37
37
-
 38
38
-
 39
39
-
 40
40
-
 41
41
-
 42
42
-
 43
43
-
 44
44
-
 45
45
-
 46
46
-
 47
47
-
 48
48
-
 49
49
-
 50
50
-
 51
51
-
 52
52
-
 53
53
-
 54
54
-
 55
55
-
 56
56
-
 57
57
-
 58
58
-
 59
59
-
 60
60
-
 61
61
-
 62
62
-
 63
63
-
 64
64
-
 65
65
-
 66
66
-
 67
67
-
 68
68
-
 69
69
-
 70
70
-
 71
71
-
 72
72


Quicksilver Hedi Manuale utente
- Tipo
- Manuale utente
- Questo manuale è adatto anche per
in altre lingue
- English: Quicksilver Hedi User manual
- français: Quicksilver Hedi Manuel utilisateur
- español: Quicksilver Hedi Manual de usuario
- Deutsch: Quicksilver Hedi Benutzerhandbuch
- русский: Quicksilver Hedi Руководство пользователя
- português: Quicksilver Hedi Manual do usuário
- 日本語: Quicksilver Hedi ユーザーマニュアル
Altri documenti
-
Festina 0S60 Manuale del proprietario
-
Festina IFMFS00-01 Manuale utente
-
-
Citizen 6S21 Manuale utente
-
Bulova PRECISIONIST CHRONO Settings Manual
-
-
-
Timex Classic Chronographs Guida utente
-
-
Freestyle Dive 75449 Manuale del proprietario