
1
TW-WLAN Router
User Guide
Copyright © TeleWell Oy
4/2011

2

3
TABLE OF CONTENTS
Chapter 1
Introduction to your Router…………….………………………………………………………….....5
Package contents……………….………………………………………………………………...…....5
Hardware configuration…………….……………………………………………………………..…..6
Led indicators…………… … …… …… .…….…………………………………………………….……7
How to Operate………………………… ..…….………………………………………………….….…8
Chapter 2
Settings Wizard
Setup Login password……………………… …..………… …… …… ……………...………………11
Set up Time Zone…………………… …… ……… …… …… ……… …… …… … …………..……….11
Select WAN Type…………… …… … …… … …… … …… … …… … … …… … …… … …………..….12
3G………… … …… … …… … …… … …… … …… … … …… … …… ..……… … …… … … ………….....13
Dynamic IP Address…………………………………… ……… ……… ……… ……… …………..…14
Wireless settings……………………………………………………………………….…… ……..….15
Additional settings………………… ……… ……… ………… ……… ……… ………… ……………18
Chapter 3
Main settings
Quick Start……………………………… ……… ………… ……… ……… ………… …………...……19
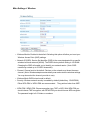
DHCP Server……………… ………… ……… ……… ……… ………… ……… ……… ………………22
Wireless……………………………………………………………… …………………………………24
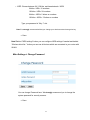
Change Password……………………… ……… ……… ………… ……… …… ………….………….25
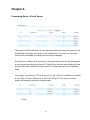
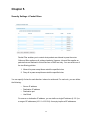
Chapter 4
Forwarding Rules
Virtual Server……………………… …… ……… …… …… ……… …… …… ……… ……………..…26
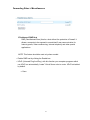
Miscellaneous………………………………………………… ………………… …………….………27
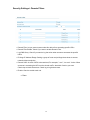
Chapter 5
Security Settings
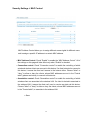
Packet filters………………………… …… ……… …… ……… …… …… ……… ……………………28
Domain filters……………… ………… ……… ……… ……… ………… …… ………………………..30
URL Blocking……………………… ……… ……… ………… ……… ……… ……… … ……………..31
MAC control……………………………………………………………………… …………………….32
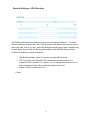
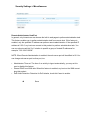
Miscellaneous………………………………………………… ………………… …………………… .33
Chapter 6
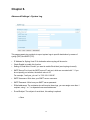
Advanced settings
System Log……………………… …… ……… …… ……… …… …… ……… …… …… … ……..…...34
Dynamic DNS………………………………… ……… ……… ………… ……… ……… …...………...35
QoS……………………… ……… ……… ………… ……… ……… ………… ……… …………..….….36
SNMP…………… …… ……… …… ……… …… …… ……… …… …… ……… …… …… … ………….37
Routing………………………………… ……… ……… ……… ………… ……… ……… … ………….38
System time…………………………… …… …… ……… …… …… ……… …… …… … …………….39

4
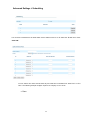
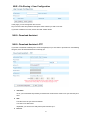
Scheduling……………………………………………………………………………….………..……40
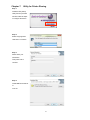
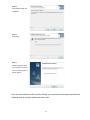
Chapter 7.
Utility for printer sharing…………………………………………………………………………………...41
Chapter 8.
NAS Configuration
Disk Utility………………………………………………………………………………………………45
File Sharing
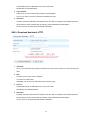
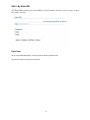
Basic setting………………………………………………………………………………………..….45
FTP Service…………………… … …… …… …… …… … …… …… …… …… … …… …… …… …… ..46
Access Control………………… ……… ……… ……… ……… ……… ……… ……… ……46
User configuration……………………… ……… ……… ……… ……… ……… ……… ….46
Download assistant
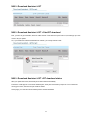
FTP………… …… …………………………………………………………………………….47
HTTP……………… …………………………………………………………………………..48
Bit Torrent (BT)….....……………………………………………….……………………….49
Start BT download…………………………………………………………………………..49
BT download status………………………………………………………………………...49
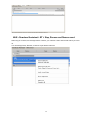
Stop, Resume and Remove seed………………… ……… …… …… …… ………………50
Download Status…………………………………………………………………………….51
Chapter 9
Tools
System info…………………………………………………………………………………..53
Firmware upgrade…………………………………………………………………………..54
Backup setting………………………………………………………………………………54
Reset to default……………………………………………………………………………...54
Reboot………………………………………………………………………………………...54
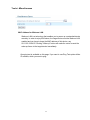
Miscellaneous………………………………………………………………………………..55
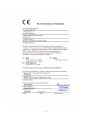
Declaration of Conformity………………………………………………………… ……………… ………..56

5
Chapter 1.
Introduction
Congratulations on your purchase of this outstanding product: WLAN Broadband Router. This
product is specifically designed for those who need to have the file sharing and P2P download
services beyond his home and office. It provides a complete solution for Internet surfing and
broadband sharing. Instructions for installing and configuring this product can be found in this
manual. Before you install and use this product, please read this manual carefully for fully
exploiting the functions of this product.
Package contents
TW-WLAN Router package should contain the items listed below. If any of the items are
missing, please contact your reseller.
! TW-WLAN Router
! Antenna 2 pcs
! Power adaptor 12V 1.5A
! Ethernet cable (RJ45)
! CD
! Manuals: English, Finnish
Caution: Using a power supply with a different voltage rating than the one included with the
TW-WLAN Router will cause damage and void the warranty for this product.

6
Hardware Installation
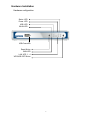
Hardware configuration
LED Indicators
Power LED
USB Connector
Reset Button
WAN LED
LAN LED 1 4
WPS/USB OFF Button
Status LED
Power LED
USB LED
WLAN LED

7
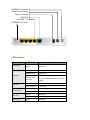
LED indicators
LED Status
Description
Status LED
Green
Power ON
USB LED
Green
USB storage attached
Green in flash
Data access
Green in flash
then stop
Press ‘USB off’ button till LED flashing, then
can remove USB storage when LED stop
flashing.
WAN LED
Green
It is connected to local Ethernet.
Green in flash
Data access
Ethernet LED
Green
RJ45 cable is plugged
Green in flash
Data access
WiFi LED
Green
WLAN is on
Green in flash
Data access
Power LED
Green
Power ON
ANTENNA Connector
Power Switch Button
Power Connector
WAN Port
LAN Port 1 4
ANTENNA Connector

8
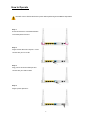
How to Operate
DO NOT connect TW-WLAN Router to power before performing the installation steps below.
Step 1.
Screw the antenna in a clockwise direction
to the back panel of the unit.
Step 2.
Plug the RJ45 cable into LAN port 1~4 and
connect with your PC or NB.
Step 3.
Plug your RJ-45 into the WAN port and
connect with your xDSL modem.
Step 4.
Plug the power jack into it.

9
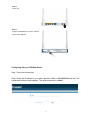
Step 5.
Power ON.
Step 6.
Prepare a USB Storage or Printer, and then
plug into the USB port.
Configuring with your TW-Wlan Router
Step 1. Open the web browser
Step 2. Enter the IP address of your router, which by default is 192.168.0.254, and click “Go”,
a password window prompt appears. The default password is “admin”

10
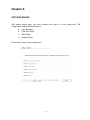
Chapter 2.
SETTINGS WIZARD
With wizard setting steps, you could configure the router in a very simple way. This
configuration wizard includes settings of
a. Login Password,
b. Time Zone Setup
c. WAN Setup
d. Wireless Setup,
Press “Next” button to start configuration.

11
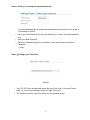
Step 1: Allow you to change the system password.
It is recommended that you change the system password into the one you prefer to
on the basis of security
• Key in your Old Password (if it is the first initiation, the “admin” will be the defaulted
one.
• Enter your New Password
• Enter your Password again for confirmation; it must be the same as the New
Password.
-> Next
Step 2 Setting up the Time Zone
• Your TW-3G Router automatically detect the right Time Zone, if not press “Detect
Again” to let router automatically search the right Time Zone
• You can also select the right Time Zone from the dropdown menu

12
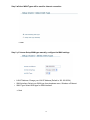
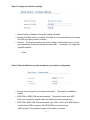
Step 3 Select WAN Types will be used for Internet connection
-> Next
Step 3 If chosen Setup WAN type manually, configure the WAN settings
• LAN IP Address: Change your LAN IP Address (Default is 192.168.0.254)
• WAN Interface: Select your WAN type from dropdown menu, Wireless or Ethernet
• WAN Type: Select WAN type for WAN Interface.
-> Next

13
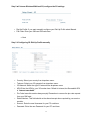
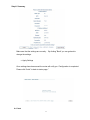
Step 3 If chosen Wireless WAN and 3G, configure the 3G settings
• Dial-Up Profile: If you want manually configure your Dial-Up Profile select Manual.
• PIN Code: Enter your SIM card PIN code here.
-> Next
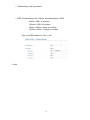
Step 3 Configuring 3G Dial-Up Profile manually
• Country: Select your country from dropdown menu
• Telecom: Select your 3G operator from dropdown menu
• 3G Network: Select the right 3G network from dropdown menu
• APN: Enter the APN for your 3G modem here. Default is Internet, but Saunalahti APN
is “internet.saunalahti”.
• Pin Code: leave this section always empty! Remember to remove the pin code request
from your SIM card.
• Dialed Number: This field should not be altered except when required by your service
provider.
• Account: Enter the new Username for your PC card here.
• Password: Enter the new Password for your PC card here.

14
-> Next
Step 3 If chosen Ethernet WAN and Dynamic IP Address, configure the Dynamic IP
Address settings
• Host Name is optional
• ISP registered MAC Address: If you click the Clone MAC button, you will find the MAC
address of your NIC shown in WAN's MAC Address. Note: Do not modify this, if
not necessary!
-> Next

15
Step 4: Configure the wireless settings.
• Select Enabled or Disabled. The default setting is Enabled.
• Network ID (SSID) will be as a default 1G-WLAN. It is recommended that you change
the SSID for making it easier to identify.
• Channel: The channel selection is at auto by default, which means that your router
will automatically choose the channel with least traffic. If necessary, you might pick
a specific channel.
-> Next
Step 5: Select the Wireless security method of your wireless configuration.
• Security: Security type for your wireless connection. The security is enabled by
default.
• WPA-PSK or WPA2-PSK are recommended. They perform better than WEP.
Note: your computer’s network card must support the chosen security type.
• WPA-PSK / WPA2-PSK: Choose encryption type, TKIP or AES. With WPA-PSK you
should choose TKIP-encryption, with WPA2-PSK-you should choose
AES-encryption. The password length is 6-63 letters or numbers.

16
• Preshared Key: Key is by default.
• WEP: Choose between 64 / 128 bits, and hexadecimals / ASCII
64 bits + HEX= 10 numbers
128 bits + HEX= 26 numbers
64 bits + ASCII= 5 letters or numbers
128 bits + ASCII= 13 letters or numbers
Type your WEP password in ”Key 1” slot.
-> Next

17
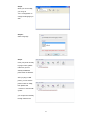
Step 6: Summary
Make sure that the settings are correctly. By clicking ”Back” you can go back to
change the settings.
-> Apply Settings
Once settings have been saved the router will notify you “Configuration is completed.
Please click “finish” to back to status page.”
" Finish

18
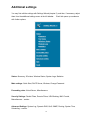
Additional settings
You may first edit the settings with Settings Wizard (chapter 2), and then, if necessary, adjust
them from the additional settings menu at the left sidebar. Each link opens up a submenu
with further options.
Status: Summary, 3G status, Wireless Status, System Logs, Statistics.
Main settings: Quick Start, DHCP Server, Wireless, Change Password.
Forwarding rules: Virtual Server, Miscellaneous.
Security Settings: Packet Filters, Domain Filters, URL Blocking, MAC Control,
Miscellaneous – section.
Advanced Settings: System Log, Dynamic DNS, QoS, SNMP, Routing, System Time,
Scheduling – section.

19
NAS: Disk Utility, File Sharing, Access Control, Download Assistant, Download Status, Web
HDD – section.
Tools: System Info, Firmware Upgrade, Backup Settings, Reset to Default, Reboot,
Miscellaneous.
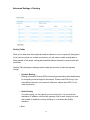
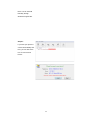
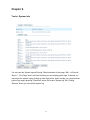
Status: Summary- page presents a summary of the router's status. Separate tables of each
topic can be found under links 3G Status, Wireless Status and Statistics. System Logs -link
is a shortcut to system logs.
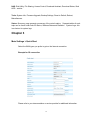
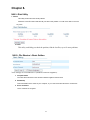
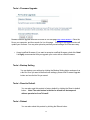
Chapter 3
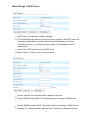
Main Settings > Quick Start
Select the WAN types you prefer to get on the Internet connection
Example for 3G connection
Please refer to your documentation or service provider for additional information.

20
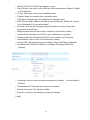
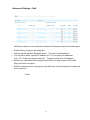
• Choose "3G" from the WAN Type dropdown –menu
• Dial-up Profile: If you want to set up Dial-up Profile manually select “Manual” (Default
is Auto-Detection)
• Country: Select your country from a dropdown menu.
• Telecom: Select your operator from a dropdown menu.
• 3G Network: Select the right 3G network from a dropdown menu.
• APN: Enter the APN notified by your ISP for your modem here. Default it is “internet”
but for Saunalahti it is “internet.saunalahti”
• Pin Code: Leave this section always empty! Remember to remove the pin code
request from your SIM card.
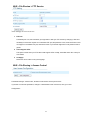
• Dialed Number: Enter the dial-number if required by your service provider.
• Account: Enter User Name (from ISP) for your modem here (if required).
• Password: Enter the Password (from ISP) for your modem here (if required).
• Authentication: Leave on auto, if not necessary to change
• Primary DNS: This feature allows you to assign a Primary DNS Server (Optional)
• Secondary DNS: This feature allows you to assign a Secondary DNS Server
(Optional)
• Connection Control: is auto reconnect and always on by default. You can disable it,
if desired.
• Precommand (AT Command) leave empty if not required
• Allowed Connection Time: Always is default.
• Keep Alive: Here you can change your keep alive settings.
-> Save
La pagina si sta caricando...
La pagina si sta caricando...
La pagina si sta caricando...
La pagina si sta caricando...
La pagina si sta caricando...
La pagina si sta caricando...
La pagina si sta caricando...
La pagina si sta caricando...
La pagina si sta caricando...
La pagina si sta caricando...
La pagina si sta caricando...
La pagina si sta caricando...
La pagina si sta caricando...
La pagina si sta caricando...
La pagina si sta caricando...
La pagina si sta caricando...
La pagina si sta caricando...
La pagina si sta caricando...
La pagina si sta caricando...
La pagina si sta caricando...
La pagina si sta caricando...
La pagina si sta caricando...
La pagina si sta caricando...
La pagina si sta caricando...
La pagina si sta caricando...
La pagina si sta caricando...
La pagina si sta caricando...
La pagina si sta caricando...
La pagina si sta caricando...
La pagina si sta caricando...
La pagina si sta caricando...
La pagina si sta caricando...
La pagina si sta caricando...
La pagina si sta caricando...
La pagina si sta caricando...
La pagina si sta caricando...
-
 1
1
-
 2
2
-
 3
3
-
 4
4
-
 5
5
-
 6
6
-
 7
7
-
 8
8
-
 9
9
-
 10
10
-
 11
11
-
 12
12
-
 13
13
-
 14
14
-
 15
15
-
 16
16
-
 17
17
-
 18
18
-
 19
19
-
 20
20
-
 21
21
-
 22
22
-
 23
23
-
 24
24
-
 25
25
-
 26
26
-
 27
27
-
 28
28
-
 29
29
-
 30
30
-
 31
31
-
 32
32
-
 33
33
-
 34
34
-
 35
35
-
 36
36
-
 37
37
-
 38
38
-
 39
39
-
 40
40
-
 41
41
-
 42
42
-
 43
43
-
 44
44
-
 45
45
-
 46
46
-
 47
47
-
 48
48
-
 49
49
-
 50
50
-
 51
51
-
 52
52
-
 53
53
-
 54
54
-
 55
55
-
 56
56


in altre lingue
- English: Telewell TW-WLAN User manual
Altri documenti
-
Zoom 1098 Manuale utente
-
ZyXEL NBG6716 Guida utente
-
-
Belkin F5D7632EA4A Manuale utente
-
ZyXEL NBG6815 Manuale del proprietario
-
ZyXEL NBG6604 Guida utente
-
-
-
Trendnet TEW-652BRP Manuale utente
-