Electrolux EWC1050 Manuale utente
- Categoria
- Lavatrici
- Tipo
- Manuale utente

EWC 1050
................................................ .............................................
EN WASHING MACHINE USER MANUAL 2
IT LAVABIANCHERIA ISTRUZIONI PER L’USO 23

Electrolux. Thinking of you.
Share more of our thinking at www.electrolux.com
CONTENTS
Safety information 2
Safety instructions 3
Product description 4
Control panel 6
Before first use 8
Daily use 8
Helpful hints and tips 11
Washing programmes 12
Care and cleaning 14
What to do if… 15
Technical data 17
Consumption values 18
Installation 18
Environment concerns 22
Subject to change without notice.
SAFETY INFORMATION
Before the installation and use of the appliance, carefully read
the supplied instructions. The manufacturer is not responsible
if an incorrect installation and use causes injuries and dam-
ages. Always keep the instructions with the appliance for fu-
ture reference.
CHILDREN AND VULNERABLE PEOPLE SAFETY
Warning! Risk of suffocation, injury or permanent disability.
• Do not let persons, children included, with reduced physical
sensory, reduced mental functions or lack of experience and
knowledge use the appliance. They must have supervision
or instruction for the operation of the appliance by a person
who is responsible for their safety.
• Do not let children play with the appliance.
• Keep all packaging away from children.
• Keep all detergents away from children.
• Keep children and pets away from the appliance door when
it is open.
• If the appliance has a child safety device, we recommend
you activate it.
GENERAL SAFETY
• Before maintenance, deactivate the appliance and discon-
nect the mains plug from the mains socket.
• Do not change the specification of this appliance.
2 electrolux

• Obey the maximum load volume of 3 kg (refer to the “Pro-
gramme chart” chapter).
• If the supply cord is damaged, it must be replaced by the
manufacturer, its service agent or similarly qualified persons
in order to avoid a hazard.
• The operating water pressure (minimum and maximum)
must be between 0,5 bar (0,05 MPa) and 8 bar (0,8 MPa)
• The ventilation openings in the base (if applicable) must not
be obstructed by a carpet.
• The appliance is to be connected to the water mains using
the new supplied hose-sets. Old hose sets must not be
reused.
SAFETY INSTRUCTIONS
INSTALLATION
• Remove all the packaging and the transit
bolts.
• Keep the transit bolts. When you move
the appliance again you must block the
drum.
• Do not install or use a damaged appli-
ance.
•Do not install or use the appliance where
the temperature is less than 0 °C or
where it is exposed to the weather.
• Obey the installation instruction supplied
with the appliance.
• Make sure that the floor where you install
the appliance is flat, stable, heat resistant
and clean.
• Do not install the appliance where the ap-
pliance door can not be fully opened.
• Always be careful when you move the
appliance because it is heavy. Always
wear safety gloves.
• Make sure that there is air circulation be-
tween the appliance and the floor.
• Adjust the feet to have the necessary
space between the appliance and the
carpet.
Electrical connection
Warning! Risk of fire and electrical
shock.
• The appliance must be earthed.
• Make sure that the electrical information
on the rating plate agrees with the power
supply. If not, contact an electrician.
• Always use a correctly installed shock-
proof socket.
• Do not use multi-plug adapters and ex-
tension cables.
• Make sure not to cause damage to the
mains plug and to the mains cable. Con-
tact the Service or an electrician to
change a damaged mains cable.
• Connect the mains plug to the mains
socket only at the end of the installation.
Make sure that there is access to the
mains plug after the installation.
• Do not pull the mains cable to disconnect
the appliance. Always pull the mains
plug.
• Do not touch the mains cable or the
mains plug with wet hands.
• This appliance complies with the E.E.C.
Directives.
Water connection
• Make sure not to cause damage to the
water hoses.
• The appliance is to be connected to the
water mains using the new supplied
hose-sets. Old hose sets must not be
reused.
electrolux 3

• Before you connect the appliance to new
pipes or pipes not used for a long time,
let the water flow until it is clean.
• The first time you use the appliance,
make sure that there is no leakage.
USE
Warning! Risk of injury, electrical
shock, fire, burns or damage to the
appliance.
• Use this appliance in a household envi-
ronment.
• Obey the safety instructions on the deter-
gent packaging.
• Do not put flammable products or items
that are wet with flammable products in,
near or on the appliance.
• Do not touch the glass of the door while
a programme operates. The glass can be
hot.
• Make sure that you remove all metal ob-
jects from the laundry.
• Do not put a container to collect possible
water leakage under the appliance. Con-
tact the Service to ensure which acces-
sories can be used.
CARE AND CLEANING
Warning! Risk of injury or damage to
the appliance.
• Do not use water spray and steam to
clean the appliance.
• Clean the appliance with a moist soft
cloth. Only use neutral detergents. Do
not use abrasive products, abrasive
cleaning pads, solvents or metal objects.
DISPOSAL
Warning! Risk of injury or suffocation.
• Disconnect the appliance from the mains
supply.
• Cut off the mains cable and discard it.
• Remove the door catch to prevent chil-
dren and pets to get closed in the appli-
ance.
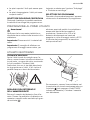
PRODUCT DESCRIPTION
Your new appliance meets all modern requirements for effective treatment of laundry
with low water, energy and detergent consumption. Its new washing system allows
total use of detergent and reduces water consumption so saving energy.
4 electrolux

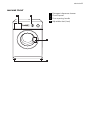
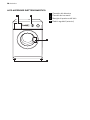
MACHINE FRONT
1 2
3
4
1
Detergent dispenser drawer
2
Control panel
3
Door opening handle
4
Adjustable feet (front)
electrolux 5

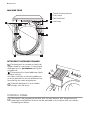
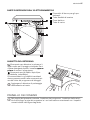
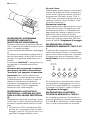
MACHINE REAR
1
3
2
4
1
Transit locking devices
2
Drain hose
3
Electrical lead
4
Inlet hose
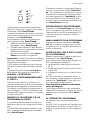
DETERGENT DISPENSER DRAWER
Compartment for powder or liquid de-
tergent used for main wash. If using liquid
detergent pour it just before starting the
programme.
Compartment for liquid additives (fabric
softener, starch).
Any fabric softener or starching additives
must be poured into the compartment be-
fore starting the wash programme.
Prewash detergent is to be added
straight into the drum.
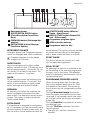
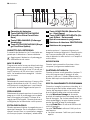
CONTROL PANEL
Henceforth, the programme selector dial, the spin selector dial, programme pro-
gress lights and different buttons will be indicated in all the book with the relevant
numbers given below.
6 electrolux

Tür
Porte
Ende
Fin
Wasch en
Schleudern
Essorage
Handwäsche
Lavage à la main
Koch-/Buntwäsche
Blanc/Couleurs
Aus
Arrêt
Schleudern/Essorage
Pumpen
Vidange
Spülen
Rinçage
Feinwäsche / Délicats
Wolle
Laine
Wolle Kalt
Laine Froid
Mini
h
h
800
1000
400
2
h
4
600
Lavage
Start
Pause
Zeit-
vorwahl
Marche
Pause
Extra
Spülen
Rinçage
Plus
Vor-
wäsche
Extra Court
Court
Pré-
lavage
Départ
Diéré
Kurz
90
30
30
30
40
Pegeleicht
Synthétique
Extra Kurz
1 2 3 4 5 6 8 97
1
Detergent drawer
2
QUICK/EXTRA QUICK button
(Court/Kurz-Extra Court/Extra
Kurz)
3
PREWASH button (Prélavage/Vor-
wäsche)
4
EXTRA RINSE button (Rinçage
Plus/Extra Spülen)
5
START/PAUSE button (Marche/
Pause - Start/Pause)
6
DELAY START button (Départ Dif-
féré - Zeitvorwahl)
7
Programme progress lights
8
SPIN reduction selector
9
Programme selector dial
DETERGENT DRAWER
Detergent drawer has 2 separate compart-
ments for detergent and fabric conditioner.
Prewash detergent is to be added
straight into the drum.
SUPER QUICK
Very short programme for lightly soiled
laundry, except for wool. The washing time
will be reduced approx. 30 minutes for cot-
ton and by 20 minutes for synthetic. The
machine will perform 1 rinse less.
QUICK
By selecting this option the washing time
will be reduced approx. 10 minutes. This
option is recommended for lightly soiled
white-/coloured and synthetic laundry.
PREWASH
By selecting this option the machine per-
forms a prewash cycle before the main
wash phase. The washing time will be pro-
longed. This option is recommended for
heavily soiled laundry.
EXTRA RINSE
This appliance is designed for saving ener-
gy. If it necessary to rinse the laundry using
an extra quantity of water (super rinse), se-
lect this option. Some additional rinses will
be performed. This option is recommended
for people who are allergic to detergents,
and in areas where the water is very soft.
START PAUSE
This button allows you to start or to inter-
rupt the selected programme.
DELAY START
By selecting this option it is possible to de-
lay the starting of the washing programme
by eight, four or two hours. The selected
delay is indicated by the illumination of the
corresponding light.
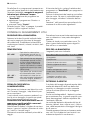
PROGRAMME PROGRESS LIGHTS
When choosing delay start, the light rele-
vant to the selected delay lights up. After
the appliance has started, the remaining
time is shown by the corresponding indica-
tor light.
The light Waschen/Lavage illuminates
when the machine is performing the wash-
ing phase. If the prewash option was chos-
en, the light will be on during the prewash
phase too.
The light Ende/Fin illuminates at the end of
the washing cycle.
The light Tür/Porte indicates if the door
can be opened:
• The light is lit: the door cannot be
opened.
electrolux 7

• The light is out: the door can be opened.
• The light is flashing: the door can soon
be opened.
SPIN REDUCTION DIAL
By turning the spin speed selector you can
change the spin speed of the selected pro-
gramme or to select «Rinse hold» or «No
spin»option.
PROGRAMME SELECTOR DIAL
It allows you to switch the appliance on/off
and/or to select a programme.
BEFORE FIRST USE
Warning!
Ensure that the electrical and water con-
nections comply with the installation in-
structions.
Important! Remove any material from the
drum.
Important! We recommend you to run a
wash programme without any load, to clear
any residues which may have been left by
the manufacturing process. Pour approx.
100 ml of detergent straight into the drum
and run a cotton cycle at 60°C. When the
programme is finished the machine will be
ready to use.
DAILY USE
Load the laundry
Open the door by carefully pulling the door
handle outwards. Place the laundry in the
drum, one item at a time, shaking them out
as much as possible. Close the door.
Make sure that no laundry stays between
the seal and the door. There is a risk of wa-
ter leakage or damage to the laundry.
MEASURE OUT THE DETERGENT AND
THE FABRIC SOFTENER
Pull out the dispenser drawer until it stops.
Measure out the amount of detergent re-
quired, pour it into the larger compartment
on the left
.
If required, pour fabric softener into the
smaller compartment marked
(the
amount used must not exceed the «MAX»
mark in the drawer). Close the drawer gen-
tly.
8 electrolux

SELECT THE REQUIRED PROGRAMME
BY MEANS OF THE PROGRAMME
SELECTOR DIAL (9)
Turn the programme selector dial to the re-
quired programme. The selector can be
turned either clockwise or anticlockwise.
The green light of button 6 starts to flash
On programme progress display the pilot
lights corresponding to all phases compos-
ing the selected programme are lit.
On position "Aus/Arrêt" the programme is
reset and the machine is switched OFF.
At the end of the programme the selec-
tor dial must be turned to position
"Aus/Arrêt" to switch the machine off.
Important! If you turn the programme
selector dial to another programme when
the machine is working, the lights in the
programme progress display will start to
flash to indicate a wrong selection. The
machine will not perform the new selected
programme.
SELECT THE SPIN SPEED, RINSE
HOLD OR NO SPIN OPTION (8)
Select the spin speed, Rinse Hold option or
No Spin option by turning the spin speed
selector.
• The position 1000 is equivalent to 900
rpm for the synthetic and wool/handwash
programmes and 700 rpm for the deli-
cate wash and mini programme.
Rinse hold
By selecting this option the water of the last
rinse is not emptied out to prevent the fab-
rics from creasing. When the programme
has finished, the lights "End" and "Door"
are lit to indicate that the water must be
emptied out (See: " At the end of the pro-
gramme").
No spin
By selecting this option all the spinning
phases are excluded. To be used for ex-
tremely delicate material. The machine will
add some additional rinses to the cotton
and synthetic programmes.
For the maximum spin speed allowed by
each programme, refer to the chapter
Washing programmes.
SELECT THE DESIRED OPTION BY
MEANS OF BUTTONS 2, 3 AND 4
Depending on the programme, different
functions can be combined. These must be
selected after choosing the desired pro-
gramme and before pressing the button
Start Pause.The relevant light will illumi-
nate.
h
8
Start
Pause
Zeit-
vorwahl
Marche
Pause
Extra
Spülen
Rinçage
Plus
Vor-
wäsche
Extra Court
Court
Pré-
lavage
Départ
Diéré
Kurz
Extra Kurz
If an incorrect option is selected, the corre-
sponding indicator lamp flashes for about 2
seconds. For the compatibility of the op-
tions with the washing programmes, refer
to the chapter «Washing programmes».
SELECT THE DELAY START BY
PRESSING BUTTON 6
Before you start the programme, if you wish
to delay the start, press the button 6 re-
peatedly, to select the desired delay. The
corresponding pilot light will light up.
Tür
Porte
Ende
Fin
Waschen
2h
4h
h
8
Lavage
Zeit-
vorwahl
Départ
Diéré
electrolux 9

You must select this option after you have
set the programme and before you press
button Start Pause.
You can cancel or modify the delay time at
any moment, before you press button Start
Pause.
Cancelling the delayed start after having
pressed button Start Pause :
1. Set the washing machine to PAUSE by
pressing button Start Pause.
2. Press the button 6 repeatedly until the
light relevant to the selected delay goes
off.
3. Press button Start Pause again to
start the programme.
Important! The selected delay can be
changed only after selecting the washing
programme again.
The door will be locked throughout the de-
lay time (door locked light lit).
The Delay Start can not be selected with
DRAIN or SPIN programme.
START THE PROGRAMME BY
PRESSING BUTTON 5
To start the selected programme, press this
button; the corresponding pilot light stops
flashing and remains lit.
On programme progress display the pilot
lights "Washing" and "Door" illuminate to in-
dicate that the appliance starts operating
and the door is locked.
ALTERING AN OPTION OR A RUNNING
PROGRAMME
It is possible to change any option before
the programme carries it out.
Before you make any change, you must
pause the washing machine by pressing the
button Start/Pause.
The programme can be changed as long as
the button Start/Pause has not been
pressed. Changing a running programme is
possible only by resetting it. Turn the pro-
gramme selector dial to "Aus/Arrêt" and
then to the new programme position. Start
the new programme by pressing the button
Start/Pause again.
INTERRUPTING A PROGRAMME
Press the button Start\Pause to interrupt a
programme which is running, the corre-
sponding light starts to flash. Press the but-
ton again to restart the programme.
CANCELLING A PROGRAMME
Turn the selector dial to "Aus/Arrêt" posi-
tion to cancel a programme which is run-
ning. Now you can select a new pro-
gramme.
OPENING THE DOOR AFTER THE
PROGRAMME HAS STARTED
First set the machine to pause by pressing
the button Start\Pause.
After some minutes, the door can be
opened, when the following conditions are
observed:
• The water temperature is below 55°C.
• The water level is below the bottom edge
of the door.
• The machine doesn’t spin.
If you cannot open the door but it is abso-
lutely necessary to open it you have to
switch the machine off by turning the selec-
tor dial to "Aus/Arrêt". After few minutes
the door can be opened
(Pay attention to the water level and
temperature!).
After this procedure, it will be necessary to
set the programme and the options again
and then press the button Start\Pause.
AT THE END OF THE PROGRAMME
The machine stops automatically.
The pilot light " End" illuminates to indicate
that the programme has finished. The pilot
light "Door" goes out, the door can be
opened and the laundry can be removed.
If at the end of a programme there is water
in the tub (when the Rinse Hold option has
been selected), to empty out the water
follow the following instructions:
• turn the programme selector dial to
"Aus/Arrêt"
• select the «Drain» or «Spin» programme
•press the "Start" button
When the pilot light "Door" goes out, the
door can be opened and the laundry can
be removed.
At the end of the cycle, turn the programme
selector dial to "Aus/Arrêt" to switch the
machine off.
Remove the laundry from the drum and
carefully check that the drum is empty. If
10 electrolux

you do not intend to carry out another
wash, close the water tap.
Leave the door open to prevent the forma-
tion of mildew and unpleasant smells.
HELPFUL HINTS AND TIPS
SORTING OUT THE LAUNDRY
Follow the wash code symbols on each
garment label and the manufacturer’s
washing instructions. Sort the laundry as
follows: whites, coloureds, synthetics, deli-
cates, woollens.
TEMPERATURES
95° or 90°
for normally soiled white cot-
tons and linen (e.g. tea cloths,
towels, tablecloths, sheets...)
60°/50°
for normally soiled, colour fast
garments (e.g. shirts, night
dresses, pyjamas....) in linen,
cotton or synthetic fibres and
for lightly soiled white cotton
(e.g. underwear)
40°-30°-
Cold
for delicate items (e.g. net cur-
tains), mixed laundry including
synthetic fibres and woollens
bearing the label «pure new
wool, machine washable, non-
shrink»
BEFORE LOADING THE LAUNDRY
Never wash whites and coloureds together.
Whites may lose their «whiteness» in the
wash.
New coloured items may run in the first
wash; they should therefore be washed
separately the first time.
Make sure that no metal objects are
left in the laundry (e.g. hair clips, safety
pins, pins).
Button up pillowcases, close zip fasteners,
hooks and poppers. Tie any belts or long
tapes.
Remove persistent stains before washing.
Rub particularly soiled areas with a special
detergent or detergent paste.
Treat curtains with special care. Remove
hooks or tie them up in a bag or net.
LAUNDRY WEIGHTS
The following weights are indicative:
The following weights are indicative:
bathrobe 1200 g
The following weights are indicative:
quilt cover 700 g
man’s work shirt 600 g
sheet, man’s pyjamas 500 g
tablecloth 250 g
pillow case, towelling towel,
night dress, man’s shirt
200 g
tea cloth, ladies’ briefs, nap-
kin, blouse, men’s under-
pants
100 g
DETERGENTS AND ADDITIVES
Good washing results also depend on the
choice of detergent and use of the correct
quantities to avoid waste and protect the
environment.
Although biodegradable, detergents contain
substances which, in large quantities, can
upset the delicate balance of nature.
The choice of detergent will depend on the
type of fabric (delicates, woollens, cottons,
etc.), the colour, washing temperature and
degree of soiling.
All commonly available washing machine
detergents may be used in this appliance:
• powder detergents for all types of fabric
• powder detergents for delicate fabrics
(60°C max) and woollens
• liquid detergents, preferably for low tem-
perature wash programmes (60°C max)
for all types of fabric, or special for wool-
lens only.
The detergent and any additives must be
placed in the appropriate compartments of
the dispenser drawer before starting the
wash programme.
Prewash detergent is to be added
straight into the drum
If using liquid detergents, a programme
without prewash must be selected. Pour
the liquid detergent into the detergent com-
partment immediately before you start the
programme.
electrolux 11

Your appliance incorporates a recirculation
system which allows an optimal use of the
concentrated detergent.
Follow the product manufacturer’s recom-
mendations on quantities to use and do
not exceed the «MAX» mark in the de-
tergent dispenser drawer.
DEGREES OF WATER HARDNESS
Water hardness is classified in so-called
“degrees” of hardness. Information on hard-
ness of the water in your area can be ob-
tained from the relevant water supply com-
pany, or from your local authority. If the wa-
ter hardness degree is medium or high we
suggest you to add a water softener follow-
ing always the manufacturer’s instructions.
When the degree of hardness is soft, read-
just the quantity of the detergent.
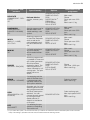
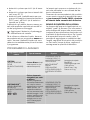
WASHING PROGRAMMES
Programme/ Tem-
perature
Type of laundry Options
Description of the
programme
COTTON
(KOCH-/BUNTWÄ-
SCHE
BLANC/COULEURS)
90°
White cotton (heavily
and normally soiled
cotton items)
SPIN REDUCTION/
RINSE HOLD/NO
SPIN
SUPER QUICK
1)
QUICK
PREWASH
EXTRA RINSE
DELAY START
Main wash
Rinses
Long spin max. 1000
rpm
Max load 3 kg
Red. load 2 kg
COTTON ECO
2)
(KOCH-/BUNTWÄ-
SCHE ECO
BLANC/COULEURS
ECO)
and
White cotton econo-
my
(This programme can
be selected for slightly
or normally soiled cot-
ton items. The temper-
ature will decrease and
the washing time will
be extended. This al-
lows to obtain a good
washing efficiency so
saving energy.)
SPIN REDUCTION/
RINSE HOLD/NO
SPIN
PREWASH
EXTRA RINSE
DELAY START
Main wash
Rinses
Long spin max. 1000
rpm
Max load 3 kg
COTTON
(KOCH-/BUNTWÄ-
SCHE
BLANC/COULEURS)
60° - 30°
Coloured cotton
(heavily and normally
soiled cotton items)
SPIN REDUCTION/
RINSE HOLD/NO
SPIN
SUPER QUICK
1)
QUICK
PREWASH
EXTRA RINSE
DELAY START
Main wash
Rinses
Long spin max. 1000
rpm
Max load 3 kg
Red. load 2 kg
SYNTHETIC
(PFLEGELEICHT -
SYNTHÉTIQUE)
40°-30°
Synthetic or mixed
fabrics: underwear,
coloured garments,
non-shrink shirts, blou-
ses.
SPIN REDUCTION/
RINSE HOLD/NO
SPIN
SUPER QUICK
1)
QUICK
PREWASH
EXTRA RINSE
DELAY START
Main wash
Rinses
Short spin max. 800
rpm
Max Load 1,5 kg
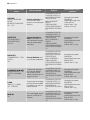
12 electrolux

Programme/ Tem-
perature
Type of laundry Options
Description of the
programme
DELICATE
(FEINWÄSCHE - DÉLI-
CATS)
40°
Delicate fabrics:
acrylics, viscose, poly-
ester.
SPIN REDUCTION/
RINSE HOLD/NO
SPIN
SUPER QUICK
1)
PREWASH
EXTRA RINSE
DELAY START
Main wash
Rinses
Short spin max. 600
rpm
Max Load 1,5 kg
HANDWASH
(HANDWÄSCHE -
LAVAGE À LA MAIN)
30°
Special programme for
delicate fabrics with
«hand washing» care
symbol.
SPIN REDUCTION/
RINSE HOLD/NO
SPIN
DELAY START
Main wash
Rinses
Short spin max. 800
rpm
Max Load 1 kg
WOOL
(WOLLE – LAINE)
40°-COLD
Washing programme
for machine washable
wool as well as for
hand washable wool-
lens and delicate fab-
rics.
SPIN REDUCTION/
RINSE HOLD/NO
SPIN
DELAY START
Main wash
Rinses
Short spin max. 800
rpm
Max Load 1 kg
MINI 30
30°
For lightly soiled laun-
dry or for laundry
which needs freshen-
ing up.
SPIN REDUCTION/
RINSE HOLD/NO
SPIN
DELAY START
Main wash
Rinses
Short spin max. 600
rpm
Max Load 1,5 kg
RINSES
(SPÜLEN - RINÇAGE)
With this programme it
is possible to rinse and
spin cotton garments
which have been
washed by hand. The
machine performs 3
rinses, followed by a fi-
nal long spin. The spin
speed can be re-
duced.
SPIN REDUCTION/
RINSE HOLD/NO
SPIN
EXTRA RINSE
DELAY START
Rinses
Spin max. 1000 rpm
Max Load 3 kg
DRAIN
(PUMPEN - VIDANGE)
For emptying out the
water of the last rinse
in programmes with
the Rinse Hold or No
Spin option selected.
Draining of water
Max Load 3 kg
SPIN
(SCHLEUDERN - ES-
SORAGE)
Separate spin for hand
washed garments and
after programmes with
the Rinse Hold option
selected. You can
choose the spin speed
by turning the spin
speed selector to
adapt it to the fabrics
to be spun.
SPIN REDUCTION
Drain and long spin
Max. spin speed 1000
rpm
Max Load 3 kg
OFF
AUS/ARRÊT
For resetting the pro-
gramme or switching
the machine off
1) If you select this option, we recommend that you reduce the maximum load as indicated. (Red. load= reduced
load). Full loading is possible however with somewhat reduced cleaning results.
electrolux 13

2) Standard programmes for the Energy Label consumption values.
According to regulation 1061/2010, these programmes are respectively the «Standard 60 °C cotton programme»
and the «Standard 40 °C cotton programme». They are the most efficient programmes in terms of combined
energy and water consumptions for washing normally soiled cotton laundry.
The water temperature of the washing phase may differ from the temperature declared for the selected pro-
gramme.
CARE AND CLEANING
Important! You must DISCONNECT the
appliance from the electricity supply, before
you can carry out any cleaning or
maintenance work.
DESCALING
The water we use normally contains lime. It
is a good idea to periodically use a water
softening powder in the machine. Do this
separately from any laundry washing, and
according to the softening powder manu-
facturer's instructions. This will help to pre-
vent the formation of lime deposits.
MAINTENANCE WASH
With the use of low temperature washes it
is possible to get a build up of residues in-
side the drum.
We recommend that a maintenance wash
be performed on a regular basis.
To run a maintenance wash:
• The drum should be empty of laundry.
• Select the hottest cotton wash pro-
gramme.
• Use a normal measure of detergent,
must be a powder with biological proper-
ties.
EXTERNAL CLEANING
Clean the exterior cabinet of the appliance
with soap and water only, and then dry
thoroughly.
CLEANING THE DISPENSER DRAWER
The washing powder and additive dispens-
er drawer should be cleaned regularly.
1. If necessary, the whole detergent draw-
er can be taken out of the machine for
cleaning. You need to pull it firmly out-
wards, so that it comes free of retaining
stop.
2. To remove the siphon at the inside
edge of the drawer for cleaning, you
need to press it inwards and pull it up-
wards at the same time. Flush it out un-
der a tap, to remove any traces of ac-
cumulated powder. When you put it
back, press it downwards until you
hear a distinct click.
14 electrolux

CLEANING THE DRAWER RECESS
Having removed the drawer, use a small
brush to clean the recess, ensuring that all
washing powder residue is removed from
the upper and lower part of the recess.
Replace the drawer and run the rinse pro-
gramme without any clothes in the drum.
CLEANING THE WATER INLET FILTER
If your water is very hard or contains traces
of lime deposit, the water inlet filter may be-
come clogged. It is therefore a good idea to
clean it from time to time.
Turn off the water tap. Unscrew the water
inlet hose. Clean the filter using a hard bris-
tle brush. Tighten up the inlet hose.
THE DANGERS OF FREEZING
If the machine is exposed to temperatures
below 0°C, certain precautions should be
taken.
• Turn off the water supply.
• Unscrew the inlet hose from the supply
tap.
• Select a wash programme, start the ma-
chine and let the programme run for a
short time.
• Interrupt the programme by turning the
programme selector to
position.
• Place the end of inlet and drain hoses
down low, into the waste gully (floor
drain) set into the floor. Make sure that
the end of the hose does not go below
the water level in the gully's (drain's) wa-
ter tap.
• Select the programme "Drain" and let it
run until it is finished.
•
Turn the programme selector to
posi-
tion. When you intend to start the ma-
chine up again, make sure that the room
temperature is above 0 °C.
The appliance is only to be used and stored
indoors at normal room temperature. The
manufacturer is not responsible for any
frost damage.
WHAT TO DO IF…
Certain problems are due to lack of simple
maintenance or oversights, which can be
solved easily without calling out an engi-
neer. Before contacting your local Service
Centre, please carry out the checks listed
below.
During machine operation it is possible that
the End pilot light blinks to indicate that the
machine is not working:
• 1 flash: problem with the water supply.
• 2 flashes: problem with the water drain-
ing.
• 4 flashes: door open.
Once the problem has been eliminated,
press the button START to restart the pro-
gramme. If after all checks, the problem
persists, contact your local Service Centre.
electrolux 15

Problem Possible cause/Solution
The machine does not start:
The door has not been closed.
• Close the door firmly.
The plug is not properly inserted in the power socket.
• Insert the plug into the power socket.
There is no power at the socket.
• Please check your domestic electrical installation.
The main fuse has blown.
• Replace the fuse.
The selector dial is not correctly positioned and the button Start
has not been pressed.
• Please turn the selector dial and press the button Start again.
The delay start has been selected.
• If the laundry are to be washed immediately, cancel the delay
start.
The machine does not fill:
The water tap is closed.
• Open the water tap.
The inlet hose is squashed or kinked.
• Check the inlet hose connection.
The filter in the inlet hose is blocked.
• Clean the water inlet hose filter.
The door is not properly closed.
• Close the door firmly.
The machine fills then emp-
ties immediately:
The end of the drain hose is too low.
• Refer to relevant paragraph in «Installation» chapter.
The machine does not
empty and/or does not
spin:
The drain hose is squashed or kinked.
• Check the drain hose connection.
An option or a programme that ends with the water still in the tub
or that eliminates all the spinning phases has been selected.
• Select the draining or spinning programme.
The laundry is not evenly distributed in the drum.
• Redistribute the laundry.
There is water on the floor:
Too much detergent or unsuitable detergent (creates too much
foam) has been used.
• Reduce the detergent quantity or use another one.
Check whether there are any leaks from one of the inlet hose fit-
tings. It is not always easy to see this as the water runs down the
hose; check to see if it is damp.
• Check the water inlet hose connection.
The drain or inlet hose is damaged.
• Change it with a new one.
Unsatisfactory washing re-
sults:
Too little detergent or unsuitable detergent has been used.
• Increase the detergent quantity or use another one.
Stubborn stains have not been treated prior to washing.
• Use commercial products to treat the stubborn stains.
The correct temperature was not selected.
• Check if you have selected the correct temperature.
Excessive laundry load.
• Reduce the laundry load.
The door will not open:
The programme is still running.
• Wait the end of washing cycle.
The door lock has not been released.
• Wait until the indicator light for door locked has gone out.
There is water in the drum.
• Select drain or spin programme to empty out the water.
16 electrolux

Problem Possible cause/Solution
The machine vibrates is
noisy:
The transit bolts and packing have not been removed.
• Check the correct installation of the appliance.
The support feet have not been adjusted
• Check the correct levelling of the appliance.
The laundry is not evenly distributed in the drum.
• Redistribute the laundry.
Maybe there is very little laundry in the drum.
• Load more laundry.
Spinning starts late or the
machine does not spin:
The electronic unbalance detection device has cut in because the
laundry is not evenly distributed in the drum. The laundry is redis-
tributed by reverse rotation of the drum. This may happen several
times before the unbalance disappears and normal spinning can
resume. If, after 10 minutes, the laundry is still not evenly distrib-
uted in the drum, the machine will not spin. In this case ,redistrib-
ute the load manually and select the spin programme.
• Redistribute the laundry.
The load is too small.
• Add more items, redistribute the load manually and then select
the spinning programme.
No water is visible in the
drum:
Machines based on modern technology operate very economically
using very little water without affecting performance.
If you are unable to identify or solve the
problem, contact our service centre. Before
telephoning, make a note of the model, se-
rial number and purchase date of your ma-
chine: the Service Centre will require this in-
formation.
Mod. ... ... ...
Prod. No. ... ... ...
Ser. No. ... ... ...
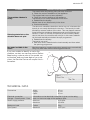
TECHNICAL DATA
Dimensions Width
Height
Depth
50 cm
67 cm
55 cm
Electrical connection
Voltage - Overall power - Fuse
Information on the electrical connection is given on the rating
plate, on the inner edge of the appliance door.
Water supply pressure Minimum
Maximum
0,05 MPa
0,8 MPa
Maximum Load Cotton 3 kg
Spin Speed Maximum 1000 rpm
electrolux 17

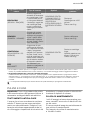
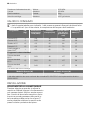
CONSUMPTION VALUES
The data of this table are approximate. Different causes can change the data: the
quantity and type of laundry, the water and ambient temperature.
Programmes Load
(kg)
Energy con-
sumption
(kWh)
Water con-
sumption (li-
tre)
Approximate
programme
duration (mi-
nutes)
Remaining
moisture
(%)
1)
Cottons 60 °C 3 0.9 45 120 60
Cottons 40 °C 3 0.45 45 110 60
Synthetics 40 °C 1,5 0.5 50 80 37
Delicates 40 °C 1,5 0.5 52 70 37
Wool/Hand wash
30 °C
1 0.3 60 75 32
Standard cotton programmes
Standard 60 °C
cotton
3 0.59 42 127 60
Standard 60 °C
cotton
1,5 0.54 38 127 60
Standard 40 °C
cotton
1,5 0.49 38 137 60
1) At the end of spin phase.
Off Mode (W) Left On Mode (W)
0.10 0.98
The information given in the charts above are in compliance with the EU Commission regulation
2015/2010 implementing directive 2009/125/EC.
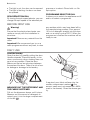
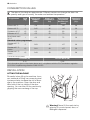
INSTALLATION
LIFTING THE MACHINE
Be careful when lifting the machine. Incor-
rect methods of lifting can cause physical
injuries and also increase the risk of dam-
age to the machine. Open the door and
take hold of the top inside of the door
opening. You can also lift the machine by
gripping the rear overhang of the top.
Warning! Never lift the machine by
gripping it’s control panel, door, or
detergent dispenser.
18 electrolux

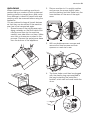
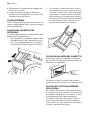
UNPACKING
When supplied the washing machine is
packed using a number of locking devices/
packing pieces to prevent drum and motor
from damage in transit All transit bolts and
packing must be removed before using the
appliance.
You are advised to keep all transit devices
so that they can be refitted if the machine
ever has to be transported again.
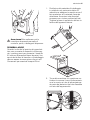
1. Spread some of the polystyrene pack-
aging materials on the floor behind the
machine and then lay the machine
carefully rear side down on them. Make
sure that no hoses are crushed in the
process. Remove the polystyrene base
from the bottom of the appliance.
2. Return machine to it's upright position
and remove the power supply cable
and the draining and inlet hose from the
hose holders on the rear of the appli-
ance.
3. With a suitable spanner unscrew and
remove the three screws and their
spacers on machine's rear.
4. The three holes must then be plugged
with the plastic plug caps supplied in
the bag containing the instruction
booklet, which can be found inside the
drum.
electrolux 19

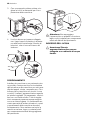
POSITIONING
Install the machine on a flat hard floor.
Make sure that air circulation around the
machine is not impeded by carpets, rugs
etc. Check that the machine does not
touch the wall or furniture. Level the wash-
ing machine by raising or lowering the two
front feet. If necessary, check the setting
with a spirit level. Any necessary adjustment
can be made with a spanner. Accurate lev-
elling prevents vibration, noise and dis-
placement of the machine during operation.
Caution! Never place cardboard,
wood or similar materials under the
machine to compensate for any
unevenness in the floor.
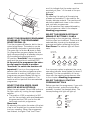
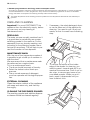
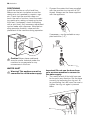
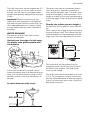
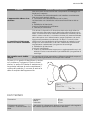
WATER INLET
Warning! This appliance must be
connected to a cold water supply.
1. Connect the water inlet hose supplied
with the machine to a tap with a 3/4"
thread. Always use the hose supplied
with the appliance.
If necessary, use the suitable or sup-
plied restrictor (1/2”).
Important! Do not use the hose from
your previous machine to connect to
the water supply.
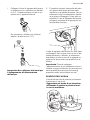
2. The machine end of the inlet hose can
be turned in any direction. Set the hose
correctly by loosening the ring nut. Af-
ter positioning the inlet hose, be sure to
tighten the ring nut again to prevent
leaks.
20 electrolux
La pagina si sta caricando...
La pagina si sta caricando...
La pagina si sta caricando...
La pagina si sta caricando...
La pagina si sta caricando...
La pagina si sta caricando...
La pagina si sta caricando...
La pagina si sta caricando...
La pagina si sta caricando...
La pagina si sta caricando...
La pagina si sta caricando...
La pagina si sta caricando...
La pagina si sta caricando...
La pagina si sta caricando...
La pagina si sta caricando...
La pagina si sta caricando...
La pagina si sta caricando...
La pagina si sta caricando...
La pagina si sta caricando...
La pagina si sta caricando...
La pagina si sta caricando...
La pagina si sta caricando...
La pagina si sta caricando...
La pagina si sta caricando...
La pagina si sta caricando...
La pagina si sta caricando...
La pagina si sta caricando...
La pagina si sta caricando...
-
 1
1
-
 2
2
-
 3
3
-
 4
4
-
 5
5
-
 6
6
-
 7
7
-
 8
8
-
 9
9
-
 10
10
-
 11
11
-
 12
12
-
 13
13
-
 14
14
-
 15
15
-
 16
16
-
 17
17
-
 18
18
-
 19
19
-
 20
20
-
 21
21
-
 22
22
-
 23
23
-
 24
24
-
 25
25
-
 26
26
-
 27
27
-
 28
28
-
 29
29
-
 30
30
-
 31
31
-
 32
32
-
 33
33
-
 34
34
-
 35
35
-
 36
36
-
 37
37
-
 38
38
-
 39
39
-
 40
40
-
 41
41
-
 42
42
-
 43
43
-
 44
44
-
 45
45
-
 46
46
-
 47
47
-
 48
48


Electrolux EWC1050 Manuale utente
- Categoria
- Lavatrici
- Tipo
- Manuale utente
in altre lingue
- English: Electrolux EWC1050 User manual

