KitchenAid 5KCM0802 Manuale utente
- Categoria
- Macchine da caffè
- Tipo
- Manuale utente

5KCM0802
W10675728B_01_EN_v02.indd 1 11/13/14 10:37 AM

W10675728B_01_EN_v02.indd 2 11/13/14 10:37 AM

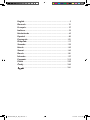
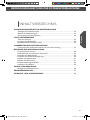
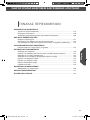
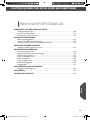
English ................................................................................5
Deutsch ............................................................................21
Français ............................................................................37
Italiano ..............................................................................53
Nederlands ......................................................................69
Español .............................................................................85
Português .......................................................................101
Ελληνικά .........................................................................117
Svenska ..........................................................................133
Norsk ..............................................................................149
Suomi ..............................................................................165
Dansk ..............................................................................181
Íslenska ...........................................................................197
Русский ..........................................................................213
Polski ...............................................................................229
Český ..............................................................................245
.............................................................................261
W10675728B_01_EN_v02.indd 3 11/13/14 10:37 AM

CMD + SHIFT CLICK TO CHANGE COPYPOUR OVER COFFEE BREWER INSTRUCTIONS
W10675728B_01_EN_v02.indd 4 11/13/14 10:37 AM

CMD + SHIFT CLICK TO CHANGE COPY
English
5
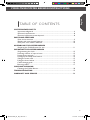
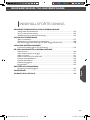
POUR OVER COFFEE BREWER INSTRUCTIONS
COFFEE BREWER SAFETY
Important safeguards .........................................................................................6
Electrical requirements .....................................................................................8
Electrical equipment waste disposal ..................................................................8
PARTS AND FEATURES
Parts and accessories .........................................................................................9
Display and control panel features ..................................................................10
How pour over coffee is different ...................................................................10
ASSEMBLING THE COFFEE BREWER
Preparing the Coffee Brewer for use ..............................................................11
OPERATING THE COFFEE BREWER
Programming the clock ...................................................................................12
Selecting number of cups to brew ...................................................................13
Setting brew strength ......................................................................................13
Setting up the Delay start feature ....................................................................14
Filling the water tank .......................................................................................15
Filling the brew basket ....................................................................................15
Coffee dosage guide ........................................................................................16
Brewing coffee ................................................................................................17
CARE AND CLEANING
Cleaning the Coffee Brewer ............................................................................18
TROUBLESHOOTING ........................................................................................19
WARRANTY AND SERVICE ..............................................................................20
TABLE OF CONTENTS
W10675728B_01_EN_v02.indd 5 11/13/14 10:37 AM

CMD + SHIFT CLICK TO CHANGE COPY
6
COFFEE BREWER SAFETY COFFEE BREWER SAFETY
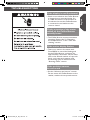
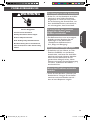
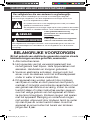
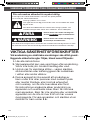
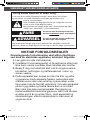
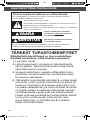
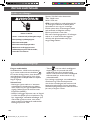
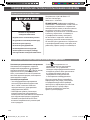
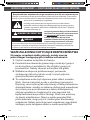
IMPORTANT SAFEGUARDS
When using electrical appliances, basic safety
precautions should always be followed, including
the following:
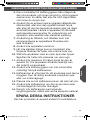
1. Read all instructions.
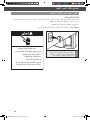
2. The heating element surface is subject to residual
heat after use. Do not touch hot surfaces. Use
handles or knobs.
3. To protect against electrical shock, do not immerse
cord, plugs, or Coffee Brewer in water or other liquid.
4. This appliance can be used by children aged from 8
years and above, and persons with reduced physical,
sensory or mental capabilities or lack of experience
and knowledge if they have been given supervision or
instruction concerning use of the appliance in a safe
way and understand the hazards involved. Children
shall not play with the appliance. Cleaning and user
maintenance shall not be made by children unless
they are older than 8 years and are supervised. Keep
the appliance and its cord out of reach of children
aged less than 8 years.
W10675728B_01_EN_v02.indd 6 11/13/14 10:37 AM

CMD + SHIFT CLICK TO CHANGE COPY
English
7
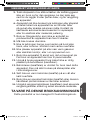
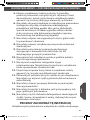
COFFEE BREWER SAFETY COFFEE BREWER SAFETY
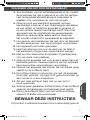
5. Unplug Coffee Brewer from outlet when not in use
and before cleaning. Allow to cool before putting on
or taking off parts, and before cleaning the appliance
6. Do not operate any appliance with a damaged cord
or plug or after the appliance malfunctions or has
been damaged in any manner. Return appliance
to the nearest Authorized Service Facility for
examination, repair or adjustment.
7. The use of accessory attachments not recommended
by the appliance manufacturer may cause injuries.
8. Do not use outdoors.
9. Do not let cord hang over edge of table or counter,
or touch hot surfaces.
10. Do not place on or near a hot gas or electric burner,
or in a heated oven.
11. Do not use appliance for other than intended use.
Misuse of the appliance may result in personal injury.
12. Do not use appliance without lid properly placed on
container (carafe).
13. The container (carafe) is designed for use with this
appliance. It must never be used on a range top or in
a microwave oven.
14. Do not set a hot container (carafe) on a wet or cold
surface.
15. Do not use a cracked container (carafe) or a container
having a loose or weakened handle.
16. Do not clean container (carafe) with abrasive
cleaners, steel wool pads, or other abrasive material.
SAVE THESE INSTRUCTIONS
This product is designed for household use only.
W10675728B_01_EN_v02.indd 7 11/13/14 10:37 AM

8
PARTS AND FEATURESCOFFEE BREWER SAFETY
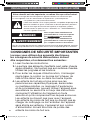
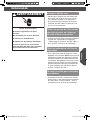
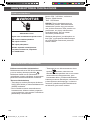
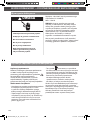
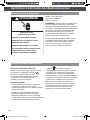
Voltage: 220-240 VAC
Frequency: 50/60 Hz
Wattage: 1250 Watts
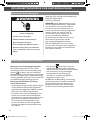
NOTE: This Coffee Brewer has a grounded
plug. To reduce the risk of electrical shock,
this plug will fit in an outlet only one way. If
the plug does not fit in the outlet, contact a
qualified electrician. Do not modify the plug
in any way.
Do not use an extension cord. If the power
supply cord is too short, have a qualified
electrician or serviceman install an outlet
near the appliance.
Electrical requirements
Electrical equipment waste disposal
Disposal of packing material
The packing material is 100% recyclable
and is marked with the recycle symbol .
The various parts of the packing must
therefore be disposed of responsibly
and in full compliance with local authority
regulations governing waste disposal.
Scrapping the product
- This appliance is marked in compliance
with European Directive 2012/19/EU, Waste
Electrical and Electronic Equipment (WEEE).
- By ensuring this product is disposed of
correctly, you will help prevent potential
negative consequences for the environment
and human health, which could otherwise
be caused by inappropriate waste handling
of this product.
- The symbol
on the product or on the
accompanying documentation indicates
that it should not be treated as domestic
waste but must be taken to an appropriate
collection centre for the recycling of
electrical and electronic equipment.
For more detailed information about
treatment, recovery and recycling of this
product, please contact your local city ofce,
your household waste disposal service or the
shop where you purchased the product.
W10675728B_01_EN_v02.indd 8 11/13/14 10:37 AM

English
9
PARTS AND FEATURESCOFFEE BREWER SAFETY
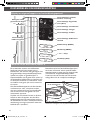
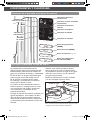
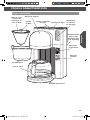
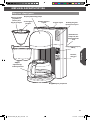
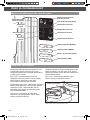
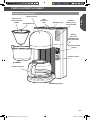
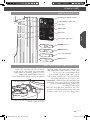
Cup/Water
tank view
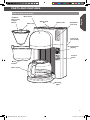
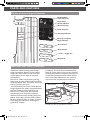
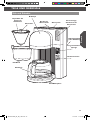
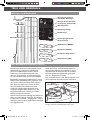
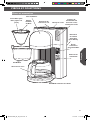
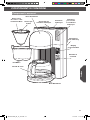
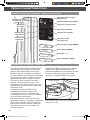
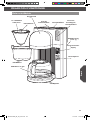
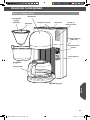
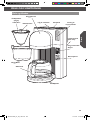
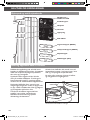
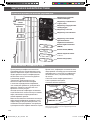
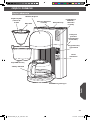
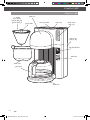
Parts and accessories
Glass carafe
Brew
basket
#4 Paper
lter (cone)
in Filter
basket
Control
panel
Warming
plate
Programmable
display
Brew head
Water tank
lid
Water tank
Cord wrap
(not shown)
Filter clip
W10675728B_01_EN_v02.indd 9 11/13/14 10:37 AM

CMD + SHIFT CLICK TO CHANGE COPY
10
PARTS AND FEATURES
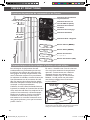
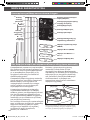
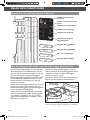
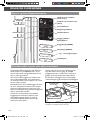
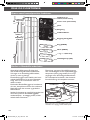
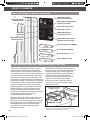
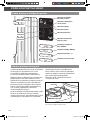
Display and control panel features
Brew button
“- and +” toggle bar
Menu button
Set button
Cup selection
indicator
Clock display
Warm indicator
Clean indicator
Medium/Dark
roast indicators
Steeping indicator
Heating
indicator
Pouring
indicator
Brewing complete/
Enjoy indicator
Delay Start
(Auto) indicator
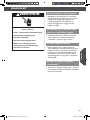
How pour over coffee is different
Traditional coffee brewing often doesn’t
bring out the best avour of your coffee
beans. We often settle for the usual drip
coffee maker for the sake of time and
convenience.
Pour Over coffee is brewed by pouring
water over ground coffee beans to extract
excellent avour. But, we usually don’t have
time to perform the ritual.
The KitchenAid Pour Over Coffee Brewer
brings together the clean, complex avours
that are created with a traditional cup
of pour over coffee with the ease and
convenience of an automatic machine.
Instead of continuously ooding the brew
basket with water, the Pour Over Coffee
Brewer pulses the ow of water, precisely
controlling the extraction, allowing the
grounds to “bloom.”
In addition, the Pour Over Coffee Brewer
heats all of the water at once to the optimal
brewing temperature instead of one drop at
a time like conventional drip coffee makers.
You’ll notice the difference in the caramel
colour and the complex layers of avour.
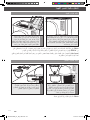
This gear inside your Pour Over Coffee Brewer precisely
controls water ow, for ideal avour extraction.
Precise water
ow control
ASSEMBLING THE COFFEE BREWER
W10675728B_01_EN_v02.indd 10 11/13/14 10:37 AM

CMD + SHIFT CLICK TO CHANGE COPY
English
11
PARTS AND FEATURES ASSEMBLING THE COFFEE BREWER
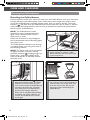
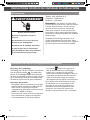
Before rst use
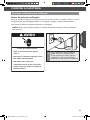
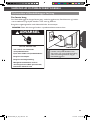
Before using your Coffee Brewer for the first time, wash the brew basket, filter clip,
and carafe in hot, soapy water, then rinse with clean water and dry.
Do not use abrasive cleaners or scouring pads.
NOTE: These parts can also be washed in the top rack of the dishwasher.
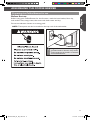
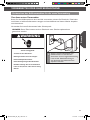
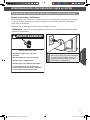
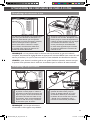
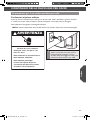
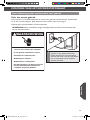
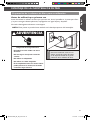
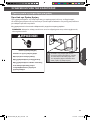
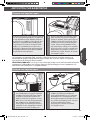
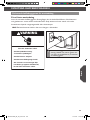
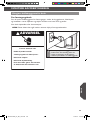
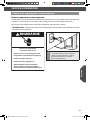
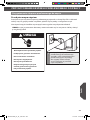
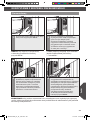
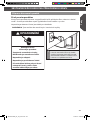
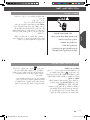
Preparing the Coffee Brewer for use
1
Plug the Coffee Brewer into a 3-prong
grounded outlet. If desired, wrap excess
cord around the cord holder on the back
of the Coffee Brewer.
W10675728B_01_EN_v02.indd 11 11/13/14 10:37 AM

CMD + SHIFT CLICK TO CHANGE COPY CMD + SHIFT CLICK TO CHANGE COPY
12
OPERATING THE COFFEE BREWER
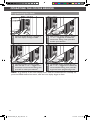
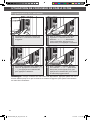
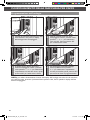
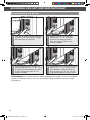
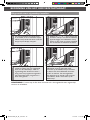
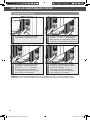
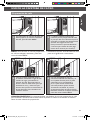
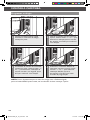
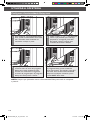
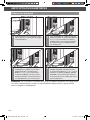
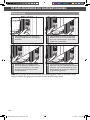
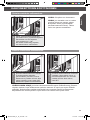
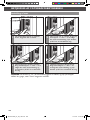
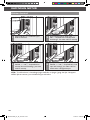
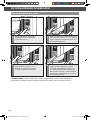
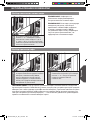
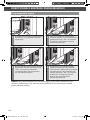
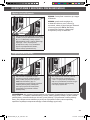
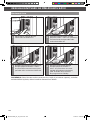
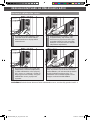
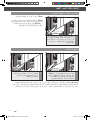
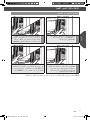
Programming the clock
2
With the hour display flashing, use the
“+” or “-” toggle bar to choose the
correct hour setting. Then press SET
to make your selection.
1
When the Coffee Brewer is plugged in,
the clock display will begin to flash.
3
The minute display will start to flash
next. Use the “+” or “-” toggle bar to
choose the correct minute setting, then
press SET to make your selection.
4
The AM/PM display will flash last. Use
the “+” or “-” toggle bar to choose the
correct AM/PM setting, then press SET
to go back to the programming menu.
NOTE: To go directly to the clock display menu, when the Coffee Brewer is already on,
press the MENU button four times, until the hour display begins to flash.
OPERATING THE COFFEE BREWER
W10675728B_01_EN_v02.indd 12 11/13/14 10:37 AM

CMD + SHIFT CLICK TO CHANGE COPY CMD + SHIFT CLICK TO CHANGE COPY
English
13
OPERATING THE COFFEE BREWER OPERATING THE COFFEE BREWER
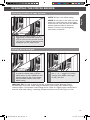
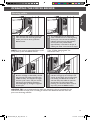
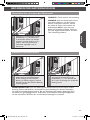
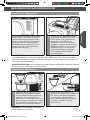
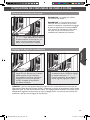
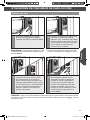
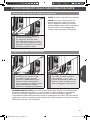
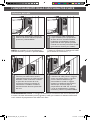
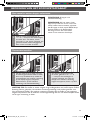
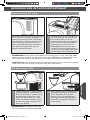
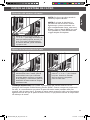
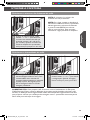
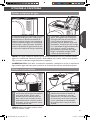
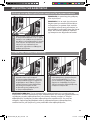
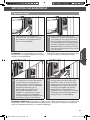
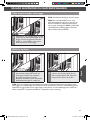
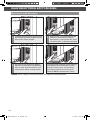
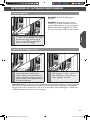
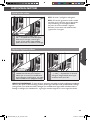
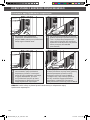
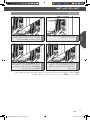
Setting brew strength
1
To set the machine to brew a light
or medium roasted coffee, press the
MENU button until the MEDIUM roast
indicator begins to flash on the display,
then press SET. Medium roast is the
default setting.
2
To choose a dark roasted coffee, use
the “+” or “-” toggle bar to switch
settings. When DARK roast begins
to flash, push SET.
HELPFUL TIP: In order to brew according to European Coffee Brewing Centre
fundamentals, brew your coffee using the medium roast setting (also ideal for light
roasted coffee). The Medium roast setting brews coffee at a slightly higher temperature
than the dark roast setting - extracting exceptional flavour out of each type of roast.
Selecting number of cups to brew
1
From the main menu, use the “+” or “-”
toggle button to choose the number of
cups you want to brew, between 2 and 8
(.15L per cup). When the desired number
is displayed, you are ready to brew.
NOTE: 8 Cups is the default setting.
NOTE: If the water in the tank has been
sitting for a while and you wish to start
fresh, select 8 cups and press the BREW
button (without coffee in the brew
basket). This will cycle through any
stale water in the tank.
W10675728B_01_EN_v02.indd 13 11/13/14 10:37 AM

CMD + SHIFT CLICK TO CHANGE COPY CMD + SHIFT CLICK TO CHANGE COPY
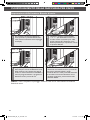
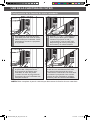
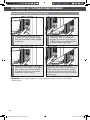
14
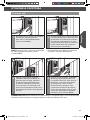
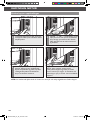
OPERATING THE COFFEE BREWER
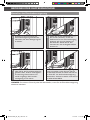
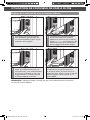
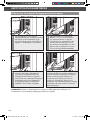
3
After pressing SET to choose AM or PM
for your Delay start brew time, 2 beeps
will sound and you will be returned to
the programming menu. The Delay start
program is ready to use.
You can use the same Delay start brew time
again by pressing the MENU button twice,
then pressing SET three times before brewing.
To cancel the Delay start feature at any time,
press the BREW button two times.
NOTE: You must complete step 4 each time you wish to enable the Delay start feature.
Setting up the Delay start feature
2
Use the “+” or “-” toggle bar to choose
the hour you want the Coffee Brewer to
begin brewing, then press SET. Then, do
the same to set the minutes and AM/PM.
1
To set up the Delay start feature, press
the MENU button twice, until the Auto
indicator is flashing on the display.
OPERATING THE COFFEE BREWER
W10675728B_01_EN_v02.indd 14 11/13/14 10:37 AM

CMD + SHIFT CLICK TO CHANGE COPY CMD + SHIFT CLICK TO CHANGE COPY
English
15
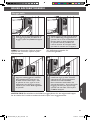
OPERATING THE COFFEE BREWER OPERATING THE COFFEE BREWER
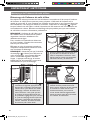
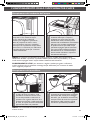
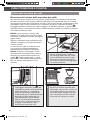
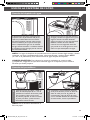
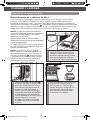
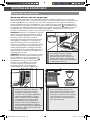
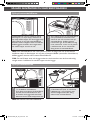
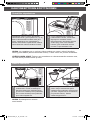
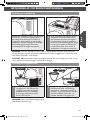
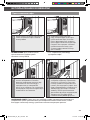
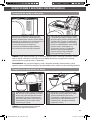
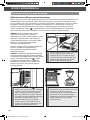
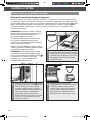
Filling the water tank
The water tank holds between 2 and 8 cups
of water (.15L each) for brewing. Since you
are able to select the number of cups you’d
like to brew each time, you do not have to
fill the water tank with the exact amount of
water you need. The Coffee Maker will use
the correct amount of water for the number
of cups you select.
1
Slide the water tank lid back, and fill
the water tank with fresh, cool water to
the desired cup level as indicated on the
water tank view. Because of the design
of this Coffee Brewer, it may take a
moment for the water to enter the place
in the tank where you can view the
water level. Close the water tank lid.
NOTE: If the water in the tank has been sitting for a while and you wish to start fresh,
select 8 cups and press the BREW button (without coffee in the brew basket). This will
cycle through any stale water in the tank.
HELPFUL TIP: For best taste and brewing results, make sure you have enough water in
the tank for the number of cups you want to brew.
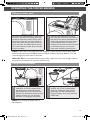
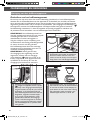
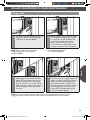
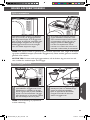
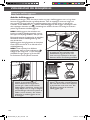
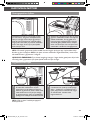
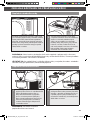
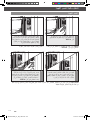
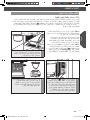
Filling the brew basket
2
Using the dosage recommendation on
the filter clip (or see “Coffee dosage
guide” for conversion chart), fill the
paper filter with the desired amount
of ground coffee. Then, close the brew
basket door.
1
Lift the filter clip and place a #4 paper
coffee filter in the brew basket. Press
the paper filter in to the sides of the
brew basket and clip it into place with
the filter clip. Should you prefer to brew
without the filter clip, you can easily
remove it by snapping it out of place.
NOTE: Pre-wetting the paper filter is
not required.
W10675728B_01_EN_v02.indd 15 11/13/14 10:37 AM

CMD + SHIFT CLICK TO CHANGE COPY CMD + SHIFT CLICK TO CHANGE COPY
16
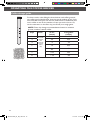
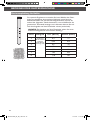
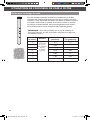
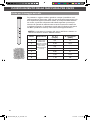
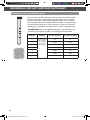
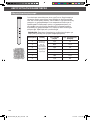
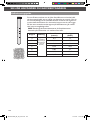
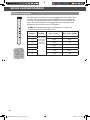
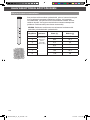
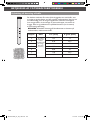
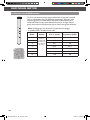
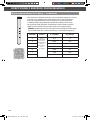
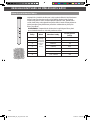
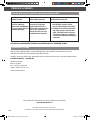
Coffee dosage guide
Cups Grind # of L
(water)
# of grams
(coffee)
2
Slightly
ner than
medium
(see
example
of grind
size at
left)
.3
17
3
.44
25.5
4
.6
34
5
.74
42.5
6
.89
51
7
1.03
59.5
8
1.18
68
For best results, when lling the brew basket with coffee grounds,
use coffee ground slightly ner than the typical medium grind. If you
have a kitchen scale, you can use the chart below to determine how
much coffee to use for the number of cups you wish to brew. Or,
use the indicators on the lter clip (see at left) as a rough guide.
OPERATING THE COFFEE BREWER
NOTE: Filter clip dosage recommendations based on medium
ground, medium roasted coffee.
8
6
4
2
OPERATING THE COFFEE BREWER
W10675728B_01_EN_v02.indd 16 11/13/14 10:37 AM

CMD + SHIFT CLICK TO CHANGE COPY CMD + SHIFT CLICK TO CHANGE COPY
English
17
OPERATING THE COFFEE BREWER OPERATING THE COFFEE BREWER
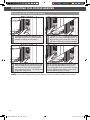
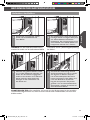
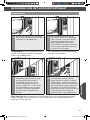
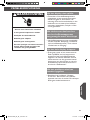
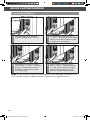
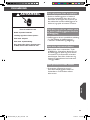
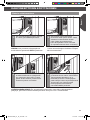
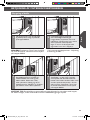
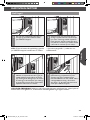
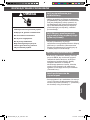
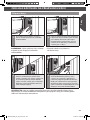
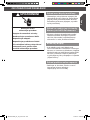
Brewing coffee
2
The Coffee Brewer will heat all the
water needed to brew at the beginning
of the cycle. You will see the Heating
indicator light up during this segment
of the cycle. This process takes
approximately 6 minutes for 8 cups of
coffee (just under 2 minutes for 2 cups)*.
1
After selecting the number of cups you
want to brew, and the strength of the
coffee you want to brew, press the
BREW button.
3
After all the water is heated, the Coffee
Brewer will begin to alternately shower
the grounds with water, and allow the
coffee to steep. This happens in stages
until the cycle is over, and you will see
the Pouring and Steeping indicators
alternately light up during this segment
of the cycle.
4
When the cycle is complete, the Enjoy
indicator will light up and 3 beeps will
sound. At this stage, the warming plate
has already pre-heated the carafe. It
will then keep the coffee at optimum
temperature for 30 minutes after
brewing. To cancel the Warm cycle at
any time, press the BREW button.
NOTE: If you wish to cancel the Brew cycle
at any time, press the BREW button.
* See “Coffee dosage guide” for
conversion chart
HELPFUL TIP: It is recommended to allow the brewing cycle to complete for the
selected number of cups prior to tasting to extract the maximum avour from the
pour over brewing method.
W10675728B_01_EN_v02.indd 17 11/13/14 10:37 AM

CMD + SHIFT CLICK TO CHANGE COPY CMD + SHIFT CLICK TO CHANGE COPY
18
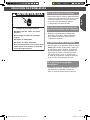
CARE AND CLEANING
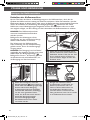
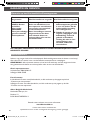
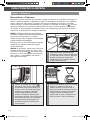
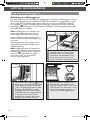
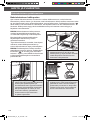
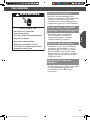
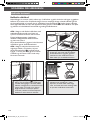
Cleaning the Coffee Brewer
Descaling the Coffee Brewer
Calcium deposits (scale) from water will build up in the Coffee Brewer over time and impair
brewing efficiency and coffee quality. If you notice that it takes longer than usual to brew,
or that the Coffee Brewer is making unusual noises, then it is time to descale. The Clean
indicator
( ) will flash when the Coffee Brewer has brewed 100 cups of coffee, or detects
scale buildup. Descaling should be done as soon as possible to preserve the performance
and life of your Coffee Brewer.
NOTE: The Coffee Brewer can be
descaled by using a packaged descaling
agent, which can be found at various
retail stores or online.
Follow the directions on the package for
the recommended ratios of descaling agent
and water to use.
The Coffee Brewer should be run through
a complete Clean cycle using a full tank of
the descaling solution.
NOTE: The Clean cycle can be completed
at regular intervals, if desired, without
the Clean indicator
( ) needing to light up.
Follow step 1, then press MENU three
times and nally SET to manually activate
the Clean cycle.
1
Before descaling, make sure the brew
basket contains no coffee or coffee
filters, and fill the tank with fresh water
to the 8 cup fill line.
2
When the Clean indicator ( ) begins to
flash: Press the SET button. The Clean
indicator will turn on while the cycle
runs. In Clean mode, the Coffee Brewer
will empty the water tank, no matter
how many Cups were selected from
previous cycle settings. When the
Clean cycle is complete (approximately
9 minutes), the “Clean” indicator will
turn off. The Coffee Brewer is ready
to use again.
3
Wash the brew basket, carafe, and filter
clip in the top rack of the dishwasher, or
wash by hand in hot, soapy water, then
rinse with warm water. Dry all parts
thoroughly before reassembling the
Coffee Brewer.
TROUBLESHOOTING
W10675728B_01_EN_v02.indd 18 11/13/14 10:37 AM

CMD + SHIFT CLICK TO CHANGE COPY CMD + SHIFT CLICK TO CHANGE COPY
English
19
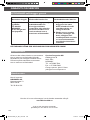
CARE AND CLEANING TROUBLESHOOTING
• Check to see whether the Coffee Brewer
is plugged into a grounded outlet. If it
is, check the fuse or circuit breaker on
the electrical circuit the Coffee Brewer
is connected to and make sure the
circuit is closed.
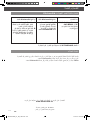
If the display is not illuminated
If the problem cannot
be corrected
If the entire display ashes
If only a portion of the water
added to the Coffee Brewer
actually brews
• The Coffee Brewer requires immediate
descaling. Please refer to “Descaling
the Coffee Brewer” in the “Care and
cleaning” section.
• There is no water in the water tank.
Press BREW to cancel the ashing and
let the Coffee Brewer cool down for
approximately 10 minutes. Fill the water
tank to the desired number of cups with
fresh, cool water and continue with
the brewing cycle as described in the
“Brewing coffee” section.
• See the “Warranty and service” section.
Do not return the Coffee Brewer to the
retailer; retailers do not provide service.
W10675728B_01_EN_v02.indd 19 11/13/14 10:37 AM

CMD + SHIFT CLICK TO CHANGE COPY
20
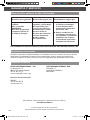
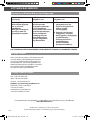
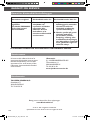
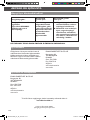
WARRANTY AND SERVICE
Length of
Warranty:
KitchenAid Will Pay For: KitchenAid Will Not
Pay For:
Europe, Middle
East and Africa:
For Model
5KCM0802:
Two years Full
Warranty from
date of
purchase.
The replacement parts
and repair labour costs to
correct defects in materials
or workmanship. Service
must be provided by an
Authorized KitchenAid
Service Center.
A. Repairs when Coffee Brewer
is used for operations other
than normal household use.
B. Damage resulting from
accident, alterations,
misuse, abuse, or installation/
operation not in accordance
with local electrical codes.
KITCHENAID DOES NOT ASSUME ANY RESPONSIBILITY FOR INDIRECT
DAMAGES.
KitchenAid Coffee Brewer warranty
In U.K. and Ireland:
For any questions, or to nd the nearest KitchenAid Authorized Service Center, please nd
our contact details below.
NOTE: All service should be handled locally by an Authorized KitchenAid Service Center.
Contact number for U.K. and Northern Ireland:
Tollfree number 0800 988 1266 (calls from mobile phones are charged standard
network rate) or call 0194 260 5504.
Contact number for Ireland:
Tollfree number +44 (0) 20 8616 5148
E-mail contact for U.K. and Ireland:
Go to www.kitchenaid.co.uk, and click on the link “Contact Us” at the bottom of the page.
Address for U.K. and Ireland:
KitchenAid Europa, Inc.
PO BOX 19
B-2018 ANTWERP 11
BELGIUM
In other countries:
For all product related questions and after sales matters, please contact your dealer
to obtain the name of the nearest Authorized KitchenAid Service/Customer Center.
For more information, visit our website at:
www.KitchenAid.co.uk
www.KitchenAid.eu
Customer service
© 2014. All rights reserved.
Specications subject to change without notice.
W10675728B_01_EN_v02.indd 20 11/13/14 10:37 AM
La pagina si sta caricando...
La pagina si sta caricando...
La pagina si sta caricando...
La pagina si sta caricando...
La pagina si sta caricando...
La pagina si sta caricando...
La pagina si sta caricando...
La pagina si sta caricando...
La pagina si sta caricando...
La pagina si sta caricando...
La pagina si sta caricando...
La pagina si sta caricando...
La pagina si sta caricando...
La pagina si sta caricando...
La pagina si sta caricando...
La pagina si sta caricando...
La pagina si sta caricando...
La pagina si sta caricando...
La pagina si sta caricando...
La pagina si sta caricando...
La pagina si sta caricando...
La pagina si sta caricando...
La pagina si sta caricando...
La pagina si sta caricando...
La pagina si sta caricando...
La pagina si sta caricando...
La pagina si sta caricando...
La pagina si sta caricando...
La pagina si sta caricando...
La pagina si sta caricando...
La pagina si sta caricando...
La pagina si sta caricando...
La pagina si sta caricando...
La pagina si sta caricando...
La pagina si sta caricando...
La pagina si sta caricando...
La pagina si sta caricando...
La pagina si sta caricando...
La pagina si sta caricando...
La pagina si sta caricando...
La pagina si sta caricando...
La pagina si sta caricando...
La pagina si sta caricando...
La pagina si sta caricando...
La pagina si sta caricando...
La pagina si sta caricando...
La pagina si sta caricando...
La pagina si sta caricando...
La pagina si sta caricando...
La pagina si sta caricando...
La pagina si sta caricando...
La pagina si sta caricando...
La pagina si sta caricando...
La pagina si sta caricando...
La pagina si sta caricando...
La pagina si sta caricando...
La pagina si sta caricando...
La pagina si sta caricando...
La pagina si sta caricando...
La pagina si sta caricando...
La pagina si sta caricando...
La pagina si sta caricando...
La pagina si sta caricando...
La pagina si sta caricando...
La pagina si sta caricando...
La pagina si sta caricando...
La pagina si sta caricando...
La pagina si sta caricando...
La pagina si sta caricando...
La pagina si sta caricando...
La pagina si sta caricando...
La pagina si sta caricando...
La pagina si sta caricando...
La pagina si sta caricando...
La pagina si sta caricando...
La pagina si sta caricando...
La pagina si sta caricando...
La pagina si sta caricando...
La pagina si sta caricando...
La pagina si sta caricando...
La pagina si sta caricando...
La pagina si sta caricando...
La pagina si sta caricando...
La pagina si sta caricando...
La pagina si sta caricando...
La pagina si sta caricando...
La pagina si sta caricando...
La pagina si sta caricando...
La pagina si sta caricando...
La pagina si sta caricando...
La pagina si sta caricando...
La pagina si sta caricando...
La pagina si sta caricando...
La pagina si sta caricando...
La pagina si sta caricando...
La pagina si sta caricando...
La pagina si sta caricando...
La pagina si sta caricando...
La pagina si sta caricando...
La pagina si sta caricando...
La pagina si sta caricando...
La pagina si sta caricando...
La pagina si sta caricando...
La pagina si sta caricando...
La pagina si sta caricando...
La pagina si sta caricando...
La pagina si sta caricando...
La pagina si sta caricando...
La pagina si sta caricando...
La pagina si sta caricando...
La pagina si sta caricando...
La pagina si sta caricando...
La pagina si sta caricando...
La pagina si sta caricando...
La pagina si sta caricando...
La pagina si sta caricando...
La pagina si sta caricando...
La pagina si sta caricando...
La pagina si sta caricando...
La pagina si sta caricando...
La pagina si sta caricando...
La pagina si sta caricando...
La pagina si sta caricando...
La pagina si sta caricando...
La pagina si sta caricando...
La pagina si sta caricando...
La pagina si sta caricando...
La pagina si sta caricando...
La pagina si sta caricando...
La pagina si sta caricando...
La pagina si sta caricando...
La pagina si sta caricando...
La pagina si sta caricando...
La pagina si sta caricando...
La pagina si sta caricando...
La pagina si sta caricando...
La pagina si sta caricando...
La pagina si sta caricando...
La pagina si sta caricando...
La pagina si sta caricando...
La pagina si sta caricando...
La pagina si sta caricando...
La pagina si sta caricando...
La pagina si sta caricando...
La pagina si sta caricando...
La pagina si sta caricando...
La pagina si sta caricando...
La pagina si sta caricando...
La pagina si sta caricando...
La pagina si sta caricando...
La pagina si sta caricando...
La pagina si sta caricando...
La pagina si sta caricando...
La pagina si sta caricando...
La pagina si sta caricando...
La pagina si sta caricando...
La pagina si sta caricando...
La pagina si sta caricando...
La pagina si sta caricando...
La pagina si sta caricando...
La pagina si sta caricando...
La pagina si sta caricando...
La pagina si sta caricando...
La pagina si sta caricando...
La pagina si sta caricando...
La pagina si sta caricando...
La pagina si sta caricando...
La pagina si sta caricando...
La pagina si sta caricando...
La pagina si sta caricando...
La pagina si sta caricando...
La pagina si sta caricando...
La pagina si sta caricando...
La pagina si sta caricando...
La pagina si sta caricando...
La pagina si sta caricando...
La pagina si sta caricando...
La pagina si sta caricando...
La pagina si sta caricando...
La pagina si sta caricando...
La pagina si sta caricando...
La pagina si sta caricando...
La pagina si sta caricando...
La pagina si sta caricando...
La pagina si sta caricando...
La pagina si sta caricando...
La pagina si sta caricando...
La pagina si sta caricando...
La pagina si sta caricando...
La pagina si sta caricando...
La pagina si sta caricando...
La pagina si sta caricando...
La pagina si sta caricando...
La pagina si sta caricando...
La pagina si sta caricando...
La pagina si sta caricando...
La pagina si sta caricando...
La pagina si sta caricando...
La pagina si sta caricando...
La pagina si sta caricando...
La pagina si sta caricando...
La pagina si sta caricando...
La pagina si sta caricando...
La pagina si sta caricando...
La pagina si sta caricando...
La pagina si sta caricando...
La pagina si sta caricando...
La pagina si sta caricando...
La pagina si sta caricando...
La pagina si sta caricando...
La pagina si sta caricando...
La pagina si sta caricando...
La pagina si sta caricando...
La pagina si sta caricando...
La pagina si sta caricando...
La pagina si sta caricando...
La pagina si sta caricando...
La pagina si sta caricando...
La pagina si sta caricando...
La pagina si sta caricando...
La pagina si sta caricando...
La pagina si sta caricando...
La pagina si sta caricando...
La pagina si sta caricando...
La pagina si sta caricando...
La pagina si sta caricando...
La pagina si sta caricando...
La pagina si sta caricando...
La pagina si sta caricando...
La pagina si sta caricando...
La pagina si sta caricando...
La pagina si sta caricando...
La pagina si sta caricando...
La pagina si sta caricando...
La pagina si sta caricando...
La pagina si sta caricando...
La pagina si sta caricando...
La pagina si sta caricando...
La pagina si sta caricando...
La pagina si sta caricando...
La pagina si sta caricando...
La pagina si sta caricando...
La pagina si sta caricando...
La pagina si sta caricando...
La pagina si sta caricando...
La pagina si sta caricando...
La pagina si sta caricando...
La pagina si sta caricando...
La pagina si sta caricando...
La pagina si sta caricando...
La pagina si sta caricando...
La pagina si sta caricando...
La pagina si sta caricando...
La pagina si sta caricando...
La pagina si sta caricando...
La pagina si sta caricando...
La pagina si sta caricando...
La pagina si sta caricando...
La pagina si sta caricando...
La pagina si sta caricando...
-
 1
1
-
 2
2
-
 3
3
-
 4
4
-
 5
5
-
 6
6
-
 7
7
-
 8
8
-
 9
9
-
 10
10
-
 11
11
-
 12
12
-
 13
13
-
 14
14
-
 15
15
-
 16
16
-
 17
17
-
 18
18
-
 19
19
-
 20
20
-
 21
21
-
 22
22
-
 23
23
-
 24
24
-
 25
25
-
 26
26
-
 27
27
-
 28
28
-
 29
29
-
 30
30
-
 31
31
-
 32
32
-
 33
33
-
 34
34
-
 35
35
-
 36
36
-
 37
37
-
 38
38
-
 39
39
-
 40
40
-
 41
41
-
 42
42
-
 43
43
-
 44
44
-
 45
45
-
 46
46
-
 47
47
-
 48
48
-
 49
49
-
 50
50
-
 51
51
-
 52
52
-
 53
53
-
 54
54
-
 55
55
-
 56
56
-
 57
57
-
 58
58
-
 59
59
-
 60
60
-
 61
61
-
 62
62
-
 63
63
-
 64
64
-
 65
65
-
 66
66
-
 67
67
-
 68
68
-
 69
69
-
 70
70
-
 71
71
-
 72
72
-
 73
73
-
 74
74
-
 75
75
-
 76
76
-
 77
77
-
 78
78
-
 79
79
-
 80
80
-
 81
81
-
 82
82
-
 83
83
-
 84
84
-
 85
85
-
 86
86
-
 87
87
-
 88
88
-
 89
89
-
 90
90
-
 91
91
-
 92
92
-
 93
93
-
 94
94
-
 95
95
-
 96
96
-
 97
97
-
 98
98
-
 99
99
-
 100
100
-
 101
101
-
 102
102
-
 103
103
-
 104
104
-
 105
105
-
 106
106
-
 107
107
-
 108
108
-
 109
109
-
 110
110
-
 111
111
-
 112
112
-
 113
113
-
 114
114
-
 115
115
-
 116
116
-
 117
117
-
 118
118
-
 119
119
-
 120
120
-
 121
121
-
 122
122
-
 123
123
-
 124
124
-
 125
125
-
 126
126
-
 127
127
-
 128
128
-
 129
129
-
 130
130
-
 131
131
-
 132
132
-
 133
133
-
 134
134
-
 135
135
-
 136
136
-
 137
137
-
 138
138
-
 139
139
-
 140
140
-
 141
141
-
 142
142
-
 143
143
-
 144
144
-
 145
145
-
 146
146
-
 147
147
-
 148
148
-
 149
149
-
 150
150
-
 151
151
-
 152
152
-
 153
153
-
 154
154
-
 155
155
-
 156
156
-
 157
157
-
 158
158
-
 159
159
-
 160
160
-
 161
161
-
 162
162
-
 163
163
-
 164
164
-
 165
165
-
 166
166
-
 167
167
-
 168
168
-
 169
169
-
 170
170
-
 171
171
-
 172
172
-
 173
173
-
 174
174
-
 175
175
-
 176
176
-
 177
177
-
 178
178
-
 179
179
-
 180
180
-
 181
181
-
 182
182
-
 183
183
-
 184
184
-
 185
185
-
 186
186
-
 187
187
-
 188
188
-
 189
189
-
 190
190
-
 191
191
-
 192
192
-
 193
193
-
 194
194
-
 195
195
-
 196
196
-
 197
197
-
 198
198
-
 199
199
-
 200
200
-
 201
201
-
 202
202
-
 203
203
-
 204
204
-
 205
205
-
 206
206
-
 207
207
-
 208
208
-
 209
209
-
 210
210
-
 211
211
-
 212
212
-
 213
213
-
 214
214
-
 215
215
-
 216
216
-
 217
217
-
 218
218
-
 219
219
-
 220
220
-
 221
221
-
 222
222
-
 223
223
-
 224
224
-
 225
225
-
 226
226
-
 227
227
-
 228
228
-
 229
229
-
 230
230
-
 231
231
-
 232
232
-
 233
233
-
 234
234
-
 235
235
-
 236
236
-
 237
237
-
 238
238
-
 239
239
-
 240
240
-
 241
241
-
 242
242
-
 243
243
-
 244
244
-
 245
245
-
 246
246
-
 247
247
-
 248
248
-
 249
249
-
 250
250
-
 251
251
-
 252
252
-
 253
253
-
 254
254
-
 255
255
-
 256
256
-
 257
257
-
 258
258
-
 259
259
-
 260
260
-
 261
261
-
 262
262
-
 263
263
-
 264
264
-
 265
265
-
 266
266
-
 267
267
-
 268
268
-
 269
269
-
 270
270
-
 271
271
-
 272
272
-
 273
273
-
 274
274
-
 275
275
-
 276
276
-
 277
277
-
 278
278
-
 279
279
-
 280
280


KitchenAid 5KCM0802 Manuale utente
- Categoria
- Macchine da caffè
- Tipo
- Manuale utente
in altre lingue
- français: KitchenAid 5KCM0802 Manuel utilisateur
- dansk: KitchenAid 5KCM0802 Brugermanual
Documenti correlati
Altri documenti
-
Melitta EPOS® Istruzioni per l'uso
-
-
Black & Decker CM1110B Guida utente
-
BLACK DECKER CM1331S Manuale utente
-
Bunn Dual® SH Soft Heat® DBC® Stainless Manuale utente
-
Beko CEG5301 Manuale del proprietario
-
-
Beko CEG5301X Manuale del proprietario
-
Bosch TASSIMO TAS 40XXGB/CH Manuale utente
-
IKEA Radig Instructions Manual