
Connection
An information plaque on the oven indicates the gas with which it has been regulated.
If you have the same gas supply with which the appliance has been regulated, follow
the connection instructions carefully. Otherwise, adapt the oven for the different types
of gas before reading the connection instructions.
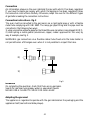
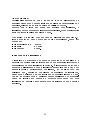
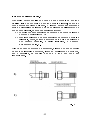
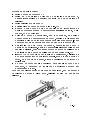
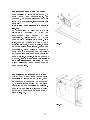
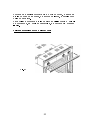
Connection instructions - fig. 3
The oven must be connected to the gas mains via a rigid metal pipe or with a flexible
metal tube complying with UNI 9891. The ramp gas pipe fitting and the pipe must be
connected in the following two ways:
1) using a connection without a gasket on the thread (the oven connection is cone-shaped: ISO R 7);
2) interrupting a metal gasket (aluminium, copper, rubber approved for this use); by
way of example, see fig. 3.
WARNING: gas connection via a flexible rubber tube fixed onto the tube holder is
not permitted on a fitted gas oven when it is not possible to inspect the tube.
Attention
On completing the operation, check that there are no gas leaks.
Search for gas leaks using soapy water or equivalent liquids.
NEVER USE A FLAME TO CHECK FOR GAS LEAKS.
Adapting the gas used
The appliance is regulated to operate with the gas indicated on the packaging and the
appliance itself (see technical data plaque).
Fig.3
2)
1)
RAMP
GASKET
FLEXIBLE TUBE
41

Technical data
Table 2
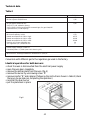
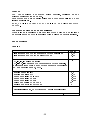
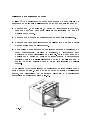
Conversion with different gas to the regulation gas used in the factory.
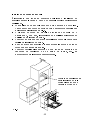
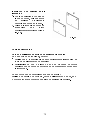
Identical operations for both burners:
• check the oven is disconnected from the electrical power supply
• open the oven door completely
• remove the bottom plate from the oven (fig. 4)
• remove the burner by unscrewing screw “A”
• remove injector “B” and replace it following the instructions shown in table 2 (check
there are no gas leaks on completing the operation)
• reinstall the oven burner
• put the plate back in place
FORNO
Ø Gas injector G30/G31 mm 0,73
Ø Gas injector G20/G31 mm 1,15
Ø Gas bypass G30/G31 mm 0,42
CAT. I3, I2, I2L sealed in factory
CAT. II2H3, II23 for gas G30/G31 screwed tight; for gas G20/G25
regulated for 0,72 kW capacity.
Rated capacity in kW 2,4
Minimum capacity in kW 0,72
Rated consumption of G30 in Kg/h 0,175
Rated consumption of G20 in m3/h 0,228
Rated consumption of G25 in m3/h 0,266
Position of ring nut G30/G31 mm 14
Air regulation (“X”) G20/G25 mm 5
Power supply voltage = 220V AC
Installed power = 1,.5kW (oven with electric grill)
Minimum air exchange needed for combustion is 4,8 m
3
/h.
Fig.4
42

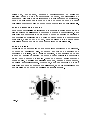
Regulating the flame
Due to the different characteristics of the gases used, flames with too much or too little air
may be obtained.In this case, regulate the flame as follows (fig. 5):
• loosen screw “C” and turn ring nut “D” to position N for methane or natural gas and
position GPL for liquid propane, ensuring that the mobile index on the ring nut
corresponds with the fixed index on the burner, thereby obtaining the correct flame
(fig. 6)
Minimum regulation
The oven thermostat is equipped with a minimum bypass and it is necessary to alter
regulation if gas type is changed, in the following manner:
• Remove control knob A;
• Remove the two ring nuts on panel B by unscrewing in an anti-clockwise direction.
• Remove control panel C;
• Remove the oven bottom plate (fig. 4);
• Turn on the oven at the highest temperature for at least 10/15 minutes.
• Turn the indexed thermostat knob to 150°C, regulate the by-pass to minimum until a
reduced but stable flame is obtained. This operation should be performed with the
oven door closed.
• Use a screwdriver on the bypass screws. It is sufficient to unscrew the bypass several
turns to regulate the minimum, passing from liquid gas to methane (fig, 7).
• IMPORTANT: after regulating the burner, check the flame remains at the minimum,
by opening and closing the oven door. If the flame goes out, adapt bypass regulation.
• For operation with G30/G31 , the bypass regulation screw must be screwed tight.
On completing regulation, indicate the gas setting on the new plaque.
Fig.6
EXCESS AIR
CORRECT FLAME
INSUFFICIENT AIR
43

Ventilation
(see UNI CIG 7129)
Places where gas appliances are installed must be ventilated during operation with an
air flow for both gas combustion and air exchange (ventilation).
This oven does not require connection to a specific device for discharging combustion
products. It must therefore be installed and connected in accordance with the
installations regulations in the country concerned.
Particular care should be taken with devices used for ventilation.
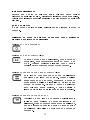
Instructions for the user
How to use the oven
Use the controls on the control panel to select the different functions.
Fig.7
A = FUME DISCHARGE GRID
44

TURNING ON AND USING THE OVEN
USE: the oven burner is equipped with a safety valve which halts gas supply in the
following cases:
• If the thermostat knob is accidentally turned and gas immediately supplied to the
oven burner;
• If the burner flame accidentally goes out.
• If the gas pipeline does not supply gas.
• To avoid the burner going out during regulation of the oven from the maximum to the
minimum temperature, the thermostat is equipped with an arrest. To turn off the
burner in the minimum position, it is sufficient to press the knob slightly and turn it
until the index on the knob corresponds with the fixed index on the front panel.
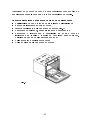
TURNING ON: the oven burner is turned on with the oven door open. If the door is
only partially open, a safety device stops automatic turning on of the burners (fig. 8).
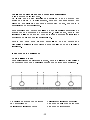
Warning light
A green warning light comes on whenever the selector knob is in any position other
than OFF (indicated with 0).
The yellow warning light comes on when the electric grill is in operation.
Selector knob
This is used to select the different cooking functions.
Fig.8
45

Use of selector with electric grill and symbols
Pos.1: OVEN LIGHT
Pos.2: SPIT
When cooking is complete, this position is used to keep the meat cooked on the
spit warm evenly,by continuing rotation.
Pos.3: GRILL + SPIT
This type of cooking is used to brown the food. For this type of cooking, it is
necessary to keep the oven door open and use the knob protection. With the
selector in this position, the grill and the spit are automatically switched on.
Pos.4: CENTRAL GRILL
This type of cooking is particularly suitable for rapid browning of food. It is also
necessary to keep the oven door open and use the knob protection for this type of
cooking.
Warning: if the oven thermostat knob is turned accidentally when using the electric grill, a
safety device will block grill operation. To restart the grill, turn the oven knob until 0 on the
mobile index corresponds with 0 on the fixed index on the front panel.
Oven thermostat knob
This is used to select the most suitable temperature for the different types of food to be
cooked.Turn the knob anti-clockwise to select the temperature, from between 150° and 270°C.
The oven is switched off by turning the knob until its index corresponds with the fixed index
on the front panel.
Timer knob
The timer may be regulated for a maximum
of 60 minutes. The regulation knob (fig. 9)
must be turned clockwise to the maximum
position, then positioned as required by
turning it anti-clockwise until the index
corresponds with the time selected. When
the time is up, an alarm goes off which stops
automatically.The timer does not switch the
oven off when the alarm goes off.
46

Proceed as follows to turn on the oven burner:
• Press the thermostat knob slightly and turn it anticlockwise to 270°C.
• Press the knob down completely to trigger electrical switch on and keep it pressed
down for several seconds until the safety device comes on.
• Position the knob at the temperature required.
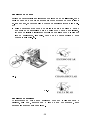
If the oven does not come on or is not equipped with a switching on device, proceed as
follows:
place a lighted match or gas lighter near the central slit in front of the oven plate,
simultaneously pressing down the thermostat knob completely and turning it anti-
clockwise to the temperature required (fig. 10).
Check the oven burner has turned on through the slits in front of the oven plate and
check that the flame continues to burn when the thermostat knob is released. If not,
repeat the operation.
Always check correct burner operation with the oven door closed.
Fig.10
47

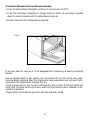
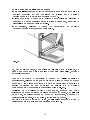
How to use the grill
Place the food to be grilled on the grill supplied or a baking pan with very low edges.
The grill should be placed in the highest position possible and the grease drip-pan
must be positioned directly beneath. For this type of cooking, the oven door must be
kept open, then partially closed by resting it against the deflector (fig. 11). Depending
on the type of food being cooked (e.g. red meat, fish, poultry, etc.) it is necessary to turn
the food in order to expose both sides to the infra-red rays.
Indicative cooking times are given below.
Fig. 11 Knob protection
Cooking time in minutes
Food to be grilled
above below
Thinly cut meat 6 4
Normal meat 8 5
Scaled fish 10 8
Fish (e.g. trout, salmon) 15 12
Sausages 12 10
Toast 5 2
48

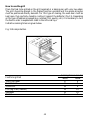
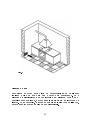
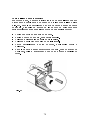
How to use the spit
It is possible to use a combination of the spit and the grill in gas ovens (see fig. 12).
After placing the meat on the skewer, block it in place using the two forks and proceed
as follows:
• Place the skewer support in position
• Remove the handle by unscrewing it
• Insert the drip-pan at the lowest level
• Position the deflector on the lower part of the front panel
• Close the door partially by resting it on the deflector
• When the meat is cooked, screw the handle onto the skewer and remove it from the
oven.
How to use the oven
Position the thermostat knob at the desired temperature (between 150° and 270°C). To
obtain the best results, the oven should be preheated to the desired temperature before
placing the food in the oven.
For particularly fatty foods, it is not necessary to preheat the oven. In the case of frozen
meat, the cooking temperature should be kept around 20°C lower and the cooking time
increased by around 15 minutes (see table 1). The oven can also be used for ECONOMY
grilling by cooking the food with the door closed, repeating the procedure indicated for
use of the spit and the grill, but altering the cooking times.This leads to:
• Energy saving
• Lower quantity of fumes in the environment
• Better grilling.
Practical advice on oven cooking is provided in the table below. The cooking time varies
on the basis of both the quality and the quantity of the food involved.
Fig.12
49

Table 1
Type of food Temp. Insertions Cooking
°C guide* time (mins)
Cake in mould with beaten mixture
Panettone or focaccia 175 1 55-65
Focaccia 175 2 60-70
Cake 175 2 60-70
Pie in mould (short pastry)
Pie base 200 2 8-10
Pie base with ricotta cheese 200 1 25-35
Pie base with fruit 200 1 25-35
Cake in moulded with raised mixture
White bread (1 kg. of flour) 200 1 25-35
Small pastries
Short pastry 200 3 10-15
Choux pastry 200 2 30-45
Biscuit pastry 200 3 15-20
Lasagne 225 2 40-50
Meat (cooking times per cm. of thickness)
Roast (slow cooking) 175 2 12-12
Roast (short cooking) 200 2 10-12
Meatloaf 200 2 30-40
Poultry
Duck 1 1/2 kg 200 2 120-180
Goose 3 kg 200 2 150-210
Roast chicken 200 2 60-90
Turkey 5 kg 175 2 240 ca.
Game
Hare 200 2 60-90
Leg of roe 200 2 90-150
Leg of venison 175 2 90-180
Vegetables
Cooked vegetable timbale 200 2 40-50
Fish
Mullet 200 2 40-50
Pizza 240 1 20-25
Grill
Pork chops 4 8-12
Sausages 4 10-12
Grilled chicken 2 25-35
Roast veal on spit 0.6 kg 50-60
Chicken on spit 60-70
* The guide number refers to the lowest level (excluding the bottom, since it is not possible to insert the drip-pan).
50

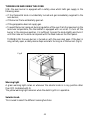
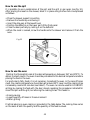
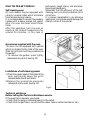
Removal of the oven door
It is possible to remove the oven door, for easier
cleaning of the oven. The ovens have two
different types of interchangeable hinges:
— hinges with movable U bolts (fig. 13)
Hinges A have two movable U bolts (B),
which block the oven door in the open
position when hooked onto sectors C of the
hinges. After doing this, it is necessary to
lift the door upwards and extract it
outwards by grasping the sides of the door
near the hinges. To replace the door in
position, first slide the hinges into their
grooves, then remove the two movable U
bolts hooked onto the hinges before closing
the door.
Replacing the oven light
ATTENTION: if it is necessary to replace the
oven light, remove the protective cover A by
unscrewing it anti-clockwise. After replacing
the bulb,replace protective cover A (fig. 16).
Fig.13
Fig.16
51

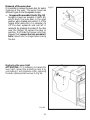
ONLY ON PRE-SET MODELS
Self-cleaning oven
All oven models may be equipped with
catalytic enamel sides which eliminate
food residues during cooking.
It is recommended to remove the powdery
residue with a damp sponge (hot water)
after the oven has been used fifteen
times.
After this operation, turn the oven on
empty at the highest temperature for
around 30 minutes. In the case of
particularly tough stains, use ammonia-
based liquid detergent.
Remember that the efficiency of the self-
cleaning oven is in direct proportion to its
correct use.
It is always inadvisable to use abrasive
substances, since these would damage the
catalytic action of the enamel.
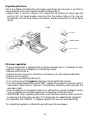
Accessories supplied with the oven
The oven can be equipped with guides
which are hooked to the sides of the oven.
Slide the grill pans and tray provided into
the guides.
• To remove the guides, press lightly
downwards on point A (see fig. 14)
Installation of self-cleaning panels
1) Place the panels against the sides of the
oven, positioning above the grills
removed beforehand and attach.
2)Replace the accessories previously
removed from the oven (see fig. 15).
Technical assistance
Before calling the Technical Assistance service
If the oven fails to operate, you should:
• Check that the plug is inserted properly in the socket.
• Check that the gas flow is correct and the rubber tube is neither twisted nor torn.
Fig.14
Fig.15
A
52

If it is not possible to identify the cause of malfunctioning, turn off the oven, do not tamper
with it and call the Technical Assistance Service.
The oven has a certificate of warranty which allows you to use the Technical Assistance
Service free of charge, with the exception of the fixed call charge, for one year from the
date of purchase.
Remember to send part A of the certificate of warranty for validation within 10 days of the
date of purchase.
Part B must be kept, duly compiled, and shown to the Technical Assistance Service if
called, together with the receipt provided by the retailer at the moment of purchase.
Cleaning and maintenance of the oven
Important: Before proceeding with
maintenance of the oven, always disconnect
the plug from the mains socket or turn off
the power using the general electrical
circuit breaker.
Cleaning the oven: An oven without self-
cleaning panels must be cleaned after use,
when turned off, but still warm (not hot).
This ensures that the film of grease
produced by the cooking vapours on the
sides is still easy to remove and that the
drips and splashes of grease have not
formed a hard crust. Remove the chrome-
plated wire side supports by pulling the
front part upwards to unhook them from
the sides and slide them out of the rear
holes.
Clean the oven using a soft cloth soaked in
a diluted ammonia solution. Rinse and dry.
If stains or drips remain, place a damp cloth
soaked in ammonia on the bottom of the
oven, close the door and wash with warm
water and liquid detergent after several
hours,rinse, then dry. For the external parts
in shiny metal, use a soft cloth with soap
and water. Never use abrasive product in
powder form.
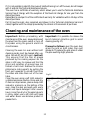
Important: it is possible to remove the
burnt material collection grid to assist
cleaning (see fig.17).
Proceed as follows: open the oven door,
grasp the grid on both sides, then pull
outwards. To replace the grid, place it under
the plan exerting slight pressure.
Fig.17
53

Notes
54

Notes
55

56

57

58

59

60
La pagina si sta caricando...
La pagina si sta caricando...
La pagina si sta caricando...
La pagina si sta caricando...
La pagina si sta caricando...
La pagina si sta caricando...
La pagina si sta caricando...
La pagina si sta caricando...
La pagina si sta caricando...
La pagina si sta caricando...
La pagina si sta caricando...
La pagina si sta caricando...
La pagina si sta caricando...
La pagina si sta caricando...
La pagina si sta caricando...
La pagina si sta caricando...
La pagina si sta caricando...
La pagina si sta caricando...
La pagina si sta caricando...
La pagina si sta caricando...
La pagina si sta caricando...
La pagina si sta caricando...
-
 1
1
-
 2
2
-
 3
3
-
 4
4
-
 5
5
-
 6
6
-
 7
7
-
 8
8
-
 9
9
-
 10
10
-
 11
11
-
 12
12
-
 13
13
-
 14
14
-
 15
15
-
 16
16
-
 17
17
-
 18
18
-
 19
19
-
 20
20
-
 21
21
-
 22
22
-
 23
23
-
 24
24
-
 25
25
-
 26
26
-
 27
27
-
 28
28
-
 29
29
-
 30
30
-
 31
31
-
 32
32
-
 33
33
-
 34
34
-
 35
35
-
 36
36
-
 37
37
-
 38
38
-
 39
39
-
 40
40
-
 41
41
-
 42
42


