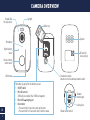
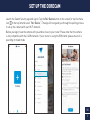
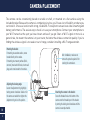
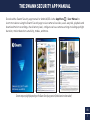
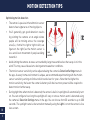
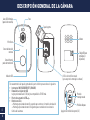
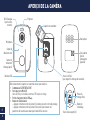
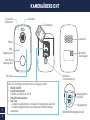
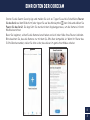
Di seguito troverai una breve informazione per Telecamera CoreCam Pro SWIFI-COREPRO. Questa telecamera è dotata di LED infrarossi per la visione notturna, di un riflettore e di un microfono incorporato. Dispone inoltre di un sensore a infrarossi passivo per il rilevamento del movimento e di un indicatore LED. La telecamera può essere montata su un tavolo o a parete tramite la staffa inclusa o su qualsiasi superficie piana. La telecamera è dotata di un interruttore ON/OFF, uno slot per scheda microSD (con 32GB preinstallata), una porta di ricarica micro USB e un pulsante di reset. Può essere collegata tramite Wi-Fi 2.4GHz e le immagini possono essere visualizzate con la app Swann Security.
Di seguito troverai una breve informazione per Telecamera CoreCam Pro SWIFI-COREPRO. Questa telecamera è dotata di LED infrarossi per la visione notturna, di un riflettore e di un microfono incorporato. Dispone inoltre di un sensore a infrarossi passivo per il rilevamento del movimento e di un indicatore LED. La telecamera può essere montata su un tavolo o a parete tramite la staffa inclusa o su qualsiasi superficie piana. La telecamera è dotata di un interruttore ON/OFF, uno slot per scheda microSD (con 32GB preinstallata), una porta di ricarica micro USB e un pulsante di reset. Può essere collegata tramite Wi-Fi 2.4GHz e le immagini possono essere visualizzate con la app Swann Security.


-
 1
1
-
 2
2
-
 3
3
-
 4
4
-
 5
5
-
 6
6
-
 7
7
-
 8
8
-
 9
9
-
 10
10
-
 11
11
-
 12
12
-
 13
13
-
 14
14
-
 15
15
-
 16
16
-
 17
17
-
 18
18
-
 19
19
-
 20
20
-
 21
21
-
 22
22
-
 23
23
-
 24
24
-
 25
25
-
 26
26
-
 27
27
-
 28
28
-
 29
29
-
 30
30
-
 31
31
-
 32
32
-
 33
33
-
 34
34
-
 35
35
-
 36
36
-
 37
37
-
 38
38
-
 39
39
-
 40
40


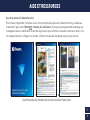
Di seguito troverai una breve informazione per Telecamera CoreCam Pro SWIFI-COREPRO. Questa telecamera è dotata di LED infrarossi per la visione notturna, di un riflettore e di un microfono incorporato. Dispone inoltre di un sensore a infrarossi passivo per il rilevamento del movimento e di un indicatore LED. La telecamera può essere montata su un tavolo o a parete tramite la staffa inclusa o su qualsiasi superficie piana. La telecamera è dotata di un interruttore ON/OFF, uno slot per scheda microSD (con 32GB preinstallata), una porta di ricarica micro USB e un pulsante di reset. Può essere collegata tramite Wi-Fi 2.4GHz e le immagini possono essere visualizzate con la app Swann Security.
in altre lingue
- English: Swann SWIFI-COREPRO User guide
- français: Swann SWIFI-COREPRO Mode d'emploi
- español: Swann SWIFI-COREPRO Guía del usuario
- Deutsch: Swann SWIFI-COREPRO Benutzerhandbuch
Documenti correlati
-
Swann SWIFI-4KXTRM-GL Guida utente
-
-
Swann SWIFI-PTCAM2 Guida utente
-
-
Swann SWIFICORESOLPK4 Guida utente
-
-
-
Swann SWIFI-2KOCAM Guida utente
-
Swann Buddy QC9116 Video Doorbell Guida utente
-