
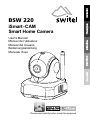
iSmart- CAM
Smart Home Camera
Please read carefully before using this equipment.
ENGLISH
FRANÇAIS
ESPAÑOL
DEUTSCH
ITALIANO
User's Manual
Manuel de l'utilisateur
Manual del Usuario
Bedienungsanleitung
Manuale d'uso
BSW 220

Before you start you need / Avant de démarrer, il vous faut /
Antes de empezar necesita / Bevor Sie loslegen benötigen Sie /
Prima di iniziare, è necessario
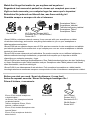
iPhone, iPad, Android smartphone
or Android tablet /
Un iPhone, iPad, smartphone Android
ou tablette Android /
Teléfono inteligente iPhone, iPad o
Android, o tableta Android /
iPhone, iPad, Android-Smartphone oder
Android-Tablet /
iPhone, iPad, smartphone Android o
tablet Android
Wi-Fi Router /
Routeur Wi-Fi /
Enrutador Wi-Fi /
WLAN-Router /
Router Wi-Fi
iSmart-CAM
Watch the things that matter to you anytime and anywhere /
Regardez à tout moment et partout les choses qui comptent pour vous /
Vigile en todo momento y en cualquier lugar las cosas que le importan /
Betrachten Sie jederzeit und überall das, was Ihnen wichtig ist /
Guardate sempre e ovunque ciò che vi interessa
iSmart-CAM is a wireless network camera. It can connect with your smartphone or tablet
via wireless technology, and monitor everything that matters to you on your smartphone or
tablet anywhere and anytime.
iSmart-CAM est une caméra réseau sans fil. Elle peut se connecter à votre smartphone ou tablette
par technologie sans fil et surveiller tout ce qui compte pour vous sur votre smartphone ou tablette
partout et à tout moment.
iSmart-CAM es una cámara de red inalámbrica. Se puede conectar con su teléfono inteligente o
tableta mediante tecnología inalámbrica y supervisar todo aquello que le importa en dichos
dispositivos en cualquier momento y lugar.
iSmart-CAM ist eine drahtlose Netzwerkkamera. Über Drahtlostechnologie kann sie eine Verbindung
zu Ihrem Smartphone oder Tablet herstellen und per Smartphone oder Tablet jederzeit und überall
alles überwachen, was Ihnen wichtig ist.
iSmart-CAM è una videocamera di rete wireless. Può connettersi a smartphone o tablet tramite
tecnologia wireless e monitorare sempre e ovunque tutto ciò che vi interessa su smartphone o tablet.
1
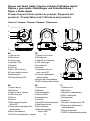
i CAMSmart-
Wi-Fi Router /
Enrutador Wi-Fi / WLAN-Router /
Router Wi-Fi
Routeur Wi-Fi /
Smartphone, tablette /
Teléfono inteligente y tableta /
Smartphone, Tablet /
Smartphone, Tablet
Smartphone,Tablet /
Internet

Camera / Caméra / Cámara / Kamera / Telecamera
Product Layout / Description du produit / Esquema del
producto / Produktübersicht / Struttura del prodotto
1
2
3
4
5
6
7
9
10
2
Figures and Quick Guide / Figures et Guide d'utilisation rapide /
Figuras y guía rápida / Abbildungen und Schnellanleitung /
Figure e Guida rapida
DE
1.Lichtsensor
2.Mikrofon
3.Kameraobjektiv
4.Infrarot-LEDs
5.Lautsprecher
6.Antenne
7.MicroSD-Kartensteckplatz
8.Netzteilanschluss
9.Rücksetztaste
10.Betriebsanzeige-
/Status-LED
ES
1.Sensor de luz
2.Micrófono
3.Objetivo de la cámara
4.LED infrarrojos
5.Altavoz
6.Antena
7.Ranura para tarjetas
Micro-SD
8.Toma para el adaptador de
alimentación
9.Botón Restablecer
10.LED de alimentación y estado
IT
1.Sensore luci
2.Microfono
3.Obiettivo videocamera
4.LED a infrarossi
5.Altoparlante
6.Antenna
7.Slot per scheda micro SD
8.Presa per adattatore di
alimentazione
9.Tasto di ripristino
10.LED di alimentazione/stato
FR
1.Capteur de lumière
2.Microphone
3.Objectif de la caméra
4.LED infrarouge
5.Haut-parleur
6.Antenne
7.Emplacement pour
carte micro SD
8.Prise de l'adaptateur
d'alimentation
9.Bouton de réinitialisation
10.DEL d'alimentation/d'état
EN
1.Light sensor
2.Microphone
3.Camera lens
4.Infrared LEDs
5.Speaker
6.Antenna
7.Micro SD Card slot
8.Power adapter socket
9.Reset button
10.Power/Status LED
8

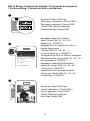
Quick Setup /Contenu de la boîte / Contenido del paquete
/ Lieferumfang / Contenuto della confezione
Download “iSmart-CAM” app/
Télécharger l'application « iSmart-CAM »/
Descargue la aplicación “iSmart-CAM”/
„iSmart-CAM“-App herunterladen/
Download dell'app “iSmart-CAM”
Smartphone/Tablet Wi-Fi setting,
select “iSmart-CAM_XX : XX : XX…”
Password is “12345678” /
Réglages Wi-Fi du smartphone ou de la
tablette,Sélectionnez
« iSmart-CAM_XX : XX : XX… »
Le mot de passe est « 12345678 » /
Configuración de Wi-Fi de Teléfono inteligente/
Tabletaseleccione “iSmart-CAM_XX : XX : XX…”
La contraseña es “12345678” /
Smartphone/Tablet-WLAN-Einstellung,
wählen Sie „iSmart-CAM_XX : XX : XX…
“ Kennwort ist „12345678“ /
Impostazione Wi-Fi smartphone/tablet,
Selezionare “iSmart-CAM_XX : XX : XX…”
La password è “12345678”
1
2
3
a
Launch the “iSmart-CAM” pp /
Lancez l'application « iSmart-CAM »/
Inicie la aplicación “iSmart-CAM” /
„iSmart-CAM“-App ausführen /
Avvia l'app “iSmart-CAM”
3

4
Package Contents /Contenu de la boîte / Contenido del paquete /
Lieferumfang / Contenuto della confezione
One Camera /
One Adapter / Un adaptateur / Un adaptador / Ein Netzteil / Un adattatore
Two Cable Clips / Deux clips de câble / Dos abrazaderas de cables /
Zwei Kabelklemmen / Due fermacavi
This User's Manual / Ce Manuel de l'utilisateur / Este manual del usuario /
Diese Bedienungsanleitung / Il presente manuale dell'utente
One Screw and One Wall Anchor / Une vis et un ancrage de mur /
Un tornillo y un taco para pared / Eine Schraube und ein Dübel /
Una vite e una grappa
Une caméra / Una cámara / Eine Kamera / Una videocamera
Select Wi-Fi router /
Sélectionner le routeur Wi-Fi /
Seleccione el enrutador Wi-Fi /
WLAN-Router wählen /
Seleziona il router Wi-Fi
4

5
Fig. 1
Fig. 2 Fig. 3
Fig. 4
1
1.2
1.
3
2
2.2
1.
4

6
Fig. 5
Fig. 6 Fig. 7
Fig. 8
3.1
3
3.2
2.3

1
2
3
8 7 6 5 4
Viewing Live Video
7
Fig. 9
Fig. 10 Fig. 11
Fig. 12
3.4
4.1
4
4.2
9
10

Fig. 13 Fig. 14
Fig. 15
Fig. 16
8
4.2 . 1 4.2 . 2
4.2 . 6
4.2 . 7

ba
c
d
e
Fig. 17
f
9
4.2 . 12
Note:
Remarque:
Nota:
Hinweis:
Nota:
All picture and function descriptions are for reference only; please subject to
the actual downloaded APP.
Toutes les descriptions d'images et de fonctions sont fournies à titre
d'information uniquement ; veuillez vous référer à l'application téléchargée réelle.
Todas las descripciones de las imágenes y funciones son solo para referencia;
limítese a la aplicación descargada real.
Alle Bilder und Funktionsbeschreibungen dienen nur der Veranschaulichung;
bitte orientieren Sie sich an der tatsächlich heruntergeladenen App.
Tutte le descrizioni di immagini e funzioni solo per riferimento e soggette all'APP
reale scaricata.

ENGLISH
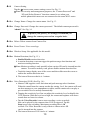
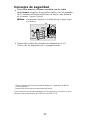
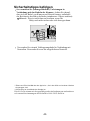
Camera Installation
1
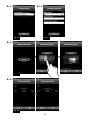
Connect your smartphone or tablet to the camera
Turn on the Wi-Fi of your smartphone or tablet.
Select “iSmart-CAM_XX : XX : XX…” under Wi-Fi Networks and enter the
password. The default password is “12345678”. See Fig. 1.
Note: If you cannot find “iSmart-CAM_XXXXXX” under Wi-Fi Networks and
the LED on the camera is not blinking, please follow step 3.4 of this user
manual to reset the camera.
Launch the iSmart-CAM app on your smartphone or tablet. The welcome screen
will be displayed. See Fig. 2.
Set up an Internet connection
The camera will scan for available Wi-Fi networks (SSID). Select the name of the Wi-Fi
network (SSID) that you wish to connect with the camera and enter the password of
your Wi-Fi router if necessary. First-time setup is now complete. See Fig. 3.
Note 1: Once you complete Internet setup, the LED on the camera will turn green
after about 1 minute.
2: Wi-Fi SSID is the wireless network name.
3: If the camera cannot find the Wi-Fi network you wish to connect to,
please make sure the camera and the Wi-Fi router are within range of
each other.
4: If you type in the wrong SSID password the camera will beep two times
and then reset to factory default automatically. Please close the App and
follow step 1.1 in the user manual to set up the camera again.
5: If you have completed Internet setup but the Power/Status LED is still
orange, please check the Wi-Fi router is OK and make sure the camera
and Wi-Fi router are within range of each other.
6: Make sure your mobile phone is connected to the Wi-Fi AP/Router you
assigned after set up.
Viewing live video
2
Select the camera icon in Camera List to view video from the camera.
Touch the image display area of the screen and slide on the screen for pan-tilt
function. See Fig. 4.
Touch the image display area of the screen and move fingers apart for digital zoom
function. See Fig. 5.
10
1
1.1
1.2
1.3
1.4
2
2.1
2.2
2.3

11
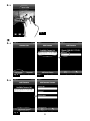
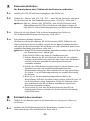
Add camera to other smartphones or tablets
3
Add camera in LAN (Your mobile phone and camera are connected to the same
Wi-Fi router.)
1. Download the iSmart-CAM app.
2. Turn on the Wi-Fi of your smartphone or tablet and then tap the screen to select
which Wi-Fi router your camera has been connected to.
3. Launch the iSmart-CAM app on your smartphone or tablet.
4. Tap the “Add Camera” icon to add a camera. See Fig. 6.
5. Tap the screen to select which camera you wish to add under
“Available Camera List”. See Fig. 7.
6. Enter password for the camera.The default password is “admin”.
7. Tap the camera icon in Camera List to view video from the camera.
Note: If you enter the wrong password, please tap the camera icon again and then
retype the correct password.
Add camera through remote setup (Your mobile and camera are NOT connected to
the same Wi-Fi router.)
1. Download the iSmart-CAM app.
2. Please make sure your smartphone or tablet can link to the Internet via a Wi-Fi
router or 3G/4G mobile network.
3. Launch the iSmart-CAM app.
4. Tap the “Add Camera” icon. See Fig. 6.
5. Tap the “Add Remote Camera” icon to enter “Add Remote
Camera” screen. See Fig. 8.
6. Tap in the UID and password of the camera you want to add.
Note 1: Tap the i (information) icon in live video screen to
get UID information. The UID is 20 characters.
2: The default password is “admin”.
3: If you enter the wrong password, please tap the camera
icon and then retype the password.
7. Tap the camera icon in Camera List to view video from the camera.
Add more cameras (Multi-camera)
Follow step 1.1 in the user manual to complete first-time setup for
each camera.
Note: Up to 10 cameras can be added.
3
3.1
3.2
3.3

Reset the camera to factory default (See Fig. 9.)
When the camera has been on for at least 1 minute, press the reset button (using a
small object or a pin) for 5 to 10 seconds.
The camera will beep 3 times and take about 1 minute to reset. The LED will start to
blink a dark orange color.
Note 1: If you do not hear a beeping sound, reset has failed. Please turn the
camera back on and press the rest button again.
2: If you replace a new Wi-Fi router or if you forget the camera password,
the camera needs to be reset to factory default.
Please refer to 3.3 - First time setup in the user manual, to set up the
camera again.
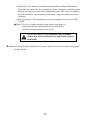
Operation Mode
4
Viewing Live Video. See Fig. 10.
1. Camera name
2. Date and Time display
3. Online Number/ Resolution/ Frame Rate display
4. Information :
Tap the icon to get information about the camera. See Fig. 11.
5. Record :
Tap the icon to start record process when SD card is inserted.
6. Audio on/off and Talk back :
Tapping the icon can turn on/off sound or talk back to camera.
: audio on
: talk back
: mute
7. Snapshot :
Tap the icon to save a snapshot of the camera on your
smartphone or tablet.
8. Photo folder :
Tap the icon to see all of the photos you have taken.
9. Security On/Off
: Security On. Press it to activate alarm system. The camera will make a
short beep sound. All sensor alarms will work as pre-set.
: Security Off. Press it again to deactivate the alarm system. The camera will
make a long beep sound. All sensor alarms will be off.
10. Siren On/Off
: siren on.
: siren off.
12
3.4
4
4.1

Tap the icon to enter camera setting screen. See Fig. 12.
Note: For security and management purposes, the “Camera Password” and
“SD card Safety Remove” functions cannot be set when your
mobile phone and camera are not connected to the same Wi-Fi router.
Change Name: Change the camera name. See Fig. 13.
Change Password: Change the camera password. The default camera password is
“admin”. See Fig. 14.
Delete: Delete camera from Camera List.
Event Viewer: View event logs.
Wireless Setup: Not applicable for this model.
Motion Detection (See Fig. 15.):
a. Enable/Disable motion detection.
b. A motion detection event can trigger the push message alert function and
motion recording function.
Note: Motion recording is only possible when a micro SD card is inserted into the
camera. To remove memory card, please disable motion detection first.
c. Touch the image display area of the screen and then slide onto the screen to
outline the motion detection area.
d. The interval between checks is 1 minute.
Voice Detection (VOX) (See Fig. 16.):
a. iSmart-CAM supports voice detection and push message alert functions.
When the sound from the camera reaches the setting level, the camera will send
an alert message to your smartphone or tablet, and the camera also can play a
pre-recorded voice or melody automatically.
b. Tapping the sensitivity level bar can adjust the sensitivity level or disable the
VOX function. With the level set to high, the camera microphone will detect
sounds that are lower in volume.
c. Tap the Voice Recorder icon to start recording a voice or melody
that can be played by the camera when VOX is triggered. Tap the
Stop icon to stop recording. Maximum recording time is 10
seconds. The Voice Recorder is only effective when a micro SD
card is inserted into the camera.
d. The interval between VOX checks is 1 minute.
Camera Setting
To protect your privacy, we strongly recommend you
change the camera password on a regular basis.
13
4.2 . 1
4.2 . 2
4.2 . 3
4.2 . 4
4.2 . 5
4.2 . 6
4.2 . 7
4.2

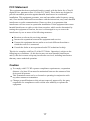
Record:
Tap the icon to enable HD 720p recording, tap it again to disable recording.
Note 1: Recording is only possible when a micro SD card is
inserted into the camera.
2: The system supports micro SD cards with a maximum
capacity of 32GB.
3: A 1GB memory card is able to record about 2 hour of VGA video or
1 hour of HD video. New images will overwrite old images when the
card is full.
4: If motion detection is not activated, the camera will
record continuously.
5: To playback recorded file
Place the micro SD card into an SD card adapter.
Connect the card adapter to a computer.
Use a media player such as VLC to playback the recorded file.
Record Setting:
Select the resolution of recording files as VGA (640x360) or HD (1280x720)
Video Playback:
Playback the recording files on smartphone or tablet directly.
SD Card Safety Remove:
Tap this icon before you remove SD card out. Make sure you stop motion or
continuous recording first.
Video Setting (See Fig. 17.):
a. Flip: Tap the Flip icon to flip the video when mounting the camera on the
ceiling.
b. Mirror: Mirror or invert the image.
c. Video Resolution: the number of distinct pixels in each dimension that can
be displayed, i.e.
HD (1280X720) /VGA(640X360) /QVGA(320X180).
d. Bit rate: the number of bits conveyed per second in telecommunications.
The higher the rate the greater the bandwidth consumption.
Do not remove the memory card while recording is still in
progress, otherwise the recording will be damaged.
14
4.2 . 8
4.2 . 9
4.2 . 10
4.2 . 11
4.2 . 12

e. Frame Rate: The frequency at which camera produces unique called frames.
The higher the frame rate, the smoother the video will appear, but that requires
more processing power and system bandwidth. Frame rate varies according to
network conditions, mobile phone performance, image resolution and object
situation.
f. Power Frequency: The frequency of your power supply. You can set as 50Hz
or 60Hz.
Note 1: To view a camera remotely from outside your home or
office network, the camera needs to be configured to
QVGA resolution to allow better access.
IoT Sensor Setting: Setting of IoT sensors, please refer to each sensor setting guide
for more detail.
15
If you select HD or VGA resolution, video streaming
quality may be affected because of insufficient network
bandwidth.
4.2 . 13

16
Troubleshooting
Users cannot connect the camera to a smartphone/tablet through
Wi-Fi router or 3G/4G mobile network
• Make sure the power plug is pushed all the way in.
• Make sure the camera is turned on and power/status LED is green.
• Make sure the camera and the Wi-Fi router are within range of each other.
• Make sure the smartphone/tablet is connected to the Internet through a
Wi-Fi or 3G/4G mobile network.
Video streaming is slow or lag
• If there is a microwave oven in use near the camera or Wi-Fi router,
remove the oven or turn it off.
• Make sure the camera and the Wi-Fi router are within range of each other.
• The speed of video feed from the camera largely depends on the speed of the
connection you are using.
• Internet speed, either from your Wi-Fi network or 3G/4G mobile network, has
a high impact on the performance of the product. The faster and more stable the
connection speed, the faster you can view video from the camera.
• Lower the video resolution, bit rate and frame rate.
• There are three main types of broadband Internet connection; ADSL, cable and
fiber optic. If you use an ADSL connection, please set video resolution at QVGA.
• To view the camera remotely from outside home or office networks, it needs
to be configured to QVGA resolution to allow better access.
Care and Maintenance
• Keep all parts out of reach of children.
• Fingerprints or dirt on the lens surface can adversely affect camera performance. Avoid touching
the lens surface with your fingers.
• Should the lens become dirty, use a blower to blow off dirt and dust, or a soft,
dry cloth to wipe the lens clean.
• Keep the camera dry. Precipitation, humidity and other liquids containing minerals
will corrode electronic circuits.
• Do not use or store in dusty or dirty areas.
• Do not store in hot areas. High temperatures can shorten the life of electronic devices
and warp or melt certain plastics.
• Do not store in very cold areas. When the system warms up (to its normal temperature),
moisture can form inside the case, which may damage electronic circuit boards.
• Do not attempt to open the case. Non-expert handling of the device may damage the system.
• Avoid dropping or strong shocks.
• Operate this product using only the power supply included or provided as an accessory.
• Do not overload electrical outlets or extension cords as this can result in fire or electric shock.

FCC Statement
This equipment has been tested and found to comply with the limits for a Class B
digital device, pursuant to Part 15 of the FCC Rules. These limits are designed to
provide reasonable protection against harmful interference in a residential
installation. This equipment generates, uses and can radiate radio frequency energy
and, if not installed and used in accordance with the instructions, may cause harmful
interference to radio communications. However, there is no guarantee that
interference will not occur in a particular installation. If this equipment does cause
harmful interference to radio or television reception, which can be determined by
turning the equipment off and on, the user is encouraged to try to correct the
interference by one or more of the following measures:
Reorient or relocate the receiving antenna
Increase the separation between the equipment and receiver
Connect the equipment into an outlet on a circuit different from that to
which the receiver is connected
Consult the dealer or an experienced radio/TV technician for help
This device complies with Part 15 of the FCC Rules. Operation is subject to the
following two conditions: (1) this device may not cause harmful interference,
and (2) this device must accept any interference received, including interference
that may cause undesired operation.
Caution
To comply with FCC RF exposure compliance requirements, a separation
distance of at least 20 cm must be maintained between the antenna of this
device and all persons.
This Transmitter must not be co-located or operating in conjunction with
any other antenna or transmitter.
Changes or modifications to this unit not expressly approved by the party
responsible for compliance could void the user authority to operate the
equipment.
17

This item is in compliance with the essential requirements and other relevant
provisions of Directive 1999/5/EC.
* iPhon e, iPad are tradema rks of Appl e Inc., regist er ed in the U.S. an d other countries .
* Goo gle Play is a trad ema rk of Goo gle Inc.
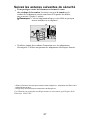
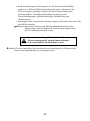
Following the safety tips
To prevent deaths and injuries associated with camera cords,
make sure the camera and AC adapter cords are always out of
reach of the baby by least 3 feet (1 meter).
Note: This is important even if your baby is not yet standing
or mobile.
Never use extension cords with AC adapters. Only use the
AC adapters provided.
3 feet
(1 metre)
adapter
cable
Camera
Frequency
Antenna
Modulation
Image Sensor
Lens
IR LED
Video compression
Audio
Recording
Pan & Tilt
Dimensions
Weight
Power
Operating temperature
2.4 GHz
Dipole antenna
DBPSK, DQPSK, CCK and OFDM
Color CMOS
f 4.1mm, F 2.8
8 pcs
H.264
Two-way audio talk (half-duplex)
Support Micro SDHC Card,
class 6 or above, up to 32GB
H: 270 deg, V:120 deg
8.5(W) x 10.6(H) x 8.5(D) cm
229g
DC 5.9V, 1.97A
0℃ ~ 40℃ (32℉ ~ 104℉)
Specifications
Specifications are subject to change without prior notice.
18

19
Service hotline
In the case of technical problems, contact our Service hotline.
Switzerland: Tel. 0900 00 1675 (national charges, Swisscom at time
of going to print: CHF 2.60/min).
In the case of claims under the terms of guarantee, contact your
sales outlet.
EuP2
Power adapter plug
Using the energy-efficient power adapter plug (input 100-240 VAC,
output 5.9 VDC, 1.97 A) the zero load is approx. 0.06 W. The average
efficiency is approx. 77.5 %. The maximum power consumption is
approx. 11 W.
Guarantee
SWITEL equipment is produced and tested according to the latest
production methods. The implementation of carefully chosen materials
and highly developed technologies ensure trouble-free functioning
and a long service life. The terms of guarantee do not apply to
the batteries or power packs used in the products. The period of
guarantee is 24 months from the date of purchase.
All deficiencies related to material or manufacturing errors within the
period of guarantee will be redressed free of charge. Rights to
claims under the terms of guarantee are annulled following tampering
by the purchaser or third parties. Damage caused as the result of
improper handling or operation, normal wear and tear, incorrect
positioning or storage, improper connection or installation or Acts of
God and other external influences are excluded from the terms of
guarantee. In the case of complaints, we reserve the right to repair
defective parts, replace them or replace the entire device. Replaced
parts or devices become our property. Rights to compensation in the
case of damage are excluded where there is no evidence of intent or
gross negligence by the manufacturer.
If your device does show signs of a defect within the period of guarantee,
please contact the sales outlet where you purchased the
SWITEL device, producing the purchase receipt as evidence. All
claims under the terms of guarantee in accordance with this agreement
can only be asserted at the sales outlet. No claims under the
terms of guarantee can be asserted after a period of two years from
the date of purchase and hand-over of the product.
Declaration of Conformity
This device fulfils the requirements stipulated in the Directive
1999/5/EC on radio equipment and telecommunications
terminal equipment and the mutual recognition of their conformity.
Conformity with the above mentioned directive is confirmed
by the CE mark on the device. To view the complete Declaration of
Conformity, please refer to the free download available on our web
site www.switel.com.
La pagina si sta caricando...
La pagina si sta caricando...
La pagina si sta caricando...
La pagina si sta caricando...
La pagina si sta caricando...
La pagina si sta caricando...
La pagina si sta caricando...
La pagina si sta caricando...
La pagina si sta caricando...
La pagina si sta caricando...
La pagina si sta caricando...
La pagina si sta caricando...
La pagina si sta caricando...
La pagina si sta caricando...
La pagina si sta caricando...
La pagina si sta caricando...
La pagina si sta caricando...
La pagina si sta caricando...
La pagina si sta caricando...
La pagina si sta caricando...
La pagina si sta caricando...
La pagina si sta caricando...
La pagina si sta caricando...
La pagina si sta caricando...
La pagina si sta caricando...
La pagina si sta caricando...
La pagina si sta caricando...
La pagina si sta caricando...
La pagina si sta caricando...
La pagina si sta caricando...
La pagina si sta caricando...
La pagina si sta caricando...
La pagina si sta caricando...
La pagina si sta caricando...
La pagina si sta caricando...
La pagina si sta caricando...
La pagina si sta caricando...
La pagina si sta caricando...
-
 1
1
-
 2
2
-
 3
3
-
 4
4
-
 5
5
-
 6
6
-
 7
7
-
 8
8
-
 9
9
-
 10
10
-
 11
11
-
 12
12
-
 13
13
-
 14
14
-
 15
15
-
 16
16
-
 17
17
-
 18
18
-
 19
19
-
 20
20
-
 21
21
-
 22
22
-
 23
23
-
 24
24
-
 25
25
-
 26
26
-
 27
27
-
 28
28
-
 29
29
-
 30
30
-
 31
31
-
 32
32
-
 33
33
-
 34
34
-
 35
35
-
 36
36
-
 37
37
-
 38
38
-
 39
39
-
 40
40
-
 41
41
-
 42
42
-
 43
43
-
 44
44
-
 45
45
-
 46
46
-
 47
47
-
 48
48
-
 49
49
-
 50
50
-
 51
51
-
 52
52
-
 53
53
-
 54
54
-
 55
55
-
 56
56
-
 57
57
-
 58
58


SWITEL BSW 220 iSmart-CAM Manuale utente
- Categoria
- Router
- Tipo
- Manuale utente
in altre lingue
Documenti correlati
-
SWITEL COIP200B Manuale utente
-
-
-
SWITEL HS 2000 Manuale utente
-
-
SWITEL BSW100 Manuale del proprietario
-
-
SWITEL BSW200 Manuale del proprietario
-
-
Altri documenti
-
AKASO V50 Pro SE Manuale utente
-
DBPOWER Action Camera EX7000 Manuale utente
-
König SEC-IPCAM100 specificazione
-
-
 Wiseup WIFI36 Manuale utente
-
Denver ACT-5020TWC Manuale utente
-
 Mr Handsfree iSmart Manuale del proprietario
-
 Mr Handsfree iSmart Manuale del proprietario
-
 Mr Handsfree iSmart Manuale del proprietario
-
 Mr Handsfree iSmart Manuale del proprietario


