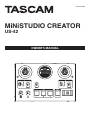
Tascam MINISTUDIO CREATOR US-42 Manuale del proprietario
- Categoria
- Apparecchiature musicali supplementari
- Tipo
- Manuale del proprietario

OWNER’S MANUAL
D01288420G
MiNiSTUDIO CREATOR
US-42

2 TASCAM MiNiSTUDIO CREATOR
IMPORTANT SAFETY INSTRUCTIONS
INFORMATION TO THE USER
This equipment has been tested and found to comply
with the limits for a Class B digital device, pursuant to
Part 15 of the FCC Rules. These limits are designed to
provide reasonable protection against harmful inter-
ference in a residential installation. This equipment
generates, uses, and can radiate radio frequency
energy and, if not installed and used in accordance
with the instruction manual, may cause harmful
interference to radio communications. However, there
is no guarantee that interference will not occur in a
particular installation. If this equipment does cause
harmful interference to radio or television reception,
which can be determined by turning the equipment
off and on, the user is encouraged to try to correct
the interference by one or more of the following
measures.
a) Reorient or relocate the receiving antenna.
b) Increase the separation between the equipment
and receiver.
c) Connect the equipment into an outlet on a circuit
different from that to which the receiver is connected.
d) Consult the dealer or an experienced radio/TV
technician for help.
CAUTION
Changes or modifications to this equipment not
expressly approved by TEAC CORPORATION for
compliance could void the user’s authority to operate
this equipment.
For U.S.A.
For Canada
THIS CLASS B DIGITAL APPARATUS COMPLIES WITH
CANADIAN ICES-003.
CET APPAREIL NUMÉRIQUE DE LA CLASSE B EST
CONFORME À LA NORME NMB-003 DU CANADA.
Declaration of Conformity
Responsible party: TEAC AMERICA, INC.
Address: 10410 Pioneer Blvd. Suite #1,
Santa Fe Springs, California
90670, U.S.A.
Telephone number: 1-323-726-0303
This device complies with Part 15 of the FCC Rules.
Operation is subject to the following two conditions:
(1) this device may not cause harmful interference,
and (2) this device must accept any interference
received, including interference that may cause
undesired operation.
This product complies with the
European Directives request and the
other Commission Regulations.
Nameplate
1 Read these instructions.
2 Keep these instructions.
3 Heed all warnings.
4 Follow all instructions.
5 Do not use this apparatus near water.
6 Clean only with dry cloth.
7 Do not block any ventilation openings. Install in
accordance with the manufacturer’s instructions.
8 Do not install near any heat sources such as
radiators, heat registers, stoves, or other apparatus
(including amplifiers) that produce heat.
9 Do not defeat the safety purpose of the polarized
or grounding-type plug. A polarized plug has two
blades with one wider than the other. A grounding
type plug has two blades and a third grounding
prong. The wide blade or the third prong are
provided for your safety. If the provided plug does
not fit into your outlet, consult an electrician for
replacement of the obsolete outlet.
10 Protect the power cord from being walked on or
pinched particularly at plugs, convenience recep-
tacles, and the point where they exit from the
apparatus.
11 Only use attachments/accessories specified by the
manufacturer.

TASCAM MiNiSTUDIO CREATOR 3
12 Use only with the cart, stand,
tripod, bracket, or table
specified by the manufacturer,
or sold with the apparatus.
When a cart is used, use
caution when moving the cart/apparatus combi-
nation to avoid injury from tip-over.
13 Unplug this apparatus during lightning storms or
when unused for long periods of time.
14 Refer all servicing to qualified service personnel.
Servicing is required when the apparatus has been
damaged in any way, such as power-supply cord or
plug is damaged, liquid has been spilled or objects
have fallen into the apparatus, the apparatus has
been exposed to rain or moisture, does not operate
normally, or has been dropped.
• The apparatus draws nominal non-operating
power from the AC outlet with its POWER or
STANDBY/ON switch not in the ON position.
• The mains plug is used as the disconnect device,
the disconnect device shall remain readily
operable.
• Caution should be taken when using earphones
or headphones with the product because
excessive sound pressure (volume) from
earphones or headphones can cause hearing
loss.
• If you are experiencing problems with this
product, contact TEAC for a service referral. Do
not use the product until it has been repaired.
CAUTION
• Do not expose this apparatus to drips or
splashes.
• Do not place any objects filled with liquids, such
as vases, on the apparatus.
• Do not install this apparatus in a confined space
such as a book case or similar unit.
• The apparatus should be located close enough
to the AC outlet so that you can easily grasp the
power cord plug at any time.
• If the product uses batteries (including a battery
pack or installed batteries), they should not be
exposed to sunshine, fire or excessive heat.
• CAUTION for products that use replaceable
lithium batteries: there is danger of explosion
if a battery is replaced with an incorrect type
of battery. Replace only with the same or
equivalent type.
8For European Customers
Disposal of electrical and electronic equipment
(a) All electrical and electronic equipment should be
disposed of separately from the municipal waste
stream via designated collection facilities appointed
by the government or the local authorities.
(b) By disposing of the electrical and electronic
equipment correctly, you will help save valuable
resources and prevent any potential negative
effects on human health and the environment.
(c) Improper disposal of waste equipment can have
serious effects on the environment and human
health as a result of the presence of hazardous
substances in electrical and electronic equipment.
(d) The crossed out wheeled dust bin
symbol indicates that electrical and
electronic equipment must be collected
and disposed of separately from
household waste.
(e) The return and collection systems are available to
the end users. For more detailed information about
disposal of old electrical and electronic equipment,
please contact your city office, waste disposal
service or the shop where you purchased the
equipment.

4 TASCAM MiNiSTUDIO CREATOR
Contents
IMPORTANT SAFETY INSTRUCTIONS .............................2
Introduction ............................................................................4
Features ....................................................................................4
Included items .......................................................................5
Conventions used in this manual ...................................5
Trademarks and copyrights ..............................................5
Precautions for placement and use ...............................5
Using the TEAC Global Site ...............................................6
Beware of condensation ....................................................6
Cleaning the unit ..................................................................6
Product registration ............................................................6
Broadcasting live...................................................................6
Names and functions of parts ..........................................8
Top panel ...........................................................................................8
Front panel ........................................................................................ 9
Rear panel ....................................................................................... 10
Installing the dedicated software ............................... 10
Installing the Windows software ..................................... 10
Installing the Mac software ..................................................11
Working with Gatekeeper .....................................................12
Connecting the power ..................................................... 13
When using a computer (Windows/Mac) ...................13
When using an iOS device ....................................................13
Connection illustrations .................................................. 13
Connecting with a computer ............................................ 14
Connecting iOS devices ........................................................ 14
Audio connections.................................................................... 14
Opening the Settings Panel ........................................... 15
Windows ...........................................................................................15
Mac .......................................................................................................15
Settings Panel overview .................................................. 15
Using the Settings Panel menu bar ................................15
EASY page .......................................................................................17
EXPERT page ................................................................................. 18
Driver settings for specific purposes (Windows only)
.. 21
Creating podcasts (Windows only) ............................. 21
Using the ducking function ........................................... 22
Notification function ........................................................ 22
Automatic Settings Panel and firmware update func-
tion ..........................................................................................22
Application Guide ..............................................................23
Windows Media Player ........................................................... 23
OS X and iTunes .......................................................................... 23
Troubleshooting ................................................................. 24
Specifications ...................................................................... 25
Ratings...............................................................................................25
Analog audio input ratings ..................................................25
Analog audio output ratings .............................................. 25
Control input/output ratings .............................................26
Audio performance .................................................................. 26
Operation requirements ................................................. 26
Windows ..........................................................................................26
Mac ......................................................................................................26
iOS device ....................................................................................... 26
Supported audio drivers .......................................................26
General...................................................................................27
Dimensional drawings ..................................................... 27
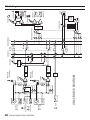
Block diagrams....................................................................28
Introduction
Thank you very much for purchasing the TASCAM
MiNiSTUDIO CREATOR.
Before using this unit, read this Owner's Manual
carefully so that you will be able to use it correctly
and enjoy working with it for many years. After you
have finished reading this manual, please keep it in a
safe place for future reference.
You can also download this Owner’s Manual from the
TEAC Global Site (https://teac-global.com/).
Before connecting this unit to a computer, you
must download and install dedicated software
on the computer.
Features
The MiNiSTUDIO series of personal audio interfaces
are designed to make Internet broadcasting of audio
performances easy.
The MiNiSTUDIO CREATOR, which is an advanced
model in the MiNiSTUDIO series, supports both live
broadcasting and production applications as well as
the simultaneous use of two mics. Users can enjoy
streaming and production with advanced features.
• Audio interface designed specifically for live
Internet broadcasting with support for not only
Windows, but also Mac and iOS
• Sound effect triggering (PON) function,
voice effects and reverb enable many audio
performance possibilities
• Easily-operated user interface designed for
Internet broadcasting
• Two input jacks support various applications
including performances with vocals and guitar
and interview programs
• CREATOR mode is optimal for creating video
contents and music.
8Note about computer operation
If you are unsure about anything related to the basic
operation of a computer when it is mentioned in
an explanation in this manual, please refer to the
computer operation manual.
To use this unit with a computer, dedicated software
must be installed on the computer.
For details about software installation, see “Installing
the dedicated software” on page 10.

TASCAM MiNiSTUDIO CREATOR 5
Included items
This product includes the following items.
Take care when opening the package to avoid
damaging the items. Keep the box and packing
materials for transportation in the future.
Please contact the store where you purchased this
unit if any of these items are missing or have been
damaged during transportation.
• Main unit ................................................................... × 1
• USB cable ..................................................................× 1
• Owner’s Manual (this document) .....................× 1
The warranty is included at the end of this manual.
Conventions used in this manual
In this manual, we use the following conventions:
• Buttons, connectors and other physical parts of
this unit are written using a bold font like this:
VOLUME knob.
• Information shown on a computer display is
written like this: “OK”.
• Additional information is provided as necessary
as tips, notes and cautions.
TIP
These are tips about how to use the unit.
NOTE
These provide additional explanations and
describe special cases.
CAUTION
Failure to follow these instructions could result
in injury, damage to equipment or lost recording
data, for example.
Trademarks and copyrights
• TASCAM and MINISTUDIO are registered
trademarks of TEAC Corporation.
• Microsoft, Windows, Windows Vista and
Windows Media are either registered trademarks
or trademarks of Microsoft Corporation in the
United States and/or other countries.
• Apple, Mac, Mac OS, macOS, iPad, iPod touch,
Lightning, App Store and iTunes are trademarks
of Apple Inc.
• IOS is a trademark or registered trademark of
Cisco in the U.S. and other countries and is used
under license.
• ASIO is a trademark of Steinberg Media
Technologies GmbH.
• Other company names, product names and
logos in this document are the trademarks
or registered trademarks of their respective
owners.
Precautions for placement and use
• The operating temperature range of this unit is
5–35 °C.
• Do not install this unit in the following types
of locations. Doing so could make the sound
quality worse or cause malfunction.
Places with significant vibrations
Near windows or other places exposed to
direct sunlight
Near heaters or other extremely hot places
Extremely cold places
Places with bad ventilation or high humidity
Very dusty locations
• Do not place this unit on top of a power
amplifier or other device that generates heat.

6 TASCAM MiNiSTUDIO CREATOR
Using the TEAC Global Site
You can download updates for this unit from the
TEAC Global Site:
https://teac-global.com/
A list of SD cards that have been confirmed for use
with this unit can be found on our web site. Please
access to a product page of this product from the
TEAC Global Site (https://teac-global.com) to find the
list or contact the TASCAM customer support service.
Beware of condensation
If the unit is moved from a cold to a warm place,
or used after a sudden temperature change, there
is a danger of condensation; vapor in the air could
condense on the internal mechanism, making correct
operation impossible. To prevent this, or if this occurs,
let the unit sit for one or two hours at the new room
temperature before using it.
Cleaning the unit
Use a dry soft cloth to wipe the unit clean. Do not
wipe with chemical cleaning cloths, thinner, alcohol
or other chemical agents. Doing so could damage the
surface or cause discoloration.
Product registration
Customers in the USA, please visit the following
TASCAM website to register your TASCAM product
online.
https://tascam.com/us/
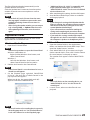
Broadcasting live
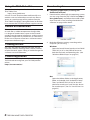
8Computer preparation (installing the
dedicated software)
1. Download the software for the operating system
you are using from the TEAC Global Site (https://
teac-global.com/) and follow the installer proce-
dures to install it. See “Installing the dedicated
software” on page 10 for details.
Installer screen
2. Make the following settings according to the
computer you are using.
Windows
Open the Sound Control panel and set “
MiNiS-
TUDIO US-32/42
” as the Default Device on
both the Playback and Recording tabs. (See
“Windows Media Player” on page 23.)
Mac
Open the Utilities folder in the Applications
folder, and double-click “Audio MIDI Setup”.
Then, set “MiNiSTUDIO US-42” to “Use this
device for sound input” and “Use this device
for sound output”. (See “OS X and iTunes” on
page 23.)

TASCAM MiNiSTUDIO CREATOR 7
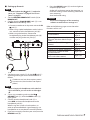
8Setting up the unit
NOTE
For details about the IN jack (1) and other
parts, see “Top panel” on page 8 and “Front
panel” on page 9.
3. Set the CREATOR/BROADCAST switch (o) to
BROADCAST.
4. Confirm that the IN VOLUME knob (4) is set
to MIN before connecting a mic.
iConnect a condenser or dynamic mic to the IN
jack (1).
iWhen using 4-pole headphones with a built-in
mic, connect it to the headphones jack (y).
iWhen using the headset, connect the
headphone plug to the headphones jack (y)
and the mic plug to the mic jack (u).
5. Set the mic type switch (5) for the IN jack (1)
according to the type of mic connected to it as
follows.
Condenser mic (mic that requires power)
Dynamic mic (mic that does not require
power)
NOTE
When using 4-pole headphones with a built-in
mic or a headset, you can set this to either or
.
6. Say or sing something, and turn the IN
VOLUME knob (4) until the LEVEL meter (2)
lights green.
7. Confirm that the headphone knob (6) is
set to MIN, and connect headphones to the
headphone jack (t).
When using this unit for a live broadcast, in
order to prevent feedback (signal looping), use
headphones or an earphone instead of speakers.
8. If you want to apply reverb to your voice, turn the
REVERB knob (0).
9. Press the ON AIR button (e) so that it lights to
complete preparation.
Audio will start being sent to the computer, so
make the settings in the streaming software to
start streaming.
Start live broadcasting.
CAUTION
Refer to the help pages of the streaming
software to make various settings in it.
Refer to the following pages to use the other
functions of this unit.
Desired action Page
Use voice effects page 17
page 18
Play background music on the
computer (Windows Media Player/
iTunes)
page 23
Play sound effects (PON trigger
function)
page 17
page 18
Use with an iOS device (connecting) page 13
Use with an iOS device (powering) page 13
Use music on a tablet or other
connected device page 9, i
Using the unit as an audio interface
(music and video creation) page 9, o

8 TASCAM MiNiSTUDIO CREATOR
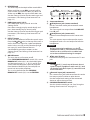
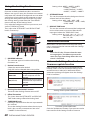
Names and functions of parts
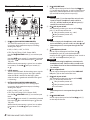
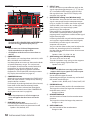
Top panel
1 IN jack (BALANCED/UNBALANCED)
This XLR/TRS combo jack is an analog input.
It supports high impedance input, including
direct guitar input.
iXLR (1: GND, 2: HOT, 3: COLD)
iTRS
(Tip: HOT, Ring: COLD, Sleeve: GND)
Use the IN VOLUME knob (4) to set the input
level.
Use the IN input switch (5) to enable balanced
line input ( / ) or unbalanced input ( ) for the
TRS jack.
When directly connecting a guitar, bass or other
instrument, set the IN jack input switch (5)
to .
2 LEVEL meters
These show the levels of the analog input signals.
When a signal is being input, this lights yellow
when the level is too low or too high, green
when the level is good and red when the signal
is distorting.
3 IN jack (BALANCED/UNBALANCED)
This XLR/TRS combo jack is an analog input.
It supports high impedance input, including
direct guitar input.
iXLR (1: GND, 2: HOT, 3: COLD)
iTRS (Tip: HOT, Ring: COLD, Sleeve: GND)
Use the IN VOLUME knob (9) to set the input
level.
Use the IN input switch (8) to enable balanced
line input ( / ) or unbalanced input ( ) for the
TRS jack.
When directly connecting a guitar, bass or other
instrument, set the IN jack input switch (8)
to .
4 IN VOLUME knob
Use to adjust the input levels from the IN jack
(1) on the top of the unit, as well as from the mic
input for 4-pole headphones with a built-in mic
(y) and the headset jack mic input (u).
CAUTION
The IN 1 jack (1) on the top of the unit, the mic
input for 4-pole headphones with a built-in
mic (y), and the headset jack mic input (u)
cannot be used at the same time.
5 IN jack input switch
Set according to the input source of the IN
jack (1) on the top of the unit.
Mic (phantom power on, +48V)
Mic (phantom power off)
Instrument
NOTE
• When using 4-pole headphones with a built-in
mic or a headset, you can set this to either or .
• Phantom power is not output through the TRS
jack.
6 (headphones) knob
Use to adjust the output level from the
headphones jack (t) and the headphone
outputs for the 4-pole headphones with a built-in
mic (y) and the headset jack (u).
CAUTION
Before connecting headphones, minimize the
headphones knob. Failure to do so could result
in a sudden loud noise that could harm hearing,
for example.
7 Line output knob
Use to adjust the output level of the LINE OUT
L/R jacks (p) on the back of the unit.
8 IN jack input switch
Set according to the input source of the IN
jack (3) on the top of the unit.
Mic (phantom power on)
Mic (phantom power off)
Instrument
NOTE
Phantom power is not output through the TRS
jack.
9 IN VOLUME knob
Use to adjust the input level of the IN jack (3)
on the top of the unit.

TASCAM MiNiSTUDIO CREATOR 9
0 REVERB knob
This knob adjusts the depth of the reverb effect.
When set all the way to MIN, no reverb will be
used and the signal will be 100% dry. When set
all the way to MAX, the signal will be 100% wet.
Use the Settings Panel to set the reverb type and
parameters. (See “Settings Panel overview” on
page 15.)
q PON trigger pads (1/2/3)
Press these pads to play sounds set in the
Settings Panel.
Press them strongly to play sounds loudly and
press them weakly to play sounds softly.
Use the Settings Panel to set the PON trigger pad
parameters. (See “Settings Panel overview” on
page 15.)
w EFFECT button
Use to turn the effect on/off for the sounds input
from the IN /IN jacks on the top of the unit, as
well as for the mic input for 4-pole headphones
with a built-in mic (y) and the headset jack
mic input (u) on the front of the unit.
Set the effect type and parameters on the
Settings Panel. (See “Settings Panel overview” on
page 15.)
e ON AIR button
This turns the on air function on/off.
If the CREATOR/BROADCAST switch (o) is set to
BROADCAST, when this is on, the button lights
and the input sound (1, 3, y, u and i) and
sound from the computer (sound of playback
from Windows Media Player, for example) are
mixed and sent to the computer.
This is on by default after the CREATOR/
BROADCAST switch (o) is set to CREATOR.
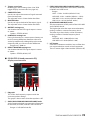
Front panel
r Strap attachments
t Headphones jack (stereo standard)
Use this standard stereo jack to connect stereo
headphones.
The same signals are output from the LINE OUT
L and R jacks.
y Headphones jack (stereo mini)
Connect stereo headphones to this stereo mini
jack.
This unit supports input and output for 4-pole
headphones with a mic and output for headset
headphones.
CAUTION
Before connecting headphones, use the
headphones knob (6) to minimize the volume.
Failure to do so could result in a sudden loud
noise that could harm hearing, for example.
u Mic jack (TS mini)
Connect the mic plug of a headset to this TS mini
jack.
CAUTION
The IN jack (1) on the top of the unit, the mic
input for 4-pole headphones with a mic (y), and
the headset jack mic input (u) cannot be used
at the same time.
i External input jack (stereo mini)
Use a stereo mini jack cable to connect this to the
line output jack of a tablet or other device.
Use the output level setting of the connected
device to adjust the input level.
o CREATOR/BROADCAST switch
Set this switch according to use. (See “Using the
Settings Panel menu bar” on page 15.)

10 TASCAM MiNiSTUDIO CREATOR
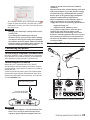
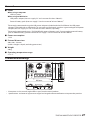
Rear panel
p LINE OUT L/R jacks (UNBALANCED)
These RCA pin jacks are analog line outputs.
a POWER switch
Use to turn the unit on and to put it into standby.
When the unit is turned on, the LEVEL meters
(2) light completely once.
s USB 2.0 port
Use the included USB cable to connect the unit
to a computer. (Supports USB 2.0.)
CAUTION
• When using this unit connected to a computer, it
will receive power from the computer's USB port.
Depending on the computer, the USB port might
not be able to supply enough power to operate
the unit.
• When connected to a USB 3.0 port, it will
function in High Speed mode equivalent to USB
2.0 (480 Mbps maximum).
• After waking a computer from suspend (sleep)
mode, if the unit does not operate properly, turn
it off and turn it on again or disconnect and
reconnect the USB cable.
• USB 1.1 is not supported.
d DC IN 5V connector
When connected to an iOS device or other
equipment that cannot power this unit, you must
use a USB power adapter, mobile battery or other
power supply. See “When using an iOS device” on
page 13 for details.
f Kensington Security Slot
Installing the dedicated software
To use this unit with a computer, dedicated software
must be installed on the computer.
Download the latest software for the operating
system you are using from the TEAC Global Site
(https://teac-global.com/).
• When you install the dedicated software on a
Windows computer, the Windows driver and the
Settings Panel application will be installed.
• When you install the dedicated software on a
Mac, only the Mac Settings Panel application will
be installed.
The standard OS driver will be used.
• When using this unit with an iOS device, the
standard OS driver will be used, so there is no
need to install dedicated software.
CAUTION
Before starting to install software, quit other
applications.
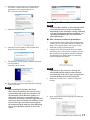
Installing the Windows software
CAUTION
• Complete installation of the Windows software
on the computer before connecting the unit to it
with the USB cable.
• If you already connected the unit to the
computer using the USB cable before installing
the Windows software and the Found New
Hardware Wizard launched, close the message
and disconnect the USB cable.
8Windows software installation procedures
1. Download the latest Windows software for the
operating system you are using from the TEAC
Global Site (https://teac-global.com/) and save it
on the computer to be used with the unit.
2. Open the saved Windows software (zip file) on,
for example, the computer desktop.
3. Double-click the “TASCAM_MiNiSTUDIO_
Installer_XXX.exe”
(XXX is the version number) file
in the folder that appears after uncompression to
automatically launch the installation software.
4. When a “Security Warning” or “User Account
Control” screens appear, click the “Yes” button.
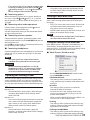
5. When the InstallShield Wizard screen appears,
click the “Next” button.

TASCAM MiNiSTUDIO CREATOR 11
6. Read the contents of the License Agreement,
and select “I accept the terms in the license
agreement” if you agree to the terms.
Then, click the “Next” button.
7. Click the “Install” button.
8. Click the “Install” button in the window that
opens to start installation.
9. The following screen appears when installation
has completed.
Click the “Finish” button.
10. The installer will quit and the Windows Settings
Panel will launch.
NOTE
After installing the software, the device
driver will be installed the first time the unit is
connected by USB. At this time, Windows will
automatically search Windows Update, so it
might take some time to recognize the unit
connection. If the unit is still not recognized after
some time, open the Software installation screen
from the message area at the bottom right of
the computer display, and click “Skip Obtaining
Drivers From Windows Update” to cancel the
search.
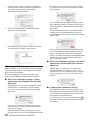
Installing the Mac software
NOTE
• Install the Mac software on the computer before
connecting the unit to it with the USB cable.
• Depending on the Gatekeeper setting, a warning
message might appear during installation. See
“Working with Gatekeeper” for information
about Gatekeeper.
8Mac software installation procedures
1. Download the latest software for the operating
system you are using from the TEAC Global Site
(https://teac-global.com/) and save it on the
computer to be used with the unit.
2. Double-click “TASCAM_MiNiSTUDIO Installer_
XXX.dmg” (XXX is the version number), which is
the saved disk image file for the Mac software,
and double-click “ MiNiSTUDIO Installer.pkg”
inside the folder that opens.
NOTE
Depending on the computer’s settings, the
downloaded zip file might not have opened
automatically. In this case, open the zip file first
and then double-click the disk image file.
3. When the installer starts, click the “Continue”
button.
4. Next, select the desired language and click the
“Continue” button.

12 TASCAM MiNiSTUDIO CREATOR
5. Click the “Read License” button and check the
contents of the Software License Agreement. If
you agree to the contents, click “Agree”.
Then, click the “Next” button.
6. Click the “Install” button in the window that
opens to start installation.
7. The following screen appears when installation
has completed. Click the “Close” button.
Working with Gatekeeper
When using Mac OS X, depending on the Gatekeeper
security function setting, a warning message might
appear during installation.
The solution depends on the warning message
shown. See the following explanations for details.
8When the Gatekeeper setting is “Allow
applications downloaded from: the Mac
App Store”
The following security warning might be shown:
“MiNiSTUDIO_Installer.pkg” can’t be opened
because it was not downloaded from the Mac
App Store.”
In this case, click the “OK” button to close the
message. Then, control-click (or right-click) the
file and click “Open”.
When the “MiNiSTUDIO_Installer.pkg” can’t be
opened because it was not downloaded from the
Mac App Store. Are you sure you want to open
it?” security warning message appears, click the
“Open” button.
This warning message might also appear when
the Gatekeeper setting is something other than
“Allow applications downloaded from: the Mac
App Store.”
The file still might not open and “MiNiSTUDIO_
Installer.pkg” can’t be opened because it was
not downloaded from the Mac App Store.” might
appear again.
In this case, copy the file from the folder where
it is to the desktop or another folder, and then
open it. Alternatively, change the Gatekeeper
settings to “Allow applications downloaded from:
the Mac App Store and identified developers”
and try opening it again.
8When the Gatekeeper setting is not “Allow
applications downloaded from: the Mac
App Store”
“MiNiSTUDIO_Installer.pkg” is an application
downloaded from the Internet. Are you sure
you want to open it?” might appear as a security
warning message. In this case, click the “Open”
button.
8Changing the Gatekeeper setting
The Gatekeeper setting can be changed using
the “Allow applications downloaded from:” item
on the “General” page of the “Security & Privacy”
pane of the System Preferences.
To change this, you must click the lock icon ( ) at
the bottom left and enter a password to unlock
the settings.

TASCAM MiNiSTUDIO CREATOR 13
This setting will lock again when you click the
button or type command-Q to close the System
Preferences or when you click “Show All” to close
the open pane.
CAUTION
Changing the Gatekeeper setting could result in
security risks.
If you changed the Gatekeeper setting to
decrease security (use one of the lower settings),
set it back to the original setting after updating
the software and/or firmware. (When installing a
firmware update immediately after software, do
this after installing the firmware update.)
Connecting the power
When using a computer (Windows/Mac)
Normally, when this unit is connected to a computer,
it will operate using USB bus power, so connecting a
separate power supply device is not necessary.
When using an iOS device
When this unit is connected to an iOS device,
connecting an external battery, USB power adapter
or other power supply device is necessary in order to
power the unit.
Connect an external battery pack (TASCAM BP-6AA)
or the USB power adapter included with the iPad or
iPhone to a USB cable (sold separately), and connect
it to the DC IN 5V port.
External battery pack
Connect USB cable
(purchased separately)
CAUTION
• No USB power adapter is included with an iPod
touch. To use it with an iPod touch, purchase
a genuine Apple USB power adapter (that can
supply 5 V and a current of at least 700 mA)
separately.
• Operation with other external battery packs and
USB power adapters is possible, but we strongly
recommend using a TASCAM BP-6AA external
battery pack or the genuine Apple USB power
adapter included with the iPad/iPhone.
When using another external battery pack or
USB power adapter, be sure that the power
supply device meets the following specifications.
• Supplied voltage: 5 V
• Supplied current: 700 mA or more
Using a power supply device when the speci-
fications are other than the above could
cause malfunction, overheating, fire or other
problems. If anything abnormal occurs, stop use
and contact the retailer where you purchased
the unit or a TASCAM customer support service
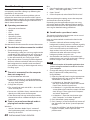
to request repair.
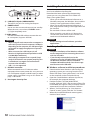
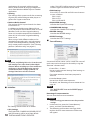
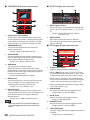
Connection illustrations
Guitar
Mic
Examples of connections to a MiNiSTUDIO (top)

14 TASCAM MiNiSTUDIO CREATOR
Headset
Tablet
Headphones
Examples of connections to a MiNiSTUDIO (front)
Powered monitor speakers
with RCA connectors
Computer
Examples of connections to a MiNiSTUDIO (back)
Connecting with a computer
Use the included USB cable to connect the unit to a
computer USB 2.0/3.0 port.
When the power is on, you can check the Settings
Panel Device item to confirm whether a USB
connection is working.
CAUTION
If you connect this unit to a computer via a
USB hub, for example, audio signal dropouts,
clicking noises and other interference could
occur due to the influence of other USB devices
connected to that hub. For this reason, we
strongly recommend connecting this unit to a
separate USB port. Connecting USB keyboards
and mice, however, to the same bus should not
be a problem.
Connecting iOS devices
You will need a Lightning to USB Camera Adapter and
the USB cable included with this unit to connect an
iOS device.
Audio connections
Analog audio signals input into this device from mics
and other audio equipment can be converted into
digital signals and sent to the computer via USB.
In addition, by connecting speakers (through an
amplifier if not powered) or headphones to this unit,
you can monitor audio signals that are input to this
unit and output from the computer.
CAUTION
Before connecting audio equipment, set the
unit’s VOLUME (4, 9), line output (7) and
headphones (6) knobs to their lowest values.
Failure to do so could cause sudden loud noises
from monitoring equipment, and this could
damage the equipment or harm hearing.
8Connecting microphones
Dynamic mics
Set the IN /IN jack input switches (5, 8)
to , and connect the mics to the IN /IN
jacks (1, 3) on the top of the unit.
Condenser mics
When using a condenser microphone that
requires phantom power, connect it to the IN
or IN XLR jack (1 or 3), and then set the
corresponding input switch (5 or 8) to .
CAUTION
• Before making connections, turn off this unit and
all connected devices (excluding computers/iOS
devices) to be connected (or put them into standby).
• Do not set the IN /IN jack input switch (5 or
8) to (phantom power on) when connecting a
mic that does not require phantom power.
• Turning phantom power on when a dynamic mic
or other mic that does not require it is connected
could damage this unit and connected equipment.
• Do not connect or disconnect mics while
phantom power is on. Doing so could cause
a loud noise and might damage this unit and
connected equipment.
• Set the VOLUME (4, 9), line output (7) and
headphones (6) knobsto their minimum values
before turning phantom power on/off. Depending
on the connected mics, sudden loud noises from
monitoring equipment could occur, and this could
damage the equipment or harm hearing.
• Supplying phantom power to some ribbon mics
will break them. If you are unsure, do not supply
phantom power to a ribbon mic.

TASCAM MiNiSTUDIO CREATOR 15
• If you connect this unit to a laptop computer that
is running on battery power and set the IN /IN
jack input switch (5 or 8) to , the computer
battery charge will be used more quickly.
8Connecting guitars
When connecting a guitar or bass guitar directly to
this unit, use the IN or IN jack (1 or 3) on the
top of the unit and set the switch for that jack (5 or
8) to .
8Connecting other audio equipment
Connect other audio equipment to the external
input jack on the front of the unit.
Use the output level setting of the connected device
to adjust the input level.
8Connecting monitor speakers
Connect monitor speakers (powered speakers with
unbalance connections) to the LINE OUT L/R jacks on
the back of the unit.
Use the line output knob (7) on the top of the unit
to adjust the speaker volume.
8Connecting headphones
Connect headphones to a headphones jack (standard
stereo jack (t) or stereo mini jack (y)) on the front
of the unit.
NOTE
The same signals are output from both the
standard stereo jack and the stereo mini jack.
CAUTION
Before connecting headphones, use the
headphones knob (6) to minimize the volume.
Failure to do so could result in a sudden loud
noise that could harm hearing, for example.
Opening the Settings Panel
You can use the Settings Panel to make settings for the
various functions of this unit. You can also check the
versions of the firmware and software used by the unit.
You can open the Settings Panel in the following ways.
Windows
Windows 10
• Click the Windows Start button, select “All apps”
and then select “MiNiSTUDIO Settings Panel”
under TASCAM.
Windows 8.1
• You can also left-click the Start button to open the
Start screen, and click the button to open the
Apps screen. On this screen, click “MiNiSTUDIO
Settings Panel” under TASCAM to open it.
Windows 7
• Click the Windows Start button, select “All
Programs” and then select “MiNiSTUDIO Settings
Panel” under TASCAM.
Mac
• Using the Finder, open the Applications folder
and click “MiNiSTUDIO Settings Panel” to open
the Settings Panel.
Settings Panel overview
The Settings Panel has two tabbed pages.
Click a tab at the top of the Settings Panel to open
that page.
• EASY: This shows the current status of the driver
and information about connections. You can
also make various basic settings.
• EXPERT: Make settings for the built-in mixer and
effects, for example, on this page.
NOTE
When you open the Settings Panel, it will open in
the same state as when last closed.
Using the Settings Panel menu bar
Click “Mode Presets”, “Initialize”, “Scene Memory” or
“Extra Effects” at the top left of the menu bar on
either the “EASY” or “EXPERT” tab of the Settings Panel
to open the corresponding menu screen.
8Mode Presets (Windows only)
Set the CREATOR/BROADCAST switch on the
unit to CREATOR to use this.
iCREATOR (default)
The settings of this preset are suitable when
using commercially-available DAW software, for
example.
iKaraoke
The settings of this preset are suitable for
Internet karaoke, for example.
Set ASIO to “ON” in the Settings Panel if you
want to use compatible VST plug-ins to add
echo or other effects.
When using the MiNiSTUDIO built-in effects, set
ASIO to “OFF” in the Settings Panel.
iTalking
The settings of this preset are for talking using
ordinary Internet audio/video communication
applications, for example.
iTalking with PON/BGM
The settings of this preset are for talking using
ordinary Internet audio/video communication

16 TASCAM MiNiSTUDIO CREATOR
applications, for example, while using the
built-in PON function or playing background
music from Windows Media Player or another
application.
iGaming
The settings of this preset are for live streaming
of game play while talking to other players in
games that support voice chat.
iPodcast Multi-channel
The number of ASIO input channels has been
increased to six.
In addition to the Mic inputs (Mixing Driver
In1/2), the output of the “MiNiSTUDIO US-32/42”
Windows Driver can be assigned to Mixing
Driver In3/4 and the output of the “Additional
driver US-32/42” can be assigned to Mixing
Driver In5/6.
When using a DAW, different audio can be
recorded to separate tracks, and adjustments
can be made independently, allowing you to
easily create podcast materials. (See “Creating
podcasts (Windows only)” on page 21.)
NOTE
As before, only Mixing Driver In1/2 can be used
with mode presets other than Podcast Multi-
channel. When switching to or from a different
mode preset, the ASIO application must be
restarted and audio settings updated. The
Settings Panel must also be restarted.
8Initialize
The Settings Panel will be set as follows.
iALL Settings
The EQUALIZER, COMPRESSOR, REVERB, EFFECT
and PON settings will be set to their default
values, PON LATCH will be turned on, and nothing
will be assigned as the PON sound source.
iPON Settings
PON LATCH is set to ON and PON sound sources
are set as follows.
PON 1: NO!!
PON 2: YES!!
PON 3: APPLAUSE!
iEQUALIZER Settings
Initialize the EQUALIZER settings.
iCOMPRESSOR Settings
Initialize the COMPRESSOR settings.
iREVERB Settings
Initialize the REVERB settings.
iEFFECT Settings
Initialize the EFFECT settings.
8Scene Memory
A maximum of five scenes can be saved. The name of
each scene can be changed as desired by using the
“Rename” submenu item.
iScene Files 1–5 items
Use to save the current Settings Panel settings as
a scene memory.
Five scene memories have been prepared in
advance.
iInitialize Memory item
Use to clear all five scene memories.
For details, see “Resetting all scene memories” on
page 16.
NOTE
The “BUFFER SIZE” item on the EXPERT page is
not saved.
Resetting all scene memories
You can clear the five scene memories.
CAUTION
After resetting, you cannot restore the previous
settings.
1. In the menu bar, open the “Scene Memory”
menu, and click “Initialize Memory”
.
2. The following confirmation message, which
explains that all scene memories will be reset,
will appear.

TASCAM MiNiSTUDIO CREATOR 17
3. Click the “OK” button to reset all the scene
memories.
NOTE
Click the “Cancel” button to return to the
Settings Panel without initializing the five scene
memories.
8Extra Effects
iDucking
Open the ducking setting screen where the
ducking function can be set. (See “Using the
ducking function” on page 22.)
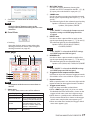
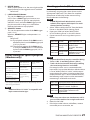
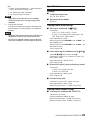
EASY page
NOTE
Click buttons with the mouse to turn them on
and off.
1 Status area
This shows the current status of the software.
Item displayed Meaning
Software version This is the software version.
Firmware version This is the firmware version
used by the connected unit.
Device
This shows the name of
the connected unit. (“No
Device” is shown when no
device is connected.)
Sample Rate This shows the sampling
frequency.
2 MIC 1/MIC 2 tabs
Use these to switch between showing the
SOUND and EFFECT controls for the MIC 1 (1, y,
u) input jacks and the MIC 2 input jack (3).
3 SOUND area
Use this to select a preset sound quality to apply
to the signals input through the inputs (1, 3, y
and u).
The indicator lights for the selected sound quality.
Options: Soft Vocal, Hard Vocal, OFF, Hard
Spoken, Soft Spoken, EXPERT
NOTE
If the “EXPERT” is selected, the Compressor and
Equalizer settings on EXPERT page would be
assigned.
4 EFFECT area
Use this to select a preset effect to apply to the
signals input through the inputs (1, 3, y and u).
The indicator lights for the selected effect.
Options: RADIO, ECHO, MALE, FEMALE,
CHOPPER, EXPERT
NOTE
If the “EXPERT” is selected, the EFFECT settings
on EXPERT page would be assigned.
5 REVERB area
Use this to select a preset reverb to apply to the
signals input through the inputs (1, 3, y and u).
The indicator lights for the selected reverb.
Options:
HALL, ROOM, LIVE, STUDIO, PLATE, EXPERT
NOTE
If the “EXPERT” is selected, the REVERB settings
on EXPERT page would be assigned.
6 Triggered sound output volume sliders
Use these to adjust the volume of triggered sounds.
Slide to MIN to mute or toward MAX to amplify the sound.
7 Repeat buttons
When a repeat button is on, the arrows light and the
repeat function for the triggered sound is enabled.
8 Trigger sound status
Drag and drop audio files to load them.
iWhen a PON trigger pad (1/2/3) has an audio
file loaded, the name of that file is shown in the
trigger sound status area and it lights orange.
iWhen there is a problem with a loaded audio
file, the name of that file is shown in the trigger
sound status area but the area appears gray.
iWhen no audio file is loaded, the trigger sound
status area appears gray.

18 TASCAM MiNiSTUDIO CREATOR
EXPERT page
CAUTION
The EQUALIZER, COMPRESSOR and REVERB have
no effect on the external input jack (i).
NOTE
• Use the mouse to click and drag parameter
knobs up and down to adjust them.
• Click buttons with the mouse to turn them on
and off.
1 EQUALIZER area
This unit has a 4-band equalizer (with HIGH, HIGH
MID, LOW MID and LOW bands).
Use the equalizer to increase or decrease the levels
of specific frequency ranges. This can be used,
for example, to enhance the sound of individual
instruments, to adjust the balance of a wide
frequency range and to cut specific unwanted
frequencies. (See “EQUALIZER (4-band parametric
EQ) display area overview” on page 19.)
2 COMPRESSOR area
When the input volume exceeds the THRESHOLD
level, the input volume is compressed, reducing
output volume variation.
For example, by reducing the levels of loud sounds,
lower level sounds become relatively louder,
creating a more even volume level throughout
and a more sustained sound. (See “COMPRESSOR
display area overview” on page 20.)
NOTE
When the compressor is off, the compressor
curve will appear but the meters will not be
active.
3 RVB SEND display area
If a reverb type switches other than OFF is
selected, the mic reverb can be turned on/off.
Options: ON (default), OFF
4 EFFECT area
Use this to select a preset effect to apply to the
signals input through the inputs (1, 3, y and
u). Use the BALANCE knob to adjust the dry/
wet signal balance. (See “EFFECT display area
overview” on page 20.)
5 BUFFER SIZE setting area (Windows only)
The Windows driver for the unit stores the audio
signals sent to and from the computer tempo-
rarily in a buffer. This buffer size can be adjusted.
Smaller buffer sizes result in less audio signal
delay (latency), but require high-speed
processing by the computer.
If the processing cannot keep up, for example,
due to other system operations, clicking and
popping noises might occur and the audio signal
might even drop out.
Increasing the buffer size will stabilize operation
and suppress negative effects on audio signals,
but the delay in audio signals sent to the
computer will increase.
You can use the slider on the panel to adjust the
buffer size, according to the use conditions.
Use the slider to select fixed values that increase
from left to right.
Options: 1024, 512, 256, 128, 64
6 ASIO setting area (Windows only)
This turns ASIO use on or off.
Turn this ON when using a plug-in that supports
ASIO on signals being input to the unit.
Options: ON, OFF
CAUTION
If this is left ON when not using a plug-in that
supports ASIO, input signals will not be output.
7 Reverb type switches
Use to select the type of reverb.
Depending on the type, the density and level of
the reverb sound changes.
Options:
HALL, ROOM, LIVE, STUDIO, PLATE, OFF
8 PRE DELAY knob
Set the amount of delay until the first reverberations.
The larger the value, the larger the reverberations
make the room sound.
Range: 0–250 ms
9 REVERB TIME knob
Set the amount of time that the reverberations
continue.
The larger the value, the longer they continue.
Range: 0.1–10 s
0 DIFFUSION knob
Sets the breadth of the reverberations.
Range: 0–100

TASCAM MiNiSTUDIO CREATOR 19
q Trigger sound area
Make trigger sound settings here. (See “PON
trigger display area overview” on page 20.)
w COMPUTER fader
Use this to adjust the amount of signal returned
from the computer.
The adjusted value is shown below the fader.
e MASTER fader
Use this to adjust the level of the output signal.
The adjusted value is shown below the fader.
r OUTPUT setting area
Set whether the MASTER signal output is mono
or stereo.
Options: STEREO, MONO
t USB DELAY setting area
During live broadcasts, screen capture latency can
result in timing differences between video and
audio. By intentionally adding delay to the audio
output by USB, you can correct this difference.
Range: 0 ms–2000 ms
y DIRECT MONITOR setting area
Set whether the MASTER signal output is mono
or stereo.
Options: STEREO, MONO, OFF
8EQUALIZER (4-band parametric EQ)
display area overview
1 EQ graph
This shows the frequency response with the
current equalizer settings.
The graph is shown even when the equalizer is off.
2 GAIN (HIGH/HIGH MID/LOW MID/LOW) knobs
Set the amount the levels are increased or decreased
for the HIGH, HIGH MID, LOW MID and LOW bands.
Range: ±12 dB (default: 0 dB)
3 FREQ (HIGH/HIGH MID/LOW MID/LOW) knobs
Set the cutoff frequencies of the HIGH, HIGH MID,
LOW MID and LOW bands.
Ranges
HIGH: 1.7 kHz–18.0 kHz (default: 5 kHz)
HIGH MID: 32 Hz–18.0 kHz (default: 1.2 kHz)
LOW MID: 32 Hz–18.0 kHz (default: 300 Hz)
LOW: 32 Hz–1.6 kHz (default: 80 Hz)
4 Q (HIGH MID/LOW MID) knobs
Set the acutenesses of the peaks of the HIGH MID
and LOW MID bands.
The higher the value the more acute it becomes,
making it affect a narrower frequency band.
The lower the value, the less acute it becomes,
making it affect a broader frequency band.
Ranges
HIGH MID: 0.25–16.00 (default: 1.00)
LOW MID: 0.25–16.00 (default: 1.00)
5 LCF button
Click the LCF button to enable a low cut filter that
cuts noise and other sounds at low frequencies.
The LCF button lights when enabled. (Default: off)

20 TASCAM MiNiSTUDIO CREATOR
8COMPRESSOR display area overview
1 Compressor status display
Three meters show the level of the signal input
to the compressor (INPUT), the level of the signal
output from the compressor (OUTPUT) and the
gain reduction caused by the compressor (GR).
2 THRESHOLD knob
Sets the threshold level that will cause the
compressor to start.
Range: −32 dB–0 dB (default: 0 dB)
3 ATTACK knob
Sets the amount of time until the compression
reaches the compression RATIO setting after the
input volume exceeds the threshold.
Range: 2 ms–200 ms (default: 2 ms)
4 GAIN knob
Sets the gain of the output signal.
When the volume is compressed, the output
level becomes lower than the input level. Use the
GAIN knob to increase the output level so that it
is close to the input level.
Range: 0 dB–20 dB (default: 20 dB)
5 RATIO knob
Sets the compression ratio for the input volume.
Turning it right raises the compression ratio,
increasing the amount of compression.
Range: 1.0:1–inf:1 (default: 1.0:1)
6 RELEASE knob
Sets the amount of time until the compression
stops and the sound returns to its uncompressed
level after the input sound goes below the
threshold level.
Range: 10 ms–1000 ms (default: 10 ms)
NOTE
When the compressor is off, the compressor
curve will appear but the meters will not be
active.
8EFFECT display area overview
1 EFFECT type switches
Use this to select a preset effect to apply to the
signals input through the inputs (1, 3, y and
u).
Options: RADIO, ECHO, MALE, FEMALE,
CHOPPER, OFF
2 ADJUST knob
Adjust the amount the sound is affected.
Turn it toward right increase the amount the
sound is affected.
8PON trigger display area overview
1 Trigger sound status
Drag and drop audio files to load them.
iWhen a PON trigger pad (1/2/3) has an audio
file loaded, the name of that file is shown in the
trigger sound status area and it lights orange.
iWhen there is a problem with a loaded audio
file, the name of that file is shown in the trigger
sound status area but the area appears gray.
iWhen no audio file is loaded, the trigger sound
status area appears gray.
2 FADE IN knob
Sets the fade in time of the triggered sound.
Range: 0.00–5.0 s (default: 0.00 s)
3 LEVEL knob
Adjusts the volume of triggered sound.
Range: 0–100 (default: 60)
4 FADE OUT knob
Sets the fade out time of the triggered sound.
Range: 0.00–5.0 s (default: 0.00 s)
5 START TIME knob
Sets where playback of the triggered sound starts
in the file.
Range: 0.0–5.0 s (default: 0.0 s)
La pagina si sta caricando...
La pagina si sta caricando...
La pagina si sta caricando...
La pagina si sta caricando...
La pagina si sta caricando...
La pagina si sta caricando...
La pagina si sta caricando...
La pagina si sta caricando...
La pagina si sta caricando...
La pagina si sta caricando...
La pagina si sta caricando...
La pagina si sta caricando...
-
 1
1
-
 2
2
-
 3
3
-
 4
4
-
 5
5
-
 6
6
-
 7
7
-
 8
8
-
 9
9
-
 10
10
-
 11
11
-
 12
12
-
 13
13
-
 14
14
-
 15
15
-
 16
16
-
 17
17
-
 18
18
-
 19
19
-
 20
20
-
 21
21
-
 22
22
-
 23
23
-
 24
24
-
 25
25
-
 26
26
-
 27
27
-
 28
28
-
 29
29
-
 30
30
-
 31
31
-
 32
32


Tascam MINISTUDIO CREATOR US-42 Manuale del proprietario
- Categoria
- Apparecchiature musicali supplementari
- Tipo
- Manuale del proprietario
in altre lingue
Documenti correlati
-
Tascam MiNiSTUDIO Creator US-42B Manuale del proprietario
-
Tascam us-4x4 Manuale del proprietario
-
-
-
-
-
-
Tascam 12 Manuale del proprietario
-