Panasonic ST-C700D Manuale del proprietario
- Categoria
- Ricevitori multimediali per auto
- Tipo
- Manuale del proprietario

Operating Instructions
Bedienungsanleitung
Mode d’emploi
Istruzioni per l’uso
Gebruiksaanwijzing
Network Audio Player
Netzwerkaudio-Player
Lecteur réseau
Network Audio Player
Netwerk Audio Speler
ST-C700D
ST-C700DE-TQBM0007.book 1 ページ 2016年10月26日 水曜日 午後1時17分

ST-C700DE-TQBM0007.book 2 ページ 2016年10月26日 水曜日 午後1時17分

Music is borderless and timeless,
touching people’s hearts across cultures and generations.
Each day the discovery of a truly emotive experience
from an unencountered sound awaits.
Let us take you on your journey to rediscover music.
ST-C700DE-TQBM0007.book 3 ページ 2016年10月26日 水曜日 午後1時17分

4
Thank you for purchasing this product.
Please read these instructions carefully before using this product, and save this manual for future use.
∫ Features of this unit
This unit offers the following features:
Digital Noise Isolation Architecture
Since most digital content storage media are intended for use with PCs, they are not designed with consideration for low noise,
which is critical to pure audio reproduction. To overcome this challenge, this unit employs a thorough measure against jitter and
outstanding noise blocking technology for each of its interfaces, delivering clear sound.
Virtual Battery Operation
Virtual Battery Operation prevents power supply noise, a factor that causes “turbidity” in sound, from mixing into the audio signal.
The result is an improvement in sound localisation performance and spatial expression.
Ultra Low Distortion Oversampling Digital Filter
High-precision oversampling eliminates distortion and enhances the sound quality of music sources, thus reproducing sound rich
with spatial expression.
∫ Recommended devices
We recommend using Technics devices (optional) for superior audio quality.
Sales and Support Information
Customer Communications Centre
≥For customers within the UK: 0333 222 8777
≥For customers within Ireland: 01 447 5229
≥Monday–Friday 9:00 am – 5:00 pm, (Excluding public holidays).
≥For further support on your product, please visit our website: www.technics.com/uk/
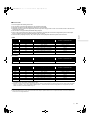
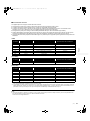
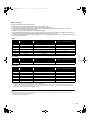
Product name Model number
Speaker System SB-C700
Compact Disc Player SL-C700
Stereo Integrated Amplifier SU-C700
(4)
ST-C700DE-TQBM0007.book 4 ページ 2016年10月26日 水曜日 午後1時17分

5
English
Safety precautions
Unit
≥ To reduce the risk of fire, electric shock or product damage,
– Do not expose this unit to rain, moisture, dripping or splashing.
– Do not place objects filled with liquids, such as vases, on this unit.
– Use only the recommended accessories.
– Do not remove covers.
– Do not repair this unit by yourself. Refer servicing to qualified service
personnel.
– Do not let metal objects fall inside this unit.
– Do not place heavy items on this unit.
AC mains lead
≥ To reduce the risk of fire, electric shock or product damage,
– Ensure that the power supply voltage corresponds to the voltage printed
on this unit.
– Insert the mains plug fully into the socket outlet.
– Do not pull, bend, or place heavy items on the lead.
– Do not handle the plug with wet hands.
– Hold onto the mains plug body when disconnecting the plug.
– Do not use a damaged mains plug or socket outlet.
≥ The mains plug is the disconnecting device.
Install this unit so that the mains plug can be unplugged from the socket
outlet immediately.
Unit
≥ Do not place sources of naked flames, such as lighted candles, on this unit.
≥ This unit may receive radio interference caused by mobile telephones
during use. If such interference occurs, please increase separation between
this unit and the mobile telephone.
≥ This unit is intended for use in moderate and tropical climates.
Placement
≥ Place this unit on an even surface.
≥ To reduce the risk of fire, electric shock or product damage,
– Do not install or place this unit in a bookcase, built-in cabinet or in another
confined space. Ensure this unit is well ventilated.
– Do not obstruct this unit’s ventilation openings with newspapers,
tablecloths, curtains, and similar items.
– Do not expose this unit to direct sunlight, high temperatures, high
humidity, and excessive vibration.
≥ Do not lift or carry this unit by holding any of its levers. Doing so may cause
this unit to fall, resulting in personal injury or malfunction of this unit.
Battery
≥ Danger of explosion if battery is incorrectly replaced. Replace only with the
type recommended by the manufacturer.
≥ Mishandling of batteries can cause electrolyte leakage and may cause a
fire.
– Remove the battery if you do not intend to use the remote control for a
long period of time. Store in a cool, dark place.
– Do not heat or expose to flame.
– Do not leave the battery(ies) in a car exposed to direct sunlight for a long
period of time with doors and windows closed.
– Do not take apart or short circuit.
– Do not recharge alkaline or manganese batteries.
– Do not use batteries if the covering has been peeled off.
– Do not mix old and new batteries or different types at the same time.
≥ When disposing of the batteries, please contact your local authorities or
dealer and ask for the correct method of disposal.
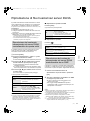
(For the AC mains plug of three pins)
For your safety, please read the following text carefully.
This appliance is supplied with a moulded three pin mains plug for your safety
and convenience.
A 10-ampere fuse is fitted in this plug.
Should the fuse need to be replaced please ensure that the replacement fuse
has a rating of 10-ampere and that it is approved by ASTA or BSI to BS1362.
Check for the ASTA mark Ï or the BSI mark Ì on the body of the fuse.
If the plug contains a removable fuse cover you must ensure that it is refitted
when the fuse is replaced.
If you lose the fuse cover the plug must not be used until a replacement cover
is obtained.
A replacement fuse cover can be purchased from your local dealer.
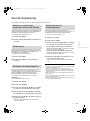
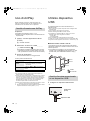
Before use
Remove the connector cover.
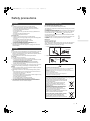
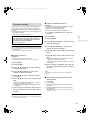
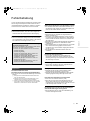
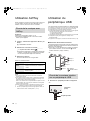
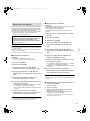
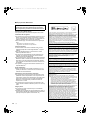
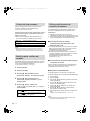
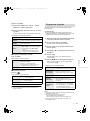
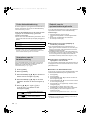
How to replace the fuse
The location of the fuse differ according to the type of AC mains plug (figures A
and B). Confirm the AC mains plug fitted and follow the instructions below.
Illustrations may differ from actual AC mains plug.
1. Open the fuse cover with a screwdriver.
2. Replace the fuse and close or attach the fuse cover.
WARNING
CAUTION
Caution for AC Mains Lead
Declaration of Conformity (DoC)
Hereby, “Panasonic Corporation” declares that this product is in compliance with the
essential requirements and other relevant provisions of Directive 1999/5/EC.
Customers can download a copy of the original DoC to our R&TTE products from our
DoC server:
http://www.doc.panasonic.de
Contact to Authorised Representative:
Panasonic Marketing Europe GmbH, Panasonic Testing Centre,
Winsbergring 15, 22525 Hamburg, Germany
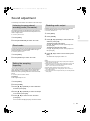
Disposal of Old Equipment and Batteries
Only for European Union and countries with recycling systems
These symbols on the products, packaging, and/or
accompanying documents mean that used electrical and
electronic products and batteries must not be mixed with
general household waste.
For proper treatment, recovery and recycling of old
products and used batteries, please take them to
applicable collection points in accordance with your
national legislation.
By disposing of them correctly, you will help to save
valuable resources and prevent any potential negative
effects on human health and the environment.
For more information about collection and recycling,
please contact your local municipality.
Penalties may be applicable for incorrect disposal of this
waste, in accordance with national legislation.
Note for the battery symbol (bottom symbol):
This symbol might be used in combination with a
chemical symbol. In this case it complies with the
requirement set by the Directive for the chemical involved.
Figure A Figure B
Fuse cover
Figure A Figure B
Fuse
(10 ampere)
Fuse
(10 ampere)
(5)
ST-C700DE-TQBM0007.book 5 ページ 2016年10月26日 水曜日 午後1時17分

6
Table of contents
∫ To dispose or transfer this unit
This unit may contain private information. Before disposing of or transferring this unit, perform the following to delete the data,
including personal or secret information.
≥“To return all settings to the factory defaults” (> 29)
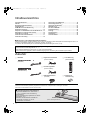
Accessories
≥ Product numbers provided in these operating instructions are correct as of September 2016. These may be subject to change.
≥ Do not use AC mains lead with other equipment.
Safety precautions ............................................................5
Accessories .......................................................................6
Control reference guide....................................................7
Getting started...................................................................9
HOME menu and basic operations................................ 11
Network settings .............................................................12
Playing back music files on the DLNA server ..............13
Playing back Internet Radio (vTuner) ............................14
Using Spotify ...................................................................16
Using iPhone/iPad/iPod..................................................17
Using AirPlay ...................................................................18
Using USB device............................................................18
Using PC, etc. ..................................................................20
Using Bluetooth
®
.............................................................21
Listening to FM radio ......................................................23
Listening to DAB/DAB+...................................................24
Sound adjustment ...........................................................25
Others ...............................................................................26
Troubleshooting ..............................................................29
Unit care ...........................................................................32
Specifications ..................................................................33
About descriptions in these operating instructions
≥Pages to be referred to are indicated as “@ ±±”.
≥The illustrations shown may differ from your unit.
≥Unless otherwise indicated, operations are described using the remote control.
∏ 1 AC mains lead
(REQ0456)
∏ 1 System connection cable
(K2KYYYY00233)
∏ 1 Coaxial digital cable
(K2KYYYY00251)
∏ 1 DAB indoor antenna
(RFA3654)
∏ 1 Remote control
(N2QAYA000096)
∏ 2 Batteries for remote
control
(K2CQ2YY00127)
∫ Using the remote control
Insert the battery so the terminals (i and j)
match those in the remote control.
Point it at the remote control signal sensor on this
unit. (> 7)
≥Keep the batteries out of reach of children to
prevent swallowing.
2
1
R03/LR03, AAA
(Alkaline or manganese batteries)
(6)
ST-C700DE-TQBM0007.book 6 ページ 2016年10月26日 水曜日 午後1時17分

7
English
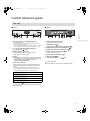
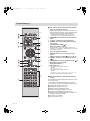
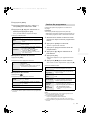
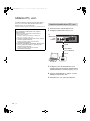
Control reference guide
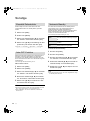
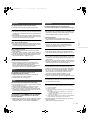
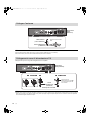
∫ Front
1 Power switch lever [Í/I (Standby/on)]/[OFF]
Turn on/off this unit.
≥ The remote control do not operate when the power switch
lever is in the lowered position.
≥ You can switch the unit from on to standby mode or vice versa
when the power switch lever is in the raised position. (> 8)
2 Port for iPhone/iPad/iPod and USB devices
( DC 5 V 2.1 A) (> 17, 18)
3 Remote control signal sensor
Distance: Within approx. 7 m directly in front
Angle: Approx. 30o left and right
4 Display
≥The input source, playback status and other information
are displayed. For more details, check the support site
below as well as these operating instructions.
www.technics.com/support/
5 Basic control switches
These switches work just by touching the marks. Each
time you touch the switch, there will be a beep sound.
(> 11)
≥ When playback information is not shown on the display
(except in NFC registration standby mode (> 21)), you can
perform the following operations on the touch panel:
6 NFC touch area (> 21)
The NFC touch area sheet is attached to this area at the
time of purchase.
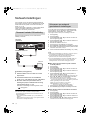
∫ Rear
7 Product identification marking
The model number is indicated.
8 DAB/FM terminal (> 10)
9 Analogue audio output terminal [LINE OUT] (> 9)
: Digital audio output terminal [COAX OUT] (> 9)
; Digital audio output terminal [OPT OUT] (> 9)
< Digital audio input terminal [PC] (> 20)
For connecting to a PC, etc.
= System terminal [CONTROL] (> 9)
> LAN port [LAN] (> 12)
? AC IN terminal [AC IN T]( ) (> 10)
This unit
:3 (Up)
94 (Down)
1/; OK (OK)
∫ RETURN (Return)
HOME (Touch and hold) MENU (Enter menu)
Class II equipment
(The construction of the product is double-insulated.)
(7)
ST-C700DE-TQBM0007.book 7 ページ 2016年10月26日 水曜日 午後1時17分

8
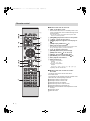
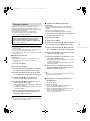
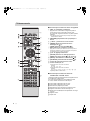
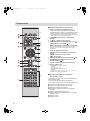
∫ Buttons that work for this unit
1 [NWP Í]: Standby/on switch
Press to switch the unit from on to standby mode or vice
versa. In standby mode, the unit is still consuming a small
amount of power.
≥ The remote control do not operate when the power switch
lever is in the lowered position.
2 [AMP]/[NWP]/[CD]: Select the device to be operated
3 [N INPUT O]: Select the input source
4 [DIMMER]: Adjust the brightness of the display, etc.
(> 11)
5 [HOME]: Display HOME menu (> 11)
6 [INFO]: View content information
Press this button to display the track, artist, and album names,
file type, sampling frequency, and other information.
7 [3, 4, 2, 1]/[OK]: Selection/OK
8 [RETURN]: Return to the previous display
9 [MENU]: Enter menu (> 21, 22, 23, 24, 26)
: [DIRECT]: Turn on/off Direct mode (> 25)
; [RE-MASTER]: Turn on/off Re-master (> 25)
< Basic playback control buttons
= Numeric buttons, etc.
≥ To select a 2-digit number
Example:
16: [S10] > [1] > [6]
≥ To select a 4-digit number
Example:
1234: [S10] > [S10] > [S10] > [1] > [2] > [3] > [4]
≥ [CLEAR]: Clear the entered value.
∫ Buttons that work for the SU-C700/
SL-C700
The remote control of this unit also works for the
SU-C700/SL-C700.
For information on the operations of the SU-C700/SL-C700,
please also refer to their operating instructions.
1 Standby/on switch for the SU-C700
2 Standby/on switch for the
SL-C700
3 Select the device to be operated
4 Select the input source of the
SU-C700
5 Adjust the brightness of the display, etc.
6 Measure the characteristics of the amplifier and correct
its output
7 Adjust the volume
8 Mute the sound
Remote control
(8)
ST-C700DE-TQBM0007.book 8 ページ 2016年10月26日 水曜日 午後1時17分

9
English
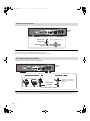
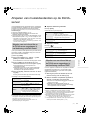
Getting started
≥Turn off all equipment before connection and read the appropriate operating instructions.
≥Do not connect the AC mains lead until all other connections are complete.
≥Insert the plugs of the cables to be connected all the way in.
≥Do not bend cables at sharp angles.
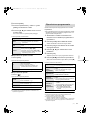
≥You can output digital audio signals from this unit and play back music.
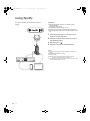
≥You can automatically link this unit with the SU-C700 and operate them easily with the remote control. (> 28)
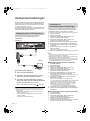
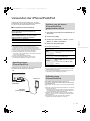
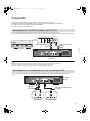
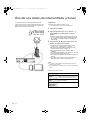
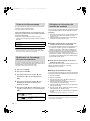
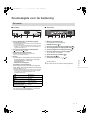
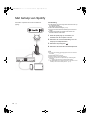
≥ Do not use any other system connection cables or coaxial digital cables except the supplied one.
≥ Connect the system connection cable to the system terminal [CONTROL1] of the SU-C700.
≥ Connect the coaxial digital cable to the digital audio input terminal [COAX1 IN] of the SU-C700.
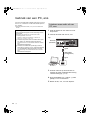
You can output analogue or digital audio signals from this unit and play back music files.
System control connection to an SU-C700
This unit
(rear)
SU-C700
Coaxial digital cable
(supplied)
System connection cable
(supplied)
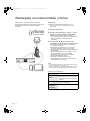
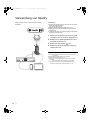
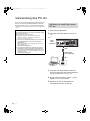
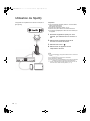
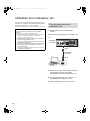
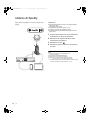
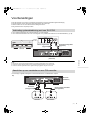
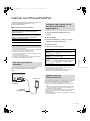
Connecting to an amplifier and a D/A converter
e.g.,
This unit
(rear)
Amplifier
Optical digital audio cable
(not supplied)
D/A converter
Audio cable
(not supplied)
(9)
ST-C700DE-TQBM0007.book 9 ページ 2016年10月26日 水曜日 午後1時17分

10
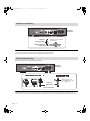
≥ If radio reception is poor, use a DAB outdoor antenna (not supplied).
≥ Do not use any other indoor antennas except the supplied DAB indoor antenna.
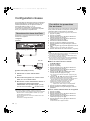
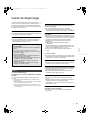
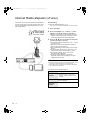
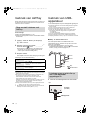
Connect only after all other connections are completed.
≥ This unit consumes a small amount of AC power (> 33) even the power switch lever is in the [OFF] position. Remove the plug from the main
electrical outlet if you will not be using the unit for an extended period of time. Place the unit so the plug can be easily removed.
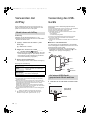
Antenna connection
AC mains lead connection
This unit
(rear)
Adhesive tape
(not supplied)
DAB indoor antenna
(supplied)
Be sure to tighten the nut fully.
Place the antenna where reception is best.
AC mains lead
(supplied)
To a household mains socket
This unit
(rear)
Insert the AC mains lead up
to A, a point just before the
round hole.
(10)
ST-C700DE-TQBM0007.book 10 ページ 2016年10月26日 水曜日 午後1時17分

11
English
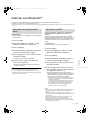
HOME menu and basic operations
Major functions of this unit can be operated from the HOME
menu.
Preparation
≥Prepare the music that you want to play back.
≥Turn on the connected device (amplifier, etc.) and lower its
volume.
1 Raise the power switch lever of this unit to
the [Í/I] position.
2 Press [NWP].
3 Press [HOME].
4 Press [3, 4] to select an item and then
press [OK].
≥If there are any other items, repeat this step.
≥ New items may be added and existing items may be updated. For
information on additions and updates, refer to the support site
below.
www.technics.com/support/
5 Start play.
∫ To display HOME menu
Press [HOME].
Adjust the volume of the connected device (amplifier, etc.).
The brightness of this unit’s display and the basic control
switches can be changed.
Press [DIMMER] repeatedly.
≥ When the display is turned off, it will light up only when you
operate this unit.
Before the display turns off again, “Display Off” will be displayed
for a few seconds.
You can turn the beep sound on/off.
≥ The factory default is “On”.
1 Press [NWP].
2 Press [HOME].
3 Press [3, 4] repeatedly to select “SETUP”
and then press [OK].
4 Press [3, 4] repeatedly to select “Beep”
and then press [OK].
5 Press [3, 4] to select “On”/“Off” and then
press [OK].
If you install the dedicated app “Technics Music App” (free of
charge) on your tablet/smartphone, you can control this unit
and the SU-C700 using a wide variety of functions.
For details, visit:
www.technics.com/support/
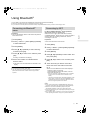
DMP
Connects this unit to a network and
plays back music over it. (> 13)
Internet Radio
Plays back Internet Radio (vTuner).
(> 14)
USB
Plays back music stored on a USB
device or an iPhone/iPad/iPod.
(> 17, 18, 19)
PC
Plays back music stored on a PC,
etc. (> 20)
Bluetooth
Connects this unit to a Bluetooth
®
device and plays back music stored
on it. (> 21, 22)
FM FM (> 23)
DAB/DAB+ DAB/DAB+ (> 24)
SETUP (> 11, 12, 25, 26, 27, 28)
ラヰヮユ
リㄏㄕㄆㄓㄏㄆㄕチンㄅㄊㄐ
ヒバベ
ュヮ
ヱ
Adjusting the volume
Display brightness
Operation sound setting
Operations using the
dedicated app “Technics
Music App”
(11)
ST-C700DE-TQBM0007.book 11 ページ 2016年10月26日 水曜日 午後1時17分

12
Network settings
You can stream music from an iOS device
(iPhone/iPad/iPod), an Android™ device or a PC
(Mac/Windows) to this unit by using the AirPlay or DLNA
feature. (> 13, 18)
To use these features, this unit must join the same network
as the AirPlay compatible device or the DLNA compatible
device.
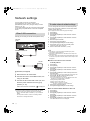
Normally, just connecting a LAN cable will complete the setup.
A: LAN cable (not supplied)
1 Disconnect the AC mains lead.
2 Connect this unit to a broadband router, etc.
using a LAN cable.
3 Connect the AC mains lead to this unit, and
raise the power switch lever to the [Í/I]
position. (> 10)
≥When the connection is established, “ ” is displayed.
≥ If “Firmware update is available” is displayed after the network
connection is set up, the firmware for this unit is available.
– Refer to “Firmware update is available” (> 31) for details on
update.
– For the update information, refer to the following website.
www.technics.com/support/firmware/
You can change this unit’s name on the network (Friendly
Name), and use specific IP address, subnet mask, default
gateway, primary DNS, etc.
≥ Do not play back music while changing these settings.
1 Press [NWP].
2 Press [HOME].
3 Press [3, 4] repeatedly to select “SETUP” and then
press [OK].
4 Press [3, 4] repeatedly to select “Network” and then
press [OK].
5 Select and input the details.
6 Press [OK] to apply the settings.
7 Press [RETURN] repeatedly to exit the settings.
8 Press [NWP Í] to turn the unit to standby mode.
≥ Wait until “Please Wait” disappears.
9 Perform “Wired LAN connection”. (> left)
≥ Use category 7 or above straight LAN cables (STP) when
connecting to peripheral devices.
≥ Inserting any cable other than a LAN cable in the LAN port can
damage the unit.
≥ If you try to change the network settings immediately after turning
on this unit, it may take some time until the network setup screen
is displayed.
∫ This unit’s name on the network
“Friendly Name”
1 Press [NWP].
2 Press [HOME].
3 Press [3, 4] repeatedly to select “SETUP” and then
press [OK].
4 Press [3, 4] repeatedly to select “Network” and then
press [OK].
5 Press [3, 4] repeatedly to select “Friendly Name” and
then press [OK]..
≥ The current name of this unit is displayed. Press [OK] to edit.
6 Press [3, 4, 2, 1] to input the friendly name.
≥ Only ASCII characters can be used.
≥ “A” can be added when you press the [1] at the time of the
last letter of the Friendly Name is selected.
≥ Press [CLEAR] to delete a letter.
≥ Press [S10] to insert a letter “A”.
≥ Default name is “Technics ST-C700D _ _ _ _ _ _”.
“ _ ” stands for a digit that is unique to each set.
7 Press [OK] to apply the settings.
8 Press [RETURN] repeatedly to exit the settings.
∫ To check the MAC address of this unit
1 Press [NWP].
2 Press [HOME].
3 Press [3, 4] repeatedly to select “SETUP” and then
press [OK].
4 Press [3, 4] repeatedly to select “Network” and then
press [OK].
5 Press [3, 4] repeatedly to select “MAC Address”.
≥ The MAC address of this unit is displayed.
Wired LAN connection
Broadband router, etc.
This unit
(rear)
PC, etc.
To make network-related settings
(12)
ST-C700DE-TQBM0007.book 12 ページ 2016年10月26日 水曜日 午後1時17分

13
English
Playing back music files on the DLNA server
You can share music files stored in the DLNA Certified media
server (PC, smartphone, etc.) connected to your home
network, and enjoy the contents with this unit.
≥ About supported format, refer to “File format” (> 35)
Preparation
≥Complete the network settings. (> 12)
≥
Connect the device to be used to the same network as this unit.
≥Add the contents and folder to the libraries of the Windows
Media
®
player 11 or 12, or a smartphone, etc.
– Playlist of Windows Media
®
player can play back only the
contents that are stored in the libraries.
– To use Windows Media
®
Player for streaming, you need to
configure it in advance.
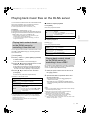
You can play back music stored on the DLNA server on this
unit (DMP—Digital Media Player) by controlling the DLNA
server with this unit.
1 Press [NWP].
2 Press [N INPUT O] below [NWP] repeatedly
to select “DMP”.
≥The server selection screen will be displayed.
3 Press [3, 4] to select a DLNA server on the
network, and then press [OK].
≥The folder/content selection screen will be displayed.
≥
Folders/content may be displayed in different order from
the order on the server, depending on its specifications.
4 Press [3, 4] to select an item and then
press [OK].
≥If there are any other items, repeat this step.
Operations on the remote control
≥ The connected server and its contents may not be displayed
properly depending on its condition. (e.g. soon after adding the
contents to the server, etc.)
Please try again later. For details, refer to the operating
instructions of the device.
∫ Random repeat playback
Press [RND].
Each time you press the button:
∫ Repeat playback
Press [`].
Each time you press the button:
By controlling a DMC (Digital Media Controller) compatible
device, you can play back music stored on the DLNA server
on this unit (DMR—Digital Media Renderer).
1 Raise the power switch lever of this unit to
the [Í/I] position.
2 Operate the DMC compatible device and
connect to this unit.
≥The device name of this unit will be displayed as
“Technics ST-C700D _ _ _ _ _ _”*
1, 2
.
≥For details on how to use DMC compatible devices,
refer to the operating instructions of the devices or the
software.
≥ When you operate DMC, playback of other audio sources will stop
and DLNA output will have priority.
≥ Depending on the contents and the connected equipment,
operations or playback may not be possible.
≥ This unit does not guarantee connection with all DMC
applications. Use the dedicated app “Technics Music App”.
*1 “ _ ” stands for a digit that is unique to each set.
*2 The device name can be changed from “This unit’s name on the
network “Friendly Name””. (> 12)
Playing back content stored
on the DLNA server by
controlling it from this unit
Stop Press [∫].
Pause
Press [1/;].
≥ Press again to restart play.
Skip Press [:] or [9] to skip track.
Search
During play or pause, press and hold
[6] or [5].
≥
On the unit: press and hold [
:
] or [
9
].
≥ This operation may not be available for
some formats.
On
All tracks in a folder are repeated
randomly.
≥ “RND `” is displayed.
≥ During random playback, you cannot skip to
the previous track.
Off Turns off random repeat mode.
1-Track
Only plays the selected track.
≥ “1 `” is displayed.
All
All tracks in a folder are repeated.
≥ “`” is displayed.
Off Turns off repeat mode.
Playing back content stored
on the DLNA server by
controlling it from a DMC
(13)
ST-C700DE-TQBM0007.book 13 ページ 2016年10月26日 水曜日 午後1時17分

14
Playing back Internet Radio (vTuner)
Internet radio is an audio broadcasting service available over
the Internet. With vTuner, an online directory service, you
can listen to many different Internet radio stations from all
over the world.
Preparation
≥Complete the network settings. (> 12)
– Make sure that the network is connected to the Internet.
1 Press [NWP].
2 Press [N INPUT O] below [NWP] repeatedly
to select “Internet Radio”.
≥When “Internet Radio” is selected as the source, this
unit will automatically try and connect to the last
selected Internet Radio station.
3 Press [3, 4] to select a station and then
press [OK].
≥The buffering status is displayed as %. ( “” stands
for a number.)
≥Repeat this step to make further selections according
to the genre, region, etc.
≥Press [RETURN] to return to the previous screen.
≥The Internet Radio stations, genre, region, etc. on this
unit are edited and managed by vTuner.
≥The podcasts on the list of vTuner can also be played
back.
≥The station that does not broadcast cannot be played
back. (It will be skipped or return to the list.)
≥ The Internet Radio service may be suspended or be otherwise
unavailable without notice.
≥ Internet Radio may not be played back properly depending on the
network condition.
Operations on the remote control
Stop Press [∫].
Pause
Press [1/;].
≥ Press again to restart play. (While playing
back the podcasts)
Skip Press [:] or [9] to skip station.
Viewing
available
information
Press [INFO].
(14)
ST-C700DE-TQBM0007.book 14 ページ 2016年10月26日 水曜日 午後1時17分

15
English
1 Press [NWP].
2 Press [3, 4] to select a station to add and
then press [OK].
3 Press [MENU].
4 Press [3, 4] repeatedly to select “Add
Favourites” and then press [OK].
≥“Added” is displayed after registering.
≥You can register up to 50 stations with this unit. If a 51st
station is added, “Favourites Full” is displayed. Delete the
stations from the favourite list. (> below)
≥You cannot add the already registered station. (“Already
Exists” is displayed.)
1 Press [NWP].
2 Press [MENU].
3 Press [3, 4] repeatedly to select “Call
Favourites” and then press [OK].
4 Press [3, 4] to select the station you want
to call up, and then press [OK].
≥“ ” is displayed.
≥If no station is registered to the favourite list, “Empty” is
displayed. Add a station to the list. (> above)
1 Press [NWP].
2 Press [MENU].
3 Press [3, 4] repeatedly to select “Delete
Favourites” and then press [OK].
4 Press [3, 4] to select a station to delete
from the favourite list.
5 Press [3, 4] to select “Yes” and then press
[OK].
≥“Deleted” is displayed after deleting.
≥“Empty” is displayed if no station is registered to the
favourite list.
You can control this unit and edit your favourite list with the
vTuner function by installing the dedicated app “Technics
Music App” (free of charge) on your tablet/smartphone.
Download and install the app from the website below.
www.technics.com/support/
Preparation
≥Check the MAC address of this unit. (> 12)
1 Press [NWP].
2 Press [N INPUT O] below [NWP] repeatedly
to select “Internet Radio”.
3 Use your PC to access the vTuner website.
www.technics.com/radio/
≥You can select the language on the website.
4 Follow the on-screen instructions and enter
the necessary information for registration.
5 Search by category (genre, region,
language, etc.) or edit the list.
∫ Playback of the stations listed by your PC
You can play back the stations listed by your PC separately
from the favourite list of this unit.
1 Press [NWP].
2 Press [N INPUT O] below [NWP] repeatedly
to select “Internet Radio”.
3 Press [3, 4] repeatedly to select
“technics.com/radio/” and then press [OK].
≥Before disposing of or transferring this unit, delete the
personal information on the website.
Adding a station to favourite list
“Add Favourites”
Calling up the favourite list
“Call Favourites”
Deleting the favourite station
“Delete Favourites”
Operations using the
dedicated app
“Technics Music App”
Creating the Internet Radio
station list with PC
(15)
ST-C700DE-TQBM0007.book 15 ページ 2016年10月26日 水曜日 午後1時17分

16
Using Spotify
This unit is compatible with the online music service
(Spotify).
Preparation
≥You will need Spotify Premium. For details, visit the
following website.
www.spotify.com/connect/
≥Complete the network settings. (> 12)
≥Make sure that the network is connected to the Internet.
≥Connect the device to be used to the same network as this
unit.
1 Start the Spotify app on your device, and
select a song to play back.
2 Select the square cover art for the song on
the playback screen.
3 Select the icon “ ”
4 Select this unit as the output speakers.
≥ The device name of this unit will be displayed as “Technics ST-
C700D _ _ _ _ _ _”*
1, 2
.
≥ Registration/subscription is required.
≥ Fees may apply.
≥ Services, icons, and specifications are subject to change.
*1 “ _ ” stands for a digit that is unique to each set.
*2 The device name can be changed from “This unit’s name on the
network “Friendly Name””. (> 12)
(16)
ST-C700DE-TQBM0007.book 16 ページ 2016年10月26日 水曜日 午後1時17分

17
English
Using iPhone/iPad/iPod
Connect your iPhone/iPad/iPod, and you can play back
music stored on iPhone/iPad/iPod or charge
iPhone/iPad/iPod.
∫ Compatible iPhone/iPad/iPod
(as of August 2016)
≥ Compatibility depends on the software version. Update your
iPhone/iPad/iPod to the latest software before using it with this
unit.
≥ Please be aware that Panasonic accepts no responsibility for the
loss of data and/or information.
≥ Do not connect the following models to the port:
– iPod classic, iPod [4th (colour display), and 5th (video)
generation], iPod nano (1st generation)
Unexpected behaviour may occur.
≥ Operation results may vary depending on the iPhone/iPad/iPod
models or the iOS version.
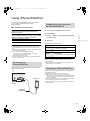
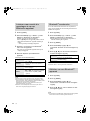
When connecting an iPhone/iPad/iPod, use the dedicated
USB cable (not supplied).
1 Connect iPhone/iPad/iPod to the unit.
2 Press [NWP].
3 Press [N INPUT O] below [NWP] repeatedly
to select “USB”.
4 Start play.
Operations on the remote control
≥ It may be necessary to select the album, artist, etc. on the
iPhone/iPad/iPod.
≥ Depending on the iPhone/iPad/iPod models, operations on the
remote control may not be possible.
During unit on, charging starts when an iPhone/iPad/iPod is
connected to this unit.
≥ Charging is not possible when this unit is turned off.
≥ Make sure the unit is turned on when you start charging.
– When charging an iPhone/iPad/iPod whose battery is depleted,
do not turn this unit to standby mode until the iPhone/iPad/iPod
becomes operational.
≥ Check the iPhone/iPad/iPod to see if the battery is fully charged.
Once fully charged, remove the iPhone/iPad/iPod.
≥ Charging stops when the battery is fully charged. The battery will
deplete naturally.
iPhone SE / iPhone 6s Plus / iPhone 6s /
iPhone 6 Plus / iPhone 6 / iPhone 5s / iPhone 5c /
iPhone 5 / iPhone 4s
iPad Pro
(9.7 inch)
/ iPad Pro
(12.9 inch)
/
iPad Air 2 / iPad Air / iPad
(3rd and 4th generation)
/ iPad 2 /
iPad mini 4 / iPad mini 3 / iPad mini 2 / iPad mini
iPod touch (5th and 6th generation)
iPod nano (7th generation)
Connecting an
iPhone/iPad/iPod
USB cable
(not supplied)
e.g.,
This unit
(front)
iPhone, etc.
Listening to music stored on
an iPhone/iPad/iPod
Stop Press [∫].
Pause
Press [1/;].
≥ Press again to restart play.
Skip Press [:] or [9] to skip track.
Search
During play or pause, press and hold
[6] or [5].
≥
On the unit: press and hold [
:
] or [
9
].
Charging an iPhone/iPad/iPod
(17)
ST-C700DE-TQBM0007.book 17 ページ 2016年10月26日 水曜日 午後1時17分

18
Using AirPlay
AirPlay works with iPhone, iPad, and iPod touch with iOS
4.3.3 or later, Mac with OS X Mountain Lion or later, and PC
with iTunes 10.2.2 or later.
Preparation
≥Complete the network settings. (> 12)
≥Connect the iOS device or PC to the same network as this
unit.
1 [iOS_d e vi c e] : Start the “Music” (or iPod) app.
[PC] : Start “iTunes”.
2 Select “Technics ST-C700D _ _ _ _ _ _”*
1, 2
from the AirPlay icon.
≥Check the volume settings before starting the playback.
(When AirPlay is used for the first time, the volume may
be output at the maximum setting.)
3 Start play.
≥The playback will start with a slight delay.
Operations on the remote control
≥ Playback of other audio sources will stop and AirPlay output will
have priority.
≥ With some iOS and iTunes versions, it may not be possible to
restart the AirPlay playback if the selector is changed or the unit is
turned off, during the AirPlay playback.
In this case, select a different device from the AirPlay icon of the
Music app or iTunes and then re-select this unit as the output
speakers.
≥ AirPlay will not work when playing back videos on iTunes.
*1 “ _ ” stands for a digit that is unique to each set.
*2 The device name can be changed from “This unit’s name on the
network “Friendly Name””. (> 12)
Using USB device
You can play back music stored on a USB device.
≥ This unit does not guarantee connection with all USB devices.
≥ FAT16 and FAT32 file systems are supported.
≥ This unit supports USB 2.0 high speed.
≥ USB devices may not be recognised by this unit when connected
using the following:
– a USB hub
– a USB extension cable
≥ It is not possible to use USB card reader/writers.
≥ This unit cannot record music to a USB device.
≥ About supported format, refer to “File format” (> 35)
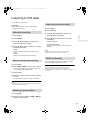
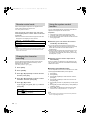
∫ Folder and file structure
The unit plays back only the music files in the selected folder.
Select the folder containing the tracks that you want to play
back.
≥Nothing is played back if you select a folder without music
files, such as the folder D in the diagram below. (“Empty”
is displayed.)
1 Connect a USB device to the unit.
Listening to music with AirPlay
Stop Press [∫].
Pause
Press [1/;].
≥ Press again to restart play.
Skip Press [:] or [9] to skip track.
Listening to music stored on a
USB device
Music 1
Music 2
Music 4
Music 5
Music 3
e.g.,
Folder
Music file
e.g.,
This unit
(front)
USB device
(18)
ST-C700DE-TQBM0007.book 18 ページ 2016年10月26日 水曜日 午後1時17分

19
English
2 Press [NWP].
3 Press [N INPUT O] below [NWP] repeatedly
to select “USB”.
4 Press [3, 4] to select an item and then
press [OK].
≥If there are any other items, repeat this step.
Operations on the remote control
∫ Random repeat playback
Press [RND].
Each time you press the button:
∫ Repeat playback
Press [`].
Each time you press the button:
≥ You can use repeat playback in combination with programme
playback.
This function allows you to programme up to 24 tracks.
Preparation
≥It is not possible to programme tracks by moving folders.
Move all the tracks you want to programme to a single
folder in advance.
1 Select the folder containing the music file to
which you want to set programme playback.
2 Press [PGM] in the stop mode.
≥“Program Mode” screen will be displayed.
3 Press [OK] to display the programming
screen.
4 Press [3, 4] to select the desired track.
5 Press [OK].
≥Do steps 3 through 4 again to programme other tracks.
6 Press [1/;] to start playback.
≥To return to the “Program Mode” screen, press [∫].
Operations on the remote control
≥ Programmed content is maintained as long as the input source is
set to “USB”.
≥ The programme memory will be cleared:
– When the USB device is disconnected.
– When the unit is turned to standby or off mode.
≥ You can use programme playback in combination with repeat
playback.
Stop Press [∫].
Pause
Press [1/;].
≥ Press again to restart play.
Skip Press [:] or [9] to skip track.
Search
During play or pause, press and hold
[6] or [5].
≥
On the unit: press and hold [
:
] or [
9
].
≥ This operation may not be available for
some formats.
On
All tracks in a folder are repeated
randomly.
≥ “RND `” is displayed.
≥ During random playback, you cannot skip to
the previous track.
Off Turns off random repeat mode.
1-Track
Only plays the selected track.
≥ “1 `” is displayed.
All
All tracks in a folder are repeated.
≥ “`” is displayed.
Off Turns off repeat mode.
Programme playback
Stop
Press [∫].
≥ Programmed content is maintained.
Check the
programmed
order
Press [2, 1] in the stop mode.
≥ To return to the “Program Mode” screen,
press [OK].
Add tracks Do steps 3 through 4 in the stop mode.
Clear the last
track
Press [CLEAR] in the stop mode.
≥ It is not possible to select and clear the
desired programmed track.
Cancel
programme
mode
1 Press [PGM] in the stop mode.
≥ “Clear Program List?” is shown.
2 Press [3, 4] to select “Yes” and
then press [OK].
≥ The programme memory will be
cleared.
(19)
ST-C700DE-TQBM0007.book 19 ページ 2016年10月26日 水曜日 午後1時17分

20
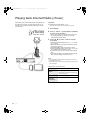
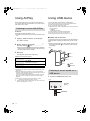
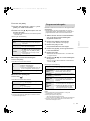
Using PC, etc.
You can connect the digital audio input terminal [PC] and a
PC, etc. with a USB cable and play back music on the PC,
etc. with this unit.
≥ About supported format, refer to “File format” (> 35)
(as of December 2015)
1 Disconnect the AC mains lead.
2 Connect this unit and a PC, etc.
3 Connect the AC mains lead to this unit, and
raise the power switch lever to the [Í/I]
position. (> 10)
4 Press [N INPUT O] below [NWP] repeatedly
to select “PC”.
5 Operate the PC, etc. for playback.
Connecting to a PC
Before connecting to a PC, follow the steps below.
≥ Refer to the following for the recommend OS versions for your
PC:
– Windows 7, Windows 8, Windows 8.1, Windows 10
– OS X 10.7, 10.8, 10.9, 10.10, 10.11
1 Download and install the dedicated driver to the PC.
(Only for Windows OS)
Download and install the driver from the website below.
www.technics.com/support/
2 Download and install the dedicated app “Technics
Audio Player” (free of charge) on your PC. (Common
to both Windows OS and OS X)
Download and install the app from the website below.
www.technics.com/support/
Listening to audio from a PC,
etc.
USB
USB 2.0 cable
(not supplied)
This unit
(rear)
e.g.,
PC, etc.
Type A
Type B
(20)
ST-C700DE-TQBM0007.book 20 ページ 2016年10月26日 水曜日 午後1時17分
La pagina si sta caricando...
La pagina si sta caricando...
La pagina si sta caricando...
La pagina si sta caricando...
La pagina si sta caricando...
La pagina si sta caricando...
La pagina si sta caricando...
La pagina si sta caricando...
La pagina si sta caricando...
La pagina si sta caricando...
La pagina si sta caricando...
La pagina si sta caricando...
La pagina si sta caricando...
La pagina si sta caricando...
La pagina si sta caricando...
La pagina si sta caricando...
La pagina si sta caricando...
La pagina si sta caricando...
La pagina si sta caricando...
La pagina si sta caricando...
La pagina si sta caricando...
La pagina si sta caricando...
La pagina si sta caricando...
La pagina si sta caricando...
La pagina si sta caricando...
La pagina si sta caricando...
La pagina si sta caricando...
La pagina si sta caricando...
La pagina si sta caricando...
La pagina si sta caricando...
La pagina si sta caricando...
La pagina si sta caricando...
La pagina si sta caricando...
La pagina si sta caricando...
La pagina si sta caricando...
La pagina si sta caricando...
La pagina si sta caricando...
La pagina si sta caricando...
La pagina si sta caricando...
La pagina si sta caricando...
La pagina si sta caricando...
La pagina si sta caricando...
La pagina si sta caricando...
La pagina si sta caricando...
La pagina si sta caricando...
La pagina si sta caricando...
La pagina si sta caricando...
La pagina si sta caricando...
La pagina si sta caricando...
La pagina si sta caricando...
La pagina si sta caricando...
La pagina si sta caricando...
La pagina si sta caricando...
La pagina si sta caricando...
La pagina si sta caricando...
La pagina si sta caricando...
La pagina si sta caricando...
La pagina si sta caricando...
La pagina si sta caricando...
La pagina si sta caricando...
La pagina si sta caricando...
La pagina si sta caricando...
La pagina si sta caricando...
La pagina si sta caricando...
La pagina si sta caricando...
La pagina si sta caricando...
La pagina si sta caricando...
La pagina si sta caricando...
La pagina si sta caricando...
La pagina si sta caricando...
La pagina si sta caricando...
La pagina si sta caricando...
La pagina si sta caricando...
La pagina si sta caricando...
La pagina si sta caricando...
La pagina si sta caricando...
La pagina si sta caricando...
La pagina si sta caricando...
La pagina si sta caricando...
La pagina si sta caricando...
La pagina si sta caricando...
La pagina si sta caricando...
La pagina si sta caricando...
La pagina si sta caricando...
La pagina si sta caricando...
La pagina si sta caricando...
La pagina si sta caricando...
La pagina si sta caricando...
La pagina si sta caricando...
La pagina si sta caricando...
La pagina si sta caricando...
La pagina si sta caricando...
La pagina si sta caricando...
La pagina si sta caricando...
La pagina si sta caricando...
La pagina si sta caricando...
La pagina si sta caricando...
La pagina si sta caricando...
La pagina si sta caricando...
La pagina si sta caricando...
La pagina si sta caricando...
La pagina si sta caricando...
La pagina si sta caricando...
La pagina si sta caricando...
La pagina si sta caricando...
La pagina si sta caricando...
La pagina si sta caricando...
La pagina si sta caricando...
La pagina si sta caricando...
La pagina si sta caricando...
La pagina si sta caricando...
La pagina si sta caricando...
La pagina si sta caricando...
La pagina si sta caricando...
La pagina si sta caricando...
La pagina si sta caricando...
La pagina si sta caricando...
La pagina si sta caricando...
La pagina si sta caricando...
La pagina si sta caricando...
La pagina si sta caricando...
La pagina si sta caricando...
La pagina si sta caricando...
La pagina si sta caricando...
La pagina si sta caricando...
La pagina si sta caricando...
La pagina si sta caricando...
La pagina si sta caricando...
La pagina si sta caricando...
La pagina si sta caricando...
La pagina si sta caricando...
La pagina si sta caricando...
La pagina si sta caricando...
La pagina si sta caricando...
La pagina si sta caricando...
La pagina si sta caricando...
La pagina si sta caricando...
La pagina si sta caricando...
La pagina si sta caricando...
La pagina si sta caricando...
La pagina si sta caricando...
La pagina si sta caricando...
La pagina si sta caricando...
La pagina si sta caricando...
La pagina si sta caricando...
La pagina si sta caricando...
La pagina si sta caricando...
La pagina si sta caricando...
La pagina si sta caricando...
La pagina si sta caricando...
La pagina si sta caricando...
La pagina si sta caricando...
La pagina si sta caricando...
La pagina si sta caricando...
La pagina si sta caricando...
La pagina si sta caricando...
-
 1
1
-
 2
2
-
 3
3
-
 4
4
-
 5
5
-
 6
6
-
 7
7
-
 8
8
-
 9
9
-
 10
10
-
 11
11
-
 12
12
-
 13
13
-
 14
14
-
 15
15
-
 16
16
-
 17
17
-
 18
18
-
 19
19
-
 20
20
-
 21
21
-
 22
22
-
 23
23
-
 24
24
-
 25
25
-
 26
26
-
 27
27
-
 28
28
-
 29
29
-
 30
30
-
 31
31
-
 32
32
-
 33
33
-
 34
34
-
 35
35
-
 36
36
-
 37
37
-
 38
38
-
 39
39
-
 40
40
-
 41
41
-
 42
42
-
 43
43
-
 44
44
-
 45
45
-
 46
46
-
 47
47
-
 48
48
-
 49
49
-
 50
50
-
 51
51
-
 52
52
-
 53
53
-
 54
54
-
 55
55
-
 56
56
-
 57
57
-
 58
58
-
 59
59
-
 60
60
-
 61
61
-
 62
62
-
 63
63
-
 64
64
-
 65
65
-
 66
66
-
 67
67
-
 68
68
-
 69
69
-
 70
70
-
 71
71
-
 72
72
-
 73
73
-
 74
74
-
 75
75
-
 76
76
-
 77
77
-
 78
78
-
 79
79
-
 80
80
-
 81
81
-
 82
82
-
 83
83
-
 84
84
-
 85
85
-
 86
86
-
 87
87
-
 88
88
-
 89
89
-
 90
90
-
 91
91
-
 92
92
-
 93
93
-
 94
94
-
 95
95
-
 96
96
-
 97
97
-
 98
98
-
 99
99
-
 100
100
-
 101
101
-
 102
102
-
 103
103
-
 104
104
-
 105
105
-
 106
106
-
 107
107
-
 108
108
-
 109
109
-
 110
110
-
 111
111
-
 112
112
-
 113
113
-
 114
114
-
 115
115
-
 116
116
-
 117
117
-
 118
118
-
 119
119
-
 120
120
-
 121
121
-
 122
122
-
 123
123
-
 124
124
-
 125
125
-
 126
126
-
 127
127
-
 128
128
-
 129
129
-
 130
130
-
 131
131
-
 132
132
-
 133
133
-
 134
134
-
 135
135
-
 136
136
-
 137
137
-
 138
138
-
 139
139
-
 140
140
-
 141
141
-
 142
142
-
 143
143
-
 144
144
-
 145
145
-
 146
146
-
 147
147
-
 148
148
-
 149
149
-
 150
150
-
 151
151
-
 152
152
-
 153
153
-
 154
154
-
 155
155
-
 156
156
-
 157
157
-
 158
158
-
 159
159
-
 160
160
-
 161
161
-
 162
162
-
 163
163
-
 164
164
-
 165
165
-
 166
166
-
 167
167
-
 168
168
-
 169
169
-
 170
170
-
 171
171
-
 172
172
-
 173
173
-
 174
174
-
 175
175
-
 176
176


Panasonic ST-C700D Manuale del proprietario
- Categoria
- Ricevitori multimediali per auto
- Tipo
- Manuale del proprietario
in altre lingue
- English: Panasonic ST-C700D Owner's manual
- français: Panasonic ST-C700D Le manuel du propriétaire
- Deutsch: Panasonic ST-C700D Bedienungsanleitung
- Nederlands: Panasonic ST-C700D de handleiding
Documenti correlati
-
Panasonic SCC70MK2EG Istruzioni per l'uso
-
Technics ST-C700 Manuale del proprietario
-
Panasonic SC-PMX74EG Manuale del proprietario
-
-
-
-
Panasonic SC-PMX152EG Manuale del proprietario
-
Panasonic SCRS54EG Manuale del proprietario
-
Panasonic SCALL05EG Istruzioni per l'uso
-
Technics OTTAVA S Istruzioni per l'uso
Altri documenti
-
Pioneer X-EM26 Manuale utente
-
-
LG RL3 Manuale utente
-
Sony RSX-GS9 Manuale del proprietario
-
-
-
-
-
Xqisit XQ S10 Quick Manual
-