Gigaset Outdoor Camera Manuale utente
- Categoria
- Telecamere di sicurezza
- Tipo
- Manuale utente

outdoor
camera
Kurzanleitung
Quick-start guide
Mémento
Istruzioni per l‘uso
Beknopte bedieningsinstructies
Guía rápida

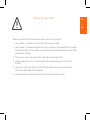
Bevor Sie die Gigaset outdoor camera anbringen, müssen Sie sicher stellen, dass
1. die Kamera nicht weiter als 10m von Ihrem Router installiert wird
2. die Kamera an einem Ort platziert und montiert wird an dem Sie auch WLAN
Empfang haben. Wir empfehlen einen Probelauf bevor Sie das Gerät montieren
(Uploadgeschwindigkeit wenn mehrere Familienmitglieder surfen)
3. sich an Ihrer Montageäche keine stromführenden Leitungen benden
4. Sie Erfahrung mit einem Bohrhammer haben und eine Führungshilfe
(z.B. ein Plastikschlauch) zur Hand haben
5. Ihr Router mit 2,4 GHz funkt oder das LAN Kabel bis zur Kamera reicht
(dieses kann mit einem Adapter verlängert werden)
6. Sie innen eine Steckdose in Reichweite des Anschlusskabels haben
Bevor Sie anfangen können…

Before you install the Gigaset outdoor camera, you must ensure that
1. your camera is installed no further than 10m from your router
2. your camera is placed and mounted in a place where you have good WLAN reception.
We recommend a test this before you install the device (upload speed if several family
members are surng)
3. there are no current-carrying cables under your mounting surface
4. you have experience with a hammer drill and a guiding aid (e.g. a plastic hose)
athand
5. your router works with 2.4 GHz or the Ethernet cable reaches up to the camera
(this can be extended with an adapter)
6. you have a power socket inside within reach of the connection cable
Before You can start…
DE
–
EN

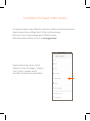
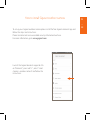
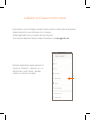
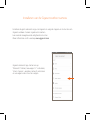
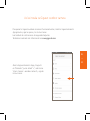
Gigaset elements app starten und auf
„Elements“ klicken; hinzufügen „+“ drücken;
„smart camera > outdoor camera“
auswählen und den Anweisungen folgen.
So installieren Sie Gigaset outdoor camera
Um Gigaset outdoor camera in Betrieb zu nehmen, installieren Sie bitte die kostenlose
Gigaset elements app und folgen den Schritten und Anweisungen.
Bitte lesen Sie auch unsere beiliegenden Sicherheitshinweise.
Mehr Informationen erhalten Sie auch auf www.gigaset.com

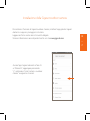
How to install Gigaset outdoor camera
To set up your Gigaset outdoor camera please install the free Gigaset elements app and
follow the steps and instructions.
Please also take notice on our added security information brochure.
For more information, go to www.gigaset.com
Launch the Gigaset elements app and click
on "Elements"; press add "+"; select "smart
camera > outdoor camera" and follow the
instructions.
DE
–
EN

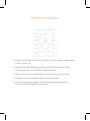
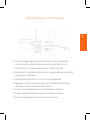
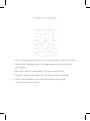
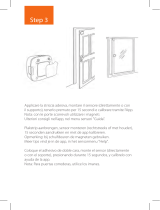
1. Platzieren Sie die Bohrschablone an der Stelle, an der Ihre Gigaset outdoor camera
installiert werden soll.
2. Markieren Sie die drei Befestigungslöcher und die Einführungslöcher für das
Anschlusskabel, die sich auf der Bohrschablone benden.
3. Bohren Sie 3 Löcher für die Kamerahalter und eines für das Anschlusskabel.
4. Platzieren Sie die 3 mitgelieferten Dübel für die Kamerahalter.
5. Führen Sie das Verbindungskabel mit einer Durchführungshilfe durch das
Anschlussloch auf die andere Seite der Wand.
Vorbereiten der Installation

Preparation for installation
1. Place the drill template in the location you want your Gigaset outdoor camera
to be installed.
2. Mark up the three xing holes & the entrance holes for the connection cable that are
located on the drill plate.
3. Drill three holes for the camera brackets and one for the connection cable.
4. Place the 3 supplied dowels for the camera brackets into their holes.
5. Feed the connection cable through the connector hole to the other side of the wall
inside your property.
DE
–
EN

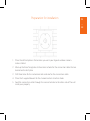
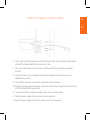
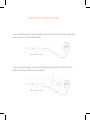
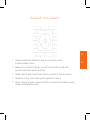
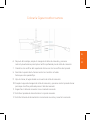
6. Nach der Montage die Tülle zum Anschlusskabel hinzufügen und gegen die Außenwand
drücken, um das für das Anschlusskabel gebohrte Loch zu füllen.
7. Richten Sie die drei Löcher am Kamerahalter mit den drei Löchern an der Wand aus.
8. Drehen Sie die drei mitgelieferten Schrauben in die Löcher durch den Kamerahalter,
bissie fest sitzen.
9. Gehen Sie nach innen zu der Stelle, an der sich das Anschlusskabel bendet.
10. Fügen Sie die zweite Tülle zum Anschlusskabel hinzu und drücken Sie gegen die
Innenwand, um das gebohrte Loch zu füllen.
11. Stecken Sie das Anschlusskabel mit dem mitgelieferten Anschlusswinkel ein.
12. Nehmen Sie das Netzgerät und stecken Sie es in die Anschlussbox.
13. Stecken Sie das Netzteil in die Steckdose und schalten Sie den Strom ein.
Gigaset outdoor camera anbringen

Install your Gigaset outdoor camera
6. Once in place, add the grommet to the connection cable and push against the external
wall to ll the hole drilled for the connection cable.
7. Line up the three holes on the Camera wall mount with the three holes located on
thewall.
8. Screw the three screws provided into the holes through the Camera mount until
tight/xed in position.
9. Go inside the property to where the connection cable is located.
10. Add the secondary grommet to the connection cable and push against the internal wall
to ll the hole that has been drilled.
11. Using the connection square provided, plug in the connection cable.
12. Take the power supply and plug into the connection box.
13. Plug the power supply into the plug socket and turn the power on.
DE
–
EN

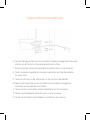
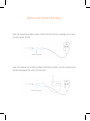
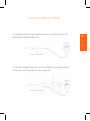
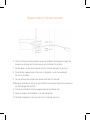
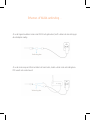
Wenn Sie die Gigaset outdoor camera mit WLAN nutzen möchten, benötigen Sie nur den
Anschluss an das Netzteil.
Wenn Sie die Kamera an ein Ethernet Kabel anschließen möchten, stecken Sie diese bitte in
die Verbindungsbox. POE wird nicht unterstützt.
Ethernet oder WLAN Verbindung…
Verbindungsbox
Verbindungsbox

If you want to use WLAN please attach the charging cable to the Connection Box.
If you want to use Ethernet please attach the cable and the charging cable to the
Connection Box. POE is not supported.
Ethernet or WLAN Connection…
Connection Box
Connection Box
DE
–
EN

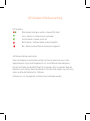
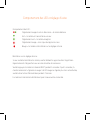
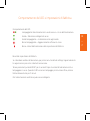
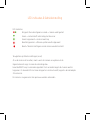
LED Verhalten:
Blinkt abwechselnd grün und rot = Kamera fährt hoch
Grün = Kamera ist mit dem Server verbunden
Grün blinkend = Kamera nimmt auf
Rot blinkend = Software Update wird durchgeführt
Rot = Kamera wird auf Werkseinstellung zurückgesetzt
Auf Werkseinstellung zurücksetzen:
Wenn Sie die Kamera zurücksetzen möchten, löschen Sie diese bitte zuerst in der
Gigaset elements App. Danach begeben Sie sich in die Nähe der Verbindungsbox.
Drücken und halten Sie den RESET Knopf für 5 Sekunden. Nach 5 Sekunden fängt die
Kamera an, rot zu blinken. Wenn die rote LED nicht mehr blinkt sondern nur noch an ist,
ziehen Sie bitte das Netzteil ab für 2 Minuten.
Die Kamera is nun zurückgesetzt und kann erneut verbunden werden.
LED Verhalten & Werkseinstellung

LED behaviour:
Flashing alternately green and red = camera is booting up
Green light = camera is connected to the server
Green ashing = camera is recording
Red ashing = software update ongoing
Red light = camera reset to factory mode
Factory reset:
If you want to factory reset your camera you start with deleting it in your Gigaset elements
app. Locate the connection box for the Camera required to be factory reset.
Press and hold the reset button on the connection box for 5 seconds. After 5 seconds the
Red LED will ash multiple times to indicate the reset process has been initiated. Once the
Red LED has gone back to solid state, please proceed to power cycle your product.
Your product has now been reset back to factory default. Please follow the Camera set up
process to install your Outdoor Camera.
LED behavior and Factory Reset
DE
–
EN

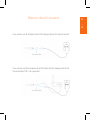
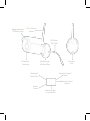
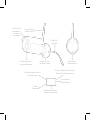
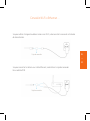
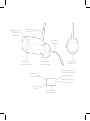
Verbindungsbox /
Connection Box
Kameralinse /
Camera lens
Rückseite /
Back
Wandhalterung /
Wall Mount Base
RJ45 Kabel /
RJ45 Cable
WLAN Antenne /
Antenna
Bewegungsmelder /
PIR Motion Sensor
Kamera /
Camera
Resetknopf /
Reset button
Buchse fürs Netzteil /
Power
Ethernetanschluss /
Ethernet

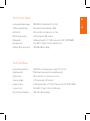
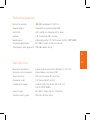
Leistungsanforderungen: 100-240V-Schaltnetzteil DC 5V/1,5A
Witterungsbeständig: Wasserdicht und wetterfest: IP66
Nachtsicht: LEDs mit IR-Cut-Schalter bis zu 15m
Betrachtungswinkel: 110° horizontal / 60° vertikal
Bildqualität: H.264 Hochprol, 1/3"-CMOS-Sensor, Full HD (1920*1080P)
Konnektivität: Wi-Fi 802.11 b/g/n 2,4
GHz
und Ethernet
Größe (LxBxH) & Gewicht: 190 x 60 x 60mm; 465g
Technische Daten
Power Requierements: 100-240V switching power supply DC 5V/1.5A
Weatherproof: IP66 Rated waterproof and weatherproof
Night Vision: LEDs with IR Cut switcher up to 15m
Viewing Angle: 110° Horizontal / 60° Vertical
Image Quality: H.264 High prole, 1/3" CMOS Sensor, Full HD (1920*1080P)
Connectivity: Wi-Fi 802.11 b/g/n 2.4 GHz & Ethernet
Size (LxWxH) & Weight: 190 x 60 x 60mm; 465g
Technical data
DE
–
EN

Avant d’installer la Gigaset outdoor camera, il est nécessaire de s’assurer que
1. la caméra n’est pas installée à plus de 10 m du routeur
2. la caméra soit placée et montée dans un endroit au niveau duquel la réception WLAN
est assurée. Avant de monter l’appareil, nous recommandons de réaliser un essai de
fonctionnement (vitesse de chargement lorsque plusieurs membres de la famille
surfent sur le net)
3. la surface de montage ne présente aucun câble conducteur de courant
4. vous maîtrisez la perceuse à percussion et disposez d’une aide au guidage
(tuyau en plastique par exemple)
5. votre routeur fonctionne avec 2,4 GHz ou que le câble LAN soit assez long pour arriver
jusqu’à la caméra (il peut être prolongé à l’aide d’un adaptateur)
6. vous disposez bien d’une prise à portée du câble de raccordement
Avant de commencer …

Prima di applicare la Gigaset outdoor camera, accertarsi
1. che la telecamera non disti più di 10 m dal router
2. che la telecamera venga posizionata e montata in un luogo che consenta
anche la ricezione WLAN. Raccomandiamo di fare una prova prima di montare
l’apparecchiatura (velocità di upload in caso di navigazione da parte di più membri
della famiglia)
3. che sulla supercie di montaggio non siano presenti linee elettriche
4. di avere esperienza con l’uso di un martello perforatore e di disporre di un ausilio di
guida (ad es. un tubo essibile in plastica)
5. che il router trasmetta a 2,4 GHz o il cavo LAN arrivi no alla telecamera
(può essere prolungato con un adattatore)
6. che all’interno sia presente una presa raggiungibile dal cavo di collegamento
Prima di iniziare…
FR
–
IT

Démarrez l'application Gigaset elements et
cliquez sur «Elements»; appuyez sur «+»;
sélectionnez «smart camera > outdoor
camera» et suivez les consignes.
Installation de la Gigaset outdoor camera
Pour mettre en service la Gigaset outdoor camera, veuillez installer l’application gratuite
Gigaset elements et suivre les étapes et les consignes.
Veuillez également lire nos consignes de sécurité jointes.
Vous trouverez également de plus amples informations sur www.gigaset.com

Installazione della Gigaset outdoor camera
Per mettere in funzione la Gigaset outdoor camera, installare l’app gratuita Gigaset
elements e seguire i passaggi e le istruzioni.
Leggere anche le nostre note di sicurezza allegate.
Ulteriori informazioni sono disponibili anche sul sito www.gigaset.com
Avviare l’app Gigaset elements e fare clic
su "Elements"; aggiungere premendo
"+"; selezionare "smart camera > outdoor
camera" e seguire le istruzioni.
FR
–
IT

1. Placez le gabarit de perçage à l’endroit auquel votre Gigaset outdoor camera
doitêtreinstallée.
2. Marquez les trois trous de xation et les trous d’insertion pour le câble de
raccordement se trouvant sur le gabarit de perçage.
3. Percez 3 trous pour les supports de la caméra et un pour le câble de raccordement.
4. Installez les 3 douilles fournies pour le support de caméra.
5. Introduisez le câble de connexion avec une douille de guidage par le trou de
raccordement sur l’autre côté du mur.
Préparation pour la mise en place
La pagina si sta caricando...
La pagina si sta caricando...
La pagina si sta caricando...
La pagina si sta caricando...
La pagina si sta caricando...
La pagina si sta caricando...
La pagina si sta caricando...
La pagina si sta caricando...
La pagina si sta caricando...
La pagina si sta caricando...
La pagina si sta caricando...
La pagina si sta caricando...
La pagina si sta caricando...
La pagina si sta caricando...
La pagina si sta caricando...
La pagina si sta caricando...
La pagina si sta caricando...
La pagina si sta caricando...
La pagina si sta caricando...
La pagina si sta caricando...
La pagina si sta caricando...
La pagina si sta caricando...
La pagina si sta caricando...
La pagina si sta caricando...
La pagina si sta caricando...
La pagina si sta caricando...
La pagina si sta caricando...
La pagina si sta caricando...
-
 1
1
-
 2
2
-
 3
3
-
 4
4
-
 5
5
-
 6
6
-
 7
7
-
 8
8
-
 9
9
-
 10
10
-
 11
11
-
 12
12
-
 13
13
-
 14
14
-
 15
15
-
 16
16
-
 17
17
-
 18
18
-
 19
19
-
 20
20
-
 21
21
-
 22
22
-
 23
23
-
 24
24
-
 25
25
-
 26
26
-
 27
27
-
 28
28
-
 29
29
-
 30
30
-
 31
31
-
 32
32
-
 33
33
-
 34
34
-
 35
35
-
 36
36
-
 37
37
-
 38
38
-
 39
39
-
 40
40
-
 41
41
-
 42
42
-
 43
43
-
 44
44
-
 45
45
-
 46
46
-
 47
47
-
 48
48


Gigaset Outdoor Camera Manuale utente
- Categoria
- Telecamere di sicurezza
- Tipo
- Manuale utente
in altre lingue
- English: Gigaset Outdoor Camera User manual
- français: Gigaset Outdoor Camera Manuel utilisateur
- español: Gigaset Outdoor Camera Manual de usuario
- Deutsch: Gigaset Outdoor Camera Benutzerhandbuch
- Nederlands: Gigaset Outdoor Camera Handleiding
Documenti correlati
-
Gigaset plug Guida utente
-
-
-
 Gigaset elements door Manuale del proprietario
-
-
Gigaset elements homecoming pack plus Manuale utente
-
-
Gigaset elements alarm system M Manuale del proprietario
-
-
Gigaset Book Case SMART Manuale utente
