
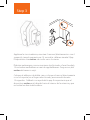
Step 3
Applicare la striscia adesiva, montare il sensore (direttamente o con il
supporto), tenerlo premuto per 15 secondi e calibrare tramite l’App.
Èimportante che motion sia rivolto verso la stanza.
Plakstrip aanbrengen, sensor monteren (rechtstreeks of met houder),
15 seconden aandrukken en met de app kalibreren. Zorg ervoor, dat
motion de kamer in wijst.
Coloque el adhesivo de doble cara y coloque el sensor (directamente
o con el soporte) en el lugar seleccionado, presionando durante
15 segundos. Calíbrelo con ayuda de la app. Es importante que el
dispositivo motion esté dirigido hacia el interior de la estancia y que
no reciba luz directa del exterior.

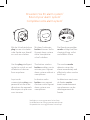
Erweitern Sie Ihr alarm system
*
Extend your alarm system
*
Complétez votre alarm system
*
Mit der Schaltsteckdose
plug lassen sich elektri-
sche Geräte von überall
an- und ausschalten.
Use the plug intelligent
socket to switch on and
o electrical devices
from anywhere.
La prise de
commutation plug vous
permet d‘activer et de
désactiver des appareils
électriques où que vous
vous trouviez.
Mit dem Funktaster
button können Sie Ihr
Gigaset alarm system
ohne Smartphone
scharf schalten.
The button wireless
button enables you to
activate your Gigaset
alarm system without a
smartphone.
Le bouton radio
button vous permet
d‘activer votre Gigaset
alarm system sans
smartphone.
Der Rauchwarnmelder
smoke schlägt bei Rau-
chentwicklung sofort
und eektiv Alarm.
The smoke smoke
detector raises the
alarm immediately and
eectively when smoke
builds up.
Le détecteur avertisseur
de fumée smoke
émet immédiatement
une alarme en cas de
développement de
fumée.
* Verfügbar im www.gigaset.com Online Shop
* Available from the www.gigaset.com online shop
* Disponible dans www.gigaset.com Online Shop

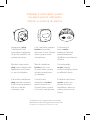
Ampliate il vostro alarm system
*
Uw alarm system
*
uitbreiden
Amplíe su sistema de alarma
*
Impiegare il plug
"intelligente" per
accendere e spegnere
i dispositivi elettrici da
qualunque posto.
Met het stopcontact
plug kunt u elektrische
apparaten op afstand
in- en uitschakelen.
El enchufe inteligente
plug permite conectar
y desconectar aparatos
eléctricos desde
cualquier lugar.
Con il pulsante wireless
button è possibile
attivare il vostro Gigaset
alarm system senza
smartphone.
Met de draadloze
button kunt u uw
Gigaset alarm system
zonder smartphone
inschakelen.
Con el botón
inalámbrico button,
podrá conectar su
Gigaset alarm system
sinusar el smartphone.
Il rilevatore di
fumo smoke
emette un‘allarme
immediatamente
all‘eettivo manifestarsi
di fumo.
De rookmelder
smoke slaat bij
rookontwikkeling direct
en eectief alarm.
El detector de humo
smoke activa una
alarma de forma
inmediata y efectiva
ante la presencia de
humo.
* Disponibile sul www.gigaset.com Online Shop
* Beschikbaar in de www.gigaset.com Online Shop
* Disponible en www.gigaset.com Online Shop

Sie haben Fragen oder wollen sich ausführlich über unsere Sicherheitslösungen
informieren? Wir freuen uns über Ihren Besuch auf www.gigaset.com.
Sie nden auch hilfreiche Videos auf YouTube oder unserer Facebook Präsenz.
Den Support erreichen Sie direkt aus der App oder auf www.gigaset.com/support.
Do you have any questions or want detailed information on our security
solutions? We look forward to welcoming you on www.gigaset.com.
Helpful videos are also on our YouTube and Facebook sites. Support is available
directly from the app and on www.gigaset.com/support.
Vous avez des questions ou vous voulez vous informer de manière détaillée
sur nos solutions de sécurité ? Nous nous réjouissons de votre visite sur
www.gigaset.com. Vous trouverez également des vidéos utiles sur YouTube ou
sur notre page Facebook. Vous pouvez joindre le service d‘assistance directement
depuis l‘application ou sur www.gigaset.com/support.
Hai qualche domanda o desideri informazioni dettagliate sulle nostre soluzioni
di sicurezza? Sei il benvenuto su www.gigaset.com. Sul nostro canale YouTube
o su Facebook si trovano anche video di aiuto. Il supporto è disponibile
direttamente dall‘app e su www.gigaset.com/support.
Heeft u vragen of wilt u meer informatie over onze beveiligingsoplossingen?
We heten u van harte welkom op www.gigaset.com. Op YouTube of onze
Facebook-pagina vindt u bovendien handige video‘s. U bereikt onze support
rechtstreeks uit de app of op www.gigaset.com/support.
¿Tiene alguna duda o necesita información detallada sobre nuestras soluciones
de seguridad? Esperamos su visita en www.gigaset.com. También encontrará
vídeos útiles en YouTube o en nuestra página de Facebook.
El servicio de asistencia está disponible directamente a través de la app o en
www.gigaset.com/support.
Wir sind gerne für Sie da. / We are here to help.
Nous sommes là pour vous. / Siamo qui per aiutarti.
Wij helpen u graag. / Estamos encantados de ayudarle.

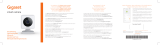
motion
Kurzanleitung
– für Nutzer von Smart Home
– smart care Nutzer folgen bitte den Anweisungen in der smart care App
Quick-start guide
– For users of Smart Home
– smart care users, please follow the instructions in the smart care app
Mémento
– pour les utilisateurs de Smart Home
– utilisateurs de smart care : veuillez suivre les consignes dans l‘application smart care
Istruzioni per l‘uso
– per utenti di Smart Home
– gli utenti di smart care devono seguire le istruzioni dell’app smart care
Beknopte bedieningsinstructies
– voor gebruikers van Smart Home
– smart care-gebruikers volgen de instructies in de smart care-app
Guía rápida
– para usuarios de Smart Home
– los usuarios de smart care deben seguir las instrucciones de la aplicación smart care

Um motion in Betrieb zu nehmen, folgen Sie bitten den folgenden
Schritten und den Anweisungen in der App.
Bitte beachten Sie das beiliegende Hinweisblatt.
Mehr Informationen erhalten Sie auch auf www.gigaset.com
To put motion into operation, please follow these steps and the
instructions from the app.
Please take note of the enclosed instruction sheet.
For more information, go to www.gigaset.com
Pour mettre en service motion, suivez les étapes suivantes ainsi que
les consignes de l‘application.
Veuillez respecter la che d‘instructions jointe.
Plus d‘informations sur www.gigaset.com
Mettere in funzione motion attenendosi ai seguenti passaggi e alle
istruzioni indicate dall’App.
Osservare anche il foglio di istruzioni allegato.
Maggiori informazioni sono disponibili anche in www.gigaset.com
Volg de volgende stappen en de aanwijzingen in de app om motion
in gebruik te nemen.
Neem daarbij ook de informatie in het meegeleverde instructievel
in acht.
Meer informatie vindt u ook op www.gigaset.com
Para poner el dispositivo motion en funcionamiento, siga los pasos
aquí indicados y las instrucciones de la app.
Tenga en cuenta la hoja de indicaciones adjunta.
Encontrará más información en www.gigaset.com
So installieren Sie motion. / How to install motion.
Comment installer motion. / Come installare motion.
Zo installeert motion. / Cómo instalar motion.

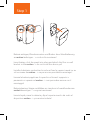
Step 1
Batterie einlegen, Blende einrasten und Boden- bzw. Wandhalterung
an motion befestigen - > noch nicht montieren!
Insert battery, click the panel into place and attach the oor or wall
bracket to the motion - > do not install the device yet!
Installer la batterie, enclencher le cache et xer le support mural ou au
sol au niveau de motion - > ne pas encore procéder aumontage !
Inserire la batteria, applicare il coperchio e ssare il supporto a
pavimento o a parete ad motion - > non procedere ancora con il
montaggio!
Batterij plaatsen, klepje vastklikken en standvoet of wandhouder aan
motion bevestigen - > nog niet monteren!
Inserte la pila, cierre la cubierta y je el soporte mural o de suelo al
dispositivo motion - > ¡no montar todavía!

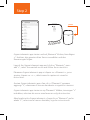
Step 2
Gigaset elements app starten und auf „Elements“ klicken; hinzufügen
„+“ drücken; den gewünschten Sensor auswählen und den
Anweisungen folgen.
Launch the Gigaset elements app and click on "Elements"; press
add "+"; select the wanted sensor and follow the instructions.
Démarrez Gigaset elements app et cliquez sur « Elements »; pour
ajouter, cliquez sur « + » ; sélectionnez le capteur et suivez les
instructions.
Avviare Gigaset elements app e fare clic su "Elements"; premere
aggiungi "+"; selezionare il sensore desiderato e seguire le istruzioni.
Gigaset elements app starten en op "Elements" klikken; toevoegen "+"
indrukken; selecteer de sensor naar keuze en volg de instructies.
Abra la aplicación Gigaset elements y haga clic en "Elements"; pulse
añadir "+"; seleccione el sensor deseado y siga las instrucciones.
press

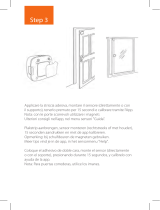
Step 3
Klebestreifen anbringen, Sensor montieren (direkt oder mit
Halterung), 15 Sekunden andrücken und mit Hilfe der App kalibrieren.
Es ist wichtig, dass motion in den Raum zeigt.
Attach the adhesive strip, t the sensor (with or without the bracket),
press for 15 seconds and use the app for calibration. It is important
that the motion points into the room.
Installez la bande adhésive, montez le capteur (directement ou avec
support), pressez 15 secondes et calibrez à l‘aide de l‘application.
Il est important que motion soit dirigé dans la pièce.

1 Sensor motion
1 Batterie CR123A
2 Halterungen
2 Klebestreifen
1 Kurzanleitung
1 Sicherheitsbroschüre
1 sensor motion
1 battery CR123A
2 brackets
2 adhesive strips
1 quick-start guide
1 safety brochure
1 capteur motion
1 batterie CR123A
2 supports
2 rubans adhésifs
1 mémento
1 brochure de sécurité
1 sensore motion
1 batteria CR123A
2 supporti
2 strisce adesive
1 istruzioni per l‘uso
1 brochure di sicurezza
Verpackungsinhalt / Contents of the package
Contenu de l‘emballage / Contenuto della confezione
Inhoud van de verpakking / Contenido de la caja
A-Klasse_Layout_Neu, Version 4, 28.05.2014 / ModuleVersion 1.0
A31008-N2513-R111-2-4N19
*A31008-N2513-R111-2-4N19*
1 sensor motion
1 batterij CR123A
2 houders
2 kleefstrook
1 beknopte bedieningsinstructies
1 veiligheidsbrochure
1 sensor motion
1 pila CR123A
2 soportes
2 adhesivos de doble cara
1 guía rápida
1 folleto de seguridad
Issued by
Gigaset Communications GmbH
Frankenstr. 2a, D-46395 Bocholt
© Gigaset Communications GmbH 2019
Subject to availability.
All rights reserved. Rights of modication reserved.
www.gigaset.com
-
 1
1
-
 2
2
-
 3
3
-
 4
4
-
 5
5
-
 6
6
-
 7
7
-
 8
8
-
 9
9
-
 10
10


Gigaset homecoming pack plus Guida utente
- Tipo
- Guida utente
- Questo manuale è adatto anche per
in altre lingue
Documenti correlati
-
Gigaset button Guida Rapida
-
 Gigaset elements door Manuale del proprietario
-
-
Gigaset elements alarm system M Manuale del proprietario
-
Gigaset elements homecoming pack plus Manuale utente
-
-
-
-
Gigaset Outdoor Camera Manuale utente
-
 Gigaset elements Smart Camera Manuale del proprietario


