La pagina si sta caricando...

Verpackungsinhalt / Contents of the package
Contenu de l‘emballage / Contenuto della confezione
Inhoud van de verpakking / Contenido de la caja
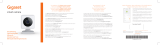
1 Gigaset camera 2.0
1 Magnetstandfuss
1 magnetic holder
1 base magnétique
1 supporto magnetico
1 magnetische voet
1 soporte magnético
1 Netzteil
1 power supply unit
1 bloc d'alimentation
1 alimentatore
1 netadapter
1 adaptador de alimentación
1 Kurzanleitung
1 quick start guide
1 mémento
1 guida rapida
1 beknopte handleiding
1 guía rápida
1 Sicherheitsbroschüre
1 security leaet
1 brochure de sécurité
1 opuscolo sulla sicurezza
1 veiligheidsbrochure
1 folleto de seguridad

Sie haben Fragen oder wollen sich ausführlich über unsere Sicherheitslösungen
informieren? Beachten Sie die beiliegenden Sicherheitshinweise.
Wir freuen uns über Ihren Besuch auf www.gigaset.com.
Sie nden auch hilfreiche Videos auf YouTube oder unserer Facebook Präsenz.
Den Support erreichen Sie direkt aus der App oder auf www.gigaset.com/support.
Do you have any questions or want detailed information on our security solutions?
Follow the safety information included.
We look forward to welcoming you on www.gigaset.com.
Helpful videos are also on our YouTube and Facebook sites.
Support is available directly from the app and on www.gigaset.com/support.
Vous avez des questions ou vous voulez vous informer de manière détaillée sur nos
solutions de sécurité? Tenez compte des consignes de sécurité jointes.
Nous nous réjouissons de votre visite sur www.gigaset.com.
Vous trouverez également des vidéos utiles sur YouTube ou sur notre page Facebook.
Vous pouvez joindre le service d‘assistance directement depuis l‘application ou sur
www.gigaset.com/support.
Wir sind gerne für Sie da.
We are here to help.
Nous sommes là pour vous.

Hai qualche domanda o desideri informazioni dettagliate sulle nostre soluzioni di
sicurezza? Attenersi alle note di sicurezza allegate.
Sei il benvenuto su www.gigaset.com.
Sul nostro canale YouTube o su Facebook si trovano anche video tutorial.
Il supporto è disponibile direttamente dall‘app e su www.gigaset.com/support.
Heeft u vragen of wilt u meer informatie over onze beveiligings-oplossingen?
Volg de meegeleverde veiligheidsinstructie.
We heten u van harte welkom op www.gigaset.com.
Op YouTube of onze Facebook-pagina vindt u bovendien handige video‘s.
U bereikt onze support rechtstreeks uit de app of op www.gigaset.com/support.
¿Tiene alguna duda o necesita información detallada sobre nuestras soluciones de
seguridad? Tenga en cuenta las recomendaciones de seguridad adjuntas.
Esperamos su visita en www.gigaset.com.
También encontrará vídeos útiles en YouTube o en nuestra página de Facebook.
El servicio de asistencia está disponible directamente a través de la app o en
www.gigaset.com/support.
Siamo qui per aiutarti.
Wij helpen u graag.
Estamos encantados de ayudarle.

APP Voraussetzung: aktuelle Android oder IOS Version
APP precondition: current Android and IOS Version
Pré requis : version actuelle pour Android ou pour IOS
Condizioni per l‘uso della APP: versione attuale di
Android e IOS
APP voorwaarde: actuele versie van Android of IOS
Requisitos de la aplicación: versión actualizada de
Android o IOS
Mehr Information / More information
Plus d‘informations / Maggiori informazioni
Meer informatie / Más información

camera 2.0
Kurzanleitung
Quick start guide
Mémento
Istruzioni per l'uso
Beknopte bedieningsinstructies
Guía rápida

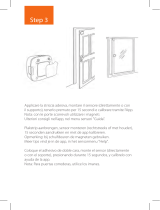
Step 1
Netzteil mit der Gigaset camera 2.0 verbinden. Fuß installieren und Gigaset camera 2.0
an einem Platz mit guter WLAN-Verbindung anbringen. Eine geringe Signalstärke kann zu
Funktionseinschränkungen führen.
Connect your power supply to the Gigaset camera 2.0. Install the magnetic holder and
place the Gigaset camera 2.0 in a location with good Wi connectivity. A low signal
strength can lead to functional limitations.
Reliez le bloc d'alimentation à la Gigaset camera 2.0. Installez la base magnétique et placez
la Gigaset camera 2.0 à un endroit avec une bonne réception au signal Wi. Un signal Wi
de faible intensité peut engendrer des restrictions fonctionnelles.
Collegare l'alimentatore alla Gigaset camera 2.0. Installare il supporto magnetico e
posizionare la videocamera Gigaset camera 2.0 in un luogo con una buona connettività
Wi. Una bassa potenza del segnale può portare a limitazioni funzionali.
Verbind de netadapter met de Gigaset camera 2.0. Installeer de magnetische voet en zet
Gigaset camera 2.0 op een plek met een goede Wi-verbinding. Een lage signaalsterkte
kan de functionaliteit nadelig beïnvloeden.
Conecte el adaptador de alimentación. Instale el soporte magnético y sitúe su
Gigaset camera 2.0 en un lugar con buena cobertura Wi. Un bajo nivel de señal
puede dar lugar a limitaciones funcionales.

Step 2
Gigaset elements app starten und auf „Elements“ klicken; hinzufügen „+“ drücken;
„smart camera“ auswählen und den Anweisungen folgen.
Launch the Gigaset elements app and click on "Elements"; press add "+";
select "smart camera" and follow the instructions.
Démarrez Gigaset elements app et cliquez sur « Elements »; pour ajouter,
cliquez sur « + » ; sélectionnez « smart camera » et suivez les instructions.
Avviare Gigaset elements app e fare clic su "Elements"; premere aggiungi "+";
scegliere "smart camera" e seguire le istruzioni.
Gigaset elements app starten en op "Elements" klikken; toevoegen "+" indrukken;
"smart camera" selecteren en vervolgens de instructies volgen.
Abra la aplicación Gigaset elements y haga clic en "Elements"; pulse añadir "+";
seleccione "smart camera" (cámara inteligente) y siga las instrucciones.

LED Statusleuchten
LED status lights
Diodes d'état
LED leuchtet nicht ......................... Aktuell werden keine Aufnahmen ausgeführt
LED leuchtet einmal ........................ Aufnahme gestartet
LED blinkt 2 x kurz 1 x lang .................. Verbindung zum WLAN
LED leuchtet durchgehend ................. Kamera fährt hoch
LED blinkt 2 x .............................. Abbruch der WLAN-Verbindung
LED blinkt schnell .......................... Software Update läuft
LED does not light up ...................... no recordings are currently being made
LED lights up once ......................... recording started
LED ashes 2 x short 1 x long ................ connection to Wi
LED lights up continuously .................. camera starts up
LED ashes 2 x ............................. termination of the Wi connection
LED ashes quickly ......................... software update in progress
La LED ne s'allume pas . . . . . . . . . . . . . . . . . . . . . . aucun enregistrement n'est en cours
de réalisation
La LED s'allume une fois .................... l'enregistrement a commencé
Deux clignotements brefs suivis d'un long ... connexion au Wi
La LED s'allume en continu ................. la caméra se met en marche
La LED clignote 2 x ......................... n de la connexion au Wi
La LED clignote rapidement ................. mise à jour du logiciel en cours

Indicatori di Stato a LED
LED-indicaties
Luces de estado LED
Il LED non si illumina ....................... nessuna registrazione in corso
Il LED si illumina una volta .................. la registrazione è stata avviata
Il LED lampeggia 2 x corto 1 x lungo ......... collegamento al Wi
Il LED si accende in modo continuo ......... la telecamera si avvia
Il LED lampeggia 2 x ........................ ne della connessione Wi
Il LED lampeggia rapidamente .............. aggiornamento software in corso
LED brandt niet ............................ er worden momenteel geen opnames gemaakt
LED brandt eenmaal ........................ opname gestart
LED knippert 2 x kort 1 x lang ............... aansluiting op Wi
LED brandt continu ........................ camera start op
LED knippert 2 x . . . . . . . . . . . . . . . . . . . . . . . . . . . . beëindiging van de Wi-verbinding
LED knippert snel .......................... software-update in uitvoering
El LED permanece apagado ................. no se están haciendo grabaciones
en este momento
El LED se enciende una vez ................. la grabación se ha iniciado
El LED parpadea 2 x corto 1 x largo .......... conexión a Wi
El LED se enciende continuamente .......... la cámara se enciende
El LED parpadea 2 x ........................ terminación de la conexión Wi
El LED parpadea rápidamente ............... actualización de software en curso

Issued by
Gigaset Communications GmbH
Frankenstr. 2a, D-46395 Bocholt
© Gigaset Communications GmbH 2020
Subject to availability.
All rights reserved. Rights of modication reserved.
www.gigaset.com
A-Klasse_Layout_Neu, Version 4, 28.05.2014 / ModuleVersion 1.0
A31008-N2556-R101-1-4U19
*A31008-N2556-R101-1-4U19*
Your unique Camera ID
/