Kenwood JMP400 Manuale del proprietario
- Categoria
- Produttori di succhi
- Tipo
- Manuale del proprietario
Questo manuale è adatto anche per

instructions
istruzioni
instrucciones
Bedienungsanleitungen
gebruiksaanwijzing
Instrukcja obsługi
TYPE JMP40

English 2 - 7
Nederlands 8 - 14
Français 15 - 21
Deutsch 22 - 28
Italiano 29 - 35
Português 36 - 42
Español 43 - 49
Dansk 50 - 55
Svenska 56 - 61
Norsk 62 - 67
Suomi 68 - 73
Türkçe 74 - 80
Česky 81 - 87
Magyar 88 - 95
Polski 96 - 103
Ελληνικά 104 - 111
Slovenčina 112 - 118
Українська 119 - 126
´¸∂w
721
- 331

4
bm
bn
bo
b
1
2
3
5
6
7 8
9
b
b

A B
C D
E F
H JI K
G

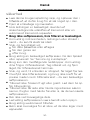
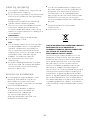
safety
l
Read these instructions carefully and retain for future
reference.
l
Remove all packaging and any labels.
l
If the cord is damaged it must, for safety reasons, be
replaced by KENWOOD or an authorised KENWOOD
repairer.
l
Do not use the juicer if the filter is damaged.
l
Never put the power unit, cord or plug in water – you
could get an electric shock.
l
Switch off and unplug:
before fitting or removing parts;
before cleaning;
after use.
l
Never use a damaged juicer. Get it checked or
repaired: see ‘Service and customer care’.
l
Only use the pusher supplied. Never put your fingers
in the feed tube. Unplug and remove the lid before
unblocking the feed tube.
l
Before removing the lid, switch off and wait for the
unit to stop.
l
Do not over fill the feed tube or use excessive force
to push the food down the feed tube – you could
damage your juicer.
l
Do not process frozen fruit or vegetables. Allow to
defrost before processing.
l
Do not process dried or hard ingredients such as
grains, fruit with hard seeds or ice as they may
damage the juicer.
l
Do not touch moving parts.
l
Never leave the juicer switched on unattended.
l
Never use an unauthorised attachment.
l
Children should be supervised to ensure that they do
not play with the appliance.
2

3
l
This appliance shall not be used by children. Keep the
appliance and its cord out of reach of children.
l
Misuse of your appliance can result in injury.
l
Do not let the cord touch hot surfaces or hang down
where a child could grab it.
l
Appliances can be used by persons with reduced
physical, sensory or mental capabilities or lack of
experience and knowledge if they have been given
supervision or instruction concerning use of the
appliance in a safe way and if they understand the
hazards involved.
l
Only use the appliance for its intended domestic use.
Kenwood will not accept any liability if the appliance
is subject to improper use, or failure to comply with
these instructions.
l
Do not operate juicer continuously for longer than 15
minutes in any 45 minute period.
before plugging in
l
Make sure your electricity supply is the same
as the one shown on the underside of the
appliance.
l
WARNING: THIS APPLIANCE MUST BE
EARTHED.
l
This appliance conforms to EC Regulation
1935/2004 on materials and articles
intended to come into contact with food.
before using for the first time
Wash the parts: see ‘care and cleaning’.
key
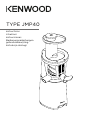
1
pusher
2
lid with hopper
3
scroll
4
filter
5
juicing bowl
6
pulp spout
7
pulp container
8
lid lock
9
power unit
bk
On/O/Reverse switch
bl
reset button
bm
juice spout
bn
anti-drip stopper
bo
juice jug
bp
cleaning brush

3 4
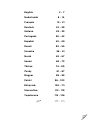
to assemble your juicer
(Aè I)
Aè B
Fit the pulp stopper into the opening on
the underside of the juicing bowl
5
and
push in until secure.
C
Fit the juicing bowl
5
to the power unit
9
by positioning the juice spout to the
front.
D
Place the filter
4
into the juicing bowl
5
, pushing down to secure into place.
E
Place the scroll
3
into the juicing bowl
and push down to secure. Note: the lid
cannot be fitted if the scroll is not fully
pushed down.
Fè G
Fit the lid
2
onto the unit ensuring the
with the (graphic) on the power unit
(graphic) on the bottom of the bowl
unlock graphic
lock graphic / Fit the lid onto the unit and click into place (x)
lter holder assembly into the juicing bowl and align the (graphic)
(graphic) on the juicing bowl
switch graphic, on, o & reverse
lines up with the
▲
on the front
of the juicing bowl. Then turn the lid
clockwise until it clicks into place and the
with the (graphic) on the power unit
(graphic) on the bottom of the bowl
unlock graphic
lock graphic / Fit the lid onto the unit and click into place (x)
lter holder assembly into the juicing bowl and align the (graphic)
(graphic) on the juicing bowl
switch graphic, on, o & reverse
lines up with the
▲
on the front of
the juicing bowl.
Hè I
Close the lid lock.
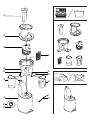
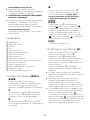
to use your juicer (J)
Place the pulp container
7
under the
pulp spout
6
and place the juice jug
bo
under the juice spout
bm
. Ensure the anti-
drip stopper
bn
is in the open position
before juicing.
Switch on
bk
and feed the food items down
slowly using the pusher.
l
Use the recommended usage chart as
a guide for juicing dierent fruits and
vegetables.
l
To extract the maximum amount of juice,
always push the food down slowly using the
pusher. Do not use excessive force as the
food should be pulled down by the scroll.
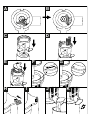
l
If the food becomes jammed in the feed
tube or on the scroll and the juicer stops
operating switch to the ‘
with the (graphic) on the power unit
(graphic) on the bottom of the bowl
unlock graphic
lock graphic / Fit the lid onto the unit and click into place (x)
lter holder assembly into the juicing bowl and align the (graphic)
(graphic) on the juicing bowl
switch graphic, on, o & reverse
’ o position.
Then press and hold the ‘
with the (graphic) on the power unit
(graphic) on the bottom of the bowl
unlock graphic
lock graphic / Fit the lid onto the unit and click into place (x)
lter holder assembly into the juicing bowl and align the (graphic)
(graphic) on the juicing bowl
switch graphic, on, o & reverse
’ reverse button
down until the food becomes dislodged.
Once the food is released, you can start
juicing again.
hints and tips
l
Wash all fruit and vegetable thoroughly
before juicing.
l
To maximise juice extraction place small
quantities at a time in the feed tube and
push down slowly.
l
Hard foods are best juiced at room
temperature.
l
You do not have to remove thin peels
or skins. Only remove thick peels that
you would not eat e.g. those of oranges,
pineapples, melons and uncooked
beetroots.
l
Use fresh fruit and vegetables as they
contain more juice.
l
Remove stones and hard seeds from
cherries, plums etc.
l
Vitamins disappear - the sooner you drink
your juice, the more vitamins you will get.
l
If you need to store the juice for a few hours
put it in the fridge. It will keep better if you
add a few drops of lemon juice.
Health Recommendations
l
Do not drink more than three 230mls (8
fl.oz.) glasses of juice a day unless you are
used to it.
l
Dilute juice for children with an equal
amount of water.
l
Juice from dark green (broccoli, spinach
etc.) or dark red (beetroot, red cabbage
etc.) vegetables is extremely strong, so
always dilute it.
l
Fruit juice is high in Fructose (fruit sugar),
so people with diabetes or low blood sugar
should avoid drinking too much.
after juicing (K)
After adding the last piece of food, allow
the juicer to run to help clear the juice
from the juicing bowl. The time will vary
depending on the fruit type and thickness
of the juice extracted.
Switch o and wait until the final flow of
juice has reduced to a few slow drips. Then
place the anti-drip stopper
bn
in position
before removing the jug.
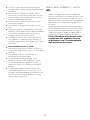
Refer to the troubleshooting
section if you experience any
problems with the operation of
the juicer.

5
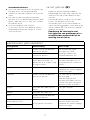
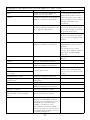
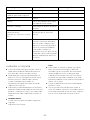
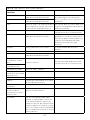
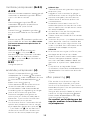
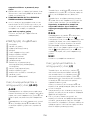
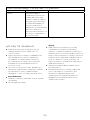
recommended usage chart
Fruit/Vegetable Preparation Hints and Tips
Apples Cut down to fit the feed tube. To maximise juice
extraction hard foods
are best juiced when at
room temperature.
Carrots Cut down to fit the feed tube.
Pineapple Remove the leaves and stalks by slicing
o the top and base. Cut into length-
wise pieces.
To prevent the filter
from clogging clean the
filter after every large
pineapple.
Seedless Grapes Remove stalks. Process small handfuls
at a time to maximise
juice extraction.
Tomatoes Cut down to fit the feed tube. A thick pulpy juice will
be produced rather than
a smooth juice.
To prevent the filter
from clogging, clean the
filter after every 500g of
tomatoes processed.
Mangoes Remove tough skin and stones. The juice produced will
be very thick.
Melons Remove tough skin. –
Kiwi fruits Cut down to fit the feed tube. –
Soft berries- (Raspberries,
Blackberries etc.)
Juice whole.
Process small handfuls
at a time to maximise
juice extraction.
Harder berries- (Cranber-
ries etc.)
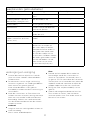
Beetroot (Raw) Remove leaves and peel. –
Leafy Vegetables- spinach,
kale, wheatgrass etc.
Wrap leaves into a bunch. –
Celery Juice whole. –
Cucumber Cut down to fit the feed tube. –
Citrus fruits-
Oranges
Peel and remove white pith. –
Fruit with stones or hard
seeds (Nectarines, Plums,
Cherries etc.)
Remove the stones or hard seeds be-
fore juicing.
–
Pomegranates Open the fruit by scoring the outside
skin and breaking apart. Submerge in
a large bowl of cold water and remove
the seeds from the pulp (this helps to
separate the seeds as they will sink to
the bottom of the bowl and the white
pulp will float to the top).
–

5 6
care and cleaning
l
Always switch o, unplug and take the juicer
apart before cleaning.
l
Some discolouration of parts may occur
upon using ingredients such as carrot or
leafy vegetables.
Cleaning all parts immediately after each use
will help to reduce stains.
l
Do not clean the pulp or filter outlet with a
sharp pointed object such as the end of a
knife as you will damage the bowl. Use the
tip of the cleaning brush handle to clean the
outlets.
power unit
l
Wipe with a damp cloth, then dry.
l
Do not immerse in water.
filter
l
To assist with removal of pulp and fibres,
place the anti-drip stopper in the closed
position. Switch the juicer on and pour
approximately 150mls water down the feed
tube. Operate the juicer for approximately
20 seconds, place the juice jug under the
juice spout and open the stopper to allow
the water to flow out.
l
Always clean the filter immediately after
juicing.
l
Use the brush supplied to clean the filter.
For best results, rinse under water and brush
until clear.
service & customer care
l
If you experience any problems with
the operation of your appliance, before
requesting assistance refer to the
“troubleshooting guide” section in the
manual or visit www.kenwoodworld.com.
l
Please note that your product is covered
by a warranty, which complies with all legal
provisions concerning any existing warranty
and consumer rights in the country where
the product was purchased.
l
If your Kenwood product malfunctions or
you find any defects, please send it or bring
it to an authorised KENWOOD Service
Centre. To find up to date details of your
nearest authorised KENWOOD Service
centre visit www.kenwoodworld.com or the
website specific to your Country.
l
Designed and engineered by Kenwood in
the UK.
l
Made in China.
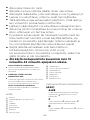
IMPORTANT INFORMATION FOR
CORRECT DISPOSAL OF THE PRODUCT
IN ACCORDANCE WITH THE EUROPEAN
DIRECTIVE ON WASTE ELECTRICAL AND
ELECTRONIC EQUIPMENT (WEEE)
At the end of its working life, the product must
not be disposed of as urban waste.
It must be taken to a special local authority
differentiated waste collection centre or to a
dealer providing this service.
Disposing of a household appliance separately
avoids possible negative consequences for
the environment and health deriving from
inappropriate disposal and enables the
constituent materials to be recovered to obtain
significant savings in energy and resources.
As a reminder of the need to dispose of
household appliances separately, the product
is marked with a crossed-out wheeled dustbin.

7
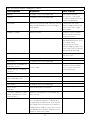
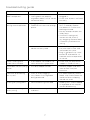
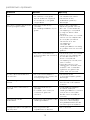
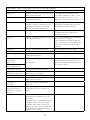
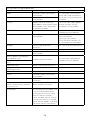
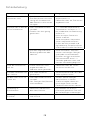
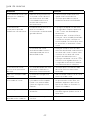
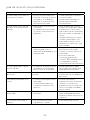
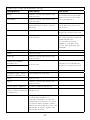
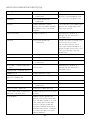
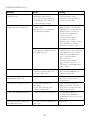
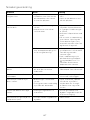
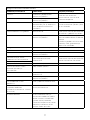
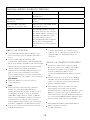
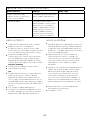
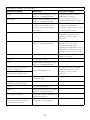
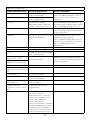
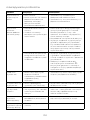
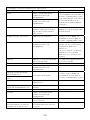
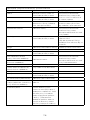
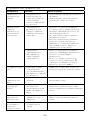
Problem Cause Solution
The juicer will not start/
does not operate.
• No power.
• Juicing bowl not properly
aligned on power unit or lid not
locked correctly.
• Make sure the appliance is
plugged in.
• Check that all parts are fitted
correctly.
The juicer has stopped
during normal operation.
• Clogging in filter and scroll.
• Food not cut into small enough
pieces.
• Press the reverse button
for 3-5 seconds. Repeat
the process 2-3 times until
blockage cleared.
• Do not attempt to open the
lid by force.
• Switch o, unplug and
remove the lid. Check if
any clogging. Remove food
if necessary and continue
juicing.
• Juicer overloaded or overheat-
ed due to heavy load.
• Switch o, unplug and take
the juicer apart. Clear and
reassemble the juicer.
• Plug in and press the “reset”
button
bl
and hold for 1-2
seconds and start operation
as normal.
Juice is leaking from
underneath the bowl.
• Pulp stopper not fitted or has
come loose during operation.
• Check that the pulp outlet
stopper is fitted correctly.
Juice does not exit juicing
outlet.
• Anti-drip stopper closed. • Remove stopper and allow
juice to flow into juice
container.
Too much pulp coming
out in juice.
• Filter or scroll clogging.
• Very fibrous fruit/vegetable
being processed.
• Cut food, especially fibrous
foods, into smaller pieces to
avoid the fibres wrapping
around the scroll.
Staining on juicing parts. • Natural colouring from food. • Rubbing with a cloth dipped
in vegetable oil will help to
remove discolouring.
There is a squeaking noise
when juicing.
• Friction between ingredients
and bowl.
• Normal operation.
troubleshooting guide

7 8
veiligheid
l
Lees deze instructies zorgvuldig door en bewaar ze
voor toekomstig gebruik.
l
Verwijder de verpakking en alle labels.
l
Als het snoer beschadigd is, moet het om
veiligheidsredenen door Kenwood of een door
Kenwood geautoriseerd reparatiebedrijf vervangen
worden.
l
Gebruik de juicer niet als het filter beschadigd is.
l
Dompel het onderstel, het snoer en de stekker nooit
onder in water, omdat dat een elektrische schok kan
veroorzaken.
l
Zet de machine uit en haal de stekker uit het
stopcontact:
voordat u hulpstukken bevestigt of loshaalt,
voor reiniging van de machine,
na gebruik van de machine.
l
Gebruik nooit een juicer die beschadigd is. Laat de
machine controleren of repareren: raadpleeg het deel
'onderhoud en klantenservice'.
l
Gebruik alleen de meegeleverde pusher. Steek nooit
uw vingers in de vultrechter. Haal de stekker uit het
stopcontact en verwijder het deksel voordat u een
verstopping in de vultrechter verwijdert.
l
Voordat u het deksel verwijdert, schakelt u de
machine uit en wacht u totdat hij is gestopt.
l
Prop de vultrechter niet vol en gebruik ook niet
te veel kracht om het fruit door de vultrechter te
duwen, omdat u daarmee de juicer kunt beschadigen.
l
Verwerk geen diepgevroren fruit of groente in de
juicer. Laat de voedingsmiddelen eerst ontdooien.
Nederlands
Vouw de voorpagina a.u.b. uit voordat u begint te lezen. Op deze manier zijn
de afbeeldingen zichtbaar

9
l
Verwerk geen gedroogde of harde ingrediënten, zoals
granen, vruchten met harde pitten of ijsblokjes, omdat
de juicer hierdoor beschadigd kan raken.
l
Raak de bewegende onderdelen niet aan.
l
Houd altijd toezicht op een ingeschakelde juicer.
l
Gebruik nooit een hulpstuk dat niet bij de machine hoort.
l
Kinderen mogen het apparaat alleen onder toezicht
gebruiken, om te voorkomen dat ze ermee spelen.
l
Dit apparaat mag niet door kinderen worden gebruikt.
Houd het apparaat en het snoer buiten het bereik van
kinderen.
l
Misbruik van dit apparaat kan persoonlijk letsel
veroorzaken.
l
Bescherm het snoer tegen hete oppervlakken en laat
het snoer niet naar beneden hangen zodat een kind
eraan kan trekken.
l
Dit apparaat kan worden gebruikt door personen met
verminderde lichamelijke, sensorische of geestelijke
capaciteiten of gebrek aan ervaring en kennis mits ze
onder toezicht staan of instructie hebben gekregen
over het veilige gebruik van het apparaat, en de
betrokken risico’s begrijpen.
l
Gebruik het apparaat alleen voor het huishoudelijke
gebruik waarvoor het is bedoeld. Kenwood kan
niet aansprakelijk worden gesteld in het geval dat
het apparaat niet correct is gebruikt, of als deze
instructies niet worden opgevolgd.
l
Gebruik de juicer nooit langer dan 15 minuten
gedurende een periode van 45 minuten.
voordat u de stekker in het stopcontact
steekt
l
Controleer of dat de
elektriciteitsvoorziening dezelfde spanning
heeft als op de onderkant van het apparaat
wordt aangegeven.
l
WAARSCHUWING: DIT APPARAAT MOET
GEAARD ZIJN.
l
Dit apparaat voldoet aan EG Verordening
1935/2004 inzake materialen en
voorwerpen die bestemd zijn om met
levensmiddelen in contact te komen.
voordat u de machine voor het eerst
gebruikt
Was de onderdelen: raadpleeg het deel
'verzorging en reiniging'.

9 10
legenda
1
pusher
2
deksel met hopper
3
rol
4
filter
5
sapkom
6
uitlaat voor vruchtvlees
7
opvangbak voor vruchtvlees
8
dekselvergrendeling
9
onderstel
bk
schakelaar voor aan/uit/terug
bl
reset-toets
bm
uitlaat voor vruchtensap
bn
antilek-stopper
bo
sapbeker
bp
schoonmaakborstel
de juicer monteren (AèI)
Aè B
Plaats de stopper voor het vruchtvlees in de
opening aan de onderkant van de sapkom
5
en duw hem stevig naar binnen.
C
Plaats de sapkom
5
op het onderstel
9
met de saptuit aan de voorkant.
D
Steek het filter
4
in de sapkom
5
en druk
hem goed op zijn plaats.
E
Plaats de rol
3
in de sapkom en druk hem
goed op zijn plaats. Opmerking: het deksel
gaat niet dicht als de rol niet goed naar
beneden is geduwd.
Fè G
Plaats het deksel
2
op de machine,
waarbij
with the (graphic) on the power unit
(graphic) on the bottom of the bowl
unlock graphic
lock graphic / Fit the lid onto the unit and click into place (x)
lter holder assembly into the juicing bowl and align the (graphic)
(graphic) on the juicing bowl
switch graphic, on, o & reverse
met
▲
wordt uitgelijnd aan de
voorkant van de sapkom. Draai het deksel
vervolgens naar rechts tot hij vastklikt en
with the (graphic) on the power unit
(graphic) on the bottom of the bowl
unlock graphic
lock graphic / Fit the lid onto the unit and click into place (x)
lter holder assembly into the juicing bowl and align the (graphic)
(graphic) on the juicing bowl
switch graphic, on, o & reverse
uitgelijnd is met
▲
aan de voorkant van
de sapkom.
Hè I
Sluit de dekselvergrendeling.
de juicer gebruiken (J)
Plaats de opvangbak voor het vruchtvlees
7
onder de uitlaat voor het vruchtvlees
6
en plaats de sapbeker
bo
onder de
uitlaat voor het sap
bm
. Zorg ervoor dat de
antilek-stopper
bn
open staat voordat u de
fruitpers begint te gebruiken.
Schakel de juicer in
bk
en duw de
voedingsmiddelen langzaam naar beneden
met de pusher.
l
Gebruik de tabel 'aanbevolen gebruik'
als richtlijn voor de verwerking van
verschillende groenten en fruit.
l
Duw de voedingsmiddelen altijd langzaam
naar beneden met de pusher, zodat het
meeste sap wordt uitgeperst. Druk niet te
hard. De voedingsmiddelen moeten door de
rol naar binnen worden getrokken.
l
Als de voedingsmiddelen in de vultrechter
of op de rol verstopt raken, zodat de
juicer stopt, zet u de schakelaar op '
with the (graphic) on the power unit
(graphic) on the bottom of the bowl
unlock graphic
lock graphic / Fit the lid onto the unit and click into place (x)
lter holder assembly into the juicing bowl and align the (graphic)
(graphic) on the juicing bowl
switch graphic, on, o & reverse
'.
Houd de terugknop '
with the (graphic) on the power unit
(graphic) on the bottom of the bowl
unlock graphic
lock graphic / Fit the lid onto the unit and click into place (x)
lter holder assembly into the juicing bowl and align the (graphic)
(graphic) on the juicing bowl
switch graphic, on, o & reverse
' ingedrukt totdat
de verstopping is verwijderd. Zodra de
voedingsmiddelen weer los zijn, kunt u de
juicer opnieuw starten.
hints en tips
l
Was al het fruit en alle groente grondig
voordat u ze verwerkt.
l
Duw telkens een kleine hoeveelheid
langzaam door de vultrechter om zoveel
mogelijk sap te verkrijgen.
l
Harde voedingsmiddelen worden het beste
op kamertemperatuur tot sap verwerkt.
l
U hoeft dunne schillen niet te verwijderen.
Verwijder alleen dikke schillen die u niet zou
eten, zoals die van sinaasappels, ananas,
meloen en ongekookte rode bieten.
l
Gebruikt vers fruit en verse groente, omdat
die meer sap bevatten.
l
Ontpit alle kersen, pruimen, enz.
l
Vitaminen verdwijnen - hoe sneller u het
sap opdrinkt, des te meer vitaminen krijgt u
binnen.
l
Als u het sap enkele uurtjes moet bewaren,
zet u het in de koelkast. Het sap blijft beter
bewaard als u er enkele druppels citroensap
in doet.

11
Gezondheidsinformatie
l
Drink niet meer dan drie 230 ml glazen sap
per dag, tenzij u eraan gewend bent.
l
Verdun het sap voor kinderen met evenveel
water.
l
Het sap van donkere groente (broccoli,
spinazie, enz.) en donkerrode groente (rode
bieten, rode kool, enz.) is heel sterk. Verdun
dit sap dus altijd.
l
Vruchtensap bevat veel fructose
(fruitsuiker). Mensen met diabetes of een
laag bloedsuikergehalte mogen er niet te
veel van drinken.
na het gebruik (K)
Nadat het laatste voedingsmiddel is
toegevoegd, laat u de juicer nog even aan
staan om het sap uit de sapkom te laten
stromen.
Hoe lang dit duurt, hangt af van het soort
fruit en van de dikte van het sap.
Schakel de juicer uit en wacht totdat het
sap uit de uitlaat druppelt. Steek daarna de
antilek-stopper
bn
in de machine voordat u
de beker verwijdert.
Raadpleeg de informatie over
het oplossen van problemen als u
moeilijkheden ondervindt bij de
werking van de juicer.
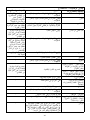
aanbevolen gebruikstabel
Fruit/groente Voorbereiding Hints en tips
Appels Snijd in stukjes die door de
vultrechter passen.
Het meeste sap wordt
verkregen als harde
voedingsmiddelen op
kamertemperatuur zijn.
Wortels Snijd in stukjes die door de
vultrechter passen.
Ananas Verwijder de bladeren en
stelen door de onder- en
bovenkant af te snijden. Snijd
in lange stukken.
Voorkom dat het filter
verstopt raakt door het na
elke grote ananas schoon te
maken.
Pitloze druiven Verwijder de steeltjes. Verwerk telkens een klein
handjevol om zoveel mogelijk
sap te verkrijgen.
Tomaten Snijd in stukjes die door de
vultrechter passen.
Het sap is dik en klonterig en
dus niet glad.
Voorkom dat het filter
verstopt raakt door het filter
na elke 500 gram verwerkte
tomaten schoon te maken.
Mango Verwijder de harde schil en
de pit.
Het sap is erg dik.
Meloen Verwijder de harde schil. –
Kiwi Snijd in stukjes die door de
vultrechter passen.
–
Zachte bessen (frambozen,
zwarte bessen, enz.)
In hun geheel verwerken.
Verwerk telkens een klein
handjevol om zoveel mogelijk
sap te verkrijgen.
Hardere bessen (cranberry's,
enz.)

11 12
aanbevolen gebruikstabel
Fruit/groente Voorbereiding Hints en tips
Rode biet (rauw) Verwijder de bladeren en de
schil.
–
Groene groente - spinazie,
boerenkool, tarwegras, enz.
Rol de bladeren op. –
Groenselderij In hun geheel verwerken. –
Komkommer Snijd in stukjes die door de
vultrechter passen.
–
Citrusvruchten - sinaasappels Verwijder de schil en het wit
onder de schil.
–
Vruchten met pitten of harde
zaden (nectarines, pruimen,
kersen, enz.)
Verwijder de pitten of harde
zaden.
–
Granaatappels Open de vrucht door in de
buitenschil te snijden en
de vrucht open te breken.
Dompel de helften onder in
een grote kom koud water
en haal de zaadjes uit het
vruchtvlees (hierdoor worden
de zaden gescheiden, omdat
ze naar de bodem van de
kom zinken en het witte
vruchtvlees blijft drijven).
–
verzorging en reiniging
l
Schakel de machine altijd uit en haal de
juicer uit elkaar voordat u de onderdelen
schoonmaken.
l
De elementen kunnen enige verkleuring
vertonen na gebruik van voedingsmiddelen
zoals wortels en groene groente.
Maak alle onderdelen na elk gebruik
onmiddellijk schoon om deze verkleuring te
verminderen.
l
Maak de vruchtvlees- en filteruitlaat niet
schoon met een scherp en puntig voorwerp
zoals een mes, omdat u daarmee de kom
beschadigt. Gebruik het handvatuiteinde
van de schoonmaakborstel om de uitlaten
schoon te maken.
onderstel
l
Veeg het met een vochtige doek schoon en
maak het droog.
l
Niet in water onderdompelen.
filter
l
Doe de antilek-stopper dicht zodat het
eenvoudiger wordt om vruchtvlees en
vezels te verwijderen. Schakel de juicer in
en giet ca. 150 ml water door de vultrechter.
Zet de juicer ca. 20 seconden aan, plaats de
sapbeker onder de sapuitlaat en open de
stopper zodat het water kan uitstromen.
l
Reinig het filter altijd onmiddellijk na het
gebruik.
l
Gebruik de meegeleverde borstel om het
filter schoon te maken. Voor het beste
resultaat spoelt u het filter onder water en
borstelt u het schoon.

13
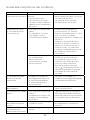
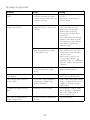
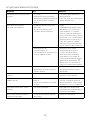
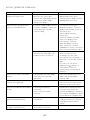
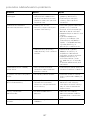
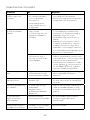
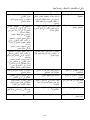
Probleem Oorzaak Oplossing
De juicer start/functioneert
niet.
• Geen stroom.
• De sapkom is niet goed
op het onderstel uitgelijnd
of het deksel is niet goed
vergrendeld.
• Controleer of de stekker in
het stopcontact steekt.
• Controleer of alle
onderdelen goed zijn
bevestigd.
De juicer is tijdens de normale
werking uitgeschakeld.
• Het filter en de rol zijn
verstopt.
• De voedingsmiddelen zijn te
groot.
• Druk 3 tot 5 seconden
op de terugknop. Herhaal
dit 2 tot 3 maal totdat de
verstopping is verwijderd.
• U mag het deksel nooit
forceren.
• Schakel de juicer uit, haal de
stekker uit het stopcontact
en verwijder het deksel.
Controleer of er een
verstopping is.
Verwijder de
voedingsmiddelen zo nodig
en ga door met het normale
gebruik.
• De juicer is overbelast of
oververhit door een te zware
belasting.
• Schakel de juicer uit, haal de
stekker uit het stopcontact
en haal de machine uit
elkaar. Verwijder de
verstopping en zet de juicer
weer in elkaar.
• Steek de stekker in het
stopcontact, houd de reset-
knop
bl
1 tot 2 seconden
ingedrukt en gebruik de
juicer weer als normaal.
Er lekt sap uit de onderkant
van de kom.
• De vruchtvleesstopper is
niet geplaatst of is tijdens de
werking losgeraakt.
• Controleer of de
vruchtvleesstopper goed is
bevestigd.
Er stroomt geen sap uit de
uitlaat.
• De antilek-stopper is dicht. • Verwijder de stopper en
laat het sap in de sapkom
stromen.
Er zit te veel vruchtvlees in
het sap.
• Het filter of de rol zijn
verstopt.
• Er worden zeer vezelrijke
vruchten of groenten
verwerkt.
• Snijd voedingsmiddelen
en vooral vezelrijke
voedingsmiddelen in kleinere
stukjes om te vermijden
dat de vezels rond de rol
wikkelen.
Verkleuring van de
onderdelen.
• Natuurlijke kleurstoen in de
voedingsmiddelen.
• Wrijf over de onderdelen
met een in plantaardige
olie gedoopte doek om de
verkleuring te verwijderen.
Piepgeluid tijdens het gebruik
van de juicer.
• Wrijving tussen de
ingrediënten en de kom.
• Dit is normaal.
problemen oplossen

13 14
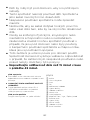
onderhoud en klantenservice
l
Als u problemen ondervindt met de
werking van de machine, raadpleegt u de
informatie onder ‘problemen oplossen’
in deze handleiding of gaat u naar
www.kenwoodworld.com.
l
Dit product is gedekt door een garantie
die voldoet aan alle wettelijke regels voor
bestaande garanties en consumentenrechten
die gelden in het land waar het product is
gekocht.
l
Als uw Kenwood product niet goed
functioneert of als u defecten opmerkt,
kunt u het naar een erkend Service
Center van KENWOOD sturen of brengen.
Voor informatie over het KENWOOD
Service Center in uw buurt gaat u naar
www.kenwoodworld.com of naar de
specifieke website in uw land.
l
Ontworpen en ontwikkeld door Kenwood in
het VK.
l
Vervaardigd in China.
BELANGRIJKE INFORMATIE VOOR DE
JUISTE VERWIJDERING VAN HET PRODUCT
VOLGENS DE EUROPESE RICHTLIJN
BETREFFENDE AFGEDANKTE ELEKTRISCHE
EN ELEKTRONISCHE APPARATUUR (AEEA)
Aan het einde van de levensduur van het
product mag het niet samen met het gewone
huishoudelijke afval worden verwerkt. Het moet
naar een speciaal centrum voor gescheiden
afvalinzameling van de gemeente worden
gebracht, of naar een verkooppunt dat deze
service verschaft. Het apart verwerken van een
huishoudelijk apparaat voorkomt mogelijke
gevolgen voor het milieu en de gezondheid
die door een ongeschikte verwerking ontstaan
en zorgt ervoor dat de materialen waaruit het
apparaat bestaat, teruggewonnen kunnen
worden om een aanmerkelijke besparing van
energie en grondstoffen te verkrijgen. Om op
de verplichting tot gescheiden verwerking
van elektrische huishoudelijke apparatuur te
wijzen, is op het product het symbool van een
doorgekruiste vuilnisbak aangebracht.

15
sécurité
l
Lisez et conservez soigneusement ces instructions
pour pouvoir vous y référer ultérieurement.
l
Retirez tous les éléments d’emballage et les
étiquettes.
l
Si le cordon est endommagé, il doit être remplacé,
pour des raisons de sécurité, par Kenwood ou par un
réparateur agréé Kenwood.
l
N’utilisez pas le presse-fruits si le filtre est
endommagé.
l
Ne mettez jamais le bloc moteur, le cordon
d’alimentation ou la prise électrique dans l’eau – vous
risqueriez de vous électrocuter.
l
Éteignez l’appareil et débranchez-le :
avant d’installer ou de retirer des éléments
avant de le nettoyer
après chaque utilisation.
l
N’utilisez jamais un presse-fruits endommagé. Faites-
le vérifier et réparer : reportez-vous à la section «
service après-vente ».
l
Utilisez uniquement le poussoir fourni avec l’appareil.
N’introduisez jamais vos doigts dans le tube
d’alimentation. Débranchez l’appareil et retirez le
couvercle avant de débloquer le tube d’alimentation.
l
Avant de retirer le couvercle, éteignez l'appareil et
attendez que l'appareil soit à l'arrêt.
l
Ne remplissez pas outre mesure le tube
d’alimentation et n’appuyez pas trop fort pour faire
descendre les aliments dans le tube d’alimentation ;
vous risqueriez d’endommager votre presse-fruits.
l
Ne passez pas au presse-fruits des fruits ou des
légumes congelés. Laissez toujours les aliments
décongeler avant de les passer au presse-fruits.
Français
Avant de lire, veuillez déplier la première page contenant les illustrations

15 16
l
Ne passez pas au presse-fruits des aliments secs ou
durs tels que des graines, des fruits avec noyaux ou
de la glace ; vous risqueriez d’endommager votre
appareil.
l
Ne touchez pas les pièces en mouvement.
l
Ne laissez jamais votre presse-fruits fonctionner sans
surveillance.
l
N'utilisez jamais un accessoire non homologué.
l
Les enfants doivent être surveillés pour veiller à ce
qu'ils ne jouent pas avec l’appareil.
l
Cet appareil ne doit pas être utilisé par des enfants.
Veuillez garder l’appareil et le cordon hors de portée
des enfants.
l
Toute mauvaise utilisation de votre appareil peut être
source de blessures.
l
Ne laissez jamais le cordon d’alimentation au contact
de surfaces chaudes et ne le laissez jamais pendre de
telle façon qu’un enfant puisse s’en saisir.
l
Les appareils peuvent être utilisés par des personnes
dont les capacités physiques, sensorielles ou
mentales sont diminuées, ou qui ne disposent pas
des connaissances ou de l’expérience nécessaires, si
elles ont été formées et encadrées pour l’utilisation
des appareils, et si elles ont conscience des risques
encourus.
l
N’employez l’appareil qu’à la fin domestique prévue.
Kenwood décline toute responsabilité dans les cas
où l’appareil est utilisé incorrectement ou que les
présentes instructions ne sont pas respectées.
l
Ne faites pas fonctionner le presse-fruits en continu
plus de 15 minutes par tranche de 45 minutes.
avant de brancher l’appareil
l
Assurez-vous que votre alimentation
électrique correspond à celle qui est
indiquée sur la partie inférieure de votre
appareil.
l
AVERTISSEMENT : CET APPAREIL DOIT
ÊTRE RELIÉ À LA TERRE
l
Cet appareil est conforme au règlement
1935/2004 de la CE sur les matériaux et les
articles destinés au contact alimentaire.

17
avant d’utiliser votre appareil pour la
première fois
Lavez les diérentes pièces de l’appareil :
reportez-vous à la section « nettoyage et
entretien ».
légende
1
poussoir
2
couvercle avec trémie
3
spirale
4
filtre
5
bocal à jus
6
sortie pour la pulpe
7
récupérateur de pulpe
8
verrouillage du couvercle
9
bloc moteur
bk
commutateur On/O/Reverse (Arrêt/
Marche/Marche arrière)
bl
bouton de réinitialisation
bm
bec verseur pour le jus
bn
bec verseur anti-gouttes
bo
carafe à jus
bp
brosse de nettoyage
montage du presse-fruits
(Aè I)
Aè B
Installez l’obturateur de pulpe dans l’orifice
présent sous le bocal à jus
5
et appuyez
dessus jusqu’à ce qu’il soit mis en place.
C
Installez le bocal à jus
5
sur le bloc moteur
9
en plaçant le bec verseur pour le jus vers
l'avant.
D
Placez le filtre
4
dans le bocal à jus
5
, en
enfonçant pour le fixer solidement en place.
E
Placez la spirale
3
dans le bocal à jus
et enfoncez-la pour fixer. Remarque : le
couvercle ne peut pas être installé si la
spirale n’est pas totalement enfoncée.
Fè G
Adaptez le couvercle
2
sur le bloc en
vérifiant que le
with the (graphic) on the power unit
(graphic) on the bottom of the bowl
unlock graphic
lock graphic / Fit the lid onto the unit and click into place (x)
lter holder assembly into the juicing bowl and align the (graphic)
(graphic) on the juicing bowl
switch graphic, on, o & reverse
est aligné sur
▲
à
l'avant du bocal à jus. Ensuite, tournez le
couvercle dans le sens des aiguilles d'une
montre jusqu'à ce qu'il soit enclenché et que
le
with the (graphic) on the power unit
(graphic) on the bottom of the bowl
unlock graphic
lock graphic / Fit the lid onto the unit and click into place (x)
lter holder assembly into the juicing bowl and align the (graphic)
(graphic) on the juicing bowl
switch graphic, on, o & reverse
soit aligné avec
▲
sur le devant du
bocal à jus.
Hè I
Verrouillez le couvercle.
utilisation de votre presse-
fruits (J)
Installez le récupérateur de pulpe
7
sous la
sortie de la pulpe
6
et disposez la carafe à
jus
bo
sous le bec verseur à jus
bm
. Veillez
à ce que le bec verseur anti-gouttes
bn
soit
sur la position ouverte avant de mettre en
marche le presse-fruits.
Éteignez l’appareil
bk
et insérez les aliments
dans le tube d’alimentation en appuyant
délicatement dessus à l’aide du poussoir.
l
Reportez-vous au tableau des utilisations
recommandées en tant que guide pour
obtenir des jus diérents à base de fruits ou
de légumes.
l
Pour optimiser l’extraction de jus, poussez
doucement vers le bas les aliments à l’aide
du poussoir. N’appuyez pas trop fort car les
aliments sont entraînés vers le bas par la
spirale.
l
Si des aliments obstruent le tube
d’alimentation ou bloquent la spirale, et que
presse-fruits arrête de fonctionner, mettez
le bouton sur «
with the (graphic) on the power unit
(graphic) on the bottom of the bowl
unlock graphic
lock graphic / Fit the lid onto the unit and click into place (x)
lter holder assembly into the juicing bowl and align the (graphic)
(graphic) on the juicing bowl
switch graphic, on, o & reverse
» ; puis sélectionnez le
bouton marche arrière
«
with the (graphic) on the power unit
(graphic) on the bottom of the bowl
unlock graphic
lock graphic / Fit the lid onto the unit and click into place (x)
lter holder assembly into the juicing bowl and align the (graphic)
(graphic) on the juicing bowl
switch graphic, on, o & reverse
» : appuyez dessus et maintenez-le
enfoncé jusqu’à ce les aliments soient
dégagés. Une fois les aliments libérés, vous
pouvez recommencer à extraire votre jus.
Conseils
l
Lavez tous vos fruits et légumes avant de
réaliser vos jus.
l
Pour optimiser l’extraction de jus, n’insérez
que de petites quantités à la fois dans le
tube d’alimentation et appuyez doucement
vers le bas.
l
Pour optimiser l’extraction de jus à partir
d’aliments durs, il est préférable d’utiliser
des aliments durs à température ambiante.
La pagina si sta caricando...
La pagina si sta caricando...
La pagina si sta caricando...
La pagina si sta caricando...
La pagina si sta caricando...
La pagina si sta caricando...
La pagina si sta caricando...
La pagina si sta caricando...
La pagina si sta caricando...
La pagina si sta caricando...
La pagina si sta caricando...
La pagina si sta caricando...
La pagina si sta caricando...
La pagina si sta caricando...
La pagina si sta caricando...
La pagina si sta caricando...
La pagina si sta caricando...
La pagina si sta caricando...
La pagina si sta caricando...
La pagina si sta caricando...
La pagina si sta caricando...
La pagina si sta caricando...
La pagina si sta caricando...
La pagina si sta caricando...
La pagina si sta caricando...
La pagina si sta caricando...
La pagina si sta caricando...
La pagina si sta caricando...
La pagina si sta caricando...
La pagina si sta caricando...
La pagina si sta caricando...
La pagina si sta caricando...
La pagina si sta caricando...
La pagina si sta caricando...
La pagina si sta caricando...
La pagina si sta caricando...
La pagina si sta caricando...
La pagina si sta caricando...
La pagina si sta caricando...
La pagina si sta caricando...
La pagina si sta caricando...
La pagina si sta caricando...
La pagina si sta caricando...
La pagina si sta caricando...
La pagina si sta caricando...
La pagina si sta caricando...
La pagina si sta caricando...
La pagina si sta caricando...
La pagina si sta caricando...
La pagina si sta caricando...
La pagina si sta caricando...
La pagina si sta caricando...
La pagina si sta caricando...
La pagina si sta caricando...
La pagina si sta caricando...
La pagina si sta caricando...
La pagina si sta caricando...
La pagina si sta caricando...
La pagina si sta caricando...
La pagina si sta caricando...
La pagina si sta caricando...
La pagina si sta caricando...
La pagina si sta caricando...
La pagina si sta caricando...
La pagina si sta caricando...
La pagina si sta caricando...
La pagina si sta caricando...
La pagina si sta caricando...
La pagina si sta caricando...
La pagina si sta caricando...
La pagina si sta caricando...
La pagina si sta caricando...
La pagina si sta caricando...
La pagina si sta caricando...
La pagina si sta caricando...
La pagina si sta caricando...
La pagina si sta caricando...
La pagina si sta caricando...
La pagina si sta caricando...
La pagina si sta caricando...
La pagina si sta caricando...
La pagina si sta caricando...
La pagina si sta caricando...
La pagina si sta caricando...
La pagina si sta caricando...
La pagina si sta caricando...
La pagina si sta caricando...
La pagina si sta caricando...
La pagina si sta caricando...
La pagina si sta caricando...
La pagina si sta caricando...
La pagina si sta caricando...
La pagina si sta caricando...
La pagina si sta caricando...
La pagina si sta caricando...
La pagina si sta caricando...
La pagina si sta caricando...
La pagina si sta caricando...
La pagina si sta caricando...
La pagina si sta caricando...
La pagina si sta caricando...
La pagina si sta caricando...
La pagina si sta caricando...
La pagina si sta caricando...
La pagina si sta caricando...
La pagina si sta caricando...
La pagina si sta caricando...
La pagina si sta caricando...
La pagina si sta caricando...
La pagina si sta caricando...
La pagina si sta caricando...
La pagina si sta caricando...
La pagina si sta caricando...
La pagina si sta caricando...
La pagina si sta caricando...
La pagina si sta caricando...
La pagina si sta caricando...
La pagina si sta caricando...
-
 1
1
-
 2
2
-
 3
3
-
 4
4
-
 5
5
-
 6
6
-
 7
7
-
 8
8
-
 9
9
-
 10
10
-
 11
11
-
 12
12
-
 13
13
-
 14
14
-
 15
15
-
 16
16
-
 17
17
-
 18
18
-
 19
19
-
 20
20
-
 21
21
-
 22
22
-
 23
23
-
 24
24
-
 25
25
-
 26
26
-
 27
27
-
 28
28
-
 29
29
-
 30
30
-
 31
31
-
 32
32
-
 33
33
-
 34
34
-
 35
35
-
 36
36
-
 37
37
-
 38
38
-
 39
39
-
 40
40
-
 41
41
-
 42
42
-
 43
43
-
 44
44
-
 45
45
-
 46
46
-
 47
47
-
 48
48
-
 49
49
-
 50
50
-
 51
51
-
 52
52
-
 53
53
-
 54
54
-
 55
55
-
 56
56
-
 57
57
-
 58
58
-
 59
59
-
 60
60
-
 61
61
-
 62
62
-
 63
63
-
 64
64
-
 65
65
-
 66
66
-
 67
67
-
 68
68
-
 69
69
-
 70
70
-
 71
71
-
 72
72
-
 73
73
-
 74
74
-
 75
75
-
 76
76
-
 77
77
-
 78
78
-
 79
79
-
 80
80
-
 81
81
-
 82
82
-
 83
83
-
 84
84
-
 85
85
-
 86
86
-
 87
87
-
 88
88
-
 89
89
-
 90
90
-
 91
91
-
 92
92
-
 93
93
-
 94
94
-
 95
95
-
 96
96
-
 97
97
-
 98
98
-
 99
99
-
 100
100
-
 101
101
-
 102
102
-
 103
103
-
 104
104
-
 105
105
-
 106
106
-
 107
107
-
 108
108
-
 109
109
-
 110
110
-
 111
111
-
 112
112
-
 113
113
-
 114
114
-
 115
115
-
 116
116
-
 117
117
-
 118
118
-
 119
119
-
 120
120
-
 121
121
-
 122
122
-
 123
123
-
 124
124
-
 125
125
-
 126
126
-
 127
127
-
 128
128
-
 129
129
-
 130
130
-
 131
131
-
 132
132
-
 133
133
-
 134
134
-
 135
135
-
 136
136
-
 137
137
-
 138
138


Kenwood JMP400 Manuale del proprietario
- Categoria
- Produttori di succhi
- Tipo
- Manuale del proprietario
- Questo manuale è adatto anche per
in altre lingue
- français: Kenwood JMP400 Le manuel du propriétaire
- slovenčina: Kenwood JMP400 Návod na obsluhu
- dansk: Kenwood JMP400 Brugervejledning
- polski: Kenwood JMP400 Instrukcja obsługi
- Türkçe: Kenwood JMP400 El kitabı
Documenti correlati
-
Kenwood JMP800 PureJuice Pro Manuale del proprietario
-
Kenwood JMP800SI Manuale del proprietario
-
Kenwood KAX720PL Manuale del proprietario
-
-
-
-
-
-
-