
Gartenhäcksler
Originalbetriebsanleitung – Sicherheitshinweise – Ersatzteile
Seite 1
Garden Shredder
Original instructions – Safety instructions – Spare parts
Page 8
Broyeur de végétaux
Notice originale – Consignes de sécurité – Pièces de rechange
Page 15
Zahradní drtič
Originální návod k použití – Bezpečnostní pokyny – Náhradní díly
Str 23
Kompostkværn
Original brugsanvisning – Sikkerhedshenvisninger – Reservdeler
Side 30
Puutarhasilppurin
Alkuperäiset ohjeet – Turvaohjeet – Varaosat
Side 37
Kerti szecskavágó
Erediti használati utalítás – Biztonsági tudnivalók – Pótalkatrészek
44. oldal
Vrtna sječkalica
Originalne upute za rad – Sigurnosne upute – Rezervni dijelovi
Strana 51
Trituratore da giardino
Istruzioni originali – Indicazioni per la sicurezza – Pezzi di ricambio
Pagina 58
Kompostkvern
Original brugsanvisning – Sikkerhetsinformasjoner – Reservedeler
Side 65
Tuinhakselaar
Oorspronkelijke gebruiksaanwijzing – Veiligheidsinstructies
Reserveonderdelen
Blz. 72
Rozdrabniacz ogorodowy
Instrukcja oryginalna – Wskazówki bezpieczeństwa
Części zamienne
Stronie 79
Садовый измельчитель
Оригинальное руководство по эксплуатации
Указания по технике безопасности – Запасные части
стр. 87
Kompostkvarn
Bruksanvisning i original – Säkerhetsanvisningar
Reservdelar
Sidan 95
Záhradný drtič
Originálný návod na použitie – Bezpečnostné pokyny
Náhradné dielce
Strana
102
Vrtni rezalnik
Navodilo za uporabo – Varnostni napotki
Nadomestni deli
Stran 109

Sie dürfen das Gerät nicht in Betrieb nehmen, bevor
Sie diese Betriebsanleitung gelesen, alle angegebe-
nen Hinweise beachtet und das Gerät wie beschrieben mon-
tiert haben.
1
Anleitung für künftige Verwendungen aufbewahren.
I
I
n
n
h
h
a
a
l
l
t
t
EG-Konformitätserklärung 1
Lieferumfang 1
Beschreibung des Gerätes 1
Symbole Gerät 2
Symbole Betriebsanleitung 2
Betriebszeiten 2
Bestimmungsgemäße Verwendung 2
Restrisiken 2
Sicherheitshinweise 3
Inbetriebnahme 4
Arbeiten mit dem Gartenhäcksler 5
Einstellen des Gegenmessers 6
Wartung und Pflege 6
Störungen 6
Technische Daten 7
Garantie 7
Zusammenbau 116
Ersatzteile 117
E
E
G
G
-
-
K
K
o
o
n
n
f
f
o
o
r
r
m
m
i
i
t
t
ä
ä
t
t
s
s
e
e
r
r
k
k
l
l
ä
ä
r
r
u
u
n
n
g
g
entsprechend der EG-Richtlinie 2006/42/EG
Hiermit erklären wir
ATIKA GmbH & Co. KG
Schinkelstraße 97, 59227 Ahlen - Germany
in alleiniger Verantwortung, dass das Produkt
Gartenhäcksler Typ AH 600
Seriennummer: siehe letzte Seite
konform ist mit den Bestimmungen der o. a. EG-Richtlinie, sowie
mit den Bestimmungen folgender weiterer Richtlinien:
2004/108/EG und 2000/14/EG.
Folgende harmonisierte Normen wurden angewandt:
EN 60335-1:2002+A1+A11+A12+A2+A13;
EN 13683:2003+A1:2009; EN 62233:2008; EN 55014-1:2006;
EN 55014-2/A1:2001; EN 61000-3-2:2006; EN 61000-3-11:2000
Konformitätsbewertungsverfahren: 2000/14/EG – Anhang V
Gemessener Schallleistungspegel L
WA
91 dB (A).
Garantierter Schallleistungspegel L
WA
92 dB (A).
Aufbewahrung der technischen Unterlagen:
ATIKA GmbH & Co. KG – Technisches Büro – Schinkelstr. 97
59227 Ahlen – Germany
Ahlen, 30.04.2010 A. Pollmeier, Geschäftsführung
L
L
i
i
e
e
f
f
e
e
r
r
u
u
m
m
f
f
a
a
n
n
g
g
Überprüfen Sie nach dem Auspacken den Inhalt des Kar-
tons auf
! Vollständigkeit
! evtl. Transportschäden
Teilen Sie Beanstandungen umgehend dem Händler, oder Her-
steller mit. Spätere Reklamationen werden nicht anerkannt.
• 1 vormontierte Geräteeinheit
• 1 Standbein-links
• 1 Standbein-rechts
• 1 Achse
• 2 Räder
• 2 Radabdeckungen
• 1 Schraubenbeutel
• 1 Auffangsack
• 1 Betriebsanleitung
B
B
e
e
s
s
c
c
h
h
r
r
e
e
i
i
b
b
u
u
n
n
g
g
d
d
e
e
s
s
G
G
e
e
r
r
ä
ä
t
t
e
e
s
s
A. Trichteröffnung für Häckselgut
B. Handgriff
C. Rückstellknopf / Motorschutz
D. Netzstecker
E. Ein-/Aus-Schalter
F. Drehrichtungsumschalter
G. Fahrgestell
H. Gehäuseoberteil
I. Einstellknopf für Schneidwalze
J. Auswurfschlitz

2
S
S
y
y
m
m
b
b
o
o
l
l
e
e
G
G
e
e
r
r
ä
ä
t
t
Vor Inbetrieb-
nahme die Be-
triebsanleitung
und Sicherheits-
hinweise lesen
und beachten.
Vor Reparatur-,
Wartungs- und
Reinigungsar-
beiten Motor ab-
stellen und Netz-
stecker ziehen.
Gefahr durch
fortschleudernde
Teile bei laufen-
dem Motor –
unbeteiligte Per-
sonen, sowie
Haus- und Nutz
Achtung vor rotie-
renden Messern.
Hände und Füße
nicht in Öffnungen
halten, wenn die
Maschine läuft.
Tiere aus dem Gefahrenbe-
reich fernhalten.
Augen- und Gehör-
schutz tragen.
Schutzhandschuhe
tragen.
Vor Feuchtigkeit
schützen.
Elektrische Geräte gehören nicht in den Hausmüll.
Geräte, Zubehör und Verpackung einer umwelt-
freundlichen Wiederverwertung zuführen.
Gemäß der Europäischen Richtlinie 2002/96/EG über Elektro-
und Elektronik-Altgeräte müssen nicht mehr gebrauchsfähige
Elektrogeräte getrennt gesammelt und einer umweltgerechten
Wiederverwertung zugeführt werden.
S
S
y
y
m
m
b
b
o
o
l
l
e
e
B
B
e
e
t
t
r
r
i
i
e
e
b
b
s
s
a
a
n
n
l
l
e
e
i
i
t
t
u
u
n
n
g
g
Drohende Gefahr oder gefährliche Situation. Das
Nichtbeachten dieser Hinweise kann Verletzungen zur
Folge haben oder zu Sachbeschädigung führen.
L
Wichtige Hinweise zum sachgerechten Umgang.
Das Nichtbeachten dieser Hinweise kann zu Störungen
führen.
Benutzerhinweise. Diese Hinweise helfen Ihnen, alle
Funktionen optimal zu nutzen.
Montage, Bedienung und Wartung. Hier wird Ihnen
genau erklärt, was Sie tun müssen.
B
B
e
e
t
t
r
r
i
i
e
e
b
b
s
s
z
z
e
e
i
i
t
t
e
e
n
n
Gemäß der Maschinenlärmschutzverordnung vom September
2002 dürfen Gartenhäcksler in reinen, allgemeinen und besonde-
ren Wohngebieten, Kleinsiedlungsgebieten, Sondergebieten, die
der Erholung dienen, Kur- und Klinikgebieten und Gebieten für
die Fremdenbeherbergung sowie auf dem Gelände von Kranken-
häusern und Pflegeanstalten an Sonn- und Feiertagen sowie an
Werktagen von 20.00 bis 7.00 Uhr nicht in Betrieb genommen
werden.
Bitte beachten Sie auch die regionalen Vorschriften zum
Lärmschutz.
B
B
e
e
s
s
t
t
i
i
m
m
m
m
u
u
n
n
g
g
s
s
g
g
e
e
m
m
ä
ä
ß
ß
e
e
V
V
e
e
r
r
w
w
e
e
n
n
d
d
u
u
n
n
g
g
Zur bestimmungsgemäßen Verwendung gehört das Häckseln von
- Ästen aller Art bis max. Durchmesser (je nach Holzart und
Frische)
- welken, feuchten, bereits mehrere Tage gelagerten Garten-
abfällen im Wechsel mit Ästen
Das Häckseln von Glas, Metall, Kunststoffteilen, Plastiktüten,
Steinen, Stoffabfällen, Wurzeln mit Erdreich, Abfällen ohne feste
Konsistenz (z. B. Küchenabfällen) wird ausdrücklich ausge-
schlossen.
Der Gartenhäcksler ist nur für die private Nutzung im Haus- und
Hobbygarten geeignet.
Als Häcksler für den privaten Haus- und Hobbygarten werden
solche Geräte angesehen, die nicht in öffentlichen Anlagen,
Parks, Sportstätten, in der Land- und Forstwirtschaft und nicht
gewerblich eingesetzt werden.
Zur bestimmungsgemäßen Verwendung gehört auch die Einhal-
tung der vom Hersteller vorgeschriebenen Betriebs-, Wartungs-
und Instandsetzungsbedingungen und die Befolgung der in der
Anleitung enthaltenen Sicherheitshinweise.
Jeder weiter darüber hinausgehende Gebrauch gilt als nicht be-
stimmungsgemäß. Für hieraus resultierende Schäden jeder Art
haftet der Hersteller nicht: Das Risiko trägt allein der Benutzer.
Eigenmächtige Veränderungen an dem Gartenhäcksler schließen
eine Haftung des Herstellers für daraus entstehende Schäden
jeder Art aus.
Das Gerät darf nur von Personen gerüstet, genutzt und gewartet
werden, die damit vertraut und über die Gefahren unterrichtet
sind. Instandsetzungsarbeiten dürfen nur durch uns bzw. durch
von uns benannte Kundendienststellen durchgeführt werden.
R
R
e
e
s
s
t
t
r
r
i
i
s
s
i
i
k
k
e
e
n
n
Auch bei bestimmungsgemäßer Verwendung können trotz
Einhaltung aller einschlägigen Sicherheitsbestimmungen auf-
grund der durch den Verwendungszweck bestimmten Konstrukti-
on noch Restrisiken bestehen.
Restrisiken können minimiert werden, wenn die „Sicherheitshin-
weise“ und die „Bestimmungsgemäße Verwendung“, sowie die
Betriebsanleitung insgesamt beachtet werden.
Rücksichtnahme und Vorsicht verringern das Risiko von Perso-
nenverletzungen und Beschädigungen.
Verletzungsgefahr der Finger und Hände, wenn Sie mit der
Hand durch eine Öffnung greifen und an das Messerwerk ge-
langen.
Verletzungsgefahr der Finger und Hände bei Montage- und
Reinigungsarbeiten am Messerwerk.
Verletzung durch weggeschleudertes Häckselgut im Bereich
des Trichters.
Gefährdung durch Strom, bei Verwendung nicht ordnungsge-
mäßer Elektro-Anschlussleitungen.
Berührung spannungsführender Teile bei geöffneten elektri-
schen Bauteilen.

Beeinträchtigung des Gehörs bei länger andauernden Arbei-
ten ohne Gehörschutz.
Des Weiteren können trotz aller getroffener Vorkehrungen nicht
offensichtliche Restrisiken bestehen.
3
S
S
i
i
c
c
h
h
e
e
r
r
h
h
e
e
i
i
t
t
s
s
h
h
i
i
n
n
w
w
e
e
i
i
s
s
e
e
Lesen und beachten Sie vor Inbetriebnahme dieses
Erzeugnisses die folgenden Hinweise und die im jeweiligen
Land gültigen Sicherheitsbestimmungen, um sich selbst und
andere vor möglichen Verletzungen zu schützen.
L
Geben Sie die Sicherheitshinweise an alle Personen
weiter, die mit der Maschine arbeiten.
L
Bewahren Sie diese Sicherheitshinweise gut auf.
Reparaturen am Gerät haben durch den Hersteller
bzw. von ihm benannte Firmen zu erfolgen.
Machen Sie sich vor Gebrauch mit Hilfe der Betriebsanleitung
mit dem Gerät vertraut.
Benützen Sie das Gerät nicht für Zwecke, für das es nicht
bestimmt ist (siehe Bestimmungsgemäße Verwendung und
Arbeiten mit dem Gartenhäcksler).
Sorgen Sie für sicheren Stand und halten Sie jederzeit das
Gleichgewicht. Strecken Sie sich nicht vor. Stehen Sie beim
Einwerfen des Häckselgutes auf gleicher Ebene mit dem Ge-
rät.
Seien Sie aufmerksam. Achten Sie darauf, was Sie tun. Ge-
hen Sie mit Vernunft an die Arbeit. Verwenden Sie das Gerät
nicht, wenn Sie müde sind oder unter dem Einfluss von Dro-
gen, Alkohol oder Medikamenten stehen. Ein Moment der
Unachtsamkeit beim Gebrauch des Gerätes kann zu ernsthaf-
ten Verletzungen führen.
Tragen Sie beim Arbeiten Schutzbrille, Arbeitshandschuhe
und Gehörschutz.
Tragen Sie geeignete Arbeitskleidung:
- keine weite Kleidung
- rutschfestes Schuhwerk
Der Bedienende ist im Arbeitsbereich der Maschine gegen-
über Dritten verantwortlich.
Kinder und Jugendliche unter 16 Jahren dürfen das Gerät
nicht bedienen.
Kinder vom Gerät fernhalten.
Setzen Sie das Gerät niemals ein, während unbeteiligte Per-
sonen in der Nähe sind.
Lassen Sie das Gerät nie unbeaufsichtigt.
Halten Sie Ihren Arbeitsbereich in Ordnung! Unordnung
kann Unfälle zur Folge haben.
Nehmen Sie eine Arbeitsstellung ein, die sich seitlich oder
hinter dem Gerät befindet. Niemals im Bereich der Auswurf-
öffnung stehen.
Niemals in die Einfüll- oder Auswurföffnung greifen.
Halten Sie Gesicht und Körper von der Einfüllöffnung fern.
Überlasten Sie das Gerät nicht! Sie arbeiten besser und si-
cherer im angegebenen Leistungsbereich.
Betreiben Sie das Gerät nur mit kompletten und korrekt ange-
brachten Schutzeinrichtungen und ändern Sie an der Ma-
schine nichts, was die Sicherheit beeinträchtigen könnte.
Ändern Sie nicht die Drehzahl des Motors, denn diese regelt
die sichere maximale Arbeitsgeschwindigkeit und schützt den
Motor und alle sich drehenden Teile vor Schaden durch ü-
bermäßige Geschwindigkeit.
Das Gerät nicht ohne Einfülltrichter betreiben.
Das Gerät bzw. Teile des Gerätes nicht verändern.
Vor Einschalten des Motors Gerät schließen.
Das Gerät nicht mit Wasser abspritzen. (Gefahrenquelle elekt-
rischer Strom).
Berücksichtigen Sie Umgebungseinflüsse:
− Benutzen Sie das Gerät nicht in feuchter oder nasser Um-
gebung.
− Gerät nicht im Regen stehen lassen oder bei Regen ar-
beiten.
− Arbeiten Sie nur bei ausreichenden Sichtverhältnissen,
Sorgen Sie für gute Beleuchtung.
Um Verletzungsgefahr für die Finger auszuschließen, bei
Montage- und Reinigungsarbeiten Schutzhandschuhe tragen.
Schalten Sie die Maschine ab und ziehen Sie den Netzste-
cker aus der Steckdose bei:
− Wartungs- und Reinigungsarbeiten
− Beseitigung von Störungen
− Überprüfungen der Anschlussleitungen, ob
diese verschlungen oder beschädigt sind
− Transport
− Reparaturarbeiten
− Messerwechsel
− Verlassen (auch bei kurzzeitigen Unterbrechungen)
Bei Verstopfungen im Ein- und Auswurf der Maschine schal-
ten Sie den Motor aus und ziehen Sie den Netzstecker, bevor
Sie Materialreste im Ein- oder Auswurf beseitigen.
Überprüfen Sie die Maschine auf eventuelle Beschädigun-
gen:
− Vor weiterem Gebrauch des Gerätes müssen Schutzvor-
richtungen sorgfältig auf ihre einwandfreie und bestim-
mungsgemäße Funktion untersucht werden.
− Überprüfen Sie, ob die beweglichen Teile einwandfrei
funktionieren und nicht klemmen oder ob Teile beschädigt
sind. Sämtliche Teile müssen richtig montiert sein und alle
Bedingungen erfüllen, um einwandfreien Betrieb des Ge-
rätes sicherzustellen.
− Beschädigte Schutzvorrichtungen und Teile müssen
sachgemäß durch eine anerkannte Fachwerkstatt repariert
oder ausgewechselt werden, soweit nichts anderes in der
Betriebsanleitung angegeben ist.
− Beschädigte oder unleserliche Sicherheitsaufkleber sind
zu ersetzen.
Bewahren Sie unbenutzte Geräte an einem trockenen, ver-
schlossenen Ort außerhalb der Reichweite von Kindern auf.
E
E
l
l
e
e
k
k
t
t
r
r
i
i
s
s
c
c
h
h
e
e
S
S
i
i
c
c
h
h
e
e
r
r
h
h
e
e
i
i
t
t
Ausführung der Anschlussleitung nach IEC 60245
(H 07 RN-F) mit einem Aderquerschnitt von mindestens
− 1,5 mm² bei Kabellänge bis 25 m
− 2,5 mm² bei Kabellänge über 25 m
Lange und dünne Anschlussleitungen erzeugen einen Span-
nungsabfall. Der Motor erreicht nicht mehr seine maximale
Leistung, die Funktion des Gerätes wird reduziert.

Stecker und Kupplungsdosen an Anschlussleitungen müssen
aus Gummi, Weich-PVC oder anderem thermoplastischen
Material der gleichen mechanischen Festigkeit sein oder mit
diesem Material überzogen sein.
Die Steckvorrichtung der Anschlussleitung muss spritzwas-
sergeschützt sein.
Beim Verlegen der Anschlussleitung darauf achten, dass sie
nicht gequetscht, geknickt und die Steckverbindung nicht nass
wird.
Wickeln Sie bei Verwendung einer Kabeltrommel das Kabel
vollständig ab.
Verwenden Sie das Kabel nicht für Zwecke, für die es nicht
bestimmt ist. Schützen Sie das Kabel vor Hitze, Öl und
scharfen Kanten. Verwenden Sie das Kabel nicht, um den
Stecker aus der Steckdose zu ziehen.
4
Kontrollieren Sie Verlängerungskabel regelmäßig und erset-
zen Sie sie, wenn sie beschädigt sind.
Verwenden Sie keine defekten Anschlussleitungen.
Verwenden Sie im Freien nur dafür zugelassene und ent-
sprechend gekennzeichnete Verlängerungskabel.
Keine provisorischen Elektroanschlüsse einsetzen.
Schutzeinrichtungen niemals überbrücken oder außer Be-
trieb setzen.
Schließen Sie das Gerät über Fehlerstromschutzschalter
(30 mA) an.
Der Elektroanschluss bzw. Reparaturen an elektrischen
Teilen der Maschine haben durch eine konzessionierte E-
lektrofachkraft oder eine unserer Kundendienststellen zu er-
folgen. Örtliche Vorschriften insbesondere hinsichtlich der
Schutzmaßnahmen sind zu beachten.
Reparaturen an anderen Teilen der Maschine haben durch
den Hersteller bzw. einer seiner Kundendienststellen zu er-
folgen.
Nur Originalersatzteile verwenden. Durch den Gebrauch
anderer Ersatzteile können Unfälle für den Benutzer ent-
stehen. Für hieraus resultierende Schäden haftet der Her-
steller nicht.
I
I
n
n
b
b
e
e
t
t
r
r
i
i
e
e
b
b
n
n
a
a
h
h
m
m
e
e
Vergewissern Sie sich, dass das Gerät komplett und vor-
schriftsmäßig montiert ist.
Stellen Sie den Häcksler zum Gebrauch auf waagerechten
und festen Untergrund (Kippgefahr).
Das Gerät nicht auf gepflasterten oder geschotterten Boden
stellen.
Benutzen Sie das Gerät nur im Freien. Halten Sie Abstand
(mindestens 2 m) von einer Wand oder einem anderen star-
ren Gegenstand.
Überprüfen Sie vor jedem Gebrauch:
− die Anschlussleitungen auf defekte Stellen (Risse,
Schnitte o. dgl.)
verwenden Sie keine defekten Leitungen
− das Gerät auf eventuelle Beschädigungen
(siehe Sicherheitshinweise)
− ob alle Schrauben fest angezogen sind
L Netzanschluss
Vergleichen Sie die auf dem Gerätetypenschild angegebene
Spannung mit der Netzspannung und schließen Sie das Gerät
an die entsprechende und vorschriftsmäßige Steckdose an.
Verwenden Sie Verlängerungskabel mit ausreichendem
Querschnitt
Netzabsicherung
Schweiz UK
2300 W
16 A träge
10 A träge 13 A träge
2500 W
16 A träge
13 A träge
2800 W
16 A träge
13 A träge
Ein-/Ausschalter
Benutzen Sie kein Gerät, bei dem sich der Schalter nicht ein
und ausschalten lässt. Beschädigte Schalter müssen unver-
züglich vom Kundendienst repariert oder ersetzt werden.
Rückstell-
knopf
(Motorschutz)
Einschalten
Drücken Sie den grünen Knopf I
Ausschalten
Drücken Sie den roten Knopf 0
Wiederanlaufsicherung bei Strom-
ausfall
Bei Stromausfall schaltet das Gerät automatisch ab (Nullspan-
nungsauslöser). Zum Wiedereinschalten erneut den grünen
Knopf drücken.
Motorschutz
Der Motor ist mit einem Schutzschalter ausgerüstet und schaltet
bei Überlastung selbsttätig ab. Der Motor kann nach einer Ab-
kühlpause (ca. 5 min.) wieder eingeschaltet werden. Drücken Sie
1. Rückstellknopf (Motorschutz)
2. grünen Knopf I zum Wiedereinschalten.
EIN
Drehrichtungs-
umschalter
AUS
Rücklauf
Einzug
AUS

Drehrichtungsumschalter
Den Drehrichtungsumschalter nur bei abgeschaltetem
Häcksler betätigen.
Stellung
Gerät läuft nicht an.
Stellung
Das Material wird von der Schneidwalze eingezogen und gehäck-
selt.
Stellung
Das Messer arbeitet in umgekehrter Richtung, und eingeklemm-
tes Material wird frei.
Nachdem Sie den Drehrichtungsumschalter in die Stellung
gebracht haben, halten Sie den grünen Knopf des Ein-/Aus-
Schalters gedrückt. Die Schneidwalze wird auf umgekehrte Rich-
tung gestellt. Wenn Sie den Ein-/Aus-Schalter loslassen, bleibt
der Häcksler automatisch stehen.
Tipps
z Große Gegenstände oder Holzstücke werden nach mehr-
maliger Betätigung sowohl in Schneide- als auch in Freiga-
berichtung entfernt.
z Benutzen Sie einen Stopfer oder Haken zum Entfernen von
blockierten Gegenständen aus dem Trichter oder Auswurf-
schlitz.
Warten Sie stets, bis der Häcksler stillsteht, bevor Sie
ihn wieder einschalten.
5
Netzimpedanz
Bei ungünstigen Netzbedingungen kann es während des Ein-
schaltvorganges des Gerätes zu kurzzeitigen Spannungsabsen-
kungen kommen, die andere Geräte beeinträchtigen können (z.
B. Flackern einer Lampe).
Es sind keine Störungen zu erwarten, wenn die in der Tabelle
angegebene maximale Netzimpedanz eingehalten wird.
Leistungsaufnahme P
1
(W)
Netzimpedanz Z
max
(Ω)
2300 0,21
2500 0,21
2800 0,19
A
A
r
r
b
b
e
e
i
i
t
t
e
e
n
n
m
m
i
i
t
t
d
d
e
e
m
m
G
G
a
a
r
r
t
t
e
e
n
n
h
h
ä
ä
c
c
k
k
s
s
l
l
e
e
r
r
Nehmen Sie eine Arbeitsstellung ein, die sich seitlich oder
hinter dem Gerät befindet. Niemals im Bereich der Auswurf-
öffnung stehen.
Längeres Material, das aus dem Gerät hervorsteht, könn-
te zurückschnellen, wenn es von den Messern eingezogen
wird! Sicherheitsabstand einhalten!
Niemals in die Einfüll- oder Auswurföffnung greifen.
Halten Sie Gesicht und Körper von der Einfüllöffnung fern.
Bringen Sie Hände, andere Körperteile und Kleidung nicht in
das Einfüllrohr, Auswurfkanal oder in die Nähe von anderen
beweglichen Teilen.
Vor Einschalten des Gerätes überprüfen, ob keine Häcksel-
reste im Einfülltrichter sind.
Kippen Sie das Gerät nicht bei laufendem Motor.
Beim Füllen darauf achten, dass keine Metallstücke, Steine,
Flaschen oder andere nicht zu verarbeitende Gegenstände in
den Einfülltrichter gelangen.
Gelangen fremde Gegenstände in den Einfülltrichter oder das
Gerät fängt an außergewöhnliche Geräusche oder Vibratio-
nen zu machen, das Gerät sofort ausschalten und zum Still-
stand kommen lassen. Netzstecker ziehen und folgende
Punkte durchführen:
− inspizieren Sie den Schaden
− ersetzen oder reparieren Sie beschädigte Teile
− überprüfen Sie das Gerät und ziehen Sie lockere Teile fest
Sie dürfen das Gerät nicht reparieren, wenn Sie dazu nicht
berechtigt sind (siehe Sicherheitshinweise)
Was kann ich häckseln?
Ja:
• organische Abfälle aus Haushalt und Garten
z. B. Hecken- und Baumschnitt, verblühte Blumen, Küchenab-
fälle
Nein:
• Glas, Metallteile, Kunststoffe, Plastiktüten, Steine, Stoffabfäl-
le, Wurzeln mit Erdreich, Speise-, Fisch- und Fleischabfälle
Besondere Hinweise zum Häckseln:
¾ Füllen Sie das zu häckselnde Mate-
rial immer von der rechten Seite in
die Einfüllöffnung des Trichters.
¾ Häckseln Sie die Äste, Zweige und
Hölzer kurz nach dem Schneiden
− dieses Häckselgut wird bei Austrocknung sehr hart, der
maximal zu verarbeitende Astdurchmesser wird hierdurch
geringer.
¾ Entfernen Sie Seitentriebe bei stärker verzweigten Ästen.
¾ Verarbeiten von stark wasserhaltigen, zum Verkleben nei-
genden Garten- bzw. Küchenabfällen
− diese abwechselnd mit holzigem Häckselgut zerkleinern,
um eine Verstopfung im Gerät zu vermeiden.
¾ Das gehäckselte Gut im Bereich der Auswurföffnung nicht zu
hoch anwachsen lassen. Dies kann zur Folge haben, dass be-
reits Gehäckseltes den Auswurfkanal verstopft. Dadurch kann
es zu einem Rückschlag des Materials durch die Einfüllöff-
nung kommen.
¾ Reinigen Sie die Einfüllöffnung und den Auswurfkanal, wenn
das Gerät verstopft ist. Schalten Sie hierfür
zuerst den Motor
aus und ziehen Sie den Netzstecker.
¾ Beachten Sie, dass der Ihrem Gerät entsprechende maximal
zu verarbeitende Astdurchmesser eingehalten wird (s.
„Technische Daten“). Je nach Art und Frische des Holzes
kann sich der maximal zu verarbeitende Astdurchmesser ver-
ringern.
¾ Das Schneidwerk zieht das Häckselgut selbständig und durch
das langsame Laufen der Schneidwalze stoßfrei ein.

¾ Selbsttätiges Umschalten der Drehrichtung:
Bei plötzlichem Blockieren des Gerätes kann die Drehrich-
tung der Schneidwalze umschalten und in diesem Fall das
Häckselgut zurückschieben.
6
− Gerät ausschalten
− Stillstand der Schneidwalze abwarten
− Gerät erneut einschalten und leichter zu verarbeitendes
Häckselgut verwenden.
¾ Beim Überlasten des Gerätes schaltet der mit einem Motor-
schutzschalter ausgestattete Schalter selbständig ab
− schalten Sie den Häcksler nach ca. 5 min. erneut ein
− lässt sich das Gerät nach dieser Wartezeit nicht einschal-
ten, sehen Sie unter Punkt „Mögliche Störungen“ nach.
E
E
i
i
n
n
s
s
t
t
e
e
l
l
l
l
e
e
n
n
d
d
e
e
s
s
G
G
e
e
g
g
e
e
n
n
m
m
e
e
s
s
s
s
e
e
r
r
s
s
Das Gegenmesser (B) kann an der Schneidwalze (A) spielfrei
eingestellt werden. Ein möglichst kleiner Abstand sollte für einen
effektiven Betrieb eingehalten werden.
Weiches Material oder nasse Zweige können reißen statt ge-
schnitten werden. Auch ein nach mehrfacher Betätigung ver-
schlissenes Gegenmesser kann zu diesem Problem führen.
Einstellen des Abstandes.
Schalten Sie das Gerät ein.
Auf der rechten Seite des Kunststoffgehäuses befindet sich eine
Einstellvorrichtung. Zum Einstellen des Abstands drehen Sie den
Einstellknopf (D) nach rechts, so dass sich die Schraube (C) zur
Schneidwalze hin bewegt. Drehen Sie so lange, bis feine Aluspä-
ne aus dem Auswurfschlitz fallen.
W
W
a
a
r
r
t
t
u
u
n
n
g
g
u
u
n
n
d
d
P
P
f
f
l
l
e
e
g
g
e
e
• Vor Beginn jeder Wartungsarbeit
- Motor abschalten und Netzstecker ziehen
- Schutzhandschuhe zur Vermeidung von Verletzungen an-
ziehen.
Das Schneidwerkzeug steht nach dem Ausschalten nicht
sofort still. Warten Sie, bevor Sie mit der Reparatur oder
Wartung beginnen, bis alle Teile zum Stillstand gekommen
sind.
Achten Sie darauf, Werkzeug und Schraubenschlüssel nach
der Wartung oder Reparatur wieder zu entfernen.
• Der Gartenhäcksler ist weitgehend wartungsfrei. Zur
Werterhaltung und einer langen Lebensdauer Nachste-
hendes beachten:
− Lüftungsschlitze frei und sauber halten.
− überprüfen der Befestigungsschrauben (ggf. nachziehen).
− nach dem Häckseln das Gerät innen und außen reinigen.
Benutzen Sie zum Reinigen Ihres Geräts nur ein warmes
feuchtes Tuch und eine weiche Bürste.
Verwenden Sie niemals Reinigungs- oder Lösungsmittel. Sie
könnten dem Gerät irreparable Schäden zufügen. Die Kunst-
stoffteile können von Chemikalien angegriffen werden.
− den Häcksler nicht mit fließendem Wasser oder Hochdruck-
reinigern reinigen.
−
−
blanke Metallteile nach jedem Gebrauch zum Schutz gegen
Korrosion mit einem umweltschonenden, biologisch abbauba-
ren Sprühöl behandeln.
− Schneidwalze und Nachschneideplatte sind Verschleißteile,
haben jedoch bei normaler Nutzung und vorschriftsmäßigem
Nachstellen eine Lebensdauer von mehreren Jahren.
S
S
t
t
ö
ö
r
r
u
u
n
n
g
g
e
e
n
n
Vor jeder Störungsbeseitigung
− Gerät ausschalten
− Stillstand des Gerätes abwarten
− Netzstecker ziehen
Störung mögliche Ursache Beseitigung
Motor läuft nicht an - Netzspannung fehlt
- Anschlusskabel defekt
- Gerät überlastet (Motorschutz wurde
ausgelöst)
- Absicherung überprüfen
- überprüfen lassen (Elektrofachmann)
- Gerät abkühlen lassen.
Drücken Sie
1. Rückstellknopf (Motorschutz)
2. grünen Knopf I zum Wiedereinschalten.

Störung mögliche Ursache Beseitigung
Motor läuft nicht an - Drehrichtungsumschalter auf Stellung „0“
gestellt
- Gerät ausschalten und Drehrichtungsumschalter
umstellen.
Motor brummt, läuft aber
nicht an
- Schneidwalze blockiert
- Kondensator defekt
- Gerät ausschalten.
Schalten Sie den Drehrichtungsumschalter in die Stel-
lung
. Gerät einschalten bis die Blockierung be-
hoben ist. Gerät wieder ausschalten. Stellen Sie den
Drehrichtungsumschalter in die Stellung
zurück.
- Gerät zur Reparatur an Hersteller bzw. an von ihm
benannte Firma
Häckselgut wird nicht einge-
zogen
- Die Schneidwalze läuft rückwärts. Schal-
terstellung nicht richtig
- Häckselgut klemmt im Trichter
(Materialstau)
- zu weiches oder nasses Häckselgut
- Verschleiß an der Schneidwalze
- Gerät ausschalten und Drehrichtungsumschalter
umstellen.
- Gerät ausschalten. Schalten Sie den Drehrichtungs-
umschalter in die Stellung
. Gerät einschalten,
damit das Häckselgut freigegeben wird, evtl. Verun-
reinigungen entfernen.
Gerät wieder ausschalten. Zum Weiterarbeiten stellen
Sie den Drehrichtungsumschalter in die Stellung
zurück.
- mit einem Ast nachschieben und durchhäckseln
- Gegenmesser wie bei „Einstellen des Gegenmessers“
beschrieben einstellen, bei starker Abnutzung
Schneidwalze ersetzen.
Häckselgut wird nicht sauber
durchtrennt
- Gegenmesser nicht ausreichend einge-
stellt
- Gegenmesser wie bei „Einstellen des Gegenmessers“
beschrieben einstellen
Gerät läuft an, blockiert je-
doch bei geringer Belastung
und schaltet über Motor-
schutzschalter ab.
Verlängerungskabel zu lang oder zu kleiner
Querschnitt. Steckdose zu weit vom Haupt-
anschluss entfernt und zu kleiner Quer-
schnitt der Anschlussleitung.
Verlängerungskabel mindestens 1,5 mm², maximal 25
m lang. Bei längerem Kabel Querschnitt mindestens 2,5
mm².
7
T
T
e
e
c
c
h
h
n
n
i
i
s
s
c
c
h
h
e
e
D
D
a
a
t
t
e
e
n
n
Modell
2300 2500 2800
Typ-Bezeichnung AH 600 AH 600 AH 600
Motor Wechselstrommotor 230 V~, 50 Hz, 2800 min
-1
Motorleistung P
1
S6 - 40 % 2300 W 2500 W 2800 W
Drehzahl Schneidwalze 40 min
-1
Ein-Aus-Schalter mit Überlastschutz, Schneid- und Rücklauffunktion, Nullspannungsauslöser
Gewicht 24 kg 24,5 kg 25 kg
Schalldruckpegel L
PA
(gemessen nach 2000/14/EG)
83,8 dB (A)
K = 3 dB (A)
84,2 dB (A)
K = 3 dB (A)
82,5 dB (A)
K = 3 dB (A)
gemessener Schallleistungspegel L
WA
(gemessen nach 2000/14/EG)
91 dB (A) 91 dB (A) 91 dB (A)
garantierter Schallleistungspegel L
WA
(gemessen nach 2000/14/EG)
92 dB (A) 92 dB (A) 92 dB (A)
max. zu verarbeitender Astdurchmesser
(je nach Holzart und -frische)
∅ max. 35 mm ∅ max. 40 mm ∅ max. 44 mm
Schutzklasse I
Schutzart IP X4
Netzabsicherung
Schweiz
UK
16 A träge
10 A träge
13 A träge
16 A träge
--
13 A träge
16 A träge
--
13 A träge
G
G
a
a
r
r
a
a
n
n
t
t
i
i
e
e
Bitte beachten Sie die beiliegende Garantieerklärung.

You may not start to operate the machine until you
have read these operating instructions, observed all
the instructions given and installed the machine as de-
scribed!
8
Keep the instructions in a safe place for future use.
C
C
o
o
n
n
t
t
e
e
n
n
t
t
s
s
EC Declaration of Conformity 8
Extent of delivery 8
Description of the device 8
Symbols on the machine 9
Symbols in the operating manual 9
Operating times 9
Proper use 9
Residual risks 9
Safety instructions 9
Commissioning 11
Working with the garden shredder 12
Adjusting the fixed counter blade 12
Maintenance and cleaning 13
Operational faults 13
Technical data 14
Guarantee 14
Assembly 116
Spare parts 117
E
E
C
C
D
D
e
e
c
c
l
l
a
a
r
r
a
a
t
t
i
i
o
o
n
n
o
o
f
f
C
C
o
o
n
n
f
f
o
o
r
r
m
m
i
i
t
t
y
y
according to EC directive: 2006/42/EC
We,
ATIKA GmbH & Co. KG
Schinkelstraße 97
59227 Ahlen - Germany
herewith declare under our sole responsibility that the product
Gartenhäcksler (Garden Shredder) type AH 600
Serial number: see last page
is conform with the above mentioned EC directive as well as with
the provisions of the guidelines below:
2004/108/EC and 2000/14/EC
Following harmonized standards have been applied:
EN 60335-1:2002+A1+A11+A12+A2+A13;
EN 13683:2003+A1:2009; EN 62233:2008; EN 55014-1:2006;
EN 55014-2/A1:2001; EN 61000-3-2:2006; EN 61000-3-11:2000
Conformity assessment procedure: 2000/14/EC - Appendix V.
Measured level of the acoustic output L
WA
91 dB (A).
Guaranteed level of the acoustic output L
WA
92 dB (A).
Keeping of technical documents at:
ATIKA GmbH & Co. KG – Technical department – Schinkelstr. 97
59227 Ahlen – Germany
Ahlen, 30.04.2010 A. Pollmeier, management
E
E
x
x
t
t
e
e
n
n
t
t
o
o
f
f
d
d
e
e
l
l
i
i
v
v
e
e
r
r
y
y
After unpacking, check the contents of the box
! That it is complete
! Check for possible transport damage
Report any damage or missing items to your dealer, supplier or
the manufacturer immediately. Complaints made at a later date
will not be acknowledged.
• 1 pre-assembled device unit
• 1 standing leg (left)
• 1 standing leg (right)
• 1 axle
• 2 wheels
• 2 wheel covers
• 1 screw bag
• 1 collection sack
• 1 operating instructions
D
D
e
e
s
s
c
c
r
r
i
i
p
p
t
t
i
i
o
o
n
n
o
o
f
f
t
t
h
h
e
e
d
d
e
e
v
v
i
i
c
c
e
e
A. Hopper opening for material to be shredded
B. Handle
C. Reset button / motor protection
D. Power supply plug
E. On / Off switch
F. Direction of rotation selector switch
G. Carriage
H. Upper enclosure part
I. Adjusting knob for cutting roller
J. Ejection slot

9
S
S
y
y
m
m
b
b
o
o
l
l
s
s
o
o
n
n
t
t
h
h
e
e
m
m
a
a
c
c
h
h
i
i
n
n
e
e
Carefully read the
operating manual
and the safety
instructions be-
fore starting the
machine and
observe the in-
structions when
operating.
Switch off the mo-
tor and disconnect
the mains plug
before performing
cleaning, mainte-
nance or repair
work.
Danger – objects
may be thrown
out at high speed
when motor is
running. Keep
bystanders, pets
Danger – rotating
blades. Keep
hands and feet out
of openings while
machine is running.
and domestic animals out of
the danger area.
Wear eye and ear
protection.
Wear protective
gloves.
Protect against
humidity.
Electrical devices do not go into the domestic rubbish.
Give devices, accessories and packaging to an
ecofriendly recycling.
According to the European Directive 2002/96/EC on electrical and
electronic scrap, electrical devices that are no longer serviceable
must be separately collected and brought to a facility for an envi-
ronmentally compatible recycling.
S
S
y
y
m
m
b
b
o
o
l
l
s
s
O
O
p
p
e
e
r
r
a
a
t
t
i
i
n
n
g
g
i
i
n
n
s
s
t
t
r
r
u
u
c
c
t
t
i
i
o
o
n
n
s
s
Potential hazard or hazardous situation. Failure to
observe this instruction may lead to injuries or cause
damage to property.
L
Important information on proper handling. Failure to
observe this instruction may lead to faults.
User information. This information helps you to use all
the functions optimally.
Assembly, operation and servicing. Here you are
explained exactly what to do.
O
O
p
p
e
e
r
r
a
a
t
t
i
i
n
n
g
g
t
t
i
i
m
m
e
e
s
s
Please observe as well the regional regulations for noise
protection.
P
P
r
r
o
o
p
p
e
e
r
r
u
u
s
s
e
e
The proper use includes the shredding of
- all types of branches up to a max. diameter (depending on
wood species and freshness)
- wilted, moist garden refuse that has already been stored for
several days, alternating with branches
Shredding of glass, metal, plastic parts, plastic bags, stones,
fabric cut-offs, roots with soil, waste without solid consistency
(e.g. kitchen scraps) is explicitly excluded.
The garden shredders are suitable for private use in gardens and
allotments.
As garden shredders for private gardens and allotments are con-
sidered such devices that are not applied in public facilities,
parks, and sports facilities as well as in agriculture and forestry on
a commercial basis.
The intended usage also includes compliance with the operating,
servicing and repair conditions prescribed by the manufacturer
and following the safety instructions included in the instructions.
Any other use is deemed not to be use as prescribed. The manu-
facturer is not liable for any type of damage resulting from this:
the user bears the sole risk.
Unauthorised modifications on the garden shredder exclude a
liability of the manufacturer for damages of any kind resulting
from it.
Only persons who are familiarised with the device and informed
about possible risks are allowed to prepare, operate and service
this device. Repair works may only be carried out by us or by a
customer service agent nominated by us.
R
R
e
e
s
s
i
i
d
d
u
u
a
a
l
l
r
r
i
i
s
s
k
k
s
s
Even if used properly, residual risks can exist even if the relevant
safety regulations are complied with due to the design determined
by the intended purpose.
Residual risks can be minimised if the “Safety information” and
the “Intended usage” as well as the whole of the operating in-
structions are observed.
Observing these instructions, and taking proper care, will reduce
the risk of personal injury or damage to the equipment.
Risk of injury to the fingers and hands, if your hand grasps
through an opening and reaches the blade unit.
Risk of injury to the fingers and hands, when carrying out
assembly work and cleaning on the blade unit.
Injury by the chopped material spinning away near the hop-
per.
Risk from electricity when using improper electrical connec-
tions.
Touching live parts of opened electrical components.
Impairment of hearing when working on the machine for
longer periods of time without ear protection.
In addition, in spite of all the precautionary measures taken, non-
obvious residual risks can still exist.
S
S
a
a
f
f
e
e
t
t
y
y
i
i
n
n
s
s
t
t
r
r
u
u
c
c
t
t
i
i
o
o
n
n
s
s
Before commissioning this product, read and keep to
the following advice. Also observe the preventive regulations
of your professional association and the safety provisions
applicable in the respective country, in order to protect
yourself and others from possible injury.

L
Pass the safety instructions on to all persons who work
with the machine.
L
Keep these safety instructions in a safe place.
Repair works on the shredder must be carried out by
the manufacturer or by companies appointed by the
manufacturer respectively.
10
Make yourself familiar with the equipment before using it, by
reading and understanding the operating instructions.
Do not use the machine for unsuitable purposes (see 'Normal
intended use' and 'Working with the garden shredder').
Provide a safe standing position and keep at any time the
balance. Do not lean forward. When placing material into the
shredder, always stand on the same level as the machine.
When placing material into the shredder, always stand on the
same level as the machine.
Be observant. Attend to what you do. Start working with ra-
tionality. Do not use the device when you are tired or under
the influence of drugs, alcohol or medicaments. One moment
of carelessness when using the device can result in serious
injuries.
Wear protective goggles, gloves and noise protection while
working with the machine.
Wear suitable work clothes:
- do not wear loose-fitting clothes
- slip-proof shoes
Within his area of work the operator is responsible for third
parties.
The machine must not be operated by children or young
people under 16 years of age.
Keep children away form machine.
Never operate the machine if other persons are in the imme-
diate vicinity.
Never leave the device unattended.
Keep your workplace in an orderly condition! Untidiness
can result in accidents.
Choose a working position alongside the equipment or be-
hind it. Never stand near the ejection opening.
Never reach into the filling or ejection opening.
Keep your face and body away from the filling opening.
Do not overload the machine! You work better and safer in the
given performance range.
Only operate the machine with complete and correctly at-
tached safety equipment and do not alter anything on the
machine that could impair the safety.
Do not alter the revolution speed of the motor, since this con-
trols the safe maximum operating speed, and protects the mo-
tor and all rotating parts against damage due to excess
speed.
Do not operate without the funnel.
Do not modify the device or parts of the device respectively.
Close machine properly before enabling motor.
Do not hose down the device with water. (Origin of danger
electric current).
Take into consideration environmental influences:
− Do not use the device in moist or wet ambience.
− Do not leave the machine standing in the rain or use
when raining.
− Provide for good illumination.
To prevent danger of injury to fingers during assembly or
cleaning operations wear protecting gloves.
Switch the machine off and remove the mains plug from the
socket when
− Performing maintenance and cleaning work.
− Eliminating faults.
− Checking connecting lines, whether these
are knotted or damaged.
− Transporting.
− Carrying out repair work.
− Leaving unattended (even during short interruptions).
If the machine’s filling funnel or ejection slot is blocked switch
off the motor and disconnect the mains plug before removing
material from the filling funnel or ejection slot.
Check the machine for possible damage:
− Before further use of the machine the safety devices must
be checked carefully for their proper and intended func-
tion.
− Check whether movable parts function perfectly and do
not stick or whether parts are damaged. All parts must be
correctly installed and fulfil all conditions to ensure perfect
operation of the machine.
− Damaged safety devices and parts must be properly re-
paired or exchanged by a recognized, specialist workshop;
insofar as nothing else is stated in the instructions for use.
− Damaged or illegible safety labels have to be replaced.
Store unused equipment in a dry, locked place out of the
reach of children.
E
E
l
l
e
e
c
c
t
t
r
r
i
i
c
c
a
a
l
l
s
s
a
a
f
f
e
e
t
t
y
y
Design of the connection cable according to IEC 60 245 (H
07 RN-F) with a core cross-section of at least
− 1.5 mm
2
for cable lengths up to 25 m
− 2.5 mm
2
for cable lengths over 25 m
Long and thin connection lines result in a potential drop. The
motor does not reach any longer its maximal power; the func-
tion of the device is reduced.
Plugs and coupler outlets on connection cables must be made
of rubber, plasticised PVC or other thermoplastic material of
same mechanical stability or be covered with this material.
The connector of the connection cable must be splash-proof.
When running the connection line observe that it does not
interfere, is not squeezed, bended and the plug connection
does not get wet.
Wind off completely the cable when using a cable drum.
Do not use the cable for purposes for which it is not meant.
Protect the cable against heat, oil and sharp edges. Do
not use the cable to pull the plug from the socket.
Regularly check the extension cables and replace them if
they are damaged.
Do not use any defective connection cables.
When working outdoors, only use extension cables especially
approved and appropriately labelled for outdoor use.
Do not set up any provisional electrical connections.
Never bypass protective devices or deactivate them.
Only hook up the machine by means of a fault-current cir-
cuit breaker (30 mA).
The electrical connection or repairs to electrical parts of
the machine must be carried out by a certified electrician or
one of our customer service points. Local regulations –
especially regarding protective measures – must be ob-
served.

Repairs to other parts of the machine must be carried out
by the manufacturer or one of his customer service points.
11
Use only original spare. Accidents can arise for the user
through the use of other spare parts. The manufacturer is
not liable for any damage or injury resulting from such ac-
tion.
C
C
o
o
m
m
m
m
i
i
s
s
s
s
i
i
o
o
n
n
i
i
n
n
g
g
Check that the machine is completely and correctly assem-
bled.
To avoid toppling, place the shredder on a firm horizontal
surface.
Do not place the equipment on ground which is paved or
surfaced with gravel.
The machine should only be operated in the open. Always
maintain a safe distance (at least 2 m) from walls or other
fixed objects.
Before each use, check
− Connection cables for defects (cracks, cuts, etc.).
Do not use any defective cables.
− There are no damage at the machine (see safety instruc-
tions).
− All screws are tight.
L Mains connection
Compare the voltage given on the machine model plate e.g.
230 V with the mains voltage and connect the machine to the
relevant and properly earthed plug.
Only use extension cables with sufficient core cross-section.
Mains fuse
Switzerland UK
2300 W 16 A time-lag
10 A time-lag
13 A time-lag
2500 W 16 A time-lag
13 A time-lag
2800 W 16 A time-lag
13 A time-lag
On / Off switch
Do not use any device where the switch can not be switched
on and off. Damaged switches must be repaired or replaced
immediately by the customer service.
Switch on
Press the green button I .
Switch off
Press the red button 0 .
Restart protection in case of power
failure
In case of a power failure, the device switches off automatically
(zero-voltage initiator). To restart, press the green button again.
Motor protection
The motor is equipped with a safety switch and switches off
automatically when overloaded. After a cooling-down break
(approx. 5 min), the motor may be restarted. Press the
1. reset button (motor protection)
2. green button I to restart.
Direction of rotation selector switch
Only actuate the direction of rotation selector switch
while the shredder is switched off.
Position
Motor does not start.
Position
The material is drawn in by the cutting roller and shredded.
Position
The blades operate in the opposite direction and jammed material
is released.
Keep depressing the green button of the on/off switch once you
have placed the direction of rotation selector switch into the
position. The cutting roller is placed into the opposite direction. If
you release the on/off switch, the shredder automatically stops.
Hints
z Large objects or pieces of wood may be removed after the
shredder has been operated several times both in cutting
and in release direction.
z Use a tamper or hook to remove jammed objects from the
hopper or ejection slot.
Always wait until the shredder has come to a complete
standstill before restarting it.
Reset button
(motor protec-
tion)
Electrical mains supply impedance
ON
Direction of
rotation selector
switch
When conditions in the electrical mains supply are un-favourable,
voltage reductions for short periods can occur during the process
of turning on the equipment, which can adversely affect other
equipment (e.g., the flickering of a lamp).
OFF
No breakdowns are to be expected if the maximum, electrical
mains supply impedances given in the table are met.
Reverse
Infeed
OFF

Power consumption P1 (W) Electrical mains supply
impedance Zmax (W)
2300 0,21
2500 0,21
2800 0,19
12
W
W
o
o
r
r
k
k
i
i
n
n
g
g
w
w
i
i
t
t
h
h
t
t
h
h
e
e
g
g
a
a
r
r
d
d
e
e
n
n
s
s
h
h
r
r
e
e
d
d
d
d
e
e
r
r
Choose a working position alongside the equipment or be-
hind it. Never stand near the ejection opening.
Longer material that is protruding from the device could
spring back when it is drawn in by the blades! Observe safety
distance!
Never reach into the filling or ejection opening.
Keep your face and body away from the filling opening.
Never place hands, other parts of the body or clothing into the
filler funnel, ejection channel or in the vicinity of other moving
parts.
Check that no chopped residues are in the filling hopper be-
fore switching on the equipment.
Do not tip or tilt the machine when the motor is running.
When filling, be careful that no pieces of metal, stones, bottles
or other objects unintended for processing, enter the filling
hopper.
Immediately switch off the equipment and allow it to come to a
stop, if foreign objects enter the filling hopper or if the equip-
ment starts to make unusual noises or vibrates. Remove the
mains plug and carry out the following checks:
− inspect for damage,
− replace or repair damaged parts,
− check the equipment and tighten loose parts.
You must not repair the equipment yourself if you are
unauthorized to do so.
What can I shred?
Yes:
• all types of branches up to a max. diameter, depending on
wood species and freshness.
• withered garden refuse which has lain a number of days.
Only shred in alternation with branches.
No:
• glass, metal, plastic, plastic bags, stones, cloth, roots with soil
• refuse which does not have a solid consistency, e. g. kitchen
waste
Special tips on shredding:
¾ Always fill the material to be shred-
ded into the filling hopper from the
right.
¾ Branches, twigs and wood should
be broken down immediately after
they have been cut.
− Material of this kinds gets very hard when it is dry, and the
maximum allowed branch diameter to be processed has to
be reduced.
¾ Remove any side shoots from branches with a large number
of twigs.
¾ How to shred garden and kitchen waste with hight water con-
tent and a tendency to clog
− to prevent the machine from clogging, alternate waste with
wood containing material.
¾ Do not allow the shredded material to pile up too high in the
area of the ejection opening. This can lead to shredded mate-
rial blocking the ejection channel, and backing up to the filler
opening.
¾ Clean out the filler opening and ejection channel thoroughly if
the machine becomes blocked. Before doing this, switch the
motor off and disconnect the machine from the mains power
supply.
¾ Please do not exceed the maximum branch diameter speci-
fied (cutting fresh wood) for your appliance (∅ see “Technical
data”). Depending on the wood’s nature and freshness the
maximum branch diameter the machine can process may be
smaller.
¾ The cutter automatically draws the shredding material into the
machine through the slow rotation of the cutting rollers.
¾ Automatic switch-over in the direction of rotation:
If the unit suddenly clogs, the blades may start to turn in the
opposite direction and push the shredded material back out.
− Switch off unit
− Wait until the blades come to a standstill
− Switch unit back on and use material which is easier to
process.
¾ If the machine is overloaded, a protective motor switch en-
sures that the machine turns itself off automatically.
− Turn the shredder on again after about 5 minutes.
− If you cannot turn on the machine after this waiting time re-
fer to „Operational faults“.
A
A
d
d
j
j
u
u
s
s
t
t
i
i
n
n
g
g
t
t
h
h
e
e
f
f
i
i
x
x
e
e
d
d
c
c
o
o
u
u
n
n
t
t
e
e
r
r
b
b
l
l
a
a
d
d
e
e
It is possible to adjust the counter blade (B) at the cutting roller
(A) free of clearance. For an effective operation, an as small as
possible clearance should be maintained.
Soft material or wet branches may tear instead of being cut. A
counter blade that is worn after repeated use may also lead to
this problem.

Setting the clearance.
Switch on the device.
There is an adjustment device on the right hand side of the plastic housing. To adjust the distance turn the adjusting knob (D)
clockwisely so that the screw (C) moves toward the cutting roller. Turn until fine aluminium chips are falling from the ejection slot.
13
M
M
a
a
i
i
n
n
t
t
e
e
n
n
a
a
n
n
c
c
e
e
a
a
n
n
d
d
c
c
l
l
e
e
a
a
n
n
i
i
n
n
g
g
• Each time before starting maintenance work:
− Switch off the motor and pull out the mains plug.
− Wear protective gloves to prevent injury.
The cutters will not come to a standstill immediately after cut-off. Before starting any service work wait until all parts are sta-
tionary.
Be sure to have removed any tools from the machine after completion of service work.
• Generally garden shredders require little maintenance. To maintain their efficiency and a long life, observe the following:
− Keep vent slits clean and free from obstructions.
− Check the locking screws (tighten where necessary).
− Clean the device after shredding.
To clean your product only use a warm moist cloth and a soft brush.
Never use cleaning agents or solvents. Otherwise the device may be damaged irreversibly. Plastic parts may be corroded by chemi-
cals.
− Do not clean the machine with running water or high-pressure cleaners.
−
−
After each operation treat bare metal parts with an environment-compatible biodegradable spray oil to protect them against corro-
sion.
− the cutting roller and shaving plate are expendable parts, though with normal use and correct adjustment they have a service life of
many years
O
O
p
p
e
e
r
r
a
a
t
t
i
i
o
o
n
n
a
a
l
l
f
f
a
a
u
u
l
l
t
t
s
s
Before each fault elimination:
− Switch off device.
− Wait for standstill of the device.
− Pull out mains plug.
Fault Possible cause Remedy
Motor does not start - Rotation selector switch on position “0”
- No power supply
- Mains cable defective
- Machine overloaded (motor protection)
- Switch off device and switch over direction of rotation
selector switch.
- Check fuses
- have these checked (electrician)
- Allow the device to cool down.
Press the
1. reset button (motor protection)
2. green button I to restart.
Motor hums but does not
start
- Cutting roller blocked
- Capacitor faulty
- Switch off the device.
Turn the direction of rotation selector switch into
position
. Switch on device until the jam has been
cleared. Switch device off again. Turn back the
direction of rotation selector switch to position
.
- Bring machine to manufacturer or authorised work-
shop for repair

Fault Possible cause Remedy
Shredding material is not
drawn into the shredder
- The cutting roller is running in reverse.
Wrong switch position.
- Shredding material caught in funnel
- Shredding material too soft or wet
- Cutting roller worn
- Switch off device and switch over direction of rotation
selector switch.
- Switch off device. Switch the direction of rotation
selector switch into position
. Switch on device to
release the material to be shredded, remove any
foreign matter.
Switch off device again. To continue work, place the
direction of rotation selector switch back into position
.
- Push down with a branch and shred
- Adjust fixed counter blade as described under „adjust-
ing the fixed counter blade“. In case of severe wear,
replace cutting roller.
Shredding material not cut
cleanly
- Fixed counter blade not adequately ad-
justed
- Adjust fixed counter blade
Device starts but blocks
under as slight load and
switches off via protective
motor switch.
Extension cable too long or cross-section to
small.
Socket too far from mains supply and cross-
section of mains cable too small
Extension cable at least 1.5 mm², maximum 25 m long. If
a longer cable is used, minimum cross-section 2.5 mm².
14
T
T
e
e
c
c
h
h
n
n
i
i
c
c
a
a
l
l
d
d
a
a
t
t
a
a
Model
2300 2500 2800
Name AH 600 AH 600 AH 600
Motor AC-Motor 230 V~, 50 Hz, 2800 rpm
Motor rating P
1
S6 - 40 % 2300 W 2500 W 2800 W
Rotational speed cutting roller
40 min
-1
ON/OFF-switch with overload protection; cutting and reverse function, zero-voltage initiator
Weight 24 kg 24,5 kg 25 kg
Sound pressure level at work L
PA
(measured to 2000/14/EC)
83,8 dB (A)
K = 3 dB (A)
84,2 dB (A)
K = 3 dB (A)
82,5 dB (A)
K = 3 dB (A)
Measured sound power level L
WA
(measured to 2000/14/EC)
91 dB (A) 91 dB (A) 91 dB (A)
Guaranteed sound power level L
WA
(measured to 2000/14/EC)
92 dB (A) 92 dB (A) 92 dB (A)
Max. branch diameter
(only for freshly cut wood)
∅ max. 35 mm ∅ max. 40 mm ∅ max. 44 mm
Safety class I
Protection class IP X4
Mains fuse
Switzerland
UK
16 A time-lag
10 A time-lag
13 A time-lag
16 A time-lag
--
13 A time-lag
16 A time-lag
--
13 A time-lag
G
G
u
u
a
a
r
r
a
a
n
n
t
t
e
e
e
e
Please observe the enclosed terms of guarantee.

Vous ne devez pas mettre la machine en route avant
d’avoir lu attentivement ce mode d’emploi, d’avoir observé
toutes les informations indiquées et d’avoir monté la ma-
chine tel que cela est décrit.
15
Conserver ces notices d’utilisation pour toute utilisation future.
T
T
a
a
b
b
l
l
e
e
d
d
e
e
s
s
m
m
a
a
t
t
i
i
è
è
r
r
e
e
s
s
Déclaration de conformité CE
15
Fourniture
15
Description de la machine
15
Symboles utilisés: appareil
16
Symboles utilisés: notice d’utilisation 16
Tranches horaires 16
Utilisation conforme
16
Risques résiduels
16
Consignes de sécurité
17
Mise en service
18
Travaux avec le broyeur de végétaux
19
Réglage du contre-couteau
20
Maintenance et entretien 20
Pannes 21
Caractéristiques techniques 22
Garantie 22
Assemblage
116
Pièces de rechange 117
D
D
é
é
c
c
l
l
a
a
r
r
a
a
t
t
i
i
o
o
n
n
d
d
e
e
c
c
o
o
n
n
f
f
o
o
r
r
m
m
i
i
t
t
é
é
C
C
E
E
Conformément à la directive CE: 2006/42/CE
Par la présente, nous
ATIKA GmbH & Co. KG
Schinkelstraße 97, 59227 Ahlen - Germany
déclarons sous notre responsabilité exclusive que le produit
Gartenhäcksler (Broyeur de végétaux) type AH 600
Numéro de série : voir la dernière page
est conforme aux dispositions de la directive CE susnommée ainsi
qu’aux dispositions des directives suivantes :
2004/108/CE, 2006/95/CE et 2000/14/CE.
Les normes harmonisées suivantes ont été appliquées :
EN 60335-1:2002+A1+A11+A12+A2+A13;
EN 13683:2003+A1:2009; EN 62233:2008; EN 55014-1:2006;
EN 55014-2/A1:2001; EN 61000-3-2:2006; EN 61000-3-11:2000
Procédé d’évaluation de la conformité: 2000/14 CE - Annexe V
Niveau de puissance sonore mesur L
WA
91 dB (A).
Niveau de puissance sonore garanti L
WA
92 dB (A).
Conservation de la documentation technique:
ATIKA GmbH & Co. KG – Bureau technique – Schinkelstr. 97 –
59227 Ahlen – Germany
Ahlen, 30.04.2010 A. Pollmeier, le gérant
F
F
o
o
u
u
r
r
n
n
i
i
t
t
u
u
r
r
e
e
Après le déballage de la machine, vérifiez le contenu du carton
quant à
! l’intégralité des pièces
! la présence éventuelle de dommages dus au transport.
Informez immédiatement le revendeur, le transporteur et / ou le
fabricant en cas de réclamation. Toute réclamation ultérieure ne
sera pas acceptée.
• 1 unité prémontée de l’appareil
• 1 pied gauche
• 1 pied droit
• 1 essieu
• 2 roues
• 2 cache-roues
• 1 sachet de vis
• 1 sac de récupération
• 1 notice d’utilisation
D
D
e
e
s
s
c
c
r
r
i
i
p
p
t
t
i
i
o
o
n
n
d
d
e
e
l
l
a
a
m
m
a
a
c
c
h
h
i
i
n
n
e
e
A. Ouverture d’entonnoir pour matière hachée
B. Poignée
C. Bouton de réinitialisation / Protection du moteur
D. Fiche de contact
E. Interrupteur marche/arrêt
F. Commutateur du sens de rotation
G. Châssis
H. Partie supérieure du carter
I. Bouton de réglage du rouleau de coupe
J. Fente d’éjection

16
S
S
y
y
m
m
b
b
o
o
l
l
e
e
s
s
u
u
t
t
i
i
l
l
i
i
s
s
é
é
s
s
s
s
u
u
r
r
c
c
e
e
t
t
a
a
p
p
p
p
a
a
r
r
e
e
i
i
l
l
Lire la notice
d’utilisation et les
consignes de
sécurité avant la
mise en service et
en tenir compte
pendant le fonc-
tionnement.
Arrêter le moteur et
débrancher la fiche
de contact avant
toute opération
d’entretien, de
remise en état ou
de nettoyage.
Les pièces éjec-
tées repré-sentent
un danger lorsque
que le moteur est
en marche – les
personnes étran-
gères ainsi que
Nous recomman-
dons une extrême
prudence avec les
lames rotatives. Ne
pas introduire les
mains ou les pieds
dans les orifices de
les animaux domestiques et de
rente doivent rester à l’écart de
la zone dangereuse.
la machine pendant que celle-ci
est en marche.
Porter des lunettes
de protection et un
casque antibruit.
Porter des gants de
protection.
Protéger de
l’humidité.
Ne jamais jeter un appareil électrique aux ordures ména-
gères. Les appareils, les accessoires et les emballages
doivent être recyclés de façon non polluante.
Conformément à la directive européenne 2002/96/CE relative aux
déchets d’équipements électriques et électroniques, les appareils
électriques ne pouvant plus être utilisés doivent être collectés
séparément et recyclés d'une manière respectueuse de l'environ-
nement.
S
S
y
y
m
m
b
b
o
o
l
l
e
e
s
s
u
u
t
t
i
i
l
l
i
i
s
s
é
é
s
s
d
d
a
a
n
n
s
s
c
c
e
e
t
t
t
t
e
e
n
n
o
o
t
t
i
i
c
c
e
e
d
d
’
’
u
u
t
t
i
i
l
l
i
i
s
s
a
a
t
t
i
i
o
o
n
n
Danger imminent ou situation dangereuse.
L’inobservation de ces indications peut entraîner des bles-
sures ou des dégâts matériels.
L
Indications importantes pour un emploi conforme à
l’usage prévu. L’inobservation de ces indications peut
provoquer des dysfonctionnements.
Indications pour l’usager. Ces indications sont d’une
aide précieuse pour un emploi optimal des différentes
fonctions.
Montage, exploitation et maintenance. Ce symbole attire
votre attention sur ce que vous devez faire.
T
T
r
r
a
a
n
n
c
c
h
h
e
e
s
s
h
h
o
o
r
r
a
a
i
i
r
r
e
e
s
s
Observez les dispositions spécifiques de la loi nationale.
U
U
t
t
i
i
l
l
i
i
s
s
a
a
t
t
i
i
o
o
n
n
c
c
o
o
n
n
f
f
o
o
r
r
m
m
e
e
Le hachage de
- branches de tout type, jusqu’au diamètre max. (suivant la nature
et la fraîcheur du bois)
- déchets de jardin flétris, humides, stockés depuis plusieurs
jours, en alternance avec des branches, fait partie d’une utilisa-
tion conforme à l’emploi.
Le hachage de verre, de métal, d’objets ou de sachets en plastique,
de pierres, de déchets textiles, de racines avec de la terre, de dé-
chets sans consistance ferme (par ex. déchets de cuisine) est for-
mellement exclu.
Le broyeur de végétaux est destiné uniquement à une utilisation
privée à la maison et dans le jardins.
Sont considérés comme broyeurs pour l'utilisation privée à la mai-
son et au jardin les machines qui ne sont pas utilisées pour les
espaces verts publics tels que les parcs et les terrains de sport, pour
l'agriculture et la sylviculture et qui ne sont pas utilisées à des fins
professionnelles.
Un emploi conforme à l’usage prévu implique notamment aussi
l’observation des instructions de service, de maintenance et de
réparation du fabricant et le respect des consignes de sécurité
contenues dans ces instructions.
Toute utilisation divergente de la machine est considérée comme
emploi non conforme à l’usage prévu. Le fabricant décline toute
responsabilité pour les dommages en résultant : le risque incombe
exclusivement à l’usager.
L'appareil ne doit être utilisé, entretenu et ajusté que par des per-
sonnes connaissant l'appareil et averties des risques qui y sont liés.
Les réparations demeurent strictement réservées à notre SAV ou à
un service après-vente nommé par nos soins.
R
R
i
i
s
s
q
q
u
u
e
e
s
s
r
r
é
é
s
s
i
i
d
d
u
u
e
e
l
l
s
s
Même un emploi conforme à l’usage prévu et le respect des
consignes de sécurité applicables en la matière ne sauraient exclure
tous les risques résiduels générés par la construction et l’emploi de
la machine.
Les risques résiduels peuvent être minimisés en respectant les
« consignes de sécurité » et une « utilisation conforme » ainsi que
toutes les indications de cette notice d’utilisation.
La prise de précautions et la prudence réduisent les risques de
blessures corporelles et d’endommagements.
Risque de blessure des doigts et des mains si vous introdui-sez
la main dans une ouverture et entrez en contact avec le cou-
teau.
Risque de blessure des doigts et des mains lors d‘opérations de
montage et de nettoyage du couteau.
Risque de blessures dues à la projection de morceaux branches
dans la zone de l’entonnoir.
Dangers d’électrocution en cas d’utilisation de câbles de raccor-
dement électrique non conformes.
Contact avec les pièces conductrices de composants électriques
ouverts.
Endommagement de l’ouïe en cas de travaux particulièrement
longs sur la machine sans protection acoustique.
Il se peut que des risques résiduels non apparents persistent bien
que toutes les mesures de protection aient été prises.

17
C
C
o
o
n
n
s
s
i
i
g
g
n
n
e
e
s
s
d
d
e
e
s
s
é
é
c
c
u
u
r
r
i
i
t
t
é
é
Avant toute mise en service de ce produit, lire et respecter
les indications suivantes et les consignes bde sécurité en vi-
gueur dans les pays respectifs afin d’éviter tout risque
d’accident sur vous et les autres.
L
Remettez les consignes de sécurité à toutes les personne
sdevant travailler avec la machine.
L
Conservez ces consignes de sécurité en lieu sûr.
Toute réparation de la machine est à effectuer par le
fabricant ou par les entreprises qu’il aura nommées.
Avant utilisation, familiarisez-vous avec l’appareil à l’aide de la
notice d’utilisation.
Ne pas utiliser l’appareil à des fins non appropriées (voir «Utili-
sation conforme» et «Travaux avec le broyeur de végétaux»).
Prenez correctement appui sur vos jambes et veillez à votre
équilibre à tout moment. Ne vous penchez pas en avant. Res-
tez à hauteur de l’appareil lorsque vous y introduisez les ma-
tériaux à hacher.
Soyez attentif. Veillez à ce que vous faites. Travaillez de façon
raisonnable. N'utilisez pas l'équipement si vous êtes fatigué ou
sous l'emprise de drogues, d'alcool ou de médicaments. La
moindre inattention pendant l'utilisation de l'équipement peut
provoquer de graves blessures.
Pendant le travail avec la machine, portez des lunettes de
protection, des gants de travail et une protection auditive.
Portez des vêtements de protection appropriés:
− Pas d’habits larges
− Chaussures avec semelles antidérapantes.
L’utilisateur est responsable de la machine à l’égard de tiers
dans la zone de travail.
Il est interdit aux enfants et aux adolescents de moins de 16
ans d’utiliser l’appareil.
Maintenez les enfants à distance de l’appareil.
Ne mettez jamais l’appareil en marche lorsque des personnes
étrangères se trouvent à proximité.
Ne laissez jamais l’appareil sans surveillance.
Veillez à maintenir la zone de travail en ordre ! Le désordre
peut être la cause d’accidents.
Adoptez une position de travail sur le côté ou derrière
l’appareil. Ne restez jamais dans la zone de l’orifice d’éjection.
Ne jamais mettre les mains dans l’ouverture de remplissage ou
d’éjection.
Maintenez le visage et le corps à distance de l’orifice de rem-
plissage.
Ne surchargez pas la machine ! Elle travaille mieux et avec une
sécurité accrue dans la plage indiquée.
Veillez au montage complet et correct des équipements de
sécurité pendant l’exploitation et ne modifiez rien sur la ma-
chine qui risquerait d’influencer sa sécurité.
Ne modifiez jamais le régime du moteur. C’est lui qui régule la
vitesse de travail maximale sûre et protège le moteur ainsi que
toutes les pièces rotatives codesntre les détériorations dues à
une vitesse excessive.
Ne jamais mettre en service sans l’entonnoir.
Ne pas modifier l'appareil ou des parties ou pièces de l'appa-
reil.
Lors de la mise en marche du moteur, l’appareil doit être fer-
mé.
L’appareil ne doit pas être arrosé d’eau (source de risque car
présence de courant électrique).
Prenez les conditions environnantes en considération :
− Ne pas utiliser la machine dans un environnement humide.
− Ne pas travailler avec l'appareil lorsqu'il pleut et ne pas
laisser l’appareil sous la pluie.
− Travaillez uniquement avec de bonnes conditions visuelles,
veillez au bon éclairage de la zone de travail.
Porter des gants de protection pour toute intervention de
montage et de nettoyage afin d'éviter le risque de blessure
des doigts.
Débranchez la machine et retirez la fiche de la
prise de secteur en cas de
− travaux de maintenance et de nettoyage
− réparation de dysfonctionnements
− vérifications pour savoir si les conduites de rac-
cordement sont enchevêtrées ou endommagées
− transport
− travaux de réparation
− et si vous quittez l’appareil (même s’il ne s’agit que d’une
brève interruption du travail)
En cas d’obstructiondes orifices d’introduction ou d’éjection de la
machine, arrêter le moteur et retirer la fiche de la prise de cou-
rant avent d’enlever les résidus de matière.
Vérifiez si la machine est éventuellement endommagée.
− Contrôlez avec soin le fonctionnement impeccable et
conforme à l’usage prévu des équipements de sécurité
avant de poursuivre l’utilisation de la machine.
− Vérifiez le fonctionnement correct des pièces mobiles et
assurez-vous qu’elles ne sont ni coincées ni partiellement
endommagées. Toutes les pièces sont à monter correcte-
ment et toutes les conditions requises sont à remplir afin de
garantir une exploitation impeccable de l’appareil.
− Les dispositifs de sécurité et les pièces endommagés
doivent être réparés ou remplacés convenablement dans un
atelier spécialisé agréé, à moins que d’autres informations
ne soient mentionnées dans le mode d’emploi.
− Les autocollants de sécurité endommagés ou illisibles
doivent être remplacés.
Conservez les appreils non utilisés dans un endroit sec et
verrouillé et hors de portée des enfants.
Sécurité électrique
Exécution de la ligne de raccordement cf.
IEC 60245 (H 07 RN-F) avec une section d’au moins
− 1,5 mm² pour les câbles d’une longueur de 25 m maximum
− 2,5 mm² pour les câbles de plus de 25 m
Les conduites de raccordement longues et minces génèrent une
chute de tension. Le moteur n’atteint plus sa puissance maxi-
male et le fonctionnement de la hacheuse est restreint.
Les fiches et les prises femelles sur les conduites de raccorde-
ment doivent être en caoutchouc, en PVC souple ou en une au-
tre matière thermoplastique de même résistance mécanique ou
bien recouvertes d‘une de ces matières.
Le système d’enfichage de la conduite de raccordement doit être
protégé contre les projections d’eau.
Lors de la pose de la ligne de raccordement, veiller à ce qu'elle
ne soit pas coincéeni pliée et à ce que le connecteur ne soit pas
mouillé.
En cas d'utilisation d'un tambour, dérouler le câble complète-
ment.
N’employez pas le câble à des fins pour lesquelles il n’est pas
prévu. Protégez le câble de la chaleur, l’huile et des arêtes
tranchantes. Ne tirez pas sur le câble pour retirer la fiche de la
prise au secteur.

Vérifiez le câble de rallonge à intervalles réguliers et rempla-
cez-le dès que vous constatez un endommagement.
Ne vous servez jamais de lignes de raccordement défec-
tueuses.
Servez-vous exclusivement de câbles de rallonge spéciaux et
homologués pour l’extérieur le cas échéant.
Ne vous servez jamais de raccordements électriques provi-
soires.
18
Ne pontez jamais les équipements de sécurité et ne les mettez
jamais hors service.
Brancher la machine à l’aide d’un disjoncteur à protection
différentielle (30 mA).
Tout raccordement électrique, voire toute réparation sur les
parties électriques de la machine doivent être effectués par
des électriciens agréés ou confiés à l’un de nos services
après-vente. Les règlements locaux, particulièrement en ce qui
concerne les mesures de protection, sont à respecter.
Toute réparation des différentes pièces de la machine est à
effectuer par le fabricant ou l’un de ses services après-vente.
N’utiliser que des pièces de rechange d’origine. L’utilisation
d’autres pièces de rechange pourraint entraîner un risque
pour l’utilisateur, le fabricant déclinant toute responsabilité
pour tout dommage encouru.
M
M
i
i
s
s
e
e
e
e
n
n
s
s
e
e
r
r
v
v
i
i
c
c
e
e
Assurez-vous que l'appareil est monté intégralement et
conformément aux réglementations.
Pour utiliser le broyeur de végétaux, placez-le sur une surface
stable et horizontale (de façon à ce qu’il ne bascule pas).
Ne posez pas l’appareil sur un sol pavé ou ballasté.
N’utilisez l’appareil qu’à l’extérieur. Restez à distance (2 m
minimum) des murs et des autres objets fixes.
Avant toute utilisation, veuillez vérifier
− que les lignes de raccordement ne présentent pas de défec-
tuosités (fissures, coupures ou autres).
− l‘d’ éventuels endommagements de l’appareil (voir consignes
de sécurité)
− que toutes les vis sont serrées à fond
L Branchement au secteur
Comparez la tension de votre secteuravec la tension indiquée
sur la plaque signalétique de la machine et raccordez la ma-
chine à une prise appropriée et conforme aux prescriptions.
Utilisez un câble de rallonge de section suffisante.
Protection de secteur
Suisse UK
2300 W 16 A retardée
10 A retardée
13 A retardée
2500 W 16 A retardée
13 A retardée
2800 W 16 A retardée
13 A retardée
Interrupteur marche/arrêt
Ne jamais utiliser un appareil dont l'interrupteur ne fonctionne
pas. Les interrupteurs défectueux doivent immédiatement être
réparés ou remplacés par le service après vente.
Bouton de
réinitialisation
(protection du
moteur)
Mise en marche
Appuyez sur le bouton vert I .
Arrêt
Appuyez sur le bouton rouge 0 .
Sécurité de remise en marche en
cas de panne de courant
En cas de panne de courant, la hacheuse s‘arrête automatiquement
(déclencheur à tension nulle). Pour une remise en marche, appuyez
à nouveau sur le bouton vert.
Protection du moteur
Le moteur est équipé d’un disjoncteur de protection et s’arrête au-
tomatiquement en cas de surcharge. Il peut être remis en marche
après une pause de refroidissement (env. 5 mn). Appuyez sur
1. le bouton de réinitialisation (protection du moteur)
2. le bouton vert I pour une remise en marche.
MARCHE
Commutateur du
sens de rotation
ARRET
Commutateur du sens de rotation
Actionnez le commutateur du sens de rotation uniquement
lorsque la hacheuse est à l‘arrêt.
Position
Le moteur ne démarre pas.
Position
La matière est entraînée et hachée par le cylindre de coupe.
Position
La lame fonctionne en sens inverse et la matière serrée est libre.
Une fois que vous avez mis le commutateur du sens de rotation en
position
, maintenez le bouton vert de l‘interrupteur mar-
che/arrêt appuyé. Le cylindre de coupe est positionné en sens in-
verse. Lorsque vous relâchez l‘interrupteur marche/arrêt, la ha-
cheuse reste automatiquement à l‘arrêt.
Mouvement
de retour
Entraînement
ARRET

Conseils
z Les gros objets ou les morceaux de bois sont enlevés en sens
de coupe ou en sens de déblocage après un actionnement à
plusieurs reprises.
z Utilisez un bouchon ou un crochet pour enlever les objets
bloqués dans l‘entonnoir ou dans la fente d‘éjection.
Attendez toujours que la hacheuse soit à l‘arrêt avant de la
remettre en marche.
Impédance de secteur
19
En cas de mauvaises conditions de secteur, des baisses de tension
momentanées peuvent survenir pendant le processus d’allumage de
l’appareil et peuvent gêner d’autres appareils (parex. une lampe
vacille).
Tout risque de dysfonctionnement est exclu si l’on respecte les
impédances de secteur maximales indiquées dans le tableau.
Puissance absorbée P
1
(W)
Impédance de secteur Z
max
(Ω)
2300 0,21
2500 0,21
2800 0,19
T
T
r
r
a
a
v
v
a
a
u
u
x
x
a
a
v
v
e
e
c
c
l
l
e
e
b
b
r
r
o
o
y
y
e
e
u
u
r
r
d
d
e
e
v
v
é
é
g
g
é
é
t
t
a
a
u
u
x
x
Adoptez une position de travail à côté ou derrière l’appareil. Ne
restez jamais dans la zone de l’orifice d’éjection.
Les branches longues dépassant de l’appareil risquent
d’être renvoyées en arrière lorsqu’elles seront entraînées par les
lames ! Respectez la distance de sécurité !
Ne jamais mettre les mains dans l'ouverture de remplissage ou
d'éjection.
Maintenez le visage et le corps à distance de l’orifice de rem-
plissage.
N’introduisez jamais les mains, d’autres parties du corps ou vos
vêtements dans le tube de remplissage, le canal d’évacuation ou
à proximité d’autres pièces mobiles.
Avant la mise en marche de l‘appareil, vérifiez si des restes de
broyage se trouvent dans l’entonnoir.
Ne renversez pas l’appareil pendant que le moteur est en mar-
che.
Lors du remplissage, veillez à ce que des pièces en métal, des
pierres, des bouteilles ou d‘autres objets n’entrent pas en
contact avec des objets à broyer dans l’entonnoir.
Si des objets extérieurs entrent dans l’entonnoir ou si l’appareil
commence à émettre des bruits ou des vibrations inhabituelles,
arrêtez immédiatement l’appareil et immobilisez-le. Débranchez
la fiche et effectuez les points suivants :
− examiner les dommages
− remplacer ou réparer les pièces endommagées
− vérifier l’appareil et resserrer les pièces dévissées
Vous ne devez pas réparer l’appareil si vous n’êtes pas au-
torisé à le faire (voir consignes de sécurité).
Qu’est-ce que je peux broyer?
Oui:
• branches de tout type, ayant un diamètre de max., suivant la
nature et la fraîcheur du bois
• déchets de jardin humides et flétris, déjà entreposés depuis
plusieurs jours
uniquement en alternance avec le broyage de branches
Non:
• verre, morceaux de métaux, matières plastiques, sacs en
plastique, pierres, déchets de tissus, racines souillées par de
la terre
• déchets sans consistance solide, par exemple déchets de
cuisine
Instructions spéciales concernant
le broyage:
¾ Introduisez toujours la matière à
hacher du côté droit dans l‘orifice
de remplis-sage de l‘entonnoir.
¾ Broyez les branches, les rameaux
et les bois juste après les avoir
coupés
− Ces matériaux à broyer deviennent très durs lorsqu’ils sè-
chent, le diamètre maximal des branches à traiter diminue
donc.
¾ Lorsque les branches sont très ramifiées, enlever les rameaux
latéraux.
¾ Broyage de déchets de cuisine ou de jardin contenant beau-
coup d’eau et tendant à coller
− Ces déchets doivent être broyés en alternance avec des dé-
chets contenant du bois afin d’éviter que l’appareil ne soit
obstrué.
¾ Ne pas laisser s’entasser trop de matériaux hachés sous la
sortie de l’orifice d’évacuation. Il risquerait sinon d’obstruer le
canal d’évacuation. Cela pourrait entraîner un retour des maté-
riaux par l’orifice de remplissage.
¾ Nettoyez l’orifice de remplissage ainsi que le canal d’évacuation
lorsque l’appareil est obstrué. Pour ce faire, éteignez d’abord le
moteur et retirez la fiche secteur.
¾ Veillez à ce que le diamètre maximal des branches pouvant
être haché par votre appareil soit respecté (∅ voir « Caractéris-
tiques techniques »). Selon la taille et la fraîcheur du bois, le dia-
mètre maximal de la branche que vous souhaitez broyer peut
être réduit.
¾ L'unité coupante introduit automatiquement et sans à-coups les
matériaux à hacher grâce à la rotation lente du rouleau de
coupe.
¾ Commutation automatique du sens de rotation:
En cas de brusque blocage de l’appareil, le sens de rotation du
cylindre de découpe peut commuter, ce qui repoussera dans ce
cas le matériau haché.
− Arrêter l‘appareil
− Patienter jusqu’a immobilisation du cylindre de découpe
− Remettre l’appareil en marche et l’alimenter en matériau
plus facile à hacher.
¾ En cas de surcharge de l’appareil, le sélecteur équipé d’un
disjoncteur-protecteur met la machine automatiquement hors
circuit
− Dans ce cas, remettez le broyeur en marche au bout de 5
minutes environ
− Au cas ou la machine ne se remettrait pas en marche au
bout de ce temps d’attente, veuillez vous reporter au point
„Pannes“.
La pagina si sta caricando...
La pagina si sta caricando...
La pagina si sta caricando...
La pagina si sta caricando...
La pagina si sta caricando...
La pagina si sta caricando...
La pagina si sta caricando...
La pagina si sta caricando...
La pagina si sta caricando...
La pagina si sta caricando...
La pagina si sta caricando...
La pagina si sta caricando...
La pagina si sta caricando...
La pagina si sta caricando...
La pagina si sta caricando...
La pagina si sta caricando...
La pagina si sta caricando...
La pagina si sta caricando...
La pagina si sta caricando...
La pagina si sta caricando...
La pagina si sta caricando...
La pagina si sta caricando...
La pagina si sta caricando...
La pagina si sta caricando...
La pagina si sta caricando...
La pagina si sta caricando...
La pagina si sta caricando...
La pagina si sta caricando...
La pagina si sta caricando...
La pagina si sta caricando...
La pagina si sta caricando...
La pagina si sta caricando...
La pagina si sta caricando...
La pagina si sta caricando...
La pagina si sta caricando...
La pagina si sta caricando...
La pagina si sta caricando...
La pagina si sta caricando...
La pagina si sta caricando...
La pagina si sta caricando...
La pagina si sta caricando...
La pagina si sta caricando...
La pagina si sta caricando...
La pagina si sta caricando...
La pagina si sta caricando...
La pagina si sta caricando...
La pagina si sta caricando...
La pagina si sta caricando...
La pagina si sta caricando...
La pagina si sta caricando...
La pagina si sta caricando...
La pagina si sta caricando...
La pagina si sta caricando...
La pagina si sta caricando...
La pagina si sta caricando...
La pagina si sta caricando...
La pagina si sta caricando...
La pagina si sta caricando...
La pagina si sta caricando...
La pagina si sta caricando...
La pagina si sta caricando...
La pagina si sta caricando...
La pagina si sta caricando...
La pagina si sta caricando...
La pagina si sta caricando...
La pagina si sta caricando...
La pagina si sta caricando...
La pagina si sta caricando...
La pagina si sta caricando...
La pagina si sta caricando...
La pagina si sta caricando...
La pagina si sta caricando...
La pagina si sta caricando...
La pagina si sta caricando...
La pagina si sta caricando...
La pagina si sta caricando...
La pagina si sta caricando...
La pagina si sta caricando...
La pagina si sta caricando...
La pagina si sta caricando...
La pagina si sta caricando...
La pagina si sta caricando...
La pagina si sta caricando...
La pagina si sta caricando...
La pagina si sta caricando...
La pagina si sta caricando...
La pagina si sta caricando...
La pagina si sta caricando...
La pagina si sta caricando...
La pagina si sta caricando...
La pagina si sta caricando...
La pagina si sta caricando...
La pagina si sta caricando...
La pagina si sta caricando...
La pagina si sta caricando...
La pagina si sta caricando...
La pagina si sta caricando...
La pagina si sta caricando...
La pagina si sta caricando...
La pagina si sta caricando...
La pagina si sta caricando...
La pagina si sta caricando...
La pagina si sta caricando...
-
 1
1
-
 2
2
-
 3
3
-
 4
4
-
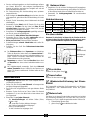 5
5
-
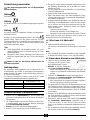 6
6
-
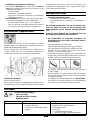 7
7
-
 8
8
-
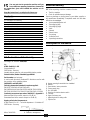 9
9
-
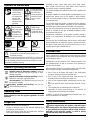 10
10
-
 11
11
-
 12
12
-
 13
13
-
 14
14
-
 15
15
-
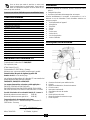 16
16
-
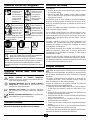 17
17
-
 18
18
-
 19
19
-
 20
20
-
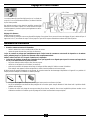 21
21
-
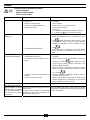 22
22
-
 23
23
-
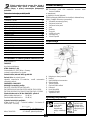 24
24
-
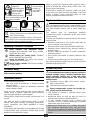 25
25
-
 26
26
-
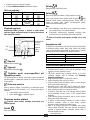 27
27
-
 28
28
-
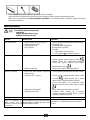 29
29
-
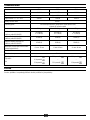 30
30
-
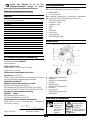 31
31
-
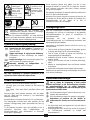 32
32
-
 33
33
-
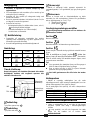 34
34
-
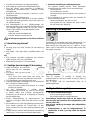 35
35
-
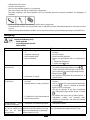 36
36
-
 37
37
-
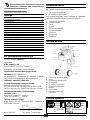 38
38
-
 39
39
-
 40
40
-
 41
41
-
 42
42
-
 43
43
-
 44
44
-
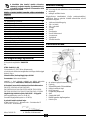 45
45
-
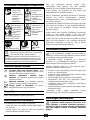 46
46
-
 47
47
-
 48
48
-
 49
49
-
 50
50
-
 51
51
-
 52
52
-
 53
53
-
 54
54
-
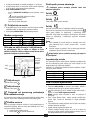 55
55
-
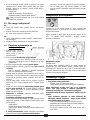 56
56
-
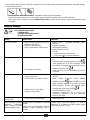 57
57
-
 58
58
-
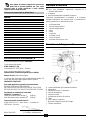 59
59
-
 60
60
-
 61
61
-
 62
62
-
 63
63
-
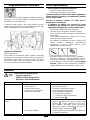 64
64
-
 65
65
-
 66
66
-
 67
67
-
 68
68
-
 69
69
-
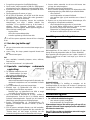 70
70
-
 71
71
-
 72
72
-
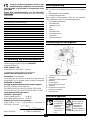 73
73
-
 74
74
-
 75
75
-
 76
76
-
 77
77
-
 78
78
-
 79
79
-
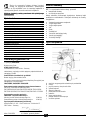 80
80
-
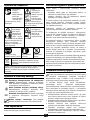 81
81
-
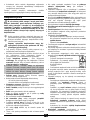 82
82
-
 83
83
-
 84
84
-
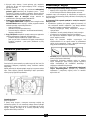 85
85
-
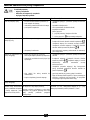 86
86
-
 87
87
-
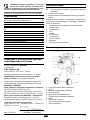 88
88
-
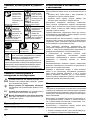 89
89
-
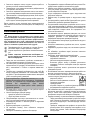 90
90
-
 91
91
-
 92
92
-
 93
93
-
 94
94
-
 95
95
-
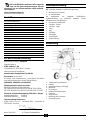 96
96
-
 97
97
-
 98
98
-
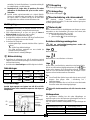 99
99
-
 100
100
-
 101
101
-
 102
102
-
 103
103
-
 104
104
-
 105
105
-
 106
106
-
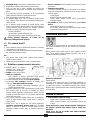 107
107
-
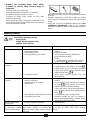 108
108
-
 109
109
-
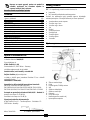 110
110
-
 111
111
-
 112
112
-
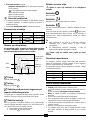 113
113
-
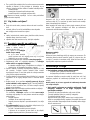 114
114
-
 115
115
-
 116
116
-
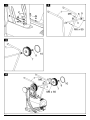 117
117
-
 118
118
-
 119
119
-
 120
120
-
 121
121
-
 122
122
-
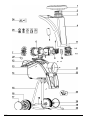 123
123


ATIKA GHD 2800 Manuale del proprietario
- Tipo
- Manuale del proprietario
in altre lingue
- English: ATIKA GHD 2800 Owner's manual
- français: ATIKA GHD 2800 Le manuel du propriétaire
- Deutsch: ATIKA GHD 2800 Bedienungsanleitung
- русский: ATIKA GHD 2800 Инструкция по применению
- Nederlands: ATIKA GHD 2800 de handleiding
- slovenčina: ATIKA GHD 2800 Návod na obsluhu
- dansk: ATIKA GHD 2800 Brugervejledning
- čeština: ATIKA GHD 2800 Návod k obsluze
- polski: ATIKA GHD 2800 Instrukcja obsługi
- svenska: ATIKA GHD 2800 Bruksanvisning
- suomi: ATIKA GHD 2800 Omistajan opas
Documenti correlati
-
ATIKA GHD 2200 Manuale del proprietario
-
-
-
-
ATIKA ALF 2600-2 Istruzioni per l'uso
-
-
-
-
-
Altri documenti
-
EINHELL 34.306.30 Manuale utente
-
Dolmar FH-2400 Manuale del proprietario
-
EINHELL GC-RS 60 CB Manuale utente
-
WOLF-Garten SDL 2100 Manuale del proprietario
-
ghd AURA Manuale utente
-
Worx WG401E Scheda dati
-
Güde Hochdruckreiniger GHD 1800-135 Manuale del proprietario
-
-
-