TELE System Smart TV Istruzioni per l'uso
- Tipo
- Istruzioni per l'uso


ITALIANO
Ingressi e Uscite
1. USB 2.0 (x2): porte USB2.0 per funzione Mediaplayer
2. Uscita Cuffie: jack 3,5mm.
3. CI/CI+: alloggiamento per moduli Common Interface di tipo CI/CI+.
4. Audio Out: uscita audio digitale.
5. HDMI1, HDMI2, HDMI3 (v.1.4) per la connessione di una sorgente AV.
6. RF IN (T2/C): ingresso antenna (IEC) per digitale terrestre (DVB-T/T2) o cavo (DVB-C).
7. RF IN (S2): ingresso Antenna SATELLITE RF (tipo F).
8. RCA: ingresso audio-video per connessione di apparecchi RCA (CVBS + Stereo LR).
9. PC Audio IN e PC VGA: ingressi audio (jack 3,5mm) e video (VGA) per PC.
10. YPbPr (mini): Ingresso video Component (jack 3,5mm)
11. LAN: porta Ethernet (RJ45) necessaria alle funzioni SmartTV/HbbTV.
12. Alimentazione (230VAC, 50Hz)
Telecomando
Inserire 2 batterie AAA (non in dotazione) nel vano del telecomando rispettando le corrette
polarità. Le batterie esaurite dovranno essere smaltite separatamente dai rifiuti domestici
portandole ad un qualsiasi punto vendita o di raccolta.
AVVERTENZE
In caso di prolungato inutilizzo rimuovere le pile per evitare che la perdita di liquido
corrosivo danneggi il telecomando. Non usare batterie diverse o batterie scariche e nuove
allo stesso tempo.
Prima installazione
Collegare il cavo antenna (terrestre e/o satellite) ed il cavo ethernet (se disponibile).
Dopo aver acceso il TV eseguire la prima installazione come da procedura guidata, utilizzare
i tasti frecce e OK per la selezione e conferma:
Passo 1,2,3,4. Scelta Lingua/Paese/Password*/Fuso orario;
Passo 5. Connessione alla rete (via cavo o wireless);
a. Cavo: il collegamento alla rete è stabilito senza nessun tipo di intervento;
b. Wireless: selezionare la voce Usa rete WiFi, quindi scegliere la rete WiFi cui
si vuole collegare il TV ed immettere la password (premere OK per
richiamare tastiera virtuale), confermare selezionando Connetti;
Passo 6. APP “E-Share”, utilizzare il Codice QR per scaricare ed installare l’app**;
Passo 7. Scelta della modalità/sorgente di avvio;
ATTENZIONE!
*Il sistema non accetta il valore “0000” come password.
**L’app E-Share è da installare sul dispositivo mobile (e.g. smartphone), per funzionare
correttamente il dispositivo mobile e la Smart TV devo essere connessi alla stessa rete.
L’applicazione non sostituisce in toto il telecomando tradizionale, essa è realizzata
principalmente per utilizzare le funzionalità Smart del TV (applicazioni, mediaplayer, etc…).
Alcune applicazioni richiedono l’utilizzo di una tastiera e/o di un cursore/mouse; in tal caso
il telecomando tradizionale fornito col TV non è sufficiente al loro controllo.

TELE System
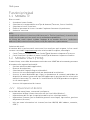
Funzioni principali
1.1 Modalità TV
Ricerca canali:
1. Accedere al menu Canale;
2. Selezionare la sorgente dalla voce Tipo di Antenna (Terrestre, Cavo o Satellite);
3. Selezionare la voce Scansione;
4. Definire i parametri di ricerca secondo l’impianto d’antenna e/o preferenze;
5. Avviare la scansione
NOTA
Scegliendo di utilizzare la funzione LCN (terrestre) o TivùSat (satellitare), al termine della
ricerca verrà creata una lista canali con un ordinamento predefinito.
La visione dei canali criptati richiede l’impiego di un modulo d’accesso condizionato
dedicato (CAM) e relativa tessera (Smart-card), da acquistare separatamente.
Selezione dei canali:
Al termine della scansione verrà creata una lista canali per ogni sorgente, le liste canali
saranno consultabili singolarmente previa selezione della sorgente, ad esempio:
1. Canali Terrestri: accedere al menu Canale/Tipo di Antenna e impostare Terrestre
2. Canali Satellitari: accedere al menu Canale/Tipo di Antenna e impostare Satellite
1.2 Modalità Smart (Home)
Il menu Home, accessibile direttamente anche da tasto HOME del telecomando, permette
di accedere alle seguenti funzionalità:
- Gestione ed utilizzo delle applicazioni;
- Browser di navigazione,
- Selezione delle sorgenti d’ingresso/modalità:
- Accesso allo store delle applicazioni per download ed installazione.
- Accesso al menu Multimedia per la per la riproduzione di contenuti audio/video da
dispositivi di memoria esterno di tipo USB oppure per la gestione dei file salvati nella
memoria interna del TV, come ad es. installazione da file APK (procedura consigliata
ai soli utenti esperti).
- Accesso alle impostazioni di sistema
1.2.1
Impostazioni di Sistema
Accessibile dal menu Home, consente di configurare:
- Impostazioni di Rete (connessione alla rete via Cavo LAN o Wireless);
- Impostazione dell’Ora per la regolazione dell’orario e relativi parametri;
- Impostazioni Comune, per le modifiche generali come lingua, tipo tastiera, gestione
dei permessi/account;
- Info, per avere informazioni sul sistema (versione HW/SW, MAC address, memoria,
GPU…).

ITALIANO
AVVERTENZE
Per usufruire delle funzionalità SMART TV, è necessario collegare il TV alla rete internet.
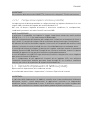
1.2.1.1
Configurazione impianto d’antenna (satellite)
Le impostazioni di default prevedono la configurazione di un impianto d’antenna fisso con
singolo LNB, ricezione del segnale dal satellite Hotbird 13°E.
Nel caso di diverso impianto d’antenna è necessario modificare la configurazione,
cambiando i parametri nel menu Canali/Scansione/LNB.
NOTE E AVVERTENZE
Il televisore è compatibile con impianti a singolo convertitore universale, multi-satellite
DiSEqC (1.0 - 1.1 - 1.2 - 1.3) e multi-utenza SCR/Unicable.
L’errata configurazione dell’antenna può comportare il mancato caricamento di alcuni o
tutti i canali. si consiglia di rivolgersi ad un installatore professionista per l’installazione.
Gli indicatori di Livello e Qualità del segnale si riferiscono al Trasponder del satellite scelto
indicato a schermo. Accertarsi quindi che esso sia valido/aggiornato e realmente attivo.
Si sconsiglia di evitare di collegare il televisore al segnale satellitare tramite il connettore
antenna passante (LNB Out/Loop Through) di un ricevitore satellitare esterno in quanto
entrambi gli apparecchi non possono funzionare contemporaneamente.
In caso di impianto con LNB SCR: ogni televisore/ricevitore collegato allo stesso impianto
deve usare un Canale SCR diverso.
Per il collegamento di più apparecchi riceventi ad un impianto SCR, non utilizzare
l’eventuale connessione antenna passante (loop through) di un ricevitore satellitare
esterno, ma servirsi di un partitore di segnale esterno dedicato.
1.3 Ripristino impostazioni di fabbrica (reset)
Riporta tutte le impostazioni alla condizione iniziale.
Accessibile dal menu Home > Impostazioni > Comune > Ripristino di sistema
AVVERTENZA
Il ripristino delle impostazioni di fabbrica cancella tutte le personalizzazioni effettuate
dall’utente, inclusi i canali memorizzati, le applicazioni scaricate e le impostazioni
modificate. Inoltre, confermando il reset, il televisore eseguirà un riavvio completo del
sistema, poi visualizzerà a schermo la procedura guidata di prima installazione.

TELE System
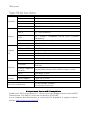
Specifiche tecniche
Pannello
Formato
31,5” - 16:9 wide (80cm)
Risoluzione
1366x768 (HD ready)
Contrasto
3000:1
Luminosità
180 (cd/m2)
Angolo di visione
178°/178° (Orizzontale/Verticale)
Ingressi
HDMI
x3 - HDMI
A/V in
x1 - CVBS+Audio LR
USB
x2 - USBv2.0, compatibile FAT32e NTFS, Funzione
Mediaplayer
VGA
x1 - DSUB15 + Audio PC
LAN
x1 - RJ45, Ethernet 10/100
Segnale
TV
RF input (DTT)
x1- 75 Ω, tipo IEC, VHF/UHF 7MHz/8MHz
RF input (SAT)
x1 - 75 Ω, tipo F
Common Interface
x1 - CI / CI+
Video
MPEG-2, MPEG-4, H.265.Main@L4.1-1920*1080@50fps
Audio
MPEG-1 layer 1/2, MPEG-2 layer 2/Dolby AC3 H.265
Speaker
2 x 10 W + 2 x 10W
Generali
Alimentazione
100-240V, 50/60Hz
Consumo
<0,5W in Stand.by
56W Max
Formati supportati
via USB
AVI/MP4/MKV, WenM, 3GPP, MPEG transport stream
Wi-Fi
IEEE b/g/n, 2,4GHz
Misure TV
(LxAxP)
con supporti
732 x 471 x 181 mm
senza supporti
732 x 434 x 75 mm
Standard supporto a muro
VESA 200/100
Accessori in dotazione
x1 telecomando standard,
x1 manuale di istruzioni
Dichiarazione di Conformità EU semplificata
Il fabbricante, TELE System Digital s.r.l., dichiara che il tipo di apparecchiatura radio SMART
TV denominata TS32 SMX10 è conforme alla direttiva 2014/53/UE.
Il testo completo della dichiarazione di conformità UE è disponibile al seguente indirizzo
Internet: https://www.telesystem.it/CE

ENGLISH
Product description
1.4 Connections
The following inputs and outputs are available behind the TV:
1. USB 2.0 (x2): USB2.0 ports for Mediaplayer function
2. Headphone output: 3.5mm jack.
3. CI/CI: CI/CI Common Interface module slot.
4. Audio Out: Digital audio output.
5. HDMI1, HDMI2, HDMI3 (v.1.4): to connect an AV source.
6. RF IN (T2/C): Antenna input (IEC) for terrestrial (DVB-T/T2) or cable (DVB-C).
7. RF IN (S2): Satellite RF Antenna Input (type F).
8. RCA: Audio-video input for connection of RCA devices (CVBS - Stereo LR).
9. PC Audio IN and PC VGA: audio inputs (jack 3.5mm) and video (VGA) for PC.
10. YPbPr (mini): Component Video Input (jack 3.5mm)
11. LAN: Ethernet port (RJ45) required for SmartTV/HbbTV functions.
12. Power (230VAC, 50Hz)
1.4.1
Remote Control
Place 2 AAA batteries (not supplied) in the remote control compartment respecting the
correct polarities. Exhausted batteries must be disposed of separately from household
waste and bring to any point of sale or collection.
WARNINGS
To prevent corrosive liquid leakage from damaging the remote control, it is advisable to
remove the batteries if you believe you will not use the device for a long time.
Avoid using different types of batteries such as new and used batteries at the same time.
First installation
Connect the antenna cable (terrestrial and/or satellite) and the ethernet cable (if available).
After turning on the TV, perform the first installation as from wizard, use the arrows and OK
keys to select and confirm:
Step 1,2,3,4. Language/Country/Password/Time Zone Choice;
Step 5. Connecting to the network (cable or wireless)';
a. Cable: the connection to the network is established without any kind of
intervention;
b. Wireless: Select use WiFi, then choose the WiFi network you want to connect to
the TV and enter the password (press OK to invoke virtual keyboard), confirm
selecting Connect;
Step 6. APP "E-Share", use the QR Code to download and install the app;
Step 7. Choosing the startup mode/source;

TELE System
WARNINGS
The system does not accept the value "0000" as the password.
The E-Share app has to be installed on the mobile device (e.g. smartphone), to properly
works the mobile device and the Smart TV need to be connected to the same network.
The application does not completely replace the traditional remote control, it is made
mainly to use the Smart features of the TV (applications, mediaplayers, etc...).
Some applications require the use of a keyboard and/or mouse; in this case the traditional
remote control provided with the TV is not sufficient to control them.
Main functions
1.5 Digital TV mode
Channel Search:
1. Go to the Channel menu;
2. Select the source from the Antenna Type (Earth, Cable, or Satellite) entry;
3. Select the Scan item;
4. Define the search parameters according to the antenna system and/or preferences;
5. Start scanning
NOTE
If you choose to use the LCN (terrestrial) or TivùSat (satellite) function, a channel list with a
predefined sort order will be created at the end of the search.
Viewing encrypted channels requires the use of a dedicated conditional access module
(CAM) and its smart-card (CA) to be purchased separately.
Selecting channels:
At the end of the scan a channel list will be created for each source, the channel lists can
be consulted individually after the selection of the source, for example:
1. Terrestrial Channels: Access the Channel/Antenna Type menu and set Terrestrial
2. Satellite Channels: Access the Channel/Antenna Type menu and set Satellite
1.6 Smart (Home) mode
The Home menu, also accessible directly from the Home button of the remote control,
allows you to access the following features:
- Application management and use;
- Navigation browser,
- Selection of input sources/modes:
- Access to application store for apps download and installation.
- Access to the Multimedia menu for playing audio/video content from USB external
memory devices or for files managing saved in the INTERNAL memory of the TV, such
as. installation from APK files (for advanced users only).
- Access to the system settings

ENGLISH
1.6.1.1
System Settings
Accessible from the Home menu, allows you to configure:
- Network settings (network connection via LAN or Wireless);
- Time setting for adjusting the time and its parameters;
- Common settings, for general changes such as language, keyboard type,
permission/account management;
- Info, to get system information (HW/SW version, MAC address, memory, GPU...).
WARNINGS
To take advantage of SMART TV features, you need to connect your TV to the internet.
Advanced functions
1.6.1.2
Antenna system configuration (Sat)
The default settings include the configuration of a single LNB fixed antenna system,
receiving the signal from the Hotbird 13-E satellite.
In the case of different antenna system, you need to change the configuration, modifing the
parameters in the Channels/Scan menu.
NOTES AND WARNINGS
The TV is compatible with universal single converter, multi-satellite DiSEqC (1.0 - 1.1 - 1.2
- 1.3) and multi-user SCR/Unicable systems.
Incorrect antenna configuration can result in some or all channels not loading. we
recommend that you contact a professional installer for installation.
The Signal Level and Quality indicators refer to the selected satellite Trasponder on the
screen. Make sure that it is valid/updated and really active.
It is not recommended to avoid connecting the TV to the satellite signal via the via-the-radar
antenna connector (LNB Out/Loop Through) of an external satellite receiver because both
devices cannot operate at the same time.
In the case of a system with LNB SCR: each TV/receiver connected to the same system must
use a different SCR channel.
To connect multiple receiving devices to an SCR system, do not use the loop through
antenna connection of an external satellite receiver, but use a dedicated external signal
party.
1.7 Factory reset (reset)
Resets all settings to the initial condition.
Accessible from the Home menu > Settings > Common > System Restore
WARNING
Restoring factory settings clears all customizations made by the user, including stored
channels, downloaded applications, and changed settings. In addition, confirming the reset,
the TV will perform a full system restart, then display the first installation wizard on screen

TELE System
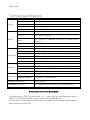
Technical specifications
Panel
Format
31,5” – 16:9 wide (80 cm)
Resolution
1366x768 (HD)
Contrast
3000:1
Brightness
180 (cd/m2)
Viewing angle
178°/178° (Horizontal/Vertical)
Inputs
HDMI
x3 – HDMI
A/V in
x1 – CVBS + Audio LR
USB
x2 - USBv2.0, compatible FAT32e NTFS, Media player
function
VGA
x1 - DSUB15 + Audio PC
LAN
x1 - RJ45, Ethernet 10/100
TV Signals
RF input (DTT)
x1- 75 Ω, type IEC, VHF/UHF 7MHz/8MHz
RF input (SAT)
x1 - 75 Ω, F type
Common Interface
x1 - CI / CI+
Video
MPEG-2, MPEG-4, H.265.Main@L4.1-1920*1080@50fps
Audio
MPEG-1 layer 1/2, MPEG-2 layer 2/Dolby AC3 H.265
Speaker
10W x2 + 10W x2
General
Power Supply
100-240V, 50/60Hz
Power Consum
<0,5W in Standby; 56 W max
USB supported
AVI/MP4/MKV, WenM, 3GPP, MPEG transport stream
Wi-Fi
IEEE b/g/n, 2,4GHz
TV
dimension
s
with supports
732 x 471 x 181 mm (WxHxD)
without supports
732 x 434 x 75 mm (WxHxD)
Standard wall bracket
VESA 200/100
Included Accessories
x1 standard remote control, x1 instruction manual
Simplified EU conformity declaration
The manufacturer, TELE System Digital s.r.l.., states that the radio equipment type of
SMART TV named TS32 SMX10 complies with the 2014/53/EU directive.
The full text of the EU compliance declaration is available at the following Internet address:
https://www.telesystem.it/CE


28000188 TS32 SMX10
Per informazioni dettagliate, si invita a visitare il sito di TELE System Digital Srl
For detailed information, please visit the TELE System Digital Srl website
Coperto da una o più rivendicazioni dei brevetti elencati in
patentlist.hevcadvance.com.
Covered by one or more claims of the patents listed at
patentlist.hevcadvance.com
TELE System Digital Srl
Via dell’Artigianato, 35
36050 Bressanvido (VI)
Website: www.telesystem-world.com
REV.01 - 28/05/2021
-
 1
1
-
 2
2
-
 3
3
-
 4
4
-
 5
5
-
 6
6
-
 7
7
-
 8
8
-
 9
9
-
 10
10
-
 11
11
-
 12
12


TELE System Smart TV Istruzioni per l'uso
- Tipo
- Istruzioni per l'uso
in altre lingue
Documenti correlati
Altri documenti
-
Thomson THS840 Manuale utente
-
SAGEMCOM DS74 SD Tivu Guida utente
-
Sharp LC-49CFE6142EW Manuale del proprietario
-
-
-
-
-
Sharp A40CF6132EB399 Manuale del proprietario
-