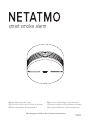
Netatmo Smart Smoke Alarm Manuale utente
- Categoria
- Componenti del dispositivo di sicurezza
- Tipo
- Manuale utente

smart smoke alarm
EN Smart Smoke Alarm | User guide
FR Détecteur de Fumée Connecté | Guide de l’utilisateur
DE Smarter Rauchmelder | Benutzerhandbuch
ES Detector de Humo Inteligente | Guía del usuario
IT Rilevatore Intelligente di Fumo | Manuale di istruzioni
NL Intelligente Rookmelder | Gebruikershandleiding
More languages available at https://smokealarm.netatmo.com NSD01

23
https://smokealarm.netatmo.com
User guide available in more languages at the following address:
EN
FR Le guide de l’utilisateur est disponible dans plusieurs autres langues
à l’adresse ci-dessous :
DE Unter der folgenden Adresse finden Sie das Benutzerhandbuch
in mehreren Sprachen:
ES Guía del usuario disponible en otros idiomas en la siguiente dirección:
IT
SE
Il manuale di istruzioni è disponibile in numerose altre lingue
al seguente indirizzo:
Bruksanvisningen finns på fler språk på:
NL
NO
CZ
Gebruikershandleiding in meer talen beschikbaar op de volgende website:
Brukerguide tilgjengelig på flere andre språk på:
Uživatelská příručka vdalších jazykových verzích je kdispozici na adrese:
PT
DA
PL
Guia do utilizador disponível em mais línguas em:
Brugervejledningen fås på flere sprog på:
Instrukcję obsługi dostępną w innych językach można znaleźć pod adresem:

45
https://smokealarm.netatmo.com
You can watch an installation video tutorial online at the following address:
EN
FR Une vidéo d’aide à l’installation est disponible à l’adresse ci-dessous :
DE Unter der folgenden Adresse können Sie ein Tutorial-Video zur Installation online anschauen:
ES Puedes ver un tutorial de instalación en línea en la siguiente dirección:
IT Guarda online il video tutorial sull’installazione del prodotto al seguente indirizzo:
NL U kunt een online installatievideo bekijken op de volgende website:
Read these instructions carefully before starting the installation.
The documentation provided with this product must be kept throughout
the product’s life time.
EN
FR Lire attentivement cette notice avant l’installation.
Conserver impérativement la documentation fournie avec ce produit pendant
toute sa durée de vie.
DE Lesen Sie diese Anleitung aufmerksam durch, bevor Sie mit der Installation beginnen.
Bewahren Sie die mit diesem Produkt mitgelieferte Dokumentation auf jeden Fall über
seine gesamte Lebensdauer auf.
ES Lee atentamente estas instrucciones antes de empezar la instalación.
Conservar toda la documentación entregada con el producto durante toda su vida útil.
IT Leggi attentamente le seguenti istruzioni prima di iniziare l’installazione.
Conservate obbligatoriamente la documentazione fornita con il prodotto per tutta
la sua durata di vita.
NL Lees de instructies aandachtig voor u begint met de installatie.
Bewaar de met het product meegeleverde documentatie tijdens de gehele
levensduur van het product.

67
Required tools .........................................................................................................................................12
Outils nécessaires
Erforderliches Werkzeug
Herramientas necesarias
Strumenti necessari
Benodigd gereedschap
Installation ............................................................................................................................................... 22
Installation
Installation
Instalación
Installazione
Installatie
Part 1 – Product installation
Pack contents ...........................................................................................................................................8
Dans le pack
Packungsinhalt
Contenido del paquete
Contenuto della confezione
Verpakkingsinhoud
Location advice .......................................................................................................................................14
Choix de l’emplacement
Bestimmen des Montageorts
Elección de ubicación
Scelta dell’ubicazione
Keuze van de montageplaats
Product overview ....................................................................................................................................10
Aperçu du produit
Produktübersicht
Descripción del producto
Descrizione prodotto
Productoverzicht

89
A B
CD
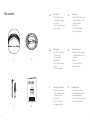
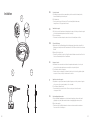
Pack contents:
A. One Smart Smoke Alarm
with built-in 10-year battery
B. One mount
C. Two screws and two anchors
D. One user guide
EN Dans le pack :
A. Un Détecteur de Fumée Connec-
té avec une batterie de 10 ans
d’autonomie intégrée
B. Un support
C. Deux vis et deux chevilles
D. Un guide de l’utilisateur
FR
DE ES
IT NL
Pack contents
smart smoke alarm
Packungsinhalt:
A. Ein Smarter Rauchmelder
mit eingebauter
10-Jahres-Batterie
B. Eine Halterung
C. Zwei Schrauben und zwei
Dübel
D. Ein Benutzerhandbuch
Contenido del paquete:
A. Un Detector de Humo Inteligente
con batería integrada de 10 años
de vida útil
B. Un soporte
C. Dos tornillos y dos tacos
D. Una guía del usuario
Contenuto della confezione:
A. Un Rilevatore Intelligente di
Fumo con batteria integrata
della durata di 10 anni
B. Un supporto
C. Due viti e due tasselli
D. Un manuale di istruzioni
Verpakkingsinhoud:
A. Een Intelligente Rookmelder
met ingebouwde 10-jaar batterij
B. Een bevestigingsplaatje
C. Twee schroeven en twee pluggen
D. Een gebruikershandleiding

10 11
Product overview:
A. Slot (for safe removal)
B. Smoke detection vents
C. Red and blue LEDs
D. Deactivation button – front
E. Alarm
EN Aperçu du produit :
A. Encoche (pour démontage)
B. Fentes de détection de fumée
C. LEDs rouge et bleue
D. Bouton désactivation – face avant
E. Alarme
FR
DE ES
IT NL
Product overview
Produktübersicht:
A. Schlitz (zum Entfernen)
B. Önungen zur
Raucherkennung
C. Rote und blaue LEDs
D. Knopf zum Stummschalten
- Vorderseite
E. Alarm
Descripción del producto:
A. Ranura (para un desmontaje seguro)
B. Rendijas de detección de humo
C. LEDs rojo y azul
D. Botón silenciador – área delantera
E. Alarma
Descrizione prodotto:
A. Incavo (per un corretto
smontaggio)
B. Fessure per la rilevazione
del fumo
C. LEDs rosso e blu
D. Pulsante silenziamento –
lato anteriore
E. Allarme
Productoverzicht:
A. Gleuf (voor veilige verwijdering)
B. Rookdetectiesleuven
C. Rode en blauwe LEDs
D. Stil-knop - voorzijde
E. Alarm
D
C
A
B
E

12 13
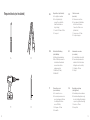
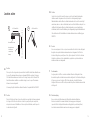
Required tools (not included)
A B
C
Required tools (not included):
A. One phillips screwdriver
B. One step ladder (only
required if you install the
Smart Smoke Alarm on
a high ceiling)
C. One drill – Ø5 mm or Ø0.2 in
D. One pencil
EN Outils nécessaires
(non inclus) :
A. Un tournevis cruciforme
B. Un escabeau (si l’installation
du Détecteur de Fumée
Connecté est faite sur un
plafond haut)
C. Une perceuse – Ø5 mm
D. Un crayon à papier
FR
DE ES
IT NL
D
Erforderliches Werkzeug
(nicht enthalten):
A. Ein Kreuzschraubendreher
B. Eine Trittleiter (nur wenn Sie
den Smarten Rauchmelder
an einer hohen Decke
anbringen wollen)
C. Ein Bohrer (Ø5 mm)
D. Ein Bleistift
Herramientas necesarias
(no incluidas):
A. Un destornillador de estrella
B. Una escalera (únicamente si
instalas el Detector de Humo
Inteligente en un techo alto)
C. Un taladro – Ø5 mm
D. Un lápiz
Strumenti necessari
(non in dotazione):
A. Un cacciavite a croce
B. Una scala (necessaria solo in
caso di montaggio del Rileva-
tore Intelligente di Fumo
su un sotto alto)
C. Un trapano – Ø5 mm
D. Una matita
Benodigd gereedschap
(niet bijgeleverd):
A. Een kruiskopschroevendraaier
B. Eén huishoudtrap (alleen nodig
als u de Intelligente Rookmelder
op een hoog plafond bevestigt)
C. Een boor – Ø5 mm
D. Een potlood

14 15
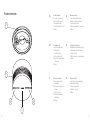
Location advice
Location
Install several Smart Smoke Alarms in your home to fully protect it. Installing one Smart Smoke
Alarm in every bedroom, children’s room and hallway is highly recommended. For maximum
protection, you should also install Smart Smoke Alarms in the living room, attic and basement.
EN
Emplacement
Équipez votre maison de plusieurs Détecteurs de Fumée Connectés pour être complètement
protégé. Il est recommandé d’installer un Détecteur de Fumée Connecté par couloir et par
chambre. Pour une protection optimale, vous pouvez installer un Détecteur de Fumée
Connecté supplémentaire dans le salon, dans le grenier et dans la cave.
FR
ES
IT
NL
DE
Highly
recommended
For maximum
protection
Not recommended
Fortement
recommandé
Pour une protection
optimale
Non recommandé
Unbedingt
empfohlen
Für maximalen
Schutz
Nicht
empfohlen
Altamente
recomendable
Para una
protección máxima
No recomendado
Altamente
consigliato
Per una protezione
ottimale
Non consigliato
Aanbevelingen Voor maximale
bescherming
Niet
aanbevolen
Anbringungsort
Installieren Sie mehrere Smarte Rauchmelder in Ihrem Haus, um für vollen Schutz zu sorgen.
Es wird unbedingt empfohlen, in jedem Schlafzimmer, in jedem Kinderzimmer und im Flur
einen Rauchmelder zu platzieren. Für maximalen Schutz sollten Sie weitere Smarte
Rauchmelder im Wohnzimmer, im Eingangsbereich und im Keller installieren.
Ubicación
Instala varios Detectores de Humo Inteligentes en tu hogar para protegerlo completamente.
Es muy recomendable instalar un Detector de Humo Inteligente en cada dormitorio,
en la habitación de los niños y en el pasillo. Para una mayor protección, también debes
instalar Detectores de Humo Inteligentes en el salón, ático y sótano.
Posizionamento
Installa vari Rilevatori Intelligenti di Fumo per proteggere in modo completo la tua abitazione.
Si consiglia vivamente di installare un Rilevatore Intelligente di Fumo in ogni camera da letto,
in camera dei bambini e in corridoio. Per una protezione ottimale, installare un Rilevatore
Intelligente di Fumo anche in salone, in sotta e in cantina.
Plaats bevestiging
Installeer meerdere Intelligente Rookmelders in uw woning om deze volledig te beschermen.
Wij raden u ten zeerste aan een Intelligente Rookmelder in elke slaapkamer, kinderkamer
en gang te plaatsen. Voor maximale bescherming kunt u ook een Intelligente Rookmelder
plaatsen in de woonkamer, op zolder en in de kelder.

16 17
Location advice
Caution : avoid false triggers
To avoid triggering the alarm unnecessarily, do not install the Smart Smoke Alarm:
• near an electronic ballast, a low voltage transformer, power-saving bulbs, fluorescent tubes
(minimum distance 50 cm or 19.69 in)
• near air vents
• in an excessively dusty room
• less than 6 m or 236.22 in from a fireplace or wood-burning stove
• in a room where cooking fumes or steam may trigger the alarm
• in a room where there may be condensation or damp
EN
Avertissement : éviter les fausses alertes
Afin d’éviter tout déclenchement intempestif de l’alarme, le Détecteur de Fumée Connecté
ne doit pas être placé:
• à proximité d’un ballast électronique, d’un transformateur basse tension, d’une ampoule
à économie d’énergie, ou d’un tube fluorescent (distance minimale de 50cm)
• à proximité d’une bouche d’aération
• dans une pièce trop poussiéreuse
• à moins de 6m d’une cheminée ou d’un poêle à bois
• dans une pièce où la fumée de cuisson et la vapeur d’eau risqueraient de déclencher l’alarme
• dans une pièce où il peut y avoir de la condensation ou de l’humidité
FR
ES
IT
NLDE Achtung: Vermeiden Sie Fehlalarme
Um Fehlalarme zu vermeiden, sollten Sie den Smarten Rauchmelder an folgenden Orten nicht installieren:
• In der Nähe elektronischer Vorschaltgeräte, Niederspannungstransformatoren, Energiesparlampen oder
Leuchtstoampen (mindestens 50 cm Abstand)
• In der Nähe von Belüftungsklappen
• In sehr staubigen Räumen
• In weniger als 6 m Entfernung von einem Kamin oder Holzofen
• In einem Raum, in dem Küchendünste oder Dampf den Alarm auslösen könnten
• In einem Raum, in dem es zu Kondensation oder Dampildung kommen könnte
Advertencia: evita falsas evita falsas alarmas
Con el fin de evitar que la alarma se active innecesariamente, no instales el Detector de Humo Inteligente:
• cerca de un balasto electrónico, un transformador de bajo voltaje, bombillas de ahorro energético
o fluorescentes (distancia mínima 50 cm)
• cerca de rejillas de ventilación
• en una habitación con demasiado polvo
• a menos de 6 m de una chimenea o de una estufa de leña
• en una habitación en la que el humo de la cocina y el vapor de agua activarían la alarma
• en una habitación en la que puede haber condensación o humedad
Attenzione: evitare false attivazioni dell’allarme
Per evitare false attivazioni non installare il Rilevatore Intelligente di Fumo:
• in prossimità di un alimentatore elettrico, un trasformatore a bassa tensione, una lampadina
a risparmio energetico o tubi al neon (distanza minima: 50 cm)
• in prossimità di prese d’aria
• in una stanza eccessivamente polverosa
• a meno di 6 m da un camino o da una stufa a legna
• in una stanza in cui i fumi della cucina e il vapore acqueo rischierebbero di attivare il rilevatore
• in una stanza in cui ci può essere condensa o umidità
Opgelet: vermijd vals alarm
Om te voorkomen dat het alarm onnodig wordt geactiveerd, plaatst u de Intelligente Rookmelder niet:
• in de buurt van een elektronische ballast, een laagspanningstransformator, spaarlampen,
tl-buizen (minimale afstand 50 cm)
• in de buurt van ventilatieroosters
• in een overmatig stoge ruimte
• op minder dan 6 m van een open haard of een houtkachel
• in een ruimte waar rook of stoom die ontstaan bij het koken, het alarm kunnen activeren
• in een ruimte waar mogelijk condenswater of waterdamp is

18 19
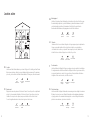
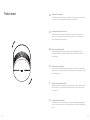
Location advice
Position
Pick a spot on the ceiling on which you would like to install the Smart Smoke Alarm. Be sure
to respect the minimum distances shown on diagram A. With the exception of Germany,
if the Smart Smoke Alarm cannot be fixed on the ceiling, it may be fixed to the wall. If the
Smart Smoke Alarm is installed on a cathedral ceiling, be sure to respect the minimum
distances shown on diagram B.
In Germany, fixing the Smart Smoke Alarm to the wall isn’t compliant with the DIN 14676.
EN
Position
Placez le Détecteur de Fumée Connecté au plafond en respectant les distances minimales
de la figureA. Si le Détecteur de Fumée Connecté ne peut pas être placé au plafond,
alors placez-le au mur. Si l’installation se fait sur un plafond cathédrale, veuillez respecter
les indications de la figureB.
FR
ES
IT
NL
DE
Recommended location
Acceptable location
for all European
countries except
Germany
d > 50 cm or 20 in
50 cm or 20 in > d > 40 cm or 16 in
d > 50 cm or 20 in
AB
Position
Suchen Sie sich eine Stelle an der Decke aus, an der Sie den Smarten Rauchmelder
installieren wollen. Vergewissern Sie sich, dass Sie die in Diagramm A gezeigten
Mindestabstände einhalten. Wenn der Smarte Rauchmelder nicht an der Decke befestigt
werden kann, kann er – außer in Deutschland, wo dies nicht den Richtlinien entspricht – an
der Wand befestigt werden. Wenn der Smarte Rauchmelder an einer Gewölbedecke
installiert wird, achten Sie auf die Einhaltung der in Diagramm B gezeigten Mindestabstände.
In Deutschland verstößt die Installation des Smarten Rauchmelders an der Wand gegen
DIN 14676.
Posición
Selecciona un lugar en el techo en el que deseas instalar el Detector de Humo Inteligente.
Asegúrate de respetar la distancia mínima mostrada en el diagrama A. Si el Detector
de Humo Inteligente no puede fijarse al techo, fíjalo en la pared. Si el Detector de Humo
Inteligente se instala en un techo abuhardillado, asegúrate de respetar las distancias
mínimas mostradas en el diagrama B.
Posizionamento
Scegli un punto del sotto in cui desideri installare il Rilevatore Intelligente di Fumo.
Assicurati di rispettare le distanze minime indicate nella figura A. Se il Rilevatore Intelligente
di Fumo non può essere fissato al sotto, fissalo alla parete. Se installi il Rilevatore
Intelligente di Fumo su un sotto a volta, assicurati di rispettare le distanze minime indicate
nella figura B.
Plaats bevestiging
Kies een plek op het plafond waar u de Intelligente Rookmelder wilt plaatsen.
Verzeker u ervan dat u de minimale afstanden, zoals aangegeven in diagram A,
respecteert. Als de Intelligente Rookmelder wordt geplaatst op een hellend plafond,
houd dan de minimale afstanden aan die worden aangegeven in diagram B.

20 21
Check Wi-Fi reception
Check your smartphone to make sure you have Wi-Fi reception where you have chosen
to install the Smart Smoke Alarm. If you do not, try to move your Wi-Fi router closer.
The Smart Smoke Alarm will detect smoke and will sound even if the Wi-Fi isn’t configured.
However, you will need Wi-Fi to receive smartphone alerts from your Smart Smoke Alarm
when you are away. Wi-Fi will be configured later in the app.
EN
Vérification du signal Wi-Fi
Vérifiez avec votre smartphone que l’endroit choisi pour l’installation du Détecteur de Fumée
Connecté bénéficie d’un signal Wi-Fi susant. Dans le cas contraire, essayez de rapprocher
votre routeur Wi-Fi. Veuillez noter que même si la connexion Wi-Fi n’est pas configurée,
le Détecteur de Fumée Connecté détectera la fumée et sonnera. Le Wi-Fi est nécessaire
pour recevoir les alertes de votre Détecteur de Fumée Connecté sur votre smartphone,
lorsque vous n’êtes pas chez vous. La configuration du Wi-Fi se fera dans l’app lors d’une
prochaine étape.
FR
ES
IT
NL
DE Prüfen Sie den WLAN-Empfang
Prüfen Sie auf Ihrem Smartphone, ob Sie WLAN-Empfang haben, wenn Sie den Smarten
Rauchmelder installieren wollen. Wenn Sie keinen Empfang haben, versuchen Sie den
Abstand zum Router zu verringern. Der Smarte Rauchmelder meldet Rauch auch dann,
wenn keine WLAN-Verbindung konfiguriert wurde. Sie brauchen die WLAN-Verbindung
aber, um die Meldungen des Smarten Rauchmelders empfangen zu können, wenn Sie
nicht zuhause sind. Das WLAN wird später in der app konfiguriert.
Comprobar la señal Wi-Fi
Comprueba con tu smartphone que el lugar que has elegido para instalar el Detector
de Humo Inteligente recibe la señal Wi-Fi. Si no es así, intenta acercar tu router del Wi-Fi.
El Detector de Humo Inteligente detectará el humo y sonará la alarma incluso si el Wi-Fi
no está configurado. Sin embargo, necesitarás Wi-Fi para recibir las alertas que envíe el
Detector de Humo Inteligente a tu smartphone cuando te encuentres fuera de casa. El
Wi-Fi se configurará posteriormente en la aplicación.
Verifica ricezione Wi-Fi
Verifica che il tuo smartphone riceva il segnale Wi-Fi nel luogo che hai scelto per installare
il Rilevatore Intelligente di Fumo. Se non è così, prova a spostare il router del Wi-Fi più
vicino. Il Rilevatore Intelligente di Fumo rileverà il fumo ed emetterà un suono anche se il
Wi-Fi non è configurato. Tuttavia, avrai bisogno del Wi-Fi per ricevere le notifiche sul tuo
smartphone dal tuo Rilevatore Intelligente di Fumo in caso di tua assenza. Il Wi-Fi verrà
configurato in seguito nell’app.
Controleer de Wi-Fi-ontvangst
Controleer op uw smartphone of u Wi-Fi-ontvangst heeft op de plaats waar u de Intelligente
Rookmelder wilt bevestigen. Heeft u geen ontvangst, plaats dan de Wi-Fi-router dichterbij.
De Intelligente Rookmelder zal rook detecteren en geluid maken, ook als de Wi-Fi niet
is geconfigureerd. U hebt echter Wi-Fi nodig om alerts op uw smartphone te ontvangen
als u niet thuis bent. De Wi-Fi wordt later in de app geconfigureerd.
Location advice

22 23
Installation Securing the mount
A. Following the previous location recommendations, place the mount in the relevant position,
then mark the two fi xing holes with a pencil.
B. Drill the two holes.
C. Insert one anchor in each of the two holes. Then insert and tighten the two screws,
leaving a 2 mm or 0.08 in gap below the heads.
EN
Installation du support
A. À l’aide des conseils d’emplacement contenus dans les pages précédentes, positionnez le support
à l’endroit adéquat et marquez deux trous à l’aide d’un crayon.
B. Percez les deux trous.
C. Insérez une cheville dans chaque trou, vissez les vis en les laissant dépasser de 2 mm.
FR
A
BC
DE Sichern der Halterung
A. Nachdem Sie die obigen Empfehlungen für den Anbringungsort gelesen haben, setzen Sie die
Halterung an die entsprechende Stelle und markieren Sie die Position der beiden Löcher mit einem
Bleistift.
B. Bohren Sie die beiden Löcher.
C. Stecken Sie einen Dübel in jedes Loch. Setzen Sie dann die Schrauben ein und ziehen Sie sie fest.
Unter den Schraubenköpfen sollten 2 mm Platz sein.
ES Asegurar el soporte
A. Atendiendo a las recomendaciones de ubicación expuestas anteriormente, coloca el soporte
en la posición adecuada, después marca con un lápiz los dos puntos de fi jación.
B. Con el taladro, realiza los dos agujeros.
C. Introduce un taco en cada agujero. A continuación, introduce los dos tornillos y ajústalos dejando
un espacio de 2 mm por debajo de las cabezas de los tornillos.
IT Installazione sicura del supporto
A. Rispettando i consigli sul posizionamento riportati nelle pagine precedenti, posizionare il supporto
nel luogo prescelto e segnare due punti per i fori con la matita.
B. Con il trapano, e ettuare due fori.
C. Inserire un tassello in ognuno dei due fori. Poi inserire e stringere le due viti, lasciando
che sporgano di 2 mm.
NL Het bevestigingsplaatje monteren
A. Volg bovenstaande aanwijzingen voor de plaats van de bevestiging, positioneer het bevesti-
gingsplaatje op de juiste plaats en markeer de twee bevestigingsgaatjes met een potlood.
B. Boor de twee gaatjes.
C. Plaats een plug in elk gat. Plaats daarna de schroeven en draai ze aan. Laat een ruimte van
2 mm over onder de schroe oppen.

24 25
Securing the mount
D. Align the holes of the mount with the screws on the ceiling.
E. Slide the mount to the right.
F. Turn the mount counterclockwise to the marked line.
G. Finish tightening the two screws in order to secure the mount.
EN
Installation du support
D. Alignez les trous du support aux vis placées au plafond.
E. Faites coulisser le support vers la droite.
F. Tournez le support dans le sens inverse des aiguilles d’une montre
jusqu’à la ligne marquée.
G. Terminez de visser les deux vis pour fi xer le support.
FR
DE
G
F
Installation
DE Sichern der Halterung
D. Bringen Sie die Löcher der Halterung auf eine Linie mit den Schrauben.
E. Schieben Sie die Halterung nach rechts.
F. Drehen Sie die Halterung gegen den Uhrzeigersinn, bis zur markierten Linie.
G. Ziehen Sie die beiden Schrauben fest, um die Halterung zu sichern.
ES Asegurar el soporte
D. Alinea los agujeros del soporte con los tornillos en el techo.
E. Desliza el soporte hacia la derecha.
F. Gira el soporte en el sentido contrario a las agujas del reloj hasta la línea marcada.
G. Termina de ajustar los dos tornillos para asegurar el soporte.
IT Installazione sicura del supporto
D. Allineare i fori del supporto alle viti sul so tto.
E. Spostare lateralmente il supporto verso destra.
F. Ruotare il supporto in senso antiorario fi no alla linea di riferimento.
G. Terminare di stringere le due viti per garantire che l’installazione del supporto sia pienamente sicura.
NL Het bevestigingsplaatje monteren
D. Zorg ervoor dat de gaten van het bevestigingsplaatje precies boven de schroeven
in het plafond zijn.
E. Schuif het bevestigingsplaatje naar de rechterkant.
F. Draai de steun tegen de richting van de klok in tot de gemarkeerde lijn.
G. Tot slot draait u de schroeven aan, zodat het bevestigingsplaatje wordt bevestigd.

26 27
Installation Powering on
H. Install the Smart Smoke Alarm on the mount by aligning the marks on it with the Smart Smoke Alarm.
I. Turn the Smart Smoke Alarm clockwise in order to lock the assembly.
Once the assembly is locked, the red and the blue LEDs will light up alternatively. After several seconds,
the red LED will flash every 10 seconds to indicate that the Smart Smoke Alarm is working correctly.
EN
Mise sous tension
H. Installez le Détecteur de Fumée Connecté sur le support en alignant les marques de ce dernier
avec le Détecteur de Fumée Connecté.
I. Tournez ensuite le Détecteur de Fumée Connecté dans le sens des aiguilles d’une montre
pour le fixer sur le support.
Une fois fixé, les LEDs rouge et bleue s’allumeront alternativement. Après quelques secondes, la LED rouge
clignotera toutes les 10 secondes pour indiquer le bon fonctionnement du Détecteur de Fumée Connecté.
FR
DE Einschalten
H. Bauen Sie den Smarten Rauchmelder in die Halterung ein und achten Sie dabei darauf, dass
die Montagemarkierungen der Halterung bündig zum Smarten Rauchmelder ausgerichtet sind.
I. Drehen Sie den Smarten Rauchmelder gegen den Uhrzeigersinn, um ihn zu fixieren.
15 Sekunden lang blickt die rote LED kurz auf. Danach blinkt sie alle 10 Sekunden, was den
korrekten Betrieb des Smarten Rauchmelders anzeigt.
ES Encendido
H. Instala el Detector de Humo Inteligente alineando las marcas presentes en el soporte con
el Detector de Humo Inteligente.
I. Gira el Detector de Humo Inteligente en el sentido de las agujas del reloj para bloquear el montaje.
Una vez que el montaje se ha bloqueado, los leds rojo y azul se pondrán a parpadear. Tras unos
segundos, el led rojo parpadeará cada diez segundos para indicar que el detector de humo está
funcionando correctamente.
IT Messa in funzione
H. Installa il Rilevatore Intelligente di Fumo sul supporto, allineandolo correttamente.
I. Ruotare il Rilevatore Intelligente di Fumo in senso orario per fissarlo al supporto.
Una volta bloccato il gruppo, il LED rosso e il LED blu si accendono alternativamente. Dopo alcuni
secondi, il LED rosso lampeggerà ogni 10 secondi per indicare che il Rilevatore intelligente di fumo
funziona correttamente.
NL Inschakelen
H. Om de Intelligente Rookmelder op het bevestigingsplaatje te installeren, lijnt u de markeringen
van het bevestigingsplaatje uit de Intelligente Rookmelder.
I. Als het gemonteerde apparaat wordt gesloten, zullen de rode en de blauwe led afwisselend
oplichten. Na een paar seconden zal de rode led om de 10 seconden knipperen om aan te geven dat
het Smart Smoke Alarm correct werkt.
IH

28 29
Netatmo
INSTALL
Netatmo Security
Installation Download the App and follow the instructions
To set up and control your Smart Smoke Alarm from your smartphone or tablet,
please download the app.
EN
Téléchargez l’App et suivez les instructions
Pour configurer et contrôler votre Détecteur de Fumée Connecté depuis votre
smartphone ou depuis votre tablette, téléchargez l’app.
FR
DE Laden Sie die App herunter und befolgen Sie die Anweisungen
Um Ihren Smarten Rauchmelder von Ihrem Smartphone oder Tablet aus
zu konfigurieren und zu steuern, laden Sie die app herunter.
ES Descárgate la Aplicación y sigue las instrucciones
Para configurar y controlar tu Detector de Humo Inteligente desde tu smartphone
o tableta, descárgate la aplicación.
IT Scarica l’App e segui le istruzioni
Per configurare e controllare il tuo Rilevatore Intelligente di Fumo dal tuo
smartphone o tablet, scarica l’app.
NL Download de App en volg de instructies
Om uw Intelligente Rookmelder in te stellen en te bedienen vanaf uw smartphone
of tablet, downloadt u de app.
netatmo security
https://smokealarm.netatmo.com/app

30 31
Fault indicators .......................................................................................................................................36
Signalisation des défauts
Fehlermeldungen
Indicadores de fallos
Spie guasti
Storingsindicatoren
Successful installation Part 2 - Product use and maintenance
Your Smart Smoke Alarm has been installed successfully.
Enjoy a safer home!
EN
Votre Détecteur de Fumée Connecté a bien été installé.
Profitez d’une maison plus sûre !
FR
DE Ihr Smarter Rauchmelder wurde installiert.
Ihr Haus ist jetzt sicherer!
ES Tu Detector de Humo Inteligente ha sido instalado con éxito.
¡Disfruta de un hogar más seguro!
IT Il tuo Rilevatore Intelligente di Fumo è stato installato correttamente.
Goditi una casa più sicura!
NL Uw Intelligente Rookmelder is succesvol geïnstalleerd.
Geniet van een veiliger huis!
Manual testing and silencing .............................................................................................................32
Test et désactivation manuels
Test und manuelle Stummschaltung
Prueba e silenciamiento manual
Test e silenziamento manuale
Handmatig testen en uitzetten
Product removal .....................................................................................................................................34
Démontage du produit
Produkt Demontage
Desmontaje del producto
Smontaggio del prodotto
Product verwijderen

32 33
Manual testing and silencing
Testing the Smart Smoke Alarm
Press the front of the Smart Smoke Alarm until it beeps twice. Then release it to trigger the alarm.
Press the front again to turn o the alarm. The manual test should be carried out once a year.
EN
Test du Détecteur de Fumée Connecté
Appuyez sur la face avant du Détecteur de Fumée Connecté jusqu’au second bip, puis relâchez pour
déclencher l’alarme. Pour arrêter l’alarme, appuyez sur la face avant du Détecteur de Fumée Connecté.
Le test est à réaliser une fois par an.
FR
Turning o the alarm
Pressing the front of the Smart Smoke Alarm will deactivate the alarm for 15 minutes, during which time
the alarm will not sound even if it detects smoke. The red LED will blink every 2 seconds.
EN
Arrêt de l’alarme
Un appui sur la face avant du Détecteur de Fumée Connecté va désactiver celui-ci pour 15minutes.
L’alarme ne se déclenchera pas pendant cette période, même si de la fumée est détectée. La LED rouge
clignotera toutes les 2secondes.
FR
DE Testen des Smarten Rauchmelders
Drücken Sie die Frontpartie des Smarten Rauchmelders, bis er zweimal piept. Lassen Sie dann los, um den
Alarm auszulösen. Drücken Sie die Frontpartie noch einmal, um den Alarm abzustellen. Der manuelle Test
sollte einmal im Jahr durchgeführt werden.
ES Comprobar el Detector de Humo Inteligente
Presiona la parte frontal del Detector de Humo Inteligente hasta que emita un doble pitido. Luego suelta
para activar la alarma. Presiona la parte frontal una vez más para desconectar la alarma.
La comprobación manual debe llevarse a cabo una vez al año.
IT Test del Rilevatore Intelligente di Fumo
Premere la parte anteriore del Rilevatore Intelligente di Fumo fino a quando non emette un doppio bip,
poi rilasciare per attivare il rilevatore. Per fermare la suoneria, premere nuovamente la parte anteriore
del Rilevatore Intelligente di Fumo. Il test manuale deve essere eettuato una volta all’anno.
NL De Intelligente Rookmelder testen
Druk de voorkant van de Intelligente Rookmelder aan, totdat het alarm twee keer piept. Laat het dan los
om het alarm te activeren. Druk de voorkant opnieuw aan om het alarm uit te schakelen. De handmatige
test dient twee keer per jaar te worden uitgevoerd.
DE Deaktivieren des Alarms
Wenn Sie die Frontpartie des Smarten Rauchmelders drücken, wird der Alarm für 15 Minuten deaktiviert.
In dieser Zeit wird der Alarm auch dann nicht ausgelöst, wenn er während der Stummschaltung Rauch
entdeckt. Die LED blinkt in diesem Fall alle 2 Sekunden.
ES Apagar la alarma
Al presionar la parte frontal del Detector de Humo Inteligente se desactivará la alarma durante 15 minutos,
durante este tiempo la alarma no sonará aunque detecte humo. El LED rojo parpadeará cada 2 segundos.
IT Arresto del rilevatore
Premendo la parte anteriore del Rilevatore Intelligente di Fumo, quest’ultimo verrà disattivato per 15 minuti.
Durante questo periodo di tempo il rilevatore non emetterà suoni anche se rileverà del fumo. Il LED rosso
lampeggerà ogni 2 secondi.
NL Het alarm uitschakelen
Als u op de voorzijde van de Intelligente Rookmelder drukt, schakelt u het alarm uit gedurende 15 minuten.
Gedurende die 15 minuten zal het alarm niet afgaan, ook al detecteert het rook. Het rode LED-lampje zal elke
2 seconden oplichten.

34 35
Product removal Removing the Smart Smoke Alarm
The Smart Smoke Alarm should be replaced every 10 years. The replacement date is shown on the back
of the product. To remove the Smart Smoke Alarm, turn the device anti-clockwise.
EN
Démontage du Détecteur de Fumée Connecté
Le Détecteur de Fumée Connecté doit être remplacé tous les 10ans. La date de remplacement est
indiquée à l’arrière du produit. Pour désinstaller le Détecteur de Fumée Connecté, tournez l’appareil
dans le sens inverse des aiguilles d’une montre.
FR
DE
ES
IT
NL
Entfernen des Smarten Rauchmelders
Der Smarte Rauchmelder sollte alle 10 Jahre ersetzt werden. Das Ersetzungsdatum finden Sie auf
der Rückseite des Produkts. Um den Smarten Rauchmelder zu entfernen, drehen Sie das Gerät gegen
den Uhrzeigersinn.
Quitar el Detector de Humo Inteligente
El Detector de Humo Inteligente debe sustituirse cada 10 años. La fecha de sustitución está indicada en
la parte posterior del producto. Para quitar el Detector de Humo Inteligente, gira el dispositivo en el sentido
contrario a las agujas del reloj.
Rimozione del Rilevatore Intelligente di Fumo
Il Rilevatore Intelligente di Fumo dovrebbe essere sostituito ogni 10 anni. La data di sostituzione è indicata
sulla parte posteriore del prodotto. Per rimuovere il Rilevatore Intelligente di Fumo, ruotare il dispositivo
in senso antiorario.
De Intelligente Rookmelder verwijderen
De Intelligente Rookmelder moet elke 10 jaar worden vervangen. De vervangingsdatum wordt aangege-
ven op de achterzijde van het product. Om de Intelligente Rookmelder te verwijderen, het apparaat tegen
de klok in.

36 37
Fault indicators
EN
FR
DE
ES
IT
NL
It is essential to carry out regular detector maintenance. Dust in the detection vents must be vacuumed at least once a year
or every time you receive a dust detection notification.
If the Smart Smoke Alarm continues to report about dust clogging problems even after vacuuming the vents, replace it by a new one
as soon as possible.
Fault indicators
L’entretien régulier du détecteur est d’une importance essentielle. les fentes de détection de fumée doivent être dépoussiérées
à l’aide d’un aspirateur au moins une fois par an ou à chaque signalisation de capteur de fumée encrassé.
Si le Détecteur de Fumée Connecté signale toujours un problème d’encrassement suite au nettoyage, remplacez-le dès
que possible par un nouveau.
Signalisation des défauts
Die regelmäßige Wartung des Melders ist sehr wichtig. Die Önungen des Detektionskopfs müssen mindestens einmal jährlich bzw.
bei jedem Alarm wegen verschmutztem Detektionskopf mit einem Tuch gereinigt werden.
Wenn der Smarte Rauchmelder auch nach dem Aussaugen der Önungen weiterhin Verschmutzung durch Staub meldet, ersetzen Sie
ihn so schnell wie möglich durch ein neues Gerät.
Fehlermeldungen
El mantenimiento regular del detector tiene una importancia esencial. Las rendijas del cabezal de detección deben limpiarse
de polvo con un aspirador al menos una vez al año o cuando se detecte suciedad en el cabezal detector.
Si el Detector de Humo Inteligente continúa señalando problemas de obstrucción a causa del polvo, incluso después de haber
pasado la aspiradora sobre las rendijas del dispositivo, sustitúyelo por uno nuevo tan pronto como sea posible.
Indicadores de fallos
La manutenzione regolare del sensore è di un’importanza fondamentale. Le fessure sulla testina del sensore devono essere
spolverate con un aspirapolvere almeno una volta all’anno oppure ogni volta che la testina del sensore è indicata come sporca.
Se il Rilevatore Intelligente di Fumo continua a segnalare un problema di ostruzione a causa della polvere anche dopo
l’aspirazione delle fessure, sostituirlo con uno nuovo appena possibile.
Spie guasti
Het regelmatig onderhouden van de rookmelder is uiterst belangrijk. De sleuven van de detectiekop moet u minstens één keer
per jaar of bij elke signalering “detectiekop vuil” met een stofzuiger reinigen.
Bij aanhoudende meldingen van de Intelligente Rookmelder dat er stofophopingen zijn, ook na het stofzuigen van de sleuven
bovenop het apparaat, kunt u het apparaat het best zo snel mogelijk vervangen door een nieuw toestel.
Storingsindicatoren
Indicator Issue Solution
2 rapid beeps every 60 sec Battery low Replace by a new
Smart Smoke Alarm
2 red LED flashes every 5 sec
8 rapid beeps every 60 sec Smoke sensor dirty Vacuum the Smart Smoke Alarm’s
vents
8 red LED flashes every 8 sec
Indicador Problema Solución
2 pitidos rápidos cada 60 segundos
Batería baja Sustituir por un nuevo Detector
de Humo Inteligente
2 destellos del LED rojo
cada 5 segundos
8 pitidos rápidos cada 60 segundos
Sensor de humos sucio Pasar la aspiradora sobre las rendijas
del Detector de Humo Inteligente
8 destellos del LED rojo
cada 8 segundos
Spia Problema Soluzione
2 bip rapidi ogni 60 secondi
Batteria quasi scarica Sostituire con un nuovo Rilevatore
Intelligente di Fumo
2 lampeggiamenti del LED rosso
ogni 5 secondi
8 bip rapidi ogni 60 secondi
Sensore fumo sporco Passare un aspirapolvere sulle fessure
del Rilevatore Intelligente di Fumo
8 lampeggiamenti del LED rosso
ogni 8 secondi
Indicatoren Probleem Oplossing
2 snelle piepjes elke 5 seconden
Batterij bijna leeg Vervangen door een nieuwe
Intelligente Rookmelder
Het rode LED-lampje knippert
elke 5 seconden 2 keer
8 snelle piepjes elke 60 seconden
Rooksensor vuil De sleuven bovenop de Intelligente
Rookmelder stofzuigen
Het rode LED-lampje knippert
elke 8 seconden 8 keer
Signalisation Problème Solution
2 bips rapides toutes les 60 sec
Batterie faible Remplacez-le par un nouveau
Détecteur de Fumée Connecté
2 clignotements rouges
toutes les 5 sec
8 bips rapides toutes les 60 sec Capteur de fumée encrassé Aspirez au niveau des fentes
de détection de fumée
8 clignotements rouges toutes 8 sec
Meldung Problem Lösung
2 x schnelles Piepen alle 60 Sekunden
Batteriestand niedrig Ersetzen Sie den Smarten
Rauchmelder
2 x kurzes Aufleuchten der roten LED
alle 5 Sekunden
8 x schnelles Piepen alle 60 Sekunden
Rauchsensor verschmutzt Saugen Sie die Önungen oben
am Smarten Rauchmelder frei
8 x kurzes Aufleuchten der roten LED
alle 8 Sekunden

38 39
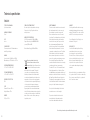
Technical specification
ENGLISH
TYPE OF SMOKE ALARM
Optical smoke alarm
AVERAGE COVERAGE
50 m
USE
Indoor
POWER SUPPLY
Two non-replaceable 3 V lithium batteries
with a 10-year lifespan
ALARM
Upon detection : 85 dB at 3 m or 118.11 in
Manual test : up to 75 dB at 1 m or 39.37 in
OPERATING TEMPERATURE
-10°C to 65°C or 14°F to 149°F
STORAGE TEMPERATURE
-20°C to 45°C or -4°F to 113°F
DEGREE OF PROTECTION
IP30
SIZE
Diameter: 120 mm or 4.72 in
Height: 44 mm or 1.73 in
WEIGHT
255 g or 0.55 lb
FREE APP, LIFETIME SUPPORT
No subscription fee. App available on the App
Store and on Google Play. Accessible from
multiple devices
WIRELESS SPECIFICATIONS
802.11 b/g/n compatible (2.4GHz ±10MHz).
Supported security: Open/WEP/WPA/ WPA2-
personal (TKIP and AES)
Bluetooth Low Energy (2.4GHz ±0.5MHz)
Disposing of waste electrical and
electronic devices at the end of their
service life (Applicable in European Union
countries and other European countries
with a waste collection system). This symbol
on products or product packaging indicates
that the product must not be thrown out with
normal household waste. It must be taken to an
appropriate collection point for recycling waste
electrical and electronic equipment. By disposing
of such products in the appropriate manner,
you are helping to prevent any harmful eects
they may have on the environment and human
health. For further information about recycling this
product, you should consult your local authorities,
waste collection centre or the shop where you
bought the product.
SAFETY WARNINGS
This device must be installed in accordance with
the latest standards and is for indoor use only.
Do not attempt to repair the device yourself.
Please contact customer service in the event
of problems. Do not attempt to access the Smart
Smoke Alarm’s internal parts, other than those
described in this user guide. Doing so will void
the product warranty and Netatmo shall not
be liable for any problems. Touching the Smart
Smoke Alarm’s internal parts and/or electronic
components can damage the product. The Smart
Smoke Alarm is designed in such a way that
these parts and components do not need to be
accessed for operation or maintenance purposes.
Do not paint the Smart Smoke Alarm. Please
remove the Smart Smoke Alarm before decorating
or making any other home improvements.
The radius of 50 cm or 0.02 in around the Smart
Smoke Alarm must be free of obstacles. Please
note that Netatmo cannot guarantee the latency of
smartphone or tablet alerts if smoke is detected by
the Smart Smoke Alarm. Life span for typical use.
The battery’s life span may vary based on the use
of the Smart Smoke Alarm. For further information,
please go to: https://netatmo.com/usage/nsd
Do not place the lithium battery of the detector
near a heat source or in direct sunlight.
To prevent accidents, the detector must be
securely attached to the mounting surface
in accordance with installation instructions.
HOMEKIT
Controlling this HomeKit-enabled accessory
automatically and away from home requires
an Apple TV with tvOS 10.x or later or an iPad
with iOS 10.x or later set up as a home hub.
Google Play and the Google Play logo are
trademarks of Google Inc.
LEGAL NOTICE
Use of the Works with Apple HomeKit logo
means that an electronic accessory has
been designed to connect specifically to
iPod touch, iPhone, or iPad, respectively, and
has been certified by the developer to meet
Apple performance standards. Apple is not
responsible for the operation of this device
or its compliance with safety and regulatory
standards.
Apple and the Apple logo are trademarks of Apple
Inc., registered in the U.S. and other countries. App
Store is a service mark of Apple Inc., registered in
the U.S. and other countries.
Non-binding document, may be modified without prior notice.
La pagina si sta caricando...
La pagina si sta caricando...
La pagina si sta caricando...
La pagina si sta caricando...
La pagina si sta caricando...
La pagina si sta caricando...
La pagina si sta caricando...
La pagina si sta caricando...
La pagina si sta caricando...
-
 1
1
-
 2
2
-
 3
3
-
 4
4
-
 5
5
-
 6
6
-
 7
7
-
 8
8
-
 9
9
-
 10
10
-
 11
11
-
 12
12
-
 13
13
-
 14
14
-
 15
15
-
 16
16
-
 17
17
-
 18
18
-
 19
19
-
 20
20
-
 21
21
-
 22
22
-
 23
23
-
 24
24
-
 25
25
-
 26
26
-
 27
27
-
 28
28
-
 29
29


Netatmo Smart Smoke Alarm Manuale utente
- Categoria
- Componenti del dispositivo di sicurezza
- Tipo
- Manuale utente
in altre lingue
- français: Netatmo Smart Smoke Alarm Manuel utilisateur
- español: Netatmo Smart Smoke Alarm Manual de usuario
- Deutsch: Netatmo Smart Smoke Alarm Benutzerhandbuch
- Nederlands: Netatmo Smart Smoke Alarm Handleiding
Documenti correlati
Altri documenti
-
 SCS Sentinel SDA0042 Manuale del proprietario
-
Marmitek SD90 Manuale utente
-
Trust ZSDR-850 Manuale utente
-
Gigaset Elementary Pack ONE X Manuale utente
-
Marmitek SD833 Manuale utente
-
Otio 520045 Manuale del proprietario
-
Profile Lithium PSE 515 Manuale utente
-
Abus HSRM30000 Manuale utente
-
Brennenstuhl BR 5232 Istruzioni per l'uso
