Progress PHN1220X Manuale utente
- Categoria
- Piani cottura
- Tipo
- Manuale utente

user manual
istruzioni per l’uso
manual de instrucciones
Built-under oven
Forno da incasso
Horno empotrado
PHN 1220

Contents
Safety information 2
Product description 3
Before first use 5
Operation 6
Tips and cooking tables 7
Care and cleaning 11
What to do if… 15
Technical Data 15
Installation 16
Disposal 18
Subject to change without notice
Safety information
Always keep these user instructions
with the appliance. Should the appliance
be passed on to third persons or sold, or
if you leave this appliance behind when
you move house, it is very important that
the new user has access to these user
instructions and the accompanying in-
formation.
These warnings are provided for the
safety of users and co-residents. So
read them carefully before connecting
and/or using the appliance.
Installation
• The installation must be performed by a
qualified person in accordance with the
rules and regulations in force. The individ-
ual operations for installing the appliance
are described under the instructions for
the installer.
• Have the appliance installed and connec-
ted by a qualified person with specialist
knowledge, who will carry it out in accord-
ance with the directives
• If any modifications to the power supply
are required because of the installation,
these should also be carried out by a quali-
fied electrician.
• Depending on the version, this oven has
been manufactured as a single appliance
or as a combination appliance with electric
hotplate for connection to 1, 2 or 3 phases
(without groups) of a 230V supply. Con-
nection to multiple phases without a neu-
tral (400V) will lead to destruction of the
oven and the connected hotplates.
Operation
• This oven is intended for cooking food;
never use it for other purposes.
• Be very careful when using the oven. The
extreme heat of the heating elements
makes the shelves and other parts very hot
• If you should for whatever reason use alu-
minium foil to cook food in the oven, never
allow it to come into direct contact with the
floor of the oven.
• When cleaning the oven, proceed with
care: never spray anything onto the grease
filter (if fitted), the heating elements or the
thermostat sensor.
• It is dangerous to make any types of mod-
ifications to this appliance itself or its char-
acteristics.
• During the baking, roasting and grilling
process, the oven window and the other
parts of the appliance get hot. Therefore,
children should be kept away from the ap-
pliance. When connecting electrical appli-
ances to sockets near the oven, take care
that cables do not come into contact with
hot rings or get caught in the oven door.
• Always use oven gloves to take hot oven-
proof dishes or pots out of the oven.
• Regular cleaning prevents the surface ma-
terial from deteriorating.
• Before cleaning the oven, either turn the
power off or pull the mains plug out.
• Make sure that the oven is in the “OFF”
position, when the oven is no longer being
used.
• The appliance must not be cleaned with a
superheated steam cleaner or a steam jet
cleaner.
• Do not use abrasive cleaners or sharp met-
al scrapers. These can scratch the glass in
the oven door, which may result in the
shattering of the glass.
2 progress

Personal safety
• This appliance is intended for use by
adults. It is dangerous to allow children to
use it or play with it.
• Children should be kept away while the
oven is working. Even after you have
switched the oven off, the door remains
hot for a long time.
• This appliance is not intended for use by
children or other persons whose physical,
sensory or mental capabilities or lack of
experience and knowledge prevents them
from using the appliance safely without su-
pervision or instruction by a responsible
person to ensure that they can use the ap-
pliance safely.
Customer service
• Have checks and/or repairs carried out by
the manufacturer’s service department or
by a service department authorised by the
manufacturer and use only original spare
parts.
• Do not attempt to repair the appliance
yourself in the event of malfunctions or
damage. Repairs carried out by untrained
persons may cause damage or injury.
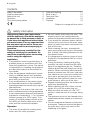
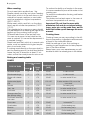
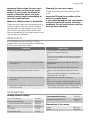
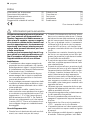
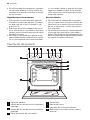
Product description
1
10
11
12
2 53 4
6 987
13
1 Control panel
2 Knob for front left hob
3 Knob for back left hob
4 Temperature control - control indicator
5 Temperature controller
6 Oven controller
7 Power indicator
8 Knob for back right hob
9 Knob for front right hob
10 Air Vents for Cooling Fan
11 Grill
12 Interior light
13 Rating Plate
progress 3

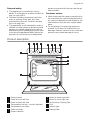
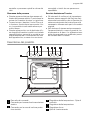
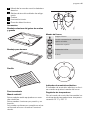
Accessories
Dripping pan
Baking tray
Oven shelf
Operation
Retractable knob
This model is equipped with retractable
knobs.
These control knobs function according to
the push-pull system.
They can be fully retracted when the oven is
not in use.
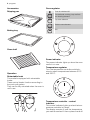
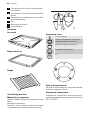
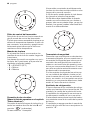
Oven regulator
Oven is switched off.
Conventional cooking -top and bot-
tom heating element
Top oven element
Bottom oven element
Grill
Power indicator
The power indicator lights up when the oven
control is in use.
Temperature regulator
Turn the temperature controller anticlock-
wise to select temperatures between 50°C
and 250°C.
Temperature controller - control
indicator
This control indicator lights up when the tem-
perature controller is turned.
The display remains lit until the temperature
you want is reached. It then cycles on and off
4 progress

to indicate that the temperature is being
maintained.
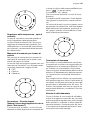
Control knobs for hob
The selector knobs for the four hob heating
elements are located on the switch panel.
The hotplates are controlled by a 9- position
switch, from which the following working lev-
els can be used:
–
0 = OFF
–
1 = Minimum
– 9 = Maximum
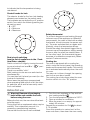
Dual-circuit switching
(see the list of appliances in the «Tech-
nical Data» chapter)
Switch on both hot rings by turning the cook-
ing zone knobs from level 9 to “
” posi-
tion (clockwise);
There is an audible “click”.
Both heating circuits are now switched on
simultaneously.
You can then set the level you want (turn the
knob anti-clockwise).
Never leave the appliance unsupervised
when preparing food with oil or fat, like chips,
for example, as oil and fat can easily catch
fire if overheated.
Safety thermostat
To prevent dangerous overheating (through
incorrect use of the appliance or defective
components), the oven is fitted with a safety
thermostat, which interrupts the power sup-
ply. The oven switches back on again auto-
matically, when the temperature drops.
Should the safety thermostat trigger due to
incorrect use of the appliance, simply remedy
the error after the oven has cooled down. If,
on the other hand, the thermostat triggers
because of a defective component, please
contact Customer service.
Cooling fan
The oven is equipped with a cooling fan,
which cools the control panel, the operating
knobs and the oven door handle. The cooling
fan is activated automatically when the oven
is in use.
The warm air is blown through the opening
next to the oven door handle.
The cooling fan shuts down when the oven
function switch is in the " 0 " position.
Before first use
Warning! Remove all packaging,
both inside and outside the oven,
before using the oven.
Before the first use, the oven should be heat-
ed while empty.
During this time, an unpleasant odour may be
emitted. This is absolutely normal. It is
caused by manufacturing residues.
Ensure that the kitchen is well ventilated.
1. Turn the oven regulator to Top and bot-
tom heating element
2. Turn the temperature regulator to 250°C.
3. Open a window for ventilation.
4. Allow the oven to run empty for approxi-
mately 45 minutes.
Repeat the procedure for Grill
for about
5-10 minutes.
Once this operation is carried out, let the
oven cool down, then clean the oven cavity
progress 5

with a soft cloth soaked in warm soapy wa-
ter.
Before cooking for the first time, carefully
wash the oven accessories as well.
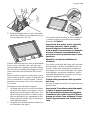
To open the oven door, always hold the han-
dle in the centre, until it is fully open.
Operation
Using the oven
Important! Do not lay aluminium foil, or
place baking trays, etc. on the oven floor, as
the heat built up will damage the oven
surface enamel. Always place pans and pots,
ovenproof pans and pots as well as
aluminium trays on the shelf which has been
inserted in the shelf runners. When food is
heated, steam is created, similar to a kettle.
When the steam comes into contact with the
glass in the oven door, it condenses and
creates water droplets.
To reduce condensation, always pre-
heat the empty oven for 10 minutes.
We recommend you wipe the water droplets
away after every cooking process.
Important! Always cook with the oven
door closed.
Always open the oven door carefully. Do not
allow the door to ”fall open”, support the
door using the door handle, until it is fully
open
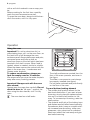
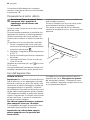
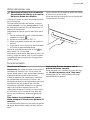
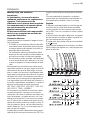
The oven has four shelf levels.
The shelf positions are counted from the
floor of the oven upwards, as shown in
the figure.
The slide-in components must always
be properly inserted (see figure).
Do not place cookware and pots directly
on the floor of the oven.
Top and bottom heating element
– The middle shelf position allows for the
best heat distribution. If you want a base
browning, simply place the cakes and pas-
tries on to a lower shelf position in the
oven. To increase top browning, raise the
shelf position.
– The material and finish of the baking trays
and dishes used will affect base browning.
Enamelware, dark, heavy or nonstick uten-
sils increase base browning, while oven
glassware, shiny aluminium or polished
steel trays reflect the heat away and give
less base browning.
6 progress

– Always place dishes centrally on the shelf
to ensure even browning.
– Stand dishes on suitably sized baking
trays to prevent spillage onto the base of
the oven and make cleaning easier.
–
Do not place dishes, tins or baking
trays directly on the oven base as it be-
comes very hot and damage will occur.
When using this setting, heat comes from
both the top and bottom elements. This
allows you to cook on a single level. This is
particularly suitable for dishes which re-
quire extra base browning such as, e. g.
quiches and flans.
Gratins, lasagne and hotpots which require
extra top browning also cook well in the con-
ventional oven.
How to use heat from above and below:
1. Turn the oven controller to the function
you want
2. Turn the temperature control to the tem-
perature you want.
Bottom oven element
This function is particularly useful when bak-
ing cakes and pastry bases as well as finish-
ing off quiches or flans, to ensure that the
quiche or pastry base is cooked through.
The temperature controller’s lamp lights
up until the correct temperature is
reached. It then cycles on and off to in-
dicate that the temperature is being
maintained.
Top oven element
Use this function to brown off cooked dishes,
such as lasagnes or cauliflower cheese.
Grilling
– Most foods should be placed on the grid
in the grill pan to allow maximum circula-
tion of air and to lift the food out of the fats
or juices. If preferred, foods such as, e. g.
fish, liver and kidneys may be placed di-
rectly on the grill pan.
– Food should be thoroughly dried before
grilling to minimise splashing. Brush lean
meats and fish lightly with a little oil or mel-
ted butter to keep them moist during cook-
ing.
– Accompaniments such, e. g. tomatoes
and mushrooms may be placed under-
neath the grid when grilling meats.
– When toasting bread, we suggest that the
top runner position is used.
– The food should be turned over during
cooking, as required.
Using the grill
The grill causes direct heat to gather quickly
in the middle of the grill pan. For best results,
grill food in small quantities. Energy can also
be saved in this way.
1. Turn the oven control in order to turn on
the oven
2. Turn the temperature control to the tem-
perature you want.
3. Choose the suitable shelf for the grill pan
and grill according to whether or not the
food to be grilled is thick or thin. Follow
the instructions for grilling.
The grill element is controlled by the thermo-
stat. During the grilling process the grill inter-
mittently switches itself on and off in order to
avoid overheating.
Tips and cooking tables
On baking:
Cakes and pastries usually require a medium
temperature (150°C-200°C).
Therefore, it is necessary to pre-heat the
oven for approx. 10 minutes.
Do not open the oven door before 3/4 of the
baking time has elapsed.
Shortcrust pastry is baked in a springform tin
or on a tray for up to 2/3 of the baking time
and then garnished before being fully baked.
This further baking time depends on the type
and amount of topping or filling.
Sponge mixtures must separate with difficul-
ty from the spoon.
The baking time would be unnecessarily ex-
tended by too much liquid.
If two baking trays with pastries or biscuits
are inserted into the oven at the same time,
a shelf level must be left free between the
trays.
If two baking trays with pastries or biscuits
are inserted into the oven at the same time,
the trays must be swapped and turned
around after about 2/3 of the baking time.
progress 7

When roasting:
Do not roast joints smaller than 1 kg.
Smaller pieces could dry out when roasting.
Dark meat, which is to be well done on the
outside but remain medium or rare inside,
must be roasted at a higher temperature
(200°C-250°C).
White meat, poultry and fish, on the other
hand, require a lower temperature (150°C-
175°C).
The ingredients for a sauce or gravy should
only be added to the roasting pan right at the
beginning if the cooking time is short.
Otherwise add them in the last half hour.
You can use a spoon to test whether the
meat is cooked: if it cannot be depressed, it
is cooked through.
Roast beef and fillet, which is to remain pink
inside, must be roasted at a higher temper-
ature in a shorter time.
If cooking meat directly on the oven shelf, in-
sert the roasting pan in the shelf level below.
Leave the joint to stand for at least 15 mi-
nutes, so that the meat juices do not run out.
To reduce the build up of smoke in the oven,
it is recommended to pour a little water in the
roasting pan.
To prevent condensation forming, add water
several times.
The plates can be kept warm in the oven at
minimum temperature until serving.
Important! Do not line the oven with
aluminium foil and do not place baking
trays, pots, etc. on the oven floor, as the
heat that builds up will damage the oven
enamel.
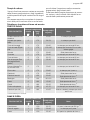
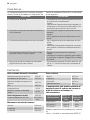
Cooking times
Cooking times can vary according to the dif-
ferent composition, ingredients and amounts
of liquid in the individual dishes.
Note the settings of your first cooking or
roasting to gain experience for later prepara-
tion of the same dishes.
Based upon your own experiences you will
be able to alter the values given in the tables.
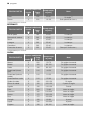
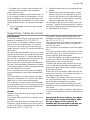
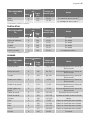
Baking and roasting table
CAKES
TYPE OF DISH
Conventional cook-
ing
Cooking time
[min]
Notes
Level
Temp
[°C]
Whisked recipies 2 170 45-60 In cake mould
Shortbread dough 2 170 24-34 In cake mould
Butter-milk cheese
cake
1 170 60-80 In cake mould 26 cm
Apple cake (Apple
pie)
1 170 100-120 2 cake moulds of 20 cm on the
oven shelf
Strudel 2 175 60-80 On baking tray
Jam- tart 2 170 30-40 In cake mould 26 cm
Fruit cake 2 170 60-70 In cake mould 26 cm
Sponge cake (Fat-
less sponge cake)
2 170 35-45 In cake mould 26 cm
Christmas cake/Rich
fruit cake
2 170 50-60 In cake mould 20 cm
Plum cake 2 170 50-60
In bread tin
1)
Small cakes 3 170 20-30 On flat baking tray
Biscuits 3 150 20-30
On flat baking tray
1)
Meringues 3 100 90-120 On flat baking tray
Buns 3 190 15-20
On flat baking tray
1)
8 progress

TYPE OF DISH
Conventional cook-
ing
Cooking time
[min]
Notes
Level
Temp
[°C]
Choux 3 190 25-35
On flat baking tray
1)
Plate tarts 3 180 45-70 In cake mould 20 cm
Victoria sandwich 1 or 2 180 40-55 Left + right in cake mould 20 cm
1) Preheat for 10 minutes.
BREAD AND PIZZA
TYPE OF DISH
Conventional cook-
ing
Cooking time
[min]
Notes
Level
Temp
[°C]
White bread 1 190 60-70
1-2 pieces, 500 gr one piece
1)
Rye bread 1 190 30-45 In bread tin
Bread rolls 2 190 25-40
6-8 rolls on flat baking tray
1)
Pizza 1 190 20-30
On deep roasting pan
1)
Scones 3 200 10~20
On flat baking tray
1)
1) Preheat for 10 minutes.
FLANS
TYPE OF DISH
Conventional cook-
ing
Cooking time
[min]
Notes
Level
Temp
[°C]
Pasta flan 2 180 40-50 In mould
Vegetable flan 2 200 45-60 In mould
Quiches 1 190 40-50 In mould
Lasagne 2 200 25-40 In mould
Cannelloni 2 200 25-40 In mould
Yorkshire pudding 2 220 20-30
6 pudding mould
1)
1) Preheat for 10 minutes.
MEAT
TYPE OF DISH
Conventional cook-
ing
Cooking time
[min]
Notes
Level
Temp
[°C]
Beef 2 200 50-70 On oven shelf and deep roasting
pan
Pork 2 180 90-120 On oven shelf and deep roasting
pan
Veal 2 190 90-120 On oven shelf and deep roasting
pan
English roast beef
rare
2 210 44-50 On oven shelf and deep roasting
pan
progress 9

TYPE OF DISH
Conventional cook-
ing
Cooking time
[min]
Notes
Level
Temp
[°C]
English roast beef
medium
2 210 51-55 On oven shelf and deep roasting
pan
English roast beef
well done
2 210 55-60 On oven shelf and deep roasting
pan
Shoulder of pork 2 180 120-150 On deep roasting pan
Shin of pork 2 180 100-120 2 pieces on deep roasting pan
Lamb 2 190 110-130 Leg
Chicken 2 200 70-85 Whole on deep roasting pan
Turkey 1 180 210-240 Whole on deep roasting pan
Duck 2 175 120-150 Whole on deep roasting pan
Goose 1 175 150-200 Whole on deep roasting pan
Rabbit 2 190 60-80 Cut in pieces
Hare 2 190 150-200 Cut in pieces
Pheasant 2 190 90-120 Whole on deep roasting pan
FISH
TYPE OF DISH
Conventional cook-
ing
Cooking time
[min]
Notes
Level
Temp
[°C]
Trout/Sea bream 2 190 40-55 3-4 fishes
Tuna fish/Salmon 2 190 35-60 4-6 fillets
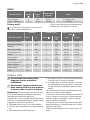
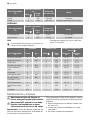
Grilling
Timings do not include pre-heating.
The empty oven should always be pre-
heated for 10 minutes.
Quantity Grilling Cooking time in minutes
TYPE OF DISH Pieces g
level
Temp.
(°C)
1st side 2nd side
Fillet steaks 4 800 3 250 12-15 12-14
Beef steaks 4 600 3 250 10-12 6-8
Sausages 8 / 3 250 12-15 10-12
Pork chops 4 600 3 250 12-16 12-14
Chicken (cut in 2) 2 1000 3 250 30-35 25-30
Kebabs 4 / 3 250 10-15 10-12
Breast of chicken 4 400 3 250 12-15 12-14
Hamburger 6 600 3 250 20-30
Pre-heat 5’00'’
Fish Fillet 4 400 3 250 12-14 10-12
Toasted sandwich-
es
4-6 / 3 250 5-7 /
10 progress

Quantity Grilling Cooking time in minutes
TYPE OF DISH Pieces g
level
Temp.
(°C)
1st side 2nd side
Toast 4-6 / 3 250 2-4 2-3
Care and cleaning
Warning! Before any cleaning,
switch the oven off and let it cool
down.
Warning! The appliance must not be
cleaned with a superheated steam
cleaner or a steam jet cleaner.
Important: Before carrying out any cleaning
operation, the device must be disconnected
from the power supply.
To ensure a long life for your appliance, it is
necessary to perform the following cleaning
operations regularly:
• Only perform when the oven has cooled
down.
• Clean the enamelled parts with soapy wa-
ter.
• Do not use abrasive cleaners.
• Dry the stainless steel parts and glass with
a soft cloth.
• If there are stubborn stains, use commer-
cially available cleaners for stainless steel
or warm vinegar.
The oven’s enamel is extremely durable and
highly impermeable.
The action of hot fruit acids (from lemons,
plums or similar) can, however, leave perma-
nent, dull, rough marks on the surface of the
enamel.
However such marks in the brightly polished
surface of the enamel do not affect the op-
eration of the oven.
Clean the oven thoroughly after every use.
This is the easiest way to clean dirt off. It pre-
vents dirt being burnt on.
Cleaning materials
Before using any cleaning materials on your
oven, check that they are suitable and that
their use is recommended by the manufac-
turer
Cleaners that contain bleach should NEVER
be used as they may dull the surface finishes.
Harsh abrasives should also be avoided.
External cleaning
Regularly wipe over the control panel, oven
door and door seal using a soft cloth well
wrung out in warm water to which a little liq-
uid detergent has been added.
To prevent damaging or weakening the door
glass panels avoid the use of the following:
• Household detergents and bleaches
• Impregnated cleaning pads that are un-
suitable for non-stick saucepans
• Brillo/Ajax pads or steel wool pads
• Chemical oven pads or aerosols
• Rust removers
• Bath/Sink stain removers
Clean the outer and inner door glass using
warm soapy water.
Should the inner door glass become heavily
soiled it is recommended that a cleaning
product such as “Hob Brite” is used Do not
use paint scrapers to remove soilage.
Oven cavity
The enamelled oven floor is best cleaned
whilst the oven is still warm.
Wipe the oven with a soft cloth which is
washed out in warm soapy water after every
use. From time to time a more thorough
cleaning is required. Use a commercially
available oven cleaner for this.
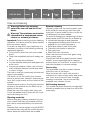
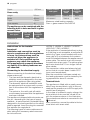
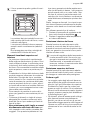
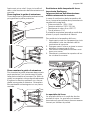
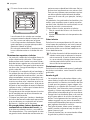
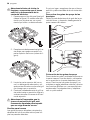
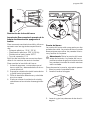
Grill heating element
This model has been fitted with a hinged grill
element to enable you to clean the roof of the
oven easily.
progress 11

Warning! Before proceeding ensure
the oven is cool and is disconnected
from the electricity supply.
1. Undo the screw fastening the grill el-
ement (see Fig.). When carrying out
this operation for the first time, we
recommend using a screwdriver.
2. Then pull the grill element down
carefully until you can access the
oven cover (see Fig.).
3. Clean the oven cover with a suitable
cleaner and wipe dry before replac-
ing the hinged grill element.
4. Gently push up the grill element into
place and tightly screw the holding
nut.
Warning! Ensure the retaining nut on
the grill element is properly
tightened so that it does not fall
down when in use.
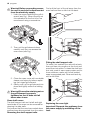
Oven shelf runner
The shelf support rails on the left and right
hand sides of the oven can be removed for
cleaning the side walls.
First ensure that the oven has cooled down
and has been disconnected from the mains.
Removing the shelf support rails .
First pull the front of the rail away from the
oven wall and then unhitch at the back.
Fitting the shelf support rails
To install, first reattach the rails at the back,
then put them into position at the front and
press them into place.To clean the shelf sup-
port rails, soak in warm soapy water and re-
move stubborn marks with a well wetted
soap impregnated pad. Rinse well and dry
with a soft cloth.
Replacing the oven light
Important! Separate the appliance from
the power supply by switching off the
fuse.
12 progress

If the oven bulb needs replacing, the new
bulb must have the following specifications:
– Electric power: 15W / 25W
– Electrical rating: 230 V (50 Hz)
– Heat resistance up to 300 °C
– Connection type: E14
These replacement bulbs can be purchased
from your dealer.
To change the oven light:
1. Before proceeding ensure the oven is
cool and is disconnected from the elec-
tricity supply.
2. Push in and turn the glass cover anti-
clockwise
3. Remove the faulty bulb and replace with
the new one.
4. Refit the glass cover and restore the elec-
trical supply.
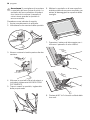
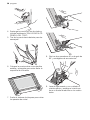
The oven door
The oven door consists of two panes of
glass. The oven door can be disassembled
and the internal panes can be removed to
make cleaning easier.
Warning! Remove the oven door before
cleaning it. The oven door could abruptly
close if you try to remove the internal
panes of glass when the door is still
assembled.
To do so, proceed as follows:
1. Open the door fully.
2. Locate the two door hinges
3. Lift and turn the levers on the two hinges
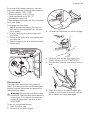
4. Hold the door by the side edges and
close it slowly but not COMPLETELY
5. Pull the door forward, removing it from its
seat
6. Place the door on a stable surface pro-
tected by a soft cloth to prevent the han-
dle surface from being damaged
progress 13

7. Release the locking system to remove the
internal panes of glass
8. Turn the 2 fasteners 90° and extract them
from their seats
90°
9. Carefully lift the top pane out a little and
pull out the pane which is visible on all
four sides of the frame.
1
2
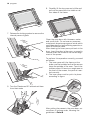
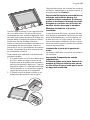
Clean the oven door with lukewarm water
and a soft cloth. Do not use any scourers,
metal wool, abrasive sponges or acids which
could damage the heat reflecting special sur-
faces of the inner pane.
After cleaning the inner pane put back in the
door. Insert the door in the oven; proceed in
reverse order. Be mindful of the correct align-
ment of the panes.
To perform this operation correctly, proceed
as follows:
1. The inner pane with the frame on four
sides must be installed so that the screen
faces the outside of the oven. Touch the
visible surface. If there is no roughness on
the level of the screen, the pane is inser-
ted correctly.
2. The inner pane must be put in its place
according to figure.
After putting the panes in the oven door, se-
cure them in reverse order, following the
guidelines in Point 8 .
14 progress

Important! Never clean the oven door
when it is warm as the panels might
shatter. If you can see scratches or
cracks in the glass panel, call your
nearest service centre immediately to
have the panel replaced.
Models in stainless steel or aluminium:
Clean the oven door and operating panel in
stainless steel or aluminium with a damp
sponge and then dry carefully with a soft
cloth. Never use metal pads, metal wool,
acids or abrasives for cleaning because they
may scratch the surfaces.
Cleaning the oven door seals
A seal is fitted around the opening of the
oven.
Important! Check the condition of the
seal on a regular basis.
If you notice damage to the seal, please
contact the nearest service centre im-
mediately. Do not use the oven until the
seal has been replaced.
What to do if…
If the appliance is not working correctly,
please check the following before contacting
the Electrolux Service Centre.
PROBLEM SOLUTION
• The oven does not switch on. • Check whether a cooking function and a tem-
perature have been selected,
or
• Check that the appliance is properly connected
and the socket switch or the mains supply to
the oven is on.
• The control light for the oven temperature does
not come on.
• Use the temperature controller to choose a
temperature,
or
• use the oven controller to select a function.
• The internal oven light does not come on. • use the oven controller to select a function.
or
• check the bulb and replace if necessary (see
“Replacing the oven light”).
• It takes too long to cook the dishes or they cook
too quickly.
• Adjust the temperature if necessary,
or
• refer to the contents of this user guide, in par-
ticular, the "Tips and cooking tables" chapter.
• Steam and condensation settle on the food and
in the oven cavity.
• Leave dishes inside the oven no longer than 15
- 20 minutes after the cooking is completed.
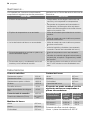
Technical Data
Heating element ratings
Top oven element 800 W
Bottom oven element 1000 W
Top and bottom heating element 1800 W
Grill 1650 W
Oven light 25 W
Cooling fan motor 25 W
Total connection rating
1850 W
Operating voltage (50 Hz) 230 V-400 V
3N~
Dimensions of the recess
Height 600 mm
Width 560 mm
progress 15

Depth 550 mm
Oven cavity
Height 335 mm
Width 395 mm
Depth 410 mm
Oven capacity 56 l
The appliance can be combined with the
following built-in hobs and built-in glass
ceramic hobs:
Glass ceramic
hob types:
Total con-
nected
load
Supply
voltage(50
Hz)
PEM 6000 E 6000 W 230V
Glass ceramic
hob types:
Total con-
nected
load
Supply
voltage(50
Hz)
PES 6000 E 5800 W 230V
PES 6060 E 7600 W 230V
Maximum rated heating capacity:
Oven + glass ceramic hob 9450 W
Installation
Instructions for the Installer
Important!
Installation and connection must be
done in compliance with the regulations
in force. Any interventions must be
carried out when the appliance is
switched off. Only qualified service
engineers may repair the appliance
The manufacturing company disclaims
any liability if the safety measures are
not observed.
Connecting to the electrical supply
Before connecting to the electrical supply,
please make sure:
– The fuse and the domestic electrical in-
stallation must be designed for the max.
load of the appliance (see rating plate).
– The domestic electrical installation must
be equipped with a proper earth connec-
tion in accordance with the regulations in
force.
– The socket or the multi-pole off switch
must be easy to access after the appliance
has been installed.
The appliance is shipped without a mains ca-
ble, as - depending on the type of supply
available - a mains lead with a standard plug
designed for the load specified on the rating
plate is required. Insert the plug into a socket
that satisfies the regulations.
The following types of mains cable are suit-
able, taking the necessary rated cross sec-
tion into account:
H07RN-F, H05RN-F, H05RR-F, H05VVF,
H05V2V2-F (T90), H05BB-F.
If the appliance is connected without a plug,
or if the plug is not accessible, a multipole off
switch (e.g. fuses, circuit breaker) with a min-
imum gap of 3 mm between the contacts
must be installed between the appliance and
mains cable. The switch must not interrupt
the earth wire at any point. The yellow-green
earth wire should be 2-3 cm longer than all
other cables.
The connection cable must always be laid
out so that at no point does it reach 50°C
(over room temperature).
After the connection has been carried out,
the heating elements must be tested by be-
ing operated for about 3 minutes.
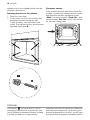
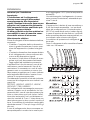
Terminal block
The appliance is fitted with an easily-acces-
sible 6-way terminal block, with its links al-
ready set for operation on a 400V supply with
neutral (see illustration).
In the case of a different supply voltage, the
terminal block links must be turned in line
with the schemes shown in the illustration.
The protective conductor is connected to the
terminal.
After connection, secure the cable to the ter-
minal block with strain relief.
16 progress

1 2
3
4
5
Electrical connection to the hob
Important! Observe the installation
instructions for hob, built-in cooker or
control box!
This appliance can be connected to the hob
models specified in the «Technical data» sec-
tion.
The socket for connecting the hob is located
on the cooker housing.
The connecting cables of the heating ele-
ments and the protective conductor cable
are brought out from the built-in hob; these
cables are fitted with plug connections.
Insert the plugs and connecting cables in the
appropriate sockets.
This prevents any possible wrong connec-
tion.
The manufacturer accepts no liability if
the safety measures are not observed.
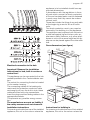
Installation instructions
For ensuring a trouble free use of the installed
appliance, the unit or the column where the
appliance is to be installed should have ap-
propriate dimensions.
In accordance with the regulations in force,
all parts which ensure the shock protection
of live and insulated parts must be fastened
in such a way that they cannot be undone
without tools.
These also include the fixing of any end walls
at the beginning or end of a line of builtin
units.
The shock protection must in any case be
ensured by the building in of the appliance.
The appliance can be placed with its back or
a side wall against higher kitchen units, ap-
pliances or walls. However, only other appli-
ances or units of the same height as the ap-
pliance can be placed against the other side
wall.
Oven dimensions (see figure)
594
7
20
570
590
540
560
550 min
600
560-570
80÷100
Instructions for building in
For ensuring a trouble free use of the installed
appliance, the unit or the column where the
progress 17

appliance is to be installed should have ap-
propriate dimensions.
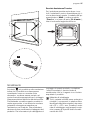
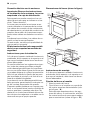
Securing the oven to the cabinet
1. Open the oven door.
2. Fix the oven into the unit using the four
distance brackets (see figure - A ).
These fit exactly into the holes in the
frame. Then tighten the four wood screws
supplied (see figure B ).
A
B
Customer service
If the problem persists after the checks de-
scribed, contact your nearest service centre
and describe the fault, appliance model
( Mod. ), product number ( Prod. No. ) and
series number ( Ser. No. ) which you will find
on the oven rating plate.
Disposal
The symbol on the product or on its
packaging indicates that this product may
not be treated as household waste. Instead
it should be taken to the appropriate
collection point for the recycling of electrical
and electronic equipment. By ensuring this
product is disposed of correctly, you will help
prevent potential negative consequences for
18 progress

the environment and human health, which
could otherwise be caused by inappropriate
waste handling of this product. For more
detailed information about recycling of this
product, please contact your local council,
your household waste disposal service or the
shop where you purchased the product.
Packaging material
The packaging material is environmen-
tally-friendly and recyclable. Plastic parts
are marked with the international abbre-
viations such as, e.g. >PE <, >PS< etc.
Dispose of the packaging material in the
containers provided for this purpose at
your local waste management facility.
Warning! Your appliance should be
made inoperable before it is disposed of,
so that it does not constitute a danger.
To do this, take the mains plug from the
socket and remove the mains cable from
the appliance.
progress 19

Indice
Informazioni per la sicurezza 20
Descrizione del prodotto 21
Preparazione al primo utilizzo 24
Uso dell'apparecchio 24
Suggerimenti e tabelle di cottura 26
Pulizia e cura 29
Cosa fare se… 34
Dati tecnici 34
Installazione 35
Smaltimento 37
Con riserva di modifiche
Informazioni per la sicurezza
Conservare sempre le presenti istruzioni
per l'uso assieme all'apparecchiatura.
Qualora l'apparecchio debba essere ce-
duto a terzi o venduto, oppure a seguito
di un trasloco debba essere lasciato nel
vecchio appartamento, è estremamente
importante che il nuovo utente possa di-
sporre delle presenti istruzioni per l'uso
e delle avvertenze
fornite per la sicurezza degli utenti. Leg-
gere quindi con estrema attenzione pri-
ma di procedere all'allacciamento del-
l'apparecchiatura e/o al suo utilizzo.
Installazione
• L'installazione deve essere eseguita da
personale tecnico qualificato, nel rispetto
delle disposizioni vigenti. I singoli interventi
di installazione sono descritti nella sezione
delle istruzioni per l'installatore.
• L'installazione e l'allacciamento devono
essere eseguiti da un tecnico qualificato
con conoscenze specifiche e conforme-
mente alle direttive.
• Se si rendesse necessario apportare delle
modifiche all'alimentazione elettrica, que-
ste devono essere effettuate da un elettri-
cista qualificato.
• A seconda del modello, questo forno è
stato costruito come apparecchio singolo
o combinato con piastra elettrica per il col-
legamento a 1, 2 o 3 fasi (senza gruppi)
dell'alimentazione da 230 V. Se viene ef-
fettuato un collegamento a più fasi senza
il neutro (400 V), il forno e le piastre di cot-
tura collegate vengono irrimediabilmente
danneggiati.
Uso dell'apparecchio
• Questo forno è destinato alla cottura di ali-
menti; non usarlo mai per altri scopi.
• Durante il funzionamento del forno, proce-
dere con la massima attenzione. A causa
del calore intenso delle resistenze, le griglie
ed altri componenti diventano molto caldi
• Se, per un qualsiasi motivo, è necessario
utilizzare fogli di alluminio per la prepara-
zione dei cibi nel forno, non lasciare che
vengano a contatto diretto con il fondo del
forno.
• Procedere con cautela, durante la pulizia
del forno: non spruzzare mai sul filtro del
grasso (se presente), sugli elementi radian-
ti e sul bulbo termostatico.
• È pericoloso apportare modifiche di qual-
siasi tipo a questa apparecchiatura o alle
sue caratteristiche.
• Durante la cottura al forno, arrosto e al grill,
la finestra del forno e gli altri elementi del-
l'apparecchiatura diventano caldi, pertan-
to tenere i bambini lontano dal forno. Du-
rante l'allacciamento degli apparecchi
elettrici a prese nelle vicinanze del forno,
fare attenzione che i cavi di collegamento
non vengano a contatto con zone di cot-
tura calde o che rimangano incastrati nello
sportello del forno.
• Utilizzare sempre manopole da forno per
togliere dall'apparecchio pentole o terrine
calde e resistenti al fuoco.
• Una pulizia regolare evita un deterioramen-
to del materiale di superficie.
• Prima di procedere alla pulizia del forno,
spegnere l’apparecchio oppure staccare
la spina.
• Assicurarsi che il forno sia in posizione
«OFF» , quando non è più utilizzato.
• L'apparecchiatura non deve essere pulita
con una pulitrice a vapore caldo o a getto
di vapore.
• Non utilizzare prodotti abrasivi o pagliette
di metallo. Possono graffiare i vetri dello
20 progress
La pagina si sta caricando...
La pagina si sta caricando...
La pagina si sta caricando...
La pagina si sta caricando...
La pagina si sta caricando...
La pagina si sta caricando...
La pagina si sta caricando...
La pagina si sta caricando...
La pagina si sta caricando...
La pagina si sta caricando...
La pagina si sta caricando...
La pagina si sta caricando...
La pagina si sta caricando...
La pagina si sta caricando...
La pagina si sta caricando...
La pagina si sta caricando...
La pagina si sta caricando...
La pagina si sta caricando...
La pagina si sta caricando...
La pagina si sta caricando...
La pagina si sta caricando...
La pagina si sta caricando...
La pagina si sta caricando...
La pagina si sta caricando...
La pagina si sta caricando...
La pagina si sta caricando...
La pagina si sta caricando...
La pagina si sta caricando...
La pagina si sta caricando...
La pagina si sta caricando...
La pagina si sta caricando...
La pagina si sta caricando...
La pagina si sta caricando...
La pagina si sta caricando...
La pagina si sta caricando...
La pagina si sta caricando...
La pagina si sta caricando...
La pagina si sta caricando...
La pagina si sta caricando...
La pagina si sta caricando...
-
 1
1
-
 2
2
-
 3
3
-
 4
4
-
 5
5
-
 6
6
-
 7
7
-
 8
8
-
 9
9
-
 10
10
-
 11
11
-
 12
12
-
 13
13
-
 14
14
-
 15
15
-
 16
16
-
 17
17
-
 18
18
-
 19
19
-
 20
20
-
 21
21
-
 22
22
-
 23
23
-
 24
24
-
 25
25
-
 26
26
-
 27
27
-
 28
28
-
 29
29
-
 30
30
-
 31
31
-
 32
32
-
 33
33
-
 34
34
-
 35
35
-
 36
36
-
 37
37
-
 38
38
-
 39
39
-
 40
40
-
 41
41
-
 42
42
-
 43
43
-
 44
44
-
 45
45
-
 46
46
-
 47
47
-
 48
48
-
 49
49
-
 50
50
-
 51
51
-
 52
52
-
 53
53
-
 54
54
-
 55
55
-
 56
56
-
 57
57
-
 58
58
-
 59
59
-
 60
60


Progress PHN1220X Manuale utente
- Categoria
- Piani cottura
- Tipo
- Manuale utente
in altre lingue
- English: Progress PHN1220X User manual
- español: Progress PHN1220X Manual de usuario
Documenti correlati
-
Progress PHN1320X Manuale utente
-
Progress PHN1310X Manuale utente
-
Progress PBN1320X Manuale utente
-
Progress PBN1310X Manuale utente
-
Progress PBN1220X Manuale utente
-
Progress PHN1220X Manuale utente
-
-
-
-
Progress PHN1310W Manuale utente