Akai Advance 49 Guida utente
- Categoria
- Attrezzatura musicale
- Tipo
- Guida utente

Quickstart Guide
English ( 2 – 13 )
Guía de inicio rápido
Español ( 14 – 25 )
Guide d'utilisation rapide
Français ( 26 – 37 )
Guida rapida
Italiano ( 38 – 49 )
Schnellstart-Anleitung
Deutsch ( 50 – 61 )
Appendix
English ( 62 )

2
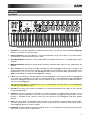
Quickstart Guide (English)
Introduction
Thank you for purchasing the Advance 49. At Akai Professional, we know how serious music is to you. That’s
why we design our equipment with only one thing in mind—to make your performance the best it can be.
Box Contents
Advance 49
USB Cable
Software Installation Card
Quickstart Guide
Safety & Warranty Manual
Important: Visit akaipro.com and find the webpage for Advance 49 to download the complete User Guide.
Support
For the latest information about this product (system requirements, compatibility information, etc.) and
product registration, visit akaipro.com.
Initial Setup
1. Software/Driver Download and Installation
To download and install the required drivers, VIP software application, and virtual instruments:
1. Go to akaipro.com and register your product. If you don't have an Akai Professional account yet, you
will be prompted to create one.
2. In your Akai Professional account, download the Advance Driver and VIP Plus (containing the VIP
software application and bundled virtual instruments).
3. Open the file and double-click the installer application: .exe (Windows) or .dmg (macOS).
4. Follow the on-screen instructions to complete the installation.
Note: By default, VIP will be installed in [your hard drive] \ Program Files \ VstPlugins (Windows) or
Applications (macOS). A shortcut will be created on your Desktop, as well.
To download additional plugins and audio content:
1. Open VIP.
2. In VIP, click the Store tab to view the virtual store of additional plugins and audio content to download
and use within VIP or your DAW.
3. Select and download the plugins and audio content you want to use with VIP. Follow the on-screen
instructions for each selection.
Important: When installing these plugins, we recommend installing them on your computer's internal
hard drive rather than on an external hard drive.

3
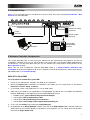
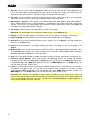
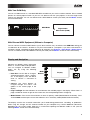
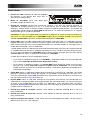
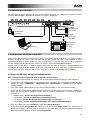
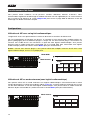
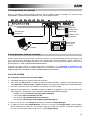
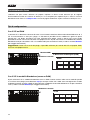
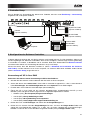
2. Controller Setup
Here is just an example of how to use Advance 49 to your setup. Items not listed under Introduction > Box
Contents are sold separately.
3. Software-Controller Configuration
This section describes how to start using your Advance 49. We recommend using Advance 49 with the
included VIP software which you can use to perform with, create, edit, and manage multiple plugin patches
simultaneously. To learn more about how you can use Advance 49 in each kind of setup, please see the
Basic Operation chapter.
Make sure you have installed the software (described earlier in 1. Software/Driver Download and
Installation) and connected Advance 49 to your computer, external MIDI equipment, and/or other devices
(described earlier in 2. Controller Setup).
With VIP in Your DAW
To set up Advance 49 with VIP in your DAW:
1. Power on your Advance 49, and open your DAW in your computer.
2. Make sure Advance 49 is selected as a controller in your DAW—you can usually do this in your DAW's
Preferences, Device Setup, or Options.
3. In your DAW, create a new MIDI track (i.e., not an audio track).
4. Open VIP in your DAW as you would open a standard plugin. By default, VIP is installed in the following
location, depending on your operating system and desired plugin format:
• Windows (VST): [your hard drive]\Program Files\VstPlugins
• macOS (VST): Library/Audio/Plug-Ins/VST
• macOS (AU): Library/Audio/Plug-Ins/Components
• macOS (AAX): Library/Application Support/Avid/Audio/Plug-Ins
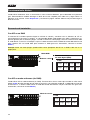
5. In VIP, click the Settings menu and select Plugin Manager.
6. At the bottom of the Plugin Manager window, click one of the Plugin Folder fields, and then select the
folder where your instrument plugins are located on your computer. You can select up to two locations
(one for each Plugin Folder field).
Powe
r
(optional)
Computer
Expression Pedal
(optional)
Sustain Pedal
(optional)
External MIDI
Sound Module
(optional)

4
7. Click Scan. VIP will scan the folder/folders for available plugins, which will appear in the list. When the
process is complete, click OK to close the Settings window. VIP will return to its main window and begin
importing the patches (presets) for all of your scanned plugins. This can take several minutes.
8. On Advance 49, turn the Data Dial to browse your list of patches in the display (the plug-in name will
appear under the patch name). Press the Data Dial to load one.
To learn more about how you can use Advance 49 in this kind of setup, please see Basic Operation >
Setup Scenarios > With VIP in Your DAW.
With VIP in Standalone Mode (Without a DAW)
To set up Advance 49 with VIP in Standalone Mode:
1. Power on your Advance 49.
2. Open VIP. By default, VIP is installed in [your hard drive]
\ Program Files \ VstPlugins (Windows) or
Applications (macOS).
3. In VIP, click the Settings menu and select Plugin Manager.
4. At the bottom of the Plugin Manager window, click one of the Plugin Folder fields, and then select the
folder where your instrument plugins are located on your computer. You can select up to two locations
(one for each Plugin Folder field).
5. Click Scan. VIP will scan the folder/folders for available plugins, which will appear in the list. When the
process is complete, click OK to close the Settings window. VIP will return to its main window and begin
importing the patches (presets) for all of your scanned plugins. This can take several minutes.
6. On Advance 49, turn the Data Dial to browse your list of patches in the display (the plug-in name will
appear under the patch name). Press the Data Dial to load one.
To learn more about how you can use Advance 49 in this kind of setup, please see Basic Operation >
Setup Scenarios > With VIP in Standalone Mode (Without a DAW).
With Your DAW Only
To set up Advance 49 with your DAW only:
1. Power on your Advance 49, and open your DAW in your computer.
2. Make sure Advance 49 is selected as a controller in your DAW—you can usually do this in your DAW's
Preferences, Device Setup, or Options.
3. In your DAW, create a new MIDI track (i.e., not an audio track).
To learn more about how you can use Advance 49 in this kind of setup, please see Basic Operation >
Setup Scenarios > With Your DAW Only.
With External MIDI Equipment (Without a Computer)
To set up Advance 49 with external MIDI equipment:
1. Power on your Advance 49 and your external MIDI device.
2. If you are using a standard power adapter connected to Advance 49's Power Input, you can start
playing immediately. Advance 49 is automatically set to send all of its MIDI messages to your external
MIDI device via the MIDI Out.
If you are using a USB charger to power Advance 49, set any relevant controls to send their MIDI
messages out of the MIDI Out. Any controls set to transmit only over the USB Port will not be sent to
your external MIDI device.
To learn more about how you can use Advance 49 in this kind of setup, please see Basic Operation >
Setup Scenarios > With External MIDI Equipment (Without a Computer).

5
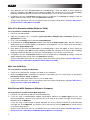
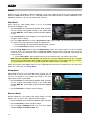
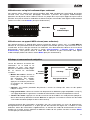
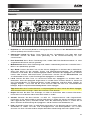
Features
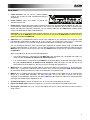
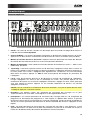
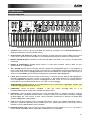
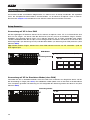
Top Panel
1
2
34
5
6
7
8
9
10
11
12
15
17
18
19
20
16
21 22
1314
7
8
9
7
8
9
7
8
9
7
8
9
7
8
9
7
8
9
7
8
9
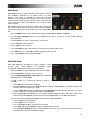
1. Keyboard: This 49-note keyboard is velocity-sensitive and, in conjunction with the Octave Up/Down
buttons, can control a 10-octave range.
2. Octave Down/Up: Use these buttons to shift the keyboard's range up or down. Press both buttons
simultaneously to reset the octave shift to "zero."
3. Pitch-Bend Wheel: Moving this wheel sends MIDI Pitch Bend information on a selected MIDI channel
and port.
4. Modulation Wheel: Moving this wheel sends continuous controller data—MIDI CC #01 (modulation), by
default.
5. Arp / Config: Press this button to enable or disable the internal Arpeggiator whose rate is based on the
current Tempo and Time Division settings. The Arpeggiator will function on notes being played on the
keyboard only. You can also sync the Arpeggiator to an internal or external MIDI Clock source. Press
Shift and this button to configure the Arpeggiator's settings.
6. Latch: Press this button to activate or deactivate the Arpeggiator's Latch feature. When the Arpeggiator
is on and Latch is enabled, you can press a combination of keys on the keyboard and the Arpeggiator
continue to arpeggiate these notes even after you release the keys. Pressing a new combination of keys
will start a new arpeggiation.
Tip: While holding down a combination of keys on the keyboard, add more notes to that arpeggiated
chord by pressing additional keys.
7. Encoders: Use these 360º knobs to send MIDI CC or Increment/Decrement messages to your software
or external MIDI device.
8. Switches: Use these switches to send MIDI CC, Program Change, or Program Bank messages to your
software or external MIDI device. They can function as momentary or toggle (latching) switches. If Time
Division is activated, these switches select the time division of the Arpeggiator and Note Repeat
features.
9. Pads: Use these pads to send MIDI Note messages to your software or external MIDI sound module.
The pads are pressure- and velocity-sensitive, which makes them very responsive and intuitive to play
when triggering drum hits or other samples.
10. Pad Bank: Use these buttons to select Pad Bank A, B, C, or D. Between these 4 banks with 8 pads per
bank, you can access up to 32 MIDI events.

6
11. Time Div: Use this button and the switches to select the current Time Division, which determines the
rate of the Note Repeat and Arpeggiator features. While Time Division is active, the switches will not
send any of their normal MIDI CC, Program Change, or Program Bank messages.
12. Full Level: Press this button to activate or deactivate Full Level. When Full Level is active, the pads
always play at their maximum velocity no matter how hard or soft you hit them.
13. Note Repeat / Config: Use this button to activate or deactivate Note Repeat. While Note Repeat is
active, striking a pad causes its note to retrigger at a rate based on the current Tempo and Time Division
settings. You can also sync Note Repeat to an internal or external MIDI Clock source. Press Shift and
this button to configure Note Repeat's settings.
14. Tap Tempo: Tap this button at the desired rate to enter a new tempo.
Important: This feature does not work when the Advance 49 is set to External sync.
15. Display: Use this full-color display to view Advance 49's menus, options, parameters, and settings.
16. Page Left/Right: Use these buttons to move between the available pages in the display.
17. Data Dial: Use this dial to change parameter values, settings, etc. in the display. Pressing the dial also
functions as an Enter button.
18. Cursors: Use these buttons to navigate through the menus and options in the current page in the
display.
19. Mode Buttons: Press one of these buttons to enter its primary mode (labeled above the button). Press
and hold Shift and then press one of these buttons to its secondary mode (labeled under the button).
See Basic Operation > Modes for more information.
20. Shift: Press and hold this button to enable secondary functions of certain other buttons on Advance 49.
21. Transport Control Buttons: These three buttons are dedicated buttons for sending conventional
transport control commands: Stop, Play, and Record. These can be set to send MIDI (Start/Stop), pre-
assigned MIDI CC values, MMC (MIDI Machine Control), and MMC/MIDI SysEx. The PTEX setting is for
use with Avid
®
Pro Tools
®
Express only.
22. Loop: Press and hold this button to activate the Loop or Repeat feature in your software. This button is
considered a transport control, so it can be set to send the same messages as the other transport
control buttons: MIDI (Start/Stop), pre-assigned MIDI CC values, MMC (MIDI Machine Control), and
MMC/MIDI SysEx. The PTEX setting is for use with Avid
®
Pro Tools
®
Express only.
Important: Your software must be able to loop or repeat in order to use this feature. Also, make sure
that you are using the Advance 49 Preset named after your particular software. If your software does not
have a corresponding Advance 49 Preset, configure the Transport Format in Global Mode so it
communicates properly with your software.

7
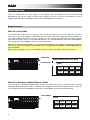
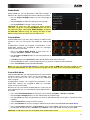
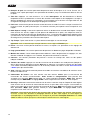
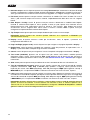
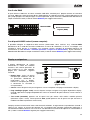
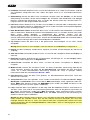
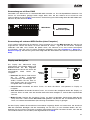
Rear Panel
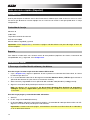
1. Cable Restraint: You can secure a power adapter
cord to this restraint to help avoid disconnecting it
accidentally.
2. Power Button: Press this button to power the
Advance 49 on or off.
3. Power Input: Connect this power input to a power outlet using an optional power adapter (6 V DC, 1 A,
center-positive, sold separately). Alternatively, if you want to use Advance 49 to control an external MIDI
device and without a computer connection, you can connect Advance 49's USB Port to a power outlet
using a standard USB charger (sold separately).
Important: If you use a USB charger to power Advance 49, set any relevant controls to send their MIDI
messages out of the MIDI Out. Any controls set to transmit only over the USB Port will not be sent to a
device connected to the MIDI Out.
4. USB Port: Use a standard USB cable to connect this USB port to your computer. The computer's USB
port provides ample power to Advance 49. If you connect it to a USB hub, make sure it is a powered
hub. This connection is also used to send and receive MIDI data to and from your computer.
You can also power Advance 49 by connecting this USB port to a power outlet using a standard USB
charger (sold separately). If you do this, set any relevant controls to send their MIDI messages out of the
MIDI Out. Any controls set to transmit only over the USB Port will not be sent to a device connected to
the MIDI Out.
When using Advance 49 with external MIDI equipment:
• If an external device is connected to the MIDI Out, your computer can send MIDI messages out
along this path: Computer Advance 49 External Device.
• If an external device is connected to the MIDI In, the external device sends MIDI messages in along
this path: External Device Advance 49 Computer. MIDI messages can then be sent to an
external device via the MIDI Out, but they must pass through the computer first.
5. MIDI Out: Use a standard five-pin MIDI cable to connect this MIDI Out to the MIDI In of an external MIDI
device (e.g., a synthesizer, sequencer, drum machine, etc.). Please see the above USB Port description
for information about how MIDI messages are routed while using Advance 49.
6. MIDI In: Use a standard five-pin MIDI cable to connect this MIDI In to the MIDI Out of an external MIDI
device (e.g., another MIDI controller). The MIDI messages sent to this MIDI In will be sent to your
computer via the USB port. Please see the above USB Port description for information about how MIDI
messages are routed while using Advance 49.
7. Sustain Pedal Input: Connect an optional 1/4" (6.35 mm) TS sustain pedal to this input.
8. Expression Pedal Input: Connect an optional 1/4" (6.35 mm) TRS expression pedal to this input.
9. Kensington
®
Lock Slot: You may use this Kensington lock slot to secure the Advance 49 to a table or
other surface.
1
2
34
5
6
7
8
9

8
Basic Operation
You can use Advance 49 in your setup in a few different ways, described here. We also recommend
downloading the full User Guide to learn more and get the most use out of your Advance 49. Visit
akaipro.com and find the webpage for Advance 49 to download the User Guide.
Setup Scenarios
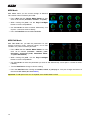
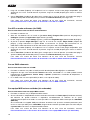
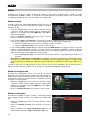
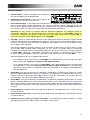
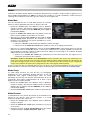
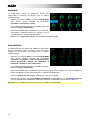
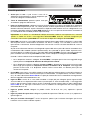
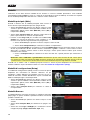
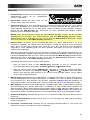
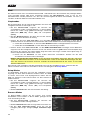
With VIP in Your DAW
The included VIP software lets you get the most control and function out of your Advance 49. VIP is
essentially a host for your plugins, a hub where you can create, edit, and manage your patches (presets) for
your various plugins. When VIP is used as a plugin, as in this scenario, all audio from VIP will be sent into
your DAW on its track. You can switch between Advance 49's Control Mode to control VIP or MIDI Mode to
control your DAW (see the Modes section for more information).
Tip: You can use Control Edit Mode to assign some knobs to MIDI CC messages instead of VST parameters.
This lets you control your plugin and your DAW while in Control Mode. See Modes > Control Edit Mode for
more information.
Tip: As with other plugins, you can use multiple instances of VIP in your DAW, each on its own track.
With VIP in Standalone Mode (Without a DAW)
You can use VIP in Standalone Mode without a DAW. This works the same way as when used as a plugin
(described above) except the audio is routed to your computer's sound card instead of to your DAW. You
can use Advance 49's Control Mode to control VIP (see the Modes section for more information).
Digital Audio Workstation (DAW)
VIP
Plugin Plugin Plugin Plugin
MIDI Mode
Control Mode
Plugin Plugin Plugin Plugin
VIP
Control Mode
Plugin Plugin Plugin Plugin
Plugin Plugin Plugin Plugin

9
With Your DAW Only
You can use Advance 49 as a standard USB MIDI controller for your music creation software. We've created
presets for several popular DAWs so you can use Advance 49 with your projects in the most logical and
intuitive way possible. You can use Advance 49's MIDI Mode to control your DAW (see the Modes section
for more information).
With External MIDI Equipment (Without a Computer)
You can connect an external MIDI device (synth, drum machine, etc.) to Advance 49's MIDI Out, letting you
use Advance 49 to control it, whether or not you're connected to a computer. If you aren't connected to a
computer, though, remember to power Advance 49 externally (see Features > Rear Panel > Power Input).
You can use Advance 49's MIDI Mode to control your DAW (see the Modes section for more information)
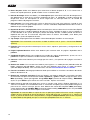
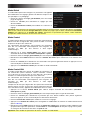
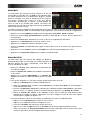
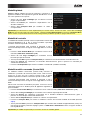
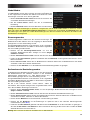
Display and Navigation
Advance 49's display shows information
about its current mode and operations.
You can navigate its different modes,
pages, etc. by using the following
controls:
• Data Dial: Use this dial to change a
selected parameter values, settings,
etc. in the display. Press the dial to
enter or confirm a command or
setting.
• Cursors: Use these buttons to
navigate through the menus and
options in the current page in the
display.
• Page Left/Right: Use these buttons to move between the available pages in the display. When there is a
page available to the left or right of the current one, the corresponding button will light up.
• Mode Buttons: Press one of these buttons to enter its primary mode (labeled above the button). Press
and hold Shift and then press one of these buttons to its secondary mode (labeled under the button).
The display contains the essential information you'll need during performance, recording, or production.
When using VIP, though, the VIP software window on your computer may contain additional information,
depending on the current mode. Keep this in mind while exploring the different modes in VIP (see the
following Modes section for more information).
Digital Audio
Workstation (DAW)
MIDI Mode
Cursors
Data
Dial
Display
Page Left/Right
Mode
Buttons

10
Modes
Advance 49 has ten different modes of operation. Enter each mode by pressing its corresponding Mode
Button (or Shift and the button, if it is a secondary button command). Note that a mode's appearance may
depend on whether or not you are using the VIP software.
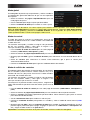
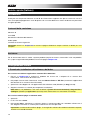
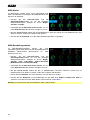
Main Mode
When using VIP, Main Mode shows a list of all available
patches for all plugins in VIP.
• Use the Cursors to move between different fields and tabs.
You can change some global settings in this mode (MIDI
channel (MIDI Ch), octave (Oct), and transposition (Trans)),
as well.
• Use the Data Dial to move through the list of patches or to
change a value or setting.
• Press the Page Left button to access Key Control mode, which enables you to lock the playable notes
to a specific key and scale or the chords of a progression.
o Use the Cursors to move between different fields and tabs.
o Use the Data Dial to change a value or setting.
• Press the Page Right button to view the DAW Control screen. This screen shows a list of all available
instances of VIP. The current instance is highlighted yellow. The left column shows the patch name, the
center column shows the plugin name, and the right column indicates which keyboard is controlling the
current instance.
o Turn the Data Dial to select another instance of VIP and then press it to confirm your choice.
Note: Only the encoders and switches will control this currently selected instance of VIP. The pads
and keys will send their MIDI note messages to record-armed tracks in your DAW. Keep this in mind as
you switch between instances of VIP and/or record-arm/-disarm tracks in your DAW.
When not using VIP, Main Mode shows a list of available presets that let you use Advance 61 to control your
DAW. This is the same as in Setup Mode.
Setup Mode
Setup Mode shows a list of available presets that let you use
Advance 49 to control your DAW. We've pre-mapped each so
you can use Advance 49 to control your DAW in the most
logical and intuitive way possible.
• Use the Cursors to move between different fields and tabs.
You can change some global settings in this mode (MIDI
channel (MIDI Ch), octave (Oct), and transposition (Trans)),
as well.
• Use the Data Dial to change a value or setting.
Browser Mode
Browser Mode lets you browse and select patches of your
plugins. You can access this mode only when using VIP.
• Use the Cursors to move between different fields and tabs.
• Use the Data Dial to select a plugin or patch.
• Use the Page Left/Right buttons to view each plugin
category (Plugin, Instrument, Style, etc).

11
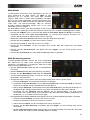
Global Mode
Global Mode lets you set parameters and make changes to
Advance 49's general settings that are not specific to a preset.
• Use the Page Left/Right buttons to view each page of
settings.
• Use the Cursors to select the setting you want to edit.
• Use the Data Dial to change a value or setting.
Important: To retain your new settings for future sessions,
save them. To do this, use the Page Right button to move to
the right-most page, select Save Global Settings, and press
the Data Dial. Without saving, the settings will return to their
default settings once you power off your Advance 49.
Control Mode
Control Mode shows you the current settings of Advance 49's
controls in VIP. You can access this mode only when using
VIP.
Orange/yellow controls are assigned to parameters in VIP.
Green/aqua controls are assigned to MIDI CC messages,
which are sent to your DAW.
• Press the Control Mode Button to view each set of
controls (encoders, switches, and pads).
• Use the Page Left/Right buttons to view each bank of that
control type.
• Hold Shift and turn the Data Dial to select the desired channel within your multi.
• Use the Cursors to select a control. Alternatively, turn or press a control to select it directly.
• Press the Data Dial to enter Control Edit Mode.
Note: You can use Control Edit Mode to assign some knobs to MIDI CC messages instead of VST
parameters (VST Param). This lets you control your plugin and your DAW in the same Control Mode page.
Control Edit Mode
Control Edit Mode lets you edit the parameters of your controls
(minimum values, maximum values, CC or note numbers, etc.)
for the current patch in VIP. You can access this mode only
when using VIP.
Orange/yellow controls are assigned to parameters in VIP.
Green/aqua controls are assigned to MIDI CC messages,
which are sent to your DAW.
Because VIP lets you control multiple patches, make sure you
have selected the one you want before making adjustments in
this mode.
• Press the Control Mode Button to view each set of controls (encoders, switches, and pads).
• Use the Page Left/Right buttons to view each bank of that control type.
• Use the Cursors to select the parameter you want to edit. Alternatively, turn or press a control to select
it directly.
• Turn the Data Dial to change a value or setting.
• Press the Data Dial to save your changes and return to the normal Control Mode (described above).
• Press and hold Shift and press the Data Dial to access Learn Mode, which lets you assign parameters
for the plugin or patch to VIP’s encoders and switches, and assign chords or notes to VIP's pads.
Important: To edit parameters for the keybed, enter Global Mode instead.

12
MIDI Mode
MIDI Mode shows you the current settings of Advance
49's controls when used with your DAW.
• Press Shift and the Control Mode Button to view
each set of controls (encoders, switches, and pads).
• When viewing the pads, use the Page Left/Right
buttons to view each pad bank.
• Use the Cursors to select a control. Alternatively, turn
or press a control to select it directly.
• Press the Data Dial to enter MIDI Edit Mode.
MIDI Edit Mode
MIDI Edit Mode lets you edit the parameters of your
controls (minimum values, maximum values, CC or note
numbers, etc.) when used with your DAW.
• Press Shift and the Control Mode Button to view
each set of controls (encoders, switches, pads,
footswitch, expression pedal, modulation wheel,
and pitch-bend wheel).
• When viewing the pads, use the Page Left/Right
buttons to view each pad bank.
• Use the Cursors to select the parameter you want to edit. Alternatively, turn or press a control to select
it directly.
• Turn the Data Dial to change a value or setting.
• Press the Data Dial when viewing an encoder, switch, or pad page to save your changes and return to
the normal MIDI Mode (described above).
Important: To edit parameters for the keybed, enter Global Mode instead.

13
Multi Mode
Multi Mode lets you use your Advance 49 to control a multi in
VIP. A multi is collection of 2–8 patches (from 1 or more
plugins). Each patch is assigned to a channel, and each
channel has an assigned color. When using a multi, you can
simultaneously control volume, panning, solos, and mutes for
each channel in a mixer-style interface. You can do this only
when using VIP.
Multi Mode also contains the channel strips for the 4 buses and
the master channel. Each channel of a multi sends its audio to
the master channel and can also send it to each independent
bus.
• Press the Multi button to cycle between the pages for Level & Pan, Sends, and Inserts.
• Use the Page Left/Right buttons to move between each view of 4 channels, the bus Sends, and the
Master Channel.
• Use the Cursors to select a channel, bus, or insert slot.
• Press a switch to solo a channel.
• Press a pad to mute a channel.
• Turn an encoder to adjust the volume of a channel or the level of a bus send.
• Press Shift and turn an encoder to adjust the panning of a channel.
• Press the Data Dial to enter Multi Edit Mode.
Multi Edit Mode
Multi Edit Mode lets you edit the various settings of each
channel when using Advance 49 (keyboard range,
transposition, MIDI channel, and mute or solo status).
• Use the Cursors to select the parameter you want to edit.
• Use the Data Dial to change a value or setting.
• Press the Multi Mode Button or Data Dial to exit Multi Edit
Mode and return to Multi Mode.
• To add a patch to a channel (or change a patch in a
channel):
1. Press Browser to enter Browser Mode.
2. Use the Cursors to move to the Channel tab at the top of the page (CH#). The number indicates the
currently selected channel of the multi.
3. Turn the Data Dial to select the desired channel (CH1–CH8) or Insert Slot (for channels 1–8, sends
B1–B4, and Master Channel) and then press the Data Dial.
4. Use the Data Dial and Cursors as you would in Browser Mode to select and load a patch. That
patch will then be loaded to the channel of the multi. Repeat Steps 2–4 to add more patches.
• You can still use the following Multi Mode controls while in Multi Edit Mode:
o Press a switch to solo a channel.
o Press a pad to mute a channel.
o Turn an encoder to adjust the volume of a channel.
o Press Shift and turn an encoder to adjust the panning of a channel.
o Use the Page Left/Right buttons to move between each view of 4 channels (the original channel's
parameters will remain in the display, though).

14
Guía de inicio rápido (Español)
Introducción
Gracias por comprar el Advance 49. En Akai Professional, sabemos que usted se toma la música en serio.
Por eso es que diseñamos nuestros equipos con una sola cosa en mente—hacer que pueda tocar su mejor
interpretación.
Contenido de la caja
Advance 49
Cable USB
Tarjeta de instalación de software
Guía de inicio rápido
Manual sobre la seguridad y garantía
Importante: Visite akaipro.com y encuentre la página web de Advance 49 para descargar la Guía del
usuario completa.
Soporte
Para obtener la información más reciente acerca de este producto (requisitos de sistema, información de
compatibilidad, etc.) y registrarlo, visite akaipro.com.
Instalación inicial
1. Descarga e instalación del software y los drivers
Para descargar e instalar la aplicación de software VIP incluida:
1. Vaya a akaipro.com y registre su producto. Si aún no posee una cuenta de Akai Professional, el sistema
le solicitará que abra una.
2. En su cuenta de Akai Professional, descargue el controlador Advance Driver y VIP Plus (que contiene la
aplicación de software VIP junto con los instrumentos virtuales).
3. Abra el archivo y haga doble clic en la aplicación del instalador: .exe (Windows) o .dmg (macOS).
4. Siga las instrucciones de la pantalla para terminar la instalación.
Nota: Por defecto, VIP se instalará en [su disco duro] \ Program Files (Archivos de programa) \
VstPlugins (Windows) o Applications (Aplicaciones) (macOS). También se creará un acceso directo en
su escritorio.
Para descargar plugins y contenido de audio adicionales:
1. Abra VIP.
2. En VIP, haga clic en Store (Almacenar).
3. En el panel Store, seleccione y descargue los plugins y el contenido de audio que desea utilizar con VIP.
Siga las instrucciones de la pantalla para cada selección.
Importante: Cuando instale estos plugins, recomendamos instalarlos en el disco duro de su ordenador y
no en un disco duro externo.

15
2. Instalación del controlador
Este es sólo un ejemplo de cómo utilizar Advance 49 en su instalación: Los elementos que no se enumeran
en Introducción > Contenido de la caja se venden por separado.
3. Configuración del controlador de software
Esta sección describe cómo comenzar a utilizar su Advance 49. Recomendamos utilizar Advance 49 con el
software VIP incluido, que puede emplear para reproducir, crear, editar y administrar múltiples parches de
plugin simultáneamente. Para saber más acerca de cómo puede utilizar Advance 49 en cada clase de
instalación, consulte el capítulo Funcionamiento básico.
Asegúrese de haber instalado el software (descrito anteriormente en 1. Descarga e instalación del
software y los drivers) y conectado Advance 49 a su ordenador, equipo MIDI externo y/u otros dispositivos
(descritos anteriormente en 2. Instalación del controlador).
Con VIP en su DAW
Para instalar Advance 49 con VIP en su DAW:
1. Encienda su Advance 49 y abra su DAW (estación de trabajo de audio digital) en su ordenador.
2. Asegúrese de que este seleccionado Advance 49 como controlador en su DAW—puede hacerlo
habitualmente en Preferences, Device Setup u Options (Preferencias, Instalación de dispositivos u
Opciones) de su DAW.
3. En su DAW, cree una nueva pista MIDI (es decir, no una pista de audio).
4. En su cuenta de Akai Professional, descargue el controlador Advance Driver y VIP Plus (que contiene la
aplicación de software VIP junto con los instrumentos virtuales).
• Windows (VST): [su disco rígido]\Archivos de programa\Plugins Vst
• macOS (VST): Biblioteca/Audio/Plug-Ins/VST
• macOS (AU): Biblioteca/Audio/Plug-Ins/Componentes
• macOS (AAX): Biblioteca/Soporte de aplicaciones/Avid/Audio/Plug-Ins
5. En VIP, haga clic en el menú Settings (Ajustes) y seleccione Plugin Manager (Administrador de plugins).
6. Al pie de la pantalla Plugin Manager, haga clic en uno de los campos Plugin Folder (Carpeta de
plugins) y luego seleccione la carpeta donde se encuentran sus plugins de instrumentos en su
ordenador. Puede seleccionar hasta dos ubicaciones (una para cada campo Plugin Folder).
Suministro
eléctrico
(opcional)
Ordenador
Pedal de
expresión
(opcional)
Pedal de
sostenido
(opcional)
Módulo de
sonido
MIDI externo
(opcional)

16
7. Haga clic en Scan (Explorar). VIP explorará la o las carpetas en busca de plugins disponibles, que
aparecerán en la lista. Cuando termine el proceso, haga clic en OK (Aceptar) para cerrar la ventana
Settings.
8. Gire el Data Dial (Cuadrante de datos) para navegar por la lista de parches (el nombre del plug-in
aparecerá debajo del nombre del parche). Presione el cuadrante de datos para cargar uno.
Para saber más acerca de cómo usar Advance 49 en esta clase de instalación, consulte
Funcionamiento básico > Escenarios de instalación > Con VIP en su DAW.
Con VIP en modo autónomo (sin DAW)
Para instalar Advance 49 con VIP en modo autónomo:
1. Encienda su Advance 49.
2. Abra VIP. Por defecto, VIP se instala en [su disco duro]
\ Program Files (Archivos de programa) \
VstPlugins (Windows) o Applications (Aplicaciones) (macOS).
3. En VIP, haga clic en el menú Settings (Ajustes) y seleccione Plugin Manager (Administrador de plugins).
4. Al pie de la pantalla Plugin Manager, haga clic en uno de los campos Plugin Folder (Carpeta de
plugins) y luego seleccione la carpeta donde se encuentran sus plugins de instrumentos en su
ordenador. Puede seleccionar hasta dos ubicaciones (una para cada campo Plugin Folder).
5. Haga clic en Scan (Explorar). VIP explorará la o las carpetas en busca de plugins disponibles, que
aparecerán en la lista. Cuando termine el proceso, haga clic en OK (Aceptar) para cerrar la ventana
Settings.
6. Gire el Data Dial (Cuadrante de datos) para navegar por la lista de parches (el nombre del plug-in
aparecerá debajo del nombre del parche). Presione el cuadrante de datos para cargar uno.
Para saber más acerca de cómo usar Advance 49 en esta clase de instalación, consulte
Funcionamiento básico > Escenarios de instalación > Con VIP en modo autónomo (sin DAW).
Con su DAW solamente
Para instalar Advance 49 con su DAW:
1. Encienda su Advance 49 y abra su DAW (estación de trabajo de audio digital) en su ordenador.
2. Asegúrese de que este seleccionado Advance 49 como controlador en su DAW—puede hacerlo
habitualmente en Preferences, Device Setup u Options (Preferencias, Instalación de dispositivos u
Opciones) de su DAW.
3. En su DAW, cree una nueva pista MIDI (es decir, no una pista de audio).
Para saber más acerca de cómo usar Advance 49 en esta clase de instalación, consulte
Funcionamiento básico > Escenarios de instalación > Con su DAW solamente.
Con equipo MIDI externo estándar (sin ordenador)
Para instalar Advance 49 con equipo MIDI externo:
1. Encienda su Advance 49 y su dispositivo MIDI externo.
2. Si está utilizando un adaptador de corriente estándar conectado a la Power Input (Entrada de corriente)
del Advance 49, puede comenzar a reproducir inmediatamente. El Advance 49 se ajusta
automáticamente para enviar todos sus mensajes MIDI a su dispositivo MIDI externo por la salida MIDI
(Midi Out).
Si está utilizando un cargador USB para alimentar el Advance 49, ajuste los controles pertinentes para
enviar sus mensajes MIDI por la salida MIDI. Ninguno de los controles ajustados para transmitir solo por
el puerto USB se enviará a su dispositivo MIDI externo.
Para saber más acerca de cómo usar Advance 49 en esta clase de instalación, consulte
Funcionamiento básico > Escenarios de instalación > Con equipo MIDI externo (sin ordenador).

17
Características
Panel superior
1
2
34
5
6
7
8
9
10
11
12
15
17
18
19
20
16
21 22
1314
7
8
9
7
8
9
7
8
9
7
8
9
7
8
9
7
8
9
7
8
9
1. Teclado: Este teclado de 49 notas es sensible a la velocidad y, en conjunto con los botones Octave
(Octava) subir/bajar, pueden controlar un rango de 10 octavas.
2. Subir/Bajar octava: Utilice estos botones para desplazar el rango del teclado hacia arriba o abajo.
Pulse ambos botones simultáneamente para resetear el desplazamiento de octavas a cero.
3. Rueda de inflexión de pitch (tono): Mueva esta rueda para enviar información de inflexión de pitch
MIDI a través de un canal y puerto MIDI seleccionados.
4. Rueda de modulación: Mueva esta rueda para enviar datos del controlador continuo—MIDI CC #01
(modulación), por defecto.
5. Arpegiador / Configuración: Pulse este botón para activar o desactivar el arpegiador interno, cuyo
ritmo se basa en el tempo actual y la configuración de la división de tiempo. El arpegiador funciona
solamente con las notas que se están tocando en el teclado. También puede sincronizar el arpegiador
con una fuente de reloj MIDI interna o externa. Pulse Shift (Función secundaria) y este botón para
configurar los ajustes del arpegiador.
6. Enganche: Pulse este botón para activar o desactivar la función de enganche del arpegiador. Cuando el
arpegiador está encendido y la función de enganche activada, puede pulsar una combinación de teclas
en el teclado y el arpegiador continuará arpegiando esas teclas aún después de soltarlas. Al pulsar una
nueva combinación de teclas se inicia un nuevo arpegio.
Consejo: Mientras mantiene pulsada una combinación de teclas en el teclado, agregue más notas a ese
acorde arpegiado pulsando teclas adicionales.
7. Codificadores: Utilice estas perillas de 360º para enviar mensajes MIDI CC o de incremento/
decremento a su software o dispositivo MIDI externo.
8. Interruptores: Utilice estos interruptores para enviar mensajes MIDI CC, de cambio de programa o
banco de programa a su software o dispositivo MIDI externo. Pueden funcionar como interruptores
momentáneos o de conmutación (enganche). Si está activada Time Division (División de tiempos), estos
interruptores seleccionan la división de tiempos del arpegiador y la función Note Repeat (Repetición de
nota).
9. Pads: Utilice estos pads para enviar mensajes CC MIDI a su software o dispositivo MIDI externo. Estos
pads son sensibles a la presión y a la velocidad, lo que los hace de muy rápida respuesta e intuitivos
para tocar cuando se disparan golpes de tambor u otras muestras.

18
10. Banco de pads: Utilice estos botones para seleccionar el banco de pads A, B, C o D. Entre estos 4
bancos con 8 pads por banco, puede acceder a hasta 32 eventos MIDI.
11. División de tiempo: Utilice este botón y los interruptores para seleccionar la división de tiempo actual,
que determinará el ritmo de las funciones repetición de nota y el arpegiador. Cuando la división de
tiempo está activa, los interruptores no envían ninguno de sus mensajes MIDI CC, de cambio de
programa o banco de programa normales.
12. Nivel máximo: Pulse este botón para activar o desactivar Full Level (nivel máximo). Cuando el nivel
máximo está activo, los pads siempre tocan a máxima velocidad, independientemente de lo fuerte o
débilmente que usted los golpee.
13. Repetición de nota / Configuración: Utilice este botón para activar o desactivar la función Note Repeat
(Repetición de nota). Cuando la repetición de nota está activa, al golpear un pad, su nota se redispara a
un ritmo basado en los ajustes de tempo y división de tiempo actuales. También puede sincronizar la
repetición de nota con una fuente de reloj MIDI interna o externa. Pulse Shift y este botón para
configurar los ajustes de repetición de nota.
14. Tap Tempo: Toque ligeramente este botón al ritmo deseado para introducir un nuevo tempo.
Importante: Esta característica no funciona cuando el Advance 49 se ajusta a sincronismo External
(externo).
15. Pantalla: Utilice esta pantalla multicolor para ver los menús, opciones, parámetros y configuraciones del
Advance 49.
16. Página izquierda/derecha: Utilice estos botones para moverse entre las páginas disponibles de la
pantalla.
17. Cuadrante de datos: Utilice este cuadrante para cambiar los valores de parámetros, ajustes, etc. en la
pantalla. Si se pulsa el cuadrante, también funciona como botón Enter.
18. Cursores: Utilice estos botones para navegar por los menús y las opciones de la página actual de la
pantalla.
19. Botones de modo: Pulse uno de estos botones para ingresar a su modo primario (indicado arriba del
botón). Mantenga pulsado Shift y pulse uno de estos botones para activar su modo secundario
(indicado debajo del botón). Para más información, consulte Funcionamiento básico > Modos.
20. Función secundaria: Mantenga pulsado este botón para habilitar las funciones secundarias de ciertos
botones del Advance 49.
21. Botones de control de transporte: Estos tres botones son botones dedicados al envío de comandos
de control de transporte convencionales: Parar, reproducir y grabar. Pueden configurarse para enviar
MIDI (Start/Stop), valores preasignados de CC MIDI, MMC (Control de máquina MIDI) y MMC/MIDI
SysEx. El ajuste PTEX es para utilizar con Avid
®
Pro Tools
®
Express únicamente.
22. Ciclo: Mantenga pulsado este botón para activar la función Loop (ciclo) o Repeat (repetición) en su
software. Este botón está considerado como un control de transporte, por lo que puede configurarse
para enviar los mismos mensajes que los otros botones de control de transporte: MIDI (Start/Stop),
valores preasignados de CC MIDI, MMC (Control de máquina MIDI) y MMC/MIDI SysEx. El ajuste PTEX
es para utilizar con Avid
®
Pro Tools
®
Express únicamente.
Importante: Su software debe ser capaz de ciclar o repetir para poder utilizar esta función. Asegúrese
también de estar utilizando el preset del Advance 49 llamado igual que su software. Si su software no
posee un preset de Advance 49 correspondiente, configure Transport Format (formato de transporte)
en Global Mode (modo global) para que se comunique apropiadamente con su software.

19
Panel trasero
1. Presilla del cable: Puede fijar el cable del adaptador
de corriente a esta presilla para evitar que se
desenchufe accidentalmente.
2. Botón de encendido: Pulse este botón para
encender o apagar el Advance 49.
3. Entrada de corriente: Conecte esta entrada de corriente a una toma de corriente utilizando un
adaptador de corriente opcional (6 V CC, 1 A, centro positivo, que se vende por separado). Como
alternativa, si desea utilizar el Advance 49 para controlar un dispositivo MIDI externo y sin conexión de
un ordenador, puede conectar el puerto USB del Advance 49 a una toma de corriente con un cargador
USB estándar (que se vende por separado).
Importante: Si utiliza un cargador USB para alimentar el Advance 49, ajuste los controles pertinentes
para enviar sus mensajes MIDI por la salida MIDI. Ninguno de los controles ajustados para transmitir
solo por el puerto USB se enviará a un dispositivo conectado a la salida MIDI.
4. Puerto USB: Utilice un cable USB estándar para conectar este puerto USB a su ordenador. El puerto
USB del ordenador suministra suficiente corriente al Advance 49. Si lo conecta a un concentrador (hub)
USB, asegúrese de que sea un concentrador alimentado. Esta conexión también se utiliza para enviar y
recibir datos MIDI desde y hacia su ordenador.
También puede alimentar el Advance 49 conectando este puerto USB a una toma de corriente utilizando
un cargador USB estándar (que se vende por separado). Si lo hace, ajuste los controles pertinentes para
enviar sus mensajes MIDI por la salida MIDI. Ninguno de los controles ajustados para transmitir solo por
el puerto USB se enviará a un dispositivo conectado a la salida MIDI.
Cuando utiliza el Advance 49 con equipo MIDI externo:
• Si se conecta un dispositivo externo a la salida MIDI, su ordenador puede enviar mensajes MIDI por
este camino: Ordenador Advance 49 Dispositivo externo.
• Si se conecta un dispositivo externo a la entrada MIDI, dicho dispositivo puede enviar mensajes
MIDI por este camino: Dispositivo externo Advance 49 Ordenador. Los mensajes MIDI
pueden entonces enviarse hacia un dispositivo externo a través de la salida MIDI, pero deben pasar
primero por el ordenador.
5. Salida MIDI: Utilice un cable MIDI estándar de cinco patillas para conectar esta salida MIDI a la entrada
MIDI de un dispositivo MIDI externo (por ejemplo, un sintetizador, secuenciador, caja de ritmos, etc.).
Consulte la descripción Puerto USB precedente para información acerca de cómo se encaminan los
mensajes MIDI cuando se utiliza el Advance 49.
6. Entrada MIDI: Utilice un cable MIDI estándar de cinco patillas para conectar esta entrada MIDI a la
salida MIDI de un dispositivo MIDI externo (por ejemplo, otro controlador MIDI). Los mensajes MIDI que
se envíen a esa entrada MIDI serán enviados a su ordenador a través del puerto USB. Consulte la
descripción Puerto USB precedente para información acerca de cómo se encaminan los mensajes MIDI
cuando se utiliza el Advance 49.
7. Entrada para pedal de sostenido: Conecte a esta entrada un pedal de sostenido de 6,35 mm (1/4
pulg.) TS opcional.
8. Entrada para pedal de expresión: Conecte a esta entrada un pedal de expresión de 6,35 mm (1/4
pulg.) TRS opcional.
9. Ranu
ra de bloqueo Kensington
®
: Puede utilizar esta ranura de bloqueo Kensington a fin de sujetar el
Advance 49 a una mesa u otra superficie.
1
2
34
5
6
7
8
9

20
Funcionamiento básico
Puede utilizar el Advance 49 en su instalación en varias maneras diferentes, que se describen en la presente
guía. Recomendamos también descargar la Guía del usuario completa para saber más y lograr utilizar su
Advance 49 al máximo. Visite akaipro.com y encuentre la página web de Advance 49 para descargar la
Guía del usuario.
Escenarios de instalación
Con VIP en su DAW
El software VIP incluido le permite lograr lo máximo en control y funciones con su Advance 49. VIP es
esencialmente un host para sus plugins, un concentrador donde usted puede crear, editar y administrar sus
parches (presets) de sus diversos plugins. Cuando se utiliza VIP como plugin, como en este escenario, todo
el audio de VIP se envía a la DAW por su pista. Puede conmutar entre el modo de control del Advance 49
para controlar VIP o el modo MIDI para controlar su DAW (para más información, consulte la sección
Modos).
Consejo: Como con otros plugins, puede utilizar varios ejemplares de VIP en su DAW, cada una en su
propia pista.
Con VIP en modo autónomo (sin DAW)
Puede utilizar VIP en modo autónomo (sin DAW). Funciona de la misma manera que cuando se utiliza como
plugin (arriba descrito) excepto que el audio se encamina a la tarjeta de sonido de su ordenador en lugar de
encaminarse a su DAW. Puede utilizar el modo de control del Advance 49 para controlar VIP (para más
información, consulte la sección Modos).
Estación de trabajo
de audio digital (DAW)
VIP
Plugin Plugin Plugin Plugin
Modo MIDI
Modo de control
Plugin Plugin Plugin Plugin
VIP
Modo de control
Plugin Plugin Plugin Plugin
Plugin Plugin Plugin Plugin
La pagina si sta caricando...
La pagina si sta caricando...
La pagina si sta caricando...
La pagina si sta caricando...
La pagina si sta caricando...
La pagina si sta caricando...
La pagina si sta caricando...
La pagina si sta caricando...
La pagina si sta caricando...
La pagina si sta caricando...
La pagina si sta caricando...
La pagina si sta caricando...
La pagina si sta caricando...
La pagina si sta caricando...
La pagina si sta caricando...
La pagina si sta caricando...
La pagina si sta caricando...
La pagina si sta caricando...
La pagina si sta caricando...
La pagina si sta caricando...
La pagina si sta caricando...
La pagina si sta caricando...
La pagina si sta caricando...
La pagina si sta caricando...
La pagina si sta caricando...
La pagina si sta caricando...
La pagina si sta caricando...
La pagina si sta caricando...
La pagina si sta caricando...
La pagina si sta caricando...
La pagina si sta caricando...
La pagina si sta caricando...
La pagina si sta caricando...
La pagina si sta caricando...
La pagina si sta caricando...
La pagina si sta caricando...
La pagina si sta caricando...
La pagina si sta caricando...
La pagina si sta caricando...
La pagina si sta caricando...
La pagina si sta caricando...
La pagina si sta caricando...
La pagina si sta caricando...
La pagina si sta caricando...
-
 1
1
-
 2
2
-
 3
3
-
 4
4
-
 5
5
-
 6
6
-
 7
7
-
 8
8
-
 9
9
-
 10
10
-
 11
11
-
 12
12
-
 13
13
-
 14
14
-
 15
15
-
 16
16
-
 17
17
-
 18
18
-
 19
19
-
 20
20
-
 21
21
-
 22
22
-
 23
23
-
 24
24
-
 25
25
-
 26
26
-
 27
27
-
 28
28
-
 29
29
-
 30
30
-
 31
31
-
 32
32
-
 33
33
-
 34
34
-
 35
35
-
 36
36
-
 37
37
-
 38
38
-
 39
39
-
 40
40
-
 41
41
-
 42
42
-
 43
43
-
 44
44
-
 45
45
-
 46
46
-
 47
47
-
 48
48
-
 49
49
-
 50
50
-
 51
51
-
 52
52
-
 53
53
-
 54
54
-
 55
55
-
 56
56
-
 57
57
-
 58
58
-
 59
59
-
 60
60
-
 61
61
-
 62
62
-
 63
63
-
 64
64


Akai Advance 49 Guida utente
- Categoria
- Attrezzatura musicale
- Tipo
- Guida utente
in altre lingue
- français: Akai Advance 49 Mode d'emploi
- español: Akai Advance 49 Guía del usuario
- Deutsch: Akai Advance 49 Benutzerhandbuch
Documenti correlati
-
Akai Professional Advance 61 Guida Rapida
-
Akai Advance 25 Guida utente
-
Akai Professional MPK225 25-Key Performance Keyboard Controller Manuale del proprietario
-
Akai MPK249 Guida utente
-
Akai MPK261 Manuale utente
-
Akai Professional MPD218 Manuale utente
-
Akai Professional MPD226 Manuale utente
-
-
Altri documenti
-
M-Audio CTRL49 Manuale del proprietario
-
-
M-Audio Axiom AIR Mini 32 Manuale del proprietario
-
-
-
M-Audio Code 49 Guida utente
-
M-Audio Code 61 Manuale del proprietario
-
Studiologic Numa Manuale utente
-
LD Systems LDCURV500I Managing Software Manuale utente