Pioneer DDJ-WEGO2-K Guida Rapida
- Categoria
- Controller DJ
- Tipo
- Guida Rapida
Questo manuale è adatto anche per

Read Before Use (Important)/Quick Start Guide
A lire avant l’utilisation (Important)/Guide de démarrage rapide
Vor Gebrauch lesen (wichtig)/Kurzanleitung
Da leggere prima dell’uso (Importante)/Guida di avvio veloce
Lees dit voor gebruik (Belangrijk)/Snelstartgids
DJ Controller
Contrôleur pour DJ
DJ Controller
DJ Controller
DJ Controller
Français Deutsch NederlandsItalianoEnglish
http://pioneerdj.com/support/
The Pioneer DJ support site shown above offers FAQs, information on software and various other types of
information and services to allow you to use your product in greater comfort.
The contents of the warranty for the United States and Canada are provided on the last pages of the
instructions in English and French.
Le site de support DJ de Pioneer indiqué ci-dessus propose une FAQ, des informations sur le logiciel et divers
types d’informations et de services qui permettent une utilisation plus confortable de ce produit.
Le contenu de la garantie pour les États-Unis et le Canada se trouvent aux dernières pages des
modes d’emploi anglais et français.
Die oben gezeigte Pioneer DJ-Support-Website enthält häufig gestellte Fragen, Informationen über Software
und andere wichtige Informationen und Dienste, die Ihnen helfen, Ihr Produkt optimal zu verwenden.
Il sito di supporto DJ Pioneer indicato qui sopra offre una sezione FAQ, informazioni sul software ed
informazioni e servizi di vario tipo, per permettere un uso più confortevole dei nostri prodotti.
De bovengenoemde Pioneer DJ ondersteuningswebsite biedt een overzicht van de vaak gestelde vragen,
informatie over software en allerlei andere soorten informatie en diensten die u in staat stellen dit product met
meer gemak te gebruiken.
DDJ-WEGO2

En
2
Read Before Use (Important)
For Europe
If you want to dispose this product, do not mix it with
general household waste. There is a separate collection
system for used electronic products in accordance with
legislation that requires proper treatment, recovery and
recycling.
Private households in the member states of the EU, in Switzerland
and Norway may return their used electronic products free of
charge to designated collection facilities or to a retailer (if you
purchase a similar new one).
For countries not mentioned above, please contact your local
authorities for the correct method of disposal.
By doing so you will ensure that your disposed product undergoes
the necessary treatment, recovery and recycling and thus prevent
potential negative effects on the environment and human health.
K058b_A1_En
WARNING
This equipment is not waterproof. To prevent a fire or
shock hazard, do not place any container filled with
liquid near this equipment (such as a vase or flower
pot) or expose it to dripping, splashing, rain or
moisture.
D3-4-2-1-3_A1_En
WARNING
To prevent a fire hazard, do not place any naked flame
sources (such as a lighted candle) on the equipment.
D3-4-2-1-7a_A1_En
Operating Environment
Operating environment temperature and humidity:
+5 °C to +35 °C (+41 °F to +95 °F); less than 85 %RH
(cooling vents not blocked)
Do not install this unit in a poorly ventilated area, or in
locations exposed to high humidity or direct sunlight (or
strong artificial light).
D3-4-2-1-7c*_A2_En
When using this product, confirm the safety
information shown on the bottom of the unit.
D3-4-2-2-4_B1_En
WARNING
Store small parts out of the reach of children and
infants. If accidentally swallowed, contact a doctor
immediately.
D41-6-4_A1_En
This product is for general household purposes. Any
failure due to use for other than household purposes
(such as long-term use for business purposes in a
restaurant or use in a car or ship) and which requires
repair will be charged for even during the warranty
period.
K041_A1_En
For U.S.A.
Read these instructions.
Keep these instructions.
Heed all warnings.
Follow all instructions.
Do not use this apparatus near water.
Clean only with dry cloth.
Do not block any ventilation openings. Install in
accordance with the manufacturer’s
instructions.
Do not install near any heat sources such as
radiators, heat registers, stoves, or other
apparatus (including amplifiers) that produce
heat.
Do not defeat the safety purpose of the polarized
or grounding-type plug. A polarized plug has two
blades with one wider than the other. A
grounding type plug has two blades and a third
grounding prong. The wide blade or the third
prong are provided for your safety. If the provided
plug does not fit into your outlet, consult an
electrician for replacement of the obsolete outlet.
Protect the power cord from being walked on or
pinched particularly at plugs, convenience
receptacles, and the point where they exit from
the apparatus.
1)
2)
3)
4)
5)
6)
7)
8)
9)
10)
Only use attachments/accessories specified by
the manufacturer.
Use only with the cart, stand, tripod, bracket, or
table specified by the manufacturer, or sold with
the apparatus. When a cart is used, use caution
when moving the cart/apparatus combination to
avoid injury from tip-over.
Unplug this apparatus during lightning storms
or when unused for long periods of time.
Refer all servicing to qualified service personnel.
Servicing is required when the apparatus has
been damaged in any way, such as power-supply
cord or plug is damaged, liquid has been spilled
or objects have fallen into the apparatus, the
apparatus has been exposed to rain or moisture,
does not operate normally, or has been dropped.
D3-7-13-69_En
11)
12)
13)
14)

En
3
English
NOTE:
This equipment has been tested and found to comply
with the limits for a Class B digital device, pursuant
to Part 15 of the FCC Rules. These limits are designed
to provide reasonable protection against harmful
interference in a residential installation. This
equipment generates, uses, and can radiate radio
frequency energy and, if not installed and used in
accordance with the instructions, may cause harmful
interference to radio communications. However,
there is no guarantee that interference will not occur
in a particular installation. If this equipment does
cause harmful interference to radio or television
reception, which can be determined by turning the
equipment off and on, the user is encouraged to try
to correct the interference by one or more of the
following measures:
— Reorient or relocate the receiving antenna.
— Increase the separation between the equipment
and receiver.
— Connect the equipment into an outlet on a circuit
different from that to which the receiver is
connected.
— Consult the dealer or an experienced radio/TV
technician for help.
D8-10-1-2_A1_En
Information to User
Alterations or modifications carried out without
appropriate authorization may invalidate the user’s
right to operate the equipment.
D8-10-2_A1_En
FEDERAL COMMUNICATIONS COMMISSION
DECLARATION OF CONFORMITY
This device complies with part 15 of the FCC Rules.
Operation is subject to the following two conditions:
(1) This device may not cause harmful interference,
and (2) this device must accept any interference
received, including interference that may cause
undesired operation.
Product Name: DJ Controller
Model Number: DDJ-WEGO2-W,DDJ-WEGO2-K,DDJ-WEGO2-R
Responsible Party Name:
PIONEER ELECTRONICS (USA) INC.
SERVICE SUPPORT DIVISION
Address: 1925 E. DOMINGUEZ ST. LONG BEACH,
CA 90810-1003, U.S.A.
Phone: 1-800-421-1404
URL: http://www.pioneerelectronics.com
D8-10-4*_C1_En
For U.S.A. and Canada
IMPORTANT NOTICE
THE MODEL NUMBER AND SERIAL NUMBER OF
THIS EQUIPMENT ARE ON THE REAR OR BOTTOM.
RECORD THESE NUMBERS ON PAGE 13 FOR
FUTURE REFERENCE.
D36-AP9-3*_A1_En
WARNING: Handling the cord on this product or
cords associated with accessories sold with the
product may expose you to chemicals listed on
proposition 65 known to the State of California and
other governmental entities to cause cancer and
birth defect or other reproductive harm.
D36-P5_B1_En
The Safety of Your Ears is in Your Hands
Get the most out of your equipment by playing it at a
safe level – a level that lets the sound come through
clearly without annoying blaring or distortion and, most
importantly, without affecting your sensitive hearing.
Sound can be deceiving. Over time, your hearing
“comfort level” adapts to higher volumes of sound, so
what sounds “normal” can actually be loud and
harmful to your hearing. Guard against this by setting
your equipment at a safe level BEFORE your hearing
adapts.
ESTABLISH A SAFE LEVEL:
• Set your volume control at a low setting.
• Slowly increase the sound until you can hear it
comfortably and clearly, without distortion.
• Once you have established a comfortable sound
level, set the dial and leave it there.
BE SURE TO OBSERVE THE FOLLOWING
GUIDELINES:
• Do not turn up the volume so high that you can’t
hear what’s around you.
• Use caution or temporarily discontinue use in
potentially hazardous situations.
• Do not use headphones while operating a motorized
vehicle; the use of headphones may create a traffic
hazard and is illegal in many areas.
S001a_A1_En

En
4
For other areas
NOTE:
This equipment has been tested and found to comply
with the limits for a Class B digital device, pursuant
to Part 15 of the FCC Rules. These limits are designed
to provide reasonable protection against harmful
interference in a residential installation. This
equipment generates, uses, and can radiate radio
frequency energy and, if not installed and used in
accordance with the instructions, may cause harmful
interference to radio communications. However,
there is no guarantee that interference will not occur
in a particular installation. If this equipment does
cause harmful interference to radio or television
reception, which can be determined by turning the
equipment off and on, the user is encouraged to try
to correct the interference by one or more of the
following measures:
— Reorient or relocate the receiving antenna.
— Increase the separation between the equipment
and receiver.
— Connect the equipment into an outlet on a circuit
different from that to which the receiver is
connected.
— Consult the dealer or an experienced radio/TV
technician for help.
D8-10-1-2_A1_En
Information to User
Alterations or modifications carried out without
appropriate authorization may invalidate the user’s
right to operate the equipment.
D8-10-2_A1_En
FEDERAL COMMUNICATIONS COMMISSION
DECLARATION OF CONFORMITY
This device complies with part 15 of the FCC Rules.
Operation is subject to the following two conditions:
(1) This device may not cause harmful interference,
and (2) this device must accept any interference
received, including interference that may cause
undesired operation.
Product Name: DJ Controller
Model Number: DDJ-WEGO2-W,DDJ-WEGO2-K,DDJ-WEGO2-R
Responsible Party Name:
PIONEER ELECTRONICS (USA) INC.
SERVICE SUPPORT DIVISION
Address: 1925 E. DOMINGUEZ ST. LONG BEACH,
CA 90810-1003, U.S.A.
Phone: 1-800-421-1404
URL: http://www.pioneerelectronics.com
D8-10-4*_C1_En

En
5
English
Before start
How to read this manual
! Thank you for buying this Pioneer product.
Be sure to read both this leaflet and the Operating Instructions con-
tained on the CD-ROM accompanying this product! Both documents
include important information that you must understand before
using this product.
After you have finished reading the instructions, put them away in a
safe place for future reference.
! In this manual, names of screens and menus displayed on the
computer screen, as well as names of buttons and terminals on the
product, etc., are indicated within brackets. (e.g.: [RECORD] panel,
[CONFIG] menu, [CUE] button, [VINYL] mode, [AUX IN] terminals)
About trademarks and registered
trademarks
! Pioneer is a registered trademark of PIONEER CORPORATION.
! The other names of companies, products, and technologies men-
tioned herein are the registered trademarks or trademarks of their
respective owners.
What’s in the box
! VIRTUAL DJ LE software/driver software/operating instructions
CD-ROM
! USB cable
! Read Before Use (Important)/Quick Start Guide
! Warranty (for some regions)
1
! iPhone/iPad connection cable (Lightning)
! iPhone/iPad stand
! Stand fixing screws x 3
! VIRTUAL DJ LE license key (indicated on this unit’s bottom panel)
1 The included warranty is for the European region.
— For the North American region, the corresponding information is
provided on the last page of both the English and French versions
of the “Read Before Use (Important)/Quick Start Guide”.
— For the Japanese region, the corresponding information is
provided on the last page of the Japanese version of the “Read
Before Use (Important)/Quick Start Guide”.
Cautions
The license key cannot be reissued. Be careful not to lose it.
Installing the software
! Be sure to read the end-user license agreements that appear when
installing the software below. The software can only be used if you
accept the terms of the agreements.
— VIRTUAL DJ “End-User License Agreement”
— Pioneer DDJ_WeGO2 ASIO driver software “Software end user
license agreement”
About the driver software (Windows)
This driver software is an exclusive ASIO driver for outputting audio
signals from the computer.
! There is no need to install the driver software when using Mac OS X.
Operating environment
Supported operating systems
Windows
®
8/Windows
®
8 Pro
32-bit version
1
64-bit version
1
1
Windows
®
7 Home Premium/Professional/Ultimate
32-bit version
1
64-bit version
1
1
Supported operating systems
Windows Vista
®
Home Basic/Home Premium/Business/
Ultimate
32-bit version
1
64-bit version
1
1
Windows
®
XP Home Edition/Professional (SP2 or later) 32-bit version
1
1 When using a 64-bit version of Windows, the driver software can only be used for
32-bit applications.
Checking the latest information on the driver software
For detailed information on this unit’s designated driver software, see
the Pioneer DJ support site below.
http://pioneerdj.com/support/
Before installing the software
! Turn off this unit’s power switch, then disconnect the USB cable
connecting this unit and the computer.
! If any other programs are running on the computer, quit them.
About the VIRTUAL DJ LE software
VIRTUAL DJ LE is a DJ software application by Atomix productions. DJ
performances are possible by connecting the computer on which this
software is installed to this unit.
! If VIRTUAL DJ is already installed on your computer, VIRTUAL DJ
LE will not operate properly. Uninstall all versions of VIRTUAL DJ
already installed on your computer before installing VIRTUAL DJ
LE for this unit.
For instructions on uninstalling VIRTUAL DJ, see the Pioneer DJ
support site below.
http://pioneerdj.com/support/
! When using Windows, the ASIO driver must be installed.
Minimum operating environment
Supported operating
systems
CPU and required memory
Mac OS X 10.5.x
Intel
®
processor
1 GB or more of RAM
Windows
®
XP
Home Edition/
Professional (SP3 or later)
Intel
®
Pentium
®
4 or AMD Athlon
™
XP processor
512 MB or more of RAM
Others
Hard disk Free space of 50 MB or greater
Optical drive Optical disc drive on which the CD-ROM can be read
USB port
A USB 2.0 port is required to connect the computer
with this unit.
Display resolution Resolution of 1 024 x 768 or greater
Recommended operating environment
Supported operating systems CPU and required memory
Mac OS X 10.6.x
Intel
®
processor
2 GB or more of RAM
Windows
®
7
Professional
32-bit version
Intel
®
Core
™
2 or AMD Athlon
™
X2
processor
1 GB or more of RAM
Others
Hard disk Free space of 200 MB or greater
Display resolution
Resolution of 1 280 x 1 024 or greater (Windows)
Resolution of 1 440 x 900 or greater (Mac)
The conditions below must be satisfied in order to conduct video mixing.
! Mac
— ATI
™
or NVIDIA
®
video chipset with 256 MB of dedicated DDR3 RAM
— Video card must support dual-screen output.

En
6
! Windows
— ATI
™
or NVIDIA
®
video card with 256 MB of dedicated DDR3 RAM
— Video card must support dual-screen output.
! Full functionality is not guaranteed on all computers, even those meeting the
operating environment requirements described above.
! Even with the required memory indicated for the operating environment above,
lack of memory due to resident programs, the number of services, etc., could
prevent the software from offering optimal functionality and performance. In
such cases, free up sufficient memory. We recommend installing additional
memory for stable operation.
! Depending on the computer’s power-saving settings, etc., the CPU and hard
disk may not provide sufficient processing capabilities. For notebook comput-
ers in particular, make sure the computer is in the proper conditions to provide
constant high performance (for example by keeping the AC power connected)
when using VIRTUAL DJ LE.
! Note that problems may arise with the functionality of VIRTUAL DJ LE depending
on other software running on your computer.
Installing the VIRTUAL DJ LE software
! Cautions when the included software involves an Internet
environment
A separate contract with and payment to a provider offering Internet
services is required.
! The installer screen’s design may differ depending on the version of
VIRTUAL DJ LE, but the operating procedure is the same.
About the installation procedure
The installation procedure depends on the operating system (OS) on the
computer you are using.
For Windows
After installing the driver software, install the VIRTUAL DJ LE software.
For Mac OS X
Only install the VIRTUAL DJ LE software.
About the installation procedure (Windows)
Do not connect this unit and the computer until installation is
completed.
! Log on as the user which was set as the computer’s administrator
before installing.
! If any other programs are running on the computer, quit them.
1 Turn on the computer’s power.
2 Insert the included CD-ROM into the computer’s CD
drive.
The CD-ROM menu is displayed.
! If the CD-ROM menu does not appear when the CD-ROM is inserted,
open the CD drive from [Computer (or My Computer)] in the [Start]
menu, then double-click the [CD_menu.exe] icon.
3 When the CD-ROM menu appears, select [Install
Driver Software (Pioneer_DDJ_WeGO2_Driver_X.XXX)],
then click [Start].
4 Proceed with installation according to the instructions
on the screen.
If [Windows Security] appears on the screen while the installation is
in progress, click [Install this driver software anyway] and continue
with the installation.
When the installation program is completed, a completion message
appears.
After installing the driver software, install the VIRTUAL DJ LE software.
! When installing on Windows XP
If [Hardware Installation] appears on the screen while the installa-
tion is in progress, click [Continue Anyway] and continue with the
installation.
5 Select [Install VIRTUAL DJ LE(DDJ-WeGO2)] from the
CD-ROM’s menu, then click [Start].
The VIRTUAL DJ LE installer is launched.
6 Once the VIRTUAL DJ LE installer is launched, click
[Next].
! To return to the previous screen: click [Back].
! To cancel installation: click [Cancel].
7 Read the contents of the [End-User License
Agreement] carefully, and if you agree, check [I accept
the terms in the License Agreement], then click [Next].
If you do not agree to the terms of the [End-User License Agreement],
click [Cancel] to cancel installation.
8 Select the type of installation for VIRTUAL DJ LE, then
click [Next].
! When [Typical] is selected, plug-ins and other components are
installed simultaneously. Normally select [Typical].
! When [Custom] is selected, you can select which components to
install.

En
7
English
9 When the screen below is displayed, click [Install].
Installation begins.
The message of successful installation appears once installation is
completed.
10 Click [Finish].
This completes the installation procedure.
VIRTUAL DJ LE is launched if [Launch VirtualDJ] on the screen is
checked when [Finish] is clicked.
11 Input the serial number printed on this unit’s bottom
panel (XXXX-XXXX-XXXXX/WEGO2), then click [OK].
This unit’ s bottom panel
VIRTUAL DJ LE Serial number
About the installation procedure (Mac OS X)
1 Insert the included CD-ROM into the computer’s CD drive.
The [CD_menu] icon appears on the screen. Double-click it.
2 When the CD-ROM’s menu is displayed, select [Install
VIRTUAL DJ LE(DDJ-WeGO2)], then click [Start].
The VIRTUAL DJ LE installer is launched.
3 Once the VIRTUAL DJ LE installer is launched, click
[Continue].
4 Read the contents of the license agreement carefully,
click [Continue] and then click [Agree] to accept the
license agreement.
If you do not agree to the license agreement, click [Disagree] to cancel
installation.
5 Select the type of installation for VIRTUAL DJ LE, then
click [Install].
— To select standard installation, click [Install].
— To install in a different location, click [Change Install
Location...] and choose the place of installation.
Installation begins.
The message of successful installation appears once installation is
completed.
6 Click [Close].
This completes the installation procedure.
Checking the latest information on the VIRTUAL
DJ LE software
For the latest information on the operating environment and compatibil-
ity, and to acquire the latest operating system, please visit the following
Atomix productions website:
To obtain the latest version of the VIRTUAL DJ LE software, you must
register your user account on the Atomix productions website.
http://www.virtualdj.com
Mounting the iPhone/iPad stand
To use an iPhone/iPad, mount the included iPhone/iPad stand.
WARNING
Keep the included screws and the screw covers that have been
removed from the unit out of the reach of children. If they should be
swallowed, contact a physician immediately.
1 Remove the three screw covers.
2 Fasten the included screws in the order shown on the
diagram below.
! Do not use any screws other than the included ones.

En
8
Cautions on using the iPhone/iPad stand
! This stand is exclusively for use with an iPhone/iPad. Do not place
tablets other than iPads or large devices on the stand.
! Set the iPhone/iPad on the stand in the horizontal direction. It may
be unstable if set in the vertical direction.
! Do not apply excessive force to the stand. Doing so may damage this
unit.
! Please note that Pioneer will accept no responsibility whatsoever for
damage to or malfunction of the device, injury, etc., due to the device
falling, etc.
! Do not move with an iPhone/iPad placed on the stand. The iPhone/
iPad could fall off.
! If there is a cover on the iPhone/iPad, remove the cover before plac-
ing the iPhone/iPad on the stand. If the cover is left on, the iPhone/
iPad could be unstable.
iOS devices that can be used with this unit and placed on
the stand
! iOS
iOS 6
! Devices supporting the iPhone/iPad connection cable (Lightning)
iPad (4th generation), iPad mini, iPhone 5, iPod touch (5th
generation)
For the latest information on iOS devices, see [DDJ-WeGO2] on the
Pioneer DJ support site below.
http://pioneerdj.com/support/
Connections
Be sure the power is off when connecting equipment and changing
connections.
Be sure to use the USB cable included with this product.
Refer to the operating instructions for the component to be connected.
Connecting with a computer
! The iPhone/iPad connection has priority, so do not connect an
iPhone/iPad when using a computer.
! VIRTUAL DJ LE for DDJ-WEGO2 is customized to output the audio
only from the unit not from the computer. Please connect head-
phones, an amplifier or powered speakers as shown in the figure
below to hear the output sound.
Audio output from your computer will be available if a paid
upgrade to VIRTUALDJ PRO FULL is completed.
With this unit, the power is supplied by USB bus power. The unit can be
used simply by connecting it to a computer using the USB cable.
! Connect this unit and the computer directly using the included USB
cable.
! Connect the computer to which this unit is to be connected to an AC
power supply.
! A USB hub cannot be used.
Component, amplifier,
powered speaker, etc.
For audio output
R L
MIC MASTER OUT
ON OFF
R
L
Microphone
Headphones
ON/OFF switch
For checking
the output sound
For audio input
DJ software
Computer
Connecting with an iPhone/iPad
Connect with the triangle mark at the top.
iPhone/iPad connection cable (Lightning)
ON/OFF switch
Component, amplifier,
powered speaker, etc.
For audio output
Microphone
Headphones
For checking
the output sound
For audio input
USB mobile battery/
USB power adapter
For power supply
R L
MIC MASTER OUT
ON OFF
iPhone/iPad
DJ software
R
L
! An iPhone/iPad cannot be charged with the iPhone/iPad connection
cable (Lightning).
Starting the system
When using a computer
1 Connect this unit to your computer via a USB cable.
2 Boot up the connected computer.
3 Slide this unit’s [ON/OFF] switch to the [ON] position.
Turn on the power of this unit.
Launching VIRTUAL DJ LE
About the order of operations when launching VIRTUAL
DJ LE
Always first turn on this unit’s power, wait for the startup illumina-
tion to finish, check that this unit’s [CTRL A], [FX1], [FX2], [FX3] and
[CTRL B] buttons are all lit dimly, then launch VIRTUAL DJ LE.
Launching VIRTUAL DJ LE (Windows)
From the Windows [Start] menu, click the [All Programs]
> [VirtualDJ] > [VirtualDJ LE (DDJ-WeGO2)] icon.
Launching VIRTUAL DJ LE (Mac OS X)
In Finder, open the [Application] folder, then double-
click the [VirtualDJ LE] icon.
When VIRTUAL DJ LE is launched the first time, a screen for entering the
serial number appears.
Input the serial number printed on this unit’s bottom panel (XXXX-
XXXX-XXXXX/WEGO2), then click [OK].

En
9
English
When using an iPhone/iPad
Audio disorders (beeping) may occur in this unit when calling or send-
ing/receiving data on the mobile phone. This problem can arise when
the mobile phone’s communications protocol is GSM, and is due to
interference caused by GSM. If this happens, change the iPhone/iPad’s
setting to flight mode.
This problem does not occur with the 3G or LTE communications
protocols.
1 Connect the iPhone/iPad with this unit using the
iPhone/iPad connection cable (Lightning).
2 Connect this unit with the USB mobile battery or USB
power adapter.
3 Slide this unit’s [ON/OFF] switch to the [ON] position.
4 Launch the DJ application on the iPhone/iPad.
Basic Operation
D DBA
B
CC
Loading tracks and playing them (rA)
1 Turn the rotary selector while pressing the [SHIFT]
button to select a folder or item.
! When a folder or item with the [+] mark is selected and the rotary
selector is pressed while pressing the [SHIFT] button, that folder or
item is opened or closed.
2 Release the [SHIFT] button then turn the rotary
selector to select the track.
3 Press the [LOAD] button to load the selected track
onto the deck.
4 Press the [f] button to play the track.
! When this button is pressed again during playback, playback
pauses.
Using the mixer functions (rB)
! Adjust the volume of the powered speakers, etc., connected to the
[MASTER OUT] terminals to an appropriate level. Note that if the
volume is set too high, the output sound could be very loud.
1 Operate the channel faders to adjust the audio level
output from the respective decks.
2 Operate the crossfader to switch the deck whose
sound is output from the speakers.
— Left edge: Sound is output from deck [A] or [C].
— Center: The sound of all the decks is mixed and output.
— Right edge: Sound is output from deck [B] or [D].
! The curve characteristics can be switched using the crossfader
curve setting button on the [MIXER] panel at the center of the com-
puter’s screen.
— [
]: Select this when you do not want to use the crossfader.
— [
]: Set here for a curve that rises gradually.
— [
]: Sets an abruptly rising curve.
3 Turn the [MASTER VOL] control to adjust the audio
level of the speakers.
Monitoring sound with headphones (rC)
1 Connect headphones to the [PHONES] terminal.
2 Press the [CUE
] button for the deck you want to
monitor.
3 Turn the [HEADPHONES MIX] control.
! Turn counterclockwise: The volume of the deck whose [CUE ] but-
ton is pressed increases relatively.
! Turn clockwise: The [MASTER OUT] volume increases relatively.
4 Turn the [HEADPHONES VOL] control.
! The sound of the deck whose [CUE ] button is pressed is output
from the headphones.
! When the [CUE
] button is pressed again, monitoring is canceled.
Quitting the system
1 Quit VIRTUAL DJ LE.
2 Slide this unit’s [ON/OFF] switch to the [OFF] position.
3 Disconnect the USB cable from your computer.

Part names and functions
AB
2 Deck2 Deck 3 Mixer
1 Browser
1 Browser3 Mixer 3 Mixer
3 Mixer2 Deck 2 Deck
2 Deck
p
1
2 2dkc
4 3 h hf
6
5
d 6
5
l
g
ic
4 3 f
j
g
m m
q
n
n
o
7
9
a
b
8
e
9
a
b
87
The screen above shows an example of 2-deck layout. The contents displayed on the screen differ according to the VIRTUAL DJ LE settings.
! The deck layout can be switched by clicking the [
] button on the computer’s screen.
1 Browser
1 Rotary selector
! Turn:
The cursor moves in section A of the above diagram.
! [SHIFT] + turn:
The cursor moves in section B of the above diagram.
! [SHIFT] + press:
Folders in section B of the above diagram open and close.
* If a panel other than the [BROWSE] panel is displayed, turn
the rotary selector to display the [BROWSE] panel.
2 LOAD button
Loads the track selected with the cursor in each of the decks.
En
10

En
11
English
2 Deck
3 f button
Use this to play/pause tracks.
4 CUE button
! Press:
Sets a cue point or moves the cue point.
! [SHIFT] + press:
The playing position moves to the beginning of the track.
5 SYNC (MASTER) button
! Press:
Synchronizes to the master deck’s tempo.
! [SHIFT] + press:
Sets the master deck for synchronization.
6 TEMPO slider
Adjusts the playing speed.
7 CTRL A button
! Press:
Turns key control on and off.
! [SHIFT] + press:
Turns key control, the filter and effects 1 to 3 all off at once.
8 CTRL B button
! Press:
Turns the filter on and off.
! [SHIFT] + press:
Turns key control, the filter and effects 1 to 3 all off at once.
9 FX1 button
! Press:
Turns effect 1 on and off.
! [SHIFT] + press:
Switches the effect types of FX1.
a FX2 button
! Press:
Turns effect 2 on and off.
! [SHIFT] + press:
Switches the effect types of FX2.
b FX3 button
! Press:
Turns effect 3 on and off.
! [SHIFT] + press:
Switches the effect types of FX3.
c AUTO LOOP (MOVE GRID) control
! Turn:
Changes the loop length for playback.
! Press:
Turns loop playback on and off.
! [SHIFT] + turn:
Moves the beat grid position.
* This function can be used when you upgrade to VIRTUALDJ
PRO FULL .
! [SHIFT] + press:
Sets the manual loop’s in and out points.
Turns manual loop playback on and off.
d DECK button
Switches the deck to be operated.
e SHIFT button
When another button is pressed while pressing the [SHIFT] button, a
different function is called out.
f SAMPLER button
! Press:
Turns the sampler mode on and off.
g HOT CUE (DELETE)/SAMPLER button
! Press:
When the sampler mode is off, sets or calls out the hot cue point.
When the sampler mode is on, plays/stops playback of the sam-
ple sound.
! [SHIFT] + press:
When the sampler mode is off, cancels the hot cue set at the
button that is pressed.
When the sampler mode is on, if a sample sound is playing, play-
back returns to the beginning of the sample sound and continues
from there.
h Jog dial
When the JOG FX mode is off
— Scratch
When turned while touching a metallic part of the top of the
jog dial, the sound is played according to the direction and
speed at which the jog dial is turned.
— Pitch bend
The playing speed can be adjusted by turning the outer part
of the jog dial during playback.
— Manual search
When the jog dial is spun while pressing [SHIFT] button dur-
ing playback, the track is fast-forwarded/fast-reversed.
When the JOG FX mode is on
— JOG FX control
Effect parameters can be adjusted by turning the jog dial.
3 Mixer
i MIC VOL control
Adjusts the audio level input to the [MIC] terminal.
j MASTER VOL control
Adjusts the sound level output from the master.
! The adjustment made here does not affect the [MASTER] control
on the computer’s screen.
k HEADPHONES MIX control
Adjusts the balance of the monitor volume between the sound of the
deck whose [
] button is pressed and the master sound.
! The sampler sound is output regardless of the position of the
[HEADPHONES MIX] control.
l HEADPHONES VOL control
Adjusts the audio level output from the [PHONES] terminal.
! The adjustment made here does not affect the [VOL] control
(headphones volume control) on the computer’s screen.
! The sound of the microphone connected to the [MIC] jack is not
output from the headphones.
m EQ (HI, MID, LOW) controls
These adjust the sound quality input to the various decks.
[HI] (treble range), [MID] (middle range), [LOW] (low range)
n CUE (Headphones cue button)
Use this to monitor the sound of the respective decks over the
headphones.
o Channel Level Indicator
Indicates the level of the sound before it passes through the channel
faders of the respective decks.
p Channel fader
Adjusts the sound level output from the various decks.
q Crossfader
Switches the sound of the decks assigned to the left and right sides
of the crossfader for output.

En
12
Additional
information
Troubleshooting
! Incorrect operation is often mistaken for trouble or malfunction. If
you think that there is something wrong with this component, check
the items in the “Troubleshooting” section of this unit’s operating
instructions and the [FAQ] for the [DDJ-WeGO2] on the Pioneer DJ
support site.
http://pioneerdj.com/support/
Sometimes the problem may lie in another component. Inspect the
other components and electrical appliances being used. If the prob-
lem cannot be rectified, ask your nearest Pioneer authorized service
center or your dealer to carry out repair work.
! This unit may not operate properly due to static electricity or other
external influences. In this case, proper operation may be restored by
turning the power off, waiting 1 minute, then turning the power back
on.
About installation locations
! Do not place this unit on objects radiating heat, such as an amplifier,
or expose it to a spotlight for an extended period of time, as this may
damage this unit.
! Install this unit away from a tuner or a TV. Otherwise, image distor-
tion or noise may result. Also, image distortion or noise can easily
occur if an indoor antenna is used. In such cases, use an outdoor
antenna or turn off the power of this unit.
Cleaning the product
Under normal circumstances, wipe it with a dry cloth. For hard-to-
remove stains, soak a soft cloth in a neutral detergent diluted with 5 to
6 times of water, wring it thoroughly, wipe off the stains, and wipe the
surface with a dry cloth again. Do not use alcohol, thinner, benzene, or
insecticide, as these may peel off the printed label or the coated film.
Avoid leaving rubber or vinyl products in contact for an extended period
of time, as this may also damage the surface of the cabinet. When using
chemical-impregnated wipes, etc., read the cautions carefully.
Unplug the USB cable from this unit before cleaning.
About the included CD-ROM
Operating environment
This CD-ROM can be used with Windows
®
XP, Windows Vista
®
,
Windows
®
7, Windows
®
8 and Apple Mac OS X (10.8, 10.7, 10.6 and
10.5.8).
Adobe Reader (Version 4.0 or later) is required to read the manuals in
the CD-ROM.
Precautions For Use
This CD-ROM is for use with a computer. It cannot be used with a DVD
player, music CD player, or DJ player. Attempting to play this CD-ROM
with those player can damage speakers or cause impaired hearing due
to the large volume.
License
Please agree to the “Terms of Use” indicated below before using this
CD-ROM. Do not use if you are unwilling to consent to the terms of its
use.
Terms of Use
Copyright to data (Driver software/Operating Instructions) provided
on this CD-ROM belongs to PIONEER CORPORATION. Unauthorized
transfer, duplication, broadcast, public transmission, translation, sales,
lending or other such matters that go beyond the scope of “personal
use” or “citation” as defined by Copyright Law may be subject to punitive
actions. Permission to use this CD-ROM is granted under license by
PIONEER CORPORATION.
General Disclaimer
PIONEER CORPORATION does not guarantee the operation of this
CD-ROM with respect to computers using any of the applicable OS.
In addition, PIONEER CORPORATION is not liable for any damages
incurred as a result of use of this CD-ROM and is not responsible for any
compensation.
If the manual in the supplied CD-ROM is not automatically opened,
double-click on the CD-ROM icon to display the content and then open
the PDF file.
Specifications
General – Main Unit
Power supply ........................................................................................DC 5 V
Power consumption ...........................................................................500 mA
Main unit weight (with iPhone/iPad stand mounted).............1.8 kg (4.0 lb)
Maximum external dimensions (with iPhone/iPad stand mounted)
.............................. 380 mm (width) × 65 mm (height) × 250.6 mm (depth)
(14.96 in. (width) × 2.56 in. (height) × 9.87 in. (depth))
Tolerable operating temperature .........+5 °C to +35 °C (+41 °F to +95 °F)
Tolerable operating humidity ...................... 5 % to 85 % (no condensation)
Audio Section
Rated output level
MASTER OUT ............................................................................+13 dBu
Total harmonic distortion
MASTER OUT ..............................................................................0.006 %
Frequency characteristic
MASTER OUT ................................................................. 20 Hz to 20 kHz
S/N ratio (when playing on computer)
MASTER OUT ................................................... 101 dB (at rated output)
Input impedance
MIC .................................................................................................. 10 kW
Output impedance
MASTER OUT ................................................................................... 1 kW
PHONES ...........................................................................................4.7 W
USB AUDIO ......................................... 24 bit/Fs: 44.1 kHz, 24 bit/Fs: 48 kHz
Input / Output terminals
USB terminal
B type ................................................................................................. 1 set
MASTER OUT output terminal
RCA pin jacks ....................................................................................1 set
PHONES output terminal
Stereo phone jack (Ø 6.3 mm) .........................................................1 set
Stereo mini phone jack (Ø 3.5 mm) ................................................. 1 set
MIC input terminal
Phone jack (Ø 6.3 mm) ..................................................................... 1 set
iOS device connection terminal
14-pin ................................................................................................. 1 set
! For improvement purposes, specifications and design of this unit
and the included software are subject to change without notice.
! © 2013 PIONEER CORPORATION. All rights reserved.

En
13
English
UCP0212
PIONEER ELECTRONICS (USA) INC.
LIMITED WARRANTY
WARRANTY VALID ONLY IN THE U.S.A. AND CANADA
WARRANTY
Pioneer Electronics (USA) Inc. (PUSA) warrants that products distributed by PUSA in the U.S.A. and Canada that fail to function properly under normal use due to a manufacturing
defect when installed and operated according to the owner’s manual enclosed with the unit will be repaired or replaced with a unit of comparable value, at the option of PUSA,
without charge to you for parts or actual repair work. Parts supplied under this warranty may be new or rebuilt at the option of PUSA.
THIS LIMITED WARRANTY APPLIES TO THE ORIGINAL OR ANY SUBSEQUENT OWNER OF THIS PIONEER PRODUCT DURING THE WARRANTY PERIOD PROVIDED THE
PRODUCT WAS PURCHASED FROM AN AUTHORIZED PIONEER DISTRIBUTOR/DEALER IN THE U.S.A. OR CANADA. YOU WILL BE REQUIRED TO PROVIDE A SALES
RECEIPT OR OTHER VALID PROOF OF PURCHASE SHOWING THE DATE OF ORIGINAL PURCHASE OR, IF RENTED, YOUR RENTAL CONTRACT SHOWING THE PLACE
AND DATE OF FIRST RENTAL. IN THE EVENT SERVICE IS REQUIRED, THE PRODUCT MUST BE DELIVERED WITHIN THE WARRANTY PERIOD, TRANSPORTATION
PREPAID, ONLY FROM WITHIN THE U.S.A. AS EXPLAINED IN THIS DOCUMENT. YOU WILL BE RESPONSIBLE FOR REMOVAL AND INSTALLATION OF THE PRODUCT .
PUSA WILL PAY TO RETURN THE REPAIRED OR REPLACEMENT PRODUCT TO YOU WITHIN THE U.S.A.
PRODUCT WARRANTY PERIOD
Parts Labor
DJ Audio and Video ................................................................................................................................................................................... 1 Year 1 Year
The warranty period for retail customers who rent the product commences upon the date product is first put into use (a) during the rental period or (b) retail sale, whichever occurs first.
WHAT IS NOT COVERED
IF THIS PRODUCT WAS PURCHASED FROM AN UNAUTHORIZED DISTRIBUTOR, THERE ARE NO WARRANTIES, EXPRESS OR IMPLIED, INCLUDING THE IMPLIED WARRANTY
OF MERCHANTABILITY AND THE IMPLIED WARRANTY OF FITNESS FOR A PARTICULAR PURPOSE AND THIS PRODUCT IS SOLD STRICTLY “AS IS” AND “WITH ALL FAULTS".
PIONEER SHALL NOT BE LIABLE FOR ANY CONSEQUENTIAL AND/OR INCIDENTAL DAMAGES.
THIS WARRANTY DOES NOT APPLY IF THE PRODUCT HAS BEEN SUBJECTED TO POWER IN EXCESS OF ITS PUBLISHED POWER RATING.
THIS WARRANTY DOES NOT COVER THE CABINET OR ANY APPEARANCE ITEM, USER ATTACHED ANTENNA, ANY DAMAGE TO RECORDS OR RECORDING TAPES OR DISCS, ANY
DAMAGE TO THE PRODUCT RESULTING FROM ALTERATIONS, MODIFICA
TIONS NOT AUTHORIZED IN WRITING BY PIONEER, ACCIDENT, MISUSE OR ABUSE, DAMAGE DUE TO
LIGHTNING OR TO POWER SURGES, SUBSEQUENT DAMAGE FROM LEAKING, DAMAGE FROM INOPERATIVE BATTERIES, OR THE USE OF BATTERIES NOT CONFORMING TO THOSE
SPECIFIED IN THE OWNER’S MANUAL.
THIS WARRANTY DOES NOT COVER THE COST OF PARTS OR LABOR WHICH WOULD BE OTHERWISE PROVIDED WITHOUT CHARGE UNDER THIS WARRANTY OBTAINED FROM
ANY SOURCE OTHER THAN A PIONEER AUTHORIZED SERVICE COMPANY OR OTHER DESIGNATED LOCATION. THIS WARRANTY DOES NOT COVER DEFECTS OR DAMAGE CAUSED
BY THE USE OF UNAUTHORIZED PARTS OR LABOR OR FROM IMPROPER MAINTENANCE.
ALTERED, DEFACED, OR REMOVED SERIAL NUMBERS VOID THIS ENTIRE WARRANTY
NO OTHER WARRANTIES
PIONEER LIMITS ITS OBLIGATIONS UNDER ANY IMPLIED WARRANTIES INCLUDING, BUT NOT LIMITED TO, THE IMPLIED WARRANTIES OF MERCHANTABILITY AND
FITNESS FOR A PARTICULAR PURPOSE, TO A PERIOD NOT TO EXCEED THE WARRANTY PERIOD. NO WARRANTIES SHALL APPLY AFTER THE WARRANTY PERIOD.
SOME STATES DO NOT ALLOW LIMITATIONS ON HOW LONG AN IMPLIED WARRANTY LASTS AND SOME STATES DO NOT ALLOW THE EXCLUSIONS OR LIMITATIONS
OF INCIDENTAL OR CONSEQUENTIAL DAMAGES, SO THE ABOVE LIMITATIONS OR EXCLUSIONS MAY NOT APPLY TO YOU. THIS WARRANTY GIVES YOU SPECIFIC LEGAL
RIGHTS AND YOU MAY HAVE OTHER RIGHTS WHICH MAY VARY FROM STATE TO STATE.
TO OBTAIN SERVICE
PUSA has appointed a number of Authorized Service Companies throughout the U.S.A. and Canada should your product require service. To receive warranty service you
need to present your sales receipt or, if rented, your rental contract showing place and date of original owner’s transaction. If shipping the unit you will need to package it
carefully and send it, transportation prepaid by a traceable, insured method, to an Authorized Service Company. Package the product
using adequate padding material to
prevent damage in transit. The original container is ideal for this purpose. Include your name, address and telephone number where you can be reached during business
hours.
On all complaints and concerns in the U.S.A. and Canada call Customer Support at 1-800-872-4159.
For hook-up and operation of your unit or to locate an
Authorized Service Company, please call or write:
CUSTOMER SUPPORT
PIONEER ELECTRONICS (USA) INC.
P.O. BOX 1720
LONG BEACH, CALIFORNIA 90801
1-800-872-4159
http://www.pioneerelectronics.com
DISPUTE RESOLUTION
Following our response to any initial request to Customer Support, should a dispute arise between you and Pioneer, Pioneer makes available its Complaint Resolution Program
to resolve the dispute. The Complaint Resolution Program is available to you without charge. Yo u are required to use the Complaint Resolution Program before you exercise
any rights under, or seek any remedies, created by Title I of the Magnuson-Moss Warranty-Federal Tr ade Commission Improvement Act, 15 U.S.C. 2301 et seq.
To use the Complaint Resolution Program call 1-800-872-4159 and explain to the customer service representative the problem you are experiencing, steps you have taken
to have the product repaired during the warranty period and the name of the authorized Distributor/Dealer from whom the Pioneer product was purchased. After the complaint
has been explained to the representative, a resolution number will be issued. Within 40 days of receiving your complaint, Pioneer will investigate the dispute and will either:
(1) respond to your complaint in writing informing you what action Pioneer will take, and in what time period, to resolve the dispute; or (2) respond to your complaint in writing
informing you why it will not take any action.
RECORD THE PLACE AND DATE OF PURCHASE FOR FUTURE REFERENCE
Model No. ____________________________________________ Serial No. _________________________________________ Purchase Date ______________________
Purchased From ____________________________________________________________________________________________________________________________
_
KEEP THIS INFORMATION AND YOUR SALES RECEIPT IN A SAFE PLACE

Fr
2
A lire avant l’utilisation (Important)
Pour l’Europe
Si vous souhaitez vous débarrasser de cet appareil, ne le
mettez pas à la poubelle avec vos ordures ménagères. Il
existe un système de collecte séparé pour les appareils
électroniques usagés, qui doivent être récupérés, traités
et recyclés conformément à la législation.
Les habitants des états membres de l’UE, de Suisse et de Norvège
peuvent retourner gratuitement leurs appareils électroniques
usagés aux centres de collecte agréés ou à un détaillant (si vous
rachetez un appareil similaire neuf).
Dans les pays qui ne sont pas mentionnés ci-dessus, veuillez
contacter les autorités locales pour savoir comment vous pouvez
vous débarrasser de vos appareils.
Vous garantirez ainsi que les appareils dont vous vous débarrassez
sont correctement récupérés, traités et recyclés et préviendrez de
cette façon les impacts néfastes possibles sur l’environnement et la
santé humaine.
K058b_A1_Fr
AVERTISSEMENT
Cet appareil n’est pas étanche. Pour éviter les risques
d’incendie et de décharge électrique, ne placez près de
lui un récipient rempli d’eau, tel qu’un vase ou un pot
de fleurs, et ne l’exposez pas à des gouttes d’eau, des
éclaboussures, de la pluie ou de l’humidité.
D3-4-2-1-3_A1_Fr
AVERTISSEMENT
Pour éviter les risques d’incendie, ne placez aucune
flamme nue (telle qu’une bougie allumée) sur
l’appareil.
D3-4-2-1-7a_A1_Fr
Milieu de fonctionnement
Température et humidité du milieu de fonctionnement :
De +5 °C à +35 °C (de +41 °F à +95 °F) ; Humidité
relative inférieure à 85 % (orifices de ventilation non
obstrués)
N’installez pas l’appareil dans un endroit mal ventilé ou
un lieu soumis à une forte humidité ou en plein soleil
(ou à une forte lumière artificielle).
D3-4-2-1-7c*_A1_Fr
Lorsque vous utilisez ce produit, vérifiez les
informations concernant la sécurité sous l’appareil.
D3-4-2-2-4_B1_Fr
AVERTISSEMENT
Gardez les pièces de petite taille hors de la portée des
bébés et des enfants. En cas d’ingestion accidentelle,
veuillez contacter immédiatement un médecin.
D41-6-4_A1_Fr
Ce produit est destiné à une utilisation domestique
générale. Toute panne due à une utilisation autre qu'à
des fins privées (comme une utilisation à des fins
commerciales dans un restaurant, dans un autocar
ou sur un bateau) et qui nécessite une réparation
sera aux frais du client, même pendant la période de
garantie.
K041_A1_Fr
Pour le Canada
REMARQUE IMPORTANTE
LE NUMÉRO DE MODÈLE ET LE NUMÉRO DE SÉRIE
SE TROUVENT À L’ARRIÈRE OU SUR LE FOND DE
CET APPAREIL. NOTEZ CES NUMÉROS À LA PAGE
11 POUR VOUS Y RÉFÉRER ULTÉRIEUREMENT.
D36-AP9-3*_A1_Fr
La protection de votre ouïe est entre vos
mains
Pour assurer le rendement optimal de votre matériel
et – plus important encore – la protection de votre ouïe,
réglez le volume à un niveau raisonnable. Pour ne pas
altérer votre sens de la perception, le son doit être clair
mais ne produire aucun vacarme et être exempt de
toute distorsion. Votre ouïe peut vous jouer des tours.
Avec le temps, votre système auditif peut en effet
s’adapter à des volumes supérieurs, et ce qui vous
semble un « niveau de confort normal » pourrait au
contraire être excessif et contribuer à endommager
votre ouïe de façon permanente. Le réglage de votre
matériel à un volume sécuritaire AVANT que votre ouïe
s’adapte vous permettra de mieux vous protéger.
CHOISISSEZ UN VOLUME SÉCURITAIRE:
• Réglez d’abord le volume à un niveau inférieur.
• Montez progressivement le volume jusqu’à un niveau
d’écoute confortable ; le son doit être clair et exempt
de distorsions.
• Une fois que le son est à un niveau confortable, ne
touchez plus au bouton du volume.
N’OUBLIEZ PAS DE RESPECTER LES
DIRECTIVES SUIVANTES:
• Lorsque vous montez le volume, assurez-vous de
pouvoir quand même entendre ce qui se passe
autour de vous.
• Faites très attention ou cessez temporairement
l’utilisation dans les situations pouvant s’avérer
dangereuses.
• N’utilisez pas des écouteurs ou un casque d’écoute
lorsque vous opérez un véhicule motorisé ; une telle
utilisation peut créer des dangers sur la route et est
illégale à de nombreux endroits.
S001a_A1_Fr

Fr
3
Français
Informations préliminaires
Comment lire ce manuel
! Merci pour l’achat de ce produit Pioneer.
Veillez à lire cette brochure et le mode d’emploi sur le CD-ROM livré
avec ce produit. Les deux documents contiennent des informations
importantes qui doivent être comprises avant d’utiliser ce produit.
Cela fait, conservez le mode d’emploi de façon à pouvoir vous y
référer en cas de nécessité.
! Dans ce manuel, les noms d’écrans et de menus s’affichant sur
l’écran de l’ordinateur, de même que les noms de touches, boutons
et de prises sur le produit, etc. sont indiqués entre parenthèses. (ex. :
Panneau [RECORD], Menu [CONFIG], Touche [CUE], Mode [VINYL],
Prises [AUX IN])
À propos des marques commerciales
et des marques déposées
! Pioneer est une marque déposée de PIONEER CORPORATION.
! Les noms d’autres sociétés, produits et technologies mentionnés ici
sont des marques déposées ou des marques commerciales de leurs
détenteurs respectifs.
Contenu du carton d’emballage
! CD-ROM avec logiciel/pilote/mode d’emploi de VIRTUAL DJ LE
! Câble USB
! A lire avant l’utilisation (Important)/Guide de démarrage rapide
! Garantie (pour certaines régions)
1
! Câble de raccordement d’iPhone/iPad (Lightning)
! Support d’iPhone/iPad
! Vis de fixation de support x 3
! Clé de licence de VIRTUAL DJ LE (indiquée sous cet appareil)
1 La garantie incluse est destinée à la région européenne.
— Pour la région nord-américaine, les informations correspon-
dantes se trouvent à la dernière page des versions anglaises et
françaises des “A lire avant l’utilisation (Important)/Guide de
démarrage rapide”.
— Pour la région japonaise, les informations correspondantes se
trouvent à la dernière page de la version japonaise des “A lire
avant l’utilisation (Important)/Guide de démarrage rapide”.
Attention
La clé de licence ne peut pas être redélivrée. Veillez à ne pas la perdre.
Installation du logiciel
! Veuillez lire les contrats de licence d’utilisation qui apparaissent lors
de l’installation du logiciel suivant. Le logiciel peut être utilisé si vous
acceptez les termes des contrats.
— VIRTUAL DJ “End-User License Agreement”
— Logiciel pilote ASIO DDJ_WeGO2 de Pioneer “Accord de licence
du logiciel”
À propos du pilote (Windows)
Ce logiciel est un pilote ASIO prévu exclusivement pour transmettre des
signaux audio de l’ordinateur.
! Il n’est pas nécessaire d’installer le pilote dans le cas de Mac OS X.
Environnement opérationnel
Systèmes d’exploitation pris en charge
Windows
®
8/Windows
®
8 Professionnel
Version à 32
bits
1
Version à 64
bits
1
1
Windows
®
7 Édition Familiale Premium/Professionnel/
Édition Intégrale
Version à 32
bits
1
Version à 64
bits
1
1
Windows Vista
®
Familiale Basique/Familiale Premium/
Professionnel/Intégrale
Version à 32
bits
1
Version à 64
bits
1
1
Windows
®
XP Édition Familiale/Édition Professionnelle
(SP2 ou ultérieur)
Version à 32
bits
1
1 Si une version de Windows à 64 bits est utilisée, le pilote ne pourra être utilisé
que pour les applications à 32 bits.
Vérification des toutes dernières informations
concernant le pilote
Pour de plus amples informations sur le pilote prévu pour cet appareil,
reportez-vous au site de support DJ de Pioneer ci-dessous.
http://pioneerdj.com/support/
Avant d’installer le pilote
! Éteignez cet appareil, puis débranchez le câble USB raccordé à cet
appareil et à l’ordinateur.
! Si des programmes sont ouverts sur l’ordinateur, fermez-les.
À propos du logiciel VIRTUAL DJ LE
VIRTUAL DJ LE est une application logicielle DJ de Atomix productions.
En reliant l’ordinateur sur lequel ce logiciel est installé à cet appareil, il
est possible d’effectuer des performances DJ.
! Si VIRTUAL DJ est déjà installé sur votre ordinateur, VIRTUAL
DJ LE ne fonctionnera pas correctement. Désinstallez toutes les
versions de VIRTUAL DJ installées sur votre ordinateur avant d’ins-
taller VIRTUAL DJ LE pour cet appareil.
Pour les instructions sur la désinstallation de VIRTUAL DJ, repor-
tez-vous au site de support DJ de Pioneer suivant.
http://pioneerdj.com/support/
! Lorsque Windows est utilisé, le pilote ASIO doit être installé.
Environnement fonctionnel minimal
Systèmes
d’exploitation pris en
charge
Processeur et mémoire requise
Mac OS X 10.5.x
Processeur
®
Intel
1 Go ou plus de RAM
Windows
®
XP
Édition Familiale/
Édition Professionnelle
(SP3 ou ultérieur)
Processeur Intel
®
Pentium
®
4 ou AMD Athlon
™
XP
512 Mo ou plus de RAM
Divers
Disque dur Espace disponible de 50 Mo ou plus
Lecteur optique Lecteur de disque optique pouvant lire le CD-ROM
Port USB
Un port USB 2.0 est indispensable pour raccorder cet
ordinateur à cet appareil.
Résolution de l’écran Résolution de 1 024 x 768 ou plus

Fr
4
Environnement opérationnel recommandé
Systèmes d’exploitation pris
en charge
Processeur et mémoire requise
Mac OS X 10.6.x
Processeur
®
Intel
2 Go ou plus de RAM
Windows
®
7
Professionnel
Version à 32
bits
Processeur Intel
®
Core
™
2 ou AMD
Athlon
™
X2
1 Go ou plus de RAM
Divers
Disque dur Espace disponible de 200 Mo ou plus
Résolution de l’écran
Résolution de 1 280 x 1 024 ou plus (Windows)
Résolution de 1 440 x 900 ou plus (Mac)
Les conditions suivantes doivent être remplies pour la réalisation de
mixages vidéo.
! Mac
— Jeu de puces vidéo ATI
™
ou NVIDIA
®
avec 256 Mo de RAM DDR3
spécialisée
— La carte vidéo doit prendre en charge une sortie double écran.
! Windows
— Carte vidéo ATI
™
ou NVIDIA
®
avec 256 Mo de RAM DDR3 spécialisée
— La carte vidéo doit prendre en charge une sortie double écran.
! Toutes les fonctionnalités ne sont pas garanties sur tous les ordinateurs, même
si ceux-ci remplissent les conditions décrites ci-dessus.
! Même si la mémoire indiquée ci-dessus, requise pour le fonctionnement, est
présente, une insuffisance de mémoire due aux programmes résidents, aux
nombres de services, etc. peut empêcher le logiciel de fonctionner de manière
optimale. Dans ce cas, libérez de la mémoire. Un ajout de mémoire permettra
un fonctionnement plus stable.
! Selon les réglages d’économie d’énergie de l’ordinateur, etc. la capacité de
traitement du processeur et du disque dur peut être insuffisante. Lorsque vous
utilisez VIRTUAL DJ LE, assurez-vous que l’ordinateur est en état de fournir sa
performance optimale (par exemple en laissant le cordon d’alimentation rac-
cordé), surtout s’il s’agit d’un ordinateur portable.
! Notez que des problèmes peuvent apparaître dans le fonctionnement de
VIRTUAL DJ LE si un autre logiciel est ouvert sur votre ordinateur.
Installation du logiciel VIRTUAL DJ LE
! Précautions à prendre lorsqu’une connexion Internet est nécessaire
Il est nécessaire de contracter un abonnement auprès d’un fournis-
seur de services Internet.
! La présentation de l’écran de l’installateur peut être différente selon
la version de VIRTUAL DJ LE, mais la marche à suivre est la même.
À propos de l’installation
La marche à suivre pour l’installation dépend du système d’exploitation
(OS) de l’ordinateur utilisé.
Pour Windows
Après avoir installé le pilote, installez le logiciel VIRTUAL DJ LE.
Pour Mac OS X
Installez seulement le logiciel VIRTUAL DJ LE.
À propos de l’installation (Windows)
Ne raccordez cet appareil et l’ordinateur que lorsque l’installation est
terminée.
! Connectez-vous sous le nom de l’utilisateur spécifié comme admi-
nistrateur de l’ordinateur avant l’installation.
! Si des programmes sont ouverts sur l’ordinateur, fermez-les.
1 Allumez l’ordinateur.
2 Insérez le CD-ROM fourni dans le lecteur CD de
l’ordinateur.
Le menu du CD-ROM apparaît.
! Si le menu du CD-ROM n’apparaît pas après l’insertion du CD-ROM,
ouvrez le lecteur CD dans [Ordinateur (ou Poste de travail)]
à partir du menu [Démarrer], puis double-cliquez sur l’icône
[CD_menu.exe].
3 Lorsque le menu du CD-ROM apparaît, sélectionnez
[Installer le Logiciel de pilotage (Pioneer_DDJ_WeGO2_
Driver_X.XXX)], puis cliquez sur [Demarrer].
4 Procédez à l’installation en suivant les instructions qui
apparaissent à l’écran.
Si [Sécurité de Windows] apparaît à l’écran au cours de l’installation,
cliquez sur [Installer ce pilote quand même] et continuez l’installation.
Lorsque le programme d’installation est terminé, le message Installation
terminée apparaît.
Après avoir installé le pilote, installez le logiciel VIRTUAL DJ LE.
! Installation sur Windows XP
Si [Installation matérielle] apparaît à l’écran au cours de l’installa-
tion, cliquez sur [Continuer] et continuez l’installation.
5 Sélectionnez [Installation de VIRTUAL DJ LE(DDJ-
WeGO2)] dans le menu du CD-ROM, puis cliquez sur
[Demarrer].
L’installateur de VIRTUAL DJ LE est lancé.
6 Lorsque l’installateur de VIRTUAL DJ LE a été lancé,
cliquez sur [Next].
! Pour revenir à l’écran précédent : cliquez sur [Back].
! Pour annuler l’installation : cliquez sur [Cancel].
7 Lisez attentivement le contenu de [End-User License
Agreement] et, si vous acceptez, cochez [I accept the
terms in the License Agreement] puis cliquez sur [Next].
Si vous n’acceptez pas les termes de [End-User License Agreement],
cliquez sur [Cancel] pour annuler l’installation.
8 Sélectionnez le type d’installation de VIRTUAL DJ LE,
puis cliquez sur [Next].
! Lorsque [Typical] est sélectionné, les plugins et autres composants
sont également installés. Normalement sélectionnez [Typical].
! Lorsque [Custom] est sélectionné, vous pouvez sélectionner les
composants qui doivent être installés.

Fr
5
Français
9 Lorsque l’écran suivant apparaît, cliquez sur [Install].
L’installation commence.
Lorsqu’elle est terminée, le message d’installation réussie apparaît.
10 Cliquez sur [Finish].
La procédure est alors terminée.
VIRTUAL DJ LE est lancé si [Launch VirtualDJ] est coché sur l’écran
quand [Finish] est cliqué.
11 Entrez le numéro de série indiqué sous cet appareil
(XXXX-XXXX-XXXXX/WEGO2), puis cliquez sur [OK].
Panneau inférieur de cet appareil
Numéro de série VIRTUAL DJ LE
À propos de l’installation (Mac OS X)
1 Insérez le CD-ROM fourni dans le lecteur CD de
l’ordinateur.
L’icône [CD_menu] apparaît à l’écran. Double-cliquez dessus.
2 Lorsque le menu du CD-ROM apparaît, sélectionnez
[Installation de VIRTUAL DJ LE(DDJ-WeGO2)], puis
cliquez sur [Demarrer].
L’installateur de VIRTUAL DJ LE est lancé.
3 Lorsque l’installateur de VIRTUAL DJ LE a été lancé,
cliquez sur [Continuer].
4 Lisez attentivement le contenu du contrat de licence,
cliquez sur [Continuer] puis sur [Accepter] pour accepter
le contrat de licence.
Si vous n’acceptez pas le contrat de licence, cliquez sur [Refuser] pour
annuler l’installation.
5 Sélectionnez le type d’installation de VIRTUAL DJ LE,
puis cliquez sur [Installer].
— Pour sélectionner l’installation standard, cliquez sur [Installer].
— Pour l’installer à un autre emplacement, cliquez sur
[Changer l'emplacement de l'installation...] et choisissez
l’emplacement.
L’installation commence.
Lorsqu’elle est terminée, le message d’installation réussie apparaît.
6 Cliquez sur [Fermer].
La procédure est alors terminée.
Vérification des toutes dernières informations
sur le logiciel VIRTUAL DJ LE
Pour les toutes dernières informations sur l’environnement opérationnel
et la compatibilité ainsi que pour acquérir le tout dernier système d’ex-
ploitation, veuillez consulter le site Atomix productions suivant :
Pour obtenir la toute dernière version du logiciel VIRTUAL DJ LE, vous
devez enregistrer votre compte utilisateur sur le site Atomix productions.
http://www.virtualdj.com
Montage du support d’iPhone/iPad
Pour utiliser un iPhone/iPad, montez le support d’iPhone/iPad fourni.
AVERTISSEMENT
Rangez les vis fournies et les caches de vis déposés de l’appareil hors
de portée des enfants. S’ils devaient être avalés accidentellement,
contactez immédiatement un médecin.
1 Déposez les trois caches de vis.

Fr
6
2 Vissez les vis fournies dans l’ordre indiqué dans le
schéma suivant.
! N’utilisez que les vis fournies, à l’exclusion de toute autre.
Précautions à prendre quand le support d’iPhone/iPad est
utilisé
! Ce support doit être utilisé exclusivement avec un iPhone/iPad. Ne
pas poser de tablettes ou d’autres iPad, ni des dispositifs plus gros,
sur le support.
! Posez l’iPhone/iPad sur le support à l’horizontale. Il peut être ins-
table s’il est posé à la verticale.
! N’exercez pas de force excessive sur le support. Cet appareil pourrait
être endommagé.
! Veuillez noter que Pioneer décline toute responsabilité quant au
dommage ou dysfonctionnement de cet appareil, aux blessures
ou autres problèmes pouvant résulter, entre autre, d’une chute du
dispositif.
! Ne déplacez pas le support avec un iPhone/iPad. L’iPhone/iPad
pourrait tomber.
! Si un couvercle protège l’iPhone/iPad, enlevez-le avant de mettre
l’iPhone/iPad sur le support. Si vous laissez le couvercle dessus,
l’iPhone/iPad pourrait être instable.
Dispositifs iOS pouvant être utilisés avec cet appareil et
posés sur le support
! iOS
iOS 6
! Appareil pouvant être raccordé par un câble de raccordement
d’iPhone/iPad (Lightning)
iPad (4e génération), iPad mini, iPhone 5, iPod touch (5e génération)
Pour les toutes dernières informations sur les appareils iOS, repor-
tez-vous à [DDJ-WeGO2] sur le site de support DJ de Pioneer
ci-dessous.
http://pioneerdj.com/support/
Raccordements
Les appareils doivent être hors tension lors du raccordement ou du
changement de câbles.
Seul le câble USB fourni avec ce produit doit être utilisé.
Reportez-vous au mode d’emploi de l’appareil devant être raccordé.
Raccordement à un ordinateur
! La connexion iPhone/iPad est prioritaire, ne raccordez pas
d’iPhone/iPad lorsqu’un ordinateur est utilisé.
! VIRTUAL DJ LE pour DDJ-WEGO2 est préréglé pour restituer le
son de l’appareil seulement mais pas de l’ordinateur. Raccordez
un casque, un amplificateur ou des enceintes amplifiées, comme
indiqué sur la figure suivante, pour écouter le son.
Le son en provenance de l’ordinateur sera disponible après une
mise à jour à VIRTUALDJ PRO FULL payante.
L’alimentation de cet appareil est fournie par le bus USB. Cet appareil
peut être utilisé simplement après l’avoir raccordé à un ordinateur par
le câble USB.
! Raccordez cet appareil et l’ordinateur directement avec le câble USB
fourni.
! Raccordez l’ordinateur auquel cet appareil doit être raccordé à une
source d’alimentation secteur.
! Un concentrateur USB ne peut pas être utilisé.
Casque
Microphone
Pour la sortie audio
Ordinateur
Composants, amplificateurs,
enceintes alimentées, etc.
R L
MIC MASTER OUT
ON OFF
R
L
Commutateur ON/OFF
Pour
l’
entrée
audio
Pour contrôler
le son
Logiciel DJ
Raccordement à un iPhone/iPad
Câble de raccordement d’ iPhone/iPad
(Lightning)
Raccordez avec le repère en triangle orienté vers le haut.
R L
MIC MASTER OUT
ON OFF
iPhone/iPad
Logiciel DJ
R
L
Casque
Microphone
Pour la sortie audio
Composants, amplificateurs,
enceintes alimentées, etc.
Pour
l’
entrée
audio
Pour contrôler
le son
Commutateur ON/OFF
Batterie portable USB/
Adaptateur d’ alimentation USB
Pour l’ alimentation électrique
! Un iPhone/iPad ne peut pas être chargé avec le câble de raccorde-
ment d’iPhone/iPad fourni (Lightning).

Fr
7
Français
Ouverture du système
Lorsqu’un ordinateur est utilisé
1 Raccordez cet appareil à votre ordinateur avec un
câble USB.
2 Allumez l’ordinateur raccordé.
3 Faites glisser le commutateur [ON/OFF] de cet appareil vers [ON].
Allumez cet appareil.
Lancement de VIRTUAL DJ LE
À propos de l’ordre des opérations lors du lancement de
VIRTUAL DJ LE
Allumez toujours d’abord cet appareil, attendez la fin de l’éclairage de
la mise en route, vérifiez que les touches [CTRL A], [FX1], [FX2], [FX3]
et [CTRL B] de cet appareil sont allumées et lancez VIRTUAL DJ LE.
Lancement de VIRTUAL DJ LE (Windows)
Depuis le menu [Démarrer] de Windows, cliquez sur
l’icône [Tous les programmes] > [VirtualDJ] > [VirtualDJ
LE (DDJ-WeGO2)].
Lancement de VIRTUAL DJ LE (Mac OS X)
Dans le Finder, ouvrez le dossier [Application], puis
double-cliquez sur l’icône [VirtualDJ LE].
La première fois que vous lancez VIRTUAL DJ LE, l’écran d’entrée du
numéro de série apparaît.
Entrez le numéro de série indiqué sous cet appareil (XXXX-XXXX-
XXXXX/WEGO2), puis cliquez sur [OK].
Lorsqu’un iPhone/iPad est utilisé
Des troubles audio (beeps) peuvent se produire dans cet appareil lors de
l’appel ou de l’envoi et de la réception de données sur le téléphone por-
table. Ce problème peut surgir lorsque le protocole de communications
du téléphone portable est le GSM, et il est dû aux interférences causées
par le GSM. Si le cas se présente, changez le réglage de l’iPhone/iPad et
sélectionnez le mode Vol.
Ce problème ne se présente pas avec les protocoles de communications
3G et LTE.
1 Raccordez l’iPhone/iPad à cet appareil avec le câble de
raccordement d’iPhone/iPad (Lightning).
2 Raccordez cet appareil avec la batterie portable USB
ou l’adaptateur secteur USB.
3 Faites glisser le commutateur [ON/OFF] de cet
appareil vers [ON].
4 Lancement de l’application DJ sur l’iPhone/iPad.
Opérations de base
D DBA
B
CC
Chargement et lecture de morceaux (rA)
1 Tournez le sélecteur rotatif tout en appuyant sur
la touche [SHIFT] pour sélectionner un dossier ou un
élément.
! Lorsqu’un dossier ou élément accompagné du signe [+] est sélec-
tionné et le sélecteur rotatif est pressé en même temps que la touche
[SHIFT], le dossier ou l’élément s’ouvre ou se ferme.
2 Relâchez la touche [SHIFT] et tournez le sélecteur
rotatif pour sélectionner le morceau.
3 Pression sur la touche [LOAD] pour charger le
morceau sélectionné sur la platine.
4 Pression sur la touche [f] pour jouer le morceau.
! Une pression sur cette touche pendant la lecture interrompt la
lecture.
Utilisation des fonctions du mixeur (rB)
! Réglez le volume des enceintes amplifiées, etc. raccordées aux
prises [MASTER OUT] au niveau approprié. Notez que si le volume
est réglé trop haut, le son peut être très fort.
1 Actionnez les faders de canaux pour régler le niveau
sonore à la sortie des platines respectives.
2 Actionnez le crossfader pour changer la platine dont
le son est restitué par les enceintes.
— Côté gauche : Le son provient de la platine [A] ou [C].
— Centre : Le son de toutes les platines est mixé avant sa sortie.
— Côté droit : Le son provient de la platine [B] ou [D].
! Les caractéristiques de la courbe peuvent être changées à l’aide
d’une des touches de réglage de courbe du crossfader sur le pan-
neau [MIXER] au centre de l’écran de l’ordinateur.
— [
] : Sélectionnez cette touche si vous ne voulez pas utiliser
le crossfader.
— [
] : Sélectionnez cette option si vous voulez une courbe
ascendante douce.
— [
] : Définit une courbe brusquement ascendante.
3 Tournez la commande [MASTER VOL] pour régler le
niveau sonore des enceintes.
Contrôle du son par un casque (rC)
1 Raccordez le casque à la prise [PHONES].
2 Appuyez sur la touche [CUE
] de la platine que vous
voulez contrôler.
3 Tournez la commande [HEADPHONES MIX].
! Rotation antihoraire : Le volume de la platine dont la touche [CUE
] est pressée augmente relativement.
! Rotation horaire : Le volume de [MASTER OUT] augmente
relativement.
4 Tournez la commande [HEADPHONES VOL].
! Le son de la platine dont la touche [CUE ] est pressée sort par le
casque d’écoute.
! Le contrôle s’annule par une nouvelle pression sur la touche [CUE
].
Fermeture du système
1 Fermez VIRTUAL DJ LE.
2 Faites glisser le commutateur [ON/OFF] de cet
appareil vers [OFF].
3 Débranchez le câble USB de l’ordinateur.

Noms et fonctions des éléments
AB
2 Platine 3 Mixeur 2 Platine
3 Mixeur
1 Navigateur
1 Navigateur 3 Mixeur
2 Platine 3 Mixeur 2 Platine
2 Platine
p
1
2 2dkc
4 3 h hf
6
5
d 6
5
l
g
ic
4 3 f
j
g
m m
q
n
n
o
7
9
a
b
8
e
9
a
b
87
L’écran ci-dessus montre en exemple l’affichage de 2 platines. Ce qui apparaît sur l’écran dépend des réglages de VIRTUAL DJ LE.
! Le nombre de platines affichées peut être changé par un clic sur le bouton [
] sur l’écran de l’ordinateur.
1 Navigateur
1 Sélecteur rotatif
! Tournez :
Le curseur se déplace dans la section A de l’illustration
ci-dessus.
! [SHIFT] + rotation :
Le curseur se déplace dans la section B de l’illustration
ci-dessus.
! [SHIFT] + pression :
Les dossiers dans la section B de l’illustration ci-dessus
s’ouvrent et se ferment.
* Si un autre panneau que le panneau [BROWSE] appa-
raît, tournez le sélecteur rotatif pour afficher le panneau
[BROWSE].
2 Touche LOAD
Charge le morceau sélectionné avec le curseur dans chacune des
platines.
Fr
8
La pagina si sta caricando...
La pagina si sta caricando...
La pagina si sta caricando...
La pagina si sta caricando...
La pagina si sta caricando...
La pagina si sta caricando...
La pagina si sta caricando...
La pagina si sta caricando...
La pagina si sta caricando...
La pagina si sta caricando...
La pagina si sta caricando...
La pagina si sta caricando...
La pagina si sta caricando...
La pagina si sta caricando...
La pagina si sta caricando...
La pagina si sta caricando...
La pagina si sta caricando...
La pagina si sta caricando...
La pagina si sta caricando...
La pagina si sta caricando...
La pagina si sta caricando...
La pagina si sta caricando...
La pagina si sta caricando...
La pagina si sta caricando...
La pagina si sta caricando...
La pagina si sta caricando...
La pagina si sta caricando...
La pagina si sta caricando...
La pagina si sta caricando...
La pagina si sta caricando...
La pagina si sta caricando...
La pagina si sta caricando...
La pagina si sta caricando...
La pagina si sta caricando...
La pagina si sta caricando...
La pagina si sta caricando...
-
 1
1
-
 2
2
-
 3
3
-
 4
4
-
 5
5
-
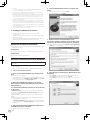 6
6
-
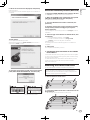 7
7
-
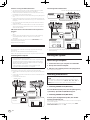 8
8
-
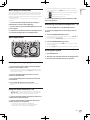 9
9
-
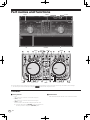 10
10
-
 11
11
-
 12
12
-
 13
13
-
 14
14
-
 15
15
-
 16
16
-
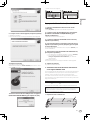 17
17
-
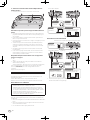 18
18
-
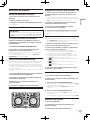 19
19
-
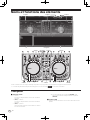 20
20
-
 21
21
-
 22
22
-
 23
23
-
 24
24
-
 25
25
-
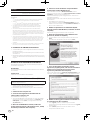 26
26
-
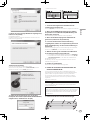 27
27
-
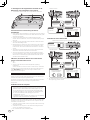 28
28
-
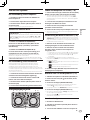 29
29
-
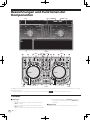 30
30
-
 31
31
-
 32
32
-
 33
33
-
 34
34
-
 35
35
-
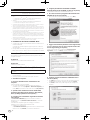 36
36
-
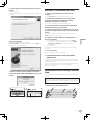 37
37
-
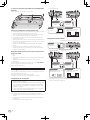 38
38
-
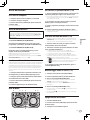 39
39
-
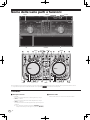 40
40
-
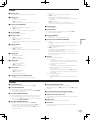 41
41
-
 42
42
-
 43
43
-
 44
44
-
 45
45
-
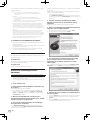 46
46
-
 47
47
-
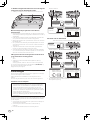 48
48
-
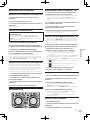 49
49
-
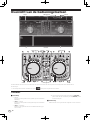 50
50
-
 51
51
-
 52
52
-
 53
53
-
 54
54
-
 55
55
-
 56
56


Pioneer DDJ-WEGO2-K Guida Rapida
- Categoria
- Controller DJ
- Tipo
- Guida Rapida
- Questo manuale è adatto anche per
in altre lingue
- English: Pioneer DDJ-WEGO2-K Quick start guide
- français: Pioneer DDJ-WEGO2-K Guide de démarrage rapide
- Deutsch: Pioneer DDJ-WEGO2-K Schnellstartanleitung
- Nederlands: Pioneer DDJ-WEGO2-K Snelstartgids
Documenti correlati
-
Pioneer DDJ-WeGO-V Guida Rapida
-
Pioneer DDJ-WEGO4-W Guida Rapida
-
-
-
-
Pioneer DDJ-SR Guida Rapida
-
Pioneer DDJ-SZ-N Manuale del proprietario
-
-
Pioneer Serato DJ DDJ-S1 Manuale utente
-
Philips XW-SMA3-K Manuale utente
