
EN_IMPORTANT, RETAIN FOR FUTURE REFERENCE: READ CAREFULLY.
FR_IMPORTANT:A LIRE ATTENTIVEMENT ET À CONSERVER POUR CONSULTATION ULTÉRIEURE.
ES_IMPORTANTE, LEA Y GUARDE PARA FUTURAS REFERENCIAS.
DE_WICHTIG! SORGFÄLTIG LESEN UND FÜR SPÄTER NACHSCHLAGEN AUFBEWAHREN.
IT _ IMPORTANTE! CONSERVARE IL PRESENTE MANUALE PER FUTURO RIFERIMENTO E LEGGERLO ATTENTAMENTE.
INbcb010V03_UK_DE_FR_IT 845-179
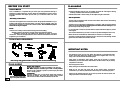
EN_Assembly video please scan the QR code.
FR_Vidéo d'assemblage, veuillez scanner le code QR.
ES_Montagevideo scannen Sie bitte den QR-Code ein.
DE_Vídeo de montaje, escanea el código QR.
IT_Scansionare il codice QR per il Video di Assemblaggio
EN
Quick & Easy Assembly
Ridge Reinforced Walls
Available in Various Sizes
FR
Assemblage rapide et facile Murs
renforcés de faîte
Disponible en différentes tailles
DE
Schnelle und einfache Montage
Verstärkte Wände
Erhältlich in verschiedenen Größen
IT
Montaggio facile e veloce
Pareti rinforzate
Disponibile in varie dimensioni
ITN221002058V01_US_CA_UK_DE_FR_IT


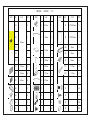
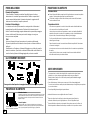
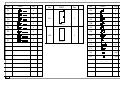
PART NO. SIZE QTY PART NO. SIZE QTY PART NO. SIZE QTY
P5 2 19 981mm 1 D1 1720X570mm 1
P6 2 37 1728mm 2 D2 1720X570mm 1
P7 2 4L 1 10R 981mm 2
P4 2 4R 1 10L 981mm 2
P3 2 36 1728mm 4 18 566mm 6
P1 1742mm 8 6 1090mm 1 21L 1147mm 2
P2 1047mm 8 17 1177mm 4 21R 1147mm 2
P9 465mm 8 35 1728mm 1
GB 2 GF 4 F2 50
GS 4 GD 4 F3 8
GE 2 G2 4 S3 324
GC 4 F1 350 S2 290
HW0608 CARTON : 1/2
1205mm
1728mm

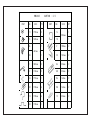
PART NO. SIZE QTY PART NO. SIZE QTY
11 1799mm 2 7L 1
5 1045mm 1 7R 1
3L 1 9 1788mm 2
3R 1 20 1143mm 2
1 1800mm 2 14L 306mm 2
2 1158mm 2 14R 306mm 2
16 1793mm 1 15L 165mm 2
22 1728mm 4 15R 165mm 2
13 1728mm 4 12 356mm 2
23 1728mm 1
HW0608 CARTON : 2/2
681mm
1096mm

-2-
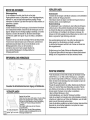
BEFORE YOU START
Owner's Manual
Prior to installation, it is important that you contact your local government authority to
determine if building approval is required. Study and understand this owner's manual.
Important information and helpful tips will make your construction easier and more
enjoyable.
Assembly instructions
Instructions are supplied in this manual and contain all appropriate information for your
building model. Review all instructions before you begin. During assembly, follow the
step sequence carefully for correct results .Please be aware: this unit takes two people
about one full day to complete.
Parts
Check to be sure that you have all the necessary parts for the building.
Separate contents of the carton by the part number while reviewing parts list.
Familiarize yourself with the hardware and fasteners for easier use during
construction. These are packaged within the carton. Note that extra fasteners have been
supplied for your convenience.
TOOLS MAY REQUIRED
Use heavy duty gloves when handling steel sheets and flashing
PLAN AHEAD
Site Selection
lAvoid overhanging trees as much as possible as leaves will make regular cleaning
necessary and broken branches are a potential hazard.
lSmall trees,bushes or fences nearby can be helpful,acting as a wind break.
Site Preparation
The site must be prepared so that the base of the shed is level all round and checking
with a spirit level is required.
The base can be constructed by treated timber or concrete,in order to stop the moisture
getting into the shed.The shed is not designed to be built onto lawn directly.Also the
ground will get muddy during rainy days.
If a concrete pad is made,it is important that this slopes towards the edges to prevent
water ingress.
Time must be allowed for any concrete or cement to dry before building the shed on top.
Bases can also be constructed from bricks,blocks,or mounted on a concrete pad.
The bricks or blocks should be cemented onto firm and level concrete footings and the
greenhouse frame drilled and screwed to the base.
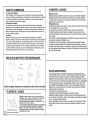
IMPORTANT NOTES:
lFind someone to help you:it is much easier with someone to hold parts,pass tools
ect.Also some steps require two people to lift structures together.This is not very
heavy work so would suit most able-bodied people.
lAllow plenty of time:rushing often causes errors and the re-doing of incorrect
assemblies.If you have never built a shed before,it can take most of a day to carefully
complete the construction.
lHave the right tools to hand.
lSafety clothing as recommended in the 'Tools' section.
lIdeally lat out the parts and check that all are present before commencing
construction.Lay on cloths or plastic sheets if there is any risk of scratching the parts.
lTighten all nuts carefully,being sure not to miss any.Check the frame is square and
using a spirit level to check that it is upright.
PLAN AHEAD
Watch the weather:
Please be sure the day you select for installation is dry and calm.
DO NOT attempt to assemble your shed in windy weather
because of risk of damage to panels, or personal injury. Be careful
of wet or muddy ground.
Teamwork:
Whenever possible, two or more people should work together to
assemble the building. One person can position parts or panels
while the other is able to handle the fasteners and the tools.
It requires two people a full
day to complete installation
-2-
BEFORE YOU START
Owner's Manual
Prior to installation, it is important that you contact your local government authority to
determine if building approval is required. Study and understand this owner's manual.
Important information and helpful tips will make your construction easier and more
enjoyable.
Assembly instructions
Instructions are supplied in this manual and contain all appropriate information for your
building model. Review all instructions before you begin. During assembly, follow the
step sequence carefully for correct results .Please be aware: this unit takes two people
about one full day to complete.
Parts
Check to be sure that you have all the necessary parts for the building.
Separate contents of the carton by the part number while reviewing parts list.
Familiarize yourself with the hardware and fasteners for easier use during
construction. These are packaged within the carton. Note that extra fasteners have been
supplied for your convenience.
TOOLS MAY REQUIRED
Use heavy duty gloves when handling steel sheets and flashing
PLAN AHEAD
Site Selection
lAvoid overhanging trees as much as possible as leaves will make regular cleaning
necessary and broken branches are a potential hazard.
lSmall trees,bushes or fences nearby can be helpful,acting as a wind break.
Site Preparation
The site must be prepared so that the base of the shed is level all round and checking
with a spirit level is required.
The base can be constructed by treated timber or concrete,in order to stop the moisture
getting into the shed.The shed is not designed to be built onto lawn directly.Also the
ground will get muddy during rainy days.
If a concrete pad is made,it is important that this slopes towards the edges to prevent
water ingress.
Time must be allowed for any concrete or cement to dry before building the shed on top.
Bases can also be constructed from bricks,blocks,or mounted on a concrete pad.
The bricks or blocks should be cemented onto firm and level concrete footings and the
greenhouse frame drilled and screwed to the base.
IMPORTANT NOTES:
lFind someone to help you:it is much easier with someone to hold parts,pass tools
ect.Also some steps require two people to lift structures together.This is not very
heavy work so would suit most able-bodied people.
lAllow plenty of time:rushing often causes errors and the re-doing of incorrect
assemblies.If you have never built a shed before,it can take most of a day to carefully
complete the construction.
lHave the right tools to hand.
lSafety clothing as recommended in the 'Tools' section.
lIdeally lat out the parts and check that all are present before commencing
construction.Lay on cloths or plastic sheets if there is any risk of scratching the parts.
lTighten all nuts carefully,being sure not to miss any.Check the frame is square and
using a spirit level to check that it is upright.
PLAN AHEAD
Watch the weather:
Please be sure the day you select for installation is dry and calm.
DO NOT attempt to assemble your shed in windy weather
because of risk of damage to panels, or personal injury. Be careful
of wet or muddy ground.
Teamwork:
Whenever possible, two or more people should work together to
assemble the building. One person can position parts or panels
while the other is able to handle the fasteners and the tools.
It requires two people a full
day to complete installation


-2-
l
l
l
l
l
l
l
l
-2-
l
l
l
l
l
l
l
l
PRIMA DELL’INIZIO
Manuale del Proprietario
Istruzioni di Assemblaggio
Le istruzioni sono fornite in questo manuale e contengono tutte le informazioni
appropriate per il modello di costruzione. Rivedere tutte le istruzioni prima di
iniziare. Durante l'assemblaggio, seguire attentamente la sequenza dei passaggi per
ottenere risultati corretti. Attenzione: questa unità ci impiega circa un giorno
intero per essere completata .
Prima di installare, è importante contattare l'autorità del governo locale per
determinare se è necessaria l'approvazione edilizia. Studiare e comprendere il
presente manuale del proprietario. Informazioni importanti e suggerimenti utili
renderanno la costruzione più semplice e piacevole.
Parti
Assicurarsi di avere tutte le parti necessarie per la costruzione della casetta.
Separare le parti dalla scatola in base al numero di parte con riferimento all'elenco
delle parti.
Familiarizzarsi con l'hardware e gli elementi di fissaggio per un utilizzo più semplice
durante la costruzione. Questi sono confezionati all'interno della scatola. Notare che
sono forniti anche gli elementi di fissaggio aggiuntivi per la vostra comodità.
Usare guanti resistenti quando si maneggiano lamiere d'acciaio e foglio di copertura.
GLI STRUMENTI RICHIESTI
PIANIFICARE IN ANTICIPO
Richiede due persone in un’intero
giorno per completare l'installazione
Attenzione al meteo:
Si prega di assicurarsi che il giorno selezionato per l'installazione sia asciutto e
calmo. NON tentare di montare la casetta con tempo ventoso perché esiste il
rischio di danni ai pannelli o di lesioni personali. Dare attenzione al terreno
bagnato o fangoso.
Lavoro di squadra:
Quando possibile, due o più persone dovrebbero lavorare insieme per
assemblare la casetta: una persona può posizionare parti o pannelli mentre
l'altra è in grado di gestire i dispositivi di fissaggio e gli strumenti.
PIANIFICARE IN ANTICIPO
Selezione del sito
Evitare il più possibile alberi sporgenti perché le foglie renderanno necessaria una pulizia
regolare e i rami spezzati rappresentano un potenziale pericolo.
Piccoli alberi, cespugli o recinzioni nelle vicinanze possono essere utili, funzionando
come la resistenza al vento.
Preparazione del sito
Il sito deve essere preparato in modo che la base della casetta sia livellata tutt'intorno
ed è necessario l’uso di una livella per il controllo.
La base può essere costruita con legno trattato o cemento, per impedire all'umidità di
penetrare nella casetta. La casetta non è progettata per essere costruito direttamente
sul prato. Inoltre, il terreno diventa fangoso durante i giorni di pioggia.
Se si fa una soletta di cemento, è importante che questa sia inclinata verso i bordi per
evitare l'ingresso di acqua.
Prima di costruire la casetta, è necessario dare sufficiente tempo affinché il calcestruzzo
o il cemento si asciughino.
Le basi possono anche essere costruite da mattoni, blocchi o montate su una piattaforma
di cemento.
I mattoni oi blocchi devono essere cementati su basi di cemento solide e livellati e il
telaio della casetta forato e poi avvitato alla base.
NOTE IMPORTANTI:
Trovare qualcuno che ti aiuti: sarà molto più facile con qualcuno tiene le parti, passa
gli attrezzi, ecc. Inoltre, alcuni passaggi richiedono due persone per sollevare le
strutture insieme. Questo non è un lavoro molto pesante, quindi si adatta alla maggior
parte delle persone abili.
Dare sufficiente tempo:: la fretta spesso causa errori e il rifare di assemblaggi errati.
Se non hai mai costruito una casetta prima, dai abbastanza tempo di una giornata per completare
con cura la costruzione.
Tenere disponibili gli strumenti giusti a portata di mano.
Indumenti di sicurezza come consigliati nella sezione 'Strumenti'.
Disporre in ordine le parti e verificare che siano tutte presenti prima di iniziare la
costruzione. Mettere su panni o fogli di plastica se c'è il rischio di graffiare le parti.
Serrare tutti i dadi con attenzione, assicurandosi di non perderne nessuno. Verificare che
il telaio sia quadrato e utilizzando una livella per controllare che sia in posizione verticale.

Qty.
1
PART
NO. PART
NO.
2
2
1
1
1
1
1
1
2
2
1
4
6
2
2
2
2
-3-
2
3L
3R
4L
4R
5
6
7L
9
10L
16
17
18
19
20
21L
21R
PART
NO. Qty.
1800mm
1158mm
681mm
681mm
1728mm
1045mm
1090mm
1788mm
981mm
1793mm
1177mm
566mm
981mm
1143mm
22 4
23 1
1728mm
1728mm
1728mm
1728mm
35
36
37
1
1728mm
4
2
1728mm
1
1096mm
1728mm
1728mm
7R 1
1096mm
2
14R
306mm
2
2
15L
15R
165mm
165mm
4
2
13
14L
1728mm
306mm
2
10R
981mm
2
11
1799mm
2
12
356mm
PACKING DETAILS:
Qty.

Qty.PART
NO.
G2
-4-
4
2
GF
GD
GB
GC
GE
4
4
4
2
GS 4
F1
F2
F3
S3
PART
NO.
P1
P4
P5
P6
8
2
2
2
350
8
50
324
1742mm
1205mm
S2 290
P9 8
P2 8
1047mm
465mm
P7 2
PART
NO.
1720X570mm
D2 1
1720X570mm
D1 1
1205mm
1205mm
1205mm
P3 2
1205mm
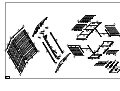
Qty.Qty.

3R
5
3L
4R
6
7R
7L
4L
9
36
36
36
37
37
P1
P1
P1
P1
P9
P9
P9
P9
P9
P9
P9
P9
P1
P1
P1
P1
22
13
13
18
18
D2
D1
1
9
22
36
1
-5-
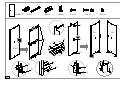
21L
21R
15R
14R
14L
15L
16
12
12
14R
15R
14L
15L
21R
21L
11
2
2
23
13
20
20
35
P2
P2
P2
P2
P2
P2
P2
P2
22
22
13
11
10L
GC
GC
17
GC
GC
GE
17
19
P4
P7
P3
P6
P4
P7
P3
P5
17
GE
17
P5
P6
19
10R
10R
10L

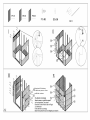
ⅠⅡⅢ
ⅠⅡⅢ
-6-
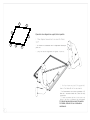
F1x 16
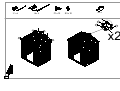
3Lx13Rx15x1
1x22 x 2
ⅠⅡⅢ
ⅠⅡⅢ
2
2
1
3R
5
1
3L

53R
3L
1
1
22
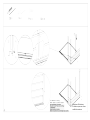
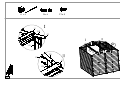
1. Quando le misure diagonali sono uguali, il telaio è quadrato.
2. Il telaio del pavimento deve essere SIA quadrato
CHE livellato, altrimenti i fori non si allineeranno
correttamente.

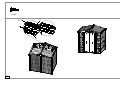
Attenzione all’inclinazione.
Richiede una persona o di uno
scaffale da sostenere.

Attenzione all’inclinazione.
Richiede una persona o di uno
scaffale da sostenere.

Attenzione all’inclinazione.
Richiede una persona o di uno
scaffale da sostenere.

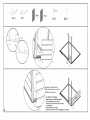
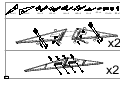
0/ � 归正
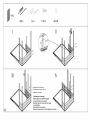
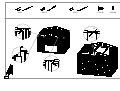
13x 1
22x2 F1x 8 S3x8
III
-11-
13
P1
22
Attenzione all’inclinazione.
Richiede una persona o di uno
scaffale da sostenere.

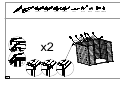
多/ 国t厮®
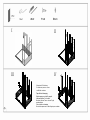
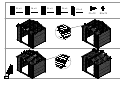
13x1 9x1 4Lx 1 F1x 12 S3 x 12
习
13
4L
Ⅱ
9
P1
P1
Ⅳ
9
P9
Attenzione all’inclinazione.
Richiede una persona o di uno
scaffale da sostenere.

Attenzione all’inclinazione.
Richiede una persona o di uno
scaffale da sostenere.

-14-
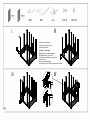
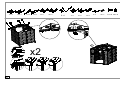
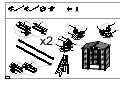
21L x 221R x215L x 215R x214L x 214R x 2F2x20
GF x4
12 x2
x2
x2
21L
21R
14L 14R
15R
15L
GF GF
12
S3 x20
La pagina si sta caricando...
La pagina si sta caricando...
La pagina si sta caricando...
La pagina si sta caricando...
La pagina si sta caricando...
La pagina si sta caricando...
La pagina si sta caricando...
La pagina si sta caricando...
La pagina si sta caricando...
La pagina si sta caricando...
-
 1
1
-
 2
2
-
 3
3
-
 4
4
-
 5
5
-
 6
6
-
 7
7
-
 8
8
-
 9
9
-
 10
10
-
 11
11
-
 12
12
-
 13
13
-
 14
14
-
 15
15
-
 16
16
-
 17
17
-
 18
18
-
 19
19
-
 20
20
-
 21
21
-
 22
22
-
 23
23
-
 24
24
-
 25
25
-
 26
26
-
 27
27
-
 28
28
-
 29
29
-
 30
30


in altre lingue
- English: Outsunny 845-179
- français: Outsunny 845-179
Altri documenti
-
 KingsBox X-094-1100 Assembly Instructions
-
Sport-thieme ST 310 Manuale utente
-
Yamaha GF16/12 Manuale utente
-
DKN technology XC-140 Manuale utente
-
ProForm PFIVEX56282 Manuale del proprietario
-
-
-
-
-
