
I GB
Manuale Utente
User Manual
FLOODLIGHT1000A - 500A
FLOODLIGHT1000S - 500S

REV.002- 09/10

3FLOODLIGHT series
Music & Lights S.r.l. si riserva ogni diritto di elaborazione in qualsiasi forma delle presenti istruzioni per l’uso.
La riproduzione - anche parziale - per propri scopi commerciali è vietata.
Tutte le speciche possono essere variate senza alcuna notica.
CONTENUTO DELL’IMBALLO:
• FLOODLIGHT
• FLOODLIGHTTPG
• Presa volante tripolare
• Manuale utente
INDICE
Sicurezza
Avvertenze generali
Attenzioni e precauzioni per l’installazione
Informazioni generali
1 Descrizione e speciche tecniche
1. 1 Elementi di comando e collegamenti
1. 2 Descrizione
1. 3 Speciche tecniche
2 Installazione
2. 1 Lampada
2. 2 Installazione o sostituzione lampada
2. 3 Montaggio
3 Manutenzione
3. 1 Pulizia sistema ottico e manutenzione
Certicato di garanzia
4
4
5
6
7
7
8
8
9
10

FLOODLIGHT series4
SICUREZZA
Avvertenze generali
• I prodotti a cui questo manuale si riferisce sono conformi alle Direttive della Comunità Europea e pertanto
recano la sigla
.
• Il dispositivo funziona con pericolosa tensione di rete 230V~. Non intervenire mai al suo interno al di
fuori delle operazioni descritte nel presente manuale; esiste il pericolo di una scarica elettrica.
• È obbligatorio eettuare il collegamento ad un impianto di alimentazione dotato di un’eciente messa a
terra (apparecchio di Classe I secondo norma EN 60598-1). Si raccomanda, inoltre, di proteggere le linee
di alimentazione delle unità dai contatti indiretti e/o cortocircuiti verso massa tramite l’uso di interruttori
dierenziali opportunamente dimensionati.
• Le operazioni di collegamento alla rete di distribuzione dell’energia elettrica devono essere eettuate
da un installatore elettrico qualicato. Vericare che frequenza e tensione della rete corrispondono alla
frequenza ed alla tensione per cui l’unità è predisposta, indicate sulla targhetta dei dati elettrici.
• L’unità non per uso domestico solo per uso professionale.
• Evitare di utilizzare l’unità:
- in luoghi soggetti a vibrazioni, o a possibili urti;
- in luoghi soggetti ad eccessiva umidità.
• Evitare che nell’unità penetrino liquidi inammabili, acqua o oggetti metallici.
• Non smontare e non apportare modiche all’unità.
• Tutti gli interventi devono essere sempre e solo eettuati da personale tecnico qualicato. Rivolgersi al
più vicino centro di assistenza tecnica autorizzato.
• Se si desidera eliminare il dispositivo denitivamente, consegnarlo
per lo smaltimento ad un’istituzione locale per il riciclaggio.
Attenzioni e precauzioni per l’installazione
• È assolutamente necessario proteggere l’unità per mezzo di una fune di sicurezza. Nell’eseguire qualsiasi
intervento attenersi scrupolosamente a tutte le normative (in materia di sicurezza) vigenti nel paese di
utilizzo.
• Prima di iniziare qualsiasi operazione di manutenzione o pulizia sull’unità togliere la tensione dalla rete
di alimentazione e assicurarsi che la temperatura delle parti non possa provocare ustioni. Attendere
almeno 15 minuti dopo lo spegnimento della lampada per aprire il vano lampada.
• La lampada deve essere sostituita se danneggiata o termicamente deformata.
• Se è necessario sostituire la lampada, utilizzare un guanto che non lasci pelucchi; evitare contatto diretto
con le mani.
• I ltri, le lenti o gli schermi ultravioletti se danneggiati possono limitare la loro ecienza.
• L’unità deve essere usata solo se completa del suo schermo di protezione.
• Non guardare direttamente il fascio luminoso.
• L’unità deve essere posizionata in modo tale che gli oggetti colpiti dal fascio luminoso siano distanti
almeno 3 m da essa.
• La distanza minima tra l’unità e le pareti circostanti deve essere superiore a 50 cm e non devono essere
ostruite, in nessun caso, le aperture d’aerazione.
• Mantenere materiali inammabili ad una distanza di sicurezza dall’unità.
ATTENZIONE! Prima di eettuare qualsiasi operazione con l’unità, leggere con attenzione
questo manuale e conservarlo accuratamente per riferimenti futuri. Contiene informazioni
importanti riguardo l’installazione, l’uso e la manutenzione dell’unità.

5FLOODLIGHT series
Le informazioni riportate in questo manuale sono state attentamente controllate.
Music & Lights S.r.l. non si assume, tuttavia, responsabilità derivanti da eventuali inesattezze.
INFORMAZIONI GENERALI
Spedizioni e reclami
Le merci sono vendute “franco nostra sede” e viaggiano sempre a rischio e pericolo del distributore/cliente.
Eventuali avarie e danni dovranno essere contestati al vettore. Ogni reclamo per imballi manomessi dovrà
essere inoltrato entro 8 giorni dal ricevimento della merce.
Garanzie e resi
Il prodotto è coperto da garanzia in base alle vigenti normative. Sul sito www.musiclights.it è possibile
consultare il testo integrale delle “Condizioni Generali di Garanzia”. Si prega, dopo l’acquisto, di procedere
alla registrazione del prodotto sul sito www.musiclights.it. In alternativa il prodotto può essere registrato
compilando e inviando il modulo riportato alla ne del manuale. A tutti gli eetti la validità della garanzia è
avallata unicamente dalla presentazione del certicato di garanzia. Music & Lights constata tramite verica
sui resi la difettosità dichiarata, correlata all’appropriato utilizzo, e l’eettiva validità della garanzia; provve-
de quindi alla riparazione dei prodotti, declinando tuttavia ogni obbligo di risarcimento per danni diretti o
indiretti eventualmente derivanti dalla difettosità.

FLOODLIGHT series6
- 1 - DESCRIZIONE E SPECIFICHE TECNICHE
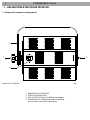
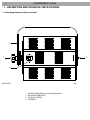
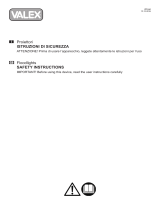
1.1 Elementi di comando e collegamenti
1. MANOPOLA DI FISSAGGIO;
2. STAFFA DI MONTAGGIO;
3. VITE DI FISSAGGIO per la staa di montaggio.
4. POWER IN per il collegamento ad una presa di
rete tramite il cavo rete in dotazione;
Fig.1
3
1
2
4
PANNELLO POSTERIORE

7FLOODLIGHT series
1.2 Descrizione e speciche tecniche
Diusore dal fascio di luce asimmetrico (FLOODLIGHTS1000A - FLOODLIGHTS500A)
o simmetrico (FLOODLIGHTS1000S - FLOODLIGHTS500S).
• Ideale per illuminazione omogenea di fondali e zone di scena.
• Lampada 230V~ 1000W non inclusa (FLOODLIGHTS1000A - FLOODLIGHTS1000S).
• Lampada 230V~ 500W non inclusa (FLOODLIGHTS500A - FLOODLIGHTS500S).
• Vetro temperato per la protezione della lampada.
• Alimentazione: 230V~ 50Hz, connettore VDE in dotazione.
• Corpo: alluminio pressofuso colore nero.
• Dimensioni (LxAxP): 369x310x215 mm (con staa).
• Peso: 3,7 kg.
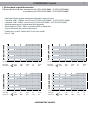
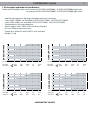
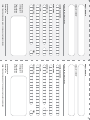
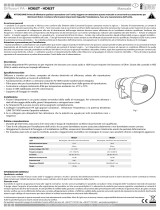
PHOTOMETRIC CHARTS
FLOODLIGHT1000A
0
2,5
5
7,5
10
12,5
Dist.(mt)
Diam. (mt)
7,75
14,5
23,25
31
Lux Center
2000
500
222
125
38,75
80
0
10
8
6
4
2
2
4
6
8
10
46°
29°
FLOODLIGHT500A
0
2,5
5
7,5
10
12,5
Dist.(mt)
Diam. (mt)
7,25
14,5
21,75
29
Lux Center
1520
380
169
95
36,25
61
0
10
8
6
4
2
2
4
6
8
10
43°
26°
FLOODLIGHT1000S
0
2,5
5
7,5
10
12,5
Dist.(mt)
Diam. (mt)
5,5
11
16,5
22
Lux Center
2400
600
267
150
27,5
96
0
10
8
6
4
2
2
4
6
8
10
66°
FLOODLIGHT500S
0
2,5
5
7,5
10
12,5
Dist.(mt)
Diam. (mt)
5
10
15
20
Lux Center
1840
460
204
115
25
74
0
10
8
6
4
2
2
4
6
8
10
63°

FLOODLIGHT series8
- 2 - INSTALLAZIONE
2.1 Lampada
Si raccomanda l’uso di lampade alogene
• 1000W 230V, attacco R7s-187 (cod. 800726); 500W 230V, attacco R7s-117 (cod. 800710).
• 1000W 230V, attacco R7s-187 (cod. 800726PL); 500W 230V, attacco R7s-117 (cod. 800710PL).
Assicurarsi che la lampada sia compatibile con il voltaggio dell’impianto elettrico usato. Se lampada viene
fatta operare con un voltaggio superiore al suo voltaggio nominale potrebbe essere danneggiata o la sua
durata notevolmente ridotta.
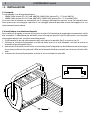
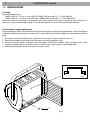
2.2 Installazione o sostituzione lampada
Per installare la lampada, osservare le seguenti istruzioni (la lampada può raggiungere temperature molto
alte, attendere il rareddamento dell’unità prima di eseguire qualsiasi tipo di operazione. Una lampada
danneggiata deve essere sostituita immediatamente).
1. Disconnettere la spina di alimentazione dell’unità, aprire lo sportello (g.2) e svitare la vite (5).
2. Sollevare lo schermo di protezione in modo da avere accesso al vano lampada, sostituire o inserire la
lampada nel portalampada (g.3).
3. Non toccare la lampada a mani nude, se ciò accade, pulire la lampada con alcool denaturato ed asciugare
con un panno che non lasci pelucchi. Aerrare la lampada alle due estremità (non al vetro) e ssarla nella
sede.
4. Sistemare lo schermo di protezione, avvitare la vite e richiudere lo sportello.
Fig.2
Fig.3
5

9FLOODLIGHT series
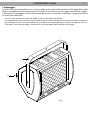
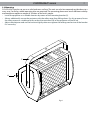
2.3 Montaggio
FLOODLIGHT può essere collocato su un piano solido. Inoltre, grazie alla possibilità di ssaggio della staa
(g.4), l’unità può essere montata anche a testa in giù, su una traversa. Per il ssaggio occorrono dei suppor-
ti robusti per il montaggio. L’area di collocazione deve avere una stabilità suciente e supportare almeno
10 volte il peso dell’unità.
• Fissare l’unità attraverso l’apposita staa (2) ad una collocazione idonea.
• È assolutamente necessario assicurare l’unità contro la caduta utilizzando un cavo di sicurezza: in partico-
lare collegare il cavo in un punto adatto (6) in modo che la caduta dell’unità non possa superare i 20 cm.
• Orientare l’unità intervenendo, se necessario, sulla manopola della staa di montaggio.
Fig.4
6
2

FLOODLIGHT series10
- 3 - MANUTENZIONE
3.1 Pulizia sistema ottico e manutenzione
• Durante gli interventi, assicurarsi che l’area sotto il luogo di installazione sia libera da personale non
qualicato.
• Spegnere l’unità, scollegare il cavo di alimentazione ed aspettare nché l’unità non si sia rareddata.
• Tutte le viti utilizzate per l’installazione dell’unità e le sue parti devono essere assicurate saldamente e
non devono essere corrose.
• Alloggiamenti, elementi di ssaggio e di installazione (sotto, truss, sospensioni) devono essere total-
mente esenti da qualsiasi deformazione.
• I cavi di alimentazione devono essere in condizione impeccabile e devono essere sostituiti immediata-
mente nel momento in cui anche un piccolo problema viene rilevato.
• L’interno del dispositivo deve essere pulito ogni anno utilizzando un aspirapolvere o un getto d’aria.
• Si dovrebbe procedere, ad intervalli regolari, alla pulizia della parte frontale per asportare polvere, fumo
e altre particelle. Solo così, la luce può essere irradiata con la luminosità massima. Per la pulizia usare un
panno morbido, pulito e un detergente per vetri come si trovano in commercio. Quindi asciugare le parti
delicatamente.
Attenzione: consigliamo che la pulizia interna sia eseguita da personale qualicato!


1FLOODLIGHT series
PACKING CONTENT:
• FLOODLIGHT
• FLOODLIGHTTPG
• Tripolar mount socket
• User manual
All rights reserved by Music & Lights S.r.l. No part of this instruction manual may be.
Reproduced in any form or by any means for any commercial use.
Design and specications are subject to change without notice.
INDEX
Safety
General instructions
Warnings and installation precautions
General information
1 Description and technical specications
1. 1 Operating elements and connections
1. 2 Description
1. 3 Technical specications
2 Installation
2. 1 Lamp
2. 2 Mounting
2. 3 Inserting or replacing the lamp
3 Maintenance
3. 1 Cleaning the unit and maintenance
Warranty
2
2
3
4
5
5
6
6
7
8

FLOODLIGHT series2
WARNING! Before carrying out any operations with the unit, carefully read this instruction
manual and keep it with cure for future reference. It contains important information about the
installation, usage and maintenance of the unit.
SAFETY
General instructions
• The products referred to in this manual conform to the European Community Directives and are therefore
marked with
.
•
The unit is supplied with hazardous network voltage (230V~). Leave servicing to skilled personnel only. Never
make any modications on the unit not described in this instruction manual, otherwise you will risk an electric
shock.
• Connection must be made to a power supply system tted with ecient earthing (Class I appliance according
to standard EN 60598-1). It is, moreover, recommended to protect the supply lines of the units from indirect
contact and/or shorting to earth by using appropriately sized residual current devices.
• The connection to the main network of electric distribution must be carried out by a qualied electrical in-
staller. Check that the main frequency and voltage correspond to those for which the unit is designed as given
on the electrical data label.
• This unit is not for home use, only professional applications.
• Never use the xture under the following conditions:
• - in places subject to vibrations or bumps;
• - in places subject to excessive humidity.
• Make certain that no inammable liquids, water or metal objects enter the xture.
• Do not dismantle or modify the xture.
• All work must always be carried out by qualied technical personnel. Contact the nearest sales point for an
inspection or contact the manufacturer directly.
• If the unit is to be put out of operation denitively, take it to a local recycling
plant for a disposal which is not harmful to the environment.
Warnings and installation precautions
• Always additionally secure the projector with the safety rope. When carrying out any work, always com-
ply scrupulously with all the regulations (particularly regarding safety) currently in force in the country
in which the xture’s being used.
• Before starting any maintenance work or cleaning the unit, cut o power from the main supply and
make certain that the temperature of the components cannot cause burns. Wait al least 15 minutes after
switching o
• The lamp must be changed if it has become damaged or thermally deformed.
• When tting a lamp, always use gloves or soft lint free cloth never touch it with your bare hands.
• Shield, lenses or ultraviolet screen shall be changed if they have become damaged to such an extent that
their eectiveness is impaired.
• The unit must be used only with its protective shield.
• Never look directly at the light beam.
• The unit needs to be positioned so that the objects hit by the beam of light are at least 3 metres from
the lens of the unit.
• The minimum distance between the xture and surrounding walls must be more than 50 cm and the air
vents at the housing must not be covered in any case.
• Keep any inammable material at a safe distance from the xture.

3FLOODLIGHT series
The information provided in this manual has been carefully checked.
However Music & Lights S.r.l. is not responsible for any possible inaccuracy.
GENERAL INFORMATION
Shipments and claims
The goods are sold “ex works” and always travel at the risk and danger of the distributor. Eventual damage
will have to be claimed to the freight forwarder. Any claim for broken packs will have to be forwarded within
8 days from the reception of the goods.
Warranty and returns
The guarantee covers the xture in compliance with existing regulations. You can nd the full version of the
“General Guarantee Conditions” on our web site www.musiclights.it. Please remember to register the piece
of equipment soon after you purchase it, logging on www.musiclights.it. The product can be also registered
lling in and sending the form available on your guarantee certicate. For all purposes, the validity of the
guarantee is endorsed solely on presentation of the guarantee certicate. Music & Lights will verify the va-
lidity of the claim through examination of the defect in relation to proper use and the actual validity of the
guarantee. Music & Lights will eventually provide replacement or repair of the products declining, however,
any obligation of compensation for direct or indirect damage resulting from faultiness.

FLOODLIGHT series
4
- 1 - DESCRIPTION AND TECHNICAL SPECIFICATIONS
1.1 Operating elements and connections
1. LOCKING KNOB for the mounting bracket;
2. MOUNTING BRACKET;
3. LOCKING SCREW;
4. POWER IN.
Fig.1
3
1
2
4
REAR PANEL

5
FLOODLIGHT series
1.2 Description and technical specications
Professional oodlight with an asymmetrical (FLOODLIGHTS1000A - FLOODLIGHTS500A) light beam
or symmetrical (FLOODLIGHTS1000S - FLOODLIGHTS500S) light beam.
• Ideal for homogeneous lighting of backgrounds and scene areas..
• Lamp 230V~ 1000W not included (FLOODLIGHTS1000A - FLOODLIGHTS1000S).
• Lamp 230V~ 500W not included (FLOODLIGHTS500A - FLOODLIGHTS500S).
• Tempered glass for lamp protection.
• Power supply: 230V~ 50Hz, VDE connector included.
• Die-cast black aluminum casing.
• Dimensions (WxHxD): 369x310x215 mm (with bar).
• Weight: 3,7 kg.
PHOTOMETRIC CHARTS
FLOODLIGHT1000A
0
2,5
5
7,5
10
12,5
Dist.(mt)
Diam. (mt)
7,75
14,5
23,25
31
Lux Center
2000
500
222
125
38,75
80
0
10
8
6
4
2
2
4
6
8
10
46°
29°
FLOODLIGHT500A
0
2,5
5
7,5
10
12,5
Dist.(mt)
Diam. (mt)
7,25
14,5
21,75
29
Lux Center
1520
380
169
95
36,25
61
0
10
8
6
4
2
2
4
6
8
10
43°
26°
FLOODLIGHT1000S
0
2,5
5
7,5
10
12,5
Dist.(mt)
Diam. (mt)
5,5
11
16,5
22
Lux Center
2400
600
267
150
27,5
96
0
10
8
6
4
2
2
4
6
8
10
66°
FLOODLIGHT500S
0
2,5
5
7,5
10
12,5
Dist.(mt)
Diam. (mt)
5
10
15
20
Lux Center
1840
460
204
115
25
74
0
10
8
6
4
2
2
4
6
8
10
63°

FLOODLIGHT series
6
- 2 - INSTALLATION
2.1 Lamp
We recommend using:
• 1000W 230V, R7s-187 base (cod. 800726); 500W 230V, attacco R7s-117 (cod. 800710).
• 1000W 230V, R7s-187 base (cod. 800726PL); 500W 230V, attacco R7s-117 (cod. 800710PL).
Make sure that the used lamp is compatible with local voltage. If the lamp is operated with a voltage sur-
passing its nominal operating voltage, it can be damaged or its service life reduced considerably.
2.2 Inserting or replacing the lamp
Please proceed as follows to replace the lamp (the lamp gets very hot during operation, so let it cool down
suciently before you attempt to dismount it! Lamps that have been damaged must be replaced immedi-
ately).
1. Disconnect the power plug the unit, open the cover (g.2) and unscrew the screw (5).
2. Open the prospective grill and insert the lamp into the lampholder (g.3).
3. Do not touch the lamp’s envelope with bare hands. Should this happen, clean the bulb with a cloth
soaked in alcohol and dry it with a clean, dry cloth. Insert a new lamp into the lampholder.
4. Replace the prospective grill and close the access hatch.
Fig.2
Fig.3
5

7
FLOODLIGHT series
Fig.4
6
2
2.3 Mounting
FLOODLIGHT may be set up on a solid and even surface. The unit can also be mounted upside down to a
cross arm. For xing, stable mounting clips are required. The mounting place must be of sucient stability
and be able to support a weight of 10 times of the unit’s weight.
• Install the projector at a suitable location by means of the mounting bracket (2).
• Always additionally secure the projector with the safety rope from falling down. For this purpose, fasten
the safety rope at a suitable position so that the maximum fall of the projector will be 20 cm.
• Adjust the projector and use the knob to slightly release or tighten the locking mechanism of the bracket
if is necessary.

FLOODLIGHT series
8
- 3 - MAINTENANCE
3.1 Cleaning the unit and maintenance
• Make sure the area below the installation place is free from unwanted persons during setup.
• Switch o the unit, unplug the main cable and wait until the unit has cooled down.
• All screws used for installing the device and any of its parts should be tightly fastened and should not
be corroded.
• Housings, xations and installation spots (ceiling, trusses, suspensions) should be totally free from any
deformation.
• The main cables must be in impeccable condition and should be replaced immediately even when a
small problem is detected.
• The interior of the device should be cleaned annually using a vacuum cleaner or air-jet.
• It is recommended to clean the front at regular intervals, from impurities caused by dust, smoke, or other
particles to ensure that the light is radiated at maximum brightness. For cleaning, disconnect the main
plug from the socket. Use a soft, clean cloth moistened with a mild detergent. Then carefully wipe the
part dry. For cleaning other housing parts use only a soft, clean cloth. Never use a liquid, it might pen-
etrate the unit and cause damage to it.
Warning: we strongly recommend internal cleaning to be carried out by qualied personnel!
La pagina si sta caricando...
La pagina si sta caricando...
La pagina si sta caricando...
La pagina si sta caricando...
La pagina si sta caricando...
La pagina si sta caricando...
La pagina si sta caricando...
La pagina si sta caricando...
-
 1
1
-
 2
2
-
 3
3
-
 4
4
-
 5
5
-
 6
6
-
 7
7
-
 8
8
-
 9
9
-
 10
10
-
 11
11
-
 12
12
-
 13
13
-
 14
14
-
 15
15
-
 16
16
-
 17
17
-
 18
18
-
 19
19
-
 20
20
-
 21
21
-
 22
22
-
 23
23
-
 24
24
-
 25
25
-
 26
26
-
 27
27
-
 28
28


ProLights 500a Manuale utente
- Tipo
- Manuale utente
in altre lingue
- English: ProLights 500a User manual
Documenti correlati
Altri documenti
-
 Valex 1153135 Manuale del proprietario
-
 Valex 1153112 Manuale del proprietario
-
 Wiva Group 11070307 Manuale utente
-
 Pro Audio HD62T Manuale utente
-
STEINEL HS 2160 Manuale utente
-
 Atex RLEQ Series Instructions For Use Manual
-
 DAD LIVE 15 Manuale utente
-
 Trime X-START Use Manual
-
Behringer EUROLIGHT Moving Head MH710 Guida utente
-
Brennenstuhl Halogen Light H 150 IP44 with PIR sensor 120W 2216lm black Manuale utente


