Muse M-1820 DJ Manuale del proprietario
- Categoria
- Lettore CD
- Tipo
- Manuale del proprietario

ALIMENTATION
ALIMENTAÇÃO
STROMVERSORGUNG
POWER SUPPLY
ÉCOUTE DES DISQUES
UTILIZANDO O CD
CD-BETRIEB
REPRODUÇÃO DE USB
USB-WIEDERGABE
LISTENING TO DISC
LECTURE USB
USB PLAYBACK
MODES DE LECTURE (CD/MP3)
MODOS DE REPRODUÇÃO (CD/MP3)
WIEDERGABE-MODUS(CD/MP3)
PLAY MODES (CD/MP3)
MISE EN MARCHE ET ARRET DE L’APPAREIL
LIGANDO/DESLIGANDO O APARELHO
EIN- UND AUSSCHALTEN DES GERÄTES
TURNING UNIT ON/OFF
ÉCLAIRAGE DE COULEUR
A LUZ DE COLORIDA
COLOR LIGHT
FICHE TECHNIQUE
ESPECIFICAÇÕES
TECHNICAL SPECIFICATION
RÉSOLUTION DES PROBLÈMES
GUIA DE RESOLUÇÃO DE PROBLEMAS
TROUBLE SHOOTING GUIDE
CD MAINTENANCE
MANUTENÇÃO DO CD
CD MAINTENANCE
CHOIX DE LA FONCTION
SELECIONANDO A FUNÇÃO
FUNKTION AUSWÄHLEN
SELECTING FUNCTION
FONCTION BLUETOOTH
FUNÇÃO DE BLUETOOTH
BEDIENUNG
BLUETOOTH FUNCTION
CONNEXION D’UNE SOURCE AUXILIAIRE
UTILIZAÇÃO DA ENTRADA AUXILIAR
ANSCHLUSS EINER ZUSATZQUELLE
CONNECTING AUXILIARY SOURCE
CHANTER AVEC LA PRISE MICRO
CANTANDO PELO CONECTOR DO MICROFONE
MIKROFON ANSCHLIESSEN UND MITSINGEN
SINGING THROUGH MIC JACK
INSTRUCTIONS IMPORTANTES SUR LA SECURITE
INSTRUÇÕES DE SEGURANÇA
IMPORTANT SAFETY INSTRUCTIONS
ATTENTION: Pour réduire le risque de choc électrique,
ne pas ouvrir l'appareil, il n'y a aucune partie à l'intérieur
destinée à l'utilisateur. Conez toutes les réparations à
un personnel qualié.
ATENÇÃO: Para reduzir o risco de choque eléctrico, não
desmonte o aparelho. O aparelho não contém qualquer
peça passível de ser reparada pelo utilizador. Cone todas
as operações de manutenção a um técnico qualicado.
CAUTION: To reduce the risk of electric shock, do not
open the device, there is no party inside for the user.
Refer all servicing to qualied personnel.
L'éclair avec le symbole de la èche dans le triangle est un signe d'alerte
avertissant l'utilisateur de "tension dangereuse" à l'intérieur de l'unité.
O símbolo do relâmpago com uma seta e situado no interior de um
triângulo destina-se a alertar o utilizador para a presença de uma “tensão
perigosa” no aparelho.
The lightning with the arrow symbol in the triangle is a warning sign alerting
the user to "dangerous voltage" inside the unit.
Le point d'exclamation dans le triangle est un signe d'alerte avertissant
l'utilisateur d'instructions importantes accompagnant le produit.
O ponto de exclamação no interior de um triângulo destina-se a alertar
o utilizador para a presença de instruções importantes no manual que
acompanha o aparelho.
The exclamation point in the triangle is a warning sign alerting the user of
important instructions accompanying the product.
La plaque de précaution est située à l’arrière de l’appareil.
AVERTISSEMENT: POUR PRÉVENIR TOUT RISQUE D’INCENDIE OU DE
CHOC ÉLECTRIQUE, N’EXPOSEZ PAS CET APPAREIL À LA PLUIE OU À
L’HUMIDITÉ.
ATTENTION: Radiations laser invisibles lorsque les dispositifs de sécurité sont
ouverts ou défectueux.
Ce lecteur de disque compact est classié comme un produit laser de CATEGORIE
1. L’inscription « PRODUIT LASER DE CATEGORIE 1 » est situé à l'arrière de
l'appareil.
O símbolo de Cuidado é encontrado na parte de trás do dispositivo.
ADVERTÊNCIA: PARA PREVENIR O RISCO DE INCÊNDIO OU DE CHOQUE
ELÉCTRICO, NÃO EXPONHA ESTE APARELHO A CHUVA OU HUMIDADE.
ATENÇÃO: São emitidas radiações invisíveis quando os dispositivos de segurança
são abertos ou defeituosos.
Esse reprodutor de discos compactos é classicado como um produto de LASER
DE CLASSE 1. A marcação CLASS 1 LASER PRODUCT está localizada na parte
traseira da unidade.
The Caution mark is located at the back of the device.
WARNING: TO PREVENT FIRE OR SHOCK HAZARD, DO NOT EXPOSE THIS
APPLIANCE TO RAIN OR MOISTURE.
CAUTION: Invisible laser radiation when open and interlocks defeated. Avoid
exposure to beam.
This compact disc player is classied as a CLASS 1 LASER product. The CLASS 1
LASER PRODUCT marking is located at the back of unit.
IMPORTANT
- Utilisez cet appareil sous un climat tempéré.
- La plaque signalétique se trouve à l’arrière de cet appareil.
- Veiller à avoir une distance minimale de 5 cm autour de l'appareil pour une
aération susante et que la ventilation ne soit pas gênée en recouvrant les orices
d'aération de l'appareil avec des objets tels que journaux, nappes, rideaux…..
- Ne placez pas de sources de ammes nues, telles que des bougies allumées
sur l'appareil.
- Ne pas exposer l'appareil à des gouttes d'eau ou éclaboussures.
- Ne placez pas d'objets remplis de liquides, tels que verre, vase ou objets
similaires sur l'appareil.
- Ne pas jeter les piles dans le feu! Respectez l'environnement lors de la disposition
des piles usagées.
- Les piles ne doivent pas être exposées à une chaleur excessive comme le soleil,
le feu ou autre source de chaleur similaire.
- L’adaptateur secteur permet de débrancher l’appareil. Il doit rester facilement
accessible durant l’utilisation. Pour couper complètement l’alimentation de
l’appareil, débranchez l’adaptateur de la prise secteur.
- Sous l'inuence du phénomène transitoire rapide et / ou phénomène
électrostatique électrique, le produit pourrait présenter des dysfonctionnements
et l'utilisateur devra faire une réinitialisation de l'appareil.
ATENÇÃO
- Utilize este aparelho num clima temperado.
- A placa de características situa-se na parte de trás deste aparelho.
- Certique-se de que respeita uma distância mínima de 5 cm à volta do aparelho
de modo a permitir uma ventilação suciente.
- Certique-se de que garante uma ventilação correcta do aparelho e que não
tapa os orifícios de ventilação com objectos como jornais, toalhas, cortinas, etc.
- Não coloque qualquer fonte de calor, como uma vela acesa, sobre ou na
proximidade do aparelho.
- Não exponha o aparelho a salpicos ou a humidade.
- Não coloque objectos que contenham líquido, como uma jarra, sobre ou na
proximidade do aparelho.
- Não deite as pilhas no fogo! Certique-se de que respeita o ambiente quando
eliminar pilhas gastas.
- Não exponha as pilhas a calor excessivo, como raios do sol, fogo ou outras fontes
de calor semelhantes.
- L’adattatore di rete permette di scollegare l’apparecchio. Deve pertanto restare
facilmente accessibile durante l’uso. Per mettere del tutto l’apparecchio fuori
tensione, scollegate il cavo di alimentazione.
- Sob o efeito de fenómenos electrostáticos e/ou eléctricos transitórios, o produto
pode apresentar anomalias e pode acabar por ser necessário proceder-se a uma
reinicialização.
IMPORTANT
- The use of apparatus in moderate climates.
- The Marking plate is located at the back of the device.
- Make sure to have a minimum distance of 5 cm around the unit for sucient
ventilation.
- Ensure that the ventilation openings is not covered with items such as newspapers,
tablecloths, curtains, etc.
- Do not place naked ame sources, such as lighted candles on the apparatus.
- Do not expose this appliance to dripping or splashing water.
- Do not place objects lled with liquids, such as glass, vase on the device.
- Do not throw batteries into re! Respect the environment when disposing of used
batteries.
- Batteries should not be exposed to excessive heat such as sunshine, re or other
similar heat source.
- AC adaptor is used as the disconnect device. It shall remain readily operable and
should not be obstructed during intended use. To be completely disconnected
the apparatus from supply mains, the AC adaptor of the apparatus shall be
disconnected from the mains socket outlet completely.
- Under the inuence of fast transient and / or electrostatic electric phenomenon,
the product may malfunction and the user must perform a power reset of the
device.
Si à l'avenir, vous deviez vous débarrasser de ce produit , sachez
que les produits électriques usagés ne doivent pas être jetés avec les
ordures ménagères. Des installations destinées au recyclage existent.
Vériez auprès de votre municipalité ou demandez à votre revendeur des
conseils. (Directive Déchets d'Equipements Electriques et Electroniques)
Caso pretenda descartar-se deste aparelho, proceda à sua reciclagem
num centro de recolha para electrodomésticos. Procure obter informações
sobre o centro de reciclagem mais próximo. Informe-se junto das
autoridades locais ou do seu revendedor local para a obtenção de
pormenores adicionais (Directiva sobre os Resíduos dos Equipamentos
Eléctricos e Electrónicos).
If in the future, you need to get rid of this product, please note that Waste
electrical products should not be disposed of with household waste.
Recycling facilities exist. Check with your municipality or ask your dealer
for advice. (Directive for Waste Electrical and Electronic Equipment)
Nos emballages peuvent faire l’objet d’une consigne de tri, pour en
savoir plus: www.quefairedemesdechets.fr
Utilisation de l’adaptateur secteur
L'adaptateur secteur fonctionne sur une alimentation AC comprise entre 100V
et 240V . L’adaptateur secteur fourni ne peut en aucun cas être utilisé sur un
autre type d’alimentation.
Avertissements
• L’adaptateur secteur fourni est exclusivement destiné à être utilisé avec cet
appareil. Ne l’utilisez donc pas avec d’autres appareils.
• An d’éviter d’abîmer l’appareil, éteignez-le avant de débrancher l’adaptateur
secteur de l’appareil.
• En cas de non-utilisation prolongée, débranchez l’adaptateur secteur de la prise
murale.
• Veillez à ce que la prise secteur se trouve à proximité et soit facilement accessible.
En cas de disfonctionnement, débranchez immédiatement la che d’alimentation
de la prise secteur.
• L’adaptateur secteur permet de débrancher l’appareil. Il doit rester facilement
accessible durant l’utilisation. Pour couper complètement l’alimentation de
l’appareil, débranchez l’adaptateur de la prise secteur.
• N’utilisez pas l’adaptateur secteur s’il est abîmé. Placez les câbles de manière
sûre et veillez à ce qu’ils ne soient ni coincés, ni pincés. Si le câble d’alimentation
est abîmé, contactez un technicien qualié.
Utilisation de la batterie intégrée
Cet appareil est équipé d’une batterie au lithium-ion rechargeable intégrée Chargez
la batterie intégrée avant la première utilisation. L'indicateur de charge s'allume en
rouge et s'éteint après une charge complète.
Avertissements:
• Rechargez la batterie intégrée lorsque vous avez l’intention de l’utiliser juste
après.
• Lors de l’utilisation de la batterie intégrée, la température ambiante doit être
comprise entre 5°C et 35°C.
• An d’allonger la durée de vie de la batterie intégrée, veuillez la recharger à une
température d’intérieur.
• La batterie intégrée de cet appareil peut présenter un risque d’incendie ou de
brûlure chimique en cas d’utilisation incorrecte. Ne démontez pas la batterie, ne
la chauez pas à plus de 100°C et ne la jetez pas au feu.
• N’exposez pas la batterie à une chaleur excessive, comme les rayons du soleil, le
feu ou d’autres sources de chaleur similaires.
• Lorsque vous vous débarrassez de la batterie, veillez au respect de
l’environnement et conformez-vous à la législation en vigueur.
• Lorsque le niveau de la batterie intégrée est faible, L'écran achera “ “.
REMARQUE:
Dans un soucis d'économie d'énergie, à la n de la lecture ou bien encore si
le volume d'écoute est réglé à un niveau très bas et qu’aucune opération n'est
eectuée sur l'appareil pendant une période de 30 minutes celui-ci se mettra
automatiquement en mode veille.
Utilizzo dell’adattatore di rete
L’adattatore di rete funziona tramite un’alimentazione AC compresa tra 100V
e 240V . L’adattatore di rete fornito in dotazione non può in alcun caso essere
utilizzato con un altro tipo di alimentazione.
Attenzione:
• L’adattatore di rete fornito in dotazione è destinato ad essere utilizzato
esclusivamente con questo apparecchio. Non utilizzatelo dunque con altri
apparecchi.
• Per evitare di rovinare l’apparecchio, spegnetelo prima di scollegare l’adattatore
di rete dall’apparecchio.
• In caso di un prolungato periodo di non utilizzo, scollegate l’adattatore di rete
dalla presa a muro.
• Fate in modo che la presa di rete sia vicina e che resti facilmente accessibile. In
caso di malfunzionamento, scollegate immediatamente la spina di alimentazione
dalla presa di rete.
• L’adattatore di rete permette di scollegare l’apparecchio. Deve pertanto restare
facilmente accessibile durante l’uso. Per mettere del tutto l’apparecchio fuori
tensione, scollegate il cavo di alimentazione.
• Non utilizzate l’adattatore di rete se è danneggiato. Posizionate i cavi in modo
sicuro facendo attenzione che non vengano incastrati o schiacciati. Se il cavo di
alimentazione è danneggiato, rivolgetevi a un tecnico qualicato.
Utilizar a bateria integrada
A unidade possui uma bateria recarregável incorporada (ião de lítio). Carregue a
bateria integrada antes de a utilizar pela primeira vez. O indicador de carga irá car
vermelho e desliga-se após a carga total.
Avisos:
• Recarregue a bateria integrada quando estiver pronto para a utilizar novamente.
• Enquanto utiliza a bateria integrada, a temperatura ambiental deverá ser entre
5°C (41°F) e 35°C (95°F).
• Para obter a maior duração possível da bateria integrada, carregue a temperaturas
de interior.
• A bateria integrada deste dispositivo pode apresentar risco de fogo ou
queimaduras químicas se não for devidamente manuseada. Não a desmonte,
não a exponha a temperaturas superiores a 100°C (212°F) e não a incinere.
• A unidade não deverá ser exposta a calor excessivo como luz solar, fogo ou
semelhantes.
• Quando eliminar a unidade devem ser consideradas as questões ambientais
e as regras ou leis locais que regem a eliminação de tais produtos devem ser
rigorosamente respeitadas.
• Quando a bateria interna estiver fraca, " " será exibido na tela.
Nota:
No interesse de economizar energia, quando uma reprodução terminar ou o nível
de volume for denido como muito baixo e nenhuma operação for realizada por um
período de 30 minutos, o aparelho entrará automaticamente no modo de Espera.
Verwendung des Netzstromadapters
Der Netzstromadapter funktioniert mit Wechselstrom zwischen 100 und 240V
Wechselstrom.
Der mitgelieferte Netzstromadapter darf auf keinen Fall mit einer Stromquelle mit
anderen Kenndaten als den genannten verwendet werden.
Vorsicht:
• Verwenden Sie den mitgelieferten Netzstromadapter ausschließlich für diesen
Player. Verwenden Sie ihn nicht mit anderen Geräten.
• Schalten Sie den Player aus, bevor Sie den Netzstromadapter aus der Steckdose
oder dem Player herausziehen; anderenfalls könnte der Player beschädigt werden.
• Falls der Player über längere Zeit hinweg nicht benutzt werden soll, ziehen Sie den
Netzstromadapter aus der Netzsteckdose heraus.
• Vergewissern Sie sich, dass sichdie Netzsteckdose in der Nähe bendet
und leicht erreichbar ist. Falls eine Fehlfunktion auftritt, ziehen Sie sofort den
Netzstromadapter aus der Netzsteckdose heraus.
• Über den Netzstromadapter kann das Gerät von der Netzspannung getrennt
werden. Er sollte schnell eingeschaltet werden können und während der
vorgesehnen Verwendung nicht blockiert sein. Um das Gerät vollständig vom
Netzstrom zu trennen, muss der Netzstromadapter von der Netzsteckdose
vollständig getrennt werden.
• Verwenden Sie niemals einen beschädigten Netzstromadapter, verlegen Sie
das Netzanschlusskabel so, dass es sicher ist und nirgendwo eingeklemmt oder
gequetscht werden kann. Falls das Netzkabel beschädigt ist, wenden sie sich an
einen qualizierten Fachbetrieb.
Verwendung des eingebauten Akkus
Das Gerät verfügt über eine integrierte wiederauadbare Batterie (Lithium-
Ion). Laden Sie den eingebauten Akku auf, bevor Sie das Gerät zum ersten
Mal in Gebrauch nehmen. Die Ladeanzeige leuchtet rot und erlischt nach dem
vollständigen Auaden.
Warnungen:
• Laden Sie am besten die Batterie erst kurz vor ihrem nächsten Gebrauch wieder
auf.
• Bei Verwendung des eingebauten Akkus sollte die Umgebungstemperatur
zwischen 5°C (41°F) und 35°C (95°F) betragen.
• Um eine maximale Lebensdauer des eingebauten Akkus zu erzielen, laden Sie ihn
möglichst bei Zimmertemperatur auf.
• Der in diesem Gerät eingebaute Akku kann bei falscher Verwendung eine
Gefahrenquelle von Feuer oder chemischer Verbrennung darstellen. Nicht
zerlegen, über 100°C (212°F) erhitzen oder verbrennen.
• Das Gerät darf keiner übermäßig großen Hitze, wie etwa Sonnenlicht, einem Feuer
oder ähnlichem ausgesetzt werden.
• Beim Entsorgen des Gerätes müssen Umweltprobleme und regionale Regeln oder
Gesetze beachtet werden, die beim Entsorgen solcher Produkte streng befolgt
werden müssen.
• Ist die Leistung der integrierten Batterie niedrig, erscheint im Display die Anzeige
„ “.
HINWEISE:
Aus Energiespargründen aktiviert das Gerät automatisch den Standby-Modus,
wenn das Ende der Wiedergabe erreicht oder eine sehr geringe Lautstärke
eingestellt ist und 30 Minuten lang keine Eingabe am Gerät erfolgt.
Using the AC adaptor
The supplied AC adaptor is suitable for use on AC mains supplies of 100-240V
50/60Hz and should only be connected to a mains supply within these parameters.
Cautions:
• The AC adaptor included with this unit is for its use only. Do not use it with other
equipment.
• Turn o the unit before unplugging the AC adaptor from the unit so as to avoid
the unit being damaged.
• When the unit is not going to be used for long time, disconnect the AC adaptor
from the AC outlet.
• Be sure to use it near the wall outlet and easily accessible. If a malfunction occurs,
disconnect the plug from the wall outlet at once.
• AC adaptor is used as the disconnect device. It shall remain readily operable and
should not be obstructed during intended use. To be completely disconnected
the apparatus from supply mains, the AC adaptor of the apparatus shall be
disconnected from the mains socket outlet completely.
• Never use an AC adaptor that is damaged, route power lead in a safe manner and
make sure it is not subjected to trapping or pinching. If the power lead is damaged
refer to a qualied service agent.
Using the Built- in battery
The unit has a built-in rechargeable battery (lithium-ion). Charge the built-in battery
before using it for the rst time. The charging indicator will light red and will be o
after fully charge.
Warnings:
• Recharge the built-in battery when you are ready to use it again.
• While using the built-in battery, the environmental temperature should be 5°C
(41°F) to 35°C (95°F).
• To get the longest service life of the built-in battery, charge at indoor-temperature.
• The built-in battery in this device may present a risk of re or chemical burn if
mistreated. Do not disassemble, heat above 100°C (212°F), or incinerate.
• The unit should not be exposed to excessive heat such as sunshine, re or the
like.
• When discarding the unit, environmental problems must be considered and local
rules or laws governing the disposal of such products must be strictly followed.
• When the built-in battery power is low, “ ” will show on display.
Note:
In a concern of saving energy, when playback has reached to the end or listening
volume is set at a very low level and no control is operated on the device for a
period of 30 minutes, the unit will automatically switch to Standby mode.
1. L'unité allumée, appuyez sur la touche SOURCE à plusieurs reprises pour
choisir le mode CD. L'écran achera « » pendant quelques secondes.
2. Ouvrez la porte de CD, insérez un disque avec l'étiquette orientée vers le haut.
3. Puis refermez le compartiment. (remarque: si aucun disque n'est inséré, l'écran
achera « »).
4. Après quelques secondes, le nombre total de pistes apparaitra sur l'écran
pendant quelques secondes et la lecture commencera automatiquement.
L'indicateur de s'allumera.
1. Quando o aparelho estiver LIGADO, pressione o botão SOURCE no aparelho
várias vezes para selecionar o modo do CD. A tela exibirá “ ” por alguns
segundos.
2. Abra a porta do CD. Insira o disco com a etiqueta voltada para cima.
3. Volte a fechar o compartimento (Observação: caso nenhum disco tenha sido
inserido, a tela exibirá “ ”).
4. Depois de alguns segundos, o número total de faixas será exibido na tela por
alguns segundos e a reprodução será automaticamente iniciada. O indicador
irá ligar.
1. Wenn das Gerät EINGESCHALTET ist, drücken Sie die Taste SOURCE
wiederholt, um den CD-Modus auszuwählen. Im Display erscheint einige
Sekunden lang die Anzeige „ “.
2. Um das CD-Fach zu önen. Legen Sie eine Disc mit der bedruckten Seite nach
oben ein.
3. Schließen Sie das CD-Fach wieder. (Hinweis: Falls keine Disc eingelegt wurde,
erscheint im Display die Anzeige „ “).
4. Nach einigen Sekunden wird im Display für einige Sekunden lang die Gesamtzahl
der Titel angezeigt. Die Anzeige leuchtet auf.
1. Conecte um dispositivo USB na conexão USB MP3 do aparelho.
2. Pressione o botão SOURCE para selecionar o modo de USB. A tela exibirá “ ”
por alguns segundos e então a reprodução iniciará automaticamente.
3. Selecione a faixa desejada com / .
Observação:
- O número total de arquivos de MP3 no dispositivo USB não deverá ser maior
que 999.
- O dispositivo USB não poderá ter mais que 99 diretórios.
- O tempo de leitura poderá ser de alguns segundos ou mais, dependendo da
quantidade de arquivos de MP3 e pastas no dispositivo USB.
- Não insira mais nada a não ser um periférico USB na porta prevista para este
efeito. Corre o risco de danicar o aparelho.
- A porta USB não deve ser directamente ligada a um computador: tal pode
danicar o aparelho.
- Existem no mercado inúmeros modelos de chaves USB e de leitores de MP3.
Não podemos garantir uma compatibilidade com todos os formatos. Utilize um
outro periférico USB se o seu não funcionar.
- Se o número da faixa for maior que 99, a unidade mostrará “99” no visor LED.
1. Schließen Sie ein USB-Gerät an den USB MP3-Port dieses Geräts an.
2. Drücken Sie die Taste SOURCE wiederholt, um den USB-Modus auszuwählen. Im
Display erscheint einige Sekunden lang die Anzeige „ “ und die Wiedergabe
startet automatisch.
3. Wählen Sie mit / einen Titel aus.
Anmerkungen:
- Auf dem USB-Gerät dürfen nicht mehr als 999 MP3-Dateien gespeichert sein.
- Das USB-Gerät darf nicht mehr als 99 Verzeichnisse enthalten.
- Je nach Anzahl der MP3-Dateien und Ordner auf dem USB-Gerät benötigt der
Lautsprecher einige Sekunden oder länger zum Lesen der Dateien.
- Stecken Sie nur ein USB-Gerät in den dazu vorgesehenen USB-Port. Sie könnten
das Gerät ansonsten beschädigen.
- Der USB-Port darf nicht direkt an einen PC angeschlossen werden: Dadurch
könnte das Gerät beschädigt werden.
- Auf dem Markt sind zahlreiche USB-Sticks und MP3-Player erhältlich. Die
Kompatibilität mit allen Formaten kann daher nicht gewährleistet werden. Benutzen
Sie bitte einen anderen USB-Stick, falls der Ihre nicht funktionieren sollte.
- Falls die Titelnummer größer ist als 99, erscheint im LED-Display die Anzeige „99“.
1. When the unit is ON, press SOURCE button repeatedly to select CD mode. The
display will show “ ” for a few seconds.
2. Open the CD door. Insert a disc with label side facing up.
3. Close the CD door. (Note: If there is no disc inserted, the display will show “ ”).
4. After a few seconds, the total number of track will appear on display for a few
seconds and playback starts automatically. indicator will light up.
1. Connectez un appareil USB sur le port USB MP3 de l'unité.
2. Appuyez sur la touche SOURCE à plusieurs reprises pour choisir le mode USB.
L'écran achera « » pendant quelques secondes et la lecture commencera
automatiquement.
3. Sélectionnez la piste de votre choix avec / .
Remarques:
- Le nombre total de chiers MP3 sur l'appareil USB ne doit pas dépasser 999.
- L'appareil USB ne peut pas contenir plus de 99 répertoires.
- La durée de lecture prend quelques secondes ou plus en fonction de la quantité
de chiers MP3 et de dossiers USB sur l'appareil.
- N’insérez rien d’autre qu’un périphérique USB dans le port prévu à cet eet. Vous
risqueriez d’abîmer l’appareil.
- Le port USB ne doit pas être directement connecté à un ordinateur: cela pourrait
endommager l’appareil.
- Il existe sur le marché de nombreux modèles de clefs USB et de lecteurs MP3.
Nous ne pouvons garantir une compatibilité avec tous les formats. Merci d’utiliser
un autre périphérique USB si le vôtre ne fonctionne pas.
1. Connect an USB device to the USB MP3 port on unit.
2. Press SOURCE button repeatedly to select USB mode. The display will show
“ ” for a few seconds and playback will start automatically.
3. Select desired track with / .
Notes:
- The total number of MP3 les on the USB device should not exceed 999.
- The device may not contain more than 99 directories.
- The reading time takes about a few seconds or more depending on the amount of
MP3 les and folders on USB device.
- Do not put anything other than a USB device to the port of this unit. Other objects
may damage the USB mechanism.
- The USB socket must not be connected to the computer directly, for that may
damage the unit.
- There are many USB devices in the market. We cannot guarantee to support all
dierent models. Please try another USB device if your device is not supported.
- If the track number is more than 99, the unit will show “99” on the LED display.
Répétition de la lecture
Appuyez de manière répétée sur la touche pour sélectionner un mode de
répétition. L'indicateur de répétition s'allumera
- Répétition de la piste, l'écran ache « ».
- Répétition du répertoire, l'écran ache « » (MP3 seulement)
- Répétition du disque, l'écran ache « ».
Pour annuler la lecture répétée, appuyez sur la touche à plusieurs reprises
jusqu'à ce que l'écran ache « » et l'indicateur de répétition disparaitra.
Lecture Programmée
1. En mode arrêt, appuyez sur la touche PROG. . L'écran achera « P- » pendant
quelques secondes, puis « 01 » (numéro de programme en mémoire) et passera
à « 01 ». (« 01 » correspond à la piste de programme 01). L'indicateur de
programme s'allumera.
2. Choisissez la piste de votre choix avec / , puis appuyez sur la touche
PROG. pour conrmer.
3. Répétez les étapes ci-dessus pour programmer jusqu'à 32 pistes pour les CD et
99 pistes pour les MP3.
4. Appuyez sur pour lancer la lecture programmée.
5. Appuyez sur la touche sur la télécommande une fois pour arrêter la lecture
programmée. Appuyez à nouveau pour annuler cette fonction.
Repetir
Pressione mais de uma vez o botão para selecionar o modo de repetição. O
indicador de Repetir se acenderá
- Repetir 1, “ ” é exibido na tela.
- Repetir pasta: “ ” é exibido na tela. (Apenas para MP3)
- Repetir todas: “ ” é exibido na tela.
Para cancelar a repetição de reprodução, pressione o botão várias vezes no
aparelho até que “ ” seja exibido na tela, e o indicador do repetir se apagará.
Reprodução programada
1. No modo Parado, pressione o botão PROG. O visor irá mostrar “P-” durante
alguns segundos, depois “01” (número da memória do programa) e mudar
para “01”. (“01” é para a faixa 01 do programa). O indicador de Programada
se acenderá.
2. Selecione a faixa desejada com / , e então pressione o botão PROG.
para conrmar.
3. Repita os passos acima para programar até 32 faixas de CDs e 99 faixas de
MP3.
4. Pressione para iniciar a reprodução programada.
5. Pressione o botão no controle remoto uma vez para interromper a reprodução
programada. Pressione novamente para cancelar esta função.
Wiederholung
Betätigen Sie die Taste mehrfach, um einen Wiederholungsmodus zu wählen.
Die Anzeige für die wiederholte Wiedergabe leuchtet auf.
- Einzelwiederholung: Anzeige zeigt " ".
- Verzeichnis wiederholen: Anzeige zeigt " ". (Nur MP3)
- Alles wiederholen: Anzeige zeigt " ".
Um die wiederholte Wiedergabe zu beenden, drücken Sie die Taste wiederholt,
bis im Display die Anzeige „ “ erscheint und die Anzeige für die wiederholte
Wiedergabe erlischt.
Programmierte Wiedergabe
1. Drücken Sie im Stopp-Modus die Taste PROG. . Im Display erscheint einige
Sekunden lang die Anzeige „P-“, gefolgt von den Anzeigen „01“ (Speicherplatz)
und „01“ (gespeicherter Titel 01). Die Anzeige für die programmierte Wiedergabe
leuchtet auf.
2. Wählen Sie mit den Tasten / den gewünschten Titel aus und drücken Sie
dann die Taste PROG. zum Bestätigen.
3. Wiederholen Sie die oben genannten Schritte, um bis zu 32 CD-Titel oder 99
MP3-Titel zu programmieren.
4. Drücken Sie die Taste , um die programmierte Wiedergabe zu starten.
5. Drücken Sie einmal die Taste auf der Fernbedienung, um die programmierte
Wiedergabe zu beenden. Drücken Sie erneut, um die Funktion zu beenden.
Repeat playback
Press button repeatedly to select a play mode. Repeat indicator will light up.
- Repeat One: display shows “ ”.
- Repeat folder: display shows “ ”. (MP3 only)
- Repeat All: display shows “ ”.
To cancel repeat playback, press button repeatedly until display shows “ ”
and repeat indicator disappears.
Program playback
1. In stop mode, press PROG. button. The display will show “P-” for a few seconds
then “01” (program memory number) and change to “01”. (“01” is for program
track 01) Program indicator lights up.
2. Select the desired track with / , then press PROG. button to conform.
3. Repeat above steps to program up to 32 tracks for CD and 99 tracks for MP3.
4. Press to start program playback.
5. Press button once to stop the program playback. Press again to cancel
this function.
Appuyez longuement sur la touche pour mettre l’appareil en marche/ éteindre
l'unité.
Mantenha o botão uma vez para ligar o aparelho / desligar o aparelho.
Halten Sie die Taste , um das Gerät einzuschalten / Gerät auszuschalten.
Press and hold button to turn on or turn o the unit.
1. En mode veille, appuyez sur le bouton pour allumer la lumière de couleur
et attendre le cycle de couleur. Appuyez à nouveau sur le bouton pour choisir
manuellement les couleurs à la couleur désirée. Maintenez la touche
enfoncée pour éteindre l’éclairage.
2. Lorsque l'appareil est allumé, appuyez sur la touche pour sélectionner le
mode d'éclairage.
1. No modo de espera, pressione o botão para ligar a luz colorida e a mudança
de várias cores para obter um efeito de ciclo de cores. Pressione novamente o
botão para acender a luz, opere repetidamente para selecionar a cor desejada.
Pressione e segure no botão para desligar a luz.
2. Quando a unidade estiver ligada, pressione o botão para selecionar o modo
de iluminação.
1. In standby mode, press button to turn on the color light, and multiple color
change to achieve a color cycle eect. Press the button again to settle down the
light, repeatedly operate to select desired color. Press and hold the to turn
o the light.
2. When the unit is on, press button to turn on or turn o the color light.
Alimentation: CA100-240V 50/60Hz
Consommation: 9.0W
PILES RECHARGEABLES
Type de batterie: batterie au lithium-ion de 7.4V de 1500 mAh
Durée de fonctionnement: Environ 5 heures à 50% du volume après chargement
complet
Temps de chargement: Environ 3 heures
BLUETOOTH
Version Bluetooth: V5.0
Bluetooth: 2.402-2.48GHz
Puissance de sortie des RF (fréquences radios): -0.698 dBm
Distance de fonctionnement: Jusqu'à 10 mètres mesurés en espace ouvert (les
murs et les structures peuvent aecter la portée de l'appareil)
Alimentação: AC100-240V 50/60Hz
Consumo: 9.0W
BATERIA RECARREGÁVEL
Tipo de bateria: 7.4V 1500mAh Bateria de ião de lítio
Tempo de Funcionamento: Aprox. 5 horas com o volume em 50% depois de uma
recarga completa.
Tempo de recarga: Aprox. 3 horas
BLUETOOTH
Versão do Bluetooth: V5.0
Bluetooth: 2.402-2.48GHz
Potência de saíde de RF (Rádio Frequência): -0.698 dBm
Distância de Funcionamento: Até 10 metros, medido em espaço aberto (paredes e
estruturas poderão afetar a distância de funcionamento do dispositivo).
POWER SUPPLY: AC100-240V 50/60Hz
Consumption: 9.0W
RECHARGEABLE BATTERY
Battery Type: 7.4V 1500mAh Lithium Ion Battery
Operating Time: Approx. 5 hours at 50% volume after fully charged
Charging Time: Approx. 3 hours
BLUETOOTH
Bluetooth Version: V5.0
Bluetooth: 2.402-2.48GHz
RF Output Power: -0.698 dBm
Working Distance: Up to 10 meters measured in open space (wall and structures
may aect range of device)
En cas de problème avec cette unité, vériez ce qui suit avant de demander une
réparation:
Pas de courant
• Assurez-vous que l’unité est connectée sur une alimentation secteur.
• Assurez-vous que l'unité soit chargée.
Pas de son - général
• Le volume de l'appareil externe est réglé au minimum, augmentez le volume.
• Le volume du M-1820DJ est réglé au minimum, augmentez le volume.
L'appareil Bluetooth ne peut pas se coupler ou se connecter à l'unité.
• Vous n'avez pas activé la fonction Bluetooth de votre appareil. Consultez le
manuel d'utilisation de votre appareil pour activer la fonction Bluetooth.
• L’unité n’est pas en mode couplage. Tenez la touche appuyée jusqu'à ce que
l'indicateur Bluetooth clignote rapidement.
• L'unité est déjà connectée à un autre appareil Bluetooth; déconnectez cet appareil
et réessayez.
Caso este aparelho apresente um problema, verique as seguintes soluções antes
de contactar um técnico:
Não funciona
• Certique-se de que o aparelho esteja conectado à uma tomada.
• Certique-se de que a bateria está recarregada.
Sem som - Geral
• O nível de volume do dispositivo externo está no mínimo; aumente o volume.
• O nível de volume to M-1820DJ está no mínimo; aumente o volume.
O dispositivo Bluetooth não consegue parear ou conectar ao aparelho.
• Você não ativou a função de Bluetooth do seu dispositivo. Consulte o manual de
instruções do seu dispositivo para ativar a função de Bluetooth.
• O aparelho não está no modo de pareamento. Mantenha o botão pressionado
até que o indicador comece a piscar rapidamente.
• O aparelho já está conectado a outro dispositivo com Bluetooth; desconecte esse
dispositivo e tente novamente.
Should this unit exhibit a problem, check the following before seeking service:
No Power
• Make sure unit is connected to AC power.
• Make sure the battery is recharged.
No Sound – General
• External device’s volume is set to minimum; raise volume.
• The M-1820DJ’s volume is set to minimum; raise volume.
The Bluetooth device cannot pair or connect with the unit.
• You have not activated the Bluetooth function of your device. Refer to the user
manual of your device to activate Bluetooth function.
• The unit is not in pairing mode. Press and hold the button until the Bluetooth
indicator blinks fast.
• The unit is already connected with another Bluetooth device; disconnect that
device and then try again.
Nettoyage
ATTENTION: Déconnectez cet appareil de toute source d’alimentation avant
de le nettoyer.
- Utilisez un chion doux, propre et sec. Dépoussiérez régulièrement les orices de
ventilation à l'arrière ou sur les côtés de l'appareil.
- L'utilisation de solvants ou de produits abrasifs ou à base d'alcool peut
endommager l'appareil.
- Si un objet ou un liquide entre dans l'appareil, débranchez immédiatement ce
dernier et faites-le contrôler par un technicien agréé.
Remarques sur les disques
* N’utilisez pas de disques de forme irrégulière (exemple: en forme de cœur,
octogonaux). L’appareil pourrait présenter des dysfonctionnements.
* Ne placez pas plusieurs disques dans le compartiment.
* N’essayez pas d’ouvrir le compartiment du disque pendant la lecture.
* Ne touchez pas la lentille. Vous pourriez provoquer un dysfonctionnement.
* Si le disque est rayé, sale ou maculé de traces de doigts, l’appareil peut ne pas
fonctionner. Avant la lecture, essuyez le disque avec un chion. Procédez du
centre vers l’extérieur. Ne rangez pas les disques dans des endroits présentant
des températures élevées ou une humidité importante. Ils pourraient se déformer.
Après la lecture, replacez vos disques dans leur boîtier.
Remarque importante
• Retirez le disque du compartiment si l’appareil doit être transporté.
Limpeza
ATENÇÃO: Desligue este aparelho de qualquer fonte de alimentação antes
de proceder à sua limpeza.
• Utilize um pano macio, limpo e seco. Limpe regularmente os orifícios de ventilação
na parte de trás ou nos lados do aparelho para eliminar as partículas de pó.
• A utilização de solventes ou de produtos abrasivos ou à base de álcool pode
danicar o aparelho.
• Se um objecto ou líquido entrar no aparelho, desligue-o de imediato e solicite a
sua inspecção por um técnico autorizado.
Observações relativas aos discos
* Não utilize discos de forma irregular (exemplo: em forma de coração, octogonais).
O aparelho pode car avariado.
* Não coloque mais do que um disco no compartimento.
* Não tente abrir o compartimento do disco durante a reprodução.
* Não toque na lente dado que pode causar uma avaria no aparelho.
* Se o disco estiver riscado, sujo ou marcado com dedadas, o aparelho pode
não funcionar. Antes da reprodução, limpe o disco com um pano. Proceda do
centro para fora. Não arrume os discos em locais com temperaturas altas ou
uma humidade signicativa. Podem car deformados. Após a reprodução, volte a
colocar os discos nas respectivas caixas.
Observação importante
• Retire o disco do compartimento se o aparelho tiver de ser transportado.
Cleaning
WARNING: Disconnect the unit from the mains supply before cleaning.
- Use a soft, dry, clean cloth. Regularly dust the vents at the back or sides.
- Using solvents, abrasive or alcohol-based products risks damaging the appliance.
- If an object or liquid enters inside the appliance, unplug it immediately and have it
checked by an authorized engineer.
Notes on disc
* Do not use irregular shape CDs (example: heart-shaped, octagonal ones). It may
result in malfunctions.
* Do not place more than one disc in the disc compartment.
* Do not try to open the disc compartment during playing.
* Do not touch the lens. Doing so may cause malfunction.
* If there is a scratch, dirt or ngerprints on the disc, it may cause tracking error.
Before playing, clean the disc with a cleaning cloth. Wipe the disc from the center
out. Don't store discs in places with high temperatures or high humidity, they can
become warped. After playing, store the disc in its case.
Important Note
• Before transporting the unit, remove the disc from the disc compartment.
La fonction (BLUETOOTH/ AUX/ CD/ USB ) peut être choisie en appuyant plusieurs
fois sur la touche SOURCE.
A função (BLUETOOTH/ AUX/ CD/ USB) é selecionada ao pressionar o botão
SOURCE repetidamente.
Wählen Sie die Funktion (BLUETOOTH/ AUX/ CD/ USB) durch wiederholtes
Drücken der Taste SOURCE.
The function (BLUETOOTH/ AUX/ CD/ USB) is selected by pressing SOURCE
button repeatedly.
Le mot Bluetooth
®
ainsi que les marques et logo sont des marques commerciales
déposées détenues par Bluetooth SIG, Inc. et l'utilisation de ces marques par New
One S.A.S se fait dans le cadre d'une autorisation. Les autres marques et noms
commerciaux sont les propriétés de leurs titulaires respectifs.
Coupler un appareil Bluetooth
1. Lorsque l’unité est allumée, appuyez sur la touche SOURCE à plusieurs reprises
pour choisir le mode Bluetooth. L'écran achera “ ”. Le témoin clignotera
indiquant qu'il est en mode d'appairage.
2. Sur l'appareil Bluetooth, activez le Bluetooth et sélectionnez « M-1820DJ» dans
la liste des appareils. (consultez le manuel d'instruction de l'appareil pour les
détails de connexion). Si l'appareil Bluetooth vous demande un mot de passe,
utilisez '0000'. Certains appareils Bluetooth vous demanderont d'accepter
la connexion. Si l'appareil est correctement appairé, le s'achera et vous
entendrez une indication vocale.
Astuce: Si vous souhaitez connecter votre enceinte Bluetooth à un autre appareil
Bluetooth, vous devez déconnecter l'appareil actuellement connecté avant de
pouvoir suivre les étapes ci-dessus pour établir une nouvelle connexion.
Si le couplage échoue, procédez ainsi:
Tenez la touche appuyée jusqu'à ce que l'indicateur Bluetooth clignote rapidement
pour passer en mode de couplage. Sur l'appareil Bluetooth, activer le Bluetooth et
sélectionnez 'M-1820DJ' dans la liste des appareils (voir l'étape 2 plus haut)
• Sur certains appareils, comme les ordinateurs, une fois couplé, vous devrez
sélectionner l'unité dans le menu Bluetooth et choisir « utiliser comme un dispositif
audio (Stéréo) » ou une phrase similaire.
• Le couplage reste intact lorsque l’unité et/ou l’appareil Bluetooth sont amenées
hors de la portée de liaison. Une connexion active sera rétablie lorsque votre
appareil Bluetooth reviendra dans la portée.
• Lorsque vous rallumez l'unité, elle essayera automatiquement de se reconnecter
avec le dernier appareil Bluetooth connecté.
Utiliser un appareil Bluetooth
1. Avec une unité couplée, (voir la section précédente), faites fonctionner votre
appareil Bluetooth et il diusera du son par le biais de l'enceinte M-1820DJ.
2. Appuyez sur la touche pour mettre la lecture en pause. Touchez à nouveau
pour reprendre la lecture.
3. Sélectionnez la piste de votre choix avec / .
4. Réglez le volume à l'aide des touches de volume . Vous pouvez
également régler le volume sur l'appareil avec lequel vous êtes couplé.
Par la présente, NEW ONE S.A.S déclare que l'appareil "MUSE M-1820 DJ"
est conforme aux exigences essentielles et autres dispositions pertinentes de la
directive 2014/53/EU. La déclaration de conformité peut être consultée sur le site
www.muse-europe.com
COUPLAGE STÉRÉO
Cette fonction vous permet d'obtenir une qualité de son surround stéréo. Il vous
faudra alors deux haut-parleurs Bluetooth M-1820DJ an obtenir une séparation
sans l en deux canaux radio Bluetooth (canaux droit et gauche), par conséquent,
vous devez donc acheter deux M-1820DJ.
Astuces: la distance recommandée entre le haut-parleur principale et le haut-
parleur secondaire doit être inférieure à 4 mètres.
O nome Bluetooth
®
e logotipos são marcas registradas de propriedade da Bluetooth
SIG, Inc. e quaisquer usos destas marcas pela New One S.A.S estão licenciados.
Outras marcas e nomes registrados pertencem aos seus respectivos proprietários.
Pareando um dispositivo com Bluetooth
1. Quando esse aparelho estiver LIGADO, pressione o botão SOURCE várias vezes
para selecionar o modo de Bluetooth. A tela exibirá “ ” por alguns segundos.
O indicador irá piscar, a indicar que está no modo de emparelhamento.
2. No dispositivo com Bluetooth, ative o Bluetooth e selecione "M-1820DJ" na Lista
de Dispositivos. (Consulte o manual de instruções do dispositivo que estiver
sendo conectado para mais detalhes). Caso o dispositivo com bluetooth solicite
uma senha, utilize "0000". Alguns dispositivos com Bluetooth solicitarão que
você aceite a conexão. Se a unidade estiver emparelhada corretamente, o
indicador de Bluetooth irá ligar com uma indicação de voz.
Dica: Caso você queira conectar a sua caixa de som Bluetooth a outro dispositivo
com Bluetooth, você precisará desconectar o dispositivo atualmente conectado
primeiro, e então seguir os passos acima para realizar a nova conexão.
Caso o pareamento falhe, faça o seguinte:
Mantenha o botão pressionado até que o indicador Bluetooth comece a
piscar rapidamente, entrando assim no modo de Pareamento. No dispositivo
com Bluetooth, ative o Bluetooth e selecione "M-1820DJ" na lista de dispositivos
(consulte o passo 2 acima).
• Em alguns dispositivos, como computadores, uma vez pareado, você precisará
selecionar o aparelho em um Menu Bluetooth e escolher "Utilizar como Dispositivo
de Áudio (estéreo)" ou semelhante.
• O pareamento permanecerá intacto quando o aparelho ou o seu dispositivo
com Bluetooth for retirado da área de comunicação. Uma conexão ativa será
restabelecida quando o dispositivo com Bluetooth voltar à área de alcance.
• Quando o aparelho for ligado novamente, ele tentará automaticamente
se reconectar ao dispositivo de Bluetooth com o qual ele tenha sido mais
recentemente pareado.
Der Bluetooth
®
-Markenname und damit verbundene Logos sind Eigentum der
Firma Bluetooth SIG, Inc. Jegliche Benutzung dieser Marken durch die Firma New
One S.A.S stehen unter Lizenz. Alle anderen Produkt- und Markennamen sind
Eigentum ihrer der jeweiligen Besitzer.
Verbindungsaufbau mit einem Bluetooth-Gerät
1. Wenn das Gerät EINGESCHALTET ist, drücken Sie die Taste SOURCE am
Gerät wiederholt um den Bluetooth-Modus auszuwählen. Im Display erscheint
einige Sekunden lang die Anzeige „ “. Blinkt die Bluetooth- Anzeige und
weist somit auf den Kopplungsmodus hin.
2. Aktivieren Sie die Bluetooth-Funktion auf Ihrem Bluetooth-Gerät, und wählen
Sie "M-1820DJ" in der Geräteliste. (Lesen Sie bitte die Bedienungsanleitung des
jeweiligen Geräts für detaillierte Bedienungsschritte zum Verbindungsaufbau.)
Wenn das Bluetooth-Gerät Sie zur Eingabe eines Schlüssels auordert, geben
Sie bitte "0000" ein. Manche Bluetooth-Geräte erfordern es zudem, dass die
Verbindung bestätigt wird. Nach der erfolgreichen Kopplung leuchtet die
Bluetooth-Anzeige auf und es ertönt ein Signalton.
Tipp: Wenn Sie Ihren Bluetooth-Lautsprecher mit einem anderen Bluetooth-Audio-
Gerät verbinden möchten, müssen Sie das zurzeit verbundene Gerät zunächst
trennen und die oben beschriebenen Schritte erneut ausführen, um eine neue
Verbindung herzustellen.
Wenn der Verbindungsaufbau nicht erfolgreich war, führen Sie die folgenden
Schritte aus:
Halten Sie die Taste solange gedrückt, bis die Bluetooth-Anzeige anfängt
schnell zu blinken, um in den Verbindungsmodus zu gelangen. Aktivieren Sie die
Bluetooth-Funktion auf Ihrem Bluetooth-Gerät, und wählen Sie "M-1820DJ" in der
Geräteliste (siehe Schritt 2 weiter oben).
• Auf einigen Geräten wie z. B. Computern müssen Sie bei bestehender Verbindung
das Gerät aus dem Bluetooth-Menü wählen und als Audiogerät aktivieren.
• Die Verbindung bleibt bestehen, wenn das Bluetooth-Gerät außer Reichweite
bzw. ausgeschaltet ist. Eine aktive Verbindung wird dann wieder hergestellt, wenn
das Bluetooth-Gerät sich wieder in Reichweite bendet.
• Wird das Gerät erneut eingeschaltet, versucht es automatisch, sich mit dem
zuletzt gekoppelten Bluetooth-Gerät zu verbinden.
Verwenden eines Bluetooth-Geräts
1. Bei bestehender Verbindung (siehe voriger Abschnitt), können Sie das Bluetooth-
Gerät bedienen und den Ton über das M-1820DJ wiedergeben.
2. Betätigen Sie die Taste , um die Wiedergabe vorübergehend anzuhalten.
Betätigen Sie die Taste ein weiteres Mal, um mit der Wiedergabe fortzufahren.
3. Wählen Sie mit den Tasten / einen Titel aus.
4. Stellen Sie die Lautstärke mit der Taste . Sie können die Lautstärke
auch direkt auf dem Gerät, mit dem die Verbindung hergestellt wurde, einstellen.
NEW ONE S.A.S erklärt hiermit, dass dieser „MUSE M-1820 DJ“ den wesentlichen
Anforderungen und anderen geltenden Vorgaben der Richtlinie 2014/53/EU
entspricht. Die Konformitätserklärung lässt sich unter www.muse-europe.com
herunterladen.
STEREO-KOPPLUNG
Mit dieser Funktion wird die Wiedergabe in Stereo Surround Sound ermöglicht.
Für die schnurlose Bluetooth-Trennung der Radiokanäle sind zwei M-1820DJ
Bluetooth-Lautsprecher erforderlich; Sie müssen daher zwei M-1820DJ erwerben.
Tipps: Es wird empfohlen, dass der Abstand zwischen dem Hauptlautsprecher und
dem zweiten Lautsprecher nicht mehr als 4 Meter beträgt.
Utilizando um dispositivo com Bluetooth
1. Com o aparelho pareado (veja seção anterior), utilize o seu dispositivo com
Bluetooth e o seu som poderá ser escutado através das caixas de som do
M-1820DJ.
2. Pressione o botão para pausar uma reprodução. Pressione novamente para
continuar uma reprodução.
3. Selecione a faixa desejada com / .
4. Ajuste o volume usando . Você também poderá ajustar o volume
através do dispositivo com o qual você estiver pareado.
A NEW ONE S.A.S aqui declara que este produto « MUSE M-1820 DJ» cumpre
os requisitos essenciais e outras disposições relevantes da Norma 2014/53/EU. A
declaração de conformidade pode ser consultada em www.muse-europe.com
EMPARELHAMENTO ESTÉREO
Esta função permite obter uma qualidade de som surround estéreo. São necessários
dois altifalantes Bluetooth M-1820DJ para realizar a separação do som sem o do
canal de rádio Bluetooth, portanto, vai precisar de comprar dois M-1820DJ.
Dicas: sugerimos que a distância entre o altifalante principal e o altifalante
secundário seja menor que 4 metros.
The Bluetooth
®
word mark and logos are registered trademarks owned by Bluetooth
SIG, Inc. and any use of such marks by New One S.A.S is under license. Other
trademarks and trade names are those of their respective owners.
Pairing a Bluetooth Device
1. When the unit is ON, press SOURCE button repeatedly to select Bluetooth
mode. The display will show “ ”. The Bluetooth indicator will start to blink
rapidly. indicating it is in pairing mode.
2. On the Bluetooth device, enable Bluetooth and select “M-1820DJ” from the
Device List.(Refer to the user manual of the device to be connected for detailed
operations.) If the Bluetooth device prompts for a pass code, use “0000”. Some
Bluetooth devices will ask you to accept the connection. If the unit is paired
properly, the Bluetooth indicator will light on with an indication voice.
Tip: If you want to connect your Bluetooth speaker to another Bluetooth audio
device, you need to disconnect current device rst and follow the steps above to
make a new connection.
If the pairing fails, perform the following:
Press and hold the button until the Bluetooth indicator blinks quickly to enter the
Pairing mode. On the Bluetooth device, enable Bluetooth and select “M-1820DJ”
from the Device List (see step 2 above).
• On some devices such as computers, once paired you must select the unit from
the Bluetooth menu and choose “Use as Audio Device (stereo)” or similar.
• Pairing remains intact when the unit and/or your Bluetooth device is taken out
of communication range. An active connection will be re-established when your
Bluetooth device returns within range.
• When the unit is turned on again, it will automatically try to reconnect with the most
recently paired Bluetooth device.
Using a Bluetooth Device
1. With a unit paired (see previous section), operate your Bluetooth device and its
sound will be heard through the M-1820DJ’s speakers.
2. Press the button to pause playback. Press again to resume playback.
3. Select desired track with / .
4. Adjust the volume using the . You can also adjust the volume on
the device to which you are paired.
Hereby, NEW ONE S.A.S, declares that this MUSE M-1820 DJ is in compliance with
the essential requirements and other relevant provisions of Directive 2014/53/EU.
The declaration of conformity may be consulted at www.muse-europe.com
STEREO PAIRING
This function makes it possible for you to get stereo surround sound quality. It
requires two Bluetooth speakers M-1820DJ to realize the real Bluetooth radio
channel wireless separation, therefore, you’ve got to purchase two M-1820DJ.
Tips: it is suggested that the distance between the main speaker and secondary
speaker is within 4 meters.
1. Allumez les deux haut-parleurs Bluetooth M-1820DJ.
2. Lorsque les deux haut-parleurs sont en mode de couplage, appuyez sur le
bouton / PROG. de l’un des deux haut-parleur bluetooth qui deviendra
le haut parleur principal,puis il recherchera et se connectera au haut-parleur
secondaire.Ils reconnaitront automatiquement les canaux gauche et droit
3. Connectez votre haut-parleur principal à un appareil compatible Bluetooth (par
exemple un smartphone).
4. Jouez votre chanson et écoutez le son rendu en stéréo.
5. Appuyez sur le bouton de l'un des deux haut-parleurs pour mettre en pause la
lecture. Appuyez à nouveau pour reprendre la lecture.
6. Maintenez enfoncé le bouton les des haut-parleurs principal pour déconnecter
le couplage stéréo.
1. Ligue os dois altifalantes Bluetooth M-1820DJ.
2. Quando os dois altifalantes estiverem no modo de emparelhamento, prima o
botão / PROG. num dos altifalantes Bluetooth que se tornará o altifalante
principal (canal L), depois ele irá procurar e conectar ao altifalante secundário.
Estes irão reconhecer automaticamente o canal esquerdo e direito.
3. Conecte o seu altifalante principal ao dispositivo Bluetooth (por exemplo,
smartphone).
4. Toque a sua música e ouça o som em estéreo.
5. Pressione o botão em qualquer um dos altifalantes para pausar a reprodução.
Pressione novamente para retomar a reprodução.
6. Pressione e segure o botão em altifalante principal para desconectar o
emparelhamento estéreo.
1. Schalten Sie die zwei M-1820DJ Lautsprecher ein.
2. Wenn an beiden Lautsprechern der Kopplungsmodus aktiviert ist, drücken Sie
die Taste / PROG. an dem Bluetooth-Lautsprecher, den Sie als Hauptgerät
(linker Kanal) verwenden möchten. Dieser Lautsprecher sucht dann den
sekundären Lautsprecher und stellt die Verbindung her. Beide Lautsprecher
erfassen automatisch den linken bzw. rechten Kanal.
3. Verbinden Sie den Hauptlautsprecher mit dem Bluetooth-fähigen Gerät (z.B.
Smartphone).
4. Starten Sie die Musikwiedergabe; die Wiedergabe erfolgt dann in Stereo.
5. Drücken Sie die Taste an einem der beiden Lautsprecher, um die Wiedergabe
zu unterbrechen. Drücken Sie die Taste erneut, um die Wiedergabe fortzusetzen.
6. Halten Sie die Taste ein zweites Mal, um die stereo-kopplung trennen.
1. Turn on the two Bluetooth speakers M-1820DJ.
2. When both speakers are in pairing mode, press / PROG. button on one
Bluetooth speaker which will become the main speaker (L channel), then it will
search and connect to the secondary speaker. They will recognize the left and
right channel automatically.
3. Connect your main speaker to Bluetooth enabled device (e.g. smart phone).
4. Play your song and listen to the sound in stereo.
5. Press button on either speaker to pause playback. Press again to resume
playback.
6. Press and hold button on main speaker to disconnect the stereo pairing.
1. Connectez votre appareil auxiliaire (ex: lecteur MP3) sur la prise AUX IN en haut
de l'unité (câble fourni).
2. Appuyez sur la touche SOURCE à plusieurs reprises pour choisir le mode AUX.
L'écran achera “ ” pendant quelques secondes.
3. Commencez la lecture de votre source auxiliaire.
4. Réglez le volume au niveau souhaité.
5. Pour arrêter la lecture, débranchez votre source auxiliaire de la prise AUX IN.
1. Conecte a sua origem auxiliar (ex: aparelho de mp3) na conexão AUX IN
localizada na parte superior do aparelho (o incluso).
2. Pressione várias vezes o botão SOURCE para selecionar o modo AUX. “ ”
será exibido na tela.
3. Arranque a reprodução na sua fonte auxiliar.
4. Ajuste o volume sonoro para o nível pretendido.
5. Para parar a reprodução, desligue a fonte áudio externa com ligação à tomada
AUX IN.
1. Schließen Sie Ihr externes Gerät (z.B. MP3-Player) an den AUX IN Eingang an
der Oberseite des Geräts an (Kabel enthalten).
2. Drücken Sie die Taste SOURCE wiederholt, um den AUX Modus auszuwählen.
Im Display erscheint die Anzeige „ “.
3. Beginnen Sie mit dem Playback Ihrer Zusatzquelle.
4. Stellen Sie die Lautstärke auf den gewünschten Pegel ein.
5. Um das Playback zu beenden, nehmen Sie Ihre Zusatzquelle aus der AUX IN
Buchse heraus.
1. Connect your auxiliary source (e.g. mp3 player) to the AUX IN jack on the top
of unit (cable included).
2. Press SOURCE button repeatedly to select AUX mode. The display will show
“ ”.
3. Start playback from your auxiliary source.
4. Adjust the volume to desired level.
5. To stop playback, disconnect your auxiliary source from the AUX IN jack.
Chantez sur la musique en branchant le microphone (non fourni) dans la prise
MIC de l'appareil.
Remarque:
• Tournez le bouton directement pour ajuster le niveau de volume.
• Lorsque le microphone est placé près du haut-parleur, un eet de larsen
(phénomène de rétroaction acoustique) peut se produire. En cas de larsen,
éloignez le microphone du haut-parleur.
Avertissement: Taper ou faire tomber le microphone peut endommager de manière
permanente votre microphone. Ne pas faire tourner le microphone par le cordon.
Cante com a música ao conectar o microfone (não fornecido) à entrada MIC da
unidade.
Observação:
• Gire o diretamente para ajustar o nível de volume desejado.
• Caso o microfone tenha sido posicionado próximo a um alto falante, um som
agudo (microfonia) poderá ocorrer. Caso isso ocorra, afaste o microfone do alto
falante.
Advertência: Bater ou derrubar o microfone poderá danicar permanentemente o
microfone. Não balance o microfone pelo o.
Für die Karaoke-Funktion schließen Sie ein Mikrofon (nicht enthalten) an die MIC-
Buchse des Geräts an.
Hinweise:
• Drehen Sie den Regler für die direkte Einstellung der gewünschten
Lautstärke.
• Falls Sie das Mikrofon zu nah an einem Lautsprecher verwenden, kann ein
dröhnendes Geräusch (Rückkopplung) verursacht werden. Bewegen Sie das
Mikrofon in solch einem Fall vom Lautsprecher weg.
Warnung: Durch Aufprall oder Herunterfallen kann das Mikrofon permanent
beschädigt werden. Schwenken Sie das Mikrofon nicht am Kabel haltend umher.
Sing along with the music by plugging in the microphone (not supplied) into the
MIC jack on the unit.
Notes:
• Rotate the directly to adjust the mic volume as desired.
• If the microphone is placed near the loudspeaker, a howling eect (acoustic
feedback) may occur. If this happens, place microphone away from the
loudspeaker.
Warning: Tapping or dropping the microphone can permanently damage your
microphone. Resist the urge to swing the microphone around by the cord.
NEW ONE S.A.S
10, Rue de la Mission, 25480 Ecole Valentin, France
NEW ONE S.A.S
10, Rue de la Mission, 25480 Ecole Valentin, France
NEW ONE S.A.S
10, Rue de la Mission, 25480 Ecole Valentin, France
EMPLACEMENT ET DESCRIPTION DES COMMANDES
DESCRIÇÃO DO APARELHO
BESCHREIBUNG DES GERÄTES
LOCATION OF CONTROLS
HAUT-PARLEUR PARTY BOX BLUETOOTH AVEC
CD ET BATTERIE
CAIXA DE FESTA - ALTIFALANTE BLUETOOTH COM
LEITOR DE CD E BATERIA
BLUETOOTH-PARTYLAUTSPRECHER MIT
CD-FUNKTION UND BATTERIE
BLUETOOTH PARTY BOX SPEAKER WITH
CD AND BATTERY
FR
PT
DE
GB
1. Compartiment disque
2. Bouton de contrôle de l'éclairage
3. : Veille/ Marche
SOURCE: Pour sélection du mode
de fonctionnement: Bluetooth, CD,
USB, AUX.
4. : Lecture/ Pause
: Couplage Bluetooth/
Déconnexion Bluetooth
5. : Saut/ recherche rapide arrière
6. : Stop
7. : Saut/ recherche rapide avant
8. Indicateur Bluetooth
9. Indicateur de Chargeur
10. Indicateur de répétition
11. Achage LED
1. Compartimento para disco
2. Botão de controle de
iluminação
3. : Para ligar e desligar o aparelho
SOURCE: Para selecionar o modo
de funcionamento: Bluetooth, CD,
USB, AUX.
4. : Leitura/ Pausa
: Emparelhar Bluetooth/
Desconectar conexão Bluetooth
5. : Pular/ Buscar
6. : Parar reprodução
7. : Pular/ Buscar
8. Indicador de Bluetooth
9. Indicador de bateria
10. Indicador de Repetir
11. Tela
12. Indicador de Leitura/ Pausa
1. Disk-Fach
2. Beleuchtungstaste
3. : Gerät ein-/ausschalten
SOURCE: Funktionsmodus
auswählen: Bluetooth, CD, USB, AUX.
4. : Wiedergabe / pause
: Bluetooth-Pairing / Trennen der
Bluetooth-Verbindung
5. : Überspringen / Suche
6. : Wiedergabe beenden
7. : Überspringen / Suche
8. Bluetooth-Anzeige
9. Ladeanzeige
10. Anzeige für wiederholte
Wiedergabe
11. LED Anzeige
12. Anzeige für wiedergabe / pause
1. CD compartment
2. Lighting control button
3. : To turn unit ON/OFF
SOURCE: To select function mode:
Bluetooth, CD, USB, AUX.
4. : Play/Pause
: Bluetooth pairing / Disconnect
Bluetooth connection
5. Skip/search
6. : To stop playback
7. : Skip/search
8. Bluetooth indicator
9. Charging indicator
10. Repeat indicator
11. LED display
12. Indicateur Lecture/ Pause
13. PROG. Indicateur de programme
14. Entrée auxiliaire (3,5MM)
15. Bouton de répétition
PROG.: Bouton de programme
Couplage stéréo
16. Port USB pour la lecture MP3
17. : Réglage du volume
18. : Molette de réglage du
MIC volume
19. Poignée
20. Entrée MIC
21. Entrée alimentation 9V 1A
22. Tweeter
23. Haut-parleurs
13. Indicador de Programação
14. Tomada de entrada Aux (3.5mm)
15. : Para repetir a reprodução
PROG.: Para programar as
sequências de reprodução
emparelhamento estéreo
16. Conexão USB para reprodução
de MP3
17. : Para ajustar o
volume principal
18. : Para ajustar o volume
do MIC
19. Pega
20. Entrada MIC
21. Entrada para adaptador de corrente
9V 1A
22. Tweeter
23. Alto-falantes
13. PROG. Anzeige für
programmierte Wiedergabe
14. AUX-Eingang (3.5mm)
15. Wiederholte Wiedergabe
PROG. Wiedergabereihenfolge
programmieren
stereo-kopplung
16. USB-Port für MP3-Wiedergabe
17. : Zur Einstellung
der Master-Lautstärke
18. : Zur Einstellung der
MIC-Lautstärke
19. Traggri
20. Eingang MIC
21. Gleichstromanschluss 9V 1A
22. Hochtonlautsprecher
23. Lautsprecher
12. Play/ Pause indicator
13. PROG. Program indicator
14. AUX IN jack (3.5MM)
15. repeat button
PROG. Program button
Stereo pairing
16. USB port for MP3 playback
17. : To adjust master
volume
18. : To adjust the MIC volume
19. Handle
20. MIC jack
21. DC IN jack 9V 1A
22. Tweeter
23. Loud speaker
LOCATION OF CONTROLS
Lire attentivement les instructions avant de faire fonctionner
l’appareil.
Please read the instruction carefully before operating the unit.
Leia este manual com atenção antes de qualquer utilização.
Bitte lesen sie dieses handbuch vor dem gebrauch des gerätes
sorgfältig durch.
Antes de utilizar este aparato, lea atentamente las siguientes
instrucciones.
Leggere attentamente questo manuale prima di utilizzare
l’apparecchio.
Lees deze handleiding aandachtig voor u het toestel gebruikt.
FR
GB
PT
DE
ES
IT
NL
FR
Manuel de l’utilisateur
GB
User Manual
PT
Manual do Utilizador
Benutzerhandbuch
DE
ES
Manual de instrucciones
Manuale di istruzioni
IT
NL
Handleiding
M-1820 DJ

M-1820DJ/IB/V0
FARBBELEUCHTUNG VERWENDEN
TECHNISCHE EIGENSCHAFTEN
FEHLERBEHEBUNG
1. Drücken Sie im Standby-Modus die Taste , um die farbige Beleuchtung
einzuschalten; unterschiedliche Farben wechseln in zyklischen Abständen.
Drücken Sie die Taste erneut, um eine Farbe auszuwählen; drücken Sie die
Taste wiederholt, um durch die unterschiedlichen Farben zu schalten. Halten Sie
die Taste gedrückt, um die Beleuchtung auszuschalten.
2. Drücken Sie Taste , wenn das Gerät eingeschaltet ist, um einen
Beleuchtungsmodus auszuwählen.
Netzstromversorgung: AC 100-240V 50/60Hz
Stromverbrauch: 9.0W
AKKU
Akku-Typ: 7.4V 1500mAh. Lithium-Polymer-Akku
Ladespannung: 5V DC 500mA
Betriebsdauer: ca. 5 Stunden bei 50% Volumen und vollem Ladezustand
Ladezeit: ca. 3 Stunden
BLUETOOTH
Bluetooth-Version: V5.0
Bluetooth: 2.402-2.48GHz
RF-Ausgangsleistung (Radiofrequenz-Augangsleistung): -0.698 dBm
Betriebsreichweite: bis zu 10 Meter in oenen Räumen (Wände und Hindernisse
können die Reichweite des Geräts beeinträchtigen)
Wenn das Gerät ein Problem aufweist, überprüfen Sie die folgenden Punkte, bevor
Sie sich an den Kundendienst wenden:
Gerät kann nicht eingeschaltet werden
• Stellen Sie sicher, dass das Gerät am Stromnetz angeschlossen ist.
• Vergewissern Sie sich, dass die Batterie aufgeladen ist
Kein Ton - Allgemein
• Die Lautstärke des externen Geräts ist auf das Minimum eingestellt. Erhöhen Sie
die Lautstärke.
• Die Lautstärke des M-1820DJ ist auf das Minimum eingestellt. Erhöhen Sie die
Lautstärke.
Das Bluetooth-Gerät kann nicht verbunden werden.
• Sie haben die Bluetooth-Funktion des Geräts nicht aktiviert. Bitte lesen Sie die
Bedienungsanleitung Ihres Geräts, um dessen Bluetooth-Funktion zu aktivieren.
• Das Gerät bendet sich nicht im Verbindungsmodus. Halten Sie die Taste
gedrückt, bis die Bluetooth-Anzeige anfängt schnell zu blinken.
• Das Gerät ist bereits mit einem anderen Bluetooth-Gerät verbunden. Trennen Sie
diese Verbindung und versuchen Sie es erneut.
CD-WARTUNG
SICHERHEITSANWEISUNGEN
ACHTUNG: Um Elektroschockgefahr zu vermeiden,
dürfen Sie dieses Gerät nicht demontieren. Das Gerät
enthält keine Teile, die der Benutzer selbst reparieren
kann. Vertrauen Sie die Instandhaltung des Geräts einem
Fachmann an.
Das in einem Pfeil endende Blitzsymbol innerhalb eines Dreiecks weist den
Benutzer auf die Gegenwart einer „gefährlichen Spannung“ im Gerät hin.
Das Ausrufezeichen im Inneren eines Dreiecks weist den Benutzer
auf wichtige Anweisungen hin, die sich in dem das Gerät begleitenden
Handbuch benden.
Der Sicherheitshinweis bendet sich an der Rückseite des Geräts.
WARNUNG: UM BRAND- UND ELEKTROSCHOCKGEFAHR VORZUBEUGEN,
DÜRFEN SIE DIESES GERÄT WEDER REGEN NOCH FEUCHTIGKEIT
AUSSETZEN.
ACHTUNG: Beim Umgehen der Sicherheitsvorrichtungen oder wenn diese defekt
sind, kann aus dem Gerät unsichtbare Laserstrahlung austreten.
Dieser CD-Player wurde als Klasse I Laserprodukt eingestuft. Das Etikett mit der
Aufschrift LASERPRODUKT DER KLASSE 1 bendet sich an der Rückseite des
Geräts.
ACHTUNG
- Verwenden Sie dieses Gerät in klimatisch gemäßigter Umgebung.
- Das Typenschild bendet sich auf der Rückseite des Geräts.
- Achten Sie auf einen Mindestabstand von 5cm zu Ihrem Gerät, um eine
ausreichende Belüftung zu gewährleisten.
- Stellen Sie eine ausreichende Belüftung des Geräts sicher und behindern Sie die
Belüftungsönungen nicht mit Gegenständen wie z. B. Zeitungen, Tischdecken,
Vorhängen, usw.
- Stellen Sie keine Wärmequelle wie eine angezündete Kerze auf oder in der Nähe
des Geräts ab.
- Setzen Sie das Gerät niemals Wasserspritzern oder Feuchtigkeit aus.
- Stellen Sie kein mit Wasser gefülltes Gefäß, wie z. B. Vasen, in der Nähe des
Geräts ab.
- Werfen Sie Batterien nicht ins Feuer! Entsorgen Sie leere Batterien umweltgerecht.
- Batterien dürfen keiner übermäßigen Hitze ausgesetzt werden (wie zum Beispiel
praller Sonne, Feuer oder anderen ähnlichen Hitzequellen).
- Über den Netzstromadapter kann das Gerät von der Netzspannung getrennt
werden. Er sollte schnell eingeschaltet werden können und während der
vorgesehnen Verwendung nicht blockiert sein. Um das Gerät vollständig vom
Netzstrom zu trennen, muss der Netzstromadapter von der Netzsteckdose
vollständig getrennt werden.
- Unter der Einwirkung von elektrostatischen und/oder elektrischen Phänomen
kann das Produkt Fehlfunktionen aufweisen. Ein Zurücksetzen auf die
Werkseinstellungen kann sich als notwendig erweisen.
Wenn Sie dieses Gerät entsorgen möchten, denken Sie daran, es bei
einer Sammelstelle für elektrische Haushaltsgeräte zu entsorgen.
Erkundigen Sie sich nach Ihrer nächstgelegenen Wertstosammelstelle.
Für detaillierte Informationen wenden Sie sich an die örtlichen Behörden
oder an Ihren Händler. (Richtlinie über elektrische und elektronische
Abfallgeräte)
Reinigung
ACHTUNG: Entfernen Sie alle Geräte von den vorhandenen Stromquellen,
bevor Sie das Gerät reinigen.
• Verwenden Sie ein weiches, trockenes und sauberes Tuch. Entfernen Sie
regelmäßig den Staub von den Lüftungsönungen hinten und an den Seiten.
• Die Verwendung von Lösungsmitteln, scharfen Reinigungsmitteln oder
alkoholhaltigen Reinigungsmitteln kann das Gerät beschädigen.
• Wenn ein Gegenstand oder eine Flüssigkeit in das Gerät gelangt, ziehen Sie
sofort den Netzstecker und lassen Sie das Gerät von einem zugelassenen
Fachmann prüfen.
HINWEISE ZU DEN DISKS
* Verwenden Sie keine CDs mit speziellen Formen (achteckige, herzförmige
CDs...), die Störungen des Gerätes hervorrufen könnten.
* Legen Sie nicht mehr als eine Disk in das CD-Fach ein.
* Versuchen Sie nicht, das CD-Fach während der Wiedergabe zu önen.
* Berühren Sie nicht die Linse, denn dadurch könnten Störungen des Gerätes
hervorgerufen werden.
* Eine CD, die Kratzer, Staub oder Fingerspuren aufweist, kann Störungen
verursachen. Nach dem Abspielen, reinigen Sie die CD mit einem Tuch. Reinigen
Sie die CD immer von innen nach außen. Räumen Sie CDs nicht an zu heißen
oder nassen Stellen auf, damit sie nicht verformt werden. Räumen Sie Ihre CDs
nach dem Abspielen in der zugehörigen Hülle auf.
Wichtiger Hinweis
• Vor dem Transport des Geräts die eventuell vorhandene Disc herausnehmen.
NEW ONE S.A.S
10, Rue de la Mission, 25480 Ecole Valentin, France
ALIMENTACIÓN
ALIMENTAZIONE
VOEDING
ENCNEDIDO/APAGADO DE LA UNIDAD
ACCENSIONE E SPEGNIMENTO L’APPARECCHIO
HET APPARAAT IN-/UITSCHAKELEN
SELECCIÓN DE FUNCIÓN
SELEZIONE DELL’ORIGINE
FUNCTIE SELECTEREN
FUNCIÓN BLUETOOTH
FUNZIONALITÀ BLUETOOTH
BLUETOOTH-FUNCTIE
Utilización del adaptador de red
Este adaptador funciona con una alimentación CA de entre 100V- 240V 50/60Hz.
El adaptador de red que se suministra con el aparato no se puede utilizar en ningún
caso con otro tipo de alimentación.
Atención:
• El adaptador de red que se suministra ha sido diseñado para utilizarse
exclusivamente con este aparato. No lo utilice con ningún otro aparato.
• Apague el aparato antes de desenchufar el adaptador de red. De lo contrario, el
aparato podría estropearse.
• Cuando no vaya a utilizar el aparato durante un período de tiempo prolongado,
desenchufe el adaptador de red de la toma de corriente.
• Asegúrese de que la toma de corriente está cerca y de que es fácil acceder a ella.
En caso de fallo en el funcionamiento del aparato, desenchufe inmediatamente el
adaptador de red de la toma de corriente.
• El adaptador de red permite enchufar y desenchufar el aparato. El acceso al
mismo debe permanecer despejado en todo momento. Para cortar por completo
la alimentación del aparato, ha de desenchufar el adaptador de red de la toma
de corriente.
• No utilice el adaptador de red si está estropeado. Coloque los cables de forma
segura y compruebe que no quedan aplastados, doblados ni tensados. Si el cable
de alimentación está estropeado, acuda a un técnico cualicado.
Utilización de la batería integrada
La unidad dispone de una batería interna recargable (iones de litio). Cargue la
batería antes de usarla por primera vez El indicador de carga se iluminará en color
rojo y se apagará tras completarse la carga.
Advertencias:
• Recargue la batería cuando tenga la intención de utilizarla inmediatamente
después.
• Durante la utilización de la batería, la temperatura ambiente debe oscilar entre
5 y 35°C.
• Para alargar la vida de la batería, asegúrese de recargarla a una temperatura
de interior.
• No desmonte la batería, ni la exponga a temperaturas superiores a 100°C o la
lance al fuego.
• No exponga la batería a temperaturas demasiado altas, como las producidas por
la exposición directa a los rayos del sol, al fuego o a otras fuentes de calor.
• Cuando se deshaga de la batería, hágalo de acuerdo con la legislación aplicable
y respete el medio ambiente.
• Cuando la batería interna esté baja, “ ” se mostrará en el display.
NOTA: Con el objetivo de ahorrar energía, cuando la reproducción haya alcanzado
el nal o el volumen se encuentre a un nivel muy bajo y no se use ningún control
en el dispositivo por un periodo de 30 minutos, la unidad pasará al modo de espera
automáticamente.
Utilizzo dell’adattatore di rete
L’adattatore di rete funziona tramite un’alimentazione AC compresa tra 100V
e 240V .
L’adattatore di rete fornito in dotazione non può in alcun caso essere utilizzato con
un altro tipo di alimentazione.
Attenzione:
• L’adattatore di rete fornito in dotazione è destinato ad essere utilizzato
esclusivamente con questo apparecchio. Non utilizzatelo dunque con altri
apparecchi.
• Per evitare di rovinare l’apparecchio, spegnetelo prima di scollegare l’adattatore
di rete dall’apparecchio.
• In caso di un prolungato periodo di non utilizzo, scollegate l’adattatore di rete
dalla presa a muro.
• Fate in modo che la presa di rete sia vicina e che resti facilmente accessibile. In
caso di malfunzionamento, scollegate immediatamente la spina di alimentazione
dalla presa di rete.
• L’adattatore di rete permette di scollegare l’apparecchio. Deve pertanto restare
facilmente accessibile durante l’uso. Per mettere del tutto l’apparecchio fuori
tensione, scollegate il cavo di alimentazione.
• Non utilizzate l’adattatore di rete se è danneggiato. Posizionate i cavi in modo
sicuro facendo attenzione che non vengano incastrati o schiacciati. Se il cavo di
alimentazione è danneggiato, rivolgetevi a un tecnico qualicato.
Utilizzo della batteria integrata
L’unità ha una batteria incorporata ricaricabile (li-ion). La batteria integrata deve
essere caricata del tutto per poter procedere al primo utilizzo. La spia che indica lo
stato di ricarica si illuminerà in rosso e si spegnerà a ricarica completata.
Avvertenze:
• Ricaricate la batteria integrata se intendete utilizzarla subito dopo.
• Durante l’utilizzo della batteria integrata, la temperatura ambiente deve essere
compresa tra 5°C e 35°C.
• Per prolungare la durata di vita della batteria integrata, ricaricatela a temperatura
ambiente (interno).
• Non smontate la batteria, non scaldatela a più di 100°C e non gettatela nel fuoco.
• Non esponete la batteria a un calore eccessivo, come raggi del sole, fuoco o fonti
di calore analoghe.
• Quando gettate la batteria, pensate a rispettare l’ambiente e agite secondo la
legislazione vigente.
• Quando la batteria interna è scarica, prima che il lettore entri in automatico in
modalità di sospensione sul display viene visualizzata la dicitura “ ”.
NOTA BENE
Per risparmiare energia, al termine della riproduzione oppure quando il volume
è impostato al minimo e nell'arco di 30 minuti non viene eseguita nessuna
operazione, l'apparecchio passa in automatico alla modalità di Standby.
Met de AC adapter
De netstroomadapter gebruikt een netstroom van AC 100V-240V 50/60Hz. De
meegeleverde netstroomadapter mag nooit gebruikt worden op een ander type
voeding.
Opmerkingen:
• De AC adapter inbegrepen in dit toestel mag alleen met dit toestel gebruikt
worden. Nooit gebruiken voor een ander toestel.
• Schakel het toestel uit voor de AC adapter los te maken om schade aan het
toestel te voorkomen.
• Als het toestel lange tijd niet gebruikt wordt, verwijdert u de AC adapter uit het
stopcontact.
• Gebruik het in de buurt van een makkelijk bereikbaar stopcontact. Doet zich een
storing voor, verwijder het contact dan onmiddellijk uit het stopcontact.
• Het moet makkelijk te bedienen blijven en mag tijdens het gebruik niet verstoord
worden. Om volledig losgekoppeld te zijn van stroomtoevoer, moet het toestel via
de AC adapter volledig uit het stopcontact worden verwijderd.
• Gebruik nooit een beschadigde AC adapter, leg de kabels op een veilige manier
vrij van druk of knijpen. Wend u tot een erkende dienstverlener als de kabel
beschadigd is.
De ingebouwde batterij gebruiken
Het apparaat is uitgerust met een ingebouwde oplaadbare batterij (lithium-ion).
Laad de ingebouwde batterij op voor het eerste gebruik De oplaadindicator licht
rood op en schakelt uit nadat de batterij volledig is opgeladen.
Waarschuwingen:
• Herlaad de ingebouwde batterij zodra u deze wilt gaan gebruiken.
• Tijdens het gebruik van de ingebouwde batterij moet de omgevingstemperatuur
liggen tussen 5°C en 35°C.
• Om de batterij een zo lang mogelijke levensduur te geven, herlaadt u bij
kamertemperatuur.
• De ingebouwde batterij in dit toestelkan een risico vormen op brand of chemische
brand bij verkeerd gebruik. Haal de batterij niet uiteen, verwarm niet boven 100°C
en verbrand deze niet.
• Stel het toestel niet bloot aan overdreven hitte, zoals zon of vuur.
• Bij het wegwerpen van het toestel, moet rekening worden gehouden met
milieuproblemen en de plaatselijke regels en wetten voor het verwerken van deze
producten moeten strikt worden nageleefd.
• Als de ingebouwde batterij bijna leeg is, dan verschijnt de melding “ ” op het
display.
OPMERKINGEN:
Om energie te besparen zal het apparaat automatisch naar de standbymodus
schakelen wanneer het afspelen het eindpunt heeft bereikt of het volume is
ingesteld op een zeer laag niveau en het apparaat niet wordt gebruikt voor een
periode van 30 minuten.
Mantenga pulsado el botón para encender el aparato / para apagar la unidad.
Tenere premuto il tasto per accendere l’apparecchio/ per spegnere l'apparecchio.
Druk lang in de standbymodus één keer op om het apparaat in te schakelen / om
het apparaat uit te schakelen.
La función (BLUETOOTH/ AUX/ CD/ USB) será seleccionada pulsando el botón
SOURCE repetidamente.
Per selezionare un'origine (BLUETOOTH/ AUX/ CD/ USB) premere più volte il tasto
SOURCE sull'apparecchio.
De functie (BLUETOOTH/ AUX/ CD/ USB) kan worden geselecteerd door
herhaaldelijk op SOURCE.
Los logos y nombres Bluetooth
®
son marcas registradas que pertenecen a
Bluetooth SIG, Inc. y cualquier uso de dichas marcas por parte de New One
S.A.S tiene sus respectivas licencias. Otras marcas comerciales y registradas son
propiedad de sus respectivos propietarios.
Emparejar un dispositivo Bluetooth
1. Cuando la unidad esté encendida, pulse el botón SOURCE de la unidad
repetidamente para seleccionar el modo Bluetooth. El display mostrará “ ”.
Indicador de Bluetooth el parpadeará, indicando que está en el modo de
emparejamiento.
2. En el dispositivo Bluetooth, habilite Bluetooth y seleccione “M-1820DJ” de la
lista de dispositivos. (Para obtener el detalle de operaciones para conectarse,
consulte el manual de usuario del dispositivo). Si el dispositivo Bluetoothle
solicita una contraseña de acceso, utilice“0000”. Algunos dispositivos Bluetooth
le indicarán que acepte la conexión. Si la unidad se vincula correctamente, el
indicador Bluetooth se encenderá con una indicación de voz.
Sugerencia: Si desea conectar su altavoz Bluetooth a otro dispositivo de audio
Bluetooth, debe desconectar el dispositivo actual primero y seguir los pasos
descritos anteriormente para hacer una conexión nueva.
Si el emparejamiento falla, realice lo siguiente:
Mantenga presionado el botón , hasta que el indicador de Bluetooth
parpadee rápidamente para ingresar al modo de emparejamiento. En el dispositivo
Bluetooth, habilite Bluetooth y seleccione “M-1820DJ” de la lista dedispositivos (ver
el paso 2 más arriba).
• En algunos dispositivos como computadoras, una vez realizado el emparejamiento,
debe seleccionar la unidad del menú Bluetooth y elegir " utilizar como dispositivo
de audio (estéreo) osimilar ".
• El emparejamiento permanece intacto cuando launidad y/o su dispositivo
Bluetooth sale del rango de comunicación. Se restablecerá una conexiónactiva
cuando su dispositivo Bluetooth vuelva dentro del rango.
• Cuando vuelva a encender la unidad, se intentará la reconexión automática con el
dispositivo Bluetooth al que se haya emparejado más recientemente.
Utilizar un dispositivo Bluetooth
1. Con alguna unidad emparejada (ver la sección anterior), haga funcionar
su dispositivo Bluetooth. El sonido se escuchará a través de los altavoces
M-1820DJ.
2. Oprima el botón para pausar la reproducción. Presione nuevamente para
retomar la reproducción.
3. Seleccione la pista que desee con / .
4. Ajuste el volumen utilizando en la unidad. También puede ajustar
el volumen en el dispositivo con el cual está emparejado.
Por la presente, NEW ONE S.A.S declara que el « MUSE M-1820 DJ » cumple con los
requerimientos esenciales y otras provisiones aplicables de la Directiva 2014/53/EU.
La declaración de conformidad podrá consultarse en www.muse-europe.com
VINCULACIÓN ESTÉREO
Esta función le permite obtener calidad de sonido estéreo envolvente. Se necesitan
dos altavoces Bluetooth M-1820DJ para realizar una separación inalámbrica de
canales de radio Bluetooth real, por lo tanto, debe comprar dos M-1820DJ.
Consejo: se aconseja que la distancia entre el altavoz principal y el secundario sea
inferior a 4 metros.
Con la presente, NEW ONE S.A.S dichiara che « MUSE M-1820 DJ » è conforme ai
requisiti essenziali e alle altre disposizioni fondamentali della direttiva 2014/53/EU.
La dichiarazione di conformità è consultabile alla pagina www.muse-europe.com
ASSOCIAZIONE STEREO
Questa funzione consente di ottenere una qualità audio stereo surround. Richiede
due altoparlanti Bluetooth M-1820DJ per realizzare la vera separazione wireless del
canale radio Bluetooth, quindi, bisogna acquistare due M-1820DJ.
Suggerimento: tenere l’altoparlante principale e l’altoparlante secondario a una
distanza non superiore ai quattro metri.
Il marchio denominativo Bluetooth
®
e i relativi loghi sono marchi registrati di
Bluetooth SIG, Inc., utilizzati da New One S.A.S su licenza. Altri marchi e nomi
commerciali sono di proprietà dei rispettivi titolari.
Associazione di un dispositivo Bluetooth
1. Da apparecchio acceso, per selezionare la modalità Bluetooth premere più volte
il tasto SOURCE sull'apparecchio. Sul display viene visualizzata la dicitura “ ”
per alcuni secondi, L'indicatore Bluetooth inizierà a lampeggiare rapidamente.
indicando che è in modalità di accoppiamento.
2. Attivare la funzione Bluetooth sul proprio dispositivo Bluetooth e selezionare
“M-1820DJ” dall’elenco dei dispositivi rilevati (consultare il manuale di istruzioni
del dispositivo per informazioni dettagliate su come connettere il dispositivo).
Se il dispositivo Bluetooth richiede la digitazione di una password, inserire
“0000”. Alcuni dispositivi Bluetooth richiedono di accettare la connessione. Se
l’apparecchio è abbinato correttamente, l’indicatore Bluetooth si illuminerà e
si udrà un messaggio vocale.
Nota: se si desidera connettere l’altoparlante Bluetooth a un altro dispositivo
Bluetooth è necessario prima disconnettere il dispositivo corrente, quindi seguire i
passaggi sopra indicati per stabilire una nuova connessione.
Se l’associazione non riesce:
Per accedere alla modalità di associazione tenere premuto il tasto no a quando
l’indicatore Bluetooth non lampeggia rapidamente. Attivare la funzione Bluetooth
sul proprio dispositivo Bluetooth e selezionare “M-1820DJ” dall’elenco dei
dispositivi rilevati (vedi punto 2).
• Su alcuni dispositivi, come ad esempio computer, una volta associato il dispositivo
è necessario selezionare l’unità dal menu Bluetooth, quindi selezionare l’opzione
“Utilizza come dispositivo audio (stereo)” o similare.
• L’associazione rimane attiva quando l’unità e/o il dispositivo Bluetooth escono dal
raggio d’azione del Bluetooth. Una connessione attiva viene ristabilita quando il
dispositivo rientra nel raggio d’azione del Bluetooth.
• Una volta riaccesa, l’unità tenta in automatico di riconnettersi all’ultimo dispositivo
Bluetooth associato.
Utilizzo di un dispositivo Bluetooth
1. Una volta associata l’unità a un dispositivo (vedi sezione precedente) l’audio del
dispositivo Bluetooth viene riprodotto mediante l’altoparlante.
2. Premere il tasto per sospendere la riproduzione. Premerlo di nuovo per
riprendere la riproduzione.
3. Utilizzare i tasti / per selezionare la traccia desiderata.
4. Regolare il volume usando il tasto sull’unità. È possibile regolare il
volume anche dal dispositivo a cui l’unità è associata.
De Bluetooth
®
markering en de logo’s zijn geregistreerde handelsmerken die
eigendom zijn van Bluetooth SIG, Inc. en het gebruik van deze markeringen door
New One S.A.S is onder licentie. Andere handelsmerken en handelsnemen zijn van
hun respectieve eigenaars.
Een Bluetooth-apparaat koppelen
1. Druk wanneer het apparaat is ingeschakeld, druk herhaaldelijk op SOURCE om
de Bluetooth-modus te selecteren. Het display zal voor “ ”. De Bluetooth-
indicator knippert om aan te geven dat het apparaat in de koppelmodus staat.
2. Schakel Bluetooth in op het Bluetooth-apparaat en selecteer “M-1820DJ”
uit de lijst met apparaten. (Kijk in de handleiding van het apparaat waarmee
u verbinding wilt maken voor gedetailleerde instructies.) Als het Bluetooth-
apparaat vraagt om een wachtwoord, voer dan “0000” in. Sommige Bluetooth-
apparaten zullen u vragen de verbinding te accepteren. Als het apparaat juist
is gekoppeld, licht de Bluetooth-indicator op en klinkt en een spraakmelding.
Tip: Als u uw Bluetooth-luidspreker wilt verbinden met een andere Bluetooth-
audioapparaat, dan moet u de verbinding met het huidige apparaat verbreken en
de bovenstaande stappen volgen om een nieuwe verbinding op te zetten.
Als het koppelen mislukt, volg dan de volgende stap:
Houd ingedrukt tot de Bluetooth-indicator snel knippert om naar de koppelmodus
te schakelen. Schakel Bluetooth in op het Bluetooth-apparaat en selecteer
“M-1820DJ” uit de lijst met apparaten (zie stap 2 hierboven).
• Op bepaalde apparaten, zoals computers, moet u, zodra er is gekoppeld, het
apparaat selecteren in het Bluetooth-menu en de optie “Gebruik als audioapparaat
(stereo)” (of een soortgelijke optie) gebruiken.
• De verbinding blijft intact wanneer de luidspreker en/of uw Bluetooth-apparaat
buiten het communicatiebereik wordt verplaatst. Er wordt opnieuw een actieve
verbinding gemaakt wanneer uw Bluetooth-apparaat terugkeert binnen het bereik.
• Als het apparaat weer wordt ingeschakeld, dan zal het automatisch proberen
opnieuw verbinding te maken met het Bluetooth-apparaat waarmee het laatst
werd gekoppeld.
Een Bluetooth-apparaat gebruiken
1. Als u verbinding heeft gemaakt met een apparaat (zie voorgaande paragraaf),
gebruik dan de bediening op uw Bluetooth-apparaat en wanneer het afspelen
wordt gestart, dan zal het geluid uit de luidsprekers van de M-1820DJ klinken.
2. Druk op om het afspelen te pauzeren. Druk nogmaals om het afspelen te
hervatten.
3. Selecteer de gewenste track met / .
4. Stel het volume in met behulp van . U kunt het volume ook
instellen op het apparaat dat is verbonden met de luidspreker.
Hierbij verklaart NEW ONE S.A.S dat deze “MUSE M-1820 DJ” voldoet aan de
essentiële eisen en andere relevante bepalingen uit richtlijn 2014/53/EU. De
verklaring van conformiteit kan worden geraadpleegd op www.muse-europe.com
STEREO KOPPELEN
Met deze functie is het mogelijk om naar stereosurroundsound te luisteren.
De functie vereist twee M-1820DJ Bluetooth-luidsprekers om de Bluetooth-
radiokanalen draadloos te scheiden. U moet daarom twee M-1820DJ luidsprekers
aanschaen.
Tips: het wordt aanbevolen ervoor te zorgen dat de afstand tussen de
hoofdluidspreker en secundaire luidspreker kleiner is dan 4 meter.
DESCRIPCIÓN DEL APARATO
DESCRIZIONE DEL PRODOTTO
BESCHRIJVING VAN HET TOESTEL
CAJÓN ALTAVOZ BLUETOOTH PARA FIESTAS CON
LECTOR DE DISCOS Y BATERÍA
CASSA BLUETOOTH PARTY BOX CON
CD E BATTERIA
BLUETOOTH PARTY BOX LUIDSPREKER MET
CD-SPELER EN BATTERIJ
ES
IT
NL
1. Compartimento del disco
2. Botón de control de iluminación
3. : Para encender/apagar la unidad
SOURCE: Para seleccionar el modo
de función: Bluetooth, CD, USB,
AUX.
4. : Reproducir/ Pausar
: Emparejamiento de Bluetooth/
Desconexión de Bluetooth
5. : Salto/ Búsqueda
6. : Detener la reproducción
7. : Salto/ Búsqueda
8. Indicador de Bluetooth
9. Indicador de carga
10. Indicador de repetición
11. Display LED
12. : Indicador de Reproducir/ Pausar
1. Compartimento disco
2. Regolazione della luce
3. : Attivazione e disattivazione
dell’apparecchio
SOURCE: Selezione dell'origine:
Bluetooth, CD, USB, AUX.
4. : Riproduzione/ pausa
: Associazione Bluetooth/ Disattiva
associazione Bluetooth
5. : Salta/ Ricerca
6. : Arresto della riproduzione
7. : Salta/ Ricerca
8. Spia di Bluetooth
9. Spia di caricamento
10. Spia di riproduzione ripetuta
11. Display LED
12. Spia di riproduzione/ pausa
13. PROG.: Spia di riproduzione
programmata
1. Diskcompartiment
2. Knop voor bediening verlichting
3. : Om het apparaat aan/uit te
zetten
SOURCE: Voor het selecteren van
de modus: Bluetooth, CD, USB, AUX.
4. : Spelen/ pauze
: Koppelen met Bluetooth/
Bluetooth-verbinding verbreken
5. : Overslaan/ Zoeken
6. : Afspelen stoppen
7. : Overslaan/ Zoeken
8. Bluetooth -indicator
9. Oplaad-indicator
10. Herhaal-indicator
11. LED-display
12. : Spelen/ pauze -indicator
13. PROG. Indicador de programa
14. Entrada auxiliar (3.5mm)
15. : Para repetir la reproducción
PROG.: Para programar
secuencias de reproducción
vinculación estéreo
16. Puerto USB para la reproducción
MP3
17. : Para ajustar el
volumen principal
18. : Para ajustar el volumen
del micrófono
19. Asa de transporte
20. Toma MIC
21. DC IN 9V 1A
22. Tweeter
23. Altavoces
14. Ingresso ausiliario (3,5 mm)
15. Consente di ripetere la
riproduzione
PROG.: consente di
programmare tracce
associazione stereo
16. Porta USB per la riproduzione di
le MP3
17. : Per regolare il
volume principale
18. : Per regolare il volume
del microfono
19. Maniglia
20. Presa MIC
21. Lngresso per alimentatore di rete:
9V 1A
22. Tweeter
23. Altoparlante
13. PROG.: Programma-indicator
14. Aux in-stekkerbus (3.5mm)
15. : Om het afspelen te herhalen
PROG.: Om de afspeelvolgorde
te programmeren
stereo koppelen
16. USB-poort voor afspelen MP3’s
17. : Om het
hoofdvolume in te stellen
18. : om het MIC-volume
in te stellen
19. Draagbeugel
20. MIC INGANG
21. Aansluiting netstroomadapter
9V 1A
22. Tweeter
23. Luidspreker
FUNCIONAMIENTO CD
ASCOLTO DI CD
BEDIENING CD-SPELER
REPRODUCIÓN DE UN DISPOSITIVO USB
RIPRODUZIONE MEDIANTE PORTA USB
WEERGAVE VAN EEN USB-APPARAAT
MODOS DE REPRODUCCIÓN (CD/MP3)
MODALITÀ DI RIPRODUZIONE (CD/MP3)
WEERGAVEMODI (CD/MP3)
LUZ DE COLOR
LUCE COLORATA
KLEURLAMP GEBRUIKEN
FICHA TÉCNICA
SPECIFICHE
TECHNISCHE KENMERKEN
GUIA DE RESOLUCION DE PROBLEMAS
GUIDA ALLA RISOLUZIONE DEI PROBLEMI
PROBLEMEN OPLOSSEN
CONEXIÓN DE UN DISPOSITIVO EXTERNO
COLLEGAMENTO SORGENTE AUSILIARIA
GEBRUIK VAN DE HULPINGANG
PARA CANTAR POR LA TOMA MIC
AMPLIFICAZIONE DEL MICROFONO
ZINGEN MET DE MIC-AANSLUITING
1. Cuando la unidad esté encendida, pulse el botón SOURCE repetidamente para
seleccionar el modo CD. El display mostrará “ ” durante unos segundos.
2. Abra el compartimento del disco. Introduzc un disco con la cara impresa mirando
hacia arriba.
3. Cierre el compartimento. (Nota: Ni no se hubiera introducido ningún disco, el
display mostrará “ ” ).
4. Pasados unos segundos, el número total de pistas aparecerá en el display
durante unos segundos y la reproducción comenzará automáticamente. El
indicador se encenderá.
1. Da apparecchio acceso, per selezionare la modalità CD premere più volte il tasto
SOURCE. Sul display viene visualizzata la dicitura “ ” per alcuni secondi.
2. Aprire il vano CD. Inserire un CD con il lato opaco rivolto verso l'alto.
3. Richiudere lo sportello. (Nota: se nel vano CD non è inserito nessun CD, sul
display viene visualizzata la dicitura “ ” ).
4. Dopo alcuni secondi, sul display viene visualizzato per alcuni istanti il numero
totale di tracce, quindi l'apparecchio avvia la riproduzione in automatico.
l’indicatore si illuminerà.
1. Druk wanneer het apparaat is ingeschakeld herhaaldelijk op SOURCE om de CD-
modus te selecteren. Het display zal voor een paar seconden “ ” weergeven.
2. Open de CD deur. Plaats een disc met de labelzijde omhoog gericht.
3. Het diskcompartiment te sluiten. (Opmerking: als er geen disc is geplaatst, dan
toont het display de melding “ ” ).
4. Na een paar seconden zal het totaal aantal tracks voor een paar seconden op het
display verschijnen en het afspelen start automatisch. De indicator licht op.
1. Conecte un dispositivo USB al puerto USB MP3 de la unidad.
2. Pulse el botón SOURCE repetidamente para seleccionar el modo USB. El
display mostrará “ ” durante unos segundos y la reproducción comenzará
automáticamente.
3. Seleccione la pista que desee con / .
Notas:
- El número total de archivps MP3 en el dispositivo USB no deberá exceder los 999.
- El dispositivo USB no podrá contener más de 99 directorios.
- El tiempo de lectura llevará unos segundos o más, dependiendo de la cantidad de
archivos MP3 y carpetas en el dispositivo USB.
- Introduzca sólo dispositivos USB en el puerto USB. En caso contrario, podría dañar
el aparato.
- No conecte el puerto USB directamente a un ordenador: podría dañar el aparato.
- En el mercado pueden encontrarse numerosos modelos de dispositivos USB y de
reproductores MP3. No podemos garantizarle que este aparato sea compatible con
todos los formatos. En caso de que su dispositivo USB no funcione, utilice otro.
- Si el número de pista es superior a 99, en la pantalla LED de la unidad se mostrará
"99".
1. Collegare un dispositivo USB alla porta USB sull'unità.
2. Per selezionare la modalità USB premere più volte il tasto SOURCE. Sul display
viene visualizzata per alcuni istanti la dicitura “ ”, quindi l'apparecchio avvia
in automatico la riproduzione.
3. Utilizzare i tasti / per selezionare la traccia desiderata.
Nota bene:
- Il numero totale di le MP3 contenuti nel dispositivo USB non deve essere
superiore a 999.
- Il numero di directory contenute nel dispositivo USB non deve essere superiore
a 99.
- Il tempo di lettura può variare a seconda del numero di le MP3 o di cartelle
contenuti nel dispositivo USB.
- Inserire esclusivamente periferiche USB nello slot corrispondente. L'inserimento
di oggetti potrebbe danneggiare l’apparecchio.
- La porta USB non deve essere direttamente collegata ad un PC, in quanto ciò
potrebbe danneggiare l’apparecchio.
- Sul mercato esistono numerosi modelli di periferiche USB e di lettori MP3. Non
è possibile garantire la compatibilità con tutti i formati. Qualora un modello di
periferica USB non sia compatibile, provare con un’altro.
- Se il numero del brano è superiore a 99, il quadrante LED dell’apparecchio
mostrerà “99”.
1. Sluit een USB-apparaat aan op de USB MP3-poort van de luidspreker.
2. Druk herhaaldelijk op SOURCE om de USB-modus te selecteren. Het display zal
voor een paar seconden “ ” weergeven en het afspelen start automatisch.
3. Selecteer de gewenste track met / .
Opmerkingen:
- Het totaal aantal MP3-bestanden op het USB-apparaat mag niet groter zijn dan
999.
- Het USB-apparaat mag niet meer dan 99 mappen bevatten.
- Het inlezen van de bestanden duurt een paar seconden of langer, afhankelijk van
het aantal MP3-bestanden en mappen op het USB-apparaat.
- Steek niets anders dan USB-randapparatuur in de hiertoe voorziene poort. U
riskeert het toestel te beschadigen.
- De USB-poort mag niet rechtstreeks aangesloten worden op een computer: dit
kan het toestel beschadigen.
- Er bestaan verschillende USB-sleutels en MP3-spelers op de markt. Wij kunnen
niet garanderen dat het toestel compatibel is met alle formaten. Gebruik daarom
een andere USB-drager indien uw USB-drager niet werkt.
- Als het tracknummer hoger is dan 99, geeft het apparaat “99” weer op het LED-
display.
Reproducción repetida
Pulse el botón repetidamente para seleccionar un modo de reproducción. El
indicaador de repetición se iluminará.
- Repetir 1, la pantalla muestra “ ”
- Repetir carpeta, la pantalla muestra “ ” (Sólo MP3)
- Repetir todo, la pantalla muestra “ ”
Para cancelar la repetición de la reproducción, pulse el botón repetidamente
hasta que el display muestre “ ” y el indicador de repetición desaparezca.
Reproducción programada
1. En el modo de detención, pulse el botón PROG. En pantalla se mostrará
"P-" durante unos segundos y a continuación, "01" (número de programa de
memoria) y cambiará a "01" (siendo "01" la pista programada 01). El indicador
de programación se iluminará.
2. Seleccione la pista que desee con / , después pulse el botón PROG.
para conrmar.
3. Repita los pasos anteriores para programar hasta un total de 32 pistas para un
CD y 99 para MP3.
4. Pulse para comenzar la reproducción de la programación.
5. Pulse una vez el botón del mando a distancia para detener la reproducción
programada. Pulse de nuevo para cancelar esta función.
Riproduzione
Premere più volte il tasto per selezionare una modalità di ripetizione, La spia di
riproduzione ripetuta si illumina.
- Ripeti 1: icona “ ”.
- Ripeti cartella, icona “ ”. (solo MP3)
- Ripeti tutto, icona “ ”.
Per annullare la riproduzione ripetuta premere più volte il tasto no a quando
sul display non viene visualizzata la dicitura “ ” e la spia di riproduzione ripetuta
non si spegne.
Riproduzione programmata
1. Dalla modalità di arresto, premere il tasto PROG. Il display mostrerà “P-“ per
alcuni secondi, quindi “01” (numero nella memoria) e passerà a “01” ("01" per il
brano 01). La spia di riproduzione programmata si illumina.
2. Utilizzare i tasti / per selezionare la traccia desiderata, quindi premere il
tasto PROG. per confermare.
3. Ripetere gli stessi passaggi per programmare no a un massimo di 32 tracce per
i CD e 99 tracce per i lettori MP3.
4. Per avviare la riproduzione programmata premere il tasto .
5. Per arrestare la riproduzione programmata premere una volta il tasto . Premere
di nuovo per annullare questa funzione.
Herhalen
Druk herhaaldelijk op de knop om een herhaalmodus te selecteren, De
herhaal-indicator licht op
- Herhaal 1, display toont “ ”
- Herhaal map, display toont “ ”. (Alleen MP3)
- Herhaal alle, display toont “ ”.
Druk om het herhalen te annuleren herhaaldelijk op tot het display “ ” toont
en de herhaal-indicator niet langer wordt getoond.
Geprogrammeerd afspelen
1. Druk als het afspelen is gestopt, op PROG. Het display geeft een paar seconden
“P-” weer, vervolgens “01” (programmageheugennummer) en schakelt daarna
naar “01”. (“01” is in dit geval track 01 van het programma) De programma-
indicator licht op.
2. Selecteer de gewenste track met / en druk daarna ter bevestiging op
PROG..
3. Herhaal de bovenstaande stappen om tot 32 tracks voor CD’s en tot 99 tracks
voor MP3’s te programmeren.
4. Druk op om het afspelen van het programma te starten.
5. Druk één keer op op de afstandsbediening om het afspelen van het programma
te stoppen. Druk nogmaals op om deze functie te annuleren.
1. En modo de espera, presione el botón para encender la luz de color y el
cambio de color múltiple para conseguir un efecto de ciclo de color. Presione el
botón de nuevo para estabilizar la luz, presione repetidamente para seleccionar
el color deseado. Mantenga presionado para apagar la luz.
2. Cuando la unidad está encendida, presione el botón para seleccionar el
modo de iluminación.
1. In modalità standby, premi per attivare le luci colorate, con molteplici cambi
di colore per ottenere il ciclo di luci colorate. Premere di nuovo il tasto per
selezionare un solo colore; premere il tasto più volte per selezionare il colore
desiderato. Tenere premuto il tasto per disattivare la luce.
2. Da unità accesa, premere il tasto per selezionare la modalità di illuminazione.
1. Druk in de standbymodus op om de kleurlamp in te schakelen, de kleur
verandert meerdere keren en er wordt een kleurencyclus doorlopen. Druk
nogmaals op de knop om het veranderen van kleur te stoppen, druk herhaaldelijk
op de knop om de gewenste kleur te selecteren. Houd ingedrukt om de lamp
uit te schakelen.
2. Druk als het apparaat is ingeschakeld op om de verlichtingsmodus te
selecteren.
Alimentación: AC100-240V 50/60Hz
Consumo: 9.0W
PILAS RECARGABLES
Tipo de batería:Batería de iones de litio de 7.4V 1500 mAh
Tiempo de funcionamiento: Aproximadamente 5 horas con el volumen al 50%
luego de haberlas cargado completamente
Tiempo de carga :Aproximadamente 3 horas
BLUETOOTH
Versión Bluetooth: V5.0
Bluetooth: 2.402-2.48GHz
Salida de corriente RF (radiofrecuencia): -0.698 dBm
Distancia de rendimiento: Hasta 10 m medidos en espacio abierto (la pared y las
estructuras pueden afectar el rango del dispositivo)
Alimentatore: AC100-240V 50/60Hz
Potenza assorbita: 9.0W
BATTERIA RICARICABILE
Tipo di batteria: Batteria Li-Ion 7.4V 1500mAh
Durata massima di utilizzo: circa 5 ore col volume al 50% dopo un ciclo di
caricamento completo.
Tempo di ricarica: circa 3 ore.
BLUETOOTH
Versione del Bluetooth: V5.0
Bluetooth: 2.402-2.48GHz
Potenza RF (radiofrequenza) irradiata: -0.698 dBm
Raggio d’azione: no a 10 metri in spazi aperti (pareti e altre strutture possono
inuire sul raggio d’azione del dispositivo).
Netstroom: AC100-240V 50/60Hz
Verbruik: 9.0W
OPLAADBARE BATTERIJ
Batterijtype: 7.4V 1500mAh Lithium-ion-batterij
Bedrijfstijd: Ca. 5 uur op 50% volume nadat de batterij volledig is opgeladen
Oplaadtijd: Ca. 3 uur
BLUETOOTH
Bluetooth-versie: V5.0
Bluetooth: 2.402-2.48GHz
RF-vermogen (radiofrequentievermogen): -0.698 dBm
Werkafstand: Tot 10 meter gemeten in een open ruimte (muren en bouwwerken
kunnen invloed hebben op het bereik van de luidspreker)
Si esta unidad presentara un problema, lea el siguiente cuadro antes de llamar al
servicio técnico:
No hay energía
• Asegúrese de que la unidad esté conectada a la alimentación de CA.
• Asegúrese de que la batería está recargada.
No hay sonido (General)
• El volumen del dispositivo externo está jado en mínimo; suba el volumen.
• El volumen del M-1820DJ está jado en mínimo; suba el volumen.
El dispositivo Bluetooth no puede emparejarse o conectarse con la unidad.
• No activó la función Bluetooth de su dispositivo. Consulte el manual de usuario de
su dispositivo para activar la función Bluetooth
• La unidad no está en modo de emparejamiento. Mantenga presionado el botón
hasta que el indicador de Bluetooth parpadee rápidamente.
• La unidad ya está conectada con otro dispositivo Bluetooth; desconecte dicho
dispositivo y luego inténtelo nuevamente.
Nel caso in cui si notino problemi con l’unità, prima di richiedere assistenza
vericare i seguenti punti.
Assenza di alimentazione
• Assicurarsi che l’unità sia collegata a una presa CA.
• Assicurarsi che la batteria sia carica
Audio assente
• Il volume del dispositivo esterno è al minimo; aumentare il volume.
• Il volume dell’altoparlante è impostato sul minimo; aumentare il volume.
Impossibile associare o connettere il dispositivo Bluetooth all’unità
• La funzione Bluetooth sul dispositivo non è stata attivata. Consultare il manuale
di istruzioni del proprio dispositivo per dettagli su come attivare la funzione
Bluetooth.
• L’unità non è in modalità di associazione. Tenere premuto il tasto no a quando
l’indicatore del Bluetooth non lampeggia rapido.
• L’unità è già connessa a un altro dispositivo Bluetooth; disconnettere il dispositivo,
quindi riprovare.
Mocht het apparaat een probleem vertonen, probeer dan de volgende stappen uit
te voeren voordat u contact opneemt met de klantenservice:
Geen stroom
• Zorg ervoor dat de luidspreker is aangesloten op het lichtnet.
• Zorg ervoor dat de batterij is opgeladen.
Geen geluid – Algemeen
• Het volume van het extern apparaat is ingesteld op het minimale niveau; verhoog
het volume.
• Het volume van de M-1820DJ is ingesteld op het minimale niveau; verhoog het
volume.
Het Bluetooth-apparaat kan niet koppelen of kan geen verbinding maken met
de luidspreker.
• U heeft de Bluetooth-functie van uw apparaat niet ingeschakeld. Raadpleeg de
handleiding van uw apparaat om de Bluetooth-functie te activeren.
• Het apparaat staat niet in de koppelmodus. Houd ingedrukt tot de Bluetooth-
indicator snel knippert.
• Het apparaat is al verbonden met een ander Bluetooth-apparaat; verbreek de
verbinding met dat apparaat en probeer het nogmaals.
1. Encienda los dos altavoces Bluetooth M-1820DJ.
2. Cuando ambos altavoces están en modo de vinculación, presionar el botón
/ PROG. en un altavoz Bluetooth lo convertirá en altavoz principal (canal L).
A continuación, buscará y se conectará al altavoz secundario. Reconocerán el
canal izquierdo y derecho automáticamente.
3. Conecte el altavoz principal al dispositivo con Bluetooth activado (por ejemplo,
un smartphone).
4. Reproduzca la canción y escuche el sonido en estéreo.
5. Presione el botón en cualquiera de los altavoces para pausar la reproducción.
Presione de nuevo para reanudar la reproducción.
6. Mantenga presionado el botón en el altavoz principal para desconectar el
vinculación estereo.
1. Accendere i due altoparlanti M-1820DJ.
2. Con entrambi gli altoparlanti in modalità di abbinamento, premi il tasto / PROG.
su uno degli altoparlanti Bluetooth, che diventerà così l’altoparlante principale
(canale L) per poi cercare e collegarsi all’altoparlante secondario. Gli altoparlanti
riconosceranno automaticamente il canale destro e il canale sinistro.
3. Connettere l’altoparlante principale al dispositivo abilitato al Bluetooth (ad
esempio: smartphone).
4. Sarà possibile adesso riprodurre la canzone desiderata ed ascoltarla in modalità
stereo.
5. Premere il tasto su uno dei due altoparlanti per interrompere la riproduzione.
Premere di nuovo per riprendere la riproduzione.
6. Tenere premuto il tasto l’altoparlante per scollegare il associazion stereo.
1. Schakel de twee M-1820DJ Bluetooth-luidsprekers in.
2. Druk wanneer beide luidsprekers in de koppelmodus staan op / PROG.
op een van de Bluetooth-luidsprekers. Dit wordt de hoofdluidspreker (L-kanaal).
De hoofdluidspreker zoekt vervolgens naar de secundaire luidspreker en maakt
verbinding met deze luidspreker. De luidsprekers herkennen automatisch het
linker- en rechterkanaal.
3. Verbind uw hoofdluidspreker met uw Bluetooth-apparaat (bijv. smartphone).
4. Speel het gewenste nummer af en luister in stereo naar het nummer.
5. Druk op op één van beide luidsprekers om het afspelen te pauzeren. Druk
nogmaals om het afspelen te hervatten.
6. Houd daarna op op de hoofdluidspreker om de stereo koppelen te verbreken.
1. Conecte su fuente de audio auxiliar (un reproductor de MP3, por ejemplo) a la
toma AUX IN de la parte superior de la unidad (cable incluido).
2. Pulse el botón SOURCE repetidamente para seleccionar el modo AUX. El
display mostrará “ ”.
3. Empiece el playback desde la fuente AUX IN.
4. Ajuste el volumen hasta el nivel deseado.
5. Para parar el playback, desconecte la fuente AUX-IN de la entrada AUX-IN.
1. Collegare la sorgente ausiliaria (ad es. lettore mp3) al jack AUX IN nella parte
superiore dell'apparecchio (cavo fornito).
2. Per selezionare la modalità AUX premere più volte il tasto SOURCE. Sul display
viene visualizzata la dicitura “ ”.
3. Avviare la riproduzione dalla sorgente ausiliaria.
4. Regolare il volume al livello desiderato.
5. Per arrestare la riproduzione scollegare la sorgente ausiliaria dalla presa AUX IN.
1. Sluit uw hulpapparaat (bijv. mp3-speler) aan op de AUX IN op de bovenkant van
de luidspreker (kabel meegeleverd).
2. Druk herhaaldelijk op SOURCE om de AUX 2-modus te selecteren. Het display
zal voor “ ” weergeven.
3. Start het afspelen van uw hulpbron.
4. Stel het geluidsvolume in op het gewenste niveau.
5. Om het afspelen te stoppen, trekt u de externe audiobron uit de AUX IN
aansluiting.
Cante con la música enchufando el micrófono (no suministrado) a la toma MIC
de la unidad.
Notas:
• Gire el directamente para ajustar el volumen según sus preferencias.
• Si colocara el micrófono cerca del altavoz, podría darse un efecto de eco
(retroalimentación acústica). de ser así, aleje el micrófono del altavoz.
Advertencia: Si golpea o deja caer el micrófono podría dañarlo permanentemente.
Resista la tentación de darle vueltas al micrófono por el cable.
Canta con la musica collegando un microfono (non incluso) alla presa MIC
dell’apparecchio.
Note:
• Ruotare per regolare direttamente il volume al livello desiderato.
• L’avvicinamento del microfono alla cassa può causare feedback acustico (eetto
Larsen). In tal caso, allontanare il microfono dalla cassa.
Attenzione: picchiettare sul microfono o sottoporre il microfono a cadute può
causarne il danneggiamento. Non far oscillare il microfono aerrandolo dal cavo.
Zing mee met de muziek door een microfoon (niet meegeleverd) aan te sluiten op
de MIC-aansluiting op het apparaat.
Opmerkingen:
• Draai rechtstreeks aan de knop om het volume naar wens in te stellen.
• Als de microfoon in de buurt van de luidspreker wordt gebruikt, dan kan er een
huilend eect (akoestische terugkoppeling) optreden. Als dit het geval is, vergroot
dan de afstand tot de luidspreker.
Waarschuwing: De microfoon laten vallen of kloppen op de microfoon kan de
microfoon permanent beschadigen. Weersta de drang om de microfoon rond te
zwaaien aan het snoer.
MANTENIMIENTO DE CD
MANUTENZIONE CD
CD ONDERHOUD
INSTRUCCIONES DE SEGURIDAD
AVVERTENZE DI SICUREZZA
VEILIGHEIDSINSTRUCTIES
ATENCIÓN: Para reducir el riesgo de descarga eléctrica,
no desmonte el aparato. En el interior de este aparato no
existe ninguna pieza que pueda ser reparada por el usuario.
Para cualquier operación de mantenimiento y reparación,
póngase en contacto con personal técnico cualicado.
ATTENZIONE: Per ridurre il rischio di scossa elettrica,
non smontate l’apparecchio. Questo apparecchio non
contiene pezzi riparabili dall’utente. Per ogni riparazione
rivolgetevi esclusivamente a tecnici qualicati.
OPGEPAST: Om het risico op elektrische schokken
te vermijden, mag u het toestel niet demonteren. Het
toestel bevat geen enkel onderdeel dat door de gebruiker
zelf kan gerepareerd worden. Contacteer altijd een
gekwaliceerde technieker indien een reparatie nodig is.
El símbolo del rayo con una echa dentro de un triángulo equilátero advierte
al usuario de la presencia de voltaje peligroso en el interior del aparato.
Il simbolo del fulmine con una freccia all’estremità all’interno di un triangolo
equilatero avverte l’utente della presenza di una “tensione pericolosa”
nell’apparecchio.
Het symbool van een zwarte driehoek met daarin een witte bliksemschicht
eindigend in een driehoek, waarschuwt de gebruiker dat er een gevaarlijke
spanning aanwezig is in het toestel.
El signo de exclamación dentro de un triángulo equilátero advierte al
usuario de la presencia de importantes instrucciones de funcionamiento y
mantenimiento en el manual que acompaña al producto.
Il punto esclamativo inscritto nel triangolo equilatero indica all'utente che
nel manuale di istruzioni si trovano importanti avvertenze per l'uso e la
manutenzione dell'apparecchio.
Het bovenstaande symbool (zwarte driehoek met daarin een wit
uitroepingsteken) waarschuwt de gebruiker dat er belangrijke
gebruiksaanwijzingen in verband met het gebruik en het onderhoud ter
beschikking zijn in de bijgeleverde handleiding.
La marca de precaución se encuentra en la parte posterior del dispositivo.
ADVERTENCIA: PARA PREVENIR EL RIESGO DE INCENDIO O DE DESCARGA
ELÉCTRICA, NO EXPONGA ESTE APARATO A LA LLUVIA O A LA HUMEDAD.
ATENCIÓN: Radiación láser invisible en caso de apertura o fallo de los cierres
de seguridad.
Este reproductor de discos compactos ha sido clasicado como producto LÁSER
DE CLASE 1. La marca de PRODUCTO LASER CLASE 1 se encuentra en la parte
posterior de la unidad.
Il simbolo di allerta è posto sul retro del dispositivo.
AVVERTENZA: PER EVITARE IL RISCHIO DI INCENDIO O SCOSSA ELETTRICA,
NON ESPONETE L’APPARECCHIO ALLA PIOGGIA O ALL’UMIDITÀ.
ATTENZIONE: Emissione di radiazioni laser invisibili quando i dispositivi di
sicurezza sono aperti o difettosi.
Questo lettore CD è un prodotto a laser di classe 1. Il contrassegno PRODOTTO
LASER DI CLASSE 1 si trova sul retro dell’apparecchio.
De waarschuwingsmarketing zit op de achterkant van het apparaat.
WAARSCHUWING Stel het toestel niet bloot aan vocht of regen om het risico op
brand of elektrische schokken te vermijden.
OPGEPAST: ONZICHTBARE LASERSTRALEN WANNEER HET
VEILIGHEIDSMECHANISME OPEN OF STUK IS.
Deze cd-speler is geclassiceerd als een KLASSE 1 LASERPRODUCT. De
markering KLASSE 1 LASERPRODUCT bevindt zich op de achterkant van het
apparaat.
ATENCIÓN
- Utilice este aparato en lugares con climas templados.
- La placa de datos técnicos está situada en la parte posterior del dispositivo.
- Deje libre alrededor del aparato una distancia mínima de 5 cm para garantizar una
correcta ventilación del mismo.
- Para asegurar una ventilación correcta del aparato, no cubra los oricios de
ventilación con objetos tales como periódicos, manteles, cortinas, etc.
- No coloque ninguna fuente de calor, como por ejemplo una vela encendida, sobre
el aparato o cerca de él.
- No exponga el aparato a salpicaduras o a la humedad.
- No coloque objetos que contengan líquido, como un jarrón, encima del aparato.
- No tire las pilas al fuego. Respete el medio ambiente cuando se deshaga de las
pilas usadas.
- No exponga las pilas a temperaturas demasiado altas, como las producidas por la
exposición directa a los rayos del sol, al fuego o a otras fuentes de calor.
- El adaptador de red permite enchufar y desenchufar el aparato. El acceso al
mismo debe permanecer despejado en todo momento. Para cortar por completo
la alimentación del aparato, ha de desenchufar el adaptador de red de la toma
de corriente.
- Como resultado de fenómenos electroestáticos y/o eléctricos transitorios, pueden
producirse fallos en el funcionamiento del producto. En estos casos, el usuario
deberá reiniciar el aparato desenchufándolo y volviéndolo a enchufar.
ATTENZIONE
- Utilizzare l’apparecchio in ambienti temperati.
- La targhetta segnaletica si trova nella parte posteriore dell'apparecchio.
- Lasciare uno spazio minimo di 5 cm intorno all’apparecchio per permettere una
ventilazione suciente.
- Garantire sempre una ventilazione corretta dell’apparecchio e non ostruire i fori di
ventilazione con oggetti come giornali, tovaglie, tende, ecc.
- Non collocare nessuna fonte di calore, come una candela accesa, sopra o nei
pressi dell’apparecchio.
- Non esporre l’apparecchio all'acqua o all’umidità.
- Non collocare nessun recipiente contenente liquidi, come ad esempio un vaso,
nelle vicinanze dell’apparecchio.
- Non gettare le pile nel fuoco! Gettare le pile nel rispetto dell'ambiente.
- Non esporre le pile a fonti di calore eccessivo, come raggi solari, fuoco o fonti di
calore analoghe.
- L’adattatore di rete permette di scollegare l’apparecchio. Deve pertanto restare
facilmente accessibile durante l’uso. Per mettere del tutto l’apparecchio fuori
tensione, scollegate il cavo di alimentazione.
- Per eetto di fenomeni transitori elettrostatici e/o elettrici, è possibile che il prodotto
non funzioni correttamente. In tal caso è opportuno reinizializzare l’apparecchio.
OPGELET
- Gebruik dit toestel bij een gematigd klimaat.
- Het kenmerkenplaatje bevindt zich aan de achterkant van het toestel.
- Zorg voor een afstand van minimum 5 cm rondom uw toestel voor voldoende
ventilatie.
- Zorg voor een juiste ventilatie van het toestel en bedek de ventilatie-openingen
niet met voorwerpen zoals dagbladen, tafellakens, gordijnen, enz.
- Plaats geen warmtebron, zoals een brandende kaars, op of in de buurt van het
toestel.
- Stel het toestel niet bloot aan waterspatten of vochtigheid.
- Plaats geen voorwerpen met vloeistof, zoals een vaas, op of in de buurt van het
toestel.
- Gooi de batterijen niet in het vuur. Respecteer het milieu als u gebruikte batterijen
wegwerpt.
- Stel de batterijen niet bloot aan overdreven hitte zoals zonnestralen, vuur of
gelijkaardige warmtebronnen.
- Het moet makkelijk te bedienen blijven en mag tijdens het gebruik niet verstoord
worden. Om volledig losgekoppeld te zijn van stroomtoevoer, moet het toestel via
de AC adapter volledig uit het stopcontact worden verwijderd.
- Onder invloed van tijdelijke elektrostatische en/of elektrische verschijnselen kan
het product storingen ondervinden en kan een heropstart nodig blijken.
Si desea deshacerse de este aparato, recuerde que ha de depositarlo en
un lugar destinado al reciclado de electrodomésticos. Infórmese acerca
del centro de reciclaje más cercano. Consulte a las autoridades locales o
a su proveedor para obtener más información al respecto. (Directiva de
Residuos de Aparatos Eléctricos y Electrónicos)
Se in futuro si desidera gettare l'apparecchio, ricordare che le
apparecchiature elettroniche non devono essere smaltite insieme ai
riuti domestici. Informarsi su quale sia il centro di riciclaggio più vicino.
Per ulteriori dettagli, rivolgersi alle autorità locali o al proprio rivenditore
(direttiva sui riuti delle apparecchiature elettriche ed elettroniche).
Indien u dit toestel in de toekomst wilt weggooien, denk er dan aan om
het te recycleren via een inzamelpunt voor elektrische huishoudapparaten.
Informeer naar het dichtstbijzijnde recyclagecentrum. Voor meer informatie
wendt u zich tot de lokale overheden of uw verdeler (richtlijn met betrekking
tot Afval afkomstig van elektrische en elektronische apparaten).
Limpieza
ATENCIÓN: Desconecte este aparato de toda fuente de alimentación antes
de limpiarlo.
- Utilice un paño suave, limpio y seco. Limpie regularmente los oricios de
ventilación de la parte trasera del aparato y de los laterales.
- El uso de disolventes o productos abrasivos o a base de alcohol puede dañar
el aparato.
- Si un objeto o un líquido penetra en el aparato, desenchúfelo inmediatamente y
póngase en contacto con personal técnico cualicado.
Notas relativas a los discos
* No utilice discos con formas especiales (octogonales, en forma de corazón, etc.),
ya que podrían ocasionar un fallo en el funcionamiento del aparato.
* No introduzca más de un disco en el compartimento.
* No intente abrir el compartimento del disco durante la reproducción.
* No toque la lente del reproductor; si lo hace, podría producirse un fallo en el
funcionamiento del aparato.
* Un disco cuya supercie esté rayada, contenga polvo o huellas puede ocasionar
fallos en el funcionamiento del aparato. Antes de comenzar la reproducción,
limpie el disco con un paño limpio. Para ello, frótelo desde el centro hacia los
bordes. No guarde los discos en lugares con temperaturas elevadas o una
humedad considerable; podrían deformarse. Una vez que haya escuchado el
disco, guárdelo en su estuche.
Nota importante
• Retire el disco del compartimento cuando transporte el aparato.
Pulizia
ATTENZIONE: Scollegare l’apparecchio dalla fonte di alimentazione prima di
pulirlo.
- Servitevi di un panno morbido e asciutto. Spolverate regolarmente le aperture di
ventilazione poste sul retro o ai lati dell’apparecchio.
- Il ricorso a solventi oppure a prodotti abrasivi o a base d’alcool rischia di
danneggiare l’apparecchio.
- Se un oggetto o un liquido entra nell’apparecchio, scollegate immediatamente
l’apparecchio dalla corrente e adatelo ad un tecnico autorizzato.
Osservazioni sui dischi
* Non utilizzate dischi di forma irregolare (ad esempio ottagonali o a forma di
cuore). L’apparecchio potrebbe non funzionare correttamente.
* Non inserite più di un disco nello scomparto.
* Non cercate di aprire il compartimento CD mentre la riproduzione è in corso.
* Non toccate la lente per non provocare un malfunzionamento.
* Se il disco è rigato, sporco o presenta impronte digitali, è possibile che
l'apparecchio non funzioni. Prima della riproduzione, pulite il disco con un
panno. Pulite delicatamente dal centro verso l'esterno. Non riponete i dischi in
luoghi soggetti a temperature elevate o a forte umidità. Potrebbero deformarsi.
Terminato l’ascolto, riponete il disco nella sua custodia.
Nota importante
• Estraete il disco dal compartimento se l’apparecchio deve essere trasportato.
OPGEPAST: Koppel het toestel los van elke voedingsbron vooraleer het
schoon te maken.
- Gebruik een propere, zachte, droge doek. Stof de verluchtingsopeningen aan de
achterzijde of zijkanten van het toestel regelmatig af.
- Het gebruik van solventen of bijtende middelen op basis van alcohol kan het
toestel beschadigen.
- Als een object of een vloeistof in het toestel loopt, koppel het dan meteen los en
laat het nakijken door een gekwaliceerd technieker.
Opmerkingen ivm disks
* Gebruik geen disks met een speciale vorm (achthoek, hartvorm, enz.) die het
toestel slecht zou doen werken.
* Plaats maar 1 disk in het compartiment.
* Open het compartiment niet tijdens de weergave.
* Raak de lens niet aan om disfunctie van het toestel te vermijden.
* Een disk met krassen, stof of vingerafdrukken kan slecht werken. Gebruik een
zachte, droge doek om de disk schoon te maken, vooraleer de disk weer te
geven. Doe dit van het midden uit naar de zijkanten toe. Plaats de disks nooit
bloot aan vochtigheid of extreme temperaturen om ze niet te vervormen. Plaats
uw disks na de weergave opnieuw in hun doosjes.
Belangrijke opmerking
• Haal de disk uit het compartiment als het toestel vervoerd moet worden.
NEW ONE S.A.S
10, Rue de la Mission, 25480 Ecole Valentin, France
NEW ONE S.A.S
10, Rue de la Mission, 25480 Ecole Valentin, France
NEW ONE S.A.S
10, Rue de la Mission, 25480 Ecole Valentin, France
LOCATION OF CONTROLS
-
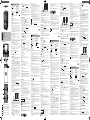 1
1
-
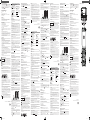 2
2


Muse M-1820 DJ Manuale del proprietario
- Categoria
- Lettore CD
- Tipo
- Manuale del proprietario
in altre lingue
- English: Muse M-1820 DJ Owner's manual
- français: Muse M-1820 DJ Le manuel du propriétaire
- español: Muse M-1820 DJ El manual del propietario
- Deutsch: Muse M-1820 DJ Bedienungsanleitung
- Nederlands: Muse M-1820 DJ de handleiding
- português: Muse M-1820 DJ Manual do proprietário
Documenti correlati
-
Muse M-692 BTC Manuale del proprietario
-
Muse Micro-chaîne M785 DAB Manuale del proprietario
-
-
-
-
-
-
Muse M-308 BTW Manuale utente
-
-
Muse MT-115 DAB Manuale del proprietario
Altri documenti
-
Schwaiger RBS124 Series Manuale utente
-
MPMan SP250BT Manuale del proprietario
-
AudioSonic SK-1532 Manuale del proprietario
-
Singsation SPKA21 Guida utente
-
Medion X64060 Manuale utente
-
iHome iBTB2 Manuale utente
-
Trevi XB 70BT Guida utente
-
NGS Roller Disco Manuale utente
-
iHome Waterproof Floatable Wireless Speaker Manuale utente
-
Boynq Vase Manuale utente