La pagina si sta caricando...

IPS5 shown
Description:
Rechargeable batteries Battery Pack IPS5/IPS10 are designed to significantly increase self-contained operating time of the
digital and thermal devices Pulsar (thermal imagers Helion, thermal sights Trail, digital riflescopes Digisight Ultra etc.)
Package contents:
џ Battery Pack IPS 5 / IPS10
џ Protective cover
џ User manual
џ Warranty card
Charging:
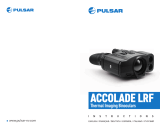
џ Lift the lever (C) of the charger.
џ Remove the protective cover from the Battery Pack.
џ Install the Battery Pack into the charger by inserting the pins (A) of the battery into the grooves (B) of the charger – the
Pulsar logo on the battery Pack should be located closer to the lever; click the lever (C)(see Pic.).
џ Upon installation, a green LED indicator (D) on the charger will start to glow and begin flashing:
- once if the battery charge ranges from 0% to 50%;
- twice if the battery charge ranges from 51% to 75%;
- three times if the battery charge ranges from 75% to 100%;
џ If the indicator glows green continuously, the battery is fully charged.
џ You can remove the battery from the charger by lifting the lever (C).
џ If the charger is not connected to the mains, the indicator glows green for 15 sec.
џ If the indicator glows red continuously, it may show that the battery's charge level is lower than acceptable. Keep it in the
charger for 30 minutes. Remove the battery and insert again. If the indicator keeps blinking green, the battery is good; if it
keeps glowing red, it's defective. Do not use the battery!
џ Connect the Micro-USB plug of the USB cable to the port (E) of the charger.
џ Connect the Micro-USB plug to the charger.
џ Insert the plug of the charger (not included) to the 220V socket.
Installing the battery pack into device:
џ Remove the protective cover from the Battery Pack.
џ Lift the lever (G).
џ Install the battery into the dedicated slot on the device housing so that element F (see Pic.) appears from below.
џ Fix the battery by clicking the lever.
Safety measures:
џ Only use the charger supplied with the Battery Pack. The use of any other charger may irreparably damage the Battery Pack
or the charger and may cause fire.
џ When keeping the battery for a long period, the battery should not be fully charged or fully discharged.
џ Do not charge the battery immediately after bringing the battery from cold environment to a warm one. Wait for 30-
40 minutes for the battery to get warm.
џ Do not leave a battery unattended while charging.
џ Never use a modified or damaged charger.
џ Charge the Battery Pack at a temperature ranging from 0 °C to +45 °C.
џ Otherwise batter's life will decrease significantly.
џ Do not leave the Battery Pack with a charger connected to the mains longer than 24 hours after full charge.
џ Do not expose the battery pack to high temperature or to a naked flame.
џ Do not submerge the battery in water.
џ Do not connect external device with a current consumption that exceeds permitted levels.
џ The Battery Pack is short circuit protected. However, any situation that may cause short-circuiting should be avoided.
џ Do not dismantle or deform the Battery Pack.
џ Do not drop or hit the battery.
џ When using the battery at negative temperatures, battery's capacity decreases, this is normal and is not a defect.
џ Do not use the battery at the temperatures above those shown in the table – this may decrease battery's life.
џ Keep the battery out of the reach of children.
BATTERY PACK PS5/IPS10
BATTERY PACK
IPS5/IPS10
Beschreibung:
Wiederaufladbare Li-Ionen-Batterien IPS 5 / IPS10 verlängern die Alleinlaufzeit von den digitalen und Wärmebildgeräten
Pulsar neuer Generation (von Wärmebildgeräten Helion, Wärmebild-Zielfernrohren Trail, digitalen Zielfernrohren Digisight Ultra
u.a).
Lieferumfang:
џ Batterie IPS 5 / IPS10
џ Schutzdeckel
Aufladung der Batterie:
џ Heben Sie den Griffhebel (C) des Ladegerätes auf.
џ Nehmen Sie den Schutzdeckel von der Akkumulatorenbatterie ab.
џ Setzen Sie die Akkumulatorenbatterie in das Ladegerät ein, indem Sie die Zapfen (A) der Batterie in die Schlitze (B) des
Ladegerätes hineinstecken. Das Logo Pulsar auf der Batterie soll sich dem Griffhebel nah befinden, schnappen Sie den
Griffhebel (C) ein (s. Abb.).
џ Beim Installieren leuchtet auf dem Ladegerät die Anzeige (D) grün und blinkt kurz in einem bestimmten Zeitabstand:
- einmal, wenn die Batterie von 0 bis 50% aufgeladen ist;
- zweimal, wenn die Batterie von 51 bis 75% aufgeladen ist;
- dreimal, wenn die Batterie von 75 bis 100% aufgeladen ist.
џ Wenn die Anzeige grün dauernd leuchtet, ist die Akkumulatorenbatterie vollgeladen. Sie kann vom Ladegerät getrennt
werden.
џ Wenn das Ladegerät an das Netzwerk nicht angeschlossen ist, leuchtet die Anzeige im Laufe nur von 15 Sekunden grün.
џ Wenn die Anzeige dauernd rot leuchtet, kann es bedeuten, dass die Batterie unter Aufladungsgrenze aufgeladen wurde.
Lassen Sie die Batterie im Ladegerät für 30 Minuten aufladen, Batterie entfernen und wieder einfügen. Wenn die Anzeige
grün blinken wird, heisst das, das die Batterie störungsfrei funktioniert, wenn aber die Anzeige weiter rot leuchtet, ist die
Batterie beschädigt. Betrieb der Batterie verboten.
џ Schliessen Sie den Stecker vom Kabel micro USB (aus dem Lieferumfang des optischen Gerätes) an die Buchse (E) des
Ladegerätes an.
џ Schliessen Sie den Stecker vom Kabel micro USB an die Netzwerkanlage.
џ Stecken Sie die Netzwerkanlage (gehört nicht zum Lieferumfang) an die Steckdose mit 220 V an.
Installieren der Batterie in das Gerät:
џ Nehmen Sie den Schutzdeckel von der Akkumulatorenbatterie ab.
џ Heben Sie den Griffhebel (G) auf.
џ Setzen Sie die Batterie in den entsprechenden Steckplatz im Gehäuse des Gerätes so ein, dass das Element F (s. Abb.)
unten liegt.
џ Machen Sie die Batterie fest, indem Sie den Griffhebel nach unten klappen.
Sicherheitshinweise:
џ Verwenden Sie für das Aufladen nur das mitgelieferte Ladegerät. Die Anwendung eines fremden Ladegerätes kann der
Batterie irreparablen Schaden antun und zur Anfeuerung der Batterie führen.
џ Bei andauernder Aufbewahrung soll die Batterie teilweise aufgeladen sein - sie soll nicht völlig aufgeladen oder
vollentladen sein.
џ Laden Sie nie die Batterie gleich auf, wenn sie von der Kälte in einen warmen Raum gebracht wurde. Warten Sie 30-
40 Minuten ab, bis sich die Batterie aufwärmt.
џ Lassen Sie die Batterie aufsichtslos nie aufladen.
џ Wenden Sie das Ladegerät nicht an, wenn es geändert oder beschädigt wurde.
џ Das Aufladen der Batterie soll bei 0 °C … +45 °C erfolgen.
џ Sonst wird sich die Betriebsdauer der Batterie wesentlich senken.
џ Lassen Sie das Ladegerät nicht mehr als 24 Stunden nach der Vollladung an das Netzwerk angeschlossen.
џ Halten Sie die Batterie vom Feuer und Quellen mit hoher Temperatur fern.
џ Tauchen Sie die Batterie ins Wasser nicht.
џ Es ist nicht empfehlenswert, fremde Anlagen mit höherem Strom, als es zulässig ist, anzuschließen.
џ Die Batterie ist kurzschlußfest. Vermeiden Sie aber die Kurzschluss provozierenden Situationen.
џ Es ist verboten, externe Stromversorgung auseinanderzunehmen und zu deformieren.
џ Lassen Sie die Batterie nicht fallen oder schlagen.
џ Beim Betrieb bei Minustemperaturen sinkt die Kapazität der Batterie, das ist normal und ist kein Defekt.
џ Wenden Sie die Batterie bei höheren Temperaturen, als es in der Tabelle angegeben ist. Dies kann die Betriebsdauer der
Batterie verringern.
џ Von den Kindern fernhalten.
WIEDERAUFLADBARE BATTERIEN IPS5/IPS10
G
џ Betriebsanweisung
џ Garantieschein
v.0417
Модель / SKU
Тип
Емкость, мАч
Напряжение заряда, В
Номинальный ток заряда, А
Номинальное напряжение, В
Время полной заряда, ч
Время полного разряда
(I=250 мА)(при t=22 °С), час
Рабочий ток разряда, А
Температурный диапазон заряд /
разряд, при относительной
влажности 60±5%
Габариты, мм
Вес, кг
ТЕХНИЧЕСКИЕ ХАРАКТЕРИСТИКИ:
IPS5 (79114)
Li-Ion
5000
5
1,3
3,7
4
20
≤ 2
0 … +45 °С / -20 °С… +60 °С
73x47x30
0,13
IPS10 (79115)
Li-Ion
10000
5
1,3
3,7
8
40
≤ 2
73x47x50
0,24
Modello / SKU
Tipo
Capacità, mAh
Tensione di carica, V
Corrente nominale di carica, А
Tensione nominale, V
Tempo di ricarica completa, ore
Tempo di scarica completa
(I=250 mА)(a t=22 °С), ore
Corrente di esercizio di scarica, А
Intervallo di temperatura in
carica/scarica (UR 60±5%)
Dimensioni, mm
Peso, kg
SPECIFICHE:
IPS5 (79114)
Li-Ion
5000
5
1,3
3,7
4
20
≤ 2
0 … +45 °С / -20 °С… +60 °С
73x47x30
0,13
Modelo / SKU
Tipo
Capacidad, mAh
Tensión de carga, V
Corriente nominal de carga, A
Tensión nominal, V
Tiempo hasta carga total, h
Tiempo hasta descarga total
(I=250 mА)(a t=22 °C), h
Corriente de descarga en
funcionamiento, A
Rango de temperatura de
carga/descarga (HR 60±5%)
Dimensiones, mm
Peso, kg
ESPECIFICACIONES:
IPS5 (79114)
Li-Ion
5000
5
1,3
3,7
4
20
≤ 2
0 … +45 °С / -20 °С… +60 °С
73x47x30
0,13
IPS10 (79115)
Li-Ion
10000
5
1,3
3,7
8
40
≤ 2
73x47x50
0,24
Modell / SKU
Typ
Kapazität, mAh
Nennspannung der Aufladung, V
Nennstrom der Aufladung, А
Nennspannung, V
Vollaufladezeit, Std.
Vollentladungszeit (I=250 mА) (bei
t=22 °С), Std.
Betriebsstrom der Entladung, А
Temperaturbereich
Aufladung / Entladung, bei relativer
Luftfeuchte 60±5%
Abmessungen, mm
Gewicht, kg
TECHNISCHE DATEN:
IPS5 (79114)
Li-Ion
5000
5
1,3
3,7
4
20
≤ 2
0 … +45 °С / -20 °С… +60 °С
73x47x30
0,13
IPS10 (79115)
Li-Ion
10000
5
1,3
3,7
8
40
≤ 2
73x47x50
0,24
Modèle / SKU
Type
Capacité, mAh
Tension de charge V
Courant nominal de charge, A
Tension nominale, V
Durée de charge complète, h
Durée de décharge complète
(I = 250 mА)(à t=22 °С), h
Courant de charge, A
Plage de températures de
charge/décharge (HR 60±5 %)
Dimensions, mm
Poids, kg
SPÉCIFICATIONS:
IPS5 (79114)
Li-Ion
5000
5
1,3
3,7
4
20
≤ 2
0 … +45 °С / -20 °С… +60 °С
73x47x30
0,13
IPS10 79115)
Li-Ion
10000
5
1,3
3,7
8
40
≤ 2
73x47x50
0,24
Model / SKU
Type
Capacity, mAh
Charge voltage, V
Rated charge current, A
Rated voltage, V
Full charge time, h
Full discharge time
(I=250 mА)(at t=22 °С), h
Operating charge current, А
Charge/discharge temperature
range (RH 60±5%)
Dimensions, mm / inch
Weight, kg / oz
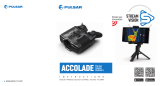
SPECIFICATIONS:
IPS5 (79114)
Li-Ion
5000
5
1.3
3.7
4
20
≤ 2
0 … +45 °С / -20 °С… +60 °С /
32 °F ... 113 °F / -4 °F...140 °F
73x47x30/2.9x1.7x1.2
0.13 / 4.6
IPS10 (79115)
Li-Ion
10000
5
1.3
3.7
8
40
≤ 2
73x47x50/2.9x1.8x2
0.24 / 8.5
IPS10 (79115)
Li-Ion
10000
5
1,3
3,7
8
40
≤ 2
73x47x50
0,24

Описание:
Перезаряжаемые литий-ионные батареи IPS 5 / IPS10 позволяют увеличить время автономной работы цифровых и
тепловизионных приборов Pulsar нового поколения (тепловизоры Helion, тепловизионные прицелы Trail, цифровые
прицелы Digisight Ultra и пр.).
ИСТОЧНИКИ ПИТАНИЯ IPS5/IPS10
GRUPPO BATTERIA IPS5/IPS10
GRUPPO BATTERIA IPS5/IPS10
Комплект поставки:
џ Батарея IPS 5 / IPS10
Зарядка батареи:
џ Поднимите рычаг (С) зарядного устройства.
џ Снимите защитную крышку с аккумуляторной батареи.
џ Установите аккумуляторную батарею в зарядное устройство, вставив штыри (А) батареи в пазы (B) зарядного
устройства – логотип Pulsar на батарее должен находиться ближе к рычагу, защелкните рычаг (С) (см. рис.).
џ При установке на зарядном устройстве загорится индикатор (D) зеленого цвета и начнет кратко мигать с определенным
интервалом:
- один раз, если заряд батареи составляет от 0 до 50%;
- два раза, если заряд батареи от 51 до 75%;
- три раза, если заряд батареи от 75 до 100%.
џ Если индикатор постоянно горит зеленым, значит, батарея полностью заряжена. Ее можно отключить от зарядного
устройства.
џ Если зарядное устройство не подключено к сети, индикация зеленым светодиода происходит только в течение 15 сек.
џ Если индикатор постоянно горит красным, вероятно, батарея заряжена ниже допустимого уровня. Оставьте ее в
зарядном устройстве на 30 минут, извлеките и вставьте обратно. Если индикатор станет мигать зеленым цветом,
значит батарея исправна, если будет продолжать гореть красным, тогда неисправна. Не используйте эту батарею.
џ Подключите штекер micro USB кабеля USB (из комплекта поставки Вашего оптического прибора) к разъему (E).
зарядного устройства.
џ Подключите штекер кабеля USB к сетевому устройству.
џ Включите сетевое устройство (не входит в комплект) в розетку 220В.
Установка батареи в прибор:
џ Снимите защитную крышку с аккумуляторной батареи.
џ Поднимите рычаг (G).
џ Установите батарею в предназначенный для нее слот на корпусе прибора таким образом, чтобы элемент F (см. рис.)
находился снизу.
џ Зафиксируйте батарею, опустив рычаг.
Меры предосторожности:
џ Для заряда всегда используйте зарядное устройство из комплекта поставки Вашего оптического прибора.
Использование другого зарядного устройства может нанести непоправимый ущерб батарее или зарядному устройству
и может привести к воспламенению батареи.
џ При длительном хранении батареи должна быть частично заряжена – не должна быть полностью заряжена
или полностью разряжена.
џ Не заряжайте батарею непосредственно после перемещения батареи из холодных условий в теплую
обстановку. Подождите 30-40 минут пока батарея нагреется.
џ Во время зарядки не оставляйте батарею без присмотра.
џ Не используйте зарядное устройство, если его конструкция была изменена или оно было повреждено.
џ Зарядка батареи должна осуществляться при температуре воздуха 0 °C … +45 °C.
џ В противном случае ресурс батареи существенно снизится.
џ Не оставляйте зарядное устройство с подключенной к сети батареей к сети более 24 часов после полной зарядки.
џ Не подвергайте батарею воздействию высоких температур и открытого огня.
џ Батарея не предназначена для погружения в воду.
џ Не рекомендуется подключать сторонние устройства с током потребления больше допустимого.
џ Батарея оснащена системой защиты от короткого замыкания. Однако следует избегать ситуаций, которые могут
привести к короткому замыканию.
џ Не разбирайте и не деформируйте батарею.
џ Не подвергайте батарею ударам и падениям.
џ При использовании батареи при отрицательных температурах емкость батареи уменьшается, это нормально и
дефектом не является.
џ Не используйте батарею при температурах, превышающих указанные в таблице – это может сократить ресурс батареи.
џ Храните батарею в месте, недоступном для детей.
Descripción:
Las baterías recargables Battery Pack IPS5/IPS10 se han diseñados para aumentar de forma significativa el tiempo de
funcionamiento autónomo de los dispositivos térmicos y digitales Pulsar (dispositivos térmicos Helion, visores térmicos Trail,
visores digitales Digisight Ultra, etc.).
Contenido del embalaje:
џ Battery Pack IPS 5 / IPS10
џ Cubierta protectora
Carga:
џ Levante la palanca (C) del cargador.
џ Retire la cubierta protectora del paquete de pilas.
џ Introduzca la batería Battery Pack en el cargador insertando las clavijas (A) de la batería en las ranuras (B) del cargador. El
logotipo de Pulsar de la batería debería estar situado junto a la palanca. Encaje la palanca con un clic (C) (ver la Fig.).
џ Tras la instalación, un indicador LED verde (D) en el cargador se encenderá y empezará a parpadear:
- una vez si la carga de la batería oscila entre el 0 % y el 50 %;
- dos veces si la carga de la batería oscila entre el 51 % y el 75 %;
- tres veces si la carga de la batería oscila entre el 75 % y el 100 %;
џ Si el indicador se mantiene encendido con una luz verde continua, la batería está totalmente cargada.
џ Ya puede retirar la batería del cargador levantando la palanca (C).
џ Si el cargador no está conectado a la red, el indicador se encenderá con una luz verde durante 15 segundos.
џ Si el indicador se mantiene encendido con una luz roja continua, eso significa que el nivel de batería está por debajo del
nivel aceptable. Mantenga la batería en el cargador durante 30 minutos, quite e inserte la bateria de nuevo. Si el indicador
sigue parpadear en verde, la batería está en buen estado; si el indicador sigue rojo, la batería estará defectuosa.
No utilice la batería.
џ Conecte el conector micro USB del cable USB al puerto (E) del cargador.
џ Conecte el conector micro USB al cargador.
џ Introduzca el enchufe del cargador (no incluido) en una toma de 220 V.
Instalación de la batería en el dispositivo:
џ Retire la cubierta protectora de la batería Battery Pack.
џ Levante la palanca (G).
џ Introduzca la batería en la ranura específica de la carcasa del dispositivo de manera que el elemento F (ver la Fig.) quede
en la parte de abajo.
џ Fije la batería encajando la palanca con un clic.
Medidas de seguridad:
џ Utilice únicamente el cargador que se suministra con la Battery Pack. La utilización de cualquier otro cargador podría dañar
de forma irreparable la batería o el cargador y podría provocar un incendio.
џ Si la batería va a estar en desuso durante un periodo prolongado, la batería no debe estar ni cargada del todo ni
descargada del todo.
џ No cargue la batería inmediatamente después de que haya pasado de un entorno frío a un entorno cálido. Espere
unos 30-40 minutos hasta que la batería se temple.
џ No deje la batería sin supervisión durante su carga.
џ No utilice nunca un cargador modificado o dañado.
џ Cargue la batería a una temperatura de entre 0 °C y +45 °C.
џ De lo contrario, la vida útil de la batería se reducirá de forma significativa.
џ No deje la batería con un cargador conectado a la red durante más de 24 horas después de una carga completa.
џ No exponga la batería a temperaturas altas ni a una llama viva.
џ No sumerja la batería en agua.
џ No conecte un dispositivo externo con un consumo de corriente que exceda los niveles permitidos.
џ La batería está protegida frente a cortocircuitos. No obstante, debería evitarse cualquier situación que pueda provocar un
cortocircuito.
џ No desmonte ni deforme la Battery Pack.
џ No deje caer ni golpee la batería.
џ Cuando la batería se utiliza a temperaturas bajo cero, la capacidad de la batería se reduce. Esto es algo normal y no se trata
de un defecto.
џ No utilice la batería a temperaturas superiores a las mostradas en la tabla puesto que eso podría acortar la vida útil de la
batería.
џ Mantenga la batería fuera del alcance de los niños.
Description:
Les batteries rechargeables Battery Pack IPS5/IPS10 sont conçues pour augmenter de manière importante l'autonomie propre
des appareils numériques et thermiques Pulsar (imageurs thermiques Helion, viseurs thermiques Trail, lunettes digitaux
Digisight Ultra, etc.)
Contenus de l'emballage :
џ Bloc batterie IPS 5 / IPS10
џ Couvercle de protection
Charge:
џ Soulevez le levier (C) du chargeur.
џ Enlevez le couvercle de protection sur le bloc batterie.
џ Installez le bloc batterie dans le chargeur en insérant les broches (A) de la batterie dans les rainures (B) du chargeur. Le
logo Pulsar sur le bloc batterie doit être placé plus près du levier; encliquetez le levier (C) (voir image).
џ Au moment de l'installation, un voyant LED vert (D) sur le chargeur s'allumera et commencera à clignoter :
- Une fois si la charge de la batterie est comprise entre 0 % et 50 %.
- Deux fois si la charge de la batterie est comprise entre 51 % et 75 %.
- Trois fois si la charge de la batterie est comprise entre 75 % et 100 %.
џ Si le voyant s'allume en vert en fixe, la batterie est chargée au maximum.
џ Vous pouvez séparer la batterie du chargeur en soulevant le levier (C).
џ Si le chargeur n'est pas connecté à l'alimentation secteur, le voyant s'allume en vert en fixe pendant 15 s.
џ Si le voyant s'allume en rouge en fixe, ceci peut indiquer que le niveau de charge de la batterie est inférieur au niveau
acceptable. Maintenez-la dans le chargeur pendant 30 minutes, enlevez et insérez la batterie de nouveau. Si le voyant reste
clignoté en vert, la batterie est en bon état; s'il reste allumé en rouge, elle est défectueuse. N'utilisez pas la batterie.
џ Raccordez la prise micro-USB du câble USB au port (E) du chargeur.
џ Raccordez la prise micro-USB au chargeur.
џ Insérez la fiche mâle du chargeur (non incluse) dans la prise femelle 220 V.
Installation du bloc batterie dans l'appareil
џ Enlevez le couvercle de protection sur le bloc batterie.
џ Soulevez le levier (G).
џ Installez la batterie dans la fente spéciale sur le boîtier de l'appareil afin que l'élément F (voir image) apparaisse par en
dessous.
џ Fixez la batterie en encliquetant le levier.
Mesures de sécurité :
џ Utilisez uniquement le chargeur fourni avec le bloc batterie. L'utilisation d'un autre chargeur peut endommager définitivement
le bloc batterie ou le chargeur et peut provoquer un incendie.
џ Lorsque la batterie est stockée pendant une longue période, elle ne doit pas être complètement chargée ou
complètement déchargée.
џ Ne chargez pas immédiatement la batterie après l'avoir amenée depuis un environnement froid vers un
environnement chaud. Attendez 30-40 minutes pour que la batterie se réchauffe.
џ Ne laissez pas une batterie sans surveillance pendant sa charge.
џ N'utilisez jamais un chargeur modifié ou endommagé.
џ Chargez le bloc batterie à une température entre 0 °C et +45 °C.
џ Sinon la durée de vie de la batterie diminuera considérablement.
џ Ne laissez pas le bloc batterie avec un chargeur connecté à l'alimentation secteur pendant plus de 24 heures après une
recharge complète.
џ N'exposez pas le bloc batterie à des températures élevées ou à une flamme nue.
џ N'immergez pas dans l'eau la batterie.
џ Ne connectez pas un appareil extérieur soutirant une intensité supérieure à l'intensité maximum autorisée.
џ Le bloc batterie est protégé contre les court-circuits. Cependant, il faut éviter les situations pouvant provoquer un court-
circuit.
џ Ne démontez pas et ne déformez pas le bloc batterie.
џ Ne laissez pas tomber ou ne heurtez pas la batterie.
џ Lorsque vous utilisez la batterie avec des températures négatives, sa capacité diminue, ceci est normal et n'est pas un
défaut.
џ N'utilisez pas la batterie à des températures supérieures à celles indiquées dans le tableau – ceci pourrait diminuer la durée
de vie de la batterie.
џ Conservez la batterie hors de portée des enfants.
Descrizione:
Il gruppo batteria IPS5/IPS10 ricaricabile è progettato per prolungare sensibilmente l'autonomia di funzionamento dei
dispositivi digitali e termici Pulsar (visori termici Helion, cannocchiali termici Trail, mirini digitali Digisight Ultra, ecc.)
Contenuto della confezione:
џ Gruppo batteria IPS5 / IPS10
џ Coperchio protettivo
Ricarica:
џ Sollevare la leva (C) del caricabatterie.
џ Rimuovere il coperchio protettivo dal gruppo batteria.
џ Installare il gruppo batteria all'interno del caricabatterie, inserendo le spine (A) della batteria nelle scanalature (B) del
caricabatterie (il logo Pulsar sul gruppo batteria deve trovarsi più vicino alla leva) e premere sulla leva (C) fino allo scatto (fig.
1).
џ Al momento dell'installazione si accende e inizia a lampeggiare un indicatore LED verde (D) sul caricabatterie:
- una volta, se la carica della batteria è compresa tra da 0% e 50%;
- due volte, se la carica della batteria è compresa tra 51% e 75%;
- tre volte, se la carica della batteria è compresa tra 75% e 100%.
џ Se l'indicatore resta acceso con colore verde in modo continuo, la batteria è completamente carica.
џ Per estrarre la batteria dal caricabatterie, sollevare la leva (C).
џ Se il caricabatterie non è collegato alla rete, l'indicatore rimane acceso con colore verde per 15 secondi.
џ Se l'indicatore resta acceso con colore rosso in modo continuo, questo potrebbe indicare un livello di carica della batteria
inferiore al limite consentito. Collegarla al caricabatterie per 30 minuti, rimuovere e reinserire. Se l'indicatore continua a
lampeggiare con colore verde, significa che la batteria è in buono stato; se invece rimane acceso con colore rosso, significa
che è difettosa. Non servirsi di questa batteria!
џ Collegare il connettore micro-USB del cavo USB alla porta (E) del caricabatterie.
џ Collegare il connettore micro-USB al caricabatterie.
џ Inserire il connettore del caricabatterie (non in dotazione) nella presa 220 V.
Installazione del gruppo batteria nel dispositivo:
џ Rimuovere il coperchio protettivo dal gruppo batteria.
џ Sollevare la leva (G).
џ Installare la batteria nell'apposito vano sull'alloggiamento del dispositivo in modo che l'elemento F (vedere fig) sia visibile da
sotto.
Misure di sicurezza:
џ Utilizzare unicamente il caricabatterie fornito in dotazione con il gruppo batteria. L'uso di qualsiasi altro caricabatterie
potrebbe danneggiare in modo irreparabile il gruppo batteria o il caricabatterie stesso, o addirittura provocare un incendio.
џ Dopo un periodo di inutilizzo prolungato, evitare di caricare o scaricare completamente la batteria.
џ Non caricare la batteria immediatamente dopo averla spostata da un ambiente freddo a uno caldo. Attendere 30-40
minuti affinché la batteria si riscaldi.
џ Non lasciare la batteria incustodita durante la ricarica.
џ In nessun caso utilizzare un caricabatterie danneggiato o modificato.
џ Ricaricare il gruppo batteria ad una temperatura compresa tra 0 °C e +45 °C.
џ In caso contrario la durata della batteria si ridurrà sensibilmente.
џ Non lasciare il gruppo batteria con il caricabatterie collegato alla rete per più di 24 ore dopo una ricarica completa.
џ Non esporre il gruppo batteria ad alte temperature o a fiamme libere.
џ Non immergere la batteria in acqua.
џ Non connettere un dispositivo esterno che abbia un assorbimento di corrente superiore ai livelli consentiti.
џ Il gruppo batteria è protetto contro i cortocircuiti. In ogni caso, evitare qualsiasi situazione che possa provocare un
cortocircuito.
џ Non smontare né deformare il gruppo batteria.
џ Non urtare né far cadere la batteria.
џ La capacità della batteria tende a diminuire in caso di utilizzo a temperature inferiori a zero: non è un difetto, ma un
fenomeno normale.
џ Per evitare di ridurre la durata della batteria, non utilizzarla a temperature superiori a quelle riportate in tabella.
џ Tenere la batteria lontano dalla portata dei bambini.
BATTERIES RECHARGEABLES IPS5/IPS10
BATERIAS RECARGABLES IPS5/IPS10
џ Гарантийный талон
џ Manuale d'uso
џ Garanzia
џ Manuel d'utilisation
џ Carte de garantie
џ Manual de usuario
џ Tarjeta de garantía
џ Защитная крышка џ Инструкция по эксплуатации
1/2