
ENGLISH
FRANÇAIS
ESPAÑOL
DEUTSCHE
ITALIANO
PORTUGUÊS
RUSSIAN
DUTCH
DANISH
2
13
25
37
49
61
73
85
97
POLISH
SWEDISH
CZECH
ARABIC
THAI
繁體中文
简体中文
109
121
133
145
157
169
181
193
204
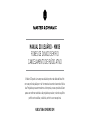
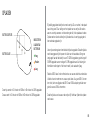
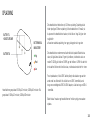
Master & Dynamic is a New York City-based premium audio company with a
deep passion for building technically sophisticated sound tools. Designed to
be modern yet timeless, our products utilize only the finest materials and
are engineered to last, creating the perfect balance of aesthetics, strength,
comfort, and exceptional sound.
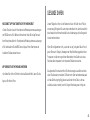
NEVER SOUND THE SAME
USER MANUAL – MW08
ACTIVE NOISE-CANCELLING
TRUE WIRELESS EARPHONES

2
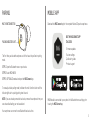
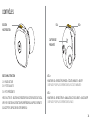
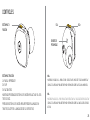
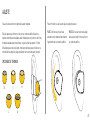
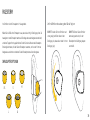
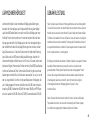
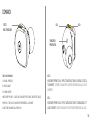
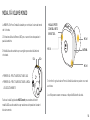
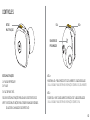
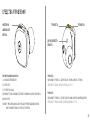
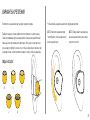
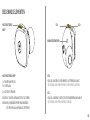
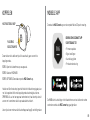
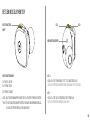
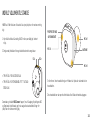
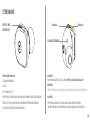
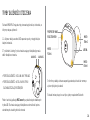
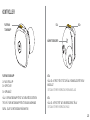
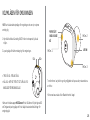
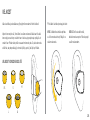
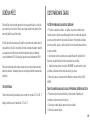
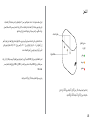
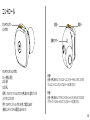
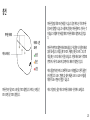
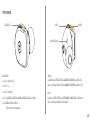
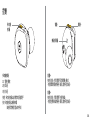
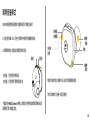
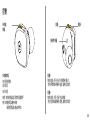
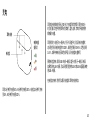
CONTROLS
2X: SKIP
1X: PAUSE / PLAY
SKIP BACK3X:
MULTI-FUNCTION BUTTON TO ACTIVATE VOICE ASSISTANT
HOLD:
MULTI-FUNCTION BUTTON TO ANSWER INCOMING CALLS
(OR ACCEPT CALL FROM YOUR DEVICE)
PRESS:
MULTI-FUNCTION BUTTON
HOLD VOL+ FOR “AMBIENT LISTENING” MODE ON/OFF
(SEE PAGE 6 FOR MORE INFORMATION ON AMBIENT LISTENING)
VOL +
HOLD VOL- FOR “ACTIVE NOISE-CANCELLING” ON/OFF
(SEE PAGE 6 FOR MORE INFORMATION ON ANC)
VOL -
MULTI-FUNCTION
BUTTON
VOL+VOL-
PROXIMITY SENSORS

3
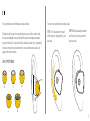
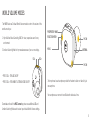
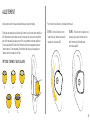
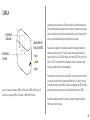
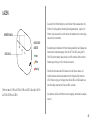
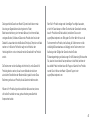
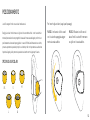
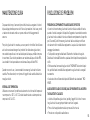
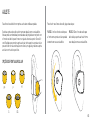
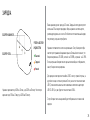
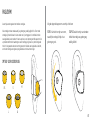
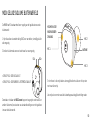
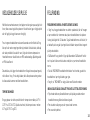
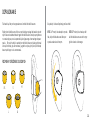
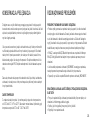
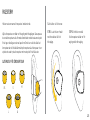
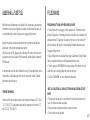
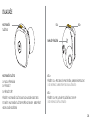
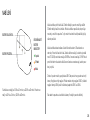
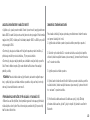
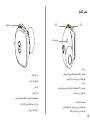
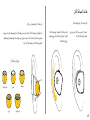
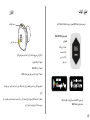
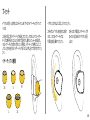
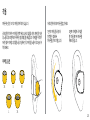
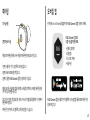
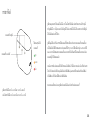
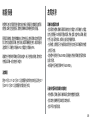
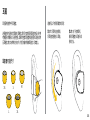
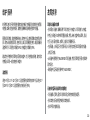
EAR TIP OPTIONS
XS S M
L XL
Your earphones come with medium ear tips attached.
Choose the ear tips that form a seal with your ear canal. Our custom round
ear tips are designed in conjunction with the oval nozzle shape to provide a
superior universal fit. If you have difficulty attaching the ear tip, try squeezing
the ear tip to match its orientation to the nozzle and then press the ear tip
against the nozzle to attach.
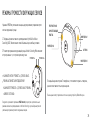
To insert your earphones follow these steps:
STEP 2: Rotate the earphone down
until the ear tip forms a seal with
your ear canal.
STEP 1: Tilt the earphone forward
with the ear tip resting lightly in your
ear canal.

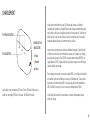
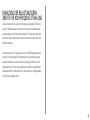
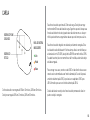
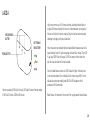
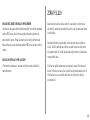
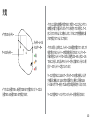
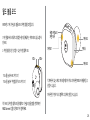
Your earphones hold up to 12 hours of charge. The charging case holds an
additional 30 hours of charge for your earphones. We suggest you place your
earphones inside the case when they are not in use. This will allow them to
have the maximum charge each time you begin to use them.
Your earphones will arrive with the battery partially charged. The battery
status will be displayed when opening /closing the lid. A green light indicates
the battery is between 70-100%, amber indicates 30-69%, and red indicates
1-29%. If the center battery flashes red or does not display, the case battery
is depleted.
To charge your case, plug in the USB-C cable into the right side of your case
and plug the other end into a power source. If you do not have a USB-C power
source you can use our supplied USB-C to USB-A adapter to use a USB-A
power source.
The battery status of the case and earphones will remain visible while the case
charges.
4
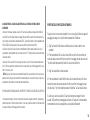
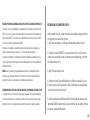
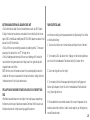
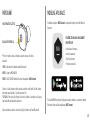
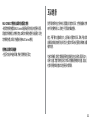
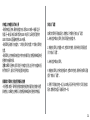
CHARGE
Earphones charge to 50% in 15 minutes, 100% in 45 minutes.
Case charges to 50% in 15 minutes, 100% in 60 minutes.
EARPHONE BATTERY
CASE BATTERY High
Med
Low
BATTERY LEVEL
INDICATORS

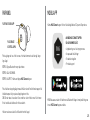
The first time you take both earphones out of their case they will enter pairing
mode.
STEP 1: Open the Bluetooth menu on your device.
STEP 2: Select M&D MW08.
STEP 3: (OPTIONAL) Download and open the M&D Connect app.
To manually activate pairing mode, hold down the multi-function button until the
indicator light starts pulsing/pairing tone is heard.
NOTE: If you are already connected to a device, remove the earphones from your
ears to avoid activating your voice assistant.
Your earphones can connect to one Bluetooth device at a time.
PAIRING
5
MOBILE APP
Download the M&D Connect app for the complete Master & Dynamic experience.
MW08 should be connected to your phone in the Bluetooth menu settings prior
to using the M&D Connect app.
USE THE M&D CONNECT APP
TO ACCESS:
• Firmware updates
• Custom settings
• Quick start guides
• Product support
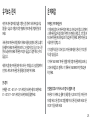
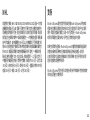
PULSING INDICATOR LIGHT
MULTI-FUNCTION BUTTON

6
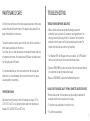
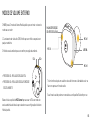
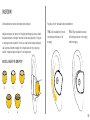
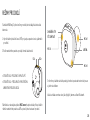
The MW08 features 2 default World Volume modes to control the volume of the
world around you:
1. Hybrid Active Noise-Cancelling (ANC) for clear, expansive sound in any
environment.
2. Ambient Listening Mode for improved awareness of your surroundings.
Download and install the M&D Connect app to access additional ANC and
Ambient Listening Modes and to select your default World Volume settings.
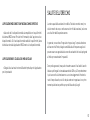
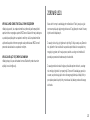
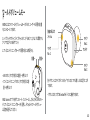
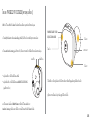
WORLD VOLUME MODES
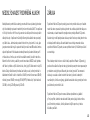
• PRESS VOL - FOR ANC ON/OFF
• PRESS VOL + FOR AMBIENT LISTENING MODE ON/OFF
VOL+VOL-
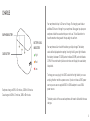
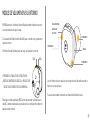
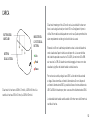
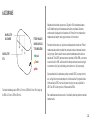
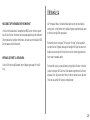
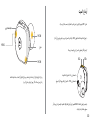
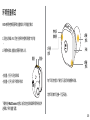
ANTENNA
MIC #2
MIC #3
PROPRIETARY WIND
REJECTION MESH
MIC #1
3 microphones in each earphone provide the freedom to listen or talk with just
one earphone.
Your earphones can connect to one Bluetooth device at a time.

TROUBLE PAIRING EARPHONES AND DEVICE
• Make sure both earphones are outside the charging case when
attempting to pair your device. Cycle power by placing earphones in the
charging case and fully closing the lid for 10 seconds. Then remove the
earphones from the case to verify they have entered pairing mode. The
indicator light will slowly pulse on the right earphone.
• Turn Bluetooth OFF, then ON again on the source device. Turn OFF Bluetooth
feature on any other device that is paired with the earphones.
• Delete any “M&D MW08” earphone connections from your device and then put
your earphones into pairing mode and pair again.
• Make sure “M&D MW08” is selected in the Bluetooth device list.
TROUBLESHOOTING
NO AUDIO OR POOR AUDIO QUALITY FROM A CONNECTED BLUETOOTH DEVICE
• Move the device closer to the earphones, as physical objects between the
earphones and the source may obstruct the signal.
• Try another music application or try another track.
• Try a different audio device.
7
Over time the proximity sensor that helps regulate pause/play functions may
become dirty and affect performance. If this happens, take a damp Q-tip or
damp cloth and lightly rub the sensor.
To clean the earphone ceramic, use a microfiber cloth. Do not use alcohol or
other cleaning substances on the product.
Do not drop, sit on, or allow the earphones to be exposed to water, moisture,
or temperature extremes. Your earphones are IPX5 water resistance rated.
Your charging case is IPX4 rated.
It is recommended that you return your earphones to their storage case
when not in use. To avoid damage, do not store other items in the canvas
case along with your earphones.
TEMPERATURE RANGE
Operate and store this product within the temperature range of -4°F to
113°F (-20°C to 45°C) only. Charge the battery where the temperature is
between 41°F and 104°F (5°C and 40°C) only.
MAINTENANCE/CARE

8
FACTORY RESET
If your earphones are no longer paired to each other, please use the following
steps to perform a factory reset:
1. Remove the Left earphone from the case (Leave the Right earphone in the
case).
2. Quickly press VOL+ on the Left earphone 6 times, and hold on the 6th press
until you hear the voice prompt announce "factory reset" on the Left
earphone.
3. Remove the Right earphone from the case.
4. Quickly press the Multi-Function button on the Right earphone 6 times, and
hold on the 6th press until you hear the voice prompt announce "factory
reset" on the Right earphone.
5. Put both earphones next to each other. The earphones are paired to each
other when the LEDs stop flashing and start "breathing" as they usually
would when pairing to a Bluetooth device.
PLAY/PAUSE NOT WORKING WHEN PLACING IN AND REMOVING FROM EAR
• Over time the proximity sensor that helps regulate pause/play functions may
become dirty and affect performance. If this happens, take a damp Q-tip or
damp cloth and lightly rub the sensor.
BATTERY LEVEL INDICATORS ON CHARGING CASE ARE NOT LIGHTING UP
• Make sure your case is charged. To charge the case, plug one end of the
USB-C cable into the back of the case and plug the other end into a power
source. If you do not have a USB-C power source you can use our supplied
USB-C to USB-A adapter to use a USB-A power source.
• Make sure the earphones are properly placed inside the charging case.
“L” represents placement for the left earphone and “R” for the right earphone.
• Make sure the charging pads on the earphones and charging pins in the case
are clean. Use a damp Q-tip or damp cloth to lightly rub the charging pads
and pins.
NOTE: If the earphones still have battery life, but the charging case battery is
depleted when earphones are placed inside the case and the lid is closed, the
indicator lights will not light up to show your battery level status.

9
Our ability to hear is amazing. Treat your ears like the precious tools they are,
and they will continue to provide you with exceptional data, as well as a lifetime
of incredible sonic experiences.
In general, do not listen “too loud or for too long,” and be attentive to your own
ears. Ringing, discomfort, or sensitivity to high frequencies and treble may be
a signal from your ears that you are pushing them to their limits and causing
irreparable damage.
As a general practice, find what seems to be your preferred listening level and
then adjust the volume down another 10% or more.
Surprisingly, your ears will attune to a slightly lower volume over time, and
what seems quiet at first can be perfect for longer listening periods.
EAR HEALTH
M&D CONNECT APP DOES NOT WORK WITH MY DEVICE
• Make sure your mobile device is compatible with the M&D Connect minimum
system requirements. For more information, visit the app store on your
mobile device. If your mobile device meets the minimum requirements,
uninstall and reinstall the M&D Connect app on your mobile device.
APP DOES NOT CONNECT WITH MY EARPHONES
• Connect to your earphones in the Bluetooth menu before opening the app for
setup.

10
NIHL is a preventable condition caused by both one-time and extended
exposure to excessive decibel (dB) levels. This harm to sensitive inner ear
structures is irreversible and people of all ages can be affected. Damage can
happen in a single event or gradually over time. One-time exposure to an
intense "impulse" sound, such as an explosion, or by continued exposure to
loud sounds over 85 decibels can cause harm. Indicators of NIHL include
hearing loss and tinnitus, a condition of sensing constant ringing, buzzing or
roaring. The NIDCD (National Institute on Deafness and Other Communication
Disorders) offers this simple rule of thumb: avoid sound exposure that is “too
loud, too close or too long.” Here are some general references to sound levels
that occur in everyday life: refrigerator humming (45 dB); normal conversation
(60 dB); city traffic (85 dB); motorcycles (95 dB); an MP3 player at full volume
(105 dB); sirens (120 dB); firecrackers (150 dB).
NIHL WARRANTY
Master & Dynamic guarantees this product against defects in materials or
workmanship for a period of one year from the date of original purchase on
our website or from an authorized Master & Dynamic retailer or reseller.
Batteries are also guaranteed for proper functioning for a period of one year
from the date of original purchase. Defective batteries are covered by
Master & Dynamic’s Limited Warranty but battery wear from normal use is
not covered.
If returned within the warranty period, Master & Dynamic will at its discretion
either repair the defective product or replace it with a repaired or refurbished
product of identical specifications as the returned product. This limited
warranty is in lieu of all other warranties, expressed or implied, including, but
not limited to, any implied warranty of merchantability or fitness for a
particular purpose.
Master & Dynamic shall have no liability of any kind for any direct, indirect,
incidental or consequential damages or expenses that arise from the use of
this product, including use-related damage to the product’s exterior.

11
Master & Dynamic’s Limited Warranty does not cover normal wear and tear to
items such as blown drivers, battery degradation from normal use, cut cords,
bent jacks, damage to the product’s exterior, loss or theft. Replaceable parts
subject to wear and tear such as ear tips, ear pads, and cables will be
replaced only in case of malfunctioning due to material or manufacturing
defects, and only once during the warranty period of your product.
The serial number and proof of purchase are required in order to enact the
warranty for products purchased on our website or from an authorized
retailer or reseller. This policy is also applicable to products received as a gift.
If we need to replace your product due to a battery defect, your product will
be new or equivalent to new in performance and reliability. You will void your
warranty if you disassemble your product or expose them to excessive
moisture. If you believe your product is defective within the warranty period,
please contact us at [email protected].
Please include your product’s serial number, proof of purchase, telephone
number, and full return shipping address in your message to us. Conditional
to serial number, proof of purchase, and warranty validity, you will be issued
a return authorization and instructions for return shipment. Please note
that the dispatch of a replacement product will take place after our receipt
of the defective product. For questions regarding your product’s warranty,
please contact Master & Dynamic Support at [email protected].

12
• This equipment complies with FCC/ISED radiation exposure limits set forth
for an uncontrolled environment. End user must follow the specific operating
instructions for satisfying RF exposure compliance. This transmitter must
not be co-located or operating in conjunction with any other antenna or
transmitter.
• The portable device is designed to meet the requirements for exposure to
radio waves established by the ISED. These requirements set a SAR limit of
1.6 W/kg averaged over one gram of tissue. The highest SAR value reported
under this standard during product certification for use when properly worn
on the body.
RF EXPOSURE COMPLIANCE

MANUEL DE L'UTILISATEUR — MW08
ANNULATION ACTIVE DU BRUIT
VRAIS ECOUTEURS SANS FIL
Master & Dynamic est une société d'audio haut de gamme située à New York qui
se passionne pour la construction d'outils sonores techniquement sophisti-
qués. Conçus pour être modernes et pourtant éternels, nos produits utilisent
uniquementles meilleurs matériaux et sont conçus pour la durabilité; créant
l’équilibre parfait entre l’esthétique, la solidité, le confort et la qualité sonore
exceptionnelle.
LE SON N’EST JAMAIS LE MÊME

BOUTON MULTIFONCTION
1X: PAUSE/LECTURE
2X: PISTE SUIVANTE
3X: PISTE PRÉCÉDENTE
MISE EN ATTENTE: BOUTON MULTIFONCTION POUR ACTIVER ASSISTANT VOCAL
APPUYER: BOUTON MULTIFONCTION POUR RÉPONDRE AUX APPELS ENTRANTS
(OU ACCEPTER L’APPEL DEPUIS VOTRE APPAREIL)
VOL +
MAINTENIR VOL+ ENFONCÉ POUR MODE «ÉCOUTE AMBIANTE» ON/OFF
(VOIR PAGE 6 POUR PLUS D’INFORMATIONS SUR L’ÉCOUTE AMBIANTE)
VOL -
MAINTENIR VOL- ENFONCÉ POUR «ANNULATION ACTIVE DU BRUIT» (ANC) ON/OFF
(VOIR PAGE 6 POUR PLUS D’INFORMATIONS SUR ANC)
BOUTON
MULTIFONCTION
CAPTEURS DE
PROXIMITÉ
VOL- VOL+
14
CONTRÔLES

AJUSTEMENT
OPTIONS D’EMBOUT AURICULAIRE
TP P
GTG
M
Vos écouteurs sont livrés avec des embouts auriculaires moyens.
Choisissez les embouts auriculaires qui forment un joint avec votre conduit au-
ditif. Nos embouts auriculaires ronds sur mesure sont conçus en conjonction
avec la forme ovale de la buse pour offrir un ajustement universel supérieur.
Si vous avez de la difficulté à fixer l’embout auriculaire, essayez de presser
l’embout pour qu’il corresponde à l’orientation de la buse, puis appuyez sur
l’embout contre la buse pour le fixer.
Pour insérer vos écouteurs, procédez comme suit:
ÉTAPE 1: Inclinez l’écouteur vers
l'avant afin que l'embout auriculaire
repose sur le canal auditif.
ÉTAPE 2: Faire tourner l’écouteur vers
le bas jusqu’à ce que l’embout auricu-
laire forme un joint étanche avec
votre canal auditif.
15

CHARGEMENT
PILE POUR ÉCOUTEUR
NIVEAU DE PILE
INDICATEURS
Élevé
Médium
Faible
PILE DU BOÎTIER
Les écouteurs se rechargent à 50% en 15 min, 100% en 45 minutes. Le
boîtier se recharge à 50% en 15 minutes, 100% en 60 minutes.
Vos écouteurs maintiennent jusqu’à 10 heures de charge. Le boîtier de
recharge peut prendre en charge 30heures de charge supplémentaires pour
vos écouteurs. Nous vous suggérons de placer vos écouteurs à l'intérieur du
boîtier lorsqu'ils ne sont pas utilisés. Cela leur permettra d'avoir la charge
maximale chaque fois que vous commencez à les utiliser.
Vos écouteurs arriveront avec la pile partiellement chargée. L’état de la pile
s’affiche lors de l’ouverture/fermeture du couvercle. Un voyant vert indique
que la pile se situe entre 70 et 100%, la couleur ambre indique 30-69%, et
rouge indique 1-29%. Si la pile centrale clignote en rouge ou ne s'affiche pas,
la pile du boîtier est épuisée.
Pour charger votre boitier, branchez le câble USB-C sur le côté droit du boitier
et branchez l'autre extrémité dans une source d'alimentation. Si vous n'avez
pas de source d'alimentation USB-C, vous pouvez utiliser notre adaptateur
USB-C à USB-A fourni pour utiliser une source d'alimentation USB-A.
L'état de la pile du boîtier et des écouteurs restera visible pendant que le
boîtier se charge.
16

JUMELAGE APPLICATION MOBILE
BOUTON MULTIFONCTION
À L’INDICATEUR LUMI-
NEUX CLIGNOTANT
La première fois que vous sortez les deux écouteurs de leur boitier, ils entre-
ront en mode jumelage.
ÉTAPE 1: Ouvrez le menu Bluetooth sur votre appareil.
ÉTAPE 2: Sélectionnez M&D MW08.
ÉTAPE 3: (FACULTATIF) Téléchargez et ouvrez l’application M&D Connect.
Pour activer manuellement le mode de jumelage, maintenez le bouton multifonc-
tion enfoncé jusqu’à ce que le voyant commence à clignoter/signal de jumelage
se fasse entendre.
REMARQUE: Si vous êtes déjà connecté à un appareil, retirez les écouteurs de
vos oreilles pour éviter d'activer votre assistant vocal.
Vos écouteurs peuvent se connecter à un seul appareil Bluetooth à la fois.
Téléchargez l’application M&D Connect pour l’expérience Master & Dynamic
complète.
MW08 doit être connecté à votre téléphone dans les paramètres du menu Blue-
tooth avant d’utiliser l’application M&D Connect.
UTILISEZ L’APPLICATION M&D CONNECT
POUR ACCÉDER
Mises à jour du micrologiciel
Paramètres de personnalisation
Guides de démarrage rapide
Assistance produit
•
•
•
•
17

MODES DE VOLUME «WORLD»
Les trois microphones de chaque écouteur offrent la liberté d'écouter ou de
parler avec un seul écouteur.
Vos écouteurs peuvent se connecter à un seul appareil Bluetooth à la fois.
Le MW08 dispose de deux modes «World»par défaut pour contrôler le volume
du monde autour de vous:
Téléchargez et installez l’application M&D Connect pour accéder aux modes sup-
plémentaires ANC et Écoute ambiante et aussi sélectionner vos paramètres par
défaut de volume «World».
APPUYEZ SUR VOL- POUR ACTIVER/*DÉSACTIVER ANC
MAINTENIR VOL+ ENFONCÉ POUR MODE «ÉCOUTE
AMBIANTE» ON/OFF
1. Annulation active du bruit (ANC) hybride pour un son clair et expansif dans
n'importe quel environnement.
2. Mode d'écoute ambiante pour une meilleure prise de conscience de votre
environnement.
•
•
COUSSINET BREVETÉ
CONTRÔLANT LE VENT
MIC #1
VOL- VOL+
MIC #2
MIC #3
ANTENNE
18

ENTRETIEN/SOINS DÉPANNAGE
DIFFICULTÉ À JUMELER LES ÉCOUTEURS ET L'APPAREIL
• Assurez-vous que les deux écouteurs ne sont pas placés dans l’étui de char-
gement lorsque vous tentez de jumeler votre appareil. Réinitialisez l’alimenta-
tion en plaçant les écouteurs dans l’étui de chargement et en fermant complè-
tement le couvercle pendant 10 secondes. Ensuite, retirez les écouteurs de
l'étui pour vérifier s'ils entrent en mode de jumelage. Le voyant de l'indicateur
clignotera lentement sur l'écouteur droit.
• DÉSACTIVEZ la fonction Bluetooth, puis L’ACTIVER de nouveau sur l’appareil
source. DÉSACTIVEZ la fonctionnalité Bluetooth sur tout autre appareil jumelé
aux écouteurs.
• Supprimez toute connexion d’écouteurs «M&D MW08» de votre appareil,
puis mettez
vos écouteurs en mode de jumelage, puis les jumeler de nouveau.
• Assurez-vous que «M&D MW08» est sélectionné dans la liste des appareils
Bluetooth.
PAS DE SON OU QUALITÉ AUDIO MÉDIOCRE D'UN APPAREIL BLUETOOTH CONNECTÉ
• Rapprochez l'appareil des écouteurs, car des objets physiques entre les
écouteurs et la source peuvent obstruer le signal.
• Essayez une autre application musicale ou essayez une autre piste.
• Essayez un autre appareil audio.
Au fil du temps, le capteur de proximité qui aide à réguler les fonctions de
pause/lecture peut devenir sale et affecter les performances. Si cela se
produit, prenez un Q-tip humide ou un chiffon humide et frottez légèrement le
capteur.
Pour nettoyer l'écouteur en céramique, vous pouvez utiliser un chiffon en
microfibre. Ne pas utiliser d'alcool ou d'autres substances nettoyantes sur
le produit. Faites attention de ne pas faire tomber les écouteurs, s’assoir
dessus, les exposer à l’eau, à l’humidité ou à des températures extrêmes. Vos
écouteurs sont homologués IPX5 - résistance à l'eau. Votre boitier de charge
est homologué IPX4.
Il est recommandé de remettre vos écouteurs dans leur boitier de rangement
lorsqu’ils ne sont pas utilisés. Pour éviter les dommages, ne stockez pas
d’autres articles avec vos écouteurs dans l’étui en toile.
PLAGE DE TEMPÉRATURE
Utilisez et rangez ce produit dans la plage de température de-4°F à 113°F
(-20°C à 45°C) seulement. Charger la pile lorsque la température est comprise
entre 41°F et 104°F (5°C et 40°C) seulement.
19

RÉINITIALISATION DES PARAMÈTRES D’USINE
Si vos écouteurs ne sont plus jumelés, veuillez utiliser ce qui suit
pour effectuer une réinitialisation des paramètres d’usine:
1. Retirez l’écouteur gauche du boîtier (laissez l’écouteur droit dans le
boîtier).
2. Appuyez rapidement sur VOL+ sur l’écouteur gauche 6 fois, et maintenez
enfoncé la sixième fois jusqu’à ce que vous entendiez l’invite vocale annonçant la
«réinitialisation des paramètres d’usine» sur l’écouteur gauche.
3. Retirez l’écouteur droit de l’étui.
4. Appuyez rapidement sur le bouton multifonction sur l’écouteur droit 6 fois, et
maintenez enfoncé la sixième fois jusqu’à ce que vous entendiez l’invite vocale
annonçant la «réinitialisation des paramètres d’usine» sur l’écouteur droit.
5. Placez les deux écouteurs l’un à côté de l’autre. Les écouteurs sont jumelés
l’un à l’autre lorsque les DEL cessent de clignoter et commencent à «respirer»
comme elles le font habituellement si vous les jumelez avec un appareil Bluetooth.
LES INDICATEURS DU NIVEAU DE CHARGE DE LA PILE SUR L’ÉTUI DE RECHARGE NE
S'ALLUMENT PAS
• Assurez-vous que votre étui est chargé. Pour charger votre étui, branchez le
câble USB-C à l'arrière de votre étui et branchez l'autre extrémité dans une source
d'alimentation. Si vous n'avez pas de source d'alimentation USB-C, vous pouvez utili-
ser notre adaptateur USB-C à USB-A pour utiliser une source d'alimentation USB-A.
• Assurez-vous que les écouteurs sont correctement placés à l'intérieur de l’étui
de chargement. «L» représente le placement de l'écouteur gauche et «R» repré-
sente le placement de l’écouteur droit.
• Assurez-vous que les coussinets de charge sur les écouteurs et les broches de
charge dans l’étui sont propres. Utilisez un Q-tip humide ou un chiffon humide pour
frotter légèrement les coussinets de charge et les broches.
REMARQUE: Si les écouteurs sont encore en état de marche, mais que l’étui de
recharge n’a plus de charge lorsque des écouteurs sont placés dans l’étui et que
le couvercle est fermé, les voyants ne s'allumeront pas pour indiquer le niveau de
charge de la pile.
LECTURE/PAUSE NE FONCTIONNE PAS LORSQUE L’ÉCOUTEUR EST PLACÉ ET
RETIRÉ DE L'OREILLE
• Au fil du temps, le capteur de proximité qui aide à réguler les fonctions de pause/
lecture peut devenir sale et affecter les performances. Si cela se produit, prenez un
Q-tip humide ou un chiffon humide et frottez légèrement le capteur.
20
La pagina si sta caricando...
La pagina si sta caricando...
La pagina si sta caricando...
La pagina si sta caricando...
La pagina si sta caricando...
La pagina si sta caricando...
La pagina si sta caricando...
La pagina si sta caricando...
La pagina si sta caricando...
La pagina si sta caricando...
La pagina si sta caricando...
La pagina si sta caricando...
La pagina si sta caricando...
La pagina si sta caricando...
La pagina si sta caricando...
La pagina si sta caricando...
La pagina si sta caricando...
La pagina si sta caricando...
La pagina si sta caricando...
La pagina si sta caricando...
La pagina si sta caricando...
La pagina si sta caricando...
La pagina si sta caricando...
La pagina si sta caricando...
La pagina si sta caricando...
La pagina si sta caricando...
La pagina si sta caricando...
La pagina si sta caricando...
La pagina si sta caricando...
La pagina si sta caricando...
La pagina si sta caricando...
La pagina si sta caricando...
La pagina si sta caricando...
La pagina si sta caricando...
La pagina si sta caricando...
La pagina si sta caricando...
La pagina si sta caricando...
La pagina si sta caricando...
La pagina si sta caricando...
La pagina si sta caricando...
La pagina si sta caricando...
La pagina si sta caricando...
La pagina si sta caricando...
La pagina si sta caricando...
La pagina si sta caricando...
La pagina si sta caricando...
La pagina si sta caricando...
La pagina si sta caricando...
La pagina si sta caricando...
La pagina si sta caricando...
La pagina si sta caricando...
La pagina si sta caricando...
La pagina si sta caricando...
La pagina si sta caricando...
La pagina si sta caricando...
La pagina si sta caricando...
La pagina si sta caricando...
La pagina si sta caricando...
La pagina si sta caricando...
La pagina si sta caricando...
La pagina si sta caricando...
La pagina si sta caricando...
La pagina si sta caricando...
La pagina si sta caricando...
La pagina si sta caricando...
La pagina si sta caricando...
La pagina si sta caricando...
La pagina si sta caricando...
La pagina si sta caricando...
La pagina si sta caricando...
La pagina si sta caricando...
La pagina si sta caricando...
La pagina si sta caricando...
La pagina si sta caricando...
La pagina si sta caricando...
La pagina si sta caricando...
La pagina si sta caricando...
La pagina si sta caricando...
La pagina si sta caricando...
La pagina si sta caricando...
La pagina si sta caricando...
La pagina si sta caricando...
La pagina si sta caricando...
La pagina si sta caricando...
La pagina si sta caricando...
La pagina si sta caricando...
La pagina si sta caricando...
La pagina si sta caricando...
La pagina si sta caricando...
La pagina si sta caricando...
La pagina si sta caricando...
La pagina si sta caricando...
La pagina si sta caricando...
La pagina si sta caricando...
La pagina si sta caricando...
La pagina si sta caricando...
La pagina si sta caricando...
La pagina si sta caricando...
La pagina si sta caricando...
La pagina si sta caricando...
La pagina si sta caricando...
La pagina si sta caricando...
La pagina si sta caricando...
La pagina si sta caricando...
La pagina si sta caricando...
La pagina si sta caricando...
La pagina si sta caricando...
La pagina si sta caricando...
La pagina si sta caricando...
La pagina si sta caricando...
La pagina si sta caricando...
La pagina si sta caricando...
La pagina si sta caricando...
La pagina si sta caricando...
La pagina si sta caricando...
La pagina si sta caricando...
La pagina si sta caricando...
La pagina si sta caricando...
La pagina si sta caricando...
La pagina si sta caricando...
La pagina si sta caricando...
La pagina si sta caricando...
La pagina si sta caricando...
La pagina si sta caricando...
La pagina si sta caricando...
La pagina si sta caricando...
La pagina si sta caricando...
La pagina si sta caricando...
La pagina si sta caricando...
La pagina si sta caricando...
La pagina si sta caricando...
La pagina si sta caricando...
La pagina si sta caricando...
La pagina si sta caricando...
La pagina si sta caricando...
La pagina si sta caricando...
La pagina si sta caricando...
La pagina si sta caricando...
La pagina si sta caricando...
La pagina si sta caricando...
La pagina si sta caricando...
La pagina si sta caricando...
La pagina si sta caricando...
La pagina si sta caricando...
La pagina si sta caricando...
La pagina si sta caricando...
La pagina si sta caricando...
La pagina si sta caricando...
La pagina si sta caricando...
La pagina si sta caricando...
La pagina si sta caricando...
La pagina si sta caricando...
La pagina si sta caricando...
La pagina si sta caricando...
La pagina si sta caricando...
La pagina si sta caricando...
La pagina si sta caricando...
La pagina si sta caricando...
La pagina si sta caricando...
La pagina si sta caricando...
La pagina si sta caricando...
La pagina si sta caricando...
La pagina si sta caricando...
La pagina si sta caricando...
La pagina si sta caricando...
La pagina si sta caricando...
La pagina si sta caricando...
La pagina si sta caricando...
La pagina si sta caricando...
La pagina si sta caricando...
La pagina si sta caricando...
La pagina si sta caricando...
La pagina si sta caricando...
La pagina si sta caricando...
La pagina si sta caricando...
La pagina si sta caricando...
La pagina si sta caricando...
La pagina si sta caricando...
La pagina si sta caricando...
La pagina si sta caricando...
La pagina si sta caricando...
La pagina si sta caricando...
La pagina si sta caricando...
La pagina si sta caricando...
La pagina si sta caricando...
La pagina si sta caricando...
La pagina si sta caricando...
La pagina si sta caricando...
La pagina si sta caricando...
La pagina si sta caricando...
La pagina si sta caricando...
La pagina si sta caricando...
La pagina si sta caricando...
La pagina si sta caricando...
-
 1
1
-
 2
2
-
 3
3
-
 4
4
-
 5
5
-
 6
6
-
 7
7
-
 8
8
-
 9
9
-
 10
10
-
 11
11
-
 12
12
-
 13
13
-
 14
14
-
 15
15
-
 16
16
-
 17
17
-
 18
18
-
 19
19
-
 20
20
-
 21
21
-
 22
22
-
 23
23
-
 24
24
-
 25
25
-
 26
26
-
 27
27
-
 28
28
-
 29
29
-
 30
30
-
 31
31
-
 32
32
-
 33
33
-
 34
34
-
 35
35
-
 36
36
-
 37
37
-
 38
38
-
 39
39
-
 40
40
-
 41
41
-
 42
42
-
 43
43
-
 44
44
-
 45
45
-
 46
46
-
 47
47
-
 48
48
-
 49
49
-
 50
50
-
 51
51
-
 52
52
-
 53
53
-
 54
54
-
 55
55
-
 56
56
-
 57
57
-
 58
58
-
 59
59
-
 60
60
-
 61
61
-
 62
62
-
 63
63
-
 64
64
-
 65
65
-
 66
66
-
 67
67
-
 68
68
-
 69
69
-
 70
70
-
 71
71
-
 72
72
-
 73
73
-
 74
74
-
 75
75
-
 76
76
-
 77
77
-
 78
78
-
 79
79
-
 80
80
-
 81
81
-
 82
82
-
 83
83
-
 84
84
-
 85
85
-
 86
86
-
 87
87
-
 88
88
-
 89
89
-
 90
90
-
 91
91
-
 92
92
-
 93
93
-
 94
94
-
 95
95
-
 96
96
-
 97
97
-
 98
98
-
 99
99
-
 100
100
-
 101
101
-
 102
102
-
 103
103
-
 104
104
-
 105
105
-
 106
106
-
 107
107
-
 108
108
-
 109
109
-
 110
110
-
 111
111
-
 112
112
-
 113
113
-
 114
114
-
 115
115
-
 116
116
-
 117
117
-
 118
118
-
 119
119
-
 120
120
-
 121
121
-
 122
122
-
 123
123
-
 124
124
-
 125
125
-
 126
126
-
 127
127
-
 128
128
-
 129
129
-
 130
130
-
 131
131
-
 132
132
-
 133
133
-
 134
134
-
 135
135
-
 136
136
-
 137
137
-
 138
138
-
 139
139
-
 140
140
-
 141
141
-
 142
142
-
 143
143
-
 144
144
-
 145
145
-
 146
146
-
 147
147
-
 148
148
-
 149
149
-
 150
150
-
 151
151
-
 152
152
-
 153
153
-
 154
154
-
 155
155
-
 156
156
-
 157
157
-
 158
158
-
 159
159
-
 160
160
-
 161
161
-
 162
162
-
 163
163
-
 164
164
-
 165
165
-
 166
166
-
 167
167
-
 168
168
-
 169
169
-
 170
170
-
 171
171
-
 172
172
-
 173
173
-
 174
174
-
 175
175
-
 176
176
-
 177
177
-
 178
178
-
 179
179
-
 180
180
-
 181
181
-
 182
182
-
 183
183
-
 184
184
-
 185
185
-
 186
186
-
 187
187
-
 188
188
-
 189
189
-
 190
190
-
 191
191
-
 192
192
-
 193
193
-
 194
194
-
 195
195
-
 196
196
-
 197
197
-
 198
198
-
 199
199
-
 200
200
-
 201
201
-
 202
202
-
 203
203
-
 204
204
-
 205
205
-
 206
206
-
 207
207
-
 208
208
-
 209
209
-
 210
210
-
 211
211
-
 212
212
-
 213
213
-
 214
214


in altre lingue
- français: Master Dynamic MW08 Manuel utilisateur
- português: Master Dynamic MW08 Manual do usuário
- 日本語: Master Dynamic MW08 ユーザーマニュアル
Documenti correlati

Altri documenti
-
 Master and Daynamic True Wireless Earphones MW07 Manuale utente
-
 Spark BXTW04G Wireless Earbuds Manuale utente
-
ACME BH420 Manuale utente
-
Bowers Wilkins PI5 Wireless Headphones Guida utente
-
Pioneer SE-C8TW Manuale utente
-
Mpow BH464A Manuale utente
-
Bang & Olufsen 1646100 Guida utente
-
-
Livoo TES256 Manuale utente
-
JAYS T6TW01 Manuale utente

