
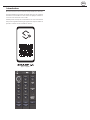
CP-LS200
User manual
EN ITES PLDE NLFR RU

2
1
2
7
11
13
9
8
3
4
5
6
10
12
14
16
15
17
18
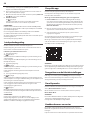
EN: Battery Pack only
DE: Nur Akkusatz
ES: Batería solo
FR: Pack de batterie uniquement
IT: Solo pacco batteria
NL: Alleen batterijset
PL: Tylko bateria
RU: Только аккумуляторный
блок
A
B C

EN
F
D
G
E

4
J
H I
LR

EN
K
M
L

6
Trademarks
The term "SumoBox" and the SumoBox logo device are registered
trademarks of Sharp Consumer Electronics Poland sp. z o.o.
"SAM® by Devialet” is a registered trademark of DEVIALET SA. All IP rights
reserved.
The Bluetooth® word mark and logos are registered trademarks owned by
Bluetooth SIG,. Inc.

EN
Important safety instructions
Please follow all safety instructions and heed all warnings.
Keep this manual for future reference.
This symbol instructs the user to consult the user manual
for further safety, operation, and maintenance related
information.
This symbol indicates presence of uninsulated “dangerous
voltage” within the product and may be of sucient
magnitude as to constitute a risk of electric shock to persons.
Refers to alternating current (AC)
This symbol indicates that the rated voltage marked with the
symbol is AC voltage.
Refers to class II equipment.
This symbol indicates that this product has a double
insulation system and does not require a safety connection to
electrical earth (ground).
Precautions
Damage
• Please inspect the unit for damage after unpacking. If it is damaged in
any way do not operate the unit and consult your dealer.
Power connection and accessibility
• Do not handle the power cord with wet hands as it may cause an
electric shock. If the power plug does not t into your outlet, do not
force the plug into an electrical socket. Switch o the unit completely
before unplugging. Disconnect the power cord if it is not used for a
long time. Ensure that the power plug is always easily accessible. Do
not attach extension cables.
Power source
• Ensure that the unit is plugged into an AC 220-240V 50/60Hz power
outlet. Using higher voltage may cause the unit to malfunction or even
catch re.
Fused moulded power plug (non rewireable) - UK, Malta, Cyprus and
Ireland only.
• The power lead on this equipment is supplied with a moulded plug
incorporating a 3 Amp fuse. The value of the fuse is indicated on the
pin face of the plug and if it requires replacing, a fuse approved to
BS1362 of the same rating must be used.
Power cord protection
• Do not damage the power cord, do not place any heavy objects on it,
do not stretch it or bend it. Damage to the power cord can result in re
or electric shock. If the power cord is damaged, it must be replaced.
The power cord is not xed and so can simply be replaced when
damaged.
Child safety
• Always follow basic safety precautions when using this product,
especially when children are present. Children should be supervised to
ensure that they do not play with the product.
Location
• When in use this product should be placed on a at, stable surface
with no part of the main unit overhanging an edge.
Insertion hazards
• Never let anyone push anything into holes, slots or any other openings
in the product’s casing as this could result in an electric shock.
Heat and operating temperature
• Do not place near any heat sources such as radiators, heat registers,
stoves, or other apparatus (including ampliers) that produce heat.
Avoid prolonged exposure to direct sunlight.
Naked ames
• To prevent the risk of re, keep candles or open ames away from this
product.
Storms and lightning
• Storms are dangerous for all electric products. If the power is struck
by lightning, the product might get damaged, even if it is turned o.
You should disconnect all the cables and connectors of the product
before a storm.
Maintenance
• Unplug the power cable from the power source before cleaning the
product. Use a soft and clean cloth to clean the outside of the unit.
Never clean it with chemicals or detergent.
Service and repair
CAUTION
RISK OF ELECTRIC SHOCK
DO NOT OPEN
• This product does not contain any parts that are serviceable by the
user. Exposing the internal parts inside the device may endanger your
life. In case of a fault, contact the manufacturer or authorised service
department. The manufacturers guarantee does not extend to faults
caused by repairs carried out by unauthorised third parties.
Caution:
Prevention of hearing loss and damage
• SumoBox Pro CP-LS200 is capable of generating excessive sound
pressure levels (SPL) sucient to cause permanent hearing loss or
damage. Caution should be taken to avoid prolonged exposure to
excessive (>85dB) SPL.
Warning: Special instructions for
handling the Lithium-ion battery pack
Follow instructions carefully. This will reduce the risk of explosion,
electric shock and possibly serious injury or death.
• Only use approved Sharp power adapter to charge battery pack.
Use a power source with the voltage specied on the nameplate of the
charger.
The charger and battery pack are specically designed to work together.
• Do not operate the charger with a damaged cord or plug.
• Do not place the battery pack near re or heat.
Exposure to re or temperature above 60°C may cause the battery pack
to explode.
• Do not charge the battery pack in a damp or wet location.
• Do not charge in the presence of ammable liquids or gases.
• Ensure the battery pack is never immersed into water.
• Do not charge in an area of extreme heat (above 40°C) or cold (below
10°C).
It will work best at normal room temperature.
• Do not crush, drop or damage the battery pack.
• Do not use a battery pack or charger that has been dropped or
received a sharp blow.
Damage to the battery pack may cause the battery pack to explode.
Properly dispose of the battery pack immediately by following instructions
on how to dispose of battery pack or contact service centre for advice.
CAUTION
RISK OF ELECTRIC SHOCK
DO NOT OPEN
CAUTION
RISK OF ELECTRIC SHOCK
DO NOT OPEN

8
• Do not open, modify or attempt to repair a battery pack.
• The battery may give o fumes if it becomes damaged or is used
incorrectly.
Ensure the area is well ventilated and seek medical attention should you
experience any adverse eects.
• The battery may leak liquid if it becomes damaged or is used
incorrectly.
If you come into contact with any liquid from the battery accidentally,
rinse o immediately with mild soap and water. If the liquid comes into
contact with your eyes, rinse with water and seek medical attention.
• Keep battery pack away from small metal objects to avoid shortening
battery terminals.
Disposal of equipment and batteries
Information for users on collection and disposal of old equipment and
used batteries:
This product does not contain any parts that are serviceable by the
user. The batteries should be removed by an authorized Sharp service
centre. Not doing so will invalidate any guarantees and warranties on
your device. Dispose of batteries according to local regulations. Do not
dispose as household waste or in a re as they may explode.
This symbol means that the product contains batteries
covered by European Directive 2013/56/EU which cannot
be disposed of with normal household waste. Cd, Hg and
Pb underneath the wheelie bin symbol shows whether
the battery contains, cadmium (Cd), mercury (Hg) or
lead (Pb).
This symbol on a product means that the product is
covered by European Directive 2012/19/EU and must not
be disposed of or dumped with your other household
waste.
These symbols on the products, packaging, and/or accompanying
documents mean that used electrical and electronic products and
batteries should not be mixed with general household waste. Household
users should contact either the retailer where they purchased this
product, or their local government oce, for details of where and how
they can take these items for environmentally safe recycling.
CE and UKCA statement
• Hereby, Sharp Consumer Electronics Poland sp. z o.o. declares that
this audio device is in compliance with the essential requirements and
other relevant provisions of RED Directive 2014/53/EU and UK Radio
Equipment Regulations 2017.
• The full CE text and UKCA declaration of conformity are available at
sharpconsumer.eu, enter the download section of your model and
choose “Declaration of Conformity“.

EN
Introduction
Thank you for purchasing the Sharp SumoBox Pro CP-LS200.
This instruction manual provides details on how to safely setup and
operate your SumoBox and explains how to connect to a variety of audio
sources.
Please take the time to familiarise yourself with the features.
You can also download the dedicated Sharp Life App and take control of
your SumoBox remotely.
app support

10
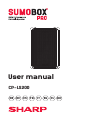
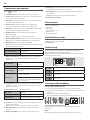
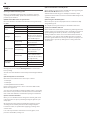
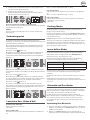
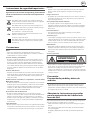
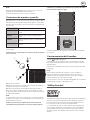
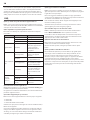
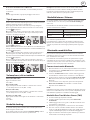
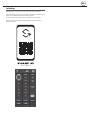
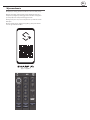
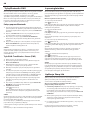
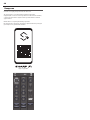
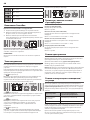
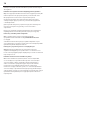
Connections and controls
(Refer to A on page 2).
1. Volume Control: Adjust the volume of the connected input.
2. Treble Control: Adjust the high tones of the connected instrument
or microphone (CH1 and CH2 only).
3. Bass Control: Adjust the low tones of the connected instrument or
microphone (CH1 and CH2 only).
4. Reverb Control: Adjust how much reverb is applied to the
connected instrument or microphone (CH1 and CH2 only).
5. Input Type: Use the switch to select the input type for CH1 and CH2.
The LED indicates the selected device type.
6. XLR/TRS Combi: Connect instruments, guitars (TRS) and
Microphones (XLR)
Note: The XLR input does not output Phantom power.
7. USB Out (DC 5V 1000mA): Allows mobile devices to be charged.
Note: This is not intended for USB ash disks to play audio les.
8. Ducking Control: Turns ducking feature ON/OFF.
When ON, CH3 audio will be suppressed by CH1 and CH2 audio. Also
controls Indoor/Outdoor mode.
Blue (solid) Ducking on
Blue (fast ashes x4) Indoor mode
Blue (slow ashes x2) Outdoor mode
9. Bluetooth / Duo Mode: Turns ON/OFF Bluetooth and Duo Mode
functions. See section "Bluetooth and Duo Mode" for more
information".
Blue (ashing) SumoBox is ready to pair to a Bluetooth
device.
Blue (solid) SumoBox is connected to a Bluetooth device.
Yellow (ashing) SumoBox is looking for another SumoBox
to pair with.
Yellow (solid)
SumoBox is paired to another SumoBox and
is the secondary unit.
When connected, the Bluetooth LED on
the primary unit will ash until a Bluetooth
device is connected.
10. 3.5 mm AUX In: Connect an audio device via a 3.5mm cable. When
an AUX device is rst connected it will autoswitch from any active
Bluetooth connection.
11. Power Switch: Turns the SumoBox ON / OFF.
Blue (solid) Power on
Red (solid) Standby
Red (blinking) Low battery (battery powered only)
12. Speaker Link IN / OUT: Connect additional SumoBoxes.
13. Power In: Connect to the mains power via the supplied power lead.
AC 200-240V ~50/60Hz
Note: Ensure you use the correct power cable for your region.
14. USB Charging Port (5V 1000mA): Allows mobile devices to be
charged.
15. Battery Status LED: Press the button to see the battery Status.
16. Battery clip: Secures the battery pack in place. Push the clip to the
right to allow the battery pack to be removed.
17. DC 18V Input: Allows charging of the battery when not installed in
the SumoBox.
Note: External charger sold separately with CP-LSBP1.
18. Connection to SumoBox
Box contents
• CP-LS200 SumoBox Pro
• Power cable
• Battery pack
• Corner protectors (x8)
• Hex driver tool
• User documentation
Optional Accessories:
• Battery Pack & Charger (CP-LSPB1)
Sold separately.
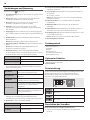
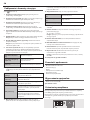
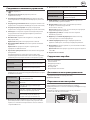
Initial set up
Before rst use, it is recommended to charge the battery pack for a
minimum of four hours (or until fully charged).
Anytime the battery is installed and the SumoBox is connected to mains
power, the battery will charge.
10 % – 25 %
26 % – 50 %
51 % – 75 %
76 % – 100 %
Turning on the SumoBox
If using SumoBox with instruments:
1. Connect any instruments/microphones to the desired channels.
2. Switch any powered instruments on and ensure they are not sending
any signals.
3. Turn on the SumoBox via the power switch.
The power LED will turn solid blue to indicate the speaker is on.
If using SumoBox only with Bluetooth
If only using Bluetooth connections, turn the SumoBox on to start
connecting.
NOTE:
When turning o the SumoBox, perform these steps in the reverse order.

EN
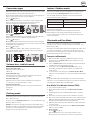
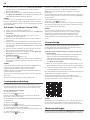
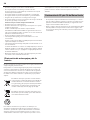
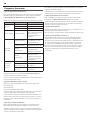
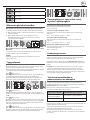
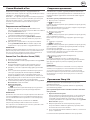
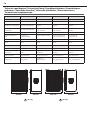
Connection types
With three channels and a variety of input types, you can connect a wide
range of instruments, microphones and other devices.
Above the CH1 and CH2 inputs is an input type selector. This adjusts the
balance of the connection. Here are some examples.
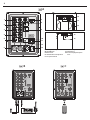
(Refer to B on page 2).
B: Connect keyboards, guitars or microphones to CH1 and CH2. Select
the correct device type on the switch. Use instrument cables for
keyboards and guitars, and XLR cables for microphones.
(Refer to C on page 2).
C: Bluetooth on CH3. Refer to the section "Bluetooth and Duo Mode" for
details on how to connect your Bluetooth enabled device.
(Refer to D on page 3).
D: Aux input (3.5mm) on CH3. Connect analog source devices using the
3.5mm input. Please note that in presence of a device connected via AUX
on CH3, Bluetooth is suppressed.
(Refer to E on page 3).
E: You can connect a mixer to CH1 or CH2 to increase the devices
connected to SumoBox. Use the "keyboard" setting on the input type
selector if you connect a mixer.
Volume, bass, treble & reverb
Volume (CH1, CH2 & CH3)
Adjusts the volume of the channel.
0-Max scale.
Treble (CH1 & CH2 only)
Adjusts the high tone of the connected instrument or microphone.
-/+ scale from 12 o'clock position (Min - 0 - Max).
Bass (CH1 & CH2 only)
Adjusts the low tone of the connected instrument or microphone.
-/+ scale from 12 o'clock position (Min - 0 - Max).
Reverb (CH1 & CH2 only)
Adjusts how much reverb is applied to the connected instrument or
microphone.
0-Max scale.
Ducking mode
The Ducking feature will reduce (duck) CH3's output when input from
CH1 or CH2 is detected.
To turn on, press the Ducking Control button once. The LED will be solid
blue. Press again to turn o.
Example: You may have a backing track playing on CH3 whilst using a
microphone on CH1. The ducking feature means audio playing on CH3
will reduce in volume slightly when you speak into the microphone -
giving your voice more space in the mix.
Indoor / Outdoor mode
There are two sound modes; Indoor and Outdoor. To switch between
modes, double tap the Ducking Control button (2x within 1 sec).
You can identify which mode SumoBox is in by observing the LED
indicator when the mode is changed:
Sound Mode Ducking LED indicator
Indoor (default) Blue - fast ash x4
Outdoor Blue - slow ash x2
Indoor mode is suitable for when SumoBox is used indoors and is
optimised for sound quality.
Outdoor mode is suitable for when SumoBox is used outdoors.
When in Outdoor mode, the high and mid range frequencies are
boosted. This allows those frequencies to be better heard when in an
outdoor environment.
Bluetooth and Duo Mode
You can connect a Bluetooth enabled device to your SumoBox.
SumoBox can also connect to another SumoBox via Duo Mode - True
Wireless Stereo (TWS).
Duo Mode is a powerful feature which allows the Bluetooth audio source
to be sent to 2 SumoBoxes, one operating as the left stereo channel,
the other operating as the right stereo channel. The eect oers a more
powerful and immersive stereo sound stage.
Connect via Bluetooth
1. With the SumoBox on activate your Bluetooth device and select
the search mode. “SUMOBOX PRO CP-LS200” will appear on your
Bluetooth device list.
2. Select “SUMOBOX PRO CP-LS200“. An audio prompt will sound from
SumoBox when it has successfully connected.
3. To disconnect, press the Bluetooth / Duo Mode button once.
Alternatively, disconnect from the SumoBox on your Bluetooth
enabled device.
4. To reconnect the same device, press the Bluetooth / Duo Mode
button once on the SumoBox or connect via your Bluetooth enabled
device.
NOTE:
The speaker will attempt to automatically connect itself to the last audio
output device connected via Bluetooth. If this is not possible, the speaker will
enter pairing mode and the Bluetooth LED will ash.
Duo Mode: True Wireless Stereo (TWS)
1. Turn on both SumoBox speakers.
2. On the rst SumoBox, double press the Bluetooth / Duo Mode
button.
3. The LED will ash yellow and SumoBox will notify it is in pairing
mode.
4. Wait for the connection between the two SumoBox to be made.
5. Once connected, both SumoBox will give an audio conrmation. The
RIGHT (secondary) SumoBox will have a steady yellow LED and The
LEFT (primary) SumoBox will have a ashing blue LED.
6. Adjust the CH3 volume on the rst SumoBox to change CH3 volume
on both speakers.
7. To disconnect Duo Mode, double press the Bluetooth / Duo Mode
button on either SumoBox.
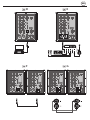
8. Usage example
(Refer to J on page 4).
When in Duo Mode you can connect 4x microphones and a
Bluetooth device. This is ideal for a conference or presentation.

12
NOTES:
When in Duo Mode, only the Bluetooth source CH3 from the LEFT (primary)
SumoBox will be shared. Input from Mic 1 and Mic 2 on both speakers will
remain local to that speaker.
It is not possible to connect to the RIGHT (secondary) SumoBox via Bluetooth
when Duo Mode is active.
If two speakers have already been paired, Duo Mode / TWS will reconnect
automatically when both speakers are powered on.
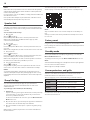
Speaker link
SumoBox can be linked to other SumoBoxes via speaker linking. This is
the optimal way to share audio incoming via CH1 and CH2 with another
SumoBox.
You can do this in various ways:
1. One way link:
(Refer to F on page 3).
Connect one speakers OUT socket to another speakers IN socket.
When in this conguration, the OUT unit will not play any audio
connections from the IN unit.
2. Two way link:
(Refer to G on page 3).
Connect one speakers OUT socket to another speakers IN socket, and
vice-versa.
When in this conguration, the audio on both units is sent to each other.
3. Daisy chain link:
(Refer to H on page 4).
Connect one speakers OUT socket to another speakers IN socket, then
that speakers OUT socket to another speakers IN socket.
When in this conguration, the audio on the rst speaker is sent down
the chain. You can add as many SumoBox as you want.
4. Two way link (small band):
(Refer to I on page 4).
Using the two way link, you have 6x inputs where the audio on both
units is sent to each other. This is ideal for a small band, for example.
NOTES:
You can daisy chain multiple SumoBox as the speaker link function on
SumoBox is an amplied output. Daisy chaining might not work correctly
using similar products from other manufacturers as these links may not be
amplied.
Sharp Life App
You can download the Sharp Life App onto your smart device.
The app allows full control of the SumoBox and also oers some
additional features.
To pair the app to the SumoBox, do the following:
1. Initial set up
If you're connecting to the app for the rst time, but have previously
connected a device to play audio via Bluetooth, you will need to
disconnect your Bluetooth device.
To disconnect the Bluetooth connection, press the Bluetooth / Duo
Mode button once.
2. On your smart device, open the Sharp Life app. Click on “Add Device”.
Your device will scan automatically for the SumoBox.
3. Once the SumoBox is found, tap the + symbol to begin the pairing
process.
When pairing is complete, tap the device icon and the SumoBox user
interface will load.
To download the app, use this QR code to go automatically to the
download page or visit: https://www.sharpconsumer.com/sharp-life-app
NOTE:
Only one SumoBox can be connected to the Sharp Life Account at any one
time.
A factory reset will clear the memory and allow a new Sharp Life account to
be connected.
Factory reset
Long press (>10 seconds) the Ducking button to reset the unit to
factory settings. An audio tone will conrm the reset and the panels back
lights will ash once.
Standby mode
You can put SumoBox into standby by long pressing (>3 seconds) the
Bluetooth/Duo Mode button.
To quickly power back on, press the Bluetooth/Duo Mode button once.
NOTE:
SumoBox will automatically go into standby mode when no input signal has
been detected for more than 15 minutes.
Whilst in App mode, standby is disabled.
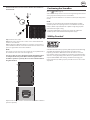
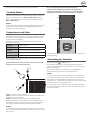
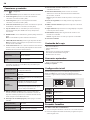
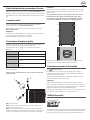
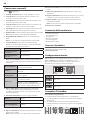
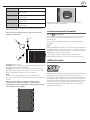
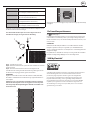
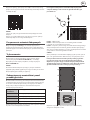
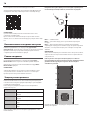
Corner protectors and grille
SumoBox comes with 8x Corner Protectors and 16x screws. Use the
included hex driver tool to ax them to each corner.
There are 4 types of corner, each with lettering on the inside surfaces:
Corner Type SumoBox Location
FTL/FBR Front Top Left or Front Bottom Right
FTR/FBL Front Top Right or Front Bottom Left
RBL/RTR Rear Bottom Left or Rear Top Right
RTL/RBR Rear Top Left or Rear Bottom Right
You will need to remove the pre-installed feet from the SumoBox to
attach the Corner Protectors.

EN
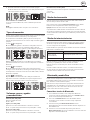
Each Corner Protector uses 2x screws to attach to the SumoBox as
demonstrated:
1
2
3
Step 1 - Remove the screws.
Step 2 - Place the corner protector on the corner of the SumoBox and
check for correct tment.
Step 3 - Using the supplied hex driver tool, screw the corner protector
to the SumoBox via the two screw holes. Ensure the holes of the corner
protector align with the holes in the SumoBox.
NOTE:
Holes for the corner protectors are only on the front, rear, top and bottom of
the SumoBox. No holes exist on the left or right sides.
It is also possible to remove the grille using the included hex driver
tool. Replacement and special edition customised grilles will be
available to purchase separately. Do not use the SumoBox without
the grille attached.
Replacement and special edition customised handles will be available to
purchase separately.
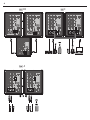
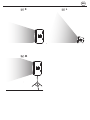
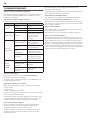
Positioning the SumoBox
(Refer to K, L, M on page 5).
Your SumoBox has protective corners and an angled design. This allows a
variety of positions when placed on a solid surface.
You can also mount SumoBox on a Standard 1-3/8 inch (35 mm) speaker
mount.
NOTE:
Do NOT use the SumoBox speaker with a tripod/stand that is unstable.
SumoBox speakers are only designed for use on a standard 1-3/8 inch (35
mm post, and the tripod/stand must be capable of supporting a speaker
with a minimum weight of 25 kg.
Using a tripod/stand that is not designed to support the weight of the
SumoBox speaker can be hazardous and may lead to injury.
SAM by Devialet®
SumoBox utilises Devialet’s proprietary SAM® (Speaker Active Matching)
algorithm which delivers improved linearity and enhanced low
frequency performance. What this means for the end user is a richer,
more detailed, and more powerful bass performance with limited audio
distortion – the high-quality speaker drivers are optimised to be at their
very best. With SHARP’s audio heritage and Devialet managing the
tuning of the bass (via SAM®), prepare yourself for a best-in-class sound
experience!

14
FAQ's
Q. Can I get additional battery packs?
A. Yes, you can! Additional battery packs are available to purchase
separately (model CP-LSBP1). Speak to the retailer from where you
purchased your SumoBox.
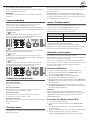
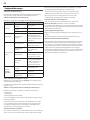
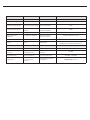
Q. What do the LEDs on the rear panel mean?
A. Look at this table to understand the information being indicated by
the LEDs:
LED Colour Status
Power
Blue (solid) Power On
Red (solid) Standby
O Power O
Input Type Blue (solid)
Refers to the position of the
inut type selector. There are
three positions: Instrument,
Guitar and Microphone
Bluetooth / Duo
Mode
Blue (ashing) SumoBox is ready to pair to
a Bluetooth Device
Blue (solid) SumoBox is connected to a
Bluetooth Device
Yellow (ashing)
SumoBox is looking for
another SumoBox to pair
with in Duo Mode
Yellow (solid)
SumoBox is paired to
another SumoBox in Duo
Mode and is the secondary
unit (right channel)
Ducking IN/
OUTDOOR
Blue (solid) Ducking on
Blue (fast ashes x4) Indoor mode was selected
Blue (slow ashes x2) Outdoor mode was selected
Q. How do I disconnect the App?
A. Long press (>10 seconds) the Ducking button to reset the unit to
factory settings.
An audio tone will conrm the reset and the panels back lights will ash
once.
Q. How many devices can I connect?
A. You have 3 channels which can connect up to 3 devices
1 x CH1 Input
1 x CH2 Input
1 x CH3 Input: Bluetooth and/or AUX
Please note that in presence of a device connected via AUX on CH3,
Bluetooth is suppressed.
You can increase the number of inputs by adding a mixer to your signal
ow. Connect all of your devices to the mixer, and connect the mixer to
CH1 or CH2 of the SumoBox, and switch the input type to Instrument.
Q. Can I customise SumoBox?
A. Yes, you can. SumoBox has been designed so the front grille can be
removed. Feel free to express yourself by painting the grille into your
unique style.
We suggest using spray paints specially made for applying to metal,
observing the correct safety instructions when using such paints.
For the best results, use a primer before applying your design and a
sealer for after.
Look out for special edition customised accessories (grilles, corner
protection and handles) coming soon.
Q. Does SumoBox have a standby mode?
A. Yes, SumoBox can be placed into standby mode by long pressing the
Bluetooth / Duo Mode button for 3 seconds.
SumoBox will automatically go into Standby mode when no input
signal has been detected for more than 15 minutes. Whilst in App mode,
standby is disabled.
Q. How long does the battery last?
A. You can expect up to 8 hours playback at 50% volume from a fully
charged battery pack.
Once depleted, recharge the battery for a minimum of four hours.
Q. Can I use SumoBox outdoors?
A. The SumoBox Pro (CP-LS200) has an IPX4 rating, indicating that it has
a degree of protection against water ingress. Specically, it is protected
against splashing water from any direction, as well as light rainfall,
making it suitable for outdoor use in areas with moderate moisture. It
is important to note, however, that the IPX4 rating does not indicate
protection against submersion or heavy rain exposure, and proper care
should be taken to prevent any damage from occurring under such
circumstances.

DE
Wichtige Sicherheitsanweisungen
Bitte befolgen Sie alle Sicherheitshinweise und beachten
Sie alle Warnungen. Bewahren dieses Handbuch zum
Nachschlagen zu einem späteren Zeitpunkt auf.
Dieses Symbol verweist den Benutzer darauf, das
Benutzerhandbuch für zusätzliche Informationen bezüglich
Sicherheit, Betrieb und Wartung zu lesen.
Dieses Symbol kennzeichnet eine nicht isolierte „gefährliche
Spannung“ im Inneren des Produkts. Diese kann so stark sein,
dass für Personen die Gefahr eines Stromschlags besteht.
Bezieht sich auf Wechselstrom (AC)
Dieses Symbol kennzeichnet, dass es sich bei der mit
dem Symbol gekennzeichneten Nennspannung um
Wechselspannung handelt.
Bezieht sich auf ein Gerät der KlasseII.
Dieses Symbol kennzeichnet, dass es sich um ein Produkt mit
doppelter Isolierung handelt, das keine sichere Verbindung
zur elektrischen Masse benötigt (Erdung).
Vorsichtsmaßnahmen
Schäden
• Bitte überprüfen Sie das Gerät nach dem Auspacken auf Schäden. Ist
das Produkt in irgendeiner Weise beschädigt, bedienen Sie das Gerät
nicht– wenden Sie sich an Ihren Händler.
Stromanschluss und Zugänglichkeit
• Fassen Sie das Netzkabel nicht mit nassen Händen an. Dies kann
einen elektrischen Schlag verursachen. Wenn der Stecker nicht in die
Steckdose passt, dürfen Sie einen nicht passenden Stecker nicht mit
Gewalt in eine Steckdose zu drücken. Ehe Sie das Gerät ausstecken,
schalten Sie es bitte vollständig aus. Trennen Sie das Stromkabel,
wenn es längere Zeit nicht verwendet wird. Stellen Sie sicher, dass
der Netzstecker immer leicht zugänglich ist. Schließen Sie keine
Verlängerungskabel an.
Spannungsversorgung
• Stellen Sie sicher, dass das Gerät an eine Steckdose mit AC 220-240V
50/60Hz angeschlossen wird. Eine höhere Spannung kann zu
Fehlfunktionen oder sogar zu einem Brand führen.
Spritzgussstecker (nicht neu verdrahtbar)– nur Großbritannien,
Malta, Zypern und Irland.
• Das Stromkabel dieses Geräts ist mit einem Spritzgussstecker mit einer
3-Ampere-Sicherung ausgestattet. Der Sicherungswert wird auf der
Stiftäche des Steckers angegeben. Sollte ein Austausch erforderlich
sein, muss eine nach BS1362 zugelassene Sicherung der gleichen
Nennleistung eingesetzt werden.
Netzkabelschutz
• Das Stromkabel darf nicht beschädigt werden. Stellen Sie keine
schweren Objekte darauf ab und dehnen oder verbiegen sie es nicht.
Schäden am Stromkabel können zu einem Feuer oder Stromschlag
führen. Wenn das Netzkabel beschädigt wird, muss es ersetzt
werden. Das Netzkabel ist nicht befestigt. Daher kann es bei einer
Beschädigung einfach ausgetauscht werden.
Kindersicherheit
• Halten Sie sich während der Nutzung dieses Produkts immer an die
allgemeinen Sicherheitshinweise, insbesondere, wenn Kinder in der
Nähe sind. Kinder sollten beaufsichtigt werden, um sicherzustellen,
dass sie nicht mit dem Produkt spielen.
Ort
• Bei Einsatz sollten Sie dieses Produkt auf eine ebene, stabile
Oberäche stellen und dabei darf kein Teil der Haupteinheit eine Kante
überragen.
Gefahren beim Einstecken
• Lassen Sie niemals zu, dass jemand– und dies gilt ganz besonders für
Kinder– etwas in die Löcher, Spalten oder anderen Önungen des
Produktgehäuses stopft, da dies zu einem Stromschlag führen kann.
Wärme und Betriebstemperatur
• Stellen Sie das Produkt nicht in der Nähe von Heizquellen, wie etwa
Heizungen, Heizregister, Öfen oder anderen Apparaten (einschließlich
Verstärker) auf, die Hitze produzieren. Vermeiden Sie längere direkte
Sonneneinstrahlung.
Oene Flammen
• Halten Sie Kerzen oder oene Flammen von diesem Produkt fern, um
eine Brandgefahr zu vermeiden.
Gewitter und Blitze
• Gewitter sind für alle elektrischen Produkte gefährlich. Wenn die
Stromversorgung vom Blitz getroen wird, kann das Gerät, auch wenn
es ausgeschaltet ist, beschädigt werden. Bei einem herannahenden
Gewitter sollten Sie alle Kabel und Stecker des Geräts ausstecken.
Wartung
• Trennen Sie vor dem Reinigen des Produkts das Stromkabel von der
Stromquelle. Verwenden Sie einen weichen und sauberen Lappen,
um die Außenächen des Geräts zu reinigen. Verwenden Sie beim
Reinigen niemals Chemikalien oder Reinigungsmittel.
Service und Reparatur
VORSICHT
GEFAHR AUF STROMSCHLAG
NICHT ÖFFNEN
• Dieses Produkt enthält keine Teile, die vom Benutzer gewartet
werden können. Teile aus dem Inneren des Geräts freizulegen kann
lebensgefährlich sein. Setzen Sie sich im Fall eines Defekts mit dem
Hersteller oder der autorisierten Kundenabteilung in Verbindung.
Die Garantie der Hersteller gilt nicht für Defekte, die durch von nicht
autorisierten Dritten durchgeführte Reparaturen entstehen.
Vorsicht:
Vorbeugung von Hörverlust und
-schäden
• Die SumoBox Pro CP-LS200 kann einen hohen Schalldruckpegel
erzeugen (SPL), der ausreicht, um einen dauerhaften Hörverlust oder
-schaden zu verursachen. Sie sollten darauf achten, dass Sie sich nicht
über einen längeren Zeitraum einem zu hohen Schalldruckpegel
(>85dB) aussetzen.
Warnung: Spezielle Hinweise für den
Umgang mit dem Lithium-Ionen-
Akkusatz
Halten Sie sich genau an die Anweisungen. Dies wird das Risiko
einer Explosion, eines Stromschlags und möglicherweise schwerer
Verletzungen oder des Todes verringern.
• Benutzen Sie zum Auaden des Akkusatzes nur ein von Sharp
zugelassenes Netzteil.
Wählen Sie eine Stromquelle mit der Spannung, die auf dem Typenschild
des Ladegeräts angegeben ist.
CAUTION
RISK OF ELECTRIC SHOCK
DO NOT OPEN
CAUTION
RISK OF ELECTRIC SHOCK
DO NOT OPEN

16
Das Ladegerät und der Akkusatz wurden speziell für die gemeinsame
Verwendung konzipiert.
• Verwenden Sie das Ladegerät nicht, wenn der Stecker oder das Kabel
beschädigt sind.
• Legen Sie den Akkusatz nicht in die Nähe von Feuer oder Hitze.
Feuer oder Temperaturen über 60°C können zu einer Explosion des Akkus
führen.
• Laden Sie den Akkusatz an keinem feuchten oder nassen Ort auf.
• Laden Sie den Akkusatz nicht in der Nähe von brennbaren
Flüssigkeiten oder Gasen auf.
• Achten Sie darauf: Der Akkusatz darf niemals in Wasser getaucht
werden.
• Laden Sie ihn niemals an einem Ort mit extremer Hitze (über 40°C)
oder Kälte (unter 10°C) auf.
Am besten funktioniert das Laden bei normaler
Zimmertemperatur.
• Lassen Sie den Akkusatz nicht fallen, zerdrücken Sie ihn nicht und
beschädigen Sie ihn nicht.
• Verwenden Sie den Akkusatz oder das Ladegerät nicht, wenn sie
heruntergefallen sind oder einen harten Schlag erlitten haben.
Eine Beschädigung des Akkusatzes kann dazu führen, dass er explodiert.
Entsorgen Sie den Akkusatz umgehend entsprechend den Anweisungen
für die Entsorgung des Akkus oder wenden Sie sich zur Beratung an das
Servicezentrum.
• Sie dürfen den Akkusatz nicht önen, verändern oder versuchen, ihn
zu reparieren.
• Es können Dämpfe aus dem Akku austreten, wenn er beschädigt ist
oder falsch verwendet wird.
Sollten Sie unerwünschte Nebenwirkungen feststellen, müssen Sie
sich vergewissern, dass die Umgebung gut belüftet ist, und einen Arzt
aufsuchen.
• Es kann eine Flüssigkeit aus dem Akku austreten, wenn er beschädigt
ist oder falsch verwendet wird.
Wenn Sie unbeabsichtigt mit einer Flüssigkeit in Kontakt kommen, die aus
dem Akku austritt, spülen Sie diese sofort mit milder Seife und Wasser ab.
Sollten Ihre Augen mit der Flüssigkeit in Berührung kommen, spülen Sie sie
mit Wasser aus und suchen Sie einen Arzt auf.
• Halten Sie den Akkusatz von kleinen Metallgegenständen fern, damit
kein Kurzschluss an den Batteriepolen entsteht.
Entsorgung des Geräts und der Akkus
Informationen für Benutzer hinsichtlich der Sammlung und Entsorgung
von Altgeräten und gebrauchten Akkus/Batterien:
Dieses Produkt enthält keine Teile, die vom Benutzer gewartet
werden können. Die Akkus sollten nur durch ein autorisiertes Sharp-
Service-Center entfernt. Ansonsten erlöschen jegliche Garantie
und Gewährleistung für Ihr Gerät. Entsorgen Sie den Akku unter
Einhaltung der örtlichen Vorschriften. Entsorgen Sie den Akku nicht als
Haushaltsabfall und werfen Sie ihn nicht in ein Feuer, da er explodieren
könnte.
Dieses Symbol bedeutet, dass Batterien in dem
Produkt enthalten sind, die unter die Europäische
Richtlinie2013/56/EU fallen, und diese Batterien können
nicht im normalen Hausmüll entsorgt werden. Cd, Hg
und Pb unter der dem Symbol der Mülltonne auf Rollen
zeigt an, ob die Batterie Cadmium (Cd), Quecksilber (Hg)
oder Blei (Pb) enthält.
Dieses Symbol auf einem Produkt bedeutet, dass das
Produkt unter die Europäische Richtlinie2012/19/EU
fällt und nicht zusammen mit dem übrigen Hausmüll
entsorgt oder deponiert werden darf.
Diese Symbole auf den Produkten, Verpackungen und/oder
Begleitdokumenten bedeuten, dass gebrauchte elektrische und
elektronische Produkte und Batterien nicht mit dem allgemeinen
Hausmüll vermischt werden dürfen. Haushaltskunden sollten
sich bezüglich Informationen, wie sie diese Gegenstände einem
umweltverträglichen Recycling zuführen können, entweder an den
Händler wenden, bei dem sie dieses Produkt gekauft haben, oder an ein
lokales Regierungsamt.
CE- und UKCA-Erklärung
• Sharp Consumer Electronics Poland Sp. z o.o. erklärt hiermit, dass
dieses Audiogerät den wesentlichen Anforderungen und weiteren
entsprechenden Vorschriften der RED-Verordnung 2014/53/EU und
der britischen Funkgeräteverordnung von 2017 entspricht.
• Der vollständige Text der UKCA-Konformitätserklärung ist unter
sharpconsumer.eu verfügbar– önen Sie den Download-Abschnitt
Ihres Modells und wählen „Konformitätserklärung“.

DE
Einleitung
Vielen Dank für den Kauf der Sharp SumoBox Pro CP-LS200.
In dieser Bedienungsanleitung erfahren Sie, wie Sie Ihre SumoBox
sicher einrichten und bedienen und wie Sie verschiedene Audioquellen
anschließen können.
Nehmen Sie sich bitte die Zeit und machen Sie sich mit den Funktionen
vertraut.
Sie können auch die zugehörige Sharp Life App herunterladen und Ihre
SumoBox fernbedienen.
app support

18
Verbindungen und Steuerung
(Beziehen Sie sich auf A auf Seite2).
1. Lautstärkeregelung: Stellen Sie die Lautstärke des angeschlossenen
Eingangs ein.
2. Höhenregler: Stellen Sie die hohen Töne des angeschlossenen
Instruments oder Mikrofons ein (nur CH1 und CH2).
3. Bassregler: Stellen Sie die tiefen Töne des angeschlossenen
Instruments oder Mikrofons ein (nur CH1 und CH2).
4. Hallregler: Stellen Sie die Stärke des Halls ein, der auf das
angeschlossene Instrument oder Mikrofon angewendet wird (nur
CH1 und CH2).
5. Eingangstyp: Mit diesem Schalter können Sie den Eingangstyp für
CH1 und CH2 auswählen. Die LED zeigt den ausgewählten Gerätetyp
an.
6. XLR/TRS-Kombi: Schließen Sie Instrumente, Gitarren (TRS) und
Mikrofone (XLR) an
Hinweis: Der XLR-Eingang gibt keine Phantomspeisung aus.
7. USB-Ausgang (DC 5V, 1.000mA): Ermöglicht das Auaden mobiler
Geräte.
Hinweis: Diese Funktion ist nicht für USB-Flash-Disks für das
Abspielen von Audiodateien gedacht.
8. Ducking-Steuerung: Schaltet die Ducking-Funktion EIN/AUS.
Ist diese auf EIN geschaltet, wird das CH3-Audio vom CH1- und CH2-
Audio unterdrückt. Steuert auch den Modus Innen/Außen.
Blau (konstant) Ducking ein
Blau (blinkt x4 schnell) Innen-Modus
Blau (blinkt 2x langsam) Außen-Modus
9. Bluetooth / Duo-Modus: Schaltet die Funktionen Bluetooth und
Duo-Modus EIN/AUS. Weitere Informationen nden Sie im Kapitel
„Bluetooth und Duo-Modus“.
Blau (blinkt) Die SumoBox ist bereit und kann mit einem
Bluetooth-Gerät gekoppelt werden.
Blau (konstant) Die SumoBox ist mit einem Bluetooth-Gerät
gekoppelt.
Gelb (blinkt) Die SumoBox sucht nach einer anderen
SumoBox, mit der sie sich koppeln kann.
Gelb (konstant)
Die SumoBox ist mit einer anderen SumoBox
gekoppelt und als sekundäre Einheit
eingerichtet.
Nach der Verbindung blinkt die Bluetooth-
LED auf dem Hauptgerät, bis ein Bluetooth-
Gerät angeschlossen ist.
10. AUX In 3,5mm: Verbindung eines Audiogeräts über ein 3,5-mm-
Kabel. Bei der ersten Verbindung eines AUX-Geräts wird es
automatisch von einer aktiven Bluetooth-Verbindung umgeschaltet.
11. Netzschalter: Schaltet die SumoBox EIN/AUS.
Blau (konstant) Einschalten
Rot (konstant) Stand-by
Rot (Blinkt) Batterie schwach (nur
batteriebetrieben)
12. Lautsprecherverbindung EINGANG/AUSGANG: Verbindung
zusätzlicher SumoBoxen.
13. Stromanschluss: Verbindung mit dem mitgelieferten Netzkabel an
das Stromnetz.
AC 200-240V ~50/60Hz
Hinweis: Vergewissern Sie sich, dass Sie das richtige Netzkabel für
Ihre Region verwenden.
14. USB-Ladeanschluss (5V, 1.000mA): Ermöglicht das Auaden
mobiler Geräte.
15. Akkustatus-LED: Drücken Sie die Taste, um den Akkustatus
anzuzeigen.
16. Batterieklemme: Hält den Akkusatz an seinem Platz. Schieben Sie
die Klemme nach rechts, um den Akku herauszunehmen.
17. DC-Eingang 18V: Ermöglicht das Auaden des Akkus, wenn er nicht
in der SumoBox eingesetzt ist.
Hinweis: Externes Ladegerät separat mit CP-LSBP1 erhältlich.
18. Verbindung mit der SumoBox
Packungsinhalt
• CP-LS200 SumoBox Pro
• Stromkabel
• Akkusatz
• Eckenschoner (x8)
• Sechskantschlüssel-Werkzeug
• Benutzerdokumentation
Optionales Zubehör:
• Akkusatz & Adapter (CP-LSPB1)
Separat erhältlich.
Ersteinrichtung
Vor der ersten Verwendung wird empfohlen, den Akku mindestens vier
Stunden lang zu laden (oder bis er vollständig aufgeladen ist).
Wenn der Akku eingelegt ist und die SumoBox an das Stromnetz
angeschlossen ist, wird der Akku geladen.
10% - 25%
26% - 50%
51% - 75%
76% - 100%
Einschalten der SumoBox
Bei der Verwendung der SumoBox mit Instrumenten:
1. Schließen Sie alle Instrumente/Mikrofone an die gewünschten
Kanäle an.

DE
2. Schalten Sie alle eingeschalteten Geräte ein und vergewissern Sie
sich, dass sie keine Signale übertragen.
3. Schalten Sie die SumoBox am Netzschalter ein.
Die Betriebs-LED leuchtet durchgehend blau und zeigt damit an,
dass der Lautsprecher eingeschaltet ist.
Bei der Verwendung der SumoBox nur mit Bluetooth
Wenn Sie nur Bluetooth-Verbindungen nutzen, schalten Sie die SumoBox
zur Verbindungsherstellung ein.
HINWEIS:
Beim Ausschalten der SumoBox führen Sie diese Schritte in umgekehrter
Reihenfolge aus.
Verbindungsarten
Es stehen Ihnen drei Kanäle und zahlreiche Eingangstypen zur
Verfügung– Sie können also eine Vielzahl von Instrumenten, Mikrofonen
und anderen Geräten anschließen.
Über den Eingängen CH1 und CH2 gibt es einen Wahlschalter für den
Eingangstyp. Damit wird die Balance der Verbindung angepasst. Hier
sind einige Beispiele.
(Beziehen Sie sich auf B auf Seite2).
B: Schließen Sie Keyboards, Gitarren oder Mikrofone an CH1 und CH2
an. Wählen Sie den richtigen Gerätetyp am Schalter aus. Benutzen
Sie Instrumentenkabel für Keyboards und Gitarren und XLR-Kabel für
Mikrofone.
(Beziehen Sie sich auf C auf Seite2).
C: Bluetooth auf CH3. Im Abschnitt „Bluetooth und Duo-Modus“ nden
Sie Einzelheiten darüber, wie Sie Ihr Bluetooth-fähiges Gerät anschließen
können.
(Beziehen Sie sich auf D auf Seite3).
D: Aux-Eingang (3,5mm) auf CH3. Über den 3,5-mm-Eingang können
Sie analoge Quellgeräte anschließen. Beachten Sie bitte: Wenn ein Gerät
über AUX auf CH3 angeschlossen ist, wird Bluetooth unterdrückt.
(Beziehen Sie sich auf E auf Seite3).
E: Sie können einen Mixer an CH1 oder CH2 anschließen, wenn Sie
weitere Geräte an die SumoBox anschließen möchten. Verwenden Sie die
„Keyboard“-Einstellung am Eingangstyp-Wahlschalter, wenn Sie einen
Mixer anschließen.
Lautstärke, Bass, Höhen & Hall
Lautstärke (CH1, CH2 & CH3)
Stellt die Lautstärke des Kanals ein.
0-Max-Skala.
Höhe (nur CH1 & CH2)
Stellt den hohen Ton des angeschlossenen Instruments oder Mikrofons
ein.
Skala -/+ von der 12-Uhr-Position (Min. - 0 - Max.).
Bass (nur CH1 & CH2)
Stellt den tiefen Ton des angeschlossenen Instruments oder Mikrofons
ein.
Skala -/+ von der 12-Uhr-Position (Min. - 0 - Max.).
Hall (nur CH1 & CH2)
Stellt die Stärke des Halls ein, der auf das angeschlossene Instrument
oder Mikrofon angewendet wird.
0-Max-Skala.
Ducking-Modus
Die Ducking-Funktion verringert den Ausgang von CH3, wenn ein
Eingang an CH1 oder CH2 anliegt.
Drücken Sie zum Aktivieren einmal die Taste Ducking Control (Ducking-
Steuerung). Die LED leuchtet durchgehend blau. Drücken Sie die Taste
zum Ausschalten erneut.
Beispiel: Vielleicht möchten Sie einen Hintergrundtrack auf CH3
abspielen lassen, während Sie ein Mikrofon auf CH1 verwenden. Mit der
Ducking-Funktion wird die Lautstärke der auf CH3 wiedergegebenen
Audiosignale leicht reduziert, sobald Sie in das Mikrofon sprechen– dies
gibt Ihrer Stimme im Mix mehr Raum.
Innen-Außen-Modus
Es gibt zwei Klangmodi: Innen und Außen. Um zwischen den Modi
umzuschalten, tippen Sie doppelt auf die Taste Ducking Control
(Ducking-Steuerung– 2x innerhalb von 1Sek.).
Wenn der Modus gewechselt wird, können Sie an der LED-Anzeige
erkennen, in welchem Modus sich die SumoBox bendet:
Tonmodus Ducking-LED-Anzeige
Innen (Standard) Blau– blinkt 4x schnell
Außen Blau– blinkt 2x langsam
Der Innenmodus ist dafür geeignet, wenn die SumoBox in Innenräumen
verwendet wird, und er wurde für eine optimale Klangqualität
entwickelt.
Der Außenmodus eignet sich, wenn die SumoBox im Freien verwendet
wird.
Im Außenmodus werden die hohen und mittleren Frequenzen
angehoben. Dies sorgt dafür, dass diese Frequenzen im Freien besser zu
hören sind.
Bluetooth und Duo-Modus
Sie können ein Bluetooth-fähiges Gerät mit Ihrer SumoBox verbinden.
Außerdem kann sich die SumoBox über den Duo-Modus– True Wireless
Stereo (TWS)– mit einer anderen SumoBox verbinden.
Der Duo-Modus ist eine leistungsstarke Funktion und kann die
Bluetooth-Audioquelle an 2SumoBoxen übertragen– dabei fungiert
eine als linker Stereokanal und die andere als rechter Stereokanal.
Dieser Eekt ermöglicht eine kraftvollere und eindringlichere Stereo-
Klangbühne.
Verbindung über Bluetooth
1. Aktivieren Sie Ihr Bluetooth-Gerät bei eingeschalteter SumoBox und
wählen Sie den Suchmodus. „SUMOBOX PRO CP-LS200“ erscheint in
der Bluetooth-Geräteliste.
2. Wählen Sie „SUMOBOX PRO CP-LS200“. Die SumoBox gibt ein
Audiosignal ab, wenn die Verbindung erfolgreich hergestellt wurde.

20
3. Zum Trennen drücken Sie einmal die Taste Bluetooth / Duo-Modus.
Alternativ trennen Sie die Verbindung zur SumoBox auf Ihrem
Bluetooth-fähigen Gerät.
4. Um das gleiche Gerät erneut zu verbinden, drücken Sie einmal die
Taste Bluetooth / Duo-Modus an der SumoBox oder stellen Sie eine
Verbindung über Ihr Bluetooth-fähiges Gerät her.
HINWEIS:
Der Lautsprecher versucht, automatisch eine Verbindung mit dem letzten
über Bluetooth verbundenen Audioausgabegerät herzustellen. Wenn dies
nicht möglich ist, schaltet der Lautsprecher in den Kopplungsmodus und die
Bluetooth-LED blinkt.
Duo-Modus: True Wireless Stereo (TWS)
1. Schalten Sie beide SumoBox-Lautsprecher ein.
2. Drücken Sie an der ersten SumoBox doppelt auf die Taste Bluetooth
/ Duo-Modus.
3. Die LED blinkt gelb und die SumoBox zeigt an, dass sie in den
Kopplungsmodus übergegangen ist.
4. Warten Sie, bis die Verbindung zwischen den beiden SumoBoxen
hergestellt ist.
5. Sobald sie verbunden sind, bestätigen beide SumoBoxen dies mit
einem Ton. An der RECHTEN (sekundären) SumoBox leuchtet eine
dauerhafte gelbe LED und an der LINKEN (primären) SumoBox blinkt
eine blaue LED.
6. Stellen Sie die CH3-Lautstärke an der ersten SumoBox ein, um die
CH3-Lautstärke an beiden Lautsprechern zu ändern.
7. Um den Duo-Modus zu trennen, drücken Sie die Taste Bluetooth /
Duo-Modus an einer beliebigen SumoBox.
8. Verwendungsbeispiel
(Beziehen Sie sich auf J auf Seite4).
Wenn Sie den Duo-Modus aktiviert haben, können Sie 4Mikrofone
und ein Bluetooth-Gerät anschließen. Ideal für eine Konferenz oder
Präsentation.
HINWEIS:
Im Duo-Modus wird nur die Bluetooth-Quelle CH3 der LINKEN (primären)
SumoBox geteilt. Die Eingänge von Mic1 und Mic2 auf beiden
Lautsprechern bleiben auf diesen Lautsprecher beschränkt.
Bei aktivem Duo-Modus ist keine Verbindung zur RECHTEN (sekundären)
SumoBox über Bluetooth möglich.
Wenn bereits zwei Lautsprecher gekoppelt wurden, verbindet sich der Duo-
Modus/TWS
automatisch, wenn beide Lautsprecher eingeschaltet werden.
Lautsprecherverbindung
Die SumoBox kann über eine Lautsprecherverbindung mit anderen
SumoBoxen verbunden werden. So können Sie das über CH1 und CH2
eingehende Audiosignal optimal mit einer anderen SumoBox teilen.
Dies ist auf mehrere Arten möglich:
1. Einweg-Verbindung:
(Beziehen Sie sich auf F auf Seite3).
Verbinden Sie eine die OUT-Buchse eines Lautsprechers mit der IN-
Buchse eines anderen Lautsprechers.
Bei dieser Konguration spielt das OUT-Gerät keine Audioverbindungen
vom IN-Gerät ab.
2. Zweiwege-Verbindung:
(Beziehen Sie sich auf G auf Seite3).
Verbinden Sie die OUT-Buchse eines Lautsprechers mit der IN-Buchse
eines anderen Lautsprechers, und umgekehrt.
Bei dieser Konguration senden sich beide Geräte gegenseitig den Ton.
3. Daisy-Chain-Verbindung:
(Beziehen Sie sich auf H auf Seite4).
Verbinden Sie die OUT-Buchse eines Lautsprechers mit der IN-Buchse
eines anderen Lautsprechers– verbinden Sie anschließend die
OUT-Buchse dieses Lautsprechers mit der IN-Buchse eines dritten
Lautsprechers.
Bei dieser Konguration wird das Audiosignal des ersten Lautsprechers
die Kette entlang geschickt. Sie können so viele SumoBoxen hinzufügen,
wie Sie möchten.
4. Zweiwege-Verbindung (kleine Band):
(Beziehen Sie sich auf I auf Seite4).
Mit der Zweiwege-Verbindung stehen Ihnen 6Eingänge zur Verfügung,
über welche die Audiosignale der beiden Geräte aneinander gesendet
werden. Ideal z.B. für eine kleine Band.
HINWEIS:
Sie können mehrere SumoBoxen in Reihe schalten, da es sich bei der
Lautsprecherverbindung der SumoBox um einen verstärkten Ausgang
handelt. Das Hintereinanderschalten (Daisy Chaining) funktioniert
mit ähnlichen Produkten anderer Hersteller möglicherweise nicht
ordnungsgemäß, da deren Verbindungen möglicherweise nicht verstärkt
werden.
Sharp Life App
Sie können die Sharp Life App auf Ihr Smartgerät herunterladen.
Die App gibt Ihnen die volle Kontrolle über die SumoBox und bietet
Ihnen außerdem einige zusätzliche Funktionen.
Um die App mit der SumoBox zu koppeln, machen Sie Folgendes:
1. Ersteinrichtung
Wenn Sie zum ersten Mal eine Verbindung mit der App herstellen,
aber zuvor ein Gerät zur Audiowiedergabe über Bluetooth
verbunden haben, müssen Sie Ihr Bluetooth-Gerät trennen.
Um die Bluetooth-Verbindung zu trennen, drücken Sie einmal die
Taste Bluetooth / Duo-Modus.
2. Önen Sie die Sharp Life App auf Ihrem Smartgerät. Klicken Sie auf
„Gerät hinzufügen“. Ihr Gerät sucht automatisch nach der SumoBox.
3. Sobald die SumoBox gefunden wurde, tippen Sie auf das „+“-Symbol,
um mit dem Kopplungsvorgang zu beginnen.
Nach dem Abschluss der Kopplung tippen Sie auf das Gerätesymbol und
die Oberäche der SumoBox wird geladen.
Um die App herunterzuladen, nutzen Sie diesen QR-Code, um
automatisch zur Download-Seite zu gelangen, oder Sie besuchen uns
hier: https://www.sharpconsumer.com/sharp-life-app
HINWEIS:
Mit dem Sharp Life Account kann immer nur eine SumoBox verbunden sein.
Wenn Sie das Gerät auf die Werkseinstellungen zurücksetzen, wird der
Speicher gelöscht– dann können Sie ein neues Sharp Life Konto einrichten.
Werkseinstellungen
Drücken Sie lange (>10Sekunden) auf die Ducking-Taste, um das Gerät
auf die Werkseinstellungen zurückzusetzen. Ein Signalton bestätigt den
La pagina si sta caricando...
La pagina si sta caricando...
La pagina si sta caricando...
La pagina si sta caricando...
La pagina si sta caricando...
La pagina si sta caricando...
La pagina si sta caricando...
La pagina si sta caricando...
La pagina si sta caricando...
La pagina si sta caricando...
La pagina si sta caricando...
La pagina si sta caricando...
La pagina si sta caricando...
La pagina si sta caricando...
La pagina si sta caricando...
La pagina si sta caricando...
La pagina si sta caricando...
La pagina si sta caricando...
La pagina si sta caricando...
La pagina si sta caricando...
La pagina si sta caricando...
La pagina si sta caricando...
La pagina si sta caricando...
La pagina si sta caricando...
La pagina si sta caricando...
La pagina si sta caricando...
La pagina si sta caricando...
La pagina si sta caricando...
La pagina si sta caricando...
La pagina si sta caricando...
La pagina si sta caricando...
La pagina si sta caricando...
La pagina si sta caricando...
La pagina si sta caricando...
La pagina si sta caricando...
La pagina si sta caricando...
La pagina si sta caricando...
La pagina si sta caricando...
La pagina si sta caricando...
La pagina si sta caricando...
La pagina si sta caricando...
La pagina si sta caricando...
La pagina si sta caricando...
La pagina si sta caricando...
La pagina si sta caricando...
La pagina si sta caricando...
La pagina si sta caricando...
La pagina si sta caricando...
La pagina si sta caricando...
La pagina si sta caricando...
La pagina si sta caricando...
La pagina si sta caricando...
La pagina si sta caricando...
La pagina si sta caricando...
La pagina si sta caricando...
La pagina si sta caricando...
-
 1
1
-
 2
2
-
 3
3
-
 4
4
-
 5
5
-
 6
6
-
 7
7
-
 8
8
-
 9
9
-
 10
10
-
 11
11
-
 12
12
-
 13
13
-
 14
14
-
 15
15
-
 16
16
-
 17
17
-
 18
18
-
 19
19
-
 20
20
-
 21
21
-
 22
22
-
 23
23
-
 24
24
-
 25
25
-
 26
26
-
 27
27
-
 28
28
-
 29
29
-
 30
30
-
 31
31
-
 32
32
-
 33
33
-
 34
34
-
 35
35
-
 36
36
-
 37
37
-
 38
38
-
 39
39
-
 40
40
-
 41
41
-
 42
42
-
 43
43
-
 44
44
-
 45
45
-
 46
46
-
 47
47
-
 48
48
-
 49
49
-
 50
50
-
 51
51
-
 52
52
-
 53
53
-
 54
54
-
 55
55
-
 56
56
-
 57
57
-
 58
58
-
 59
59
-
 60
60
-
 61
61
-
 62
62
-
 63
63
-
 64
64
-
 65
65
-
 66
66
-
 67
67
-
 68
68
-
 69
69
-
 70
70
-
 71
71
-
 72
72
-
 73
73
-
 74
74
-
 75
75
-
 76
76


Sharp CP-LS100 Manuale utente
- Tipo
- Manuale utente
- Questo manuale è adatto anche per
in altre lingue
- français: Sharp CP-LS100 Manuel utilisateur
- español: Sharp CP-LS100 Manual de usuario
- Nederlands: Sharp CP-LS100 Handleiding
- polski: Sharp CP-LS100 Instrukcja obsługi
Documenti correlati
Altri documenti
-
CAME RIOCONN01 Guida d'installazione
-
PROEL V12 Free Manuale utente
-
Yamaha 02R96-v2 Manuale del proprietario
-
AxelTech Oxygen 3000 Plus Manuale utente
-
-
Yamaha 01V96i Manuale utente
-
-
-
Roland BA-330 Manuale del proprietario
-