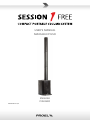
PROEL SESSION1FREE Battery Powered PA System Manuale utente
- Tipo
- Manuale utente

USER’S MANUAL
MANUALE D’USO
ENGLISH
ITALIANO
96MAN0166-REV.4/22

2
IMPORTANT SAFETY INSTRUCTIONS
Watch for these symbols:
• The lightning
flash with arrowhead symbol within an equilateral triangle is intended to alert the user to
the presence of uninsulated “dangerous voltage” within the product’s enclosure, that may be of sufficient
magnitude to constitute a risk of electric shock to persons.
•
The exclamation point within an equilateral triangle is intended to alert the user to the presence of
important operating and maintenance (servicing) instructions in the literature accompanying the
appliance.
1. Read these instructions.
2. Keep these instructions.
3. Heed all warnings.
4. Follow all instructions.
5. Do not use this apparatus near water.
6. Clean only with dry cloth.
7. Do not block any ventilation openings. Install in accordance with the manufacturer’s instructions.
8. Do not install near any heat sources such as radiators, heat registers, stoves, or other apparatus (including
amplifiers) that produce heat.
9. Do not defeat the safety purpose of the polarized or grounding-type plug. A polarized plug has two blades
with one wider than the other. A grounding-type plug has two blades and a third grounding prong. The
wide blade or the third prong are provided for your safety. If the provided plug does not fit into your
outlet, consult an electrician for replacement of the obsolete outlet.
10. Protect the power cord from being walked on or pinched, particularly at plugs, convenience receptacles,
and the point where they exit from the apparatus.
11. Only use attachments/accessories specified by the manufacturer.
12. Use only with the cart, stand, tripod, bracket, or
table specified by the manufacturer, or sold with the
apparatus. When a cart is used, use caution when moving the cart/apparatus combination to avoid injury
from tip-over.
13. Unplug this apparatus during lightning storms or when unused for long periods of time.
14.
Refer all servicing to qualified service personnel. Servicing is required when the apparatus has been
damaged in any way, such as power supply cord or plug is damaged, liquid has been spilled or objects have
fallen into the apparatus, the apparatus has been exposed to rain or moisture, does not operate normally,
or has been dropped.
15. Warning: to reduce the risk of fire or electric shock, do not expose this apparatus to rain or moisture.
16. Do not expose this equipment to dripping or splashing and ensure that no objects filled with liquids, such
as vases, are placed on the equipment.
17.
To completely disconnect this apparatus from the ac mains, disconnect the power supply cord plug from
the ac receptacle.
18. The mains plug of the power supply cord shall remain readily operable.
19.
This apparatus contains potentially lethal voltages. To prevent electric shock or hazard, do not remove the
chassis, input module or ac input covers. No user serviceable parts inside. Refer servicing to qualified
service personnel.
20. The louds
peakers covered by this manual are not intended for high moisture outdoor environments.
Moisture can damage the speaker cone and surround and cause corrosion of electrical contacts and metal
parts. Avoid exposing the speakers to direct moisture.
21. Keep loudspeakers out of extended or intense direct sunlight. The driver suspension will prematurely dry
out and finished surfaces may be degraded by long-term exposure to intense ultra-violet (UV) light.
22. The loudspeakers can generate considerable energy. When placed on a slippery surface such as polished
wood or linoleum, the speaker may move due to its acoustical energy output.
23.
Precautions should be taken to assure that the speaker does not fall off a stage or table on which it is
placed.
24. The loudspeakers are easil
y capable of generating sound pressure levels (SPL) sufficient to cause
permanent hearing damage to performers, production crew and audience members. Caution should be
taken to avoid prolonged exposure to SPL in excess of 90 dB.

3
This marking shown on the product or its literature, indicates that it should not be disposed with other
household wastes at the end of its working life. To prevent possible harm to the environment or human health
from uncontrolled waste disposal, please separate this from other types of wastes and recycle it responsibly to
promote the sustainable reuse of material resources. Household users should contact either the retailer where
they purchased this product, or their local government office, for details of where and how they can take this
item for environmentally safe recycling. Business users should contact their supplier and check the terms and
conditions of the purchase contract. This product should not be mixed with other commercial wastes for
disposal.
FEDERAL COMMUNICATIONS COMMISSION (FCC) STATEMENT
This equipment has been tested and found to comply with the limits for a Class A digital device, pursuant to part 15 of the FCC Rules.
These limits are designed
to provide reasonable protection against harmful interference when the equipment is operated in a
commercial environment. This equipment generates, uses, and can radiate radio frequency energy and, if not installed and used in
accordance with the instruction manual, may cause harmful interference to radio communications.
Operation of this equipment in a residential area is likely to cause harmful interference in which case the user will be required
to correct the interference at their own expense.
This device complies with Part 15 of the FCC rules. Operation is subject to the following two conditions:
(1) this device may not cause harmful interference, and
(2) this device must accept any interference received, including interference that may cause undesired operation.
DECLARATION OF CONFORMITY
The product is in compliance with the following European Directives:
EMC 2014/30/EU, RED 2014/53/EU, LVD 2014/35/EU, RoHS 2011/65/EU and WEEE 2012/19/EU.
WARNING (EN 55032 CISPR 32)
This equipment is compliant with Class A of CISPR 32. In a residential environment this equipment may cause radio interference.
Under the EM disturbance, the ratio of signal-noise will be changed above 10 dB.
LIMITED WARRANTY
Proel warrants all materials, workmanship and proper operation of this product for a period of two years from the original date of
purchase. If any defects are found in the materials or workmanship or if the product fails to function properly during the applicable
warranty period, the owner should inform about these defects the dealer or the distributor, providing receipt or invoice of date of
purchase and defect detailed description. This warranty does not extend to damage resulting from improper installation, misuse,
neglect or abuse. Proel S.p.A. will verify damage on returned units, and when the unit has been properly used and warranty is still
valid, then the unit will be replaced or repaired. Proel S.p.A. is not responsible for any “direct damage” or “indirect damage” caused
by product defectiveness.
• This unit
package has been submitted to ISTA 1A integrity tests. We suggest you control the unit conditions immediately after
unpacking it.
• If any damage is found, immediately advise the dealer. Keep all unit packaging parts to allow inspection.
• Proel is not responsible for any damage that occurs during shipment.
• Products are sold “delivered ex warehouse” and shipment is at charge and risk of the buyer.
• Possible damages to unit should be immediately notified to forwarder. Each complaint for package tampered with should be
done within eight days from product receipt.
CONDITIONS OF USE
Proel do not accept any liability for damage caused to third parties due to improper installation, use of non-original spare parts, lack
of maintenance, tampering or improper use of this product, including disregard of acceptable and applicable safety standards. Proel
strongly recommends that this loudspeaker cabinet be suspended taking into consideration all current National, Federal, State and
Local regulations. The product must be installed be qualified personal. Please contact the manufacturer for further information.

4
INDEX
IMPORTANT SAFETY INSTRUCTIONS ___________________________________________________ 2
FEDERAL COMMUNICATIONS COMMISSION (FCC) STATEMENT _____________________________ 3
DECLARATION OF CONFORMITY ______________________________________________________ 3
LIMITED WARRANTY _______________________________________________________________ 3
CONDITIONS OF USE _______________________________________________________________ 3
INDEX ___________________________________________________________________________ 4
INTRODUCTION ___________________________________________________________________ 4
DESCRIPTION _____________________________________________________________________ 4
MAIN PANEL OPERATIONS __________________________________________________________ 5
INSTALLATION ____________________________________________________________________ 8
TECHNICAL SPECIFICATIONS _________________________________________________________ 9
MAIN PANEL _____________________________________________________________________ 18
INSTALLATION ___________________________________________________________________ 19
INTRODUCTION
Thank you for choosing a PROEL product. Please take some time to read this manual to understand all the
features of your system and take advantage of all its performance capabilities. All PROEL products are CE
approved and designed for continuous use in professional applications.
DESCRIPTION
SESSION1 FREE is a battery-powered portable column system featuring multiple inputs and a versatile MP3
player with BLUETOOTH connectivity. Hosted in lightweight yet ultra-durable polypropylene cabinets, it is
composed by a column with four high-definition 2.5” full-range speakers and a powerful 8” sub-woofer. The
state-of-the-art electronics includes a sophisticated pre-amp section with active filtering and dual CLIP
LIMITERS, and a powerful 2-channel 400W Class D power amplifier.
The built-in MEDIA PLAYER is able to play songs from an SD card or a USB MEMORY STICK, but also from your
smartphone or your tablet thru a BLUETOOTH connection, without the need of any cable. The built-in 3-
channel mixer allows to connect two microphone or line sources and a stereo player, each one with
independent level controls. A digital EFFECT is also available for microphone inputs. With a simple knob is
possible to optimize the sound for speech, music or low boost applications, adapting the system to any
situation. The built-in Li-ion battery provides up to 8 hours of mains-free continuous operation, for the
maximum freedom of use.
SESSION1 FREE can be used in a variety of applications, ranging from speech diffusion and music playback to
live music and DJ sets.

5
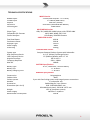
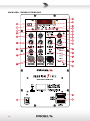
MAIN PANEL OPERATIONS
1. CH1 / CH2 XLR input
This is a female XLR connector that accepts an XLR plug from any balanced or unbalanced dynamic
microphone or line level device. The XLR input is wired as follows:
Pin 1 = shield or ground
Pin 2 = + positive or "hot"
Pin 3 = - negative or "cold"
2. CH1 / CH2 JACK input
This is a female JACK connector that accepts a JACK plug from any dynamic balanced or unbalanced
microphone or line level device. The balanced JACK input is wired as follows:
Tip = + positive or "hot"
Ring = - negative or "cold"
Sleeve = shield or ground
The unbalanced JACK input is wired as follows:
Tip = + positive or "hot"
Sleeve = shield or ground
3. CH1 / CH2 LINE/MIC SWITCH
This switch sets the sensitivity of the channel input between microphone level or line level.
4. CH1 / CH2 LEVEL
These potentiometers set the level of CH1 / CH2 channels.
5. CH1 / CH2 EFFECT
These potentiometers set the level of CH1 / CH2 channels delay effect.
6. LINE OUT (XLR)
This male XLR connector provides a balanced line-level signal with the mix of the inputs picked up
before the MASTER controls. Connect it to the input of another audio system or powered speaker.
7. CH3 LINE IN (MINI JACK)
This is a MINI JACK (3.5mm) female connector that accepts a STEREO MINI JACK plug from Computer /
CD / DVD / MP3 players. The MINI JACK is wired as follows:
Tip = positive signal of left channel
Ring = positive signal of right channel
Sleeve = shield or ground
8. CH3 LINE/MP3 SWITCH
Use this switch to select the external player connected to MINI JACK connector or the built-in Media
Player as the source for the input channel 3.
9. CH3 LEVEL
This potentiometer sets the level of the respective CH3 LINE input or the built-in Media Player.
10. SUB LEVEL for SPEECH – MUSIC - BOOST
This potentiometer sets the full system equalization: if rotated counter-clockwise it enhances the
speech, the centre is the best position for music reproduction and rotated full clockwise it enhances the
lows.
11. SIGNAL / LIMIT
GREEN LED illuminates when a signal is sent to the amplifier.
RED LED illuminates when the internal amplifier's output is limited. When this LED flashes, reduce the

6
signal level.
12. MASTER
This potentiometer sets the general level of all signals send to the internal speaker amplifier.
13. USB SLOT
This slot is where you can insert an USB FLASH DRIVE containing audio files.
Preferably use only reliable memories (suggested brands are: SanDisk, Kingston, Lexar, Verbatim).
14. SD SLOT
This slot is where you can insert a SD MEMORY CARD containing audio files.
15. MODE SWITCH
Pressing this switch, you can select the source containing audio files between SD, USB or external
Bluetooth player device. A small icon on the display identifies the source currently used:
SD MEMORY CARD
USB FLASH DRIVE
BLUETOOTH DEVICE
To connect a Bluetooth device, follow these instructions:
• Press MODE one or two times until the text appears.
• If the Bluetooth symbol in the display is steady on, your device is associated and linked to
the loudspeaker (a previously associated device will be relinked automatically).
• If the Bluetooth symbol in the display is flashing, there is no device associated.
• To associate a new device (smartphone, tablet, pc or other) you must turn on the Bluetooth
in your device.
• On the device in the list of Bluetooth devices a new device named “SESSION1” will appear
and a tone will be reproduced by the loudspeaker,
• To associate it to your device choose it and if the linking is successful another tone will be
reproduced by the loudspeaker.
• Now you will see “SESSION1
” in the list of your recognized Bluetooth devices on your
smartphone or tablet and you are ready to play music with it using your preferred app.
NOTE: the audio file types and quality playable with Bluetooth connection depends on the Bluetooth
device used. The Bluetooth connection range is about 10 m (33 feet).
How to link two loudspeakers with STEREO LINK: the STEREO LINK function allows you to play stereo
tracks on two SESSION1
loudspeaker linked together. The MASTER loudspeaker will reproduce the
left channel and the SLAVE loudspeaker will reproduce the right channel.
• The MASTER
loudspeaker must be already linked with your Bluetooth device with the
procedure described above.
• Turn on the SLAVE loudspeaker and press its MODE button until the display shows:
• Then press the STEREO LINK button on the SLAVE loudspeaker and the display will show:
• Wait a few moment (5 to 10 seconds) until the Bluetooth symbol on the display is steady,
meaning that the connection is established between the SLAVE and the MASTER. A double

7
note reproduced from both loudspeakers confirms the successful linking between them: just
press play on your Bluetooth device and your music will be played in STEREO from both
loudspeakers.
• In case the Bluetooth symbol on the display keeps on flashing, try to press the STEREO
LINK button also in the MAIN loudspeaker.
NOTE: the STEREO LINK function allows to link the speakers only for playing music from a Bluetooth
source. If you want to reproduce the instruments connected to the input channels of the first loudspeaker
also on a second loudspeaker, you need to connect them physically using a XLR-XLR cable from the LINE
OUT of the MASTER one to the LINE IN of the SLAVE one. Please do not use STEREO LINK and cable
connection at same time.
NOTE: for using STEREO LINK the two loudspeakers must be in the range of 10 m (33 feet).
16. STEREO LINK
Use this button to link two loudspeakers thru Bluetooth (see above).
17. PLAY/PAUSE
This button plays or pauses the current audio file: during the play the display shows the elapsed time.
appears on display when the song is paused. Pressing again the button the song is resumed from
the latest position. NOTE: when using Bluetooth neither elapsed time nor are shown.
18. PLAY MODE
This button changes the play mode of the audio files. A brief temporary text on the display shows the
current mode.
ALL: normal forward play of all songs contained in all memories and all folders. When the last
song is played, it will restart from the first.
SINGLE ONE: it plays only the current song and repeat it indefinitely.
RANDOM: it plays all songs contained in all memories and all folders randomly.
FOLDER: it plays all song contained in the current folder.
Brief explanation of how the player works. When you insert an SD memory card or USB flash drive in
the respective slot, the player scrolls the entire content of the memory locating all audio file that can
be played (files with .WAV .MP3 .WMA. APE .FLAC extensions). All files will be played in numerical and
alphabetical order, considering first the “name of the folder” and then the “name of the file”.
19. PREVIOUS SONG
Use it to skip to previous song with a shortly press and release action or rewind the current song
keeping it pressed for a longer time.
20. NEXT SONG
Use it to skip to next song with a shortly press and release action or fast forward the current song
keeping it pressed for a longer time.

8
21. LCD DISPLAY
The LCD DISPLAY shows several data:
22. POWER
Use this switch to power ON or OFF the loudspeaker. It is "ON" when the switch is in the "I" position.
Note: if the unit is connected to the mains line, the internal supply circuit charges the battery also if the
unit is switched off. In order to extend the battery life, the charging starts when the battery level is below
75% of the capacity, whether the system is on or off. The CHARGE LED turns on when the charging starts.
23. ON
GREEN LED: when lighted indicates the equipment has been turned on and AC power is available.
24. AC~ SOCKET
Here’s where you plug in your mains supply cord. You should always use the mains cord supplied with
the device. Be sure that your device is turned off before you plug the mains supply cord into an electrical
outlet.
25. FUSE holder
Here is where the mains protection fuse is placed.
REPLACE THE PROTECTION FUSE ONLY WITH THE SAME TYPE.
IF, AFTER THE REPLACEMENT, THE FUSE BLOWS AGAIN, DO NOT TRY TO REPLACE IT AND
CONTACT THE NEAREST PROEL SERVICE CENTER.
26. BATTERY LEVEL
This LED bar shows the battery level when the sound system is switched on.
LOW: this RED LED indicates that the residual power of the internal battery is lower than 50% of the
capacity (the other LEDs are off). When this LED is on, connect your system to a mains line.
50%: this GREEN LED indicates that the residual battery power is between 50% and 75% of the capacity.
75%: this GREEN LED indicates that the residual battery power is between 75% and 100% of the capacity.
100%: this GREEN LED indicates that the internal battery is fully charged.
CHARGE: this YELLOW LED indicates that the internal battery is being charged (the system must be
connected to the mains line). To extend the battery life the internal charger usually starts the charge
only when the battery level is below 75% of the capacity, whether the system is on or off.
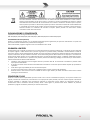
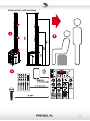
INSTALLATION
1. Insert the column modules upper the sub with the column speaker on top.
2. Optimize the total height of the column with the top just above the head of the audience.
3. Connect the devices you intend to use to the rear panel, power on and enjoy.

9
TECHNICAL SPECIFICATIONS
MIXER Section
MONO inputs
2 x MIC/LINE IN (XLR-F + 1.4" JACK)
STEREO input
1 x LINE IN (MINI-JACK)
Outputs
LINE OUT (XLR-M)
EQ control
SUB LEVEL (SPEECH-MUSIC-BOOST)
Internal Effect
ECHO-DELAY
MULTIMEDIA Section
Player Type
USB / SD / WIRELESS AUDIO player with STEREO LINK
Compatible File Formats
MP3, WAV, WMA, APE, FLAC
Control Interface
LCD display, CONTROL buttons
AMPLIFIER Section
Total Peak Power
400 W
Continuous Power
200 W
Amplifier Type
Class D
Power Supply
SMPS
Processing
Analog
LOUDSPEAKER Section
System type
Compact Powered Column System with Subwoofer
High Frequency Device
4 x 2.5" (66mm) Full Range Drivers
Low Frequency Device
8” (200mm) Woofer with 1.5” VC
Angular Coverage
90° H x 60° V
Frequency Response
50Hz – 18kHz
Max SPL
108 dB
BAT TERY Specifications
Battery Type
11.1 V , 8000 mAh , Lithium Battery
Battery Life
8 - 10 hours
Battery Charging Time
5 - 8 hours
GENERAL Specifications
Construction
Polypropylene
Cabinet Color
Black
Column system
3-pcs with fast-linking system and integral power connections
Handles
1 x subwoofer top
Accessories
Padded bag for 3-pcs column
Dimensions (W x H x D)
SUB: 318x 400 x484.5 mm
COLUMN (each piece): 520 X 84 X 97.5 mm
Weight
14.5 Kg (complete system)
Power Supply
100-240 V~ 50/60 Hz
Rated Power Consumption
100 W

10
ISTRUZIONI DI SICUREZZA IMPORTANTI
Guarda questi simboli:
• Il lampo con la freccia all'interno di un triangolo equilatero ha lo scopo di avvisare l'utente della presenza di
"tensione pericolosa" non isolata all'interno della custodia del prodotto, che può essere di ampiezza
sufficiente a costituire un rischio di scossa elettrica per le persone.
• Il punto esclamativo all'interno di un triangolo equilatero avverte l'utente della presenza di importanti
istruzioni operative e di manutenzione (assistenza) nella documentazione che accompagna l'apparecchio.
1. Leggere queste istruzioni.
2. Conservare queste istruzioni.
3. Fare attenzione a tutti gli avvertimenti.
4. Seguire tutte le istruzioni.
5. Non usare questo dispositivo vicino all’acqua.
6. Pulire solo con uno strofinaccio asciutto.
7. Non bloccare alcuna fessura di ventilazione. Installare conformemente alle istruzioni del produttore.
8. Non installare nelle vicinanze di fonti di calore come radiatori, caloriferi, stufe o altri apparecchi
(amplificatori compresi) che generano calore.
9. Non annullare l’obiettivo di sicurezza delle spine polarizzate o con messa a terra. Le spine polarizzate hanno
due lame, con una più larga dell’altra. Una spina con messa a terra ha due lame e un terzo polo di terra. La
lama larga o il terzo polo servono per la sicurezza dell’utilizzatore. Se la spina fornita non è adatta alla
propria presa, consultate un elettricista per la sostituzione della spina.
10. Disporre il cavo di alimentazione in modo tale da essere protetto dal calpestio e da spigoli taglienti e che
non possa essere danneggiato, in particolare in prossimità delle spine, del cavo di prolunga e nel punto in
cui il cavo di alimentazione esce dall’apparecchio.
11. Usare solo dispositivi opzionali/accessori specificati dal produttore.
12.
Usare solo con carrello, supporto, cavalletto, sostegno o tavola specificate dal produttore o acquistati con
l’apparecchio. Quando si u
sa un carrello, prestare attenzione, muovendo il carrello/la combinazione di
apparecchi, a non ferirsi.
13. Staccare la spina in caso di temporale o quando non si usa l’apparecchio per un lungo periodo.
14. Per l’assistenza tecnica rivolgersi a personale qualifica
to. L’assistenza tecnica è necessaria nel caso in cui
l’unità sia danneggiata, per es. per problemi del cavo di alimentazione o della spina, rovesciamento di
liquidi od oggetti caduti nell’apparecchio, esposizione alla pioggia o all’umidità, anomalie di funzionamento
o cadute dell’apparecchio.
15. Avvertenza: per ridurre il rischio di incendi o scosse elettriche, non esporre questo apparecchio alla pioggia
o all'umidità.
16. Non esporre questa apparecchiatura a gocciolamenti o schizzi e assicurarsi che nessun oggetto riempito di
liquidi, come i vasi, venga posta sull'apparecchiatura.
17. Per scollegare completamente questo apparato dalla rete elettrica AC, scollegare la spina del cavo di
alimentazione dalla presa elettrica AC.
18. La spina di alimentazione del cavo di alimentazione deve rimanere facilmente accessibile.
19.
Questo apparecchio contiene tensioni potenzialmente letali. Per evitare scosse elettriche o rischi, non
rimuovere lo chassis, il modulo di ingresso o le coperture degli ingressi AC. All'interno non ci sono parti
riparabili dall'utente. Per l'assistenza, rivolgersi a personale di assistenza qualificato.
20. Gli altoparlanti trattati in questo manuale non sono destinati ad ambienti esterni ad alta umidità. L'umidità
può danneggiare il cono dell'altoparlante e la cornice e causare la corrosione dei contatti elettrici e delle
parti metalliche. Evitare di esporre gli altoparlanti all'umidità diretta.
21.
Tenere gli altoparlanti lontani dalla luce solare diretta prolungata o intensa. La sospensione del driver si
asciugh
erà prematuramente e le superfici finite potrebbero essere degradate dall'esposizione a lungo
termine alla luce ultravioletta (UV) intensa.
22.
Gli altoparlanti possono generare una notevole energia. Quando viene posizionato su una superficie
scivolosa come legno lucidato o linoleum, l'altoparlante potrebbe spostarsi a causa della sua emissione di
energia acustica.
23. È necessario prendere precauzioni per assicurare che l'altoparlante non cada da un palco o da un tavolo su
cui è posizionato.
24. Gli altoparlanti sono facilmente in grado di generare livelli di pressione sonora (SPL) sufficienti a causare
danni permanenti all'udito agli artisti, alla troupe di produzione e ai membri del pubblico. È necessario
prestare attenzione per evitare l'esposizione prolungata a SPL superiore a 90 dB.

11
Il marchio riportato sul prodotto o sulla documentazione indica che il prodotto non deve essere smaltito con
altri rifiuti domestici al termine del ciclo di vita. Per evitare eventuali danni all’ambiente si invita l’utente a
separare questo prodotto da altri tipi di rifiuti e di riciclarlo in maniera responsabile per favorire il riutilizzo
sostenibile delle risorse materiali. Gli utenti domestici sono invitati a contattare il rivenditore presso il quale è
stato acquistato il prodotto o l’ufficio locale preposto per tutte le informazioni relative alla raccolta differenziata
e al riciclaggio per questo tipo di prodotto. Gli utenti aziendali sono invitati a contattare il proprio fornitore e
verifi
care i termini e le condizioni del contratto di acquisto. Questo prodotto non deve essere smaltito
unitamente ad altri rifiuti commerciali.
DICHIARAZIONE DI CONFORMITÀ
Il prodotto è conforme alle seguenti direttive europee:
EMC 2014/30/EU, RED 2014/53/EU, LVD 2014/35/EU, RoHS 2011/65/EU and WEEE 2012/19/EU.
AVVERTIMENTO EN 55032 (CISPR 32)
Questo è un apparecchio di Classe A. In un ambiente residenziale questo apparecchio può provocare radio disturbi. In questo caso
può essere richiesto all’utilizzatore di prendere misure adeguate.
Sotto il disturbo EM, il rapporto segnale-rumore verrà modificato oltre i 10 dB.
GARANZIA LIMITATA
Proel garantisce tutti i materiali, la lavorazione e il corretto funzionamento di questo prodotto per un periodo di due anni dalla data
di acquisto originale. I difetti rilevati entro il periodo di garanzia sui prodotti venduti, attribuibili a materiali difettosi o difetti di
costruzione, devono essere tempestivamente segnalati al proprio rivenditore o distributore, allegando evidenza scritta della data di
acquisto e descrizione del tipo di difetto riscontrato. Sono esclusi dalla garanzia difetti causati da uso improprio o manomissione.
Proel constata tramite verifica sui resi la difettosità dichiarata, correlata all’appropriato utilizzo, e l’effettiva validità della garanzia;
provvede quindi
alla sostituzione o riparazione dei prodotti, declinando tuttavia ogni obbligo di risarcimento per danni diretti o
indiretti eventualmente derivanti dalla difettosità.
• L’imballo è stato
sottoposto a test di integrità secondo la procedura ISTA 1A. Si raccomanda di controllare il prodotto subito
dopo l’apertura dell’imballo..
• Se vengono riscontrati danni informare immediatamente il rivenditore. Conservare quindi l’imballo completo per permetterne
l’ispezione.
• Proel declina ogni responsabilità per danni causati dal trasporto.
• Le merci sono vendute “franco nostra sede” e viaggiano sempre a rischio e pericolo del distributore.
• Eventuali avarie e danni dovranno essere contestati al vettore. Ogni reclamo per imballi manomessi dovrà essere inoltrato
entro 8 giorni dal ricevimento.
CONDIZIONI D'USO
Proel non si assume alcuna responsabilità per danni causati a terzi a causa di installazione impropria, uso di parti di ricambio non
originali, mancanza di manutenzione, manomissione o uso improprio di questo prodotto, incluso il mancato rispetto di standard di
sicurezza accettabili e applicabili. Proel raccomanda vivamente di sospendere questo cabinet per altoparlanti tenendo in
considerazione tutte le normative nazionali, federali, statali e locali vigenti. Il prodotto deve essere installato da personale
qualificato. Si prega di contattare il produttore per ulteriori informazioni.

12
INDICE
ISTRUZIONI DI SICUREZZA IMPORTANTI _______________________________________________ 10
DICHIARAZIONE DI CONFORMITÀ ____________________________________________________ 11
GARANZIA LIMITATA ______________________________________________________________ 11
CONDIZIONI D'USO _______________________________________________________________ 11
INDICE __________________________________________________________________________ 12
INTRODUZIONE __________________________________________________________________ 12
DESCRIZIONE ____________________________________________________________________ 12
FUNZIONI DEL PANNELLO PRINCIPALE ________________________________________________ 13
INSTALLAZIONE __________________________________________________________________ 16
SPECIFICHE TECNICHE ______________________________________________________________ 17
PANNELLO PRINCIPALE ____________________________________________________________ 18
INSTALLAZIONE __________________________________________________________________ 19
INTRODUZIONE
Grazie per aver scelto un prodotto PROEL. Dedicate del tempo alla lettura di questo manuale per
comprendere tutte le funzionalità del vostro sistema e sfruttare al massimo le sue possibilità operative. Tutti i
nostri prodotti sono conformi alle normative CE per un utilizzo continuo in applicazioni professionali.
DESCRIZIONE
SESSION1 è un sistema a colonna portatile alimentato a batteria dotato di ingressi multipli e di un versatile
lettore MP3 con connettività BLUETOOTH. Alloggiato in cabinet in polipropilene leggeri e allo stesso tempo
robusti, è formato da una colonna con 4 altoparlanti full-range da 2.5” ed un potente subwoofer da 8”.
L’elettronica allo stato dell’arte include una sofisticata sezione di pre-amplificazione con filtri attivi e doppi
LIMITER, ed un potente amplificatore in Classe D da 400W.
Il MEDIA PLAYER che trovate a bordo è in grado di riprodurre musica non solo da una card SD o da una
chiavetta di memoria USB, ma anche dal vostro smartphone o tablet attraverso una connessione
BLUETOOTH, senza bisogno di cavi. Il mixer a tre canali incorporato permette di collegare 2 microfoni o
sorgenti linea ed un player stereo. Un effetto digitale è disponibile per gli ingressi microfonici. Con una
semplice manopola è possibile ottimizzare il suono per voce, musica o bassi spinti adattando il sistema ad
ogni situazione. La batteria agli ioni di Litio incorporata fornisce fino a 8 ore di autonomia, consentendo la
massima libertà di movimento.
SESSION1 può essere utilizzato in una varietà di applicazioni, dalla diffusione vocale e di musica dal vivo, alla
riproduzione di musica e ai DJ sets.

13
FUNZIONI DEL PANNELLO PRINCIPALE
1. CH1 / CH2 XLR input
Connettore XLR femmina che accetta un XLR maschio da qualsiasi microfono dinamico o sorgente a
livello linea bilanciato o sbilanciato. Le terminazioni dell’ingresso XLR sono le seguenti:
Pin 1 = schermo o massa
Pin 2 = + positivo o "caldo"
Pin 3 = - negativo o "freddo"
2. CH2 / CH3 JACK input
Connettore JACK femmina che accetta un JACK maschio da qualsiasi microfono dinamico o sorgente a
livello linea bilanciato o sbilanciato. Le terminazioni dell’ingresso JACK sono le seguenti:
Tip (punta) = + positivo o "caldo"
Ring (anello) = - negativo o "freddo"
Sleeve (manicotto) = schermo o massa
Quando si collega un segnale sbilanciato, le terminazioni sono le seguenti:
Tip (punta) = + positivo o "caldo"
Sleeve (manicotto) = schermo o massa
3. CH1 / CH2 TASTO LINE/MIC
Questo tasto imposta la sensibilità del canale di ingresso tra livello microfono o livello linea.
4. CH1 / CH2 LEVEL
Potenziometri per la regolazione del livello degli ingressi CH1 / CH2.
5. CH1 / CH2 EFFECT
Potenziometri per la regolazione del livello dell’effetto delay sugli ingressi CH1 / CH2.
6. LINE OUT (XLR)
Connettore XLR maschio che fornisce un segnale bilanciato a livello linea con il mix degli ingressi
prelevato prima dei controlli MASTER. Collegarlo all’ingresso di un altro sistema audio o diffusore attivo.
7. CH3 LINE IN (MINI JACK)
Connettore femmina MINI JACK (3.5mm) che accetta un JACK MINI STEREO maschio da una sorgente
ausiliaria (PC / CD / DVD / lettore MP3). Il MINI JACK è terminato come segue:
Tip (punta) = segnale positivo del canale sinistro
Ring (anello) = segnale positivo del canale destro
Sleeve (manicotto) = schermo o massa
8. CH3 TASTO LINE/MP3
Usate questo tasto per selezionare un lettore esterno connesso all’ingresso MINI JACK oppure il Media
Player interno come sorgente per il canale 3.
9. CH3 LEVEL
Potenziometro per la regolazione del corrispondente livello del canale CH3 o del media player interno.
10. SUB LEVEL per SPEECH – MUSIC – BOOST
Questo potenziometro imposta la regolazione dell’equalizzazione del sistema: se ruotato al minimo
enfatizza la voce, al centro è la miglior posizione per la riproduzione musicale, se ruotato al massimo si
esaltano i bassi.
11. SIGNAL / LIMIT
LED VERDE che si illumina quando un segnale e inviato all’amplificatore interno.
LED ROSSO che si illumina quando l’uscita dell’amplificatore interno è limitata. Quando questo LED

14
lampeggia ridurre il segnale di ingresso.
12. MASTER
Potenziometro per la regolazione del livello generale di tutti i segnali inviati all’amplificatore interno.
13. USB SLOT
In questa porta potete inserire una memoria tipo USB (USB FLASH DRIVE) contenente file audio.
Preferibilmente usare solo memorie affidabili, marchi suggeriti sono: Sandisk, Kingston, Lexar,
Verbatim.
14. SD SLOT
In questa porta potete inserire una memoria tipo SD (SD MEMORY CARD) contenente file audio.
15. MODE SWITCH
Premendo questo tasto si sceglie la sorgente contenente i file audio fra SD, USB o Bluetooth. Una piccola
icona appare sul display per identificare la sorgente corrente:
USB FLASH DRIVE
SD MEMORY CARD
BLUETOOTH DEVICE
Per connettere un lettore Bluetooth seguite queste istruzioni:
• Premere MODE una o due volte fino a visualizzare
• Se il simbolo Bluetooth
sul display è acceso fisso, il dispositivo è associato e collegato al
diffusore (un dispositivo associato in precedenza verrà ricollegato automaticamente).
• Se il simbolo Bluetooth sul display lampeggia non è associato alcun dispositivo.
• Per associare un nuovo dispositivo (smartphone, tablet, PC o altro) si deve attivare il Bluetooth del
dispositivo.
• Nella lista dei dispositivi Bluetooth verrà visualizzato un nuovo dispositivo chiamato “SESSION1” e
verrà emesso un tono dal diffusore.
• Per associare il diffusore al dispositivo selezionarlo e se il collegamento ha esito positivo verrà
emesso un altro tono dall'altoparlante.
• Ora vedrai "SESSION1" nell'elenco dei tuoi dispositivi Bluetooth riconosciuti sul tuo smartphone o
tablet e sei pronto per riprodurre musica con esso utilizzando la tua app preferita.
NOTA: il tipo di file audio e la qualità di riproduzione con la connessione Bluetooth dipende dal
dispositivo Bluetooth usato. La portata della connessione Bluetooth è di circa 10 m.
Come collegare due diffusori mediante STEREO LINK: la funzione STEREO LINK consente di
riprodurre tracce stereo su due diffusori SESSION1 collegati insieme. Il diffusore MASTER riprodurrà il
canale sinistro e il diffusore SLAVE riprodurrà il canale destro.
• Il diffusore MASTER deve essere già collegato con il dispositivo Bluetooth utilizzando la procedura
sopra descritta.
• Accendente il diffusore SLAVE e premete MODE fino a quando il display mostra:
• Quindi premete il pulsante STEREO LINK sul diffusore SLAVE e il display mostrerà .
• Attendete alcuni momenti (da 5 a 10 secondi) fino a quando il simbolo Bluetooth sul display
rimane fisso, ad indicare che la connessione è stata stabilita tra il diffusore SLAVE ed il diffusore

15
MASTER. Una doppia nota riprodotta da ciascun diffusore conferma la corretta connessione: ora è
sufficiente premere play sul dispositivo Bluetooth e la vostra musica sarà riprodotta in STEREO da
entrambi i diffusori.
• Se il simbolo Bluetooth sul display continua a lampeggiare, provate a premere il pulsante
STEREO LINK anche sul diffusore MAIN.
NOTA: la funzione STEREO LINK consente di collegare i diffusori solo per la riproduzione da una
sorgente Bluetooth. Se volete riprodurre gli strumenti collegati ai canali del primo diffusore anche sul
secondo, dovete collegarli fisicamente utilizzando un cavo XLR-XLR dal LINE OUT del diffusore
MASTER al LINE IN del diffusore SLAVE. Non utilizzare la funzione STEREO LINK e la connessione via
cavo contemporaneamente.
NOTA: per utilizzare la funzione STEREO LINK entrambi i diffusori devono essere nel raggio di 10 m.
16. STEREO LINK
Utilizzare questo pulsante per collegare due diffusori (vedere sopra).
17. PLAY/PAUSE
Questo pulsante riproduce o mette in pausa il file audio corrente: durante la riproduzione il display
mostra il tempo trascorso- appare sul display quando la canzone è in pausa. Premendolo di nuovo
la riproduzione si riavvia dall'ultima posizione. NOTA: utilizzando il Bluetooth non viene mostrato il
tempo trascorso né .
18. PLAY MODE
Questo pulsante cambia la modalità di riproduzione dei file audio. Un breve testo temporaneo sul
display mostra la modalità corrente.
TUTTO: normale riproduzione in avanti di tutti i brani contenuti in tutte le cartelle, quando
raggiunge l'ultimo brano riparte dal primo.
SINGOLO UNO: suona solo il brano corrente, quindi lo ripete indefinitamente.
CASUALE: riproduce casualmente tutte le canzoni contenute in tutte le cartelle.
FOLDER: riproduce tutti i brani contenuti nella cartella corrente.
Breve spiegazione di come funziona il media player. Quando si inserisce la SD memory card o USB
flash drive nel corrispondente slot, il media player controlla l’intero contenuto della memoria
localizzando tutti i files che possono essere riprodotti (file con le estensioni .WAV .MP3 .WMA .APE
.FLAC). Tutti i files saranno riprodotti in ordine numerico e alfabetico, considerando in primo luogo il
“nome della cartella” ed in seguito il “nome del file”.
19. PREVIOUS SONG
Passa al brano precedente con una pressione breve oppure manda indietro veloce il brano corrente
tenendolo premuto più a lungo.
20. NEXT SONG
Passa al brano successivo con una pressione breve oppure manda avanti veloce il brano corrente
tenendolo premuto più a lungo.

16
21. DISPLAY LCD
Il display mostra diverse informazioni:
22. POWER
Usare questo tasto per accendere e spegnere l’apparecchio.
Nota: se l'unità è collegata alla rete elettrica, il circuito di alimentazione interno ricarica la batteria
anche se l'unità è spenta. Per prolungare la vita della batteria stessa, la carica si avvia se la batteria
interna ha meno del 75% di energia. Quando la batteria è in carica si accende il LED CHARGE.
23. ON
LED VERDE che indica quando il l’apparecchio è stato acceso e l’alimentazione è disponibile.
24. AC~ SOCKET
Inserire in questa presa il cavo di alimentazione di rete, utilizzando esclusivamente il cavo in dotazione.
Accertarsi che l'altoparlante sia spento prima di collegarlo alla rete.
25. FUSE holder
In questo vano è inserito il fusibile di protezione principale di rete.
SOSTITUITE IL FUSIBILE DI PROTEZIONE ESCLUSIVAMENTE CON UN FUSIBILE CON LE MEDESIME
CARATTERISTICHE RIPORTATE SUL PRODOTTO.
SE, DOPO LA SOSTITUZIONE, IL FUSIBILE SI INTERROMPE NUOVAMENTE, NON INSISTETE NELLA
SOSTITUZIONE E CONTATTATE IL SERVIZIO ASSISTENZA PROEL PIU’ VICINO.
26. LIVELLO BATTERIA
Questa barra LED mostra il livello della batteria quando il sistema audio è acceso.
LOW: questo LED ROSSO indica che la potenza residua della batteria interna è inferiore al 50% della capacità
(gli altri LED sono spenti). Quando questo LED è acceso collegate il sistema ad una presa di corrente.
50%: questo LED VERDE indica che la potenza residua della batteria è compresa tra il 50% e il 75% della
capacità.
75%: questo LED VERDE indica che la potenza residua della batteria è compresa tra il 75% e il 100% della
capacità.
100%: questo LED VERDE indica che la batteria interna è completamente carica.
CHARGE: questo LED GIALLO indica che la batteria interna è in carica. Per prolungare la durata della
batteria, il carica-batterie interno di solito si avvia solo quando il livello della batteria è inferiore al
75% della capacità, sia che il sistema audio sia acceso o spento, purché sia collegato alla rete elettrica.
INSTALLAZIONE
1. Inserire i moduli della colonna nella parte superiore del sub con l'altoparlante della colonna in alto.
2. Ottimizza l'altezza totale della colonna con la parte superiore appena sopra la testa del pubblico.
3. Collega i dispositivi che intendi utilizzare al pannello posteriore, accendi e divertiti.

17
SPECIFICHE TECNICHE
Sezione MIXER
Ingressi MONO
2 x MIC/LINE IN (XLR-F + 1.4" JACK)
Ingressi STEREO
1 x LINE IN (MINI-JACK)
Outputs
LINE OUT (XLR-M)
Controllo EQ
SUB LEVEL (SPEECH-MUSIC-BOOST)
Internal Effect
ECHO-DELAY
Sezione MULTIMEDIA
Dispositivi di Riproduzione
USB / SD / WIRELESS AUDIO con STEREO LINK
Formato File Compatibili
MP3, WAV, WMA, APE, FLAC
Controlli Interfaccia
LCD display, tasti di CONTROLLO
Sezione AMPLIFICATORE
Potenza di Picco Totale
400 W
Potenza Continua
200 W
Tipo di Amplificatore
Class D
Tipo di Alimentatore
SMPS
Processamento
Analogico
Sezione ALTOPARLANTI
Tipo di Sistema
Sistema a Colonna Compatto con Subwoofer
Alta Frequenza
4 x 2.5" (66mm) full range drivers
Bassa Frequenza
8” (200mm) woofer con bobina 1.5”
Copertura Angolare
90° O x 60° V
Risposta in Frequenza
50Hz – 18kHz
SPL Massima
108 dB
Specifiche BATTERIA
Tipo Batteria
11.1 V , 8000 mAh , Batteria al Litio
Durata Batteria
8 - 10 ore
Tempo di Ricarica Batteria
5 - 8 ore
Specifiche GENERALI
Materiale
Polipropilene
Colore
Nero
Sistema Colonna
3-pz - Sistema di connessione veloce con collegamenti
Maniglie
1 x subwoofer sopra
Accessori
Borsa Imbottita per 3-pz colonna
Dimensioni (L x A x P)
SUB: 318x 400 x484.5 mm
COLUNNA (ciascuno pz): 520 X 84 X 97.5 mm
Peso
14.5 Kg (sistema completo)
Tensione Alimentazione
100-240 V~ 50/60 Hz
Potenza Alimentazione
100 W

18
MAIN PANEL / PANNELLO PRINCIPALE

19
INSTALLATION / INSTALLAZIONE

-
 1
1
-
 2
2
-
 3
3
-
 4
4
-
 5
5
-
 6
6
-
 7
7
-
 8
8
-
 9
9
-
 10
10
-
 11
11
-
 12
12
-
 13
13
-
 14
14
-
 15
15
-
 16
16
-
 17
17
-
 18
18
-
 19
19
-
 20
20