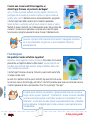
Haba 305485 Manuale del proprietario
- Categoria
- Giochi da tavolo
- Tipo
- Manuale del proprietario

1
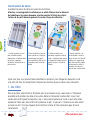
Meine ersten Spiele
DEUTSCH
Spielanleitung
·
Rulebook
·
Règle du jeu
·
Spelregels
·
Instrucciones
·
Istruzioni
Copyright - Spiele Bad Rodach 2020
Need to Potty! · Bonjour petit pot !
Op het potje · ¡Tengo pipí! · Ciao vasino!
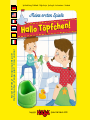
Hallo Töpfchen!
Hallo Töpfchen!
Meine ersten Spiele


3
Meine ersten Spiele
DEUTSCH
Meine ersten Spiele
Hallo Töpfchen!
Ein kooperatives Würfelspiel für 1 – 4 Kinder ab 2 Jahren.
Autorin: Franziska Knauber
Illustration: Sandy Thißen
Redaktion: Annemarie Wolke
Spieldauer: ca. 5 Minuten
Spielinhalt
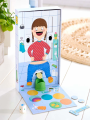
1 Spielkulisse (4-teiliges Steckkreuz, doppelseitiger Oberkörper-Spielplan, Unterkörper-Spielplan,
Badezimmerboden-Spielplan), 3 Getränkeplättchen, 1 Wischerplättchen, 1 Würfel, 1 Töpfchen,
1 Spielanleitung
Liebe Eltern,
herzlichen Glückwunsch zum Kauf dieses Spiels aus der Reihe Meine ersten Spiele. Sie haben
eine gute Wahl getroffen und eröffnen Ihrem Kind damit viele Perspektiven, sich spielerisch zu
entwickeln.
Diese Anleitung bietet Ihnen viele Tipps und Anregungen, wie Sie das Spielmaterial gemeinsam
mit Ihrem Kind entdecken und für verschiedene Spiele einsetzen können. Dabei werden
unterschiedliche Fähigkeiten und Fertigkeiten Ihres Kindes gefördert: Feinmotorik, Sprache,
genaues Schauen, Teamfähigkeit sowie das Erkennen und Zuordnen von Symbolen. Vor allem
macht das Spielen aber eines: viel Spaß! Lernen geht also nebenbei und fast von allein.
Wir wünschen Ihnen und Ihrem Kind viel Spaß beim Spielen!
Ihre Erfinder für Kinder
Bitte drücken Sie die Plättchen vorsichtig aus dem Tableau. Der innere Papprahmen und die kleineren
Pappteile aus den Schlitzen und Löchern werden für das Spiel nicht benötigt und müssen entsorgt
werden.

4
Meine ersten Spiele
DEUTSCH
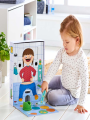
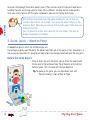
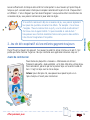
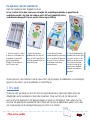
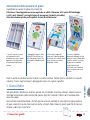
Aufbau der Spielkulisse
Bauen Sie die Spielkulisse wie abgebildet zusammen:
Achtung: Zusammenbau durch Erwachsene. Entfernen Sie alle Verpackungsteile
und Stanzteile, bevor Sie den Artikel an Kinder weitergeben.
Diese sind teilweise verschluckbare Kleinteile. Erstickungsgefahr!
Nach dem Spiel können Sie das Steckkreuz zusammengebaut lassen. Verstauen Sie die Plättchen, den
Würfel und das Töpfchen einfach in den Fächern. Legen Sie die Spielpläne vorsichtig wieder darauf.
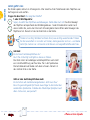
1. Freies Spiel
Im freien Spiel beschäftigt sich Ihr Kind mit dem Spielmaterial. Spielen Sie mit! Erkunden Sie
gemeinsam die Abbildungen auf der Spielkulisse und die anderen Materialien. Fragen Sie Ihr Kind,
was es entdeckt.
Lassen Sie Ihr Kind die Pipiplättchen in das Töpfchen legen und sprechen Sie dabei darüber, was
diese Aktion verdeutlicht. Sprechen Sie gemeinsam mit Ihrem Kind darüber, wofür das Töpfchen da ist.
Üben sie auch das Würfeln. Das richtige Maß an Schwung und Kraft abzuschätzen, ist manchmal gar
nicht so einfach.
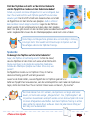
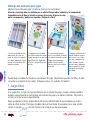
1. Stecken Sie das Steckkreuz
im Schachtelboden zusammen.
Die Farbpunkte helfen dabei.
Wichtig: Achten Sie auf die
Ausrichtung der Schräge.
2. Legen Sie den Oberkörper-
Spielplan darauf. Mit welcher
Seite gespielt wird (Paul oder
Pia), können Sie frei entscheiden.
Beziehen Sie Ihr Kind gerne in
diese Entscheidung mit ein.
3. Stecken Sie danach den
Unterkörper-Spielplan vorsichtig
darüber. Achten Sie darauf, dass
die seitlichen Laschen zwischen
Steckkreuz und Schachtelboden
klemmen.
4. Stecken Sie den
Badezimmerboden-Spielplan
an der kurzen Seite
zwischen Steckkreuz und
Schachtelboden und stellen
Sie die gesamte Spielkulisse
hochkant auf. Achten Sie
darauf, dass der Oberkörper-
Spielplan ganz nach unten
geschoben ist.

5
Meine ersten Spiele
DEUTSCH
Lassen Sie Ihrem Kind dabei genügend Zeit und bleiben Sie geduldig, wenn es nach Ihrem Empfinden
sehr lange dauert oder Ihr Kind für die richtige Handhabung von Töpfchen und Würfel noch Hilfe
benötigt. Jedes Kind ist anders ... und nur Übung macht den Meister. Wenn Ihr Kind dann mit dem
Spielmaterial vertraut ist, können Sie mit dem Regelspiel starten.
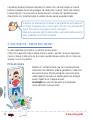
2. Eins, zwei - Töpfchen eil herbei!
Ein kooperatives Würfelspiel, bei dem die Kinder immer gewinnen.
Paul und Pia müssen ganz dringend aufs Töpfchen! Die Spieler helfen ihnen dabei, rechtzeitig auf
das Töpfchen zu gehen. Manchmal ist es nämlich gar nicht so leicht, abzuschätzen, wann es wirklich
dringend wird. Wer fleißig übt, dem gelingt es ganz sicher!
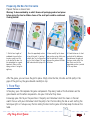
Bevor es losgeht
Legen Sie alle Getränkeplättchen mit der Getränkeseite nach oben.
Legen Sie das Wischerplättchen und den Würfel neben der Spielfläche
bereit. Zu Beginn stellen Sie das Töpfchen auf das erste Badematten-Feld
auf dem Badezimmerboden-Spielplan. Dies ist die Badematte mit den
Fußmotiven.
Tipp: Für ein schnelleres Spiel können Sie das Töpfchen auch direkt
weiter vorne starten lassen.
Bei Kindern, die das Spielmaterial schon kennen, können Sie auch Fragen nach
Details stellen. Beispiele sind: Wo ist die Spinne zu sehen? Was liegt alles auf
dem Badezimmerboden? Wo überall findest du Klopapier? Wie sieht es in
deinem Badezimmer aus?
Sie können sich auch gemeinsam eigene Namen für die beiden Kinder über-
legen. Das fördert die Fantasie und das Einfühlungsvermögen.

6
Meine ersten Spiele
DEUTSCH
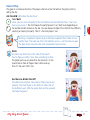
Jetzt geht’s los
Die Kinder spielen reihum im Uhrzeigersinn. Wer zuletzt auf der Toilette oder dem Töpfchen war,
darf beginnen und würfeln.
Fragen Sie das Kind: Was zeigt der Würfel?
1 oder 2 Würfelpunkte:
Super, du darfst das Töpfchen weiterbewegen. Zähle dabei laut mit. Das Kind bewegt
das Töpfchen entsprechend des Würfelergebnisses 1 oder 2 Badematten weiter nach
vorne. Helfen Sie, wenn das Kind noch Schwierigkeiten beim Zählen oder Bewegen des
Töpfchens hat. Danach ist das nächste Kind an der Reihe.
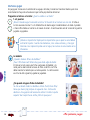
Getränk:
Es sind noch Getränkeplättchen da?
Paul / Pia ist durstig! Jetzt gibt es etwas zu trinken.
Das Kind nimmt ein beliebiges Getränkeplättchen und steckt
es in die Mundöffnung von Paul bzw. Pia in der Spielkulisse.
Die Getränkeseite soll dabei nach oben schauen. Danach ist
das nächste Kind an der Reihe.
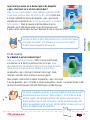
Gibt es kein Getränkeplättchen mehr
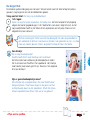
Es sind schon alle Getränke leergetrunken. Jetzt muss Paul
bzw. Pia ganz dringend Pipi.Stecke zwei Finger in die Löcher der
senkrechten Spielkulisse. Schiebe den Oberkörper-Spielplan nach
oben. Schau mal, was passiert!
Trinken ist wichtig! Erklären Sie Ihrem Kind, wie wichtig ausreichendes Trinken
für die Gesundheit ist. Je mehr wir trinken, desto gesünder sind wir – und desto
mehr Pipi machen wir. Am besten sind Wasser und ungesüßte Säfte oder Tees.

7
Meine ersten Spiele
DEUTSCH
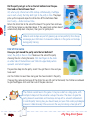
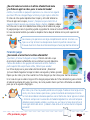
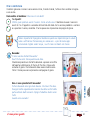
Steht das Töpfchen noch nicht auf der letzten Badematte
und die Pipiplättchen landen auf dem Badezimmerboden?
Schade, es passiert ein kleines Missgeschick. Es war so dringend, dass
Paul / Pia es leider nicht bis aufs Töpfchen geschafft hat und etwas
daneben geht. Das Kind hilft schnell beim Saubermachen und schiebt
die Pipiplättchen mit dem Wischer vom Spielplan. Halb so schlimm!
Beim nächsten Versuch klappt es bestimmt. Legen Sie die Plättchen
danach wieder mit der Getränkeseite nach oben neben dem Spielplan
bereit. Das Spiel geht danach mit dem nächsten Spieler wie oben beschrieben
weiter. Gegebenenfalls müssen Sie den Oberkörperspielplan wieder nach unten schieben.
Spielende
Du bewegst das Töpfchen auf die letzte Badematte?
Super, das Töpfchen ist rechtzeitig erreicht! Achten Sie darauf,
dass das Töpfchen mit dem Stern nach vorne auf der Matte steht.
Stecke zwei Finger in die Löcher der senkrechten Spielkulisse.
Schiebe den Oberkörper-Spielplan nach oben. Schau mal, was
passiert!
Die Pipiplättchen landen nun im Töpfchen: Prima, ihr habt es
diesmal rechtzeitig geschafft und habt gewonnen!
Lassen Sie die Kinder zählen, wie viele Pipiplättchen im Töpfchen gelandet sind.
Sollte kein Pipiplättchen herauskommen, weil alle Getränkeplättchen noch neben der Spielkulisse
liegen, dürfen die Kinder Paul / Pia ein Getränk trinken lassen und danach „Pipi machen“.
Rückschläge und Missgeschicke gehören dazu und sind völlig in Ordnung.
Ermutigen Sie Ihr Kind sowohl bei Enttäuschungen im Spiel als auch bei
Misserfolgen während des Töpfchen-Trainings.
Die Kinder können hier nicht verlieren, das Spiel kann nur länger oder kürzer
dauern, mit mehr oder weniger „Missgeschicken“. Das „Töpfchengehen“ soll
mit positiven Assoziationen verknüpft werden und am Ende auf jeden Fall immer
mit einem Erfolgserlebnis abschließen. Auch beim Töpfchen-Training im echten
Leben sollten Sie niemals Druck aufbauen. Feiern Sie jeden kleinen Erfolg auf
dem Weg zum Sauberwerden!

8
My Very First Games
ENGLISH
My Very First Games
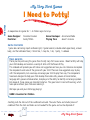
I Need to Potty!
A cooperative dice game for 1 - 4 children ages 2 and up.
Game Designer: Franziska Knauber
Illustrator: Sandy Thißen
Game Developer: Annemarie Wolke
Playing Time: about 5 minutes
Game Contents
1 game box containing 4-part cardboard grid, 3 game boards (a double-sided upper body, a lower
body, and the bathroom floor), 3 drink tiles, 1 mop tile, 1 die, 1 potty, 1 rulebook
Dear parents,
Thank you for purchasing this game from the My Very First Games series. I Need to Potty will help
your child develop and work on a variety of skills with the Power of Play.
This rulebook will provide you with ideas and suggestions on how you can introduce and explore
the components and rules of the game with your child. There are two suggested ways to play
with the components, but we always encourage your child to play their way. The components
have been designed to help your child develop fine motor skills, powers of concentration,
language skills, powers of observation, teamplay and the ability to identify and arrange symbols.
But above all, these games are intended to be fun. This goes hand in hand with learning, which
takes place without your child even realizing it.
We hope you and your child enjoy playing!
HABA’s Inventors for Children
Carefully push the tiles out of the cardboard surround. The outer frame and smaller pieces of
cardboard from the slots and holes are not needed for the game and can be disposed of.

9
My Very First Games
ENGLISH
Preparing the Box for the Game
Prepare the box as shown here:
Warning: To be assembled by an adult. Remove all packaging and cut out pieces
before giving the item to children. Some of the small parts could be swallowed.
Choking hazard!
After the game, you can leave the grid in place. Simply store the tiles, the dice and the potty in the
gaps of the grid. Lay the game boards carefully on top.
1. Free Play
In free play, your child explores the game components. Play along! Look at the illustrations on the
game boards and the other components. Ask your child what they show.
Encourage your child to put the pee tiles in the potty and talk about what this means in the real
world. Discuss with your child about what the potty is for. Practice rolling the die as well. Getting the
technique right isn’t always easy. Practice rolling the die into the game lid to help keep the die on the
table.
1. Slot the four lengths of
cardboard into each other
to make a grid. Insert this
in the base of the box. Use
the colored dots as a guide.
Important: Make sure the
sloping section is facing the
right way.
2. Place the upper body section
on top of the grid. It is printed
on both sides, so it will go either
way (i.e. Paul or Pippa). Ask your
child to decide who to play with.
3. Now carefully lay the lower
body section on top. Make sure
that the side tabs fit snugly
between the grid and the sides
of the box.
4. Stand the box on its short
end and slot the bathroom
floor between the grid and
the lower inside wall of the
box. Make sure that the
upper body section is pushed
all the way down.

10
My Very First Games
ENGLISH
Give your child enough time and be patient, even if they are slow to get the idea and need help in
handling the potty and the die correctly. Every child is different, and only practice makes perfect.
Once your child is familiar with the game components, you can start to play by the rules.
2. Quick, Quick – I Need to Potty!
A cooperative game in which the children always win.
Paul or Pippa urgently need the potty! The players help them get on the potty in time. Sometimes it is
not so easy to know when it’s going to get really urgent. But everyone eventually gets the hang of it!
Before the Game Begins
Place all drinks tiles with the drinks side up. Place the mop tile and
the die next to the bathroom floor. Place the potty on the starting
bathmat space. This is the one with the two footprints.
Tip: To speed up the game, you can alternatively start with
the potty directly in front of Paul or Pippa.
With children who already know the game components, you can also ask
questions about details. For example: Can you see the spider? What’s on the
bathroom floor? Where do you normally find the toilet paper? What does your
bathroom look like?
They can also think up their own names for the two children. This helps to
develop imagination and empathy.

11
My Very First Games
ENGLISH
How to Play
Play goes in a clockwise direction. The player who last sat on the toilet or the potty starts by
rolling the die.
Ask the child: What does the die show?
1 or 2 dots:
Great, you can move the potty to the next bathmat on the bathroom floor. Count out
loud as you move it. The child moves the potty forward 1 or 2 bath mats depending on
the number of dots shown on the die. You are allowed to help if the child still has difficulty
counting or moving the potty. Then it’s the next player’s turn.
Drink:
Are there any drinks tiles at the side of the board?
Paul or Pippa are thirsty! Give them something to drink.
The player picks up any one drink tile and puts it in the
mouth slot on Paul or Pippa’s head, drinks side up.
Then it’s the next child’s turn.
Are there no drinks tiles left?
The drinks have all gone. Now Paul or Pippa have to pee
urgently. Stick two fingers in the holes on either side of
the bathroom wall. Slide the upper body section upwards.
Look what happens!
Drinking is important! Explain to your child how important fluid intake is for a
healthy body. The more we drink, the healthier we are – and the more we pee.
The best drinks are pure water and unsweetened juices or teas.

12
My Very First Games
ENGLISH
Did the potty not get as far as the last bathmat and the pee
tiles land on the bathroom floor?
Oh, what a pity. We’ve had a little mishap. Unfortunately, Paul/Pippa
was in such a hurry that they didn’t get to the potty in time. The player
picks up the mop and wipes the drinks tiles off the bathroom floor.
Don’t worry… Better luck next time.
Return the drink tiles to the side of the board. The game then continues
with the next player as described above. If the upper body section doesn’t
automatically drop back into place, then give it a gentle push.
End of the Game
Have you just moved the potty onto the last bathmat?
Great, the potty is there in time! Make sure the side of the potty
showing the star is facing forwards. Stick two fingers in the holes
on either side of the bathroom wall. Slide the upper body section
upwards. Look what happens!
The pee tiles drop into the potty. Great! You got there in time and you
have won!!
Ask the children to count how many pee tiles have landed in the potty.
If no pee tiles come out because all the drinks tiles are still next to the board, the children are allowed
to give Paul/Pippa a drink and then watch the pee come out.
Setbacks and mishaps are part of growing up and are perfectly fine. Always
encourage your child when it encounters setbacks in the game and mishaps
during potty training.
The children cannot lose in this game. It may be a short or a long game, with
multiple mishaps but the outcome is always the same. The idea is to give the
potty pleasant associations and to always end up with a sense of achievement.
In real-life potty training too, you should never put your child under psychological
pressure. Celebrate every little success on the way to making a clean job of it!

13
Mes premiers jeux
FRANÇAIS
Mes premiers jeux
Bonjour petit pot !
Un jeu de dé coopératif pour 1 à 4 enfants à partir de 2 ans.
Auteure : Franziska Knauber
Illustration : Sandy Thißen
Rédaction : Annemarie Wolke
Durée de la partie : 5 à 10 minutes
Contenu du je
1 décor de jeu (4 parties à emboîter en croix, 1 planche cartonnée double face « haut du corps »,
1 planche cartonnée « bas du corps », 1 planche cartonnée « sol de salle de bain »), 3 plaquettes
« boissons », 1 plaquette « balai-serpillière », 1 dé, 1 petit pot, 1 règle du jeu
Chers parents,
Nous vous félicitons d’avoir acheté ce jeu de la série Mes premiers jeux. Vous avez fait un bon
choix et allez permettre à votre enfant d’évoluer dans un environnement ludique en lui ouvrant
de nombreuses perspectives. Dans ce livret, nous vous donnons de nombreux conseils ainsi que
des suggestions pour faire découvrir les accessoires du jeu à votre enfant et les utiliser pour
différents jeux. Ces jeux permettront de stimuler différentes capacités et aptitudes de votre
enfant : la motricité fine, le langage, l’observation, l’esprit d’équipe ainsi que la reconnaissance
et le classement de symboles. Ce jeu est surtout fait pour apporter beaucoup de plaisir à jouer !
Apprendre se fait donc tout simplement et sans s’en rendre compte.
Nous vous souhaitons beaucoup de plaisir à jouer ensemble.
Les créateurs pour enfants joueurs
Veuillez appuyer sur les plaquettes avec précaution pour les détacher de la planche. Vous pouvez jeter
le cadre intérieur et les chutes en carton qui ne seront pas utilisés pour le jeu.

14
Mes premiers jeux
FRANÇAIS
Construction du décor
Assemblez les pièces du décor en suivant les illustrations :
Attention : le montage doit être effectué par un adulte. Éliminez tous les éléments
de l’emballage et les pièces découpées avant de remettre l’article à des enfants.
Certains de ces petits éléments peuvent être avalés. Risque de suffocation !
Après avoir joué, vous pourrez laisser emboîtées les parties en croix. Rangez les plaquettes, le dé
et le petit pot dans les compartiments. Reposez les planches de jeu par-dessus avec précaution.
1. Jeu libre
Dans le jeu libre, votre enfant se familiarise avec les accessoires du jeu. Jouez avec lui ! Découvrez
ensemble les illustrations du décor et les autres éléments. Demandez à votre enfant ce qu’il voit.
Laissez votre enfant poser la plaquette « pipi » dans le pot et parlez avec lui de ce que cette action
représente. Parlez avec votre enfant de la présence du pot : à quoi sert-il ? Exercez aussi votre enfant
au lancer du dé. Il n’est pas toujours facile d’estimer la force et l'élan nécessaires pour le lancer
correctement.
1. Insérez les parties en croix
dans le fond de la boîte.
Repérez-vous à l’aide des points
de couleurs. Important :
attention à l’orientation de la
pièce inclinée.
2. Posez la planche « haut du
corps » par-dessus. Choisissez
le personnage avec lequel
vous voulez jouer (Paul ou Pia).
Demandez à votre enfant de
décider.
3. Enfoncez ensuite avec
précaution la planche « bas du
corps ». Attention à bien insérer
les languettes latérales entre les
parties en croix et le fond de
la boîte.
4. Insérez la planche « sol
de salle de bain » entre les
parties en croix et le fond de
la boîte sur la largeur de la
boîte. Placez ensuite la boîte
verticalement en veillant à
bien pousser la planche «
haut du corps » jusqu’en bas.

15
Mes premiers jeux
FRANÇAIS
Laissez suffisamment de temps à votre enfant et restez patient si vous trouvez qu’il prend trop de
temps ou qu’il a encore besoin d’aide pour manipuler correctement le pot et le dé. Chaque enfant
est différent…C’est en forgeant que l’on devient forgeron ! Lorsque votre enfant connaîtra bien les
accessoires de jeu, vous pourrez commencer à jouer selon les règles.
2. Jeu de dé coopératif où les enfants gagnent toujours
Paul et Pia ont un besoin très pressant ! Les joueurs les aident à arriver à temps sur le pot. Il n’est
parfois pas facile d’estimer l’urgence. Celui qui s’entraîne avec application réussira à coup sûr !
Avant de commencer
Posez toutes les plaquettes « boissons » côté boisson vers le haut.
Préparez la plaquette « balai-serpillière » et le dé à côté de la surface de jeu.
Pour commencer, placez le pot sur le premier tapis sur le sol de la salle de
bain. Il s’agit du tapis avec les traces de pas
Astuce : pour aller plus vite, vous pouvez aussi poser le pot sur un
tapis situé plus à l’avant pour commencer.
Si les enfants connaissent déjà les accessoires de jeu, vous pourrez également
leur poser des questions concernant les détails. Par exemple : Où se trouve
l’araignée ? Peux-tu nommer tout ce qu’il y a sur le sol de la salle de bain ?
Où trouve-t-on du papier toilette ? A quoi ressemble ta salle de bain ?
Vous pouvez aussi chercher ensemble d’autres noms pour les deux enfants.
Cela stimule l’imagination et l’empathie.

16
Mes premiers jeux
FRANÇAIS
C’est parti
Les enfants jouent chacun leur tour dans le sens des aiguilles d’une montre. Le dernier qui est allé aux
toilettes ou sur le pot commence et lance le dé.
Demandez à l’enfant : Qu’indique le dé ?
1 ou 2 points :
Super, tu peux avancer le pot. Compte à voix haute. L’enfant avance le pot d’1 ou 2 tapis selon
le nombre de points du dé. Aidez l’enfant s’il a des difficultés à compter ou à déplacer le
pot. Puis, c’est au tour de l’enfant suivant.
Boisson :
Reste-t-il encore des plaquettes « boissons » ?
Paul / Pia a soif ! Donne-lui quelque chose à boire.
L’enfant prend une plaquette « boisson » et l’insère dans
l’ouverture de la bouche de Paul ou Pia. La boisson doit
être visible. Puis, c’est au tour de l’enfant suivant.
Il n’y a plus de plaquette « boisson » ?
Toutes les boissons ont été bues. Paul ou Pia doit vite aller faire
pipi ! Insère deux doigts dans les trous du décor vertical près de
la tête de l’enfant. Pousse le haut du corps vers le haut.
Observe ce qu’il se passe !
Il est important de boire ! Expliquez à votre enfant qu’il est important de boire
suffisamment pour être en bonne santé. Plus on boit, plus on est en bonne
santé….et plus on fait pipi ! L’eau et les jus de fruits non sucrés ou les infusions
sans sucre sont ce qu’il y a de mieux.

17
Mes premiers jeux
FRANÇAIS
Le pot n’est pas encore sur le dernier tapis et les plaquettes
« pipi » atterrissent sur le sol de la salle de bain ?
Oups, il y a eu un petit accident ! C’était tellement urgent que Paul/Pia
n’a pas réussi à arriver à temps sur le pot et a fait à côté. L’enfant aide
à nettoyer rapidement et pousse les plaquettes « pipi » avec le balai-
serpillière hors du plateau de jeu. Ce n’est pas trop grave ! La prochaine
fois tu réussiras ! Posez de nouveau à côté du plateau de jeu les
plaquettes avec le côté boisson visible. Le jeu continue ensuite avec
le joueur suivant comme décrit plus haut. Repoussez le haut du corps vers le bas.
Fin de la partie
Tu as déplacé le pot sur le dernier tapis ?
Super, tu as atteint le pot à temps ! Veillez à ce que la petite étoile
se trouve bien sur le devant du pot lorsqu’il est sur le tapis. Insère
deux doigts dans les trous du décor vertical à côté du visage de l’enfant.
Pousse le haut du corps vers le haut. Observe ce qu’il se passe !
Les plaquettes « pipi » atterrissent maintenant dans le pot : bravo,
cette fois-ci vous êtes arrivés à temps et vous avez gagné !
Faites compter à votre enfant le nombre de plaquettes « pipi » dans le pot.
Si aucune plaquette « pipi » ne tombe car toutes les plaquettes « boisson » se trouvent encore à côté
du décor, les enfants peuvent faire boire Paul/Pia pour qu’il/elle fasse pipi.
Les échecs et petits accidents font partie de la vie, c’est tout à fait normal.
Encouragez votre enfant, qu’il échoue dans le jeu ou qu’il ait de petits
accidents lorsqu’il apprend à aller sur le pot.
Les enfants ne peuvent pas perdre : le jeu peut simplement durer plus ou moins
longtemps avec plus ou moins de « petits accidents ». Le fait d’aller sur le pot
doit être associé à des sentiments positifs et doit toujours se terminer par un
résultat gratifiant. Dans la vraie vie non plus, il ne faut pas faire pression sur les
enfants qui apprennent à aller sur le pot. Félicitez l’enfant à chaque succès sur le
chemin de l’apprentissage de la propreté !

18
Mijn eerste spellen
NEDERLANDS
Mijn eerste spellen
Op het potje
Een coöperatief dobbelspel voor 1-4 kinderen vanaf 2 jaar.
Auteur: Franziska Knauber
Illustrator: Sandy Thißen
Redactie: Annemarie Wolke
Speelduur: 5-10 minuten
Spelinhoud
1 speeldecor (4-delig inzetkruis, dubbelzijdig bovenlichaam-speelbord, onderlichaam-speelbord,
badkamervloer-speelbord), 3 drankenplaatjes, 1 vloerwisserplaatje, 1 dobbelsteen, 1 plaspotje,
1 spelhandleiding
Lieve ouders
Van harte gefeliciteerd met de aankoop van dit spel uit de serie Mijn eerste spellen. U hebt een
goede keuze gemaakt, waarmee uw kind verschillende perspectieven krijgt aangereikt om zich
spelenderwijs te ontwikkelen.
In deze handleiding vindt u talrijke tips om het spelmateriaal samen met uw kind te ontdekken
en het te gebruiken voor verschillende spellen. Bij het spelen worden diverse vaardigheden en
vermogens van uw kind bevorderd: fijne motoriek, taal, aandachtig observeren, teamwork en
het herkennen en ordenen van symbolen. Maar bij ieder spel staat steeds één ding voorop: veel
plezier! Zo wordt tijdens het spelen een heleboel haast vanzelf geleerd.
Veel plezier bij het samen spelen wensen u,
de uitvinders voor kinderen
Duw de plaatjes voorzichtig uit de plaat. De binnenste kartonnen frames en de kleinere kartonnen
delen uit de sleuven en gaten zijn niet nodig voor het spel en kunnen worden weggegooid.

19
Mijn eerste spellen
NEDERLANDS
De opbouw van het speeldecor
Steek het speeldecor zoals afgebeeld in elkaar.
Let op: in elkaar zetten door volwassene. Verwijder alle verpakkingsonderdelen en geperforeerde
onderdelen voordat u het item aan kinderen geeft. Het bevat gedeeltelijk kleine
onderdelen die doorgeslikt kunnen worden. Gevaar op verstikking!
Na het spel kunt u het inzetkruis in elkaar laten zitten. Leg de plaatjes, de dobbelsteen en het plaspotje
gewoon in de vakken. Leg de speelborden er voorzichtig op.
1. Vrij spel
Tijdens het vrije spel houdt uw kind zich met het spelmateriaal bezig. Speel mee! Bekijk samen de
afbeeldingen op het speeldecor en de andere materialen. Vraag uw kind wat het allemaal ziet.
Laat uw kind het plasplaatje in het plaspotje leggen en vertel wat dit betekent. Praat samen met het
kind over het plaspotje en waarvoor het dient. Oefen ook het met de dobbelsteen gooien. Het is soms
niet zo eenvoudig om de benodigde beweging en kracht in te schatten.
1. Steek het inzetkruis in elkaar
en plaats het in de bodem van
de speldoos. De gekleurde
punten helpen daarbij.
Belangrijk: let op de positie
van het schuine deel.
2. Leg het bovenlichaam-
speelbord erop. Men kan zelf
kiezen met welke zijde (Paul of
Pia) wordt gespeeld. Betrek uw
kind bij deze keuze.
3. Steek daarna het onder-
lichaam-speelbord er voorzichtig
over. Let erop dat de lippen aan
de zijkant tussen het inzetkruis
en de bodem van de doos
worden geklemd.
4. Steek het badkamervloer-
speelbord aan de korte zijde
tussen het inzetkruis en de
bodem van de doos en zet
het complete speeldecor
rechtop. Let erop dat het
bovenlichaam-speelbord
helemaal naar onderen is
geschoven.

20
Mijn eerste spellen
NEDERLANDS
Geef uw kind daarbij voldoende tijd en blijf geduldig, als het voor uw gevoel erg lang duurt of als
uw kind hulp nodig heeft om het plaspotje en de dobbelsteen juist te gebruiken. Elk kind is anders
en alleen oefening baart kunst. Als uw kind met het spelmateriaal vertrouwd is, kunt u beginnen met
het spel volgens de regels.
2. Hop, hop, het potje op!
Een coöperatief dobbelspel waarbij de kinderen altijd winnen.
Paul en Pia moeten heel dringend plassen! De spelers helpen hen om tijdig op het potje te gaan.
Soms is het namelijk niet zo gemakkelijk om in te schatten wanneer het écht dringend wordt.
Voordat er wordt begonnen
Leg alle drankenplaatjes met het drankje naar boven. Leg het
vloerwisserplaatje en de dobbelsteen klaar naast het speeldecor.
Om te beginnen, zet u het plaspotje op het eerste badmatveld op
het badkamervloer-speelbord. Dit is de badmat met de voeten.
Tip: voor een korter spel kunt u het potje bij de start ook
verder naar voren plaatsen.
Uil: Aan kinderen die het spelmateriaal al kennen, kunt u ook vragen stellen
over de details. Bijvoorbeeld: Waar zit de spin? Wat ligt er allemaal op de
badkamervloer? Waar zie je overal toiletpapier? Hoe ziet jouw badkamer eruit?
Jullie kunnen ook samen zelf namen voor de twee kindjes bedenken.
Dat bevordert de fantasie en het inlevingsvermogen
La pagina si sta caricando...
La pagina si sta caricando...
La pagina si sta caricando...
La pagina si sta caricando...
La pagina si sta caricando...
La pagina si sta caricando...
La pagina si sta caricando...
La pagina si sta caricando...
La pagina si sta caricando...
La pagina si sta caricando...
La pagina si sta caricando...
La pagina si sta caricando...
La pagina si sta caricando...
La pagina si sta caricando...
La pagina si sta caricando...
La pagina si sta caricando...
-
 1
1
-
 2
2
-
 3
3
-
 4
4
-
 5
5
-
 6
6
-
 7
7
-
 8
8
-
 9
9
-
 10
10
-
 11
11
-
 12
12
-
 13
13
-
 14
14
-
 15
15
-
 16
16
-
 17
17
-
 18
18
-
 19
19
-
 20
20
-
 21
21
-
 22
22
-
 23
23
-
 24
24
-
 25
25
-
 26
26
-
 27
27
-
 28
28
-
 29
29
-
 30
30
-
 31
31
-
 32
32
-
 33
33
-
 34
34
-
 35
35
-
 36
36


Haba 305485 Manuale del proprietario
- Categoria
- Giochi da tavolo
- Tipo
- Manuale del proprietario
in altre lingue
- English: Haba 305485 Owner's manual
- français: Haba 305485 Le manuel du propriétaire
- español: Haba 305485 El manual del propietario
- Deutsch: Haba 305485 Bedienungsanleitung
- Nederlands: Haba 305485 de handleiding


