Dell E515dw Multifunction Printer Guida Rapida
- Categoria
- Telefoni
- Tipo
- Guida Rapida

Dell™ Multifunction Printer | E515dw
Dell™ Multifunction Printer | E515dn
Dell™ Multifunction Printer | E514dw
Setup Guide
Guide d'installation
Guida di configurazione
Konfigurationshandbuch
Guía de configuración
La pagina sta caricando ...

3
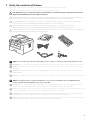
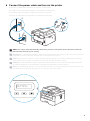
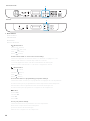
1 Verify the contents of the box
Vérifiez le contenu de l'emballage | Controllare il contenuto della confezione
Überprüfen des Lieferumfangs | Compruebe el contenido de la caja
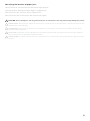
CAUTION: Before you set up and operate your Dell printer, read and follow the safety instructions in the
Important Information that comes with your printer.
PRÉCAUTION : Avant de configurer et d'utiliser votre imprimante Dell, lisez et respectez les consignes de
sécurité reprises dans le document Informations importantes fourni avec votre imprimante.
ATTENZIONE: Prima di configurare e utilizzare la stampante Dell, leggere e attenersi alle istruzioni di
sicurezza presenti in Informazioni importanti in dotazione con la stampante.
ACHTUNG: Bevor Sie den Dell-Drucker einrichten und bedienen, lesen und befolgen Sie die
Sicherheitshinweise in der Anleitung Wichtige Informationen im Lieferumfang des Druckers.
PRECAUCIÓN: Antes de configurar y utilizar su impresora Dell, lea y siga las instrucciones de seguridad en
la Información importante incluida con la impresora.
NOTE: The contents of the box vary depending on the country or region you purchased the printer from.
REMARQUE : Le contenu de l'emballage varie selon le pays ou la région où votre imprimante a été achetée.
NOTA: Il contenuto della confezione varia in funzione del paese o della regione dove la stampante è stata
acquistata.
HINWEIS: Der Inhalt des Kartons variiert abhängig von dem Land oder der Region, in der Sie den Drucker
gekauft haben.
NOTA: El contenido de la caja puede variar en función del país o de la región en la que compre la impresora.
NOTE: The telephone line cord (A) is bundled for U.K. (The cord is bundled only for Dell Multifunction
Printer | E515dn and Dell Multifunction Printer | E515dw)
REMARQUE : Le cordon de la ligne téléphonique (A) est destiné au Royaume-Uni. (Ce cordon est destiné
uniquement au Dell Multifunction Printer | E515dn et au Dell Multifunction Printer | E515dw)
NOTA: Nella confezione è presente il cavo per linea telefonica (A) per il Regno Unito. (Il cavo è indicato solo
per la Dell Multifunction Printer | E515dn e Dell Multifunction Printer | E515dw)
HINWEIS: Das Telefonleitungskabel (A) im Lieferumfang ist für GB. (Das Kabel ist nur im Lieferumfang des
Dell Multifunction Printer | E515dn und Dell Multifunction Printer | E515dw enthalten.)
NOTA: El cable de línea telefónica (A) se proporciona para el Reino Unido. (El cable solo se proporciona para
Dell Multifunction Printer | E515dn y Dell Multifunction Printer | E515dw)
(A)

4
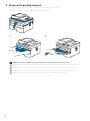
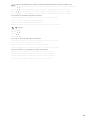
2 Remove the packing material
Retirez le matériau d'emballage | Eliminare il materiale di imballaggio
Entfernen des Verpackungsmaterials | Quite el embalaje
NOTE: The location of adhesive tapes and the shape of the packing material may vary.
REMARQUE : L'emplacement des rubans adhésifs et la forme du matériau d'emballage peuvent varier.
NOTA: Il posizionamento dei nastri adesivi e la forma del materiale di imballaggio può variare.
HINWEIS: Die Position der Klebebänder und die Form des Verpackungsmaterials können variieren.
NOTA: La ubicación de las cintas adhesivas y la forma del embalaje pueden variar.

5
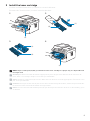
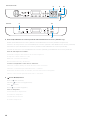
3 Install the toner cartridge
Installez la cartouche de toner | Installare la cartuccia del toner
Einsetzen der Tonerkassette | Instale el cartucho de tóner
NOTE: Dispose of the part (C) that you detach from the toner cartridge in a proper way. It is disposable and
no longer used.
REMARQUE : Mettez au rebut de manière appropriée la pièce (C) que vous détachez de la cartouche de
toner. Celle-ci est à usage unique et n'est donc pas réutilisable.
NOTA: Smaltire il componente (C) staccato dalla cartuccia del toner in modo appropriato. È monouso e non
può essere più utilizzato.
HINWEIS: Entsorgen Sie das Teil (C), das Sie von der Tonerkassette gelöst haben, auf die entsprechende Art.
Es wird nicht mehr verwendet und kann entsorgt werden.
NOTA: Deseche de forma adecuada la pieza (C) que desacople del cartucho de tóner. Es desechable y ya no
se utilizará.
(C)
(B)
(A)
(B)
(A)
(A)
La pagina sta caricando ...

7
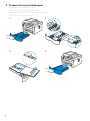
5 Connect the necessary cables
Raccordez les câbles nécessaires | Collegare i cavi necessari
Anschließen der notwendigen Kabel | Conecte los cables necesarios
For USB connection, connect the USB cable
Pour la connexion USB, raccordez le câble USB
Nel caso di connessione USB, connettere il cavo USB
Schließen Sie bei einer USB-Verbindung das USB-Kabel an
Para la conexión USB, conecte el cable USB
For Ethernet connection, connect the ethernet cable
Pour la connexion Ethernet, raccordez le câble Ethernet
Nel caso di connessione ethernet, connettere il cavo ethernet
Schließen Sie bei einer Ethernet-Verbindung das Ethernet-Kabel an
Para la conexión Ethernet, conecte el cable Ethernet

8
For fax connection, connect telephone line cable (Dell Multifunction Printer | E515dn and Dell Multifunction
Printer | E515dw only)
Pour la connexion du fax, raccordez le câble de la ligne téléphonique (Dell Multifunction Printer | E515dn et Dell
Multifunction Printer | E515dw uniquement)
Per la connessione fax, collegare il cavo della linea telefonica (solo Dell Multifunction Printer | E515dn e Dell
Multifunction Printer | E515dw)
Schließen Sie für eine Faxverbindung das Telefonleitungskabel an (nur Dell Multifunction Printer | E515dn und Dell
Multifunction Printer | E515dw)
Para la conexión de fax, conecte el cable de línea telefónica (solo Dell Multifunction Printer | E515dn y Dell
Multifunction Printer | E515dw)

9
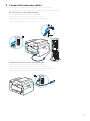
6 Connect the power cable and turn on the printer
Branchez le câble d'alimentation et allumez l'imprimante
Connettere il cavo di alimentazione e accendere la stampante
Anschließen des Netzkabels und Einschalten des Druckers
Conecte el cable de alimentación y encienda la impresora
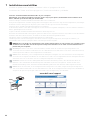
NOTE: The country setup automatically starts when you turn on the printer for the first time. Follow the
panel message and select your country.
REMARQUE : La configuration du pays démarre automatiquement lors de la première mise sous tension de
l'imprimante. Suivez le message du panneau et sélectionnez votre pays.
NOTA: L'impostazione del Paese si avvia automaticamente quando si accende la stampante per la prima
volta. Attenersi al messaggio visualizzato sul pannello, quindi selezionare il Paese.
HINWEIS: Die Einrichtung des Landes wird automatisch gestartet, wenn Sie den Drucker zum ersten Mal
einschalten. Befolgen Sie die Meldungen im Bedienfeld und wählen Sie das Land aus.
NOTA: La configuración del país se inicia automáticamente al encender la impresora por primera vez. Siga
las indicaciones del mensaje que aparece en el panel y seleccione su país.
Set Country
Press OK Key
La pagina sta caricando ...

11
NOTE: To get the latest version of software or firmware in future, always allow automatic software updates
when prompted.
REMARQUE : À l'avenir, pour obtenir la dernière version de logiciel ou de micrologiciel, autorisez toujours les
mises à jour logicielles automatiques lors des messages d'invite.
NOTA: In futuro per ottenere la versione più recente del software o del firmware, consentire sempre
l'aggiornamento automatico del software quando richiesto.
HINWEIS: Um auch in Zukunft die aktuelle Version der Software oder Firmware zu erhalten, sollten Sie die
automatischen Softwareaktualisierungen immer zulassen, wenn Sie dazu aufgefordert werden.
NOTA: Para disponer en todo momento de la última versión del software o del firmware en el futuro,
autorice siempre las actualizaciones de software automáticas cuando el sistema se lo pregunte.
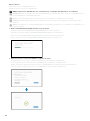
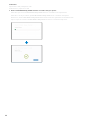
On the Dell Printer Easy Install window, click Next. Dell Printer Easy Install begins to search for your printer.
Sur la fenêtre Dell Printer Easy Install, cliquez sur Suivant. Dell Printer Easy Install lance la recherche de cette
imprimante.
Nella finestra Dell Printer Easy Install fare clic su Avanti. Dell Printer Easy Install avvia la ricerca della stampante.
Klicken Sie im Fenster Dell Printer Easy Install auf Weiter. Dell Printer Easy Install beginnt die Suche nach dem
Drucker.
En la ventana Dell Printer Easy Install, haga clic en Siguiente. Dell Printer Easy Install empieza a buscar esta
impresora.
La pagina sta caricando ...

13
Ethernet Printer
Imprimante Ethernet | Stampante Ethernet
Ethernet-Drucker | Impresora Ethernet
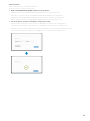
1 Wait for
Dell Printer Easy Install
wizard to find your printer.
Attendez que l'assistant Dell Printer Easy Install détecte votre imprimante.
Attendere che la procedura guidata Dell Printer Easy Install trovi la stampante.
Warten Sie, bis der Dell Printer Easy Install-Assistent den Drucker gefunden hat.
Espere a que el asistente de Dell Printer Easy Install encuentre la impresora.
2 Select the printer, and then click
Next
to complete the setup.
Sélectionnez l'imprimante, puis cliquez sur Suivant pour terminer la configuration.
Selezionare la stampante, quindi fare clic su Avanti per completare la configurazione.
Wählen Sie den Drucker und klicken Sie dann auf Weiter, um die Einrichtung abzuschließen.
Seleccione la impresora y haga clic en Siguiente para completar la configuración.

14
USB Printer
Imprimante USB | Stampante USB
USB-Drucker | Impresora USB
1 Wait for
Dell Printer Easy Install
wizard to find and install your printer.
Attendez que l'assistant Dell Printer Easy Install détecte et installe votre imprimante.
Attendere che la procedura guidata Dell Printer Easy Install trovi e installi la stampante.
Warten Sie, bis der Dell Printer Easy Install-Assistent den Drucker gefunden und installiert hat.
Espere a que el asistente de Dell Printer Easy Install encuentre e instale la impresora.

15
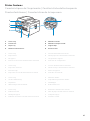
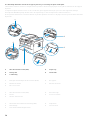
Printer Features
Caractéristiques de l'imprimante | Caratteristiche della stampante
Druckerfunktionen | Características de la impresora
1 Service Tag 5 Manual Feed Slot
2 Front Cover 6 Manual Feed Paper Guide
3 Paper Tray 7 Support Flap
4 Manual Feed Slot Cover 8 Control Panel
1 Service Tag 5 Fente d'alimentation manuelle
2 Capot avant 6 Guide papier de l'alimentation manuelle
3 Bac papier 7 Languette de support
4 Couvercle de la fente d'alimentation manuelle 8 Panneau de configuration
1 Service Tag 5 Fessura di alimentazione manuale
2 Coperchio anteriore 6 Guida carta per alimentazione manuale
3 Cassetto fogli 7 Aletta di supporto
4 Coperchio fessura di alimentazione manuale 8 Pannello di comando
1 Service Tag 5 Manuelle Zufuhr
2 Vordere Abdeckung 6 Papierführung manuelle Zufuhr
3 Papierfach 7 Stützklappe
4 Abdeckung manuelle Zufuhr 8 Bedienerkonsole
1 Service Tag 5 Ranura de alimentación manual
2 Cubierta frontal 6 Guía de papel de alimentación manual
3 Bandeja de papel 7 Solapa de apoyo
4 Cubierta de la ranura de alimentación manual 8 Panel de control
5
4
6
7
8
3
1
2

16
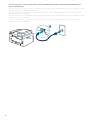
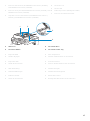
1 Phone Connector (Dell Multifunction Printer | E515dn and Dell
Multifunction Printer | E515dw)
4 Network Port
5 USB Port
2 Wall Jack Connector (Dell Multifunction Printer | E515dn and
Dell Multifunction Printer | E515dw)
6 Back Cover (Output Tray)
7 AC Power Connector
3 Phone Connector CAP (Dell Multifunction Printer | E515dn and
Dell Multifunction Printer | E515dw)
1 Connecteur de ligne téléphonique (Dell Multifunction Printer |
E515dn et Dell Multifunction Printer | E515dw)
4 Port de réseau
5 Port USB
2 Connecteur de prise murale (Dell Multifunction Printer | E515dn
et Dell Multifunction Printer | E515dw)
6 Capot arrière (bac de sortie)
7 Connecteur d'alimentation secteur
3 Connecteur de ligne téléphonique CAP (Dell Multifunction
Printer | E515dn et Dell Multifunction Printer | E515dw)
1 Connettore telefonico (Dell Multifunction Printer | E515dn e
Dell Multifunction Printer | E515dw)
4 Porta di rete
5 Porta USB
2 Connettore per presa a muro (Dell Multifunction Printer |
E515dn e Dell Multifunction Printer | E515dw)
6 Coperchio posteriore (Vassoio di uscita)
7 Connettore di alimentazione CA
3 TAPPO connettore telefonico (Dell Multifunction Printer |
E515dn e Dell Multifunction Printer | E515dw)
1 Telefonanschluss (Dell Multifunction Printer | E515dn und Dell
Multifunction Printer | E515dw)
4 Netzwerkanschluss
5 USB-Anschluss
2 Netzanschluss (Dell Multifunction Printer | E515dn und Dell
Multifunction Printer | E515dw)
6 Rückwärtige Abdeckung (Ausgabefach)
7 Anschluss für das Netzkabel
3 Telefonanschluss-ABDECKUNG (Dell Multifunction Printer |
E515dn und Dell Multifunction Printer | E515dw)
6
4
5
7
1
2
3
La pagina sta caricando ...
La pagina sta caricando ...
La pagina sta caricando ...
La pagina sta caricando ...

21
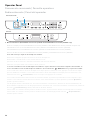
4 LCD (Liquid Crystal Display)
Écran LCD (écran à cristaux liquides)
LCD (Liquid Crystal Display)
LCD (Liquid Crystal Display)
LCD (pantalla de cristal líquido)
Displays messages to help you set up and use the printer.
Affiche des messages pour vous aider à configurer et à utiliser l'imprimante.
Visualizza messaggi che aiutano ad impostare e utilizzare la stampante.
Zeigt Meldungen an, die Ihnen helfen, des Druckers einzurichten und zu verwenden.
Muestra mensajes que le ayudan a configurar y utilizar la impresora.
5Mode buttons
Boutons de mode
Pulsanti modalità
Modus-Tasten
Botones de modo
(FAX) button (Dell Multifunction Printer | E515dn and Dell Multifunction Printer | E515dw only)
Boutons (FAX) (Dell Multifunction Printer | E515dn et Dell Multifunction Printer | E515dw uniquement)
Pulsanti (FAX) (solo Dell Multifunction Printer | E515dn e Dell Multifunction Printer | E515dw)
Taste (FAX) (nur Dell Multifunction Printer | E515dn und Dell Multifunction Printer | E515dw)
Botón (FAX) (solo Dell Multifunction Printer | E515dn y Dell Multifunction Printer | E515dw)
Switches the printer to FAX Mode.
Permet de mettre l'imprimante en mode FAX.
Passa la stampante alla modalità FAX.
Schaltet den Drucker in den FAX-Modus um.
Cambia la impresora al modo FAX.
(SCAN) button
Bouton (SCAN)
Pulsante (SCAN)
Taste (SCAN)
Botón (SCAN)
Switches the printer to SCAN Mode.
Permet de mettre l'imprimante en mode SCAN (NUMÉRISATION).
Passa la stampante alla modalità SCAN.
Schaltet den Drucker in den SCAN-Modus um.
Cambia la impresora al modo SCAN (ESCANEO).
(COPY) button (Dell Multifunction Printer | E515dn and Dell Multifunction Printer | E515dw only)
Boutons (COPY) (Dell Multifunction Printer | E515dn et Dell Multifunction Printer | E515dw uniquement)
Pulsanti (COPY) (solo Dell Multifunction Printer | E515dn e Dell Multifunction Printer | E515dw)
Taste (COPY) (nur Dell Multifunction Printer | E515dn und Dell Multifunction Printer | E515dw)
Botón (COPY) (solo Dell Multifunction Printer | E515dn y Dell Multifunction Printer | E515dw)
Switches the printer to COPY Mode.
Permet de mettre l'imprimante en mode COPY (COPIE).
Passa la stampante alla modalità COPY.
Schaltet den Drucker in den COPY (KOPIER)-Modus um.
Cambia la impresora al modo COPY (COPIA).

22
6 (Copy) buttons
Bouton (Copie)
Pulsante (Copia)
Taste (Kopieren)
Botones (Copiar)
(Options) button
Bouton (Options)
Pulsante (Opzioni)
Taste (Optionen)
Botón (Opciones)
Accesses temporary settings for copying.
Permet d'accéder aux paramètres temporaires pour la copie.
Accede alle impostazioni temporanee per la copia.
Ruft vorübergehende Einstellungen zum Kopieren auf.
Accede a la configuración temporal para copiar.
(2 in 1 (ID) Copy) button
Bouton (Copie 2 en 1 (ID))
Pulsante (Copia 2 in 1 (ID))
Taste (2-in-1-Kopie (Ausweis))
Botón (Copia 2 en 1 (ID))
Copies both sides of an identification card onto a single page.
Permet de copier les deux faces d'une carte d'identité sur une seule page.
Copia entrambi i lati di una carta di identità su una sola pagina.
Kopiert beide Seiten eines Ausweises auf ein einzelnes Blatt.
Copia ambas caras de una tarjeta de identificación en una sola página.
6
E515dn/E515dw
6
E514dw
La pagina sta caricando ...

24
7Menu buttons
Boutons Menu
Pulsanti Menu
Menütasten
Botones del menú
(Clear) button
Bouton (Effacer)
Pulsante (Cancella)
Taste (Löschen)
Botón (Borrar)
Deletes entered data or cancels the current setting.
Permet de supprimer les données saisies ou d'annuler le réglage en cours.
Elimina i dati immessi o annulla l'impostazione corrente.
Löscht eingegebene Daten oder bricht die aktuelle Einstellung ab.
Elimina los datos introducidos o cancela la configuración actual.
(Menu) button
Bouton (Menu)
Pulsante (Menu)
Taste (Menü)
Botón (Menú)
Accesses the Menu for programming your printer settings.
Permet d'accéder au menu pour programmer les réglages de votre imprimante.
Accede al menu per la programmazione delle impostazioni della stampante.
Ruft das Menü zum Programmieren der Druckereinstellungen auf.
Accede al menú para programar la configuración de la impresora.
OK
button
Bouton
OK
Pulsante
OK
Taste
OK
Botón
OK
Stores your printer settings.
Permet de mémoriser les paramètres de votre imprimante.
Memorizza le impostazioni della stampante.
Speichert die Druckereinstellungen.
Almacena la configuración de la impresora.
7
E515dn/E515dw
7
E514dw
La pagina sta caricando ...
La pagina sta caricando ...

27
Turn off the printer by pressing and holding the (Power On/Off) button. The LCD displays
Shutting Down
for a few
seconds to turn off.
Éteignez l'imprimante en maintenant le bouton (Marche/Arrêt) enfoncé. L'écran LCD affiche
Arrêt en cours
pendant
quelques secondes avant de s'éteindre.
Spegnere la stampante tenendo premuto il pulsante (Accensione/spegnimento). Il display LCD visualizza
Shutting
Down
(Spegnimento) per alcuni secondi.
Schalten Sie den Drucker aus, indem Sie die Taste (Ein/Aus) gedrückt halten. Das LCD zeigt einige Sekunden lang die
Meldung zum
Ausschalten
an und schaltet sich dann aus.
Apague la impresora manteniendo pulsado el botón (encendido/apagado). La pantalla LCD muestra el mensaje
Shutting Down
(Apagando) durante unos segundos antes de apagarse.
10 (Cancel) button
Bouton (Annuler)
Pulsante (Annulla)
Taste (Abbrechen)
Botón
(Cancelar)
Stops an operation.
Permet d'arrêter une opération.
Interrompe un'operazione.
Stoppt einen Vorgang.
Detiene una operación.
Exits from a menu.
Permet de quitter un menu.
Esce da un menu.
Schließt ein Menü.
Sale de un menú.
11 (Start) button
Bouton (Démarrer)
Pulsante (Avvia)
Taste (Start)
Botón
(Inicio)
Starts sending faxes.
Démarre l'envoi de fax.
Avvia l'invio di fax.
Startet das Senden von Faxen.
Inicia el envío de faxes.
Starts copying.
Démarre la copie.
Avvia la copia.
Startet das Kopieren.
Inicia la copia.
Starts scanning documents.
Démarre la numérisation de documents.
Avvia la scansione di documenti.
Startet das Scannen von Dokumenten.
Inicia el escaneo de documentos.

28
Dell Printer Hub
Dell Printer Hub | Dell Printer Hub
Dell Printer Hub | Dell Printer Hub
Manage your printer and imaging needs with ease. The Dell Printer Hub consolidates printer management and
monitoring tools, advanced scan features, cloud connectivity and more, into an easy to use console for a simplified user
experience and improved workflow.
With the Dell Printer Hub, you can easily access the Dell Document Hub for document sharing and storage in supported
cloud services.
For more information about using the Dell Printer Hub, see the FAQ for the Dell Printer Hub or visit Dell.com/printerhub
Gérez facilement vos besoins en impression et numérisation. Dell Printer Hub consolide les outils de surveillance et de
gestion de l'imprimante, les fonctions de numérisation avancées, la connectivité en nuage et bien davantage, dans une
console facile d'emploi qui simplifie l'expérience utilisateur et améliore le flux de travail.
Avec Dell Printer Hub, vous pouvez accéder facilement aux services Dell Document Hub pour partager et stocker vos
documents sur le cloud.
Pour en savoir plus sur l'utilisation de Dell Printer Hub, consultez la FAQ de Dell Printer Hub ou consultez la page
Dell.com/printerhub
Gestione semplificata di stampante e immagini. Il Dell Printer Hub consolida gli strumenti di gestione e monitoraggio
della stampante, le funzioni di scansione avanzate, la connettività cloud e altro ancora, in una console di facile utilizzo
per un'esperienza semplificata da parte dell'utente e un flusso di lavoro migliore.
Grazie a Dell Printer Hub, è possibile accedere facilmente a Dell Document Hub per la condivisione e l'archiviazione dei
documenti nei servizi cloud supportati.
Per ulteriori informazioni sull'uso di Dell Printer Hub, vedere le domande frequenti in Dell Printer Hub o visitare il sito
Dell.com/printerhub
Verwalten Sie ganz einfach Ihren Drucker, und nutzen Sie die benutzerfreundlichen Bildverarbeitungsfunktionen. Das
Dell Printer Hub stellt Druckerverwaltungs- und Überprüfungstools, erweiterte Scanfunktionen, Cloud-Konnektivität
und vieles mehr in einer einfach zu bedienenden Konsole bereit. Dies ermöglicht eine vereinfachte Nutzung und bessere
Arbeitsabläufe.
Dell Printer Hub bietet Ihnen folgende Möglichkeiten rufen Sie ganz einfach Dell Document Hub auf, und teilen und
speichern Sie Dokumente bei unterstützten Cloud-Diensten.
Weitere Informationen zur Verwendung von Dell Printer Hub finden Sie in den FAQs zum Dell Printer Hub oder
besuchen Sie Dell.com/printerhub
Administre su impresora y sus necesidades de imagen de una forma sencilla. Dell Printer Hub combina herramientas de
gestión y de supervisión de la impresora, características avanzadas de escaneado, conectividad a la nube y mucho más,
en una consola fácil de usar que proporciona al usuario una experiencia simplificada y un flujo de trabajo mejorado.
Con la aplicación Dell Printer Hub, se puede acceder fácilmente a Dell Document Hub para compartir y almacenar
documentos en servicios en la nube compatibles.
Para obtener más información acerca del uso de Dell Printer Hub, consulte las preguntas frecuentes en Dell Printer Hub
o bien visite Dell.com/printerhub

29
Dell Document Hub
Dell Document Hub | Dell Document Hub
Dell Document Hub | Dell Document Hub
Easily access and share documents, images and digital content with the Dell Document Hub. This innovative cloud
collaboration solution connects your printer and devices to popular cloud services, providing a flexible and secure way
to collaborate from virtually anywhere.
For more information about using Dell Document Hub, see the FAQ in Dell Document Hub or visit
Dell.com/documenthub
Accédez aux documents, images et contenus numériques et partagez-les facilement avec Dell Document Hub. Cette
solution innovante de collaboration en nuage connecte votre imprimante et vos périphériques à des services en nuage
populaires, fournissant ainsi un moyen flexible et sécurisé de collaborer de pratiquement n'importe où.
Pour en savoir plus sur l'utilisation de Dell Document Hub, consultez la FAQ de Dell Document Hub ou consultez la page
Dell.com/documenthub
Accedere e condividere i documenti con facilità, le immagini e il contenuto digitale con Dell Document Hub. Questa
innovativa soluzione di collaborazione cloud connette la stampante e i dispositivi ai noti servizi cloud, offrendo un modo
flessibile e sicuro per collaborare virtualmente da qualsiasi luogo.
Per ulteriori informazioni sull'uso di Dell Document Hub, vedere le domande frequenti in Dell Document Hub o visitare il
sito Dell.com/documenthub
Greifen Sie mit Dell Document Hub einfach auf Dokumente, Bilder und digitale Inhalte zu und teilen Sie diese. Diese
innovative Cloud-Zusammenarbeitslösung verbindet Ihren Drucker und Ihre Geräte mit beliebten Cloud-Diensten und
bietet eine flexible und sichere Möglichkeit zur Zusammenarbeit und das von fast überall.
Weitere Informationen zur Verwendung von Dell Document Hub finden Sie in den FAQs zum Dell Document Hub oder
besuchen Sie Dell.com/documenthub
Acceda a documentos, imágenes y contenido digital, y compártalos con facilidad, con Dell Document Hub. Este servicio
innovador de colaboración en la nube conecta su impresora y sus dispositivos a servicios en la nube populares, lo que
proporciona una forma segura y flexible de colaborar desde prácticamente cualquier lugar.
Para obtener más información acerca del uso de Dell Document Hub, consulte las preguntas frecuentes en
Dell Document Hub o bien visite Dell.com/documenthub
La pagina sta caricando ...
La pagina sta caricando ...
La pagina sta caricando ...

33
Problema Operazioni da effettuare
Impossibile impostare la connessione
wireless.
Assicurarsi che il cavo Ethernet sia scollegato dalla stampante.
Assicurarsi che Wi-Fi sia attivato. Per maggiori informazioni, vedere la Guida per
l'utente.
Il firewall del computer potrebbe bloccare la comunicazione con la stampante.
Provare a disabilitare il firewall del computer.
Impossibile impostare la connessione
wireless utilizzando WPS (Wi-Fi
Protected Setup).
Verificare che l'impostazione di protezione del punto di accesso LAN o del router
sia WPA o WPA2 (WEP non è supportato da WPS).
Impossibile impostare la connessione
wireless utilizzando WPS-PBC (Wi-Fi
Protected Setup-Push Button
Configuration).
Premere il pulsante WPS sul punto di accesso LAN wireless o sul router entro due
minuti dall'avvio dell'operazione WPS sulla stampante. Per ulteriori informazioni
sul punto di accesso LAN wireless o sul router, consultare la documentazione
fornita con il punto di accesso LAN wireless o con il router.
Impossibile impostare la connessione
wireless utilizzando WPS-PIN (Wi-Fi
Protected Setup-Personal
Identification Number).
Verificare che il PIN inserito nel computer sia corretto.
Problem Maßnahme
Die Wireless-Verbindung kann nicht
eingerichtet werden.
Stellen Sie sicher, dass das Ethernet-Kabel vom Drucker getrennt ist.
Stellen Sie sicher, dass Wi-Fi auf Ein gesetzt ist. Weitere Informationen finden Sie
in der Benutzerhandbuch.
Die Firewall des Computers blockiert möglicherweise die Kommunikation mit
dem Drucker. Deaktivieren Sie testweise die Firewall des Computers.
Die Wireless-Verbindung kann nicht
mit WPS (Wi-Fi Protected Setup)
eingerichtet werden.
Stellen Sie sicher, dass die Sicherheitseinstellung des WLAN-Access Points oder
Routers auf WPA oder WPA2 eingestellt ist. (WEP wird bei WPS nicht unterstützt.)
Die Wireless-Verbindung kann nicht
mit WPS-PBC (Wi-Fi Protected Setup-
Push Button Configuration)
eingerichtet werden.
Drücken Sie die WPS-Taste am WLAN-Access Point oder Router innerhalb von
zwei Minuten, nachdem Sie den WPS-Vorgang beim Drucker gestartet haben.
Ausführliche Informationen zum WLAN-Access Point oder Router finden Sie in
der Bedienungsanleitung im Lieferumfang des WLAN-Access Points oder
Routers.
Die Wireless-Verbindung kann nicht
mit WPS-PIN (Wi-Fi Protected Setup-
Personal Identification Number)
eingerichtet werden.
Überprüfen Sie, ob die beim Computer eingegebene PIN korrekt ist.
La pagina sta caricando ...
La pagina sta caricando ...

36
The following illustration shows where paper jams may occur along the print media path.
L'illustration suivante montre les emplacements possibles des bourrages papier le long du cheminement du support
imprimé.
La seguente figura mostra le aree in cui si verificano gli inceppamenti lungo il percorso dei supporti di stampa.
Die folgende Abbildung zeigt die Bereiche des Papierwegs, in denen Papierstaus auftreten können.
En la siguiente ilustración se muestra dónde se pueden producir los atascos de papel en la trayectoria del material de
impresión.
1 Auto Document Feeder (ADF) 4 Paper Tray
2 Fusing Unit 5 Inside Path
3 2-sided Tray
1 Chargeur automatique de documents (CAD) 4 Bac papier
2 Module de fusion 5 Chemin intérieur
3 Bac recto-verso
1 Auto Document Feeder (ADF) 4 Cassetto fogli
2 Fusore 5 Percorso interno
3 Vassoio fronte/retro
1 Automatischer Dokumenteneinzug (ADF) 4 Papierfach
2 Fixieranlage 5 Innerer Pfad
3 Fach für den beidseitigen Druck
4
2
3
5
1
La pagina sta caricando ...
La pagina sta caricando ...
La pagina sta caricando ...
La pagina sta caricando ...
-
 1
1
-
 2
2
-
 3
3
-
 4
4
-
 5
5
-
 6
6
-
 7
7
-
 8
8
-
 9
9
-
 10
10
-
 11
11
-
 12
12
-
 13
13
-
 14
14
-
 15
15
-
 16
16
-
 17
17
-
 18
18
-
 19
19
-
 20
20
-
 21
21
-
 22
22
-
 23
23
-
 24
24
-
 25
25
-
 26
26
-
 27
27
-
 28
28
-
 29
29
-
 30
30
-
 31
31
-
 32
32
-
 33
33
-
 34
34
-
 35
35
-
 36
36
-
 37
37
-
 38
38
-
 39
39
-
 40
40


Dell E515dw Multifunction Printer Guida Rapida
- Categoria
- Telefoni
- Tipo
- Guida Rapida
in altre lingue
Documenti correlati
-
Dell E310dw Printer Guida Rapida
-
-
-
-
Dell E525w Color Multifunction Printer Guida Rapida
-
-
-
-