
DOC272.98.80041
2100Q/DR 1900 Modules
04/2013, Edition 2
User Instructions
Bedienungsanleitung
Istruzioni per l'uso
Instructions d'utilisation
Instrucciones para el usuario
Instruções de utilizador
Návod pro uživatele
Brugervejledninger
Gebruiksaanwijzingen
Instrukcja obsługi
Bruksanvisning
Käyttöohje
Инструкции за потребителя
Felhasználói utasítások
Instrucţiuni de utilizare
Руководство пользователя
Kullanım talimatları
Navodila za uporabo
Korisničke upute
Οδηγίες χρήσης

English...................................................................................................................................................................................................
3
Deutsch...............................................................................................................................................................................................13
Italiano.................................................................................................................................................................................................23
Français..............................................................................................................................................................................................33
Español...............................................................................................................................................................................................43
Português..........................................................................................................................................................................................53
Čeština................................................................................................................................................................................................63
Dansk...................................................................................................................................................................................................72
Nederlands........................................................................................................................................................................................82
Polski...................................................................................................................................................................................................92
Svenska............................................................................................................................................................................................102
Suomi.................................................................................................................................................................................................111
български.......................................................................................................................................................................................121
Magyar..............................................................................................................................................................................................132
Română............................................................................................................................................................................................142
Русский............................................................................................................................................................................................152
Türkçe................................................................................................................................................................................................
163
Slovenski..........................................................................................................................................................................................173
Hrvatski.............................................................................................................................................................................................183
Ελληνικά...........................................................................................................................................................................................193
2

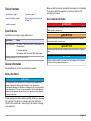
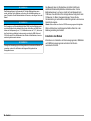
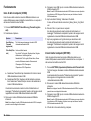
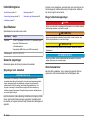
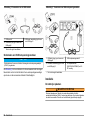
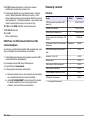
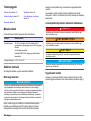
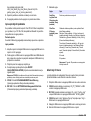
Table of contents
Specifications on page 3 Operation on page 10
General information on page 3 Replacement parts and accessories
on page 12
Installation on page 5
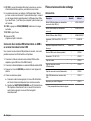
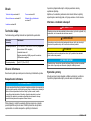
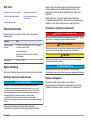
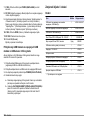
Specifications
Specifications are subject to change without notice.
Specification Details
Power requirement AC 100–240 V, 50/60 Hz to 9V/2A DC (with power or USB
+Power module)
4 AA alkaline batteries
Rechargeable NiMH (for use with USB+Power module)
Operating conditions 0 to 40 °C (32 to 104 °F)
General information
Revised editions are found on the manufacturer’s website.
Safety information
N O T I C E
The manufacturer is not responsible for any damages due to misapplication or
misuse of this product including, without limitation, direct, incidental and
consequential damages, and disclaims such damages to the full extent permitted
under applicable law. The user is solely responsible to identify critical application
risks and install appropriate mechanisms to protect processes during a possible
equipment malfunction.
Please read this entire manual before unpacking, setting up or operating
this equipment. Pay attention to all danger and caution statements.
Failure to do so could result in serious injury to the operator or damage
to the equipment.
Make sure that the protection provided by this equipment is not impaired.
Do not use or install this equipment in any manner other than that
specified in this manual.
Use of hazard information
D A N G E R
Indicates a potentially or imminently hazardous situation which, if not avoided, will
result in death or serious injury.
W A R N I N G
Indicates a potentially or imminently hazardous situation which, if not avoided,
could result in death or serious injury.
C A U T I O N
Indicates a potentially hazardous situation that may result in minor or moderate
injury.
N O T I C E
Indicates a situation which, if not avoided, may cause damage to the instrument.
Information that requires special emphasis.
English 3

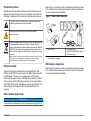
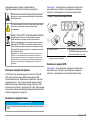
Precautionary labels
Read all labels and tags attached to the instrument. Personal injury or
damage to the instrument could occur if not observed. A symbol on the
instrument is referenced in the manual with a precautionary statement.
This symbol, if noted on the instrument, references the instruction
manual for operation and/or safety information.
This symbol indicates that a risk of electrical shock and/or
electrocution exists.
Electrical equipment marked with this symbol may not be disposed of
in European public disposal systems after 12 August of 2005. In
conformity with European local and national regulations (EU Directive
2002/96/EC), European electrical equipment users must now return
old or end-of-life equipment to the Producer for disposal at no charge
to the user.
Note: For return for recycling, please contact the equipment producer or supplier
for instructions on how to return end-of-life equipment, producer-supplied
electrical accessories, and all auxiliary items for proper disposal.
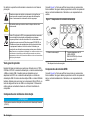
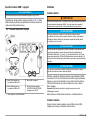
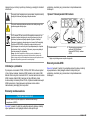
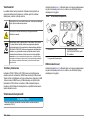
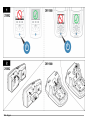
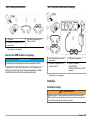
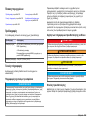
Product overview
There are three types of modules that can be used with the 2100Q,
2100Qis and DR 1900: the power module, the USB+Power module and
the USB module. The meter can be powered by an AC-DC power
adaptor with the power module and the USB+Power module. The USB
+Power module and the USB module are also used for communication
with a PD-24 Citizen printer, USB-Barcode scanner and computer. The
module firmware can be updated with a file downloaded from the
computer.
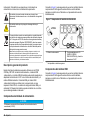
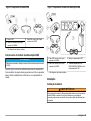
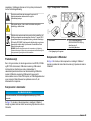
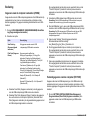
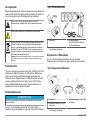
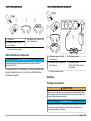
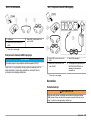
Power module components
N O T I C E
The manufacturer recommends to use only the supplied power supply (LZV803).
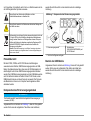
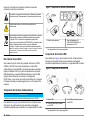
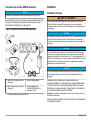
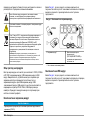
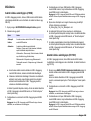
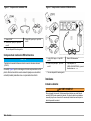
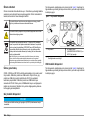
Refer to Figure 1 to make sure that all components have been received.
If any of these items are missing or damaged, contact the manufacturer
or a sales representative immediately.
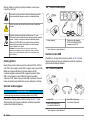
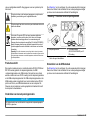
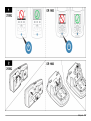
Figure 1 Power module components
1 Power module
1
2 AC adapter plugs
(EU/USA/UK/AUSTRALIA) and AC-
DC power supply
1
Not available in all regions
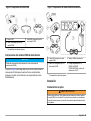
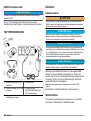
USB module components
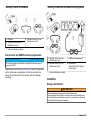
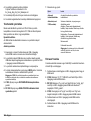
Refer to Figure 2 to make sure that all components have been received.
If any of these items are missing or damaged, contact the manufacturer
or a sales representative immediately.
4 English

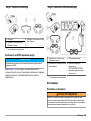
Figure 2 USB module components
1 USB module
1
3 USB cable, type A receptacle to
USB mini B plug
2 USB cable, type A plug to USB mini
B plug
1
Not available in all regions
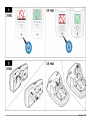
USB+Power module components
N O T I C E
The manufacturer recommends to use only the supplied power supply (LZV803).
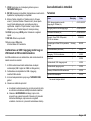
Refer to Figure 3 to make sure that all components have been received.
If any of these items are missing or damaged, contact the manufacturer
or a sales representative immediately.
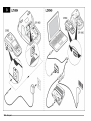
Figure 3 USB+Power module components
1 USB cable, type A plug to USB mini
B plug
3 USB+Power module
1
2 USB cable, type A receptacle to
USB mini B plug
4 AC adapter plugs
(EU/USA/UK/AUSTRALIA) and AC-
DC power supply
1
Not available in all regions
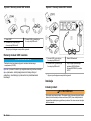
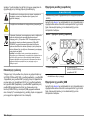
Installation
Install the battery
W A R N I N G
Potential fire hazard. Use only alkaline or nickel metal hydride batteries (NiMH) in
the meter. Other battery types or incorrect installation can cause a fire. Never mix
battery types in the meter.
N O T I C E
The battery compartment is not waterproof. If the battery compartment becomes
wet, remove and dry the batteries and dry the interior of the compartment. Check
the battery contacts for corrosion and clean them if necessary.
English 5

N O T I C E
When using nickel metal hydride (NiMH) batteries, the battery icon will not
indicate a full charge after freshly charged batteries have been inserted (NiMH
batteries are 1.2 V versus 1.5 V for alkaline batteries). Even though the icon does
not indicate complete charge, 2300 mAH NiMH batteries will achieve 90% of
instrument operation lifetime (before recharge) versus new alkaline batteries.
N O T I C E
To avoid potential damage to the meter from battery leakage, remove the meter
batteries prior to extended periods of non-use.
The meter can be powered with AA alkaline or rechargeable NiMH
batteries. To conserve battery life, the meter will power off after
10 minutes of inactivity. The backlight powers off after 30 seconds.
Select a new time in the Power Management menu to change the
power-off default times.
Note: Rechargeable batteries will only be recharged with the USB+Power module.
Refer to the Instrument User Manual for additional information about
battery installation.
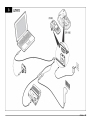
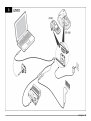
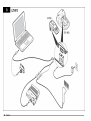
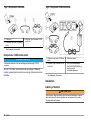
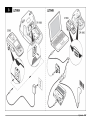
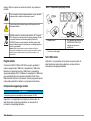
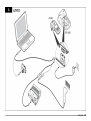
Module installation
Refer to the numbered procedure steps for instructions on how to install
the power module, USB module and USB+Power module.
6 English

English 7

8 English

English 9

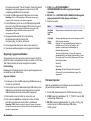
Operation
Send data to the computer (2100Q)
Data that has been downloaded to the USB+Power module or USB
module can be transferred and stored to a computer. The data will be
formatted as an XML file.
1. Push DATA MANAGEMENT>Send Data Log.
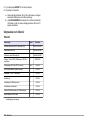
2. Select an option.
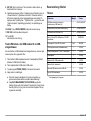
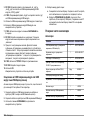
Option Description
Send Data
Log
All data is sent to the USB+Power/USB module.
Filter Data Data is filtered by:
Data Type—All Logs, Reading Log, Calibration Log and
Verify Cal Log
Time Interval—All Logs, Last Reading, Current Day, Current
Week and Current Month
Sample ID—Off or Sample ID
Operator ID—Off or Operator ID
a. Select Send Data to send all data to the USB+Power/USB
module.
b. Select Filter Data. Make a choice of the data to transfer and push
Exit. Select Send Data to send the selected data to the USB
+Power module.
A progress bar will show the transfer status and shows "Transfer
Complete" when the data is successfully sent to the USB
+Power/USB module.
3. Remove the USB+Power/USB module from the meter.
Note: Do not connect the USB+Power/USB module to the computer when the
module is still connected to the meter.
4. Plug the USB cable, type A, to the USB+Power/USB module and
connect the USB+Power/USB module to the PC.
Note: The USB+Power/USB module works like a USB storage device.
Navigate through Windows Explorer to find the USB+power module.
5. Open the folder "datalog". Find the data file.
The file name will be formatted as: Year_Month_Day_Hour_Minute.
xml.
6. Save the data file to a location on the computer.
A progress bar will show the transfer status and shows "Transfer
Complete" when the data is successfully sent to the USB
+Power/USB module.
7. Open a spreadsheet program to view the data.
A progress bar will show the transfer status and shows "Transfer
Complete" when the data is successfully sent to the USB
+Power/USB module.
Send data to the computer (DR 1900)
Data that has been downloaded to the USB+Power or USB module can
be transferred and stored to a computer. The data will be formatted as
an CSV file.
1. Push SETTINGS>Data Management>Send Data. All data is sent to
the USB+Power/USB module.
The reading screen shows "Transfer Complete" when the data is
successfully sent to the USB+Power/USB module.
2. Remove the USB+Power/USB module from the meter.
Note: Do not connect the USB+Power/USB module to the computer when the
module is still connected to the meter.
3. Plug the USB cable, type A, to the USB+Power/USB module and
connect the USB+Power/USB module to the PC.
Note: The USB+Power/USB module works like a USB storage device.
Navigate through Windows Explorer to find the USB+power/USB module.
4. The data file is located under the root directory.
The file name will be formatted as: LOG-
Year_Month_Day_Hour_Minute_Second.txt.
5. Save the data file to a location on the computer.
6. Open a spreadsheet program to view the data.
10 English

Print stored data
All data can be sent to a printer. The PD-24 Citizen Printer is compatible
with the meter and is FCC Part 15B, Class B compliant. Other printers
may not be compatible.
Printer setup
Refer to the documentation supplied with the printer to select the USB
interface.
Print data
1. Turn off the meter. Install the USB+Power/USB module to the meter
and to AC power.
2. Connect the printer to the USB+Power/USB module with the USB
cable supplied with the printer and the special USB cable adapter
supplied with the module.
3. Connect the printer to power and turn the printer on.
4. Push the ON/OFF key to turn the meter on. The meter automatically
detects when the printer is installed.
Note: 2100Q: After a reading is taken, the data is automatically transferred to
the printer when the Auto-print data is selected.
5. 2100Q:
Push DATA MANAGEMENT>Send Data Log.
6. DR 1900: Push SETTINGS>Data Management>Print Data.
7. Select an option.
Option Description
Send Data
Log/Send Data
Data is sent directly to the printer.
Filter Data
(2100Q only)
Select specific data and then press Send Data.
Data type—All Logs (Default setting), Reading Log,
Calibration Log or Verify Cal Log
Time Interval—All Logs (Default setting), Last Reading,
Current day, Current week or Current Month
Sample ID
Operator ID
Note: Sample ID and Operator ID are disabled when no
ID was created.
Update firmware
Locate the firmware upgrade file on the product website. Save the file
from the website to the PC.
1. Connect the USB+Power or USB module to the PC.
2. 2100Q:
Copy the update file "UI_TP_TURB.blk" to the USB
+Power/USB module.
3. DR 1900: Copy the update file "fw_.pzip" and "config_.pzip" to the
USB+Power/USB module folder: "dr1900_update".
4. 2100Q: Unzip the file "Ing.zip" and copy the folder "Ing" to the USB
+Power/USB module.
5. Disconnect the USB+Power/USB module from the PC.
6. Plug the USB+Power/USB module into the meter.
7. 2100Q: Press and hold the POWER key for 4 seconds.
8. DR 1900: Set the power to off. Connect the module to external
power, then set the power to on.
9. The update process starts. The display shows “Updating meter to
<firmware version>”. After this update, the language update starts
automatically. The display shows "Updating files..." and then shows
"Update complete" when the update is done.
10. 2100Q: Press DONE. Select the applicable language.
11. DR 1900: Set the current time.
12. Press OK.
The meter is ready to use.
Connect the USB+Power or USB module to a USB-
Barcode scanner
If a USB-Barcode handset scanner is connected, Sample IDs and
Operator IDs can also be scanned.
1. Connect the USB-Barcode scanner cable to the adapter cable (USB
A receptacle to USB B mini B plug).
2. Connect the adapter cable to the USB+Power/USB module.
English 11

3. Push the POWER key to turn the meter on.
4. Select between two options:
a. Scan the appropriate barcode. A new sample ID is created and
automatically stored with the next reading.
b. Select DATA MANAGEMENT and then Sample ID or Operator
ID. Select Create New ID and scan the appropriate barcode. The
new ID is automatically stored.
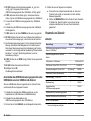
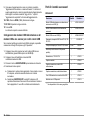
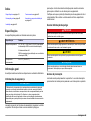
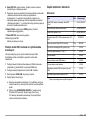
Replacement parts and accessories
Accessories
Description Quantity Item no.
USB+Power module with universal power
supply, USB cable (2x)
1 LZV813.99.00001
1
Power module with universal power supply 1 LZV804.99.00001
1
USB module with USB cable (2x) 1 LZV949.99.00001
1
Printer, Citizen PD-24 USB printer, 120–
220 VAC
1 5835900.00
Printer paper for Citizen PD-24, thermal 5/pkg 5836000
USB-Barcode Scanner (handset scanner) 1 LZV566
Power supply, 110-240 VAC 1 LZV803
Module cover 1 LZV824
Connector cover, USB+Power module 1 LZV825
Connector cover, power module 1 LZV826
Standard USB Cable with Mini USB connector 1 LZV818
Special USB Cable adapter 1 LZV819
1
Not available in all regions
12 English

Inhaltsverzeichnis
Technische Daten auf Seite 13 Betrieb auf Seite 20
Allgemeine Informationen
auf Seite 13
Ersatzteile und Zubehör auf Seite 22
Installation auf Seite 15
Technische Daten
Änderungen vorbehalten.
Technische Daten Details
Spannungsversorgung AC 100– 240 V, 50/60 Hz auf 9 V/2 A DC (mit
Stromversorgungs- oder USB/Stromversorgungsmodul)
4 Alkali-Batterien Größe AA
Aufladbarer NiMH-Akku (für
USB/Stromversorgungsmodul)
Betriebsbedingungen 0 bis 40 °C (32 bis 104 °F)
Allgemeine Informationen
Überarbeitete Ausgaben der Bedineungsanleitung sind auf der
Hersteller-Webseite erhältlich.
Sicherheitshinweise
H I N W E I S
Der Hersteller ist nicht für Schäden verantwortlich, die durch Fehlanwendung
oder Missbrauch dieses Produkts entstehen, einschließlich, aber ohne
Beschränkung auf direkte, zufällige oder Folgeschäden, und lehnt jegliche
Haftung im gesetzlich zulässigen Umfang ab. Der Benutzer ist selbst dafür
verantwortlich, schwerwiegende Anwendungsrisiken zu erkennen und
erforderliche Maßnahmen durchzuführen, um die Prozesse im Fall von möglichen
Gerätefehlern zu schützen.
Bitte lesen Sie dieses Handbuch komplett durch, bevor Sie dieses Gerät
auspacken, aufstellen oder bedienen. Beachten Sie alle Gefahren- und
Warnhinweise. Nichtbeachtung kann zu schweren Verletzungen des
Bedieners oder Schäden am Gerät führen.
Stellen Sie sicher, dass die durch dieses Messgerät bereitgestellte
Sicherheit nicht beeinträchtigt wird. Verwenden bzw. installieren Sie das
Messsystem nur wie in diesem Handbuch beschrieben.
Bedeutung von Gefahrenhinweisen
G E F A H R
Kennzeichnet eine mögliche oder drohende Gefahrensituation, die, wenn sie
nicht vermieden wird, zum Tod oder zu schweren Verletzungen führt.
W A R N U N G
Kennzeichnet eine mögliche oder drohende Gefahrensituation, die, wenn sie
nicht vermieden wird, zum Tod oder zu schweren Verletzungen führen kann.
V O R S I C H T
Kennzeichnet eine mögliche Gefahrensituation, die zu geringeren oder
moderaten Verletzungen führen kann.
H I N W E I S
Kennzeichnet eine Situation, die, wenn sie nicht vermieden wird, das Gerät
beschädigen kann. Informationen, die besonders beachtet werden müssen.
Warnhinweise
Lesen Sie alle am Gerät angebrachten Aufkleber und Hinweise.
Nichtbeachtung kann Verletzungen oder Beschädigungen des Geräts
Deutsch 13

zur Folge haben. Im Handbuch wird in Form von Warnhinweisen auf die
am Gerät angebrachten Symbole verwiesen.
Dieses Symbol am Gerät weist auf Betriebs- und/oder
Sicherheitsinformationen im Handbuch hin.
Dieses Symbol weist auf die Gefahr eines elektrischen Schlages hin,
der tödlich sein kann.
Elektrogeräte, die mit diesem Symbol gekennzeichnet sind, dürfen ab
12. August 2005 nicht in öffentlichen europäischen Abfallsystemen
entsorgt werden. Benutzer von Elektrogeräten müssen in Europa in
Einklang mit lokalen und nationalen europäischen Regelungen (EU-
Richtlinie 2002/96/EG) Altgeräte kostenfrei dem Hersteller zur
Entsorgung zurückgeben.
Hinweis: Mit der Wiederverwertung, der stofflichen Verwertung oder anderen
Formen der Verwertung von Altgeräten leisten Sie einen wichtigen Beitrag zum
Schutz unserer Umwelt.
Produktübersicht
Mit dem 2100Q, 2100Qis und DR 1900 können drei Modultypen
verwendet werden: Netzteil, USB/Stromversorgungsmodul und USB-
Modul. Das Messinstrument kann über einen AC-DC-Netzadapter mit
dem Netzgerät und mit dem USB/Stromversorgungsmodul betrieben
werden. Das USB/Stromversorgungsmodul und das USB-Modul werden
auch für die Kommunikation mit einem Citizen PD-24 Drucker, einem
USB-Barcode-Scanner und einem Computer verwendet. Die Firmware
des Moduls kann mit einer vom Computer heruntergeladenen Datei
aktualisiert werden.
Komponenten des Stromversorgungsmoduls
H I N W E I S
Der Hersteller empfiehlt, ausschließlich die mitgelieferte Stromversorgung zu
verwenden (LZV803).
Vergewissern Sie sich anhand von Abbildung 1, dass alle Teile geliefert
wurden. Sollte eines der aufgelisteten Teile fehlen oder defekt sein,
wenden Sie sich bitte sofort an den Hersteller oder die zuständige
Vertretung.
Abbildung 1 Komponenten des Stromversorgungsmoduls
1 Stromversorgungsmodul
1
2 Netzteilstecker
(EU/USA/UK/AUSTRALIEN) und
AC-/DC-Netzteil
1
Nicht in allen Regionen verfügbar
Bauteile des USB-Moduls
Vergewissern Sie sich anhand von Abbildung 2, dass alle Teile geliefert
wurden. Sollte eines der aufgelisteten Teile fehlen oder defekt sein,
wenden Sie sich bitte sofort an den Hersteller oder die zuständige
Vertretung.
14 Deutsch

Abbildung 2 Bauteile des USB-Moduls
1 USB-Modul
1
3 USB-Kabel, Buchse Typ A auf
USB-Ministecker Typ B
2 USB-Kabel, Stecker Typ A auf
USB-Ministecker Typ B
1
Nicht in allen Regionen verfügbar
Komponenten des USB/Stromversorgungsmoduls
H I N W E I S
Der Hersteller empfiehlt, ausschließlich die mitgelieferte Stromversorgung zu
verwenden (LZV803).
Vergewissern Sie sich anhand von Abbildung 3, dass alle Teile geliefert
wurden. Sollte eines der aufgelisteten Teile fehlen oder defekt sein,
wenden Sie sich bitte sofort an den Hersteller oder die zuständige
Vertretung.
Abbildung 3 Komponenten des USB/Stromversorgungsmoduls
1 USB-Kabel, Stecker Typ A auf
USB-Ministecker Typ B
3 USB/Stromversorgungsmodul
1
2 USB-Kabel, Buchse Typ A auf
USB-Ministecker Typ B
4 Netzteilstecker
(EU/USA/UK/AUSTRALIEN) und
AC-/DC-Netzteil
1
Nicht in allen Regionen verfügbar
Installation
Einlegen der Batterien
W A R N U N G
Potenzielle Brandgefahr Benutzen Sie nur Alkali-Batterien oder
Nickelmetallhydrid-Akkus (NiMH) für das Messgerät. Andere Batterietypen oder
ein falscher Einbau können Brände verursachen. Verwenden Sie nie gleichzeitig
unterschiedliche Batterietypen im Messgerät.
Deutsch 15

H I N W E I S
Das Batteriegehäuse ist nicht wasserdicht. Falls das Batteriegehäuse nass
wurde, entfernen Sie die Batterien und trocknen Sie das Batteriegehäuse von
innen. Überprüfen Sie die Batteriekontakte auf Korrosion, und reinigen Sie sie bei
Bedarf.
H I N W E I S
Bei Verwendung von Nickelmetallhydrid-Akkus (NiMH) zeigt das Batteriesymbol
nach dem Einlegen frisch geladener Akkus keine volle Ladung an (NiMH-Akkus
haben eine Nennspannung von 1,2 V, Alkalibatterien eine von 1,5 V). Auch wenn
das Symbol keine vollständige Ladung anzeigt, erreichen die NiMH-Akkus mit
2300 mAh etwa 90% der Betriebsdauer des Geräts mit Alkalibatterien, bevor sie
wieder aufgeladen werden müssen.
H I N W E I S
Um mögliche Beschädigungen des Messgerätes durch auslaufende Batterien zu
vermeiden, nehmen Sie die Batterien bei längerem Nichtgebrauch des
Messgerätes heraus.
Das Messgerät kann mit Alkalibatterien der Größe AA/LR6 oder
aufladbaren Nickelmetallhydrid-Akkus betrieben werden. Um die
Batterielebensdauer zu schonen, schaltet sich das Messgerät nach
10 Minuten ohne Aktivität ab. Die Hintergrundbeleuchtung erlischt nach
30 Sekunden. Im Menü „Energieeinstellungen“ können Sie die
Grundeinstellung zur automatischen Abschaltung ändern und eine neue
Abschaltzeit eingeben
Hinweis: Akkus werden nur über das USB/Stromversorgungsmodul aufgeladen.
Weitere Informationen zum Einlegen der Batterie finden Sie in der
Bedienungsanleitung des Gerätes.
Installation des Moduls
Informationen zur Installation von Stromversorgungsmodul, USB-Modul
und USB/Stromversorgungsmodul entnehmen Sie bitte den
nummerierten Schritten.
16 Deutsch

Deutsch 17

18 Deutsch

Deutsch 19

Betrieb
Senden von Daten an einen Computer (2100Q)
Daten, die auf das USB/Stromversorgungsmodul und USB-Modul
heruntergeladen wurden, können an einen Computer übertragen und
dort gespeichert werden. Die Daten sind als XML-Datei formatiert.
1. Drücken Sie auf DATA MANAGEMENT>Send Data Log
(Datenverwaltung>Datenprotokoll senden).
2. Wählen Sie eine Option.
Optionen Beschreibung
Send Data Log
(Datenprotokoll
senden)
Alle Daten werden an das
USB/Stromversorgungsmodul bzw. USB-Modul
gesendet.
Daten filtern Daten werden gefiltert nach:
Datentyp—Alle Daten, Messwerte, Kalibrierungen
und Prüfungen
Zeitintervall—Alle Daten, Letzte Messung,
Tagesdaten, Wochendaten und Monatsdaten
Proben-ID—Aus oder Proben-ID
Anwender-ID—Aus oder Anwender-ID
a. Wählen Sie „Send Data“ (Daten senden), um alle Daten an das
USB/Stromversorgungsmodul bzw. USB-Modul zu senden.
b. Wählen Sie „Datenfilter“. Wählen Sie die zu übertragenden Daten
und drücken Sie „Beenden“. Wählen Sie „Daten senden“, um die
ausgewählten Daten an das USB/Stromversorgungsmodul zu
senden.
Eine Statusanzeige stellt den Fortschritt der Übertragung dar und
meldet „Transfer Complete“ (Übertragung beendet), wenn die Daten
erfolgreich an das USB/Stromversorgungsmodul bzw. USB-Modul
gesendet wurden.
3. Trennen Sie das USB/Stromversorgungsmodul bzw. USB-Modul
vom Messgerät.
Hinweis: Schließen Sie das USB/Stromversorgungsmodul bzw. USB-Modul
nicht an den Computer an, solange es noch an das Messgerät angeschlossen
ist.
4. Schließen Sie das USB-Kabel Typ A an das
USB/Stromversorgungsmodul bzw. USB-Modul an und schließen Sie
das USB/Stromversorgungsmodul bzw. USB-Modul an den PC an.
Hinweis: Das USB/Stromversorgungsmodul bzw. USB-Modul funktioniert wie
ein USB-Speichergerät. Navigieren Sie im Windows Explorer zum
USB/Stromversorgungsmodul.
5. Öffnen Sie den Ordnung „datalog“. Suchen Sie die Datendatei.
Der Dateiname hat das Format: Jahr_Monat_Tag_Stunde_Minute.
xml.
6. Speichern Sie die Datei am gewünschten Speicherort auf dem
Computer.
Eine Statusanzeige stellt den Fortschritt der Übertragung dar und
meldet „Transfer Complete“ (Übertragung beendet), wenn die Daten
erfolgreich an das USB/Stromversorgungsmodul bzw. USB-Modul
gesendet wurden.
7. Öffnen Sie ein Tabellenkalkulationsprogramm, um die Daten
anzuzeigen.
Eine Statusanzeige stellt den Fortschritt der Übertragung dar und
meldet „Transfer Complete“ (Übertragung beendet), wenn die Daten
erfolgreich an das USB/Stromversorgungsmodul bzw. USB-Modul
gesendet wurden.
Senden von Daten an einen Computer (DR 1900)
Daten, die auf das USB/Stromversorgungsmodul und USB-Modul
heruntergeladen wurden, können an einen Computer übertragen und
dort gespeichert werden. Die Daten werden als CSV-Datei formatiert.
1. Drücken Sie auf SETTINGS>Data Management>Send Data
(EINSTELLUNGEN>Datenverwaltung> Daten senden). Alle Daten
werden an das USB/Stromversorgungsmodul bzw. USB-Modul
gesendet.
Der Messwertbildschirm zeigt „Transfer Complete“ (Übertragung
beendet) an, wenn die Daten erfolgreich an das
USB/Stromversorgungsmodul bzw. USB-Modul gesendet wurden.
2. Trennen Sie das USB/Stromversorgungsmodul bzw. USB-Modul
vom Messgerät.
20 Deutsch
La pagina si sta caricando...
La pagina si sta caricando...
La pagina si sta caricando...
La pagina si sta caricando...
La pagina si sta caricando...
La pagina si sta caricando...
La pagina si sta caricando...
La pagina si sta caricando...
La pagina si sta caricando...
La pagina si sta caricando...
La pagina si sta caricando...
La pagina si sta caricando...
La pagina si sta caricando...
La pagina si sta caricando...
La pagina si sta caricando...
La pagina si sta caricando...
La pagina si sta caricando...
La pagina si sta caricando...
La pagina si sta caricando...
La pagina si sta caricando...
La pagina si sta caricando...
La pagina si sta caricando...
La pagina si sta caricando...
La pagina si sta caricando...
La pagina si sta caricando...
La pagina si sta caricando...
La pagina si sta caricando...
La pagina si sta caricando...
La pagina si sta caricando...
La pagina si sta caricando...
La pagina si sta caricando...
La pagina si sta caricando...
La pagina si sta caricando...
La pagina si sta caricando...
La pagina si sta caricando...
La pagina si sta caricando...
La pagina si sta caricando...
La pagina si sta caricando...
La pagina si sta caricando...
La pagina si sta caricando...
La pagina si sta caricando...
La pagina si sta caricando...
La pagina si sta caricando...
La pagina si sta caricando...
La pagina si sta caricando...
La pagina si sta caricando...
La pagina si sta caricando...
La pagina si sta caricando...
La pagina si sta caricando...
La pagina si sta caricando...
La pagina si sta caricando...
La pagina si sta caricando...
La pagina si sta caricando...
La pagina si sta caricando...
La pagina si sta caricando...
La pagina si sta caricando...
La pagina si sta caricando...
La pagina si sta caricando...
La pagina si sta caricando...
La pagina si sta caricando...
La pagina si sta caricando...
La pagina si sta caricando...
La pagina si sta caricando...
La pagina si sta caricando...
La pagina si sta caricando...
La pagina si sta caricando...
La pagina si sta caricando...
La pagina si sta caricando...
La pagina si sta caricando...
La pagina si sta caricando...
La pagina si sta caricando...
La pagina si sta caricando...
La pagina si sta caricando...
La pagina si sta caricando...
La pagina si sta caricando...
La pagina si sta caricando...
La pagina si sta caricando...
La pagina si sta caricando...
La pagina si sta caricando...
La pagina si sta caricando...
La pagina si sta caricando...
La pagina si sta caricando...
La pagina si sta caricando...
La pagina si sta caricando...
La pagina si sta caricando...
La pagina si sta caricando...
La pagina si sta caricando...
La pagina si sta caricando...
La pagina si sta caricando...
La pagina si sta caricando...
La pagina si sta caricando...
La pagina si sta caricando...
La pagina si sta caricando...
La pagina si sta caricando...
La pagina si sta caricando...
La pagina si sta caricando...
La pagina si sta caricando...
La pagina si sta caricando...
La pagina si sta caricando...
La pagina si sta caricando...
La pagina si sta caricando...
La pagina si sta caricando...
La pagina si sta caricando...
La pagina si sta caricando...
La pagina si sta caricando...
La pagina si sta caricando...
La pagina si sta caricando...
La pagina si sta caricando...
La pagina si sta caricando...
La pagina si sta caricando...
La pagina si sta caricando...
La pagina si sta caricando...
La pagina si sta caricando...
La pagina si sta caricando...
La pagina si sta caricando...
La pagina si sta caricando...
La pagina si sta caricando...
La pagina si sta caricando...
La pagina si sta caricando...
La pagina si sta caricando...
La pagina si sta caricando...
La pagina si sta caricando...
La pagina si sta caricando...
La pagina si sta caricando...
La pagina si sta caricando...
La pagina si sta caricando...
La pagina si sta caricando...
La pagina si sta caricando...
La pagina si sta caricando...
La pagina si sta caricando...
La pagina si sta caricando...
La pagina si sta caricando...
La pagina si sta caricando...
La pagina si sta caricando...
La pagina si sta caricando...
La pagina si sta caricando...
La pagina si sta caricando...
La pagina si sta caricando...
La pagina si sta caricando...
La pagina si sta caricando...
La pagina si sta caricando...
La pagina si sta caricando...
La pagina si sta caricando...
La pagina si sta caricando...
La pagina si sta caricando...
La pagina si sta caricando...
La pagina si sta caricando...
La pagina si sta caricando...
La pagina si sta caricando...
La pagina si sta caricando...
La pagina si sta caricando...
La pagina si sta caricando...
La pagina si sta caricando...
La pagina si sta caricando...
La pagina si sta caricando...
La pagina si sta caricando...
La pagina si sta caricando...
La pagina si sta caricando...
La pagina si sta caricando...
La pagina si sta caricando...
La pagina si sta caricando...
La pagina si sta caricando...
La pagina si sta caricando...
La pagina si sta caricando...
La pagina si sta caricando...
La pagina si sta caricando...
La pagina si sta caricando...
La pagina si sta caricando...
La pagina si sta caricando...
La pagina si sta caricando...
La pagina si sta caricando...
La pagina si sta caricando...
La pagina si sta caricando...
La pagina si sta caricando...
La pagina si sta caricando...
La pagina si sta caricando...
La pagina si sta caricando...
La pagina si sta caricando...
La pagina si sta caricando...
La pagina si sta caricando...
La pagina si sta caricando...
La pagina si sta caricando...
La pagina si sta caricando...
La pagina si sta caricando...
La pagina si sta caricando...
La pagina si sta caricando...
-
 1
1
-
 2
2
-
 3
3
-
 4
4
-
 5
5
-
 6
6
-
 7
7
-
 8
8
-
 9
9
-
 10
10
-
 11
11
-
 12
12
-
 13
13
-
 14
14
-
 15
15
-
 16
16
-
 17
17
-
 18
18
-
 19
19
-
 20
20
-
 21
21
-
 22
22
-
 23
23
-
 24
24
-
 25
25
-
 26
26
-
 27
27
-
 28
28
-
 29
29
-
 30
30
-
 31
31
-
 32
32
-
 33
33
-
 34
34
-
 35
35
-
 36
36
-
 37
37
-
 38
38
-
 39
39
-
 40
40
-
 41
41
-
 42
42
-
 43
43
-
 44
44
-
 45
45
-
 46
46
-
 47
47
-
 48
48
-
 49
49
-
 50
50
-
 51
51
-
 52
52
-
 53
53
-
 54
54
-
 55
55
-
 56
56
-
 57
57
-
 58
58
-
 59
59
-
 60
60
-
 61
61
-
 62
62
-
 63
63
-
 64
64
-
 65
65
-
 66
66
-
 67
67
-
 68
68
-
 69
69
-
 70
70
-
 71
71
-
 72
72
-
 73
73
-
 74
74
-
 75
75
-
 76
76
-
 77
77
-
 78
78
-
 79
79
-
 80
80
-
 81
81
-
 82
82
-
 83
83
-
 84
84
-
 85
85
-
 86
86
-
 87
87
-
 88
88
-
 89
89
-
 90
90
-
 91
91
-
 92
92
-
 93
93
-
 94
94
-
 95
95
-
 96
96
-
 97
97
-
 98
98
-
 99
99
-
 100
100
-
 101
101
-
 102
102
-
 103
103
-
 104
104
-
 105
105
-
 106
106
-
 107
107
-
 108
108
-
 109
109
-
 110
110
-
 111
111
-
 112
112
-
 113
113
-
 114
114
-
 115
115
-
 116
116
-
 117
117
-
 118
118
-
 119
119
-
 120
120
-
 121
121
-
 122
122
-
 123
123
-
 124
124
-
 125
125
-
 126
126
-
 127
127
-
 128
128
-
 129
129
-
 130
130
-
 131
131
-
 132
132
-
 133
133
-
 134
134
-
 135
135
-
 136
136
-
 137
137
-
 138
138
-
 139
139
-
 140
140
-
 141
141
-
 142
142
-
 143
143
-
 144
144
-
 145
145
-
 146
146
-
 147
147
-
 148
148
-
 149
149
-
 150
150
-
 151
151
-
 152
152
-
 153
153
-
 154
154
-
 155
155
-
 156
156
-
 157
157
-
 158
158
-
 159
159
-
 160
160
-
 161
161
-
 162
162
-
 163
163
-
 164
164
-
 165
165
-
 166
166
-
 167
167
-
 168
168
-
 169
169
-
 170
170
-
 171
171
-
 172
172
-
 173
173
-
 174
174
-
 175
175
-
 176
176
-
 177
177
-
 178
178
-
 179
179
-
 180
180
-
 181
181
-
 182
182
-
 183
183
-
 184
184
-
 185
185
-
 186
186
-
 187
187
-
 188
188
-
 189
189
-
 190
190
-
 191
191
-
 192
192
-
 193
193
-
 194
194
-
 195
195
-
 196
196
-
 197
197
-
 198
198
-
 199
199
-
 200
200
-
 201
201
-
 202
202
-
 203
203
-
 204
204
-
 205
205
-
 206
206


Hach LANGE LZV813 User Instructions
- Tipo
- User Instructions
- Questo manuale è adatto anche per
in altre lingue
- română: Hach LANGE LZV813
Documenti correlati


Altri documenti
-
HP Deskjet 9600 Printer series Manuale utente
-
LG LG Hi-Fi Plus Manuale del proprietario
-
-
HP Photosmart Pro B8300 Printer series Guida Rapida
-
Motorola PMLN6432 Manuale utente
-
HP Deskjet 9800 Printer series Guida utente
-
Datalogic Lynx 00N0LD-1N0-MEN0 Manuale utente
-
LAUNCH CRP123 Guida utente
-
-
Datalogic Memor Manuale utente