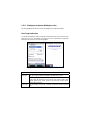
Datalogic Lynx 00N0LD-1N0-MEN0 Manuale utente
- Categoria
- Computer portatili palmari
- Tipo
- Manuale utente
Questo manuale è adatto anche per

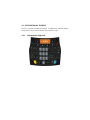
1 INTRODUCTION
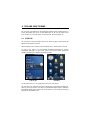
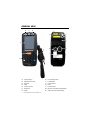
1.1 LYNX DESCRIPTION
The Lynx contains the most innovative technical features, providing them to the user
in an ergonomic and elegant form factor. The accelerometer, the vibrator alert and
the 3 LEDs help to do not waste time in the configuration and usage of the product.
Working with the Lynx becomes an easy pleasure.
The great aesthetics does not put the rubustness on a second level.The Lynx has
been deisgned for surviving to industrial environmental, outside and inside the four
walls. The reliability of the product continues with the architecture chosen: an
806MHz processor working with 256 MB RAM and 512 MB of Flash. A Micro SD card
slot supporting SDHC storage cards provides for virtually unlimited storage space.
The Lynx has been equipped with both a 1D laser scanner and 2D bar code imager.
For being ready also to the most demanding applicatinons, an autofocus camera with
flash has been foreseen on the back of the product.
The Lynx provides four wireless technologies in the same form factor, without
antenna protruding: Bluetooth® v2.1 EDR for fast data transfer, 802.11b/g/n with
CCX v4, 802.11i Security, UMTS HSPA+ for real-time communication outside the
four walls and Assisted GPS (A-GPS) with Skyhook‘s Core Engine hybrid positioning
system for location based applications.
Them micro-USB port facilitates charging with a phone industry standard power
supply or On-the-Go (OTG) communications.
The Lynx integrates the latest Windows Embedded Hend Held 6.5, tailored for mobile
devices.
As all the Datalogic ADC Computers, also this PDA is offering Wavelink Avalanche®
for a fast configuration and deploymant.
Finally, Datalogic’s comprehensive service programs protect the Lynx investment.

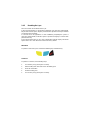
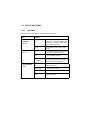
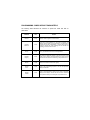
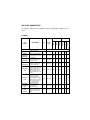
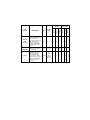
1.2 AVAILABLE MODELS
The brand new Lynx is available in different models depending on the options it is
equipped with. All options are listed below:
communication options: 802.11 b/g/n radio, Bluetooth®, GSM
data capture options: laser, 2D imager
compute options: Windows Mobile 6.5
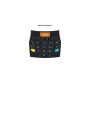
keyboard options: numeric, qwerty
For further details about the Lynx models refer to the web site:
www.adc.datalogic.com
.
For further information regarding Windows Embedded Handheld refer to the website:
http://www.microsoft.com/windowsembedded
.
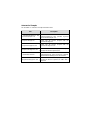
The currently available models are:
944400000 Lynx 00N0LD-1N0-MEN0
Lynx with Bluetooth v2.0, Wi-Fi 802.11 b/g/n, Decodified Laser (SE955),
Windows Mobile 6.5, 27-Key Numeric
944400001 Lynx H2N0LD-1N1-MEN0
Lynx with Bluetooth v2.0, UMTS HSPA+ Voice and Data, Assisted GPS, Wi-Fi
802.11 b/g/n, Decodified Laser (SE955), Camera, Windows Mobile 6.5, 27-Key
Numeric
944400002 Lynx 00N0WI-1N1-MEN0
Lynx with Bluetooth v2.0, Wi-Fi 802.11 b/g/n, 2D Imager (4500) Wide Aspect,
Camera, Windows Mobile 6.5, 27-Key Numeric
944400003 Lynx H2N0WI-1N1-MEN0
Lynx with Bluetooth v2.0, UMTS HSPA+ Voice and Data, Assisted GPS, Wi-Fi
802.11 b/g/n, 2D Imager (4500) Wide Aspect, Camera, Windows Mobile 6.5, 27-
Key Numeric
944400004 Lynx 00N0LD-1Q0-MEN0
Lynx with Bluetooth v2.0, Wi-Fi 802.11 b/g/n, Decodified Laser (SE955),
Windows Mobile 6.5, 46-Key QWERTY
944400005 Lynx H2N0LD-1Q1-MEN0

Lynx with Bluetooth v2.0, UMTS HSPA+ Voice and Data, Assisted GPS, Wi-Fi
802.11 b/g/n, Decodified Laser (SE955), Camera, Windows Mobile 6.5, 46-Key
QWERTY
944400006 Lynx 00N0WI-1Q1-MEN0
Lynx with Bluetooth v2.0, Wi-Fi 802.11 b/g/n, 2D Imager (4500) Wide Aspect,
Camera, Windows Mobile 6.5, 46-Key QWERTY
944400007 Lynx H2N0WI-1Q1-MEN0
Lynx with Bluetooth v2.0, UMTS HSPA+ Voice and Data, Assisted GPS, Wi-Fi
802.11 b/g/n, 2D Imager (4500) Wide Aspect, Camera, Windows Mobile 6.5, 46-
Key QWERTY

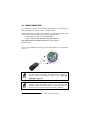
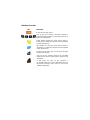
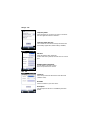
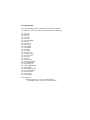
1.3 PACKAGE CONTENTS
The Lynx package contains:
1 Lynx PDA
1 Lynx quick start guide
1 rechargeable battery pack (standard for Wi-Fi models, high cap for UMTS
models)
1 power supply with regional plugs
1 Lanyard
1 guitar pick stylus
Any other packages will contain the accessories necessary for the Lynx connection
to the host computer and to the network: the cradle, one or more connection cables.
Remove all the components from their packaging; check their integrity and congruity
with the packing documents.
Keep the original packaging for use when sending products to the
technical assistance center. Damage caused by improper
packaging is not covered under the warranty.
CAUTION

Rechargeable battery packs are not initially charged. Therefore the
first operation to perform is to charge them. See paragraph
오류
!
참조
원본을
찾을
수
없습니다
..
NOTE

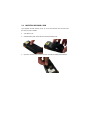
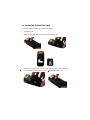
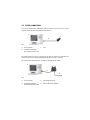
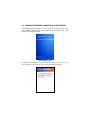
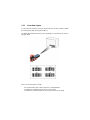
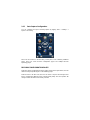
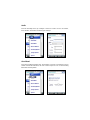
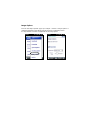
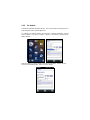
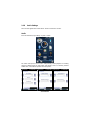
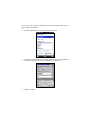
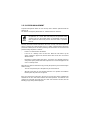
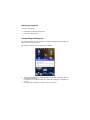
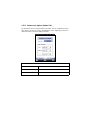
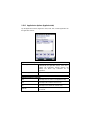
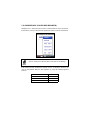
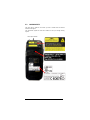
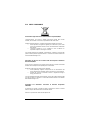
1.4 INSERTING MICROSD CARD
Lynx supports microSD memory cards. To access the microSD card slot and insert
the card, proceed as follows:
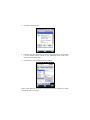
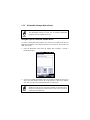
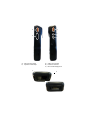
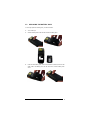
1. Turn off the Lynx.
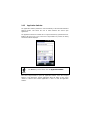
2. Shift the battery latch to the left and remove the battery pack:
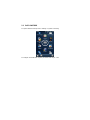
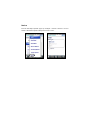
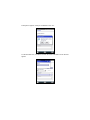
3. Open the card slot and insert the microSD card with the written part downward:

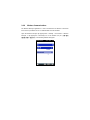
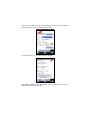
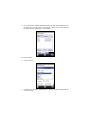
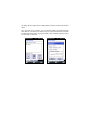
4. Shift the card to the right to lock it into the cardholder; close the card slot:
5. First insert the bottom (contacts) and then the upper side of the battery pack into
the slot. Press until the battery latch clicks..

1.4.1 Removing the MicroSD Card
To remove the microSD card, follow the steps above to access the microSD card
cage under the battery, and remove it from microSD slot.
Follow proper ESD precautions to avoid damaging the
microprocessors in the Lynx or the microSD card itself.
Proper ESD precautions include, but are not limited to, working on
an ESD mat and ensuring that the operator is properly grounded.
Do not force the card. If you feel resistance, remove the card, check
the orientation, and reinsert it.
Do not use the microSD card slot for any other accessories.
It is highly recommended that users latch the card cage's bale even
when the card is not present.
CAUTION

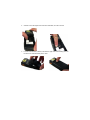
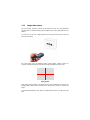
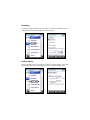
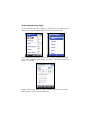
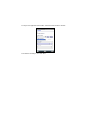
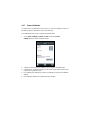
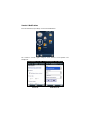
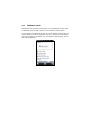
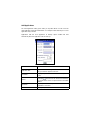
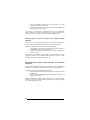
1.5 INSTALLING THE SIM CARD
To correctly insert the SIM Card, proceed as follows:
1. Turn off the Lynx.
2. Shift the battery latch to the left and remove the battery pack:
3. Insert the SIM card with the contacts downwards:
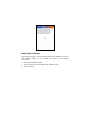
4. First insert the bottom (contacts) and then the upper side of the battery pack into
the slot. Press until the battery latch clicks.

Follow proper ESD precautions to avoid damaging the SIM card.
Proper ESD precautions include, but are not limited to, working on
an ESD mat and ensuring that the operator is properly grounded.
Do not force the card. If you feel resistance, remove the card, check
the orientation, and reinsert it.
Do not use the SIM card slot for any other accessories.
CAUTION
1.5.1 Removing the SIM Card
To remove the SIM card, follow the steps above to access the SIM area, and remove
it from its slot.
All the basic functionalities normally associated to the SIM card are
managed by the terminal (GPRS connectivity, phone calls, SMS
handling).
All core functionalities (GPRS connectivity, phone calls, and SMS
handling) is managed by the terminal. Advanced functionality may
require additional software from the SIM card vendor.
It is possible that not all the services connected to the SIM card can
be used or can be managed by the terminal.
NOTE

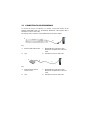
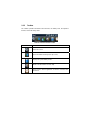
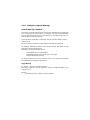
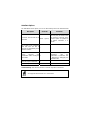
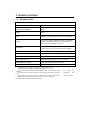
1.6 ACCESSORIES
Cradles
94A150036 Dock, Single Slot, Lynx
94A150037 Charger, 4 Slot Dock, Lynx
94A150038 Dock, Ethernet 4 Slot, Lynx
94A150039 Charger, 4 Slot Battery, Lynx
Batteries
94ACC0064 Battery, Standard Capacity, Lynx
94ACC0065 Battery, High Capacity, Lynx
Power Supply
94A051975 Power Adapter, 12 to 24v Pwr Plug 2.1mm
94A051976 Adapter, Pwr Jack 2.1mm To Handylink
94ACC1380 Power Supply, Micro USB
94ACC1381 Power Supply, Dock, PWR Plug 2.1mm
Cables
94A051020 Cable for dock-PC (RS232) communication
94A051968 Cable, Micro USB, Client
94A051969 Cable, Micro USB, Host
94A051970 Cable, USB Handylink, Client
94A051971 Cable, USB Handylink, Host
94A051972 Cable, RS232 Handylink, Client
94A051973 Cable, RS232 Handylink, Host
94A051974 Cable, Dex Handylink
Various
95ACC1033 Screen Protector Kit, 5 Pack
94ACC1230 Swivel for Functional Case (10pcs)
94ACC1345 Stylus Pen (10 pcs.)
94ACC1371 Module, Ethernet, Single Slot Dock
94ACC1372 Module, Modem, Single Slot Dock
94ACC1382 Stylus, Guitar Pick W/ Cord (5pcs)

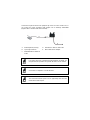
Use only a Datalogic ADC-approved power supply and cables. Use
of an alternative power supply will invalidate any approval given to
this device and may be dangerous.
NOTE

2. BATTERIES AND MAINTENANCE
Rechargeable backup batteries and battery packs are not initially
charged. Therefore the initial operation to perform is to charge them.
See below.
NOTE
By default, the battery pack is disconnected at the factory to avoid
damage due to excessive draining.
Annual replacement of rechargeable battery pack avoids possible
risks or abnormalities and ensures maximum performance.
CAUTION
1.1 CHARGING THE BATTERY PACK
The battery pack autonomy varies according to many factors, such
as the frequency of barcode scanning, RF usage, battery life,
storage, environmental conditions, etc.
NOTE
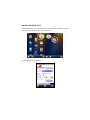
The battery icon on the Taskbar indicates when the battery pack is low.
It is possible to recharge the battery pack by connecting the power supply directly to
the Lynx.
Alternatively, it is also possible to recharge the battery pack by using the single slot
dock, the powered mobile dock, the Ethernet four slot dock or the four slot battery
charger.
Moreover recharging is possible by USB Direct connection with the host computer,
but with longer charging times and only if the PDA is off.
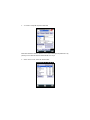
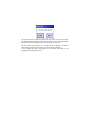
During the charging process the LED positioned at the left side of the display is red
constant. Once the charging process has been completed this LED is green constant
(see par. 오류! 참조 원본을 찾을 수 없습니다.).
If the battery pack is removed from the PDA, it can be recharged by inserting it into
the rear slot of the single slot dock, the powered mobile dock, the Ethernet four slot
dock or the four slot battery charger.

It’s recommended to charge batteries before first use.
NOTE
Risk of explosion if battery is replaced by an incorrective type.
Dispose of used batteries according to the instructions.
CAUTION
Il y a risque d’explosion si la batterie est remplacée par une batterie
de type incorrect.
Mettre au rebut les batteris usagées conformément aux instructions.
CAUTION
Avoid storing batteries for long periods in a state of full charge or very
low charge.
We recommend charging the battery pack every two to three months
to keep its charge at a moderate level to maximize battery life.
CAUTION
Even if the storage temperature range is wider, In order to achieve
the longest battery life, store the terminal and the spare batteries
between 20 to 30 ºC (68 to 86 ºF).
Extended batteries must be charged at a temperature ranging from
0° to +45°C (+32° to +113°F).
Standard batteries must be charged at a temperature ranging from 0°
to +45°C (+32° to +113°F).
NOTE
The battery level may display incorrectly for several minutes after the
Lynx is disconnected from its charger if the charging cycle is not
completed.
NOTE

The Lynx could get warm during charging, this is normal and does
not mean a malfunction.
NOTE
Use only a USB-IF compliant USB port as a charging source.
NOTE

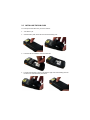
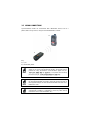
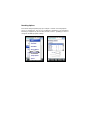
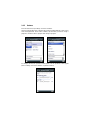
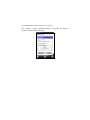
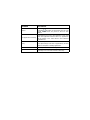
1.2 REPLACING THE BATTERY PACK
To correctly replace the battery pack, proceed as follows.
1. Turn off the Lynx.
2. Shift the battery latch to the left and remove the battery pack:
3. Install the new battery pack, first insert the bottom (contacts) and then the upper
side of the battery pack into the slot. Press
until the battery latch clicks.

WARNING
Installing, charging and/or any other action should be done by
authorized personnel and following this manual.
The battery pack may get hot, explode, ignite, and/or cause serious
injury if exposed to abusive conditions.
If the battery pack is replaced with an improper type, there is risk of
explosion.
Do not place the battery pack in or near a fire or heat; do not place
the battery pack in direct sunlight, or use or store the battery pack
inside unventilated areas in hot weather; do not place the battery
pack in microwave ovens, dryer, high pressure containers, on
induction cookware or similar device. Doing so may cause the
battery pack to generate heat, explode or ignite. Using the battery
pack in this manner may also result in a loss of performance and a
shortened life expectancy.
Use only a Datalogic ADC approved power supply. The use of an
alternative power supply will void the product warranty, may cause
product damage and may cause heat, explode or ignite.
The area in which the units are charged should be clear of debris
and combustible materials or chemicals.
Do not use the battery pack of this terminal for power devices
different from this PDA.
Immediately discontinue use of the battery pack if, while using,
charging or storing the battery pack, the battery pack emits an
unusual smell, feels hot, changes colour or shape, or appears
abnormal in any other way.
Do not short-circuit the battery pack contacts connecting the positive
terminal and negative terminal. This might happen, for example,
when you carry a spare battery pack in your pocket or purse;
accidental short–circuiting can occur when a metallic object such as
a coin, clip, or pen causes direct connection of the contacts of the
battery pack (these look like metal strips on the battery pack). Short–
circuiting the terminals may damage the battery pack or the
connecting object.
Do not apply voltages to the battery pack contacts.
Do not pierce the battery pack with nails, strike it with a hammer,
step on it or otherwise subject it to strong impacts or shocks.

WARNING
Do not disassemble or modify (i.e. bend, crush or deform) the battery
pack. The battery pack contains safety and protection devices,
which, if damaged, may cause the battery pack to generate heat,
explode or ignite.
In case of leakage of liquid from the battery, avoid contact with liquid
the skin or eyes. If the contact occurs, immediately wash the affected
area with water and consult a doctor.
Do not solder directly onto the battery pack.
Do not expose the battery pack to liquids.
Avoid any knocks or excessive vibrations. If the device or the battery
is dropped, especially on a hard surface, you should take it to the
nearest Authorised Repair Centre for inspection before continuing to
use it.
Do not replace the battery pack when the device is turned on.
Do not remove or damage the battery pack’s label.
Do not use the battery pack if it is damaged in any part.
Battery pack usage by children should be supervised.
Collect and recycle waste batteries separately from the device in
comply with European Directive 2006/66/EC, 2002/95/EC,
2002/96/EC and subsequent modifications, US and China regulatory
and others laws and regulations about environment.
In order to guarantee an adequate operating autonomy, when
replacing the battery pack the PDA checks the battery energy level.
If the battery is not sufficiently charged, Lynx does not turn on (when
pressing the ON/OFF key).
In this case, either substitute the battery pack with a charged one
(sufficiently charged) or insert Lynx into a powered cradle or plug it
into the direct power supply.
NOTE
To maximize battery life, turn off radios when they are not needed.
NOTE

1.3 CLEANING THE PDA
Periodically clean the Lynx with a slightly dampened cloth.
Do not use alcohol, corrosive products or solvents.

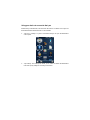
3. CONNECTIONS
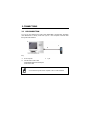
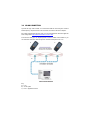
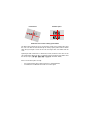
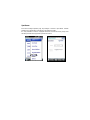
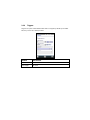
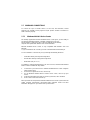
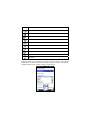
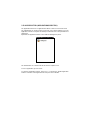
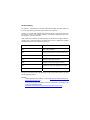
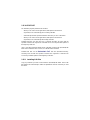
1.1 USB CONNECTION
You can use the standard micro USB cable 94A051968 or the Datalogic Handylink
cable 94A051970 to directly connect the Lynx to a host computer to transfer data
through the USB interface.
Key:
A Host computer C Lynx
B Standard Micro USB cable
94A051968/ 94A051970 Handylink
USB Client Cable
Connection through the cable complies to the 1.1 USB standard.
NOTE
A
B
C
La pagina si sta caricando...
La pagina si sta caricando...
La pagina si sta caricando...
La pagina si sta caricando...
La pagina si sta caricando...
La pagina si sta caricando...
La pagina si sta caricando...
La pagina si sta caricando...
La pagina si sta caricando...
La pagina si sta caricando...
La pagina si sta caricando...
La pagina si sta caricando...
La pagina si sta caricando...
La pagina si sta caricando...
La pagina si sta caricando...
La pagina si sta caricando...
La pagina si sta caricando...
La pagina si sta caricando...
La pagina si sta caricando...
La pagina si sta caricando...
La pagina si sta caricando...
La pagina si sta caricando...
La pagina si sta caricando...
La pagina si sta caricando...
La pagina si sta caricando...
La pagina si sta caricando...
La pagina si sta caricando...
La pagina si sta caricando...
La pagina si sta caricando...
La pagina si sta caricando...
La pagina si sta caricando...
La pagina si sta caricando...
La pagina si sta caricando...
La pagina si sta caricando...
La pagina si sta caricando...
La pagina si sta caricando...
La pagina si sta caricando...
La pagina si sta caricando...
La pagina si sta caricando...
La pagina si sta caricando...
La pagina si sta caricando...
La pagina si sta caricando...
La pagina si sta caricando...
La pagina si sta caricando...
La pagina si sta caricando...
La pagina si sta caricando...
La pagina si sta caricando...
La pagina si sta caricando...
La pagina si sta caricando...
La pagina si sta caricando...
La pagina si sta caricando...
La pagina si sta caricando...
La pagina si sta caricando...
La pagina si sta caricando...
La pagina si sta caricando...
La pagina si sta caricando...
La pagina si sta caricando...
La pagina si sta caricando...
La pagina si sta caricando...
La pagina si sta caricando...
La pagina si sta caricando...
La pagina si sta caricando...
La pagina si sta caricando...
La pagina si sta caricando...
La pagina si sta caricando...
La pagina si sta caricando...
La pagina si sta caricando...
La pagina si sta caricando...
La pagina si sta caricando...
La pagina si sta caricando...
La pagina si sta caricando...
La pagina si sta caricando...
La pagina si sta caricando...
La pagina si sta caricando...
La pagina si sta caricando...
La pagina si sta caricando...
La pagina si sta caricando...
La pagina si sta caricando...
La pagina si sta caricando...
La pagina si sta caricando...
La pagina si sta caricando...
La pagina si sta caricando...
La pagina si sta caricando...
La pagina si sta caricando...
La pagina si sta caricando...
La pagina si sta caricando...
La pagina si sta caricando...
La pagina si sta caricando...
La pagina si sta caricando...
La pagina si sta caricando...
La pagina si sta caricando...
La pagina si sta caricando...
La pagina si sta caricando...
La pagina si sta caricando...
La pagina si sta caricando...
La pagina si sta caricando...
La pagina si sta caricando...
La pagina si sta caricando...
La pagina si sta caricando...
La pagina si sta caricando...
La pagina si sta caricando...
La pagina si sta caricando...
La pagina si sta caricando...
La pagina si sta caricando...
La pagina si sta caricando...
La pagina si sta caricando...
La pagina si sta caricando...
La pagina si sta caricando...
La pagina si sta caricando...
La pagina si sta caricando...
La pagina si sta caricando...
La pagina si sta caricando...
La pagina si sta caricando...
La pagina si sta caricando...
La pagina si sta caricando...
La pagina si sta caricando...
La pagina si sta caricando...
La pagina si sta caricando...
La pagina si sta caricando...
La pagina si sta caricando...
La pagina si sta caricando...
La pagina si sta caricando...
La pagina si sta caricando...
La pagina si sta caricando...
La pagina si sta caricando...
La pagina si sta caricando...
La pagina si sta caricando...
La pagina si sta caricando...
La pagina si sta caricando...
La pagina si sta caricando...
La pagina si sta caricando...
La pagina si sta caricando...
La pagina si sta caricando...
La pagina si sta caricando...
La pagina si sta caricando...
La pagina si sta caricando...
La pagina si sta caricando...
La pagina si sta caricando...
La pagina si sta caricando...
La pagina si sta caricando...
La pagina si sta caricando...
La pagina si sta caricando...
La pagina si sta caricando...
La pagina si sta caricando...
La pagina si sta caricando...
La pagina si sta caricando...
La pagina si sta caricando...
La pagina si sta caricando...
La pagina si sta caricando...
La pagina si sta caricando...
La pagina si sta caricando...
La pagina si sta caricando...
La pagina si sta caricando...
La pagina si sta caricando...
La pagina si sta caricando...
La pagina si sta caricando...
La pagina si sta caricando...
La pagina si sta caricando...
La pagina si sta caricando...
La pagina si sta caricando...
La pagina si sta caricando...
La pagina si sta caricando...
La pagina si sta caricando...
La pagina si sta caricando...
La pagina si sta caricando...
La pagina si sta caricando...
La pagina si sta caricando...
La pagina si sta caricando...
La pagina si sta caricando...
La pagina si sta caricando...
La pagina si sta caricando...
La pagina si sta caricando...
La pagina si sta caricando...
La pagina si sta caricando...
La pagina si sta caricando...
La pagina si sta caricando...
La pagina si sta caricando...
La pagina si sta caricando...
La pagina si sta caricando...
La pagina si sta caricando...
La pagina si sta caricando...
La pagina si sta caricando...
La pagina si sta caricando...
La pagina si sta caricando...
La pagina si sta caricando...
La pagina si sta caricando...
La pagina si sta caricando...
La pagina si sta caricando...
La pagina si sta caricando...
La pagina si sta caricando...
La pagina si sta caricando...
La pagina si sta caricando...
La pagina si sta caricando...
-
 1
1
-
 2
2
-
 3
3
-
 4
4
-
 5
5
-
 6
6
-
 7
7
-
 8
8
-
 9
9
-
 10
10
-
 11
11
-
 12
12
-
 13
13
-
 14
14
-
 15
15
-
 16
16
-
 17
17
-
 18
18
-
 19
19
-
 20
20
-
 21
21
-
 22
22
-
 23
23
-
 24
24
-
 25
25
-
 26
26
-
 27
27
-
 28
28
-
 29
29
-
 30
30
-
 31
31
-
 32
32
-
 33
33
-
 34
34
-
 35
35
-
 36
36
-
 37
37
-
 38
38
-
 39
39
-
 40
40
-
 41
41
-
 42
42
-
 43
43
-
 44
44
-
 45
45
-
 46
46
-
 47
47
-
 48
48
-
 49
49
-
 50
50
-
 51
51
-
 52
52
-
 53
53
-
 54
54
-
 55
55
-
 56
56
-
 57
57
-
 58
58
-
 59
59
-
 60
60
-
 61
61
-
 62
62
-
 63
63
-
 64
64
-
 65
65
-
 66
66
-
 67
67
-
 68
68
-
 69
69
-
 70
70
-
 71
71
-
 72
72
-
 73
73
-
 74
74
-
 75
75
-
 76
76
-
 77
77
-
 78
78
-
 79
79
-
 80
80
-
 81
81
-
 82
82
-
 83
83
-
 84
84
-
 85
85
-
 86
86
-
 87
87
-
 88
88
-
 89
89
-
 90
90
-
 91
91
-
 92
92
-
 93
93
-
 94
94
-
 95
95
-
 96
96
-
 97
97
-
 98
98
-
 99
99
-
 100
100
-
 101
101
-
 102
102
-
 103
103
-
 104
104
-
 105
105
-
 106
106
-
 107
107
-
 108
108
-
 109
109
-
 110
110
-
 111
111
-
 112
112
-
 113
113
-
 114
114
-
 115
115
-
 116
116
-
 117
117
-
 118
118
-
 119
119
-
 120
120
-
 121
121
-
 122
122
-
 123
123
-
 124
124
-
 125
125
-
 126
126
-
 127
127
-
 128
128
-
 129
129
-
 130
130
-
 131
131
-
 132
132
-
 133
133
-
 134
134
-
 135
135
-
 136
136
-
 137
137
-
 138
138
-
 139
139
-
 140
140
-
 141
141
-
 142
142
-
 143
143
-
 144
144
-
 145
145
-
 146
146
-
 147
147
-
 148
148
-
 149
149
-
 150
150
-
 151
151
-
 152
152
-
 153
153
-
 154
154
-
 155
155
-
 156
156
-
 157
157
-
 158
158
-
 159
159
-
 160
160
-
 161
161
-
 162
162
-
 163
163
-
 164
164
-
 165
165
-
 166
166
-
 167
167
-
 168
168
-
 169
169
-
 170
170
-
 171
171
-
 172
172
-
 173
173
-
 174
174
-
 175
175
-
 176
176
-
 177
177
-
 178
178
-
 179
179
-
 180
180
-
 181
181
-
 182
182
-
 183
183
-
 184
184
-
 185
185
-
 186
186
-
 187
187
-
 188
188
-
 189
189
-
 190
190
-
 191
191
-
 192
192
-
 193
193
-
 194
194
-
 195
195
-
 196
196
-
 197
197
-
 198
198
-
 199
199
-
 200
200
-
 201
201
-
 202
202
-
 203
203
-
 204
204
-
 205
205
-
 206
206
-
 207
207
-
 208
208
-
 209
209
-
 210
210
-
 211
211
-
 212
212
-
 213
213


Datalogic Lynx 00N0LD-1N0-MEN0 Manuale utente
- Categoria
- Computer portatili palmari
- Tipo
- Manuale utente
- Questo manuale è adatto anche per
in altre lingue
Documenti correlati
-
Datalogic Memor Manuale utente
-
Datalogic Jet Manuale utente
-
Datalogic Joya Manuale utente
-
-
Datalogic 942500002 Manuale utente
-
Datalogic SKORPIO Compact Hand-Held Mobile Computer Manuale utente
-
Datalogic Industrial PDA Manuale utente
-
-
-
Datalogic Falcon X4 Manuale utente
Altri documenti
-
Ryobi R18R Original Instructions Manual
-
Baracoda BL 2604 Manuale utente
-
Dell Wireless 355 Module Manuale del proprietario
-
Snap-On BK8000 Manuale utente
-
Cirago BTA3310 Scheda dati
-
Juniper FIELD PC Manuale utente
-
-
 MyManga CLASS II Manuale utente
-
Microsoft LifeCam Cinema Manuale utente
-
