Akai MPC X Special Edition Guida utente
- Categoria
- Attrezzatura musicale
- Tipo
- Guida utente


2
Quickstart Guide (English)
Introduction
Features
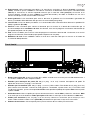
• Standalone MPC—no computer required
• 10.1” (257 mm) full-color multi-touch display
• Also acts as a control surface for MPC 2.0 software
• Phono inputs with ground peg
• (16) Q-Link knobs with graphical displays
• (2) full-size MIDI inputs and (4) full-size MIDI outputs
• 48 GB of on-board storage, with over 16 GB available for user storage
• 4 GB of RAM for sampling
• Full-size SD card slot
• User-expandable 2.5” SATA drive connector (SSD or HDD)
• (2) USB-A 3.0 slots for thumb drives or MIDI controllers
Box Contents
MPC X Special Edition
Power Adapter
USB Cable
Software Download Card
Quickstart Guide
Safety & Warranty Manual
Important: Visit akaipro.com and find the webpage for MPC X Special Edition to download the complete user
guide.
Support
For the latest information about this product (documentation, technical specifications, system requirements,
compatibility information, etc.) and product registration, visit akaipro.com.
For additional product support, visit akaipro.com/support.


4
Features
Important: Visit akaipro.com and find the webpage for MPC X Special Edition to download the complete User
Guide.
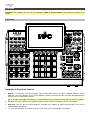
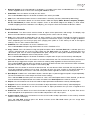
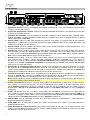
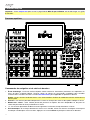
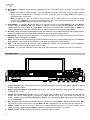
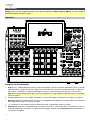
Top Panel
1
2
3
4
5
6
7
8
910
21
28 29 30
32 33
34 35
36
37 38
39 40
41
42
43
44
47 48
49
50
51 52
53 54
55 55
45 45
46
44
31
23 24 25 26 27
22
12
15
11
13
16 17 18 19 20
14
Navigation & Data Entry Controls
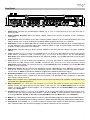
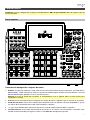
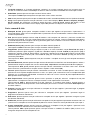
1. Display: This full-color multi-touch display shows information relevant to MPC X Special Edition’s current
operation. Touch the display (and use the hardware controls) to control the MPC interface. See Operation to
learn how to use some basic functions.
Tip: If you adjust the angle of the display, we recommend using the stand on its back panel to secure it in place.
2. Cursors: Press these buttons to navigate through the fields of menus and options shown in the display.
3. Data Dial: Turn this dial to scroll through the available menu options or adjust the parameter values of the
selected field in the display.
4. –/+: Press these buttons to increase or decrease the value of the selected field in the display.

5
5. Numeric Keypad: If the selected field in the display is a number, press these numbered buttons as a standard
numeric keypad to enter a value. Press the keypad’s Enter to enter it.
6. Undo/Redo: Press this button to undo your last action.
Press and hold Shift and press this button to redo the last action you undid.
7. Shift: Press and hold this button to access some buttons’ secondary functions (indicated by red writing).
8. F-Key: Press and hold this button to use the 6 buttons under the display (Menu, Browse, Step Seq, Sampler,
XY FX, Pad Perform) to select one the 6 options shown at the bottom edge of the display. In other words,
instead of tapping one of the 6 buttons in the display, you can press one of these hardware buttons under it.
Pad & Q-Link Controls
9. Q-Link Knobs: Turn these touch-sensitive knobs to adjust various parameters and settings. The display strip
above each knob indicates the parameter it is controlling and its current value or setting.
10. Pads: Press these pads to trigger drum hits or other samples in your software. The pads are velocity-sensitive
and pressure-sensitive, which makes them very responsive and intuitive to play. The pads will light up different
colors, depending on how hard you play them (ranging from yellow at a low velocity to red at the highest
velocity). You can also customize their colors.
11. Pad Bank: Press these buttons to access Pad Banks A–D.
Press and hold Shift while pressing these buttons to access Pad Banks E–H.
12. Copy / Delete: Press this button to copy one pad to another. When the From Pad field is selected, press the
“source” pad (the pad you want to copy). When the To Pad graphic (of all pads) is selected, press the
“destination” pad. You can select multiple destination pads, and you can select pads in different pad banks. Tap
Do It to continue or Cancel to return to the previous screen.
Press and hold Shift and press this button to delete the samples from all layers of the currently selected pad.
13. Full Level / Half Level: Press this button to activate or deactivate the Full Level feature. When activated, the
pads will always trigger their samples at the maximum velocity (127), regardless of how much force you use.
Press and hold Shift and then press this button to activate or deactivate the Half Level feature. When activated,
the pads will always trigger their samples at half-velocity (64).
14. 16 Level: Press this button to activate or deactivate the 16 Level feature. When activated, the last pad that was
hit will be temporarily copied to all 16 pads. The pads will play the same sample as the original pad, but a
selectable parameter will increase in value with each pad number, regardless of how much force you use.
15. Note Repeat / Latch: Press and hold this button, and then press a pad to trigger that pad’s sample repeatedly.
The rate is based on the current tempo and Time Correct settings.
Press and hold Shift and then press this button to “latch” the Note Repeat feature. When latched, you do not
have to hold the Note Repeat button for it to be activated. Press Note Repeat once more to unlatch it.
16. Project: Press this button to use the Q-Link knobs to adjust parameters related to the currently selected project.
17. Program: Press this button to use the Q-Link knobs to adjust parameters of the currently selected program.
18. Pad Scene: Press this button to use the Q-Link knobs to adjust parameters that you have assigned for the
currently selected pad.
19. Pad Param: Press this button to use the Q-Link knobs to adjust one parameter across all 16 pads. Each Q-Link
knob corresponds to the pad with the same number and position in the 4-by-4 layout.
20. Screen Control / Edit: Press this button to use the Q-Link knobs to adjust parameters in the currently selected
mode as shown in the display.
Press and hold Shift and then press this button to enter Q-Link Edit Mode where you can assign other
parameters to the Q-Link knobs.

6
Mode & View Controls
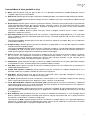
21. Menu: Press this button to open the Menu where you can select any of the available modes. Tap an option to
enter that mode.
22. Main / Track: Press this button to view Main Mode, an overview of the most-used functions.
Press and hold Shift and press this button to view Track View Mode, an overview of the tracks of each sequence.
23. Browse / Save: Press this button to view the Browser. The Browser lets you navigate your computer’s internal
and external hard disks to load samples, sequences, songs, etc. Using filter buttons and user-definable folders,
you can easily adapt it to your workflow. You can also preview samples before loading them.
Press and hold Shift and press this button to save the current project (including its samples, programs,
sequences, and songs).
24. Step Seq / List Edit: Press this button to view the Step Sequencer where you can create or edit sequences by
using the pads as “step buttons,” simulating the experience of a traditional step-sequencer-style drum machine.
Press and hold Shift and press this button to view your sequences using the List Edit View instead of Grid View.
25. Sampler / Looper: Press this button to view the Sampler where you can record audio samples to use in your projects.
Press and hold Shift and press this button to view the Looper where you can record and overdub audio in real
time—a great tool for live performance as well as spontaneous moments in the studio. You can export the loop
as a sample to use in your project.
26. XY FX: Press this button to view XY FX Mode, which turns the touchscreen into an XY pad where each axis
represents the range of an effect parameter. As you move touch or move your finger on the touchscreen, the
current position will determine the current value of the two parameters. You can use this mode to create
interesting effect automation on your tracks.
27. Pad Perform: Press this button to view Pad Perform Mode where you can assign musical scales/modes, chords,
or progressions to the pads for creative performance options.
28. Prog Edit: Press this button to view Program Edit Mode, which contains all parameters for editing your programs.
29. Sample Edit: Press this button to view Sample Edit Mode where you can edit your samples using various
functions and processes.
30. Pad Mixer: Press this button to view the Pad Mixer where you can set a program’s levels, stereo panning,
routing, and effects.
31. Ch. Mixer: Press this button to view the Channel Mixer where you can set levels, stereo panning, and other
settings for your tracks, programs, returns, submixes, and main outputs.
32. Track Mute / Pad Mute: Press this button to view Track Mute Mode where you can easily mute tracks within a
sequence or set mute groups for each track.
Press and hold Shift and press this button to view Pad Mute Mode where you can easily mute pads within a
program or set mute groups for each pad within a program.
33. Next Seq / Song: Press this button to view Next Sequence Mode where you can trigger different sequences
simply by playing the pads. This is useful for live performances, letting you change a song’s structure in real time.
Press and hold Shift and press this button to view Song Mode where you can arrange sequences in a specific order
and/or repetition to create songs. You can edit the structure of a song during playback for easy, on-the-fly composing.
Transport & Recording Controls
34. Play: Press this button to play the sequence from the audio pointer’s current position.
35. Play Start: Press this button to play the sequence from its start point.
36. Stop: Press this button to stop playback.
37. Rec: Press this button to record-arm the sequence. Press Play or Play Start to start recording. Recording in this
way (rather than using Overdub) erases the events of the current sequence. After the sequence plays through
once while recording, Overdub will be enabled.
38. Overdub: Press this button to enable Overdub, which allows you to record note events in a sequence without
overwriting any previously recorded note events. You can enable Overdub either before or during recording.

7
39. </> (Event |</>|): Use these buttons to move the audio pointer left/right, one step at a time.
Press and hold Locate and press one of these buttons to move the audio pointer to the previous/next event in
the sequence grid.
40. <</>> (Start/End): Use these buttons to move the audio pointer left/right, one bar at a time.
Press and hold Locate and press one of these buttons to move the audio pointer to the start or end of the
sequence grid.
41. Locate: Press and hold this button to activate the secondary functions of the </> and <</>> buttons (i.e., Event
|</>| and Start/End, respectively).
42. Erase: As a sequence is playing, press and hold this button and then press a pad to delete the note event for
that pad at the current playback position. This is a quick way to delete note events from your sequence without
having to stop playback.
43. Tap / Global: Press this button in time with the desired tempo to enter a new tempo (in BPM) in the software.
Press and hold Shift and press this button to set whether the currently selected sequence follows its own tempo
(the button will be lit amber) or a global tempo (the button will be lit red).
I/O & Level Controls
44. Gain 1/2: Use these knobs to adjust the gain of the incoming signal from Input 1/2 on the rear panel or Inst 1/2 on
the front panel. Use the Rear/Front switches below the knobs to determine the input. Use the level meter to
check the recording level. Be careful when setting this knob at higher levels, which can cause the signal to distort.
45. Rear/Front: Use each switch to set whether the Gain 1/2 knob above it will control the gain of the input signal on
the rear panel (Input 1/2) or on the front panel (Inst 1/2).
46. Phantom Power (+48V): This switch activates and deactivates phantom power for Input 1/2. When activated,
+48V of phantom power will be supplied to both inputs. Note that most dynamic microphones do not require
phantom power, while most condenser microphones do. Refer to your microphone’s documentation to check if it
needs phantom power.
47. 3/4 Rec Gain: Use this knob to adjust the gain of the incoming signal from Input 3/4 on the rear panel. Use the
level meter to check the recording level. Be careful when setting this knob at higher levels, which can cause the
signal to distort.
48. Main Volume: Turn this knob to adjust the volume level of the Main L/R outputs.
49. Direct/Main: Turn this knob to adjust the balance between the input and output signals in the headphones.
Direct corresponds to the input signal—all devices connected to the inputs on the front and rear panels.
While recording, you can turn this knob all the way to Direct for zero-latency direct monitoring.
Main corresponds to the output signal—the signal sent from the Main L/R outputs on the rear panel. When
you are not recording, we recommend turning this knob all the way to the Main position to hear the full-
volume playback signal.
50. Stereo/Mono: Use this switch to set whether the signal in the headphones is binaural (Stereo) or monaural
(Mono). When set to Stereo, the headphone signal will be split so that the input signal (Direct) is heard in the left
ear while the output signal (Main) is heard in the right ear. When set to Mono, the input and output signals are
blended into a single, summed mix, which is heard in both ears.
51. Rec Arm: Press this button to arm or disarm recording in the sampler or looper. (This is different from the Rec
button that record-arms the sequencer.)
52. Read/Write: Press this button to set whether the sequencer will read any automation during playback (Read) or
record automation (Write).
53. Mute: Press this button to mute the item shown in the display strip below the level meters. Usually, this will be
the currently selected program (the one you can play with the pads).
54. Solo: Press this button to solo the currently selected program. Usually, this will be the currently selected
program (the one you can play with the pads).
55. Level Meters: These meters indicate the level of the audio signal shown in the display strip below them.

8
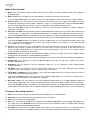
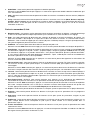
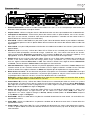
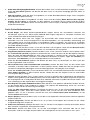
Front Panel
123456
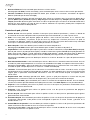
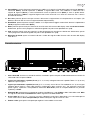
1. SD Card Slot: Insert a standard SD or SDHC card into this slot to access its files directly using MPC X Special
Edition.
2. Footswitch Inputs (FS 1/2) (1/4” / 6.35 mm): Connect optional 1/4” (6.35 mm) TS footswitches to these inputs.
3. Instrument Inputs (Inst 1/2) (1/4” / 6.35 mm): Use standard 1/4” (6.35 mm) TS cables to connect these inputs to
audio sources (guitars, synthesizer, drum machine, etc.). To use each of these inputs, set the corresponding
Rear/Front switch (below the Gain 1/2 knob on the top panel) to Front.
4. Mix Knob: Turn this knob to adjust the balance between the Main and 3/4 signals in your headphones. Main is
the signal sent from the Main L/R outputs. 3/4 is the signal sent from the Outputs 3/4.
5. Headphone Outputs (1/8” or 1/4” / 3.5 mm or 6.35 mm): Connect your headphones (not included) to either or
both of these standard stereo outputs. Use the Mix Knob to determine what signal is heard in the headphones.
6. Headphone Volume: Turn this knob to adjust the volume of the headphone outputs.

9
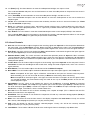
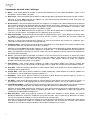
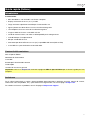
Rear Panel
1
2
3
4
5
678
9
10
11 12
13
14
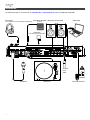
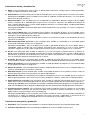
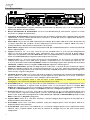
1. Power Input: Connect the included power adapter (19 V, 3.42 A, center-positive) to this jack then into an
electrical outlet.
2. Power Adapter Restraint: Secure the power adapter cable to this restraint to prevent it from accidentally
unplugging.
3. Power Switch: Press this button to turn MPC X Special Edition’s power on or off. While powered on, press and
hold this button for 5 seconds to force MPC X Special Edition to power off (similar to a computer).
4. USB-B Port: Use the included USB cable to connect this high-retention-force USB port to an available USB port
on your computer. This connection allows MPC X Special Edition to send and receive MIDI and audio data to
and from the MPC software on your computer.
5. USB-A Ports: Connect USB flash drives to these USB ports to access their files directly using MPC X Special
Edition.
6. Inputs 1/2 (XLR or 1/4” / 6.35 mm): Use standard XLR or 1/4” (6.35 mm) TRS cables to connect these inputs to
audio sources (microphone, mixer, synthesizer, etc.). To use each of these inputs, set the corresponding
Rear/Front switch (below the Gain 1/2 knob on the top panel) to Rear. Turn the Gain 1/2 knobs to set the input
level of each one.
7. Inputs 3/4 (1/4” / 6.35 mm or RCA): Use standard 1/4” (6.35 mm) TRS cables or stereo RCA cables to connect
these inputs to audio sources (mixer, turntable, synthesizer, etc.). To use the 1/4” (6.35 mm) inputs, set the
Phono/Line switch to Line. To use the RCA inputs, set the Phono/Line switch to Phono. Turn the 3/4 Rec Gain
knob to set their input levels.
8. Phono/Line Switch: Set this switch to the appropriate position, depending on which Input 3/4 connectors you
want to use. If you are using the 1/4” (6.35 mm) inputs, set this switch to Line. If you are using the RCA inputs,
set this switch to Phono to provide the additional amplification needed for phono-level signals.
9. Grounding Terminal: If you are sending a phono-level turntable signal to the Input 3/4 RCA connectors and are
hearing a low hum or buzz, it could mean that the turntable is not grounded. If the turntable has a grounding
wire, connect it to this terminal.
Note: Some turntables have a grounding wire built into the RCA connection and, therefore, nothing needs to be
connected to the grounding terminal.
10. Main L/R Outputs (1/4” / 6.35 mm): Use standard 1/4” (6.35 mm) TRS cables to connect these outputs to your
speaker system. The signal sent out of these outputs is the main mix. Turn the Main Volume knob to set their
volume. To route a program to these outputs, set its routing to Out 1,2 in the Channel Mixer when the Mixer
field is set to Programs.
11. Outputs 3/4, 5/6, 7/8 (1/4” / 6.35 mm): Use standard 1/4” (6.35 mm) TRS cables to connect these outputs to an
external mixer. The signal sent from these outputs is full-volume (0 dB). To route a program to these outputs, set
its routing to Out 3,4, Out 5,6, or Out 7,8 in the Channel Mixer when the Mixer field is set to Programs.
12. MIDI In: Use a standard 5-pin MIDI cable to connect this input to the MIDI output of an optional external MIDI device.
13. MIDI Out: Use a standard 5-pin MIDI cable to connect this output to the MIDI input of an optional external MIDI device.
14. CV/Gate Out: Use standard 1/8” (3.5 mm) TS cables to connect these outputs to optional external sequencers.
MPC X Special Edition will send control voltage (CV) and/or Gate data over this connection.

10
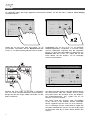
Operation
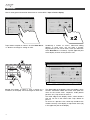
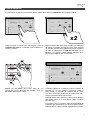
Here is some general information about how to use the MPC X Special Edition display:
Tap a button or option to select it. Use the Data Dial or
–/+ buttons to change its setting or value.
Double-tap a button to access advanced editing
options. In some cases, this will show a numeric
keypad that you can use to enter a value (an alternative
to the Data Dial or –/+ buttons). Tap the upper-left part
of the display to return to the previous view.
Spread two fingers to zoom in (into a section of a
waveform, for example). Pinch two fingers to zoom out.
The upper edge of the display shows the toolbar, which
contains information about the current view (often the
name of the current track, sequence, audio pointe
r
position, etc.). Tap an item to select it.
The lower edge of the display shows various buttons
that you can use in the current view. Tap a button to
press it.
To return to a previous view, either tap outside of the
window currently in the display or tap the left arrow ()
in the upper-left part of the display.

11
Guía de inicio rápido (Español)
Introducción
Características:
• MPC autónomo—no requiere ordenador
• Pantalla multitácil de 25 cm (10,1 pulg.) a todo color
• También funciona como superficie de control para el software MPC 2.0
• Entradas fonográficas con clavija a tierra
• 16 perillas Q-Link con bandas de visualización
• 2 entradas MIDI de tamaño completo y 4 salidas MIDI de tamaño completo
• 48 GB de almacenamiento integrado, con más de 16 GB para el almacenamiento del usuario
• 4 GB de RAM para muestreo
• Ranura para tarjeta SD de tamaño completo
• Conector para unidad SATA de 6,35 cm (2,5 pulg.) expandible por el usuario (SSD o HDD)
• 2 ranuras USB-A 3.0 para unidades de memoria o controladores MIDI
Contenido de la caja
MPC X Special Edition
Adaptador de alimentación
Cable USB
Tarjeta de descarga de software
Guía de inicio rápido
Manual sobre la seguridad y garantía
Importante: Visite en akaipro.com la página correspondiente al MPC X Special Edition para descargar la guía de
usuario complete.
Soporte
Para obtener la información más reciente acerca de este producto (documentación, especificaciones técnicas,
requisitos de sistema, información de compatibilidad, etc.) y registrarlo, visite akaipro.com.
Para obtener soporte adicional del producto, visite akaipro.com/support.

12
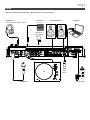
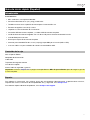
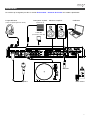
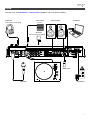
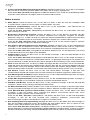
Instalación
Los elementos que no se enumeran en Introducción > Contenido de la caja se venden por separado.
A
uriculares
(a la salida del auricular del panel delantero)
Interruptor de pedal
(al FS 1)
Monitores alimentados Ordenador
Tarjeta SD
(a la ranura para tarjeta SD)
Giradiscos Micrófono Toma de corriente
Unidad
flash
USB

13
Características
Importante: Visite en akaipro.com la página correspondiente al MPC X Special Edition para descargar la guía de
usuario completa.
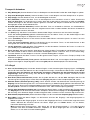
Panel superior
1
2
3
4
5
6
7
8
910
21
28 29 30
32 33
34 35
36
37 38
39 40
41
42
43
44
47 48
49
50
51 52
53 54
55 55
45 45
46
44
31
23 24 25 26 27
22
12
15
11
13
16 17 18 19 20
14
Controles de navegación e ingreso de datos
1. Pantalla: Esta pantalla multitáctil a todo color muestra información relevante para la operación actual del MPC X
Special Edition. Toque la pantalla (y utilice los controles de hardware) para controlar la interfaz del MPC. Consulte
Funcionamiento para aprender a usar las funciones básicas.
Consejo: Si ajusta el ángulo de la pantalla, le recomendamos usar el soporte sobre su panel trasero para
asegurarlo en su lugar.
2. Cursores: Pulse estos botones para navegar por los campos de menús y opciones que se muestran en la pantalla.
3. Cuadrante de datos: Utilice este cuadrante para desplazarse por las opciones de menú disponibles o ajustar
los valores de los parámetros del campo seleccionado en la pantalla.
4. –/+: Pulse estos botones para aumentar o disminuir el valor del campo seleccionado en la pantalla.
5. Teclado numérico: Si el campo seleccionado en la pantalla es un número, use estos botones numerados como
teclado numérico estándar para ingresar valores. Pulse Enter del teclado para ingresarlo.

14
6. Deshacer/Rehacer: Pulse este botón para deshacer su última acción.
Mantenga pulsado Shift (Función secundaria) y pulse este botón para volver a hacer la última acción que deshizo.
7. Función secundaria: Mantenga pulsado este botón para acceder a las funciones secundarias de algunos
botones (indicadas por el texto color rojo).
8. Tecla de función: Mantenga pulsado este botón para utilizar los 6 botones que se encuentran debajo de la
pantalla (Menu (Menú), Browse (Explorar), Step Seq (Secuenciador de pasos), Sampler (Muestreador), XY FX,
Looper (Generador de bucles) para seleccionar una de las 6 opciones que se muestran en el borde inferior de la
pantalla. En otras palabras, en lugar de tocar uno de los 6 botones en la pantalla, puede pulsar cualquiera de
estos botones de hardware debajo de ella.
Controles de pad y Q-Link
9. Perillas Q-Link: Gire estas perillas sensibles al tacto para ajustar diversos parámetros y valores. La banda de
visualización encima de cada perilla indica el parámetro que está controlando y su valor o ajuste actual.
10. Pads: Pulse estos pads para disparar golpes de batería u otras muestras existentes en su software. Son
sensibles a la velocidad y a la presión, lo que los hace muy responsivos e intuitivos para tocar. Los pads se
encienden con diferentes colores en función de la fuerza con que los toca (varían de amarillo a baja velocidad
hasta rojo a la velocidad máxima). También puede personalizar sus colores.
11. Banco de pads: Pulse estos botones para acceder a los bancos de pads A–D.
Mantenga pulsado Shift mientras pulsa estos botones para acceder a los bancos de pads E–H.
12. Copiar/Borrar: Pulse este botón para copiar un pad a otro. Cuando se selecciona el campo From Pad (Desde pad),
pulse el pad “fuente” (el pad que desea copiar). Cuando se selecciona el gráfico To Pad (Hacia pad) (de todos los
pads), pulse el pad “destino”. Puede seleccionar múltiples pads destino y puede seleccionar pads en diferentes
bancos de pads. Toque Do It (Ejecutar) para continuar o Cancel (Cancelar) para volver a la pantalla anterior.
Mantenga pulsado Shift y pulse este botón para eliminar las muestras de todas las capas del pad actualmente
seleccionad.
13. Nivel máximo/Nivel medio: Pulse este botón para activar o desactivar la característica de nivel máximo. Una vez
activada, los pads siempre dispararán sus muestras a la velocidad máxima (127), sin importar cuánta fuerza utilice.
Mantenga pulsado Shift y pulse este botón para activar/desactivar la característica de nivel medio. Una vez
activado, los pads siempre dispararán sus muestras a medio velocidad (64).
14. 16 niveles: Pulse este botón para activar o desactivar la característica de 16 niveles. Cuando se activa, se copia
temporalmente en los 16 pads el último pad que se golpeó. Los pads reproducirán la misma muestra que el pad
original, pero un parámetro seleccionable aumentará su valor con cada número de pad, sin importar cuánta
fuerza utilice.
15. Repetir/trabar nota: Mantenga pulsado este botón y pulse un pad para disparar la muestra de ese pad
repetidamente. La frecuencia se basa en el tempo actual y los ajustes de la corrección de tiempo.
Mantenga pulsado Shift y pulse este botón para “trabar” la característica de repetición de nota. Una vez trabada,
no necesita mantener pulsado el botón Note repeat para activarlo. Pulse Note Repeat una vez para destrabarla.
16. Proyecto: Pulse este botón para utilizar las perillas Q-Link a fin de ajustar los parámetros relacionados con el
proyecto actualmente seleccionado.
17. Programa: Pulse este botón para utilizar las perillas Q-Link a fin de ajustar los parámetros del programa
actualmente seleccionado.
18. Escena de pad: Pulse este botón para utilizar las perillas Q-Link a fin de ajustar los parámetros que asignó al
pad actualmente seleccionado.
19. Parámetro de pad: Pulse este botón para utilizar las perillas Q-Link a fin de ajustar los parámetros del programa
actualmente seleccionado. Cada perilla Q-Link corresponde al pad con el mismo número y posición en la
distribución de 4 × 4.
20. Control/Edición de pantalla: Pulse este botón para utilizar las perillas Q-Link a fin de ajustar los parámetros del
modo actualmente seleccionado tal como se muestra en la pantalla.
Mantenga pulsado Shift y luego pulse este botón para entrar al modo de edición de Q-Link en el cual podrá
asignar otros parámetros a las perillas Q-Link.

15
Controles de modo y visualización
21. Menú: Pulse este botón para abrir el menú en donde podrá seleccionar cualquiera de los modos disponibles.
Toque una opción para entrar a ese modo.
22. Principal/Pista: Pulse este botón para acceder al modo principal, una vista general de las funciones más usadas.
Mantenga pulsado Shift y pulse este botón para acceder al modo de visualización de pistas, una vista general
de las pistas de cada secuencia.
23. Explorar/Guardar: Pulse este botón para ver el explorador. El explorador le permite navegar los discos rígidos
internos y externos de su ordenador para cargar muestras, secuencias, canciones, etc. Mediante los botones de
filtro y carpetas definidas por el usuario, puede adaptarlo fácilmente a su flujo de trabajo. También puede probar
las muestras antes de cargarlas.
Mantenga pulsado Shift y pulse este botón para guardar el proyecto actual (incluidos sus muestras, programas,
secuencias y temas).
24. Sec. de pasos/Editar lista: Pulse este botón para acceder al secuenciador de pasos, en el cual podrá crear o
editar secuencias utilizando los pads como “botones de paso”, simulando la experiencia de una caja de ritmos al
estilo de un secuenciador de pasos tradicional.
Mantenga pulsado Shift y pulse este botón para visualizar sus secuencias usando la vista de edición de lista en
lugar de la vista de grilla.
25. Muestreador/Generador de bucles: Pulse este botón para acceder al muestreador en el cual podrá grabar
muestras de audio para utilizarlas en sus proyectos.
Mantenga pulsado Shift y pulse este botón para acceder al generador de bucles en el cual podrá grabar y
sobregrabar audio en tiempo real—una excelente herramienta para actuaciones en vivo así como también
momentos espontáneos en el estudio. Puede exportar el bucle como una muestra para usar en su proyecto.
26. XY FX: Pulse este botón para acceder al modo XY FX, el cual transforma la pantalla táctil en un pad XY en
donde cada eje representa el rango del parámetro de un efecto. A medida que toca o mueve su dedo sobre la
pantalla táctil, la posición actual determinará el valor actual de los dos parámetros. Puede usar este modo para
crear un interesante efecto de automatización en sus pistas.
27. Actuación de pad: Pulse este botón para acceder al modo de actuación de pad en el cual podrá asignar
escalas/modos musicales, acordes o progresiones a los pads para disponer de opciones creativas para su actuación.
28. Edición de programa: Pulse este botón para acceder al modo de edición de programa, el cual contiene todos
los parámetros para editar sus programas.
29. Edición de muestra: Pulse este botón para acceder al modo de edición de muestra, en el cual podrá editar sus
muestras utilizando diversas funciones y procesos.
30. Mezclador de pad: Pulse este botón para acceder al mezclador de pad, en el cual podrá ajustar los niveles, el
balance (panning) estéreo, el enrutamiento y los efectos del programa.
31. Mezclador de canal: Pulse este botón para acceder al mezclador de canal, en el cual podrá ajustar los niveles, el
balance (panning) estéreo y otros ajustes para sus pistas, programas, regresos, submezclas y salidas principales.
32. Silenciamiento de pista/pad: Pulse este botón para acceder al modo de silenciamiento de pista, en el cual
podrá silenciar pistas con facilidad dentro de una secuencia o definir grupos de silenciamiento para cada pista.
Mantenga pulsado Shift y pulse este botón para acceder al modo de silenciamiento de pad, en el cual podrá silenciar
pads con facilidad dentro de un programa o definir grupos de silenciamiento para cada pad dentro de un programa.
33. Canción/Secuencia siguiente: Pulse este botón para acceder al modo de secuencia siguiente, en el cual podrá
disparar diferentes secuencias con sólo tocar los pads. Esta función es útil para actuaciones en vivo, ya que
podrá cambiar la estructura de los temas en tiempo real.
Mantenga pulsado Shift y pulse este botón para acceder al modo de canción, en el cual podrá acomodar las
secuencias en un orden y/o repetición específicos para crear canciones. Puede editar la estructura de una
canción durante su reproducción pudiendo realizar una composición sencilla sobre la marcha.
Controles de transporte y grabación
34. Reproducir: Pulse este botón para reproducir la secuencia desde la posición actual del puntero de audio.
35. Comenzar reproducción: Pulse este botón para reproducir la secuencia desde su punto inicial.

16
36. Detener: Pulse este botón para detener la reproducción.
37. Grabación: Pulse este botón para preparar la secuencia para grabar. Pulse Play o Play Start para comenzar la
grabación. Al grabar de esta manera (en lugar de usar Overdub), se borran los eventos de la secuencia actual.
Después de que la secuencia se reproduce una vez durante la grabación, se activa la función Overdub
(Sobregrabación).
38. Sobregrabación: Pulse este botón para activar la función Overdub (Sobregrabar), que permite grabar eventos
de notas en una secuencia sin sobrescribir los eventos de nota grabados anteriormente. Puede activar Overdub
antes o durante la grabación.
39. </> (Evento |</>|): Use estos botones para desplazar el puntero de audio a la derecha/izquierda, de a un paso
por vez.
Mantenga pulsado Locate (Localizar) y pulse uno de estos botones para desplazar el puntero de audio al evento
anterior/siguiente en la grilla de secuencia.
40. <</>> (Comienzo/Final): Use estos botones para desplazar el puntero de audio a la derecha/izquierda, de a un
paso por vez.
Mantenga pulsado Locate y pulse uno de estos botones para desplazar el puntero de audio al inicio o final de la
grilla de secuencia.
41. Localizar: Mantenga pulsado este botón para activar las funciones secundarias de los botones < / > y << / >>
(es decir, Event |< / >| y Start/End respectivamente).
42. Borrar: Mientras se reproduce una secuencia, mantenga pulsado este botón y pulse un pad para suprimir el
evento de nota de ese pad en la posición de reproducción actual. Esta es una manera rápida de suprimir
eventos de nota de su secuencia sin tener que detener la reproducción.
43. Tempo propio/global: Pulse este botón en sincronismo con el tempo deseado para ingresar un tempo nuevo
(en BPM) en el software.
Mantenga pulsado Shift y pulse este botón para definir si la secuencia seleccionada actualmente sigue su
propio tempo (el botón se iluminará de color ámbar) o el tempo global (el botón se iluminará de color rojo).
Controles de E/S y nivel
44. Ganancia 1/2: Utilice estas perillas para ajustar la ganancia de la señal que ingresa por la entrada 1/2 en el
panel trasero o inst. 1/2 en el panel delantero. Utilice los interruptores Rear/Front que se encuentran debajo de
las perillas para determinar la entrada. Utilice el medidor de nivel para verificar el nivel de grabación. Tenga
cuidado al ajustar esta perilla a niveles más elevados, ya que esto puede generar distorsiones en la señal.
45. Trasero/Delantero: Utilice cada interruptor para definir si las perillas Gain 1/2 encima de ellos controlarán la
ganancia de la señal de entrada en el panel trasero (entrada 1/2) o en el panel delantero (inst. 1/2).
46. Potencia fantasma (+48 V): Este interruptor activa y desactiva la potencia fantasma de la entrada 1/2. Una vez
activada, se suministran +48 V de potencia fantasma ambas entradas. Tenga en cuenta que la mayoría de los
micrófonos dinámicos no necesitan potencia fantasma mientras que la mayoría de los micrófonos condensadores
sí lo hacen. Verifique la documentación de su micrófono para averiguar si necesita alimentación fantasma.
47. Ganancia de grabación 3/4: Utilice esta perilla para ajustar la ganancia de la señal que ingresa por la entrada
3/4 en el panel trasero. Utilice el medidor de nivel para verificar el nivel de grabación. Tenga cuidado al ajustar
esta perilla a niveles más elevados, ya que esto puede generar distorsiones en la señal.
48. Volumen principal: Gire esta perilla para ajustar el nivel de volumen de las salidas L/R principales.
49. Directa/Principal: Gire esta perilla para ajustar el balance entre las señales de entrada y salida en los auriculares.
Direct (Directa) corresponde a la señal de entrada—todos los dispositivos conectados a las entradas en los
paneles delantero y trasero. Al grabar, puede girar esta perilla del todo hacia Direct para obtener una
monitorización directa con latencia cero.
Main (Principal) corresponde a la señal de salida—la señal que se envía desde las salidas L/R principales del
panel trasero. Cuando no está grabando, le recomendamos girar esta perilla completamente hacia la
posición Main para escuchar la señal de reproducción a máximo volumen.

17
50. Estéreo/mono: Utilice interruptor para definir si la señal de los auriculares es binaural (estéreo) o monoaural
(mono). Cuando se ajusta a estéreo, la señal de los auriculares se dividirá de manera que la señal de entrada
(directa) se escuche en el auricular izquierdo mientras que la señal de salida (principal) se escuche en el
auricular derecho. Cuando se ajusta a Mono, las señales de entrada y de salida se combinan en una única
mezcla sumada que se escucha en ambos auriculares.
51. Armar grabación: Pulse este botón para armar o desarmar la grabación en el muestreador o generador de
bucles. (Este botón difiere del botón Rec que arma el secuenciador para grabar).
52. Leer/Escribir: Pulse este botón para definir si el secuenciador leerá automatizaciones durante la reproducción
(Leer) o grabación (Escribir).
53. Silenciar: Pulse este botón para silenciar el elemento que se muestra en la banda de visualización que se
encuentra debajo de los medidores de nivel. Usualmente, este será el programa actualmente seleccionado (el
que puede interpretar con los pads).
54. Solo: Pulse este botón para activar el solo del programa actualmente seleccionado. Usualmente, este será el
programa actualmente seleccionado (el que puede interpretar con los pads).
55. Medidores de nivel: Estos medidores indican el nivel de la señal de audio que se muestra en la banda de
visualización debajo de ellos.
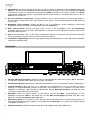
Panel frontal
123456
1. Ranura para tarjeta SD: Inserte una tarjeta SD o SDHC estándar en esta ranura para acceder directamente a
sus archivos mediante el MPC X Special Edition.
2. Entradas para interruptor de pedal (FS 1/2) (1/4 pulg. / 6,35 mm): Conecte interruptores de pedal TS
opcionales de 6,35 mm (1/4 pulg.) a esta entrada.
3. Entradas para instrumento (Inst 1/2) (1/4 pulg. / 6,35 mm): Utilice cables TS estándar de 1/4 pulg. (6,35 mm)
para conectar estas entradas a fuentes de audio (guitarras, sintetizador, caja de ritmos, etc.). Para utilizar cada
una de estas entradas, ajuste el interruptor Rear/Front correspondiente (debajo de la perilla Gain 1/2 en el panel
superior a Front.
4. Perilla de mezcla: Gire esta perilla para ajustar el balance entre las señales Main y 3/4 en los auriculares. Main
es la señal que se envía desde las salidas principales L/R. 3/4 es la señal que se envía desde las salidas 3/4.
5. Salidas para auriculares (1/8 o 1/4 pulg. / 6,35 o 6,35 mm): Conecte sus auriculares (no se incluyen) a una o
ambas salidas estéreo estándar. Use la perilla Mix para determinar qué señal se oye en los auriculares.
6. Volumen de auriculares: Gire esta perilla para ajustar el volumen de las salidas para auriculares.

18
Panel trasero
1
2
3
4
5
678
9
10
11 12
13
14
1. Entrada de corriente: Conecte el adaptador de corriente incluido (19 V, 3,42 A, centro positivo) a este conector
y luego a una toma de corriente.
2. Presilla del adaptador de corriente: Asegure el cable del adaptador de corriente a esta presilla para evitar que
se desconecte accidentalmente.
3. Interruptor de encendido: Pulse este botón para encender o apagar el secuenciador del MPC X Special Edition.
Estando encendido, mantenga pulsado este botón durante 5 segundos para forzar el apagado del MPC X Special
Edition (al igual que un ordenador).
4. Puerto USB-B: Utilice el cable USB incluido para conectar este puerto a un puerto USB de alta retención
disponible en su ordenador. Esta conexión permite que el MPC X Special Edition envíe y reciba datos MIDI y de
audio hacia y desde el software del MPC.
5. Puertos USB-A: Conecte unidades de memoria USB a estos puertos USB para acceder directamente a sus
archivos mediante el MPC X Special Edition.
6. Entradas 1/2 (XLR o TRS de 1/4 pulg.): Utilice cables XLR o TRS de 1/4 pulg. (6,35 mm) estándar para conectar
estas entradas a fuentes de audio (micrófono, mezclador, sintetizador, etc.). Para utilizar cada una de estas
entradas, ajuste el interruptor Rear/Front correspondiente (debajo de la perilla Gain 1/2 en el panel superior a
Rear. Gire las perillas Gain 1/2 para ajustar el nivel de cada una.
7. Entradas 3/4 (1/4 pulg. / 6.35 mm o RCA): Utilice cables TRS de 1/4 pulg. (6,35 mm) o RCA estéreo estándar
para conectar estas entradas a fuentes de audio (mezclador, giradiscos, sintetizador, etc.). Para utilizar las
entradas de 6,35 mm (1/4 pulg.), coloque el interruptor Line/Phono (Línea/Fonográfico) en Line. Para utilizar las
entradas RCA, coloque el interruptor Line/Phono (Línea/Fonográfico) en Phono. Gire la perilla 3/4 Rec Gain
para ajustar sus niveles de entrada.
8. Conmutador de entrada fonográfica/de línea: Coloque este interruptor en la posición apropiada, en función
del conector de las entradas 3/4 que desea utilizar. Si está utilizando las entradas de 6,35 mm (1/4 pulg.),
coloque este interruptor en Line. Si está utilizando las entradas RCA, coloque este interruptor en Phono para
proporcionar la amplificación adicional necesaria para las señales de este nivel.
9. Terminal de conexión a tierra: Si está enviando una señal de giradiscos de nivel fonográfico a los conectores
RCA de la entrada 3/4 y escucha un zumbido leve, esto puede indicar que el giradiscos no está conectado a
tierra. Si el giradiscos tiene un cable de conexión a tierra, conéctelo a esta terminal.
Nota: Algunos giradiscos tienen el cable de conexión a tierra incorporado a la conexión RCA y, por lo tanto, no
es necesario conectar nada al terminal de tierra.
10. Salidas principales L/R (6,35 mm / 1/4 pulg.): Utilice cables TRS estándar de 1/4 pulg. (6,35 mm) para conectar
estas salidas a su sistema de altavoces. La señal enviada desde estas salidas es la mezcla principal. Gire la
perilla Volumen principal para ajustar sus volúmenes. Para encaminar un programa a estas salidas, ajuste su
enrutamiento a Out 1,2 en el mezclador de canal cuando el campo Mixer (Mezclador) se ajusta a Programs
(Programas).
11. Salidas 3/4, 5/6, 7/8 (6,35 mm / 1/4 pulg.): Utilice cables TRS estándar de 1/4 pulg. (6,35 mm) para conectar
estas salidas a un mezclador externo. La señal enviada desde estas salidas es de máximo volumen (0 dB). Para
encaminar un programa a estas salidas, ajuste su enrutamiento a Out 3,4, Out 5,6 u Out 7,8 en el mezclador de
canal cuando el campo Mixer (Mezclador) se ajusta a Programs (Programas).
12. Entrada MIDI: Use un cable MIDI estándar de 5 pines para conectar esta entrada a la salida MIDI de un
dispositivo MIDI externo opcional.
13. Salida MIDI: Use un cable MIDI estándar de 5 pines para conectar esta salida a la entrada MIDI de un
dispositivo MIDI externo.
14. Salida de voltaje de control/compuerta: Utilice cables TS estándar de 1/8 pulg. (3,5 mm) para conectar estas
salidas a secuenciadores opcionales externos. El MPC X Special Edition enviará voltaje de control (CV) y/o datos
de compuerta a través de esta conexión.

19
Funcionamiento
A continuación se presenta información general sobre cómo utilizar la pantalla del MPC X Special Edition:
Toque un botón u opción para seleccionarla. Utilice el
cuadrante de datos o –/+ botones para modificar sus
ajustes o valores.
Toque un botón dos veces para acceder a las opciones
de edición avanzadas. En algunos casos, esto mostrará
un teclado numérico que puede utilizar para introduci
r
un valor (una alternativa al cuadrante de valor o a los
botones –/+). Toque la parte superior izquierda de la
pantalla para regresar a la vista anterior.
Separe sus dos dedos para hacer zoom (en una
sección de la forma de onda, por ejemplo). Junte sus
dos dedos para alejar el zoom.
El borde superior de la pantalla muestra la barra de
herramientas, la cual contiene información sobre la
pista actual (a menudo el nombre de la pista,
secuencia, o posición de puntero de audio actual, etc.).
Toque un elemento para seleccionarlo.
El borde inferior de la pantalla muestra varios botones
que puede utilizar en la vista actual. Toque un botón
para pulsarlo.
Para volver a una vista anterior, toque la parte exterior de
la pantalla que actualmente se muestra o toque la flecha
izquierda () en la parte superior izquierda de la pantalla.

20
Guide d’utilisation rapide (Français)
Présentation
Caractéristiques :
• MPC autonome — ne requiert pas d’ordinateur
• Écran couleur tactile multipoint de 25 cm
• Agit également comme contrôleur logiciel MPC 2.0
• Entrées phono avec borne de mise à la terre
• 16 bouton Q-Link avec bandes d’affichage graphiques
• 2 entrées MIDI standards et 4 sorties MIDI standards
• Capacité de stockage interne de 48 Go, avec plus de 16 Go disponibles pour le stockage utilisateur
• 4 Go de mémoire vive pour l’échantillonnage
• Port pour carte SD standard
• Connecteur SATA de 6,35 cm (SSD ou HDD)
• 2 ports USB-A 3.0 pour clés USB ou contrôleurs MIDI
Contenu de la boîte
MPC X Special Edition
Adaptateur d’alimentation
Câble USB
Carte de téléchargement de logiciel
Guide d’utilisation rapide
Consignes de sécurité et informations concernant la garantie
Important : Visitez akaipro.com pour trouver la page Web du MPC X Special Edition afin de télécharger son guide
d’utilisation complet.
Assistance
Pour les toutes dernières informations concernant la documentation, les spécifications techniques, la configuration
requise, la compatibilité et l’enregistrement du produit, veuillez visiter akaipro.com.
Pour de l’assistance supplémentaire, veuillez visiter akaipro.com/support.
La pagina sta caricando ...
La pagina sta caricando ...
La pagina sta caricando ...
La pagina sta caricando ...
La pagina sta caricando ...
La pagina sta caricando ...
La pagina sta caricando ...
La pagina sta caricando ...
La pagina sta caricando ...
La pagina sta caricando ...
La pagina sta caricando ...
La pagina sta caricando ...
La pagina sta caricando ...
La pagina sta caricando ...
La pagina sta caricando ...
La pagina sta caricando ...
La pagina sta caricando ...
La pagina sta caricando ...
La pagina sta caricando ...
La pagina sta caricando ...
La pagina sta caricando ...
La pagina sta caricando ...
La pagina sta caricando ...
La pagina sta caricando ...
La pagina sta caricando ...
La pagina sta caricando ...
La pagina sta caricando ...
La pagina sta caricando ...
-
 1
1
-
 2
2
-
 3
3
-
 4
4
-
 5
5
-
 6
6
-
 7
7
-
 8
8
-
 9
9
-
 10
10
-
 11
11
-
 12
12
-
 13
13
-
 14
14
-
 15
15
-
 16
16
-
 17
17
-
 18
18
-
 19
19
-
 20
20
-
 21
21
-
 22
22
-
 23
23
-
 24
24
-
 25
25
-
 26
26
-
 27
27
-
 28
28
-
 29
29
-
 30
30
-
 31
31
-
 32
32
-
 33
33
-
 34
34
-
 35
35
-
 36
36
-
 37
37
-
 38
38
-
 39
39
-
 40
40
-
 41
41
-
 42
42
-
 43
43
-
 44
44
-
 45
45
-
 46
46
-
 47
47
-
 48
48


Akai MPC X Special Edition Guida utente
- Categoria
- Attrezzatura musicale
- Tipo
- Guida utente
in altre lingue
Documenti correlati
-
Akai Professional MPC ONE Guida utente
-
Akai 541332 Guida utente
-
Akai Professional MPC Studio Black Manuale del proprietario
-
-
Akai Timbre Wolf Manuale del proprietario
-
Akai Rhytm Wolf Manuale utente
-
Akai Professional MPC Element Manuale utente
-
Akai Professional Tom Cat Manuale utente
-
Akai Professional MPK 49 Manuale utente