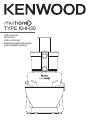
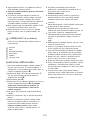
Kenwood KHH300WH Manuale del proprietario
- Categoria
- Accessori per mixer / robot da cucina
- Tipo
- Manuale del proprietario
Questo manuale è adatto anche per

TYPE KHH30
instructions
istruzioni
instrucciones
Bedienungsanleitungen
gebruiksaanwijzing

English 2 - 14
Nederlands 15 - 28
Français 29 - 43
Deutsch 44 - 57
Italiano 58 - 71
Português 72 - 85
Español 86 - 99
Dansk 100 - 112
Svenska 113 - 125
Norsk 126 - 137
Suomi 138 - 149
Türkçe 150 - 162
Ïesky 163 - 175
Magyar 176 - 189
Polski 190 - 204
Ekkgmij 205 - 220
Slovenčina 221 - 235
Українська 236 - 250
´¸∂w
152 - 362

4
8
9
7
2
3
bp
bq
br
bs
bt
bk
1
3
2
4
1
bl
bm bn bo
56

A
F
A
B
G
H
I
C
B
D
E
5
6
7
bp bq
9
8

A
F
G
H
I
A
B
D
E
F
C
C
B
D
E
bk
bm
bl
bq
bo
bp
bn
bs
br
bt
A
B
C
D
E
br bs bt

safety
l
Read these instructions carefully and retain for future
reference.
l
Remove all packaging and any labels.
l
Switch off and unplug:
l
before fitting or removing parts;
l
when not in use;
l
before cleaning.
l
Turn the speed control to ‘O’ (OFF) position and unplug
before fitting or removing tools/attachments, after use and
before cleaning.
l
Keep your fingers away from moving parts and fitted
attachments.
l
Never leave the Kitchen Machine unattended when it is
operating.
l
Never use a damaged appliance. Get it checked or repaired:
see ‘service and customer care’ section.
l
Never let the cord hang down where a child could grab it.
l
Never let the power unit, cord or plug get wet.
l
Ensure that no bowl tools are fitted or stored in
the bowl when using the dual drive outlet.
l
Never use an unauthorised attachment or more than one
attachment at once.
l
Never exceed the quantities stated in the maximum capacity
chart.
l
Take care when lifting this appliance. Ensure the head is
correctly latched in the down position and that the bowl,
tools, outlet cover and cord are secure before lifting.
l
Ensure the cord is fully unwound from the cord storage
compartment
4
before using the Kitchen Machine.
l
Children should be supervised to ensure that they do not play
with the appliance.
l
Do not move or raise the mixer head with an attachment
fitted as the Kitchen Machine could become unstable.
2

l
Do not operate your appliance near the edge of a work
surface.
l
Appliances can be used by persons with reduced physical,
sensory or mental capabilities or lack of experience and
knowledge if they have been given supervision or instruction
concerning use of the appliance in a safe way and if they
understand the hazards involved.
l
Misuse of your appliance can result in injury.
l
This appliance shall not be used by children. Keep the
appliance and its cord out of reach of children.
l
Only use the appliance for its intended domestic use.
Kenwood will not accept any liability if the appliance is subject
to improper use, or failure to comply with these instructions.
l
The maximum rating is based on the attachment that draws
the greatest load. Other attachments may draw less power.
l
Attachments will be damaged and may cause
injury if the interlock mechanism is subjected to
excessive force.
Food Processor attachment
l
The food processor knife blade and discs are extremely
sharp, handle with care. Always hold by the finger grip
at the top, away from the cutting edge, both when
handling and cleaning.
l
Always remove the knife blade before pouring contents from
the bowl.
l
Keep hands and utensils out of the food processor bowl
whilst connected to the power supply.
l
Never use your fingers to push food down the feed tube.
Always use the pusher supplied.
l
Before removing the lid from the food processor bowl:
l
switch off;
l
wait until the attachment/blades have completely stopped.
l
Never remove the food processor lid until the knife
blades/cutting discs have completely stopped.
3

l
SCALD RISK: Hot ingredients should be allowed to cool to
room temperature before processing in the attachment.
l
Do not use the lid to operate the food processor, always use
the speed/pulse control.
Blender attachment
l
Keep hands and utensils out of the blender goblet whilst
connected to the power supply.
l
Never fit the blade unit to the power unit without
the blender goblet fitted.
l
SCALD RISK: Hot ingredients should be allowed to cool to
room temperature before processing or blending in the
attachment.
l
Only operate the blender with the lid in place.
l
Only use the goblet with the blade assembly supplied.
l
Never run the blender empty.
l
To ensure the long life of your blender, never run for longer
than 60 seconds. Switch off as soon as you have achieved
the right consistency.
l
The processing of spices is not recommended as they may
damage the plastic parts.
l
Smoothie recipes – never blend frozen ingredients that have
formed a solid mass during freezing; break it up before adding
to the goblet.
Food Mincer attachment
l
Always ensure bones and rind etc. are removed from the
meat before mincing.
l
When mincing nuts only feed a few down at a time and allow
the scroll to pick them up before adding any more.
l
Always use the pusher supplied. Never put your fingers or
utensils in the feed tube.
l
Warning – the cutting blade is sharp, handle with care both in
use and when cleaning.
l
Ensure the attachment is secured in position before switching
on.
4

before plugging in
l
Make sure your electricity supply is the same as
the one shown on the underside of your appliance.
l
This appliance conforms to EC directive
2004/108/EC on Electromagnetic Compatibility and
EC regulation no. 1935/2004 of 27/10/2004 on
materials intended for contact with food.
before using for the first time
l
Wash the parts: see ‘care and cleaning’.
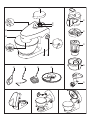
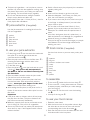
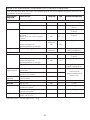
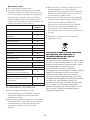
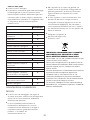
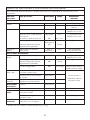
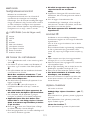
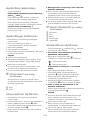
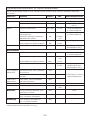
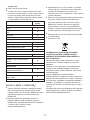
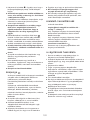
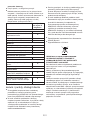
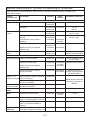
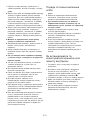
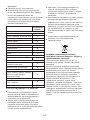
key
1
outlet cover
2
dual drive outlet (medium and high speed)
3
interlocks
4
cord storage compartment
5
speed/pulse control
6
power unit
7
bowl tool socket
8
bowl
9
mixer head
bk
head release lever
bl
K-beater
bm
spiral dough hook
bn
whisk
bo
splashguard
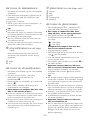
attachments
Not all of the attachments listed will
necessarily be included with your
kitchen machine. Attachments are
dependent upon the model variant.
bp
food processor (if supplied)
bq
citrus juicer (if supplied)
br
glass blender (if supplied)
bs
juice extractor (if supplied)
bt
food mincer (if supplied)
Refer to the recommended speed chart for each
attachment.
Juice Extractor attachment
l
Do not use the juicer if the filter is damaged.
l
The cutting blades on the base of the filter are very sharp,
take care when handling and cleaning the filter.
• Do not use the lid to operate the juicer, always use the
speed/pulse control.
• Should excessive vibration occur when using this attachment,
either adjust the speed or stop the machine, unplug and clear
any pulp from the drum (the juicer vibrates if the pulp
becomes unevenly distributed).
5

the mixing tools and some of
their uses
K
-beater
l
For making cakes, biscuits, pastry, icing, fillings,
éclairs and mashed potato.
whisk
l
For eggs, cream, batters, fatless sponges,
meringues, cheesecakes, mousses, soufflés. Do
not use the whisk for heavy mixtures (e.g. creaming
fat and sugar) - you could damage it.
spiral dough hook
l
For yeast mixtures.
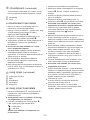
to use your bowl tools
1 Press the head release lever down
1
and raise the
mixer head until it locks into position.
2 Fit the bowl into the base and turn anti-clockwise
to lock into position
2
.
3 Select a tool and push into the tool socket until it
clicks
3
.
4 Press the head release lever down and lower the
mixer head until it locks into position.
5 Plug into the power supply. To switch on, turn the
speed switch to the desired setting. To switch off
turn to ‘O’ (OFF) position.
If the mixer head is in the raised position
or the outlet cover is not fitted, the Power
On light will flash and the machine will
not operate.
l
Switch to pulse for short bursts.
6 Unplug from the power supply.
7 Raise the mixer head and whilst holding it steady,
pull the tool from the tool socket.
important
l
If the mixer head is raised during operation, the
machine will stop working straight away. To
re-start, lower the mixer head, turn the speed
switch to the ‘O’ (OFF) position, wait a few
seconds and then re-select the speed. The
machine should resume operating straight away.
l
If for any reason power is interrupted and the
machine stops working, turn the speed switch to
the ‘O’ (OFF) position, wait a few seconds and then
re-select the speed. It should resume operating
straight away.
l
The machine will not operate unless the
outlet cover is correctly fitted.
l
If you hear the machine labouring either switch off
and remove some of the mixture or increase the
speed.
l
A
lways remove attachments fitted to the dual drive
outlet before raising the mixer head.
l
E
nsure that no bowl tools are fitted or
s
tored in the bowl when using the dual
drive outlet.
hints
l
S
witch off and scrape the bowl with a spatula
when necessary.
l
Eggs at room temperature are best for whisking.
l
Before whisking egg whites, make sure there is no
grease or egg yolk on the whisk or bowl.
l
Use cold ingredients for pastry unless your recipe
states otherwise.
l
When creaming fat and sugar for cake mixes,
always use the fat at room temperature or soften it
first.
l
Your machine has been fitted with a ‘soft start’
feature to minimise spillage. However if the
machine is switched on with a heavy mixture in the
bowl such as bread dough, you may notice that it
takes a few seconds to reach the selected speed.
points for bread making
important
l
Never exceed the maximum capacities stated - you
will overload the machine.
l
Some movement of the mixer head is
normal when mixing heavy loads such as
bread dough.
l
The ingredients mix best if you put the liquid in first.
l
At intervals stop the machine and scrape the
mixture off the dough hook.
l
Different batches of flour vary considerably in the
quantities of liquid required and the stickiness of
the dough can have a marked effect on the load
imposed on the machine. You are advised to keep
the machine under observation whilst the dough is
being mixed; the operation should take no longer
than 6-8 minutes.
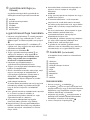
to fit and use your splashguard
1 Fit the bowl into the base and add the ingredients.
2 Fit the splashguard by aligning the tabs with the
bowl tool socket
7
and rotate anti-clockwise to
lock into position
4
.
3 Fit the tool then lower the mixer head.
4 To remove the splashguard reverse the above
procedure.
l
During mixing, ingredients can be added directly to
the bowl via the chute.
PP
6

electronic speed sensor control
Y
our mixer is fitted with an electronic speed sensor
control that is designed to maintain the speed
under different load conditions, such as when
k
neading bread dough or when eggs are added to
a cake mix. You may therefore hear some variation
in speed during the operation as the mixer adjusts
to the load and speed selected - this is normal.
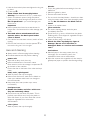
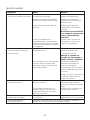
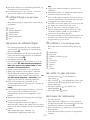
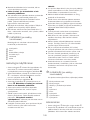
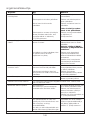
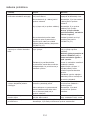
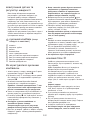
bp
food processor (if supplied)
A
pusher
B
feed tube
C
lid
D
knife blade
E
bowl with drive shaft
F
thick slicing/grating disc
G
thin slicing/grating disc
H
extra fine grating disc
I
detachable drive shaft
to use your food processor
1 Remove the outlet cover by turning it anti-
clockwise and lifting off
5
.
2 Fit the bowl
E
over the outlet with the handle to
the right hand side and turn clockwise until it locks
into position
6
.
3 Add the knife blade or detachable drive shaft with
the desired attachment.
Note: The detachable drive shaft
I
should only be fitted when using the discs
and citrus juicer.
l
Always fit the bowl and attachment onto the
processor before adding ingredients.
4 Fit the lid
7
– ensuring the top of the knife
blade/drive shaft locates into the centre of the lid.
l
Do not use the lid to operate the
processor, always use the speed/pulse
control.
5 Plug in, switch on and select a speed (refer to the
recommended speed chart).
l
The processor will not operate if the bowl
or lid are not fitted correctly into the
interlocks. Check that the feed tube and
bowl handle are situated to the front.
l
Use the pulse
P
for short bursts. The pulse will
operate for as long as the control is held in
position.
6 Reverse the above procedure to remove the lid,
attachments and bowl.
l
Always switch off and unplug before
removing the lid.
i
mportant
l
Your processor is not suitable for crushing or
g
rinding coffee beans, or converting granulated
s
ugar to caster sugar.
l
When adding almond essence or flavouring to
m
ixtures, avoid contact with the plastic as this may
r
esult in permanent marking.
l
Do not process hot ingredients.
knife blade
D
The knife blade is the most versatile of all the
attachments. The length of the processing time will
determine the texture achieved.
For coarser textures use the pulse control.
Use the knife blade for cake and pastry making,
chopping raw and cooked meat, vegetables, nuts,
pâté, dips, pureeing soups and to also make
crumbs from biscuits and bread.
hints
l
Cut food such as meat, bread, vegetables into
cubes approximately 2cm/ ¾in before processing.
l
Biscuits should be broken into pieces and added
down the feed tube whilst the machine is running.
l
When making pastry, use fat straight from the
fridge cut into 2cm/ ¾in cubes.
l
Take care not to over-process.
l
Do not use the knife blade to mix heavy
loads such as bread dough.
l
Do not use the knife blade to chop ice cubes or
other hard foods, such as spices, they may
damage the attachment.
slicing/grating discs
to use the discs
reversible slicing/grating discs – thick
F
,
thin
G
Use the grating side for cheese, carrots, potatoes
and foods of a similar nature.
Use the slicing side for cheese, carrots, potatoes,
cabbage, cucumber, beetroot and onions.
extra fine grating disc
H
Grates Parmesan cheese and potatoes for German
potato dumplings.
7

to use the cutting discs
1
Fit the bowl on the power unit, add the detachable
drive shaft.
2 Hold by the centre grip, place the disc onto the
d
rive shaft with the appropriate side uppermost.
3 Fit the lid.
4 Put the food in the feed tube.
5 Switch on, then push down evenly with the pusher
– never put your fingers in the feed tube.
hints
l
Use fresh ingredients.
l
Do not cut food too small. Fill the width of the feed
tube fairly full. This prevents the food from slipping
sideways during processing.
l
Food placed upright comes out shorter than food
placed horizontally.
l
There will always be a small amount of waste on
the disc or in the bowl after processing.
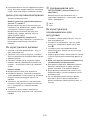
bq
citrus juicer (if supplied)
Use the citrus juicer to squeeze the juice from
citrus fruits (e.g. oranges, lemons, limes and
grapefruits).
A
cone
B
sieve
to use the citrus juicer
1 Fit the bowl onto the power unit, add the
detachable drive shaft.
2 Fit the sieve into the bowl – ensuring the sieve
handle is locked into position directly over the bowl
handle
8
.
3 Place the cone over the drive shaft turning until it
drops all the way down
9
.
4 Cut the fruit in half. Then switch on and press the
fruit onto the cone.
l
The citrus juicer will not operate if the
sieve is not locked correctly.
l
For best results store and juice the fruit at room
temperature and hand roll on a worktop before
juicing.
l
To help with juice extraction move the fruit from
side to side when juicing.
l
When juicing large quantities, empty the strainer
regularly to prevent the build up of pulp and seeds.
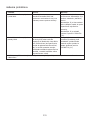
br
glass blender (if supplied)
A
f
iller cap
B
l
id
C
goblet
D
s
ealing ring
E
b
lade unit
to use your glass blender
1 Fit the sealing ring
D
into the blade unit
E
-
ensuring the seal is located correctly in the grooved
area.
l
Leaking will occur if the seal is damaged
or incorrectly fitted.
2 Screw the goblet onto the blade assembly
bk
.
Refer to the graphics on the underside of the blade
unit as follows:
- unlocked position
- locked position
The blender will not operate if incorrectly
assembled.
3 Put your ingredients into the goblet.
4 Fit the lid to the goblet and push down to secure
bl
. Fit the filler cap.
5 Remove the dual drive outlet cover by turning it
anti-clockwise and lifting off.
6 Place the blender onto the power unit, and turn
clockwise
bm
until it clicks into position.
l
The appliance will not operate if the
blender is incorrectly fitted to the
interlock.
7 Select a speed (refer to recommended speed
chart) or use pulse
P
for short bursts.
hints
l
When making mayonnaise, put all the ingredients,
except the oil, into the blender. Remove the filler
cap. Then, with the appliance running, add the oil
slowly through the hole in the lid.
l
Thick mixtures, e.g. pâtés and dips, may need
scraping down. If the mixture is difficult to process,
add more liquid.
l
Ice crushing – operate the pulse in short bursts
until crushed to the desired consistency.
l
The processing of spices is not recommended as
they may damage the plastic parts.
l
The appliance will not work if the blender
is incorrectly fitted.
8

l
T
o blend dry ingredients – cut into pieces, remove
the filler cap, then with the appliance running, drop
t
he pieces down one by one. Keep your hand over
t
he opening. For best results empty regularly.
l
Do not use the blender as a storage container.
Keep it empty before and after use.
l
Never blend more than 1.2 litres (42 fl oz) – less for
f
rothy liquids like milkshakes.
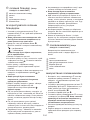
bs
juice extractor (if supplied)
Use the juice extractor for making juice from firm
fruit and vegetables.
A
pusher
B
juicer lid
C
pulp remover
D
filter drum
E
juicer bowl
F
spout
to use your juice extractor
1 Fit the juicer bowl
E
over the dual drive outlet with
the spout
F
to the left hand side and turn
clockwise until it locks
bn
.
2 Place the pulp remover
C
into the filter drum
D
–
ensuring the tabs locate with the slots in the
bottom of the drum
bo
.
3 Fit the filter drum
bp
.
4 Place the juicer lid
B
onto the bowl and turn until
it locks
bq
. Your juicer will not operate if
the bowl or lid are not fitted correctly into
the interlock.
5 Place a suitable container under the juice outlet.
6 Cut the food to fit the feed tube.
7 Switch to maximum speed, then place the food
into the feed tube. Push down evenly with the
pusher - never put your fingers in the feed
tube. Process fully before adding more.
l
After adding the last piece, let the juicer run for a
further 30 seconds to extract all the juice from the
filter drum.
important
l
If the juicer starts to vibrate, switch off and empty
the pulp from the filter. (The juicer vibrates if the
pulp becomes unevenly distributed).
l
Maximum capacity that can be processed at one
time is 800g (1lb 12oz) of fruit or vegetables.
l
Some very hard foods may make your attachment
slow down or stop. If this happens switch off and
unblock the filter.
l
S
witch off and empty the pulp and juice containers
regularly during use.
hints
l
I
nsert soft food slowly to get the most juice.
l
Vitamins disappear - the sooner you drink your
juice, the more vitamins you will get.
l
I
f you need to store the juice for a few hours put it
in the fridge. It will keep better if you add a few
drops of lemon juice.
l
Do not drink more than three 230mls (8 fl.oz.)
glasses of juice a day unless you are used to it.
l
Dilute juice for children with an equal amount of
water.
l
Juice from dark green (broccoli, spinach etc.) or
dark red (beetroot, red cabbage etc.) vegetables is
extremely strong, so always dilute it.
l
Fruit juice is high in fructose (fruit sugar), so people
with diabetes or low blood sugar should avoid
drinking too much.
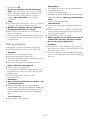
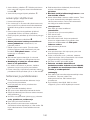
bt
food mincer (if supplied)
Use the food mincer to process meat, poultry and
fish.
A
spanner
B
ring nut
C
screens: medium and coarse
D
cutter
E
scroll
F
body
G
feed tube
H
tray
I
pusher
to assemble
1 Fit the scroll
E
inside the food mincer body
F
.
2 Fit the cutter
D
– cutting side outermost. Ensure it
is seated properly, otherwise you could damage
your food mincer.
3 Fit a screen
C
. Put the notch over the locating
tab
br
.
4 Loosely fit the ring nut
B
.
to use your food mincer
1 Raise the mixer head.
2 With the food mincer in the position shown, align
the drive tabs on the end of the scroll with the
corresponding slots in the drive outlet
bs
.
3 Push the food mincer into the outlet and turn anti-
clockwise until it locks into place.
9

4
Hold the feed tube in place and tighten the ring nut
by hand.
5
Fit the tray
bt
.
6
Thaw frozen food thoroughly before
mincing. Cut meat into 2.5cm (1”) –wide strips.
7 Switch to maximum speed. Using the pusher,
gently push the food through one piece at a time.
D
o not push hard – you could damage your
food mincer.
important
l
Never operate the food mincer attachment for
longer than 10 minutes as this could damage your
mixer.
l
The food mincer attachment will not
operate unless the dual speed outlet
cover is fitted.
8 Once all the food has been minced, switch off and
unplug.
9 Remove the food mincer. Use the spanner
A
to
remove the ring nut if it is too tight.
care and cleaning
l
Always switch off and unplug before cleaning.
l
Dismantle attachments fully before cleaning.
power unit
l
Wipe with a damp cloth, then dry.
l
Never use abrasives or immerse in water.
l
Store excess cord in the storage compartment
4
at the back of the machine.
l
Ensure the feet on the base of the mixer are kept
clean.
bowl, tools, splashguard
l
Wash by hand, then dry thoroughly.
l
Never use a wire brush, steel wool or bleach to
clean your stainless steel bowl. Use vinegar to
remove limescale.
l
Keep away from heat (cooker tops, ovens,
microwaves).
food processor
l
Handle the blades and discs with care –
they are extremely sharp.
l
Some foods may discolour the plastic. This is
perfectly normal and won’t harm the plastic or
affect the flavour of your food. Rub with a cloth
dipped in vegetable oil to remove the
discolouration.
citrus juicer
l
Wash by hand, then dry thoroughly.
b
lender
1 Empty the goblet before unscrewing it from the
b
lade unit.
2
Wash the goblet by hand.
3 Remove and wash the seal.
4
Do not touch the sharp blades – brush them clean
u
sing hot soapy water, then rinse thoroughly under
the tap. Do not immerse the blade unit in
water.
5 Leave to dry upside down.
juice extractor
l
For easier cleaning always wash the parts
immediately after use.
l
Some foods, e.g. carrot, will discolour the plastic.
Rubbing with a cloth dipped in vegetable oil helps
remove discolouring.
l
Clean the filter using a soft brush.
l
Check the filter regularly for signs of
damage. Do not use if the filter is
damaged. Refer to “service and customer
care”.
food mincer
l
Wash all parts in hot soapy water, then dry
thoroughly. Do not wash any part in the
dishwasher. Never use a soda solution.
l
Wipe the screens with vegetable oil, then wrap in
greaseproof paper to prevent discolouring/rusting.
10

a
ll other parts
l
Wash by hand, then dry.
l
A
lternatively, refer to dishwasher chart for parts that
a
re dishwasher safe and can be washed on the top
rack of your dishwasher. Avoid placing items on the
b
ottom rack directly over the heating element. A
s
hort, low temperature (Maximum 50°C)
programme is recommended.
service and customer care
l
I
f the cord is damaged it must, for safety reasons,
be replaced by KENWOOD or an authorised
KENWOOD repairer.
l
I
f you experience any problems with the operation
of your appliance, before requesting assistance
refer to the “troubleshooting guide” section in the
manual or visit www.kenwoodworld.com.
l
Please note that your product is covered by a
warranty, which complies with all legal provisions
concerning any existing warranty and consumer
rights in the country where the product was
purchased.
l
If your Kenwood product malfunctions or you find
any defects, please send it or bring it to an
authorised KENWOOD Service Centre. To find up
to date details of your nearest authorised
KENWOOD Service centre visit
www.kenwoodworld.com or the website specific to
your Country.
l
Designed and engineered by Kenwood in the UK.
l
Made in China.
IMPORTANT INFORMATION FOR CORRECT
DISPOSAL OF THE PRODUCT IN
ACCORDANCE WITH EC DIRECTIVE
2002/96/EC.
At the end of its working life, the product must not be
disposed of as urban waste.
It must be taken to a special local authority differentiated
waste collection centre or to a dealer providing this
service.
Disposing of a household appliance separately avoids
possible negative consequences for the environment
and health deriving from inappropriate disposal and
enables the constituent materials to be recovered to
obtain significant savings in energy and resources. As
a reminder of the need to dispose of household
appliances separately, the product is marked with a
crossed-out wheeled dustbin.
11
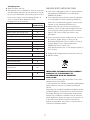
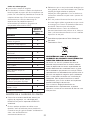
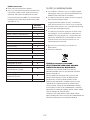
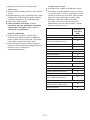
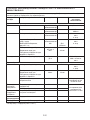
item suitable for
dishwashing
Mixer
Bowl 4
Whisk, beater and dough hook 4
Splashguard 4
Outlet cover 8
Food Processor
Main bowl, lid and pusher 4
Knife blade 4
Detachable drive shaft 4
Discs 4
Citrus juicer
Cone, sieve 4
Blender
Goblet, lid and filler cap 4
Blade unit and seal 8
Juice extractor
Bowl, pusher, lid, filter drum and
pulp remover
4
Food mincer
Ring nut, screens, cutter, scroll and
body
8
Tray and pusher 4

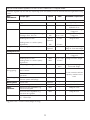
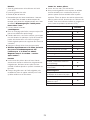
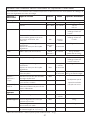
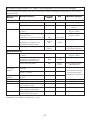
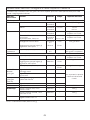
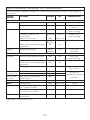
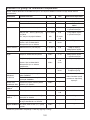
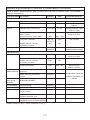
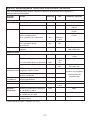
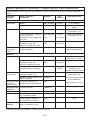
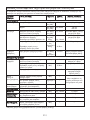
recommended speed chart and maximum capacities
These are a guide only and will vary depending upon the quantity of mix in the bowl and the ingredients being
m
ixed.
tool/ recipe type speed time maximum capacities
attachment
K
itchen machine
Whisk Egg whites Min to Max 2 mins 2-8 (70g-280g/2oz-10oz)
Cream Min to Max 1½ mins 125ml/4½ fl oz
600ml/21 fl oz
Beater All in one cake mixes Min to Max 1½ mins 1.6kg /3lb 8oz total weight
8 egg mix
Fruit cake - creaming fat and sugar Min to Max 4 mins 1.8kg/4lb total weight
Folding in flour, fruit, etc. Min Up to 1 min 6 egg mix
Rubbing fat into flour Min to 5 mins 450g/1lb flour
Speed 2
Adding water to combine pastry
ingredients Min 30 secs
Dough hook Bread dough (stiff yeasted) Min to 4 mins 500g/1lb 2oz flour weight
Speed 2 800g/1lb 12oz total weight
Food processor
Knife blade All in one cake mixes Max 15 secs 600g/1lb 5oz total weight
3 egg mix
Rubbing fat into flour Max Up to 1 min 340g/12oz flour weight
Adding water to combine pastry Max 10 secs
ingredients
Chopping/pureeing/pâtés Max Up to 30 400g/14oz chopping lean
secs meat total weight
Discs – Firm food items such as carrots, Max –
slicing/grating hard cheeses
Softer items such as cucumbers, Speed 3 –
tomatoes
Extra fine grating Parmesan cheese, potato for Max –
disc German potato dumplings
Citrus juicer Citrus fruits Speed 2 ––
Blender All processing Max Up to 1 min 1.2 litres/42 fl oz
Juice Hard fruits and vegetables e.g. Max – 800g/1lb 12oz
extractor carrots and apples
Soft fruits and vegetables e.g. Max – 500g/1lb 2oz
tomatoes and grapes
Food mincer Meat, poultry, fish cut into 2.5cm Max ––
(1”) –wide strips
12
*Egg sizes used = medium sized (Weight 53-63g)
Do not exceed maximum
capacity marked on the
bowl.

13
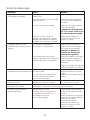
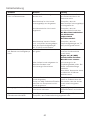
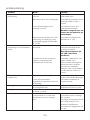
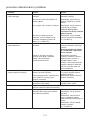
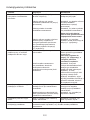
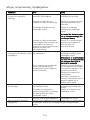
P
roblem Cause Solution
The machine will not operate No power/indicator light not lit. Check machine is plugged in.
when using mixing tools.
M
ixer head not locked down correctly. Check that the mixer head is
locked down correctly.
Outlet cover not fitted correctly. Check that the outlet cover is
located correctly.
The machine will not work
if the outlet cover is fitted
incorrectly.
Mixer head has been lifted during Check that the speed control is
operation and lowered again without reset to ‘O’ (OFF) position.
resetting the speed control to
‘O’ (OFF) position.
Machine stops during operation Outlet cover or attachment has Check that attachments and/or
and indicator light flashes. unlocked. outlet cover are located correctly.
Reset control to ‘O’ (OFF)
position, then restart the
machine.
If attachment is located correctly, then Check maximum capacities
machine is overloaded or maximum stated in the recommended
capacities exceeded. speed chart. Reduce quantity
being processed if necessary.
Switch off, unplug and allow the
machine to cool down for 30
minutes.
Dual drive attachment will Dual drive attachment is not locked Check the dual drive attachment
not operate. on correctly. is located correctly.
Food processor/juice extractor lid Check that the attachment is
or citrus juicer sieve located fitted correctly.
incorrectly.
Movement on the work surface. Feet on the underside of the machine Regularly check the feet are
are dirty or wet. clean and dry.
Poor performance of Refer to hints in relevant “using the attachment” section. Check
tools/attachments. attachments are assembled correctly.
troubleshooting guide

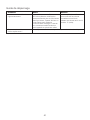
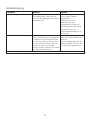
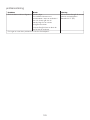
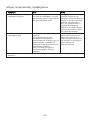
14
P
roblem Cause Solution
Power On light flashing rapidly. Normal operation. If using an attachment, check
The light will flash if one or more of the that it is locked into place
i
nterlocks are not engaged correctly. correctly.
Check the mixer head is fully in
the lowered position, unless
using the meat grinder
attachment.
Check the speed control is in the
‘O’ (OFF) position.
Power On light flashing slowly. Standby mode operating. The kitchen machine will return
If the kitchen machine is left plugged to normal operation when the
in for over 30 minutes without being speed control is turned to a
used, it will go into Standby mode to speed and then turned back to
reduce energy consumption. the ‘O’ (OFF) position.
The light will change to being
constantly lit when ready to use.
If none of the above solve the problem see “service and customer care”.
troubleshooting guide

veiligheid
l
Lees deze instructies zorgvuldig door en bewaar ze voor
toekomstig gebruik.
l
Verwijder alle verpakking en labels.
l
De machine altijd uitzetten en de stekker uit het stopcontact
halen:
l
voordat u hulpstukken bevestigt of loshaalt;
l
indien niet in gebruik;
l
voordat u de machine schoonmaakt.
l
Zet de snelheidsregeling op 'O' (uit) en haal de stekker uit het
stopcontact voordat u hulpstukken monteert of verwijdert,
zowel na het gebruik als voor de reiniging.
l
Houd uw vingers uit de buurt van bewegende onderdelen en
aangebrachte hulpstukken.
l
Laat de keukenmachine nooit onbeheerd aan staan.
l
Gebruik nooit een machine die beschadigd is. Laat de
machine controleren of repareren: raadpleeg het deel
'Klantenservice'.
l
Laat het snoer nooit overhangen, zodat een kind erbij kan.
l
Zorg ervoor dat het motorblok, het snoer en de stekker nooit
nat worden.
l
Zorg ervoor dat er geen menghulpstukken zijn
bevestigd of in de kom aanwezig zijn wanneer u
het contact met dubbele aandrijving gebruikt.
l
Gebruik nooit een hulpstuk dat niet goedgekeurd is en
gebruik nooit meer dan één hulpstuk per keer.
l
Overschrijd nooit de hoeveelheden die staan vermeld op de
tabel met de maximumcapaciteiten.
l
Wees voorzichtig wanneer u de machine optilt. Hij is zwaar.
Zorg ervoor dat de kop omlaag staat en vergrendeld is, en
dat de kom, de hulpstukken, de contactdeksels en het snoer
vast zitten, voordat u de machine optilt.
15
Nederlands
V
ouw voor het lezen a.u.b. de voorpagina met illustraties uit

l
Zorg ervoor dat u het hele snoer uit het opbergvak
4
hebt
gehaald, voordat u de keukenmachine gebruikt.
l
Kinderen mogen de machine alleen onder toezicht gebruiken,
om te voorkomen dat ze ermee spelen.
l
Verplaats de machine niet en haal de kop niet omhoog als
een hulpstuk aangebracht is, omdat de keukenmachine dan
instabiel kan worden.
l
Gebruik de machine niet aan de rand van het werkoppervlak.
l
Dit apparaat kan worden gebruikt door personen met
verminderde lichamelijke, sensorische of geestelijke
capaciteiten of gebrek aan ervaring en kennis mits ze onder
toezicht staan of instructie hebben gekregen over het veilig
gebruik van het apparaat en de betrokken risico's begrijpen.
l
Misbruik van uw apparaat kan tot letsel leiden.
l
Dit apparaat mag niet door kinderen worden gebruikt. Houd
het apparaat en het snoer buiten het bereik van kinderen.
l
Gebruik het apparaat alleen voor het huishoudelijke gebruik
waarvoor het is bedoeld. Kenwood kan niet aansprakelijk
worden gesteld in het geval dat het apparaat niet correct is
gebruikt, of waar deze instructies niet worden opgevolgd.
l
Het maximumvermogen hangt af van het hulpstuk met de
grootste belasting. Andere hulpstukken kunnen minder
energie vragen.
l
De hulpstukken raken beschadigd en kunnen letsel
veroorzaken als er teveel druk op het
vergrendelingsmechanisme wordt uitgeoefend.
Hulpstuk van de keukenmachine
l
Het meselement en de schijven van de keukenmachine zijn
erg scherp, wees dus voorzichtig. Houd het meselement
altijd aan de vingergreep aan de bovenkant vast,
houd uw vingers uit de buurt van de snijrand,
zowel tijdens de verplaatsing als tijdens de
reiniging.
l
Verwijder altijd het meselement voordat u de inhoud van de
kom uitschenkt.
16
La pagina sta caricando ...
La pagina sta caricando ...
La pagina sta caricando ...
La pagina sta caricando ...
La pagina sta caricando ...
La pagina sta caricando ...
La pagina sta caricando ...
La pagina sta caricando ...
La pagina sta caricando ...
La pagina sta caricando ...
La pagina sta caricando ...
La pagina sta caricando ...
La pagina sta caricando ...
La pagina sta caricando ...
La pagina sta caricando ...
La pagina sta caricando ...
La pagina sta caricando ...
La pagina sta caricando ...
La pagina sta caricando ...
La pagina sta caricando ...
La pagina sta caricando ...
La pagina sta caricando ...
La pagina sta caricando ...
La pagina sta caricando ...
La pagina sta caricando ...
La pagina sta caricando ...
La pagina sta caricando ...
La pagina sta caricando ...
La pagina sta caricando ...
La pagina sta caricando ...
La pagina sta caricando ...
La pagina sta caricando ...
La pagina sta caricando ...
La pagina sta caricando ...
La pagina sta caricando ...
La pagina sta caricando ...
La pagina sta caricando ...
La pagina sta caricando ...
La pagina sta caricando ...
La pagina sta caricando ...
La pagina sta caricando ...
La pagina sta caricando ...
La pagina sta caricando ...
La pagina sta caricando ...
La pagina sta caricando ...
La pagina sta caricando ...
La pagina sta caricando ...
La pagina sta caricando ...
La pagina sta caricando ...
La pagina sta caricando ...
La pagina sta caricando ...
La pagina sta caricando ...
La pagina sta caricando ...
La pagina sta caricando ...
La pagina sta caricando ...
La pagina sta caricando ...
La pagina sta caricando ...
La pagina sta caricando ...
La pagina sta caricando ...
La pagina sta caricando ...
La pagina sta caricando ...
La pagina sta caricando ...
La pagina sta caricando ...
La pagina sta caricando ...
La pagina sta caricando ...
La pagina sta caricando ...
La pagina sta caricando ...
La pagina sta caricando ...
La pagina sta caricando ...
La pagina sta caricando ...
La pagina sta caricando ...
La pagina sta caricando ...
La pagina sta caricando ...
La pagina sta caricando ...
La pagina sta caricando ...
La pagina sta caricando ...
La pagina sta caricando ...
La pagina sta caricando ...
La pagina sta caricando ...
La pagina sta caricando ...
La pagina sta caricando ...
La pagina sta caricando ...
La pagina sta caricando ...
La pagina sta caricando ...
La pagina sta caricando ...
La pagina sta caricando ...
La pagina sta caricando ...
La pagina sta caricando ...
La pagina sta caricando ...
La pagina sta caricando ...
La pagina sta caricando ...
La pagina sta caricando ...
La pagina sta caricando ...
La pagina sta caricando ...
La pagina sta caricando ...
La pagina sta caricando ...
La pagina sta caricando ...
La pagina sta caricando ...
La pagina sta caricando ...
La pagina sta caricando ...
La pagina sta caricando ...
La pagina sta caricando ...
La pagina sta caricando ...
La pagina sta caricando ...
La pagina sta caricando ...
La pagina sta caricando ...
La pagina sta caricando ...
La pagina sta caricando ...
La pagina sta caricando ...
La pagina sta caricando ...
La pagina sta caricando ...
La pagina sta caricando ...
La pagina sta caricando ...
La pagina sta caricando ...
La pagina sta caricando ...
La pagina sta caricando ...
La pagina sta caricando ...
La pagina sta caricando ...
La pagina sta caricando ...
La pagina sta caricando ...
La pagina sta caricando ...
La pagina sta caricando ...
La pagina sta caricando ...
La pagina sta caricando ...
La pagina sta caricando ...
La pagina sta caricando ...
La pagina sta caricando ...
La pagina sta caricando ...
La pagina sta caricando ...
La pagina sta caricando ...
La pagina sta caricando ...
La pagina sta caricando ...
La pagina sta caricando ...
La pagina sta caricando ...
La pagina sta caricando ...
La pagina sta caricando ...
La pagina sta caricando ...
La pagina sta caricando ...
La pagina sta caricando ...
La pagina sta caricando ...
La pagina sta caricando ...
La pagina sta caricando ...
La pagina sta caricando ...
La pagina sta caricando ...
La pagina sta caricando ...
La pagina sta caricando ...
La pagina sta caricando ...
La pagina sta caricando ...
La pagina sta caricando ...
La pagina sta caricando ...
La pagina sta caricando ...
La pagina sta caricando ...
La pagina sta caricando ...
La pagina sta caricando ...
La pagina sta caricando ...
La pagina sta caricando ...
La pagina sta caricando ...
La pagina sta caricando ...
La pagina sta caricando ...
La pagina sta caricando ...
La pagina sta caricando ...
La pagina sta caricando ...
La pagina sta caricando ...
La pagina sta caricando ...
La pagina sta caricando ...
La pagina sta caricando ...
La pagina sta caricando ...
La pagina sta caricando ...
La pagina sta caricando ...
La pagina sta caricando ...
La pagina sta caricando ...
La pagina sta caricando ...
La pagina sta caricando ...
La pagina sta caricando ...
La pagina sta caricando ...
La pagina sta caricando ...
La pagina sta caricando ...
La pagina sta caricando ...
La pagina sta caricando ...
La pagina sta caricando ...
La pagina sta caricando ...
La pagina sta caricando ...
La pagina sta caricando ...
La pagina sta caricando ...
La pagina sta caricando ...
La pagina sta caricando ...
La pagina sta caricando ...
La pagina sta caricando ...
La pagina sta caricando ...
La pagina sta caricando ...
La pagina sta caricando ...
La pagina sta caricando ...
La pagina sta caricando ...
La pagina sta caricando ...
La pagina sta caricando ...
La pagina sta caricando ...
La pagina sta caricando ...
La pagina sta caricando ...
La pagina sta caricando ...
La pagina sta caricando ...
La pagina sta caricando ...
La pagina sta caricando ...
La pagina sta caricando ...
La pagina sta caricando ...
La pagina sta caricando ...
La pagina sta caricando ...
La pagina sta caricando ...
La pagina sta caricando ...
La pagina sta caricando ...
La pagina sta caricando ...
La pagina sta caricando ...
La pagina sta caricando ...
La pagina sta caricando ...
La pagina sta caricando ...
La pagina sta caricando ...
La pagina sta caricando ...
La pagina sta caricando ...
La pagina sta caricando ...
La pagina sta caricando ...
La pagina sta caricando ...
La pagina sta caricando ...
La pagina sta caricando ...
La pagina sta caricando ...
La pagina sta caricando ...
La pagina sta caricando ...
La pagina sta caricando ...
La pagina sta caricando ...
La pagina sta caricando ...
La pagina sta caricando ...
La pagina sta caricando ...
La pagina sta caricando ...
La pagina sta caricando ...
La pagina sta caricando ...
La pagina sta caricando ...
La pagina sta caricando ...
La pagina sta caricando ...
La pagina sta caricando ...
La pagina sta caricando ...
La pagina sta caricando ...
La pagina sta caricando ...
La pagina sta caricando ...
La pagina sta caricando ...
La pagina sta caricando ...
La pagina sta caricando ...
La pagina sta caricando ...
La pagina sta caricando ...
La pagina sta caricando ...
La pagina sta caricando ...
La pagina sta caricando ...
-
 1
1
-
 2
2
-
 3
3
-
 4
4
-
 5
5
-
 6
6
-
 7
7
-
 8
8
-
 9
9
-
 10
10
-
 11
11
-
 12
12
-
 13
13
-
 14
14
-
 15
15
-
 16
16
-
 17
17
-
 18
18
-
 19
19
-
 20
20
-
 21
21
-
 22
22
-
 23
23
-
 24
24
-
 25
25
-
 26
26
-
 27
27
-
 28
28
-
 29
29
-
 30
30
-
 31
31
-
 32
32
-
 33
33
-
 34
34
-
 35
35
-
 36
36
-
 37
37
-
 38
38
-
 39
39
-
 40
40
-
 41
41
-
 42
42
-
 43
43
-
 44
44
-
 45
45
-
 46
46
-
 47
47
-
 48
48
-
 49
49
-
 50
50
-
 51
51
-
 52
52
-
 53
53
-
 54
54
-
 55
55
-
 56
56
-
 57
57
-
 58
58
-
 59
59
-
 60
60
-
 61
61
-
 62
62
-
 63
63
-
 64
64
-
 65
65
-
 66
66
-
 67
67
-
 68
68
-
 69
69
-
 70
70
-
 71
71
-
 72
72
-
 73
73
-
 74
74
-
 75
75
-
 76
76
-
 77
77
-
 78
78
-
 79
79
-
 80
80
-
 81
81
-
 82
82
-
 83
83
-
 84
84
-
 85
85
-
 86
86
-
 87
87
-
 88
88
-
 89
89
-
 90
90
-
 91
91
-
 92
92
-
 93
93
-
 94
94
-
 95
95
-
 96
96
-
 97
97
-
 98
98
-
 99
99
-
 100
100
-
 101
101
-
 102
102
-
 103
103
-
 104
104
-
 105
105
-
 106
106
-
 107
107
-
 108
108
-
 109
109
-
 110
110
-
 111
111
-
 112
112
-
 113
113
-
 114
114
-
 115
115
-
 116
116
-
 117
117
-
 118
118
-
 119
119
-
 120
120
-
 121
121
-
 122
122
-
 123
123
-
 124
124
-
 125
125
-
 126
126
-
 127
127
-
 128
128
-
 129
129
-
 130
130
-
 131
131
-
 132
132
-
 133
133
-
 134
134
-
 135
135
-
 136
136
-
 137
137
-
 138
138
-
 139
139
-
 140
140
-
 141
141
-
 142
142
-
 143
143
-
 144
144
-
 145
145
-
 146
146
-
 147
147
-
 148
148
-
 149
149
-
 150
150
-
 151
151
-
 152
152
-
 153
153
-
 154
154
-
 155
155
-
 156
156
-
 157
157
-
 158
158
-
 159
159
-
 160
160
-
 161
161
-
 162
162
-
 163
163
-
 164
164
-
 165
165
-
 166
166
-
 167
167
-
 168
168
-
 169
169
-
 170
170
-
 171
171
-
 172
172
-
 173
173
-
 174
174
-
 175
175
-
 176
176
-
 177
177
-
 178
178
-
 179
179
-
 180
180
-
 181
181
-
 182
182
-
 183
183
-
 184
184
-
 185
185
-
 186
186
-
 187
187
-
 188
188
-
 189
189
-
 190
190
-
 191
191
-
 192
192
-
 193
193
-
 194
194
-
 195
195
-
 196
196
-
 197
197
-
 198
198
-
 199
199
-
 200
200
-
 201
201
-
 202
202
-
 203
203
-
 204
204
-
 205
205
-
 206
206
-
 207
207
-
 208
208
-
 209
209
-
 210
210
-
 211
211
-
 212
212
-
 213
213
-
 214
214
-
 215
215
-
 216
216
-
 217
217
-
 218
218
-
 219
219
-
 220
220
-
 221
221
-
 222
222
-
 223
223
-
 224
224
-
 225
225
-
 226
226
-
 227
227
-
 228
228
-
 229
229
-
 230
230
-
 231
231
-
 232
232
-
 233
233
-
 234
234
-
 235
235
-
 236
236
-
 237
237
-
 238
238
-
 239
239
-
 240
240
-
 241
241
-
 242
242
-
 243
243
-
 244
244
-
 245
245
-
 246
246
-
 247
247
-
 248
248
-
 249
249
-
 250
250
-
 251
251
-
 252
252
-
 253
253
-
 254
254
-
 255
255
-
 256
256
-
 257
257
-
 258
258
-
 259
259
-
 260
260
-
 261
261
-
 262
262
-
 263
263
-
 264
264
-
 265
265
-
 266
266
-
 267
267
-
 268
268
-
 269
269


Kenwood KHH300WH Manuale del proprietario
- Categoria
- Accessori per mixer / robot da cucina
- Tipo
- Manuale del proprietario
- Questo manuale è adatto anche per
in altre lingue
- français: Kenwood KHH300WH Le manuel du propriétaire
- slovenčina: Kenwood KHH300WH Návod na obsluhu
- dansk: Kenwood KHH300WH Brugervejledning
- polski: Kenwood KHH300WH Instrukcja obsługi
- Türkçe: Kenwood KHH300WH El kitabı
Documenti correlati
-
Kenwood MULTI-ONE KHH321WH Manuale del proprietario
-
-
Kenwood KHH323WH Manuale del proprietario
-
-
Kenwood MULTIPRO EXCEL FPM910 Manuale utente
-
-
-
-
-