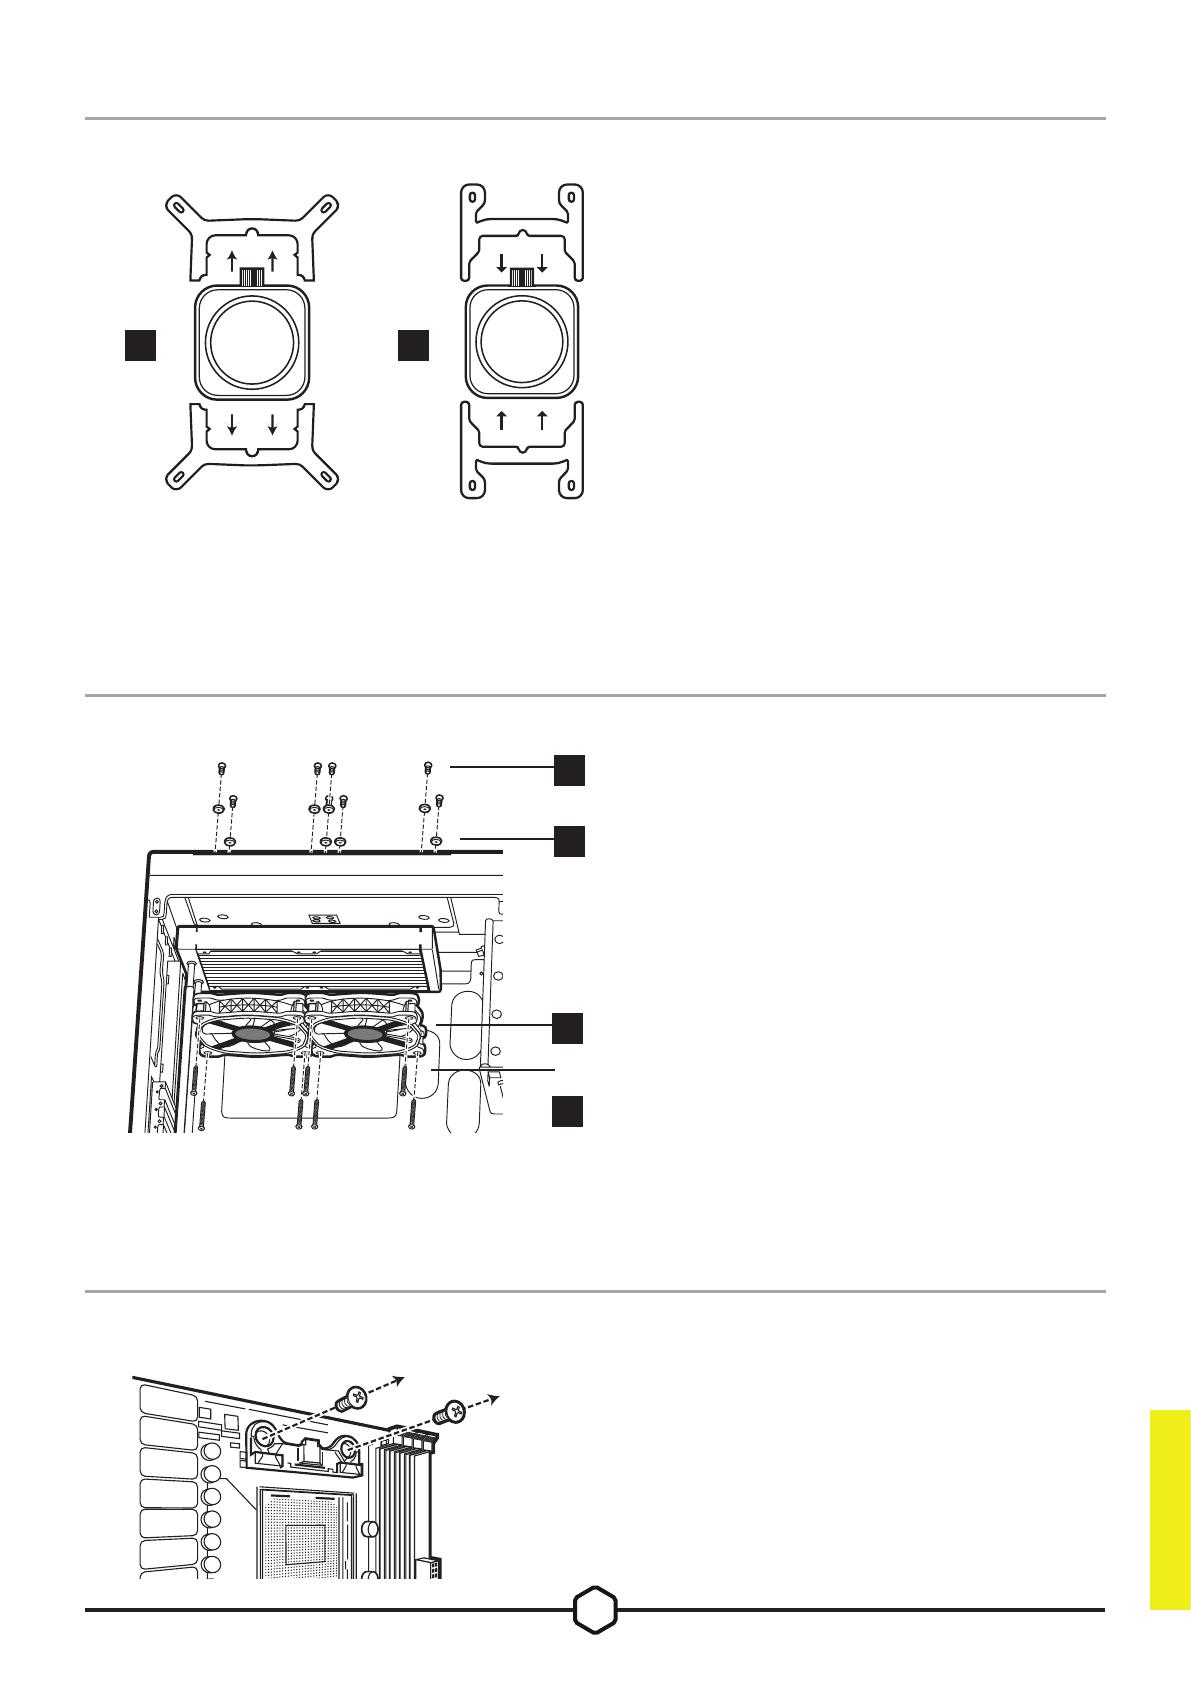
H100i

Corsair H100i Manuale utente

  • Ciao, sono il tuo assistente virtuale. Ho letto il manuale utente per i sistemi di raffreddamento a liquido iCUE ELITE LCD serie H100i, H150i e H170i. Questo manuale fornisce istruzioni dettagliate sull'installazione e l'uso, compatibilità con diverse piattaforme e consigli per un raffreddamento ottimale. Sono pronto a rispondere a tutte le tue domande su questi dispositivi.
  • Come faccio a sapere la direzione del flusso d'aria della ventola?
    Posso riutilizzare la pasta termica pre-applicata sul dissipatore per la reinstallazione?
    In quale orientamento devo installare il mio radiatore?
    Il mio dissipatore e le mie ventole lampeggiano in rosso o non funzionano. Cosa devo fare?
iCUE ELITE LCD
H100i | H150i | H170i
EXTREME PERFORMANCE LCD LIQUID CPU COOLER
ENGLISHEN
FRANÇAIS
DEUTSCH
NEDERLANDS
FR
DE
NL
ITALIANO
IT
ESPAÑOL
PORTUGUÊS
POLSKI
ES
PT
PL
PУССКИЙ
RU
简体中文

SC
AR
ENGLISH
Note: Most newer PC cases include a CPU cut-out to allow access to the bottom of
the motherboard. If your case does not include a cut-out, you will need to remove your
motherboard from the case prior to installation. RGB Series coolers come with the Intel
mounting bracket pre-installed on the pump for quick installation.
Intel
AMD AM4
AMD sTRX4
Installation
FAQ
TABLE OF CONTENTS
Please ensure you power down your entire PC before installation.
The LCD Module, the pump, and the Commander CORE are sensitive to
hotplugging and ESD.
1
65 4 3 2 1
65 4 3 2 1
RGB HUB
FANS
B
H
N
E
K
A
G
M
D
J
P
C
I
O
F
L
ENGLISH
INCLUDED HARDWARE
Highlighted parts for Intel installation only
x4 INTEL 1200/1150/1151/1156/1155
STANDOFFS x4 INTEL 2011/2011-3/2066 STANDOFFS x4 INTEL 1700 STANDOFFS
x1 INTEL BACKPLATE x1 INTEL MOUNTING BRACKET
(PRE-INSTALLED) x4 THUMBSCREWS
x4 AMD AM4 STANDOFFS x1 AMD AM4 MOUNTING BRACKET x1 AMD STR4/STRX4
MOUNTING BRACKET
x4 AMD STR4/STRX4 STANDOFFS x16 LONG FAN SCREWS (H100i)
x24 LONG FAN SCREWS (H150i/H170i) x8 RADIATOR SCREWS (H100i)
x12 RADIATOR SCREWS (H150i/H170i)
x16 WASHERS (H100i)
x24 WASHERS (H150i/H170i) x2 ML RGB FANS (H100i)
x3 ML RGB FANS (H150i/H170i) COMMANDER CORE
USB Y-SPLITTER
INTEL
G
x4 AMD AM4 STANDOFFS
J
x4 AMD STR4/STRX4 STANDOFFS
H
x1 AMD AM4 MOUNTING BRACKET
I
x1 AMD STR4/STRX4
2
D
ALGA 1200/1150/
1151/1155/1156
BLGA 2011/
2011-3/2066
CLGA 1700
ENGLISH
1. Installing the Intel Backplate
2. Installing the Intel Standoff Screws
NOTE: Intel LGA 2011/2011-3/2066
do not require backplate installation.
Proceed to step 2.
> Attach the provided Intel standoff
for your socket.
> Use (A) for LGA 1200/115X,
(B) for LGA 2011/ 2011-3/2066
or (C) for LGA1700.
> Tighten all four screws until
rmly secured.
3
Please continue to Page 10 to continue your installation.
L
M
N
K
ENGLISH
3. Install the Fans and Radiator
Attach the radiator and the fans
as shown. For the best cooling
performance, we recommend
mounting the fans as an air-intake
to your PC case.
4. Installing the Pump Unit
> Align the bracket and pump over the
standoff screws as shown.
> Attach the thumbscrews (F) to the
standoff screws as shown.
> Tighten the thumbscrews until all
four corners are rmly secured.
4
65 4 3 2 1
65 4 3 2 1
RGB HUB
FANS
B
H
N
E
K
A
G
M
D
J
P
C
I
O
F
L
ENGLISH AMD AM4
INCLUDED HARDWARE
Highlighted parts for AMD AM4 installation only
x4 INTEL 1200/1150/1151/1156/1155
STANDOFFS x4 INTEL 2011/2011-3/2066 STANDOFFS x4 INTEL 1700 STANDOFFS
x1 INTEL BACKPLATE x1 INTEL MOUNTING BRACKET
(PRE-INSTALLED) x4 THUMBSCREWS
x4 AMD AM4 STANDOFFS x1 AMD AM4 MOUNTING BRACKET x1 AMD STR4/STRX4
MOUNTING BRACKET
x4 AMD STR4/STRX4 STANDOFFS x16 LONG FAN SCREWS (H100i)
x24 LONG FAN SCREWS (H150i/H170i) x8 RADIATOR SCREWS (H100i)
x12 RADIATOR SCREWS (H150i/H170i)
x16 WASHERS (H100i)
x24 WASHERS (H150i/H170i) x2 ML RGB FANS (H100i)
x3 ML RGB FANS (H150i/H170i) COMMANDER CORE
USB Y-SPLITTER
A
x4 INTEL 1200/1150/1151/1156/1155
STANDOFFS
D
x1 INTEL BACKPLATE
J
x4 AMD STR4/STRX4 STANDOFFS
E
x1 INTEL MOUNTING BRACKET
(PRE-INSTALLED)
I
x1 AMD STR4/STRX4
B
x4 INTEL 2011/2011-3/2066 STANDOFFS
C
x4 INTEL 1700 STANDOFFS
5
E H
gure 1 gure 2
L
M
N
K
ENGLISH
2. Install the Fans and Radiator
3. Prepare The Motherboard For Installation
1. Installing the AMD AM4 Mounting Bracket
Attach the radiator and the fans
as shown. For the best cooling
performance, we recommend mounting
the fans as an air-intake
to your PC case.
Remove the existing AMD AM4
mounting brackets shown.
> Remove the integrated Intel
mounting bracket (gure 1).
> Install the AMD AM4 bracket by
pushing both sides into the slot on
the pump until secure (gure 2).
Note: It is important that the
AMD AM4 retention bracket
be evenly secured on all sides
before installation.
6
Please continue to Page 10 to continue your installation.
G
ENGLISH
4. Installing the AMD AM4 Standoff Screws
5. Installing the Pump Unit
> Attach the provided AMD AM4
standoffs to the CPU socket.
> Tighten all four screws until
rmly secure.
Align the bracket with the AMD AM4
standoffs as shown. Tighten the
thumb screws until secure.
7
65 4 3 2 1
65 4 3 2 1
RGB HUB
FANS
B
H
N
E
K
A
G
M
D
J
P
C
I
O
F
L
ENGLISH AMD sTRX4
INCLUDED HARDWARE
Highlighted parts for AMD sTRX4 installation only
x4 INTEL 1200/1150/1151/1156/1155
STANDOFFS x4 INTEL 2011/2011-3/2066 STANDOFFS x4 INTEL 1700 STANDOFFS
x1 INTEL BACKPLATE x1 INTEL MOUNTING BRACKET
(PRE-INSTALLED) x4 THUMBSCREWS
x4 AMD AM4 STANDOFFS x1 AMD AM4 MOUNTING BRACKET x1 AMD STR4/STRX4
MOUNTING BRACKET
x4 AMD STR4/STRX4 STANDOFFS x16 LONG FAN SCREWS (H100i)
x24 LONG FAN SCREWS (H150i/H170i) x8 RADIATOR SCREWS (H100i)
x12 RADIATOR SCREWS (H150i/H170i)
x16 WASHERS (H100i)
x24 WASHERS (H150i/H170i) x2 ML RGB FANS (H100i)
x3 ML RGB FANS (H150i/H170i) COMMANDER CORE
USB Y-SPLITTER
A
x4 INTEL 1200/1150/1151/1156/1155
STANDOFFS
D
x1 INTEL BACKPLATE
E
x1 INTEL MOUNTING BRACKET
(PRE-INSTALLED)
G
x4 AMD AM4 STANDOFFS
H
x1 AMD AM4 MOUNTING BRACKET
B
x4 INTEL 2011/2011-3/2066 STANDOFFS
C
x4 INTEL 1700 STANDOFFS
8
E I
gure 1 gure 2
J
ENGLISH
1. Installing the AMD sTRX4 Mounting Bracket
2. Installing the AMD sTRX4 Standoff Screws
> Remove the integrated Intel
mounting bracket (gure 1).
> Install the AMD sTRX4 bracket
by pushing both sides into the slot
on the pump until secure (gure 2).
Note: It is important that the
AMD sTRX4 retention bracket
be evenly secured on all sides
before installation.
> Attach the provided AMD sTRX4
standoffs to the CPU socket.
> Tighten all four screws until
rmly secure.
9
Please continue to Page 10 to continue your installation.
L
M
N
K
ENGLISH
3. Install the Fans and Radiator
4. Installing the Pump Unit
Attach the radiator and the fans
as shown. For the best cooling
performance, we recommend mounting
the fans as an air-intake
to your PC case.
> Align the bracket and pump over the
standoff screws as shown.
> Attach the thumbscrews (F) to the
standoff screws as shown.
> Tighten the thumbscrews until all
four corners are rmly secured.
10
65 4 3 2 1
65 4 3 2 1
RGB HUB
FANS
3-PIN
65 4 3 2 1
65 4 3 2 1
RGB HUB
FANS
65 4 3 2 1
65 4 3 2 1
RGB HUB
FANS
gure 1 gure 2 gure 3
ENGLISH
Connect Fans and Pump to Commander CORE
Connect Commander CORE and Elite LCD Module to
USB 2.0 Header and Power
> Connectpump24-pincabletoyourCommanderCORE(gure1).
> ConnectpumptachcabletotheCPU_FANheaderonyourmotherboard(gure2).
> ConnecteachfantotheCommanderCORE(gure3).
> ConnecteachfanRGBleadtotheCommanderCORE(gure3).
> UsingtheattachedUSBcable,connecttheCommanderCORE to a motherboard
USB2.0header.
> ConnectpumppowercabletoanavailableSATApowerplugfromyourpowersupply.
> UseincludedUSBY-SpilttertoreducerequiredUSBportsfrom2xto1x.
FAQ
1. HowdoIknowthedirectionoftheairowofthefan?
An arrow located on the side of the fan indicates the direction of air ow.
2. CanIreusethepre-appliedthermalpasteonthecoolerforre-installation?
Re-installation of the cooler will require you to clean off the pre-applied thermal paste and
apply an aftermarket paste.
3. WhatorientationshouldIinstallmyradiator?
The best way to install a radiator is with the tubes on the bottom of the case, though you can
install it with the tubes in any position, including an inverted radiator, as long as the highest
point in the radiator is visibly higher than the CPU pump.
4. Mycoolerandfansareblinkingredornotfunctioning.WhatdoIdo?
Please double check all connections from the cooler and fans to the Commander CORE.
Ensure that the Commander CORE and LCD module are update to the most recent rmware
via iCUE. If this does not resolve your problems, please open a ticket at support.corsair.com or
contact our customer support team for further troubleshooting and assistance.
https://help.corsair.com/hc/en-us/requests/new
FRANÇAIS
Avant l’installation, veuillez vous assurer que le PC est complètement hors tension.
Ce produit, la pompe et le Commander CORE sont sensibles aux décharges
électrostatiques et aux branchements à chaud.
Intel
AMD AM4
AMD sTRX4
Installation
Foire Aux Questions
TABLE DES MATIÈRES
Remarque: La plupart des nouveaux boîtiers de PC comportent un accès facilité au
processeur qui permet d’accéder à la base de la carte mère. Si aucun accès n’est prévu
sur votre boîtier, vous devrez retirer votre carte mère du boîtier avant de procéder à
l’installation. Les refroidisseurs RGB Series sont fournis avec le support de xation Intel
préinstallé sur la pompe an de permettre une installation rapide.
1
65 4 3 2 1
65 4 3 2 1
RGB HUB
FANS
B
H
N
E
K
A
G
M
D
J
P
C
I
O
F
L
INTEL
x4 ENTRETOISES INTEL
1200/1150/1151/1156/1155 x4 ENTRETOISES INTEL 2011/2011-3/2066 x4 ENTRETOISES INTEL 1700
x1 PLAQUE ARRIÈRE INTEL x1 SUPPORT DE FIXATION INTEL
(PRÉINSTALLÉ) x4 VIS MOLETÉES
x4 ENTRETOISES AMD AM4 x1 SUPPORT DE FIXATION AMD AM4 x1 SUPPORT DE FIXATION
AMD STR4/STRX4
x4 ENTRETOISES AMD STR4/STRX4 x16 VIS DE VENTILATEUR LONGUES (H100i)
x24 VIS DE VENTILATEUR LONGUES (H150i/H170i) x8 VIS DE RADIATEUR (H100i))
x12 VIS DE RADIATEUR (H150i/H170i)
x16 RONDELLES (H100i)
x24 RONDELLES (H150i/H170i) x2 VENTILATEURS RGB ML (H100i)
x3 VENTILATEURS RGB ML (H150i/H170i) COMMANDER CORE
SÉPARATEUR EN Y USB
G
x4 ENTRETOISES AMD AM4
J
x4 ENTRETOISES AMD STR4/STRX4
H
x1 SUPPORT DE FIXATION AMD AM4
I
x1 SUPPORT DE FIXATION
AMD STR4/STRX4
Les sections en surbrillance concernent uniquement l’installation Intel
MATÉRIEL INCLUS
FRANÇAIS
2
D
ALGA 1200/1150/
1151/1155/1156
BLGA 2011/
2011-3/2066
CLGA 1700
> Attachez les entretoises Intel
fournies pour votre prise.
> Utilisez (A) pour le modèle
LGA 1200/115X, (B) pour
LGA 2011/2011-3/2066 ou
(C) pour LGA 1700.
> Serrez les quatre vis jusqu’à ce
qu’elle soient solidement xées.
2. Installation Des Vis D’entretoise Intel
REMARQUE: LGA 2011/2011-3/2066
ne nécessitent pas linstallation d’une
plaque arrière.
Passez à l’étape 2.
1. Installation De La Plaque Arrière Intel
FRANÇAIS
3
Veuillez passer à la page 10 pour procéder à la suite de l’installation.
L
M
N
K
> Alignez le support et la pompe avec
les vis à entretoise comme indiqué.
> Attachez les vis moletées (F) sur les
vis à entretoise comme indiqué.
> Serrez les vis moletées jusqu’à
ce que les quatre coins soient
solidement xés.
4. Installation De La Pompe
Attachez le radiateur et les ventilateurs,
comme illustré. Pour des performances
de refroidissement optimales, nous
vous recommandons d’installer les
ventilateurs comme une entrée d’air sur
la tour de votre ordinateur.
3. Installation Des Ventilateurs Et Du Radiateur
FRANÇAIS
4
65 4 3 2 1
65 4 3 2 1
RGB HUB
FANS
B
H
N
E
K
A
G
M
D
J
P
C
I
O
F
L
AMD AM4
x4 ENTRETOISES INTEL
1200/1150/1151/1156/1155 x4 ENTRETOISES INTEL 2011/2011-3/2066 x4 ENTRETOISES INTEL 1700
x1 PLAQUE ARRIÈRE INTEL x1 SUPPORT DE FIXATION INTEL
(PRÉINSTALLÉ) x4 VIS MOLETÉES
x4 ENTRETOISES AMD AM4 x1 SUPPORT DE FIXATION AMD AM4 x1 SUPPORT DE FIXATION
AMD STR4/STRX4
x4 ENTRETOISES AMD STR4/STRX4 x16 VIS DE VENTILATEUR LONGUES (H100i)
x24 VIS DE VENTILATEUR LONGUES (H150i/H170i) x8 VIS DE RADIATEUR (H100i))
x12 VIS DE RADIATEUR (H150i/H170i)
x16 RONDELLES (H100i)
x24 RONDELLES (H150i/H170i) x2 VENTILATEURS RGB ML (H100i)
x3 VENTILATEURS RGB ML (H150i/H170i) COMMANDER CORE
SÉPARATEUR EN Y USB
A
x4 ENTRETOISES INTEL
1200/1150/1151/1156/1155
D
x1 PLAQUE ARRIÈRE INTEL
J
x4 ENTRETOISES AMD STR4/STRX4
E
x1 SUPPORT DE FIXATION INTEL
(PRÉINSTALLÉ)
I
x1 SUPPORT DE FIXATION
AMD STR4/STRX4
B
x4 ENTRETOISES INTEL 2011/2011-3/2066
C
x4 ENTRETOISES INTEL 1700
Les sections en surbrillance concernent uniquement l’installation AMD AM4
MATÉRIEL INCLUS
FRANÇAIS
5
E H
gure 1 gure 2
L
M
N
K
Retirez les supports de xation
AMD AM4 existants indiqués.
3. Préparation De La Carte Mère Pour L’installation
Attachez le radiateur et les ventilateurs,
comme illustré. Pour des performances
de refroidissement optimales, nous
vous recommandons d’installer les
ventilateurs comme une entrée d’air sur
la tour de votre ordinateur.
2. Installation Des Ventilateurs Et Du Radiateur
> Pour retirer le support de xation
Intel intégré (gure 1).
> Installez le support AMD AM4 en
appuyant des deux côtés dans le
logement sur la pompe jusqu’à ce
qu’il soit en place (gure 2).
Remarque: Il est important que le
support de retenue AMD AM4 soit
bien en place des deux côtés avant
de procéder à l’installation.
1. Installation Du Support De Fixation AMD AM4
FRANÇAIS
6
Veuillez passer à la page 10 pour procéder à la suite de l’installation.
G
Alignez le support avec les xations
AMD AM4, comme indiqué. Serrez
complètement les vis moletées.
5. Installation De La Pompe
> Placez les entretoises AMD AM4
fournies dans le socket
de processeur.
> Serrez les quatre vis jusqu’à ce
qu’elle soient solidement xées.
4. Installation Des Vis D’entretoise AMD AM4
FRANÇAIS
/