Artemide Tolomeo Midi Tavolo LED Desk Lamp Guida d'installazione
- Tipo
- Guida d'installazione

AVVERTENZE
Prima di ogni operazione sull’apparecchio, disinserire la tensione di rete. L’apparecchio
non può essere alimentato da presa comandata dimmerabile.
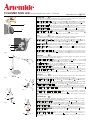
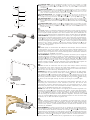
ISTRUZIONI BASE TAVOLO: Inserire il corpo lampada A nella base B (fig.1). Capovolgere
la base B, posizionare la boccola C, la rondella piana D e bloccare con la vite E (fig.2).
Agire sulle due ghiere F per aumentare o diminuire la rigidità dell’apparecchio (fig.3).
ISTRUZIONI PARE TE (fig.4): Fissare a muro il supporto G. Inserire il corpo lampada A
nell’apposita sede eseguendo una rotazione e una pressione verso il basso.
ISTRUZIONI MORSETTO (fig.5): Fissare il morsetto H mediante la vite I. Inserire il corpo
lampada A nell’apposita sede eseguendo una rotazione e una pressione verso il basso.
IST RUZ IONI TAVOL O FIS SO (fig.6): Praticare un foro (diametro 18,5-19,5 mm) nel
piano prescelto, inserire il supporto L e bloccare la ghiera M. Inserire il corpo lampada A
nell’apposita sede eseguendo una rotazione e una pressione verso il basso.
A
B
F
I
AVIS
Déconnecter la tension de réseau avant toute opération sur l’appareil. L’appareil ne peut
pas être alimenté par une prise commandée avec gradateur de lumière.
INST RUCTIONS BASE T ABLE: Insérer le corps de la lampe A dans la base B (fig.1).
Renverser la base B, positionner la douille C, la rondelle D et visser la vis E (fig.2). Agir sur
les deux bagues F pour augmenter ou diminuer la rigidité de l’appareil (fig. 3).
INSTRUCTIONS MUR (fig. 4): Fixer au mur le support B. Insérer le corps de l’appareil A
dans son logement en effectuant une rotation et en exerçant une pression vers le bas.
INSTRUCTIONS ETAU (fig. 5): Fixer l’étau H au moyen de la vis I. Introduire le corps de
l’appareil A dans son logement en effectuant une rotation et en exerçant une pression
vers le bas.
INSTRUCT IONS T ABL E FIXE (fig. 6): Percer un trou (diamètre 18,5-19,5mm) sur la
surface choisie, introduire le support L et bloquer l’embout M. Insérer le corps de l’appareil
A dans son logement en effectuant une rotation et en exerçant une pression vers le bas.
WARNING
Before any operation on the fixture, disconnect the power supply. The fixture can not be
supplied by an outlet provided with dimmer.
TABL E BASE INSTRUCTIONS : Insert fixture body A into base B (fig.1). Turn base B
upside down, position bush C washer D and lock with screw E (fig.2). Act on two ring
nuts F to increase or decrease the stiffness of the fixture (fig. 3).
WALL INSTRUCTIONS (fig. 4): Fix support G to the wall. Insert fixture body A into the
proper seat by rotating and pressing it downward.
HOL DFAST INST RUCTIONS (fig. 5): Fix clamp H by means of screw I. Insert fixture
body A into the proper seat by rotating and pressing it downward.
FIXED TA BLE INS T RUCTIONS (fig. 6): Make a hole (diameter 18.5-19.5mm) in the
chosen flat surface, insert support L and lock ring nut M. Insert fixture body A into the
proper seat by rotating and pressing it downward. N.B.: Do not use nuts and bolts
supplied with the base.
VORSICHT
Vor jedem Eingriff an dem Gerät die Netyspannung unterbrechen. Das Gerät kann
nicht durch eine gesteuerte Steckdose mit Dimmer versorgt werden.
ANLEITUNGE N BASIS TISCH: Den Beleuchtungskörper A in die Basis B einstecken
(Abb.1). Die Basis B umkeheren, die Buchse C, die Unterlegscheibe D positionieren und
die gelieferte Schraube E an dem Lampenkörper anschrauben (Abb. 2). Die zwei Ringe
F drehen, um die Starrheit des Gerät zu steigern oder verringern (Abb.3).
ANLEITUNGEN WANDLEUCHTE (Abb. 4): Die Halterung G and der Wand befestigen. Den
Beleuchungskörper A in die geeigneten Sitz beim Drehen und Drücken nach unten einsetzen.
ANLEIT UNGEN KL EMMENLE UCHTE (Abb. 5): Die Klemme H durch die Schraube I
befestigen. Den Beleuchungskörper A in die geeigneten Sitz beim Drehen und Drücken
nach unten einsetzen.
ANLE IT UN G E N FE ST E T ISC HL E U CH T E (Abb. 6): Die Tischplatte kreisformig
ausbohren (Durchmesser 18,5-19,5mm), die Halterung L einstecken und mit Nutmutter
M festziehen. Den Beleuchungskörper A in die geeigneten Sitz beim Drehen und Drücken
nach unten einsetzen.
EN
F
D
F
Fig. 1
A
A
H
I
TOLOMEO MIDI LED designed by M. De Lucchi, G. Fassina Apparecchio in CL IP20
ADVERTENCIAS
Antes de efectuar cualquier operación, desconectar la tensión de red. El aparato no puede ser
alimentado por una toma mandada con regulador de luz.
INSTRUCCIONES BASE MESA: Introducir el cuerpo lámpara A en la base B (fig.1). Volcar
la base B, poner el casquillo C la arandela D y atornillar el tornillo E entregado con el cuerpo
lámpara (fig.2). Mediante las dos abrazaderas F aumentar o disminuir la rigidez del aparato (fig. 3).
INSTRUCCIONES PARED (fig. 4): Fijar a la pared el soporte G. Introducir el cuerpo lámpara
A en el espacio correspondiente efectuando una rotación y una presión hacia abajo.
INSTRUCCIONES MORDAZA (fig. 5): Ajustar la mordaza H mediante el tornillo I. Introducir
el cuerpo lámpara A en el espacio correspondiente efectuando una rotación y una presión
hacia abajo.
INS TRUCCIO NES MESA F IJA (fig. 6): Hacer un agujero (diámetro18,5-19,5mm) en
la superficie establecida, introducir el soporte L y bloquear la virola M. Introducir el
cuerpo lámpara A en el espacio correspondiente efectuando una rotación y una presión
hacia abajo.
E
Fig. 2
Fig. 3
G
Fig. 4
Fig. 5 A
L
MFig. 6
D
E
C
A
B
F
W A R N I NG
Before any operation on the fixture, disconnect the power supply. The fixture can not be
supplied by an outlet provided with dimmer.
T AB L E BA SE IN S T R U CTIO NS : Insert fixture body A into base B (fig.1). Turn base B
upside down, position bush C washer D and lock with screw E (fig.2). Act on two ring
nuts F to increase or decrease the stiffness of the fixture (fig. 3).
WALL INSTRUCT IO NS (fig. 4): Fix support G to the wall. Insert fixture body A into the
proper seat by rotating and pressing it downward.
HOL DF A ST IN ST R U CT I O NS (fig. 5): Fix clamp H by means of screw I . Insert fixture
body A into the proper seat by rotating and pressing it downward.
F I X E D T A BL E IN S T RU C T I O NS (fig. 6): Make a hole (diameter 18.5-19.5mm) in the
chosen flat surface, insert support L and lock ring nut M. Insert fixture body A into the
proper seat by rotating and pressing it downward. N.B.: Do not use nuts and bolts
supplied with the base.
EN
F
Fig. 1
A
A
H
I
TOLOMEO LED-TOLOMEO MINI LED
Fig. 2
Fig. 3
G
Fig. 4
Fig. 5 A
L
MFig. 6
D
E
C
等级 IP 20 装置
设计师: M. De Lucchi, G. Fassina
劝告:
安装操作前切断电网电压.。不能使用可调节的插座来控制
该照明装置。
桌子平面安装说明:用压力,将 A灯体旋转一直到插入 B
底座 (图 1)。将 B底座翻倒,放置 C 衬套和 D垫片之后,
用E螺丝固定(图 2)。用 F两个固定环, 可以调节照明装
置的硬度(图 3)。
墙壁安装说明(图 4):将 G支座固定于墙上。用压力,将
A灯体旋转一直到插入专用位置。
用夹子固定安装说明(图 5):用 I螺丝,将 H夹子固定,
然后用压力,将 A灯体旋转一直到插入专用位置。
固定台面安装说明 (图 6):在固定台面打 18,5-19,5mm 直
径的孔。插入 L支座,固定 M固定环。用压力,将 A灯体
旋转一直到插入专用位置。
II

CUIDADO: Equipar el transformador con el adaptador de enchufe adecuado. Antes de
conectar el transformador a la toma de corriente, cerciorarse de que la tensión nominal
indicada en el mismo corresponda a la disponible en la red. No se admite ningún tipo de
conexión entre aparatos y transformadores/sistemas de alimentación diferentes de los
indicados por ARTEMIDE.
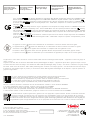
FUNCIONAMIENTO: El aparato está provisto de un regulador de la intensidad luminosa;
para encenderlo, presionar brevemente la parte central del interruptor R colocado en el
cable de alimentación. Mantener presionado el interruptor R para regular la intensidad
luminosa hasta el nivel deseado o el nivel máximo. Otra presión prolongada del interruptor
R invierte el sentido de regulación de la intensidad luminosa hacia el nivel mínimo. Presionar
brevemente el interruptor R para apagar el aparato. Cuando se enciende nuevamente, el
aparato produce la misma intensidad de luz programada antes de su apagamiento.
I
F
EN
D
E
ACHTUNG: Den Transformator mit dem geeigneten Steckeradapter ausrüsten. Vor der
Ve rbindung des Transformators zu der Steckdose prüfen Sie, dass die auf dem
Transformator mark ierte Nennspannung gleich die Leitungss pann ung ist. Keine
Verbindung zwischen Gerät und Transformator/Steckdose verwenden, die von den
jeniger, die von ARTEMIDE bestimmt wird, unterschiedlich ist.
BETRIEB: Das Gerät ist mit einem Dimmer zur Regelung der Lichtstärke ausgerüstet. Der
Zentralteil des Schalters R auf das Speisekabel kurz drücken, um das Gerät einzuschalten.
Den Schalter R gedrückt halten, um die Lichtstärke bis zu dem gewünschten Niveau
oder zu dem maximalen Niveau zu regeln. Beim zweiten langen Druck des Schalters R
wird die Richtung der Lichtstärke nach dem Minimum umgekehrt. Das Gerät beim kurzen
Druck des Schalters R ausschalten. Beim Wiedereinschalten hat das Gerät die selbe
Lichtstärke, die vor dem Ausschalten eingestellt war.
WARNING: Provide the transformer with the proper outlet adapter. Before connecting
the transformer to the outlet, check that the rated voltage marked on it is the same of
the network one. No type of connection between fixtures and transformers/outlets
different from the ones defined by ARTEMIDE is allowed.
OPERATION: The fixture is provided with a dimmer for the regulaion of the light intensity.
To turn the fixture on, just touch the central part of switch R located on the feeding cable.
Keep pressed switch R to regulate the light intensity up to the desired level or up to the
maximum level. Another long pressure of switch R inverts the regulation direction of the
light intensity toward the minimum. Turn the fixture off by acting on switch R. When turning
the fixture on the same light intensity set before the turning off is produced again.
ATTENTION: Equiper le transformateur de l’adaptateur fiche adéquat. Avant de connecter
le transformateur à la prise de courant, vérifier que la tension nominale marquée sur le
transformateur lui-même soit pareille à celle disponible dans le réseau. Aucun type de
connexion entre les appareils et les transformateurs/systèmes d’alimentation différents
de ceux indiqués par ARTEMIDE n’est admis.
FONCTIONNEMENT: L’appareil est pourvu d’un gradateur de lumière pour le réglage de
l’intensité lumineuse. L’allumage se produit en touchant brièvement la parte centrale de
l’interrupteur R placé sur le câble d’alimentation. Tenir pressé l’interrupteur R pour régler
l’intensité lumineuse jusqu’au niveau désiré ou au niveau maximum. Une autre pression
prolongée du l’interrupteur R inverse le sens de réglage de l’intensité lumineuse vers le
minimum. Eteindre l’appareil en pressant brièvement l’interrupteur R. Lorsque l’appareil est
rallumé, il reproduit la même intensité de lumière établie avant de l’éteindre.
ATTENZIONE: Dotare il trasformatore dell’apposito adattatore a spina. Prima di collegare il
trasformatore alla presa di corrente, verificare che la tensione nominale marcata sullo
stesso sia uguale a quella disponibile in rete. Non è ammesso alcun tipo di abbinamento fra
apparecchi e trasformatori/sistemi di alimentazione diversi da quelli definiti da ARTEMIDE.
FUNZIONAMENTO: L’apparecchio è dotato di un dimmer per la regolazione dell’inten-
sità luminosa. L’accensione avviene tramite un breve tocco nella parte centrale dell’inter-
ruttore R posto sul cavo di alimentazione. Tenere premuto l’interruttore R per regolare
l’intensità luminosa sino al livello desiderato o sino al livello massimo. Una seconda
pressione prolungata dell’interruttore R inverte il senso di regolazione dell’intensità
luminosa verso il minimo. Spegnere l’apparecchio agendo sull’interruttore R con un
breve tocco. Alla riaccensione l’apparecchio riproduce la stessa intensità di luce imposta-
ta prima dello spegnimento.
R
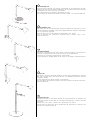
ISTRUZIONI TERRA: Inserire l’asta N nella base O e bloccare con la rondella e la vite P.
Posizionare i tre reggifilo Q sull’asta N. Inserire il corpo lampada A nell’apposita sede
eseguendo una rotazione e una pressione verso il basso. Far passare il cavo di alimentazione
nei reggifilo Q.
INSTRUCTIONS TERRE: Insérer la tige N dans la base O et bloquer à l’aide de la rondelle et
de la vis P. Positionner les trois supports du câble Q sur la tige N. Insérer le corps de l’appareil
dans son logement en effectuant une rotation et en exerçant une pression vers le bas. Faire
passer le câble d’alimentation dans les supports du câble Q.
FLOOR INSTRUCTIONS: Inser stem N into base O and lock it by means of the washer and
screw P. Position the three wire holders Q on stem N. Insert lamp body A into its seat by
rotating and pressing downwards. Make the feeding cable go through wire holders Q.
ANLEITUNGEN ERDE: Den Stab N in die Basis O einstecken und sie durch die Scheibe und die
Schraube P befestigen. Die drei Drahthalter Q auf den Stab N positionieren. Den Lampenkörper A in
seinen Sitz beim Drehen und Drucken unterwärts einstecken. Das Speisekabel durch die Drahthalter Q
einführen.
INSTRUCCIONES SUELO: Introducir la varilla N en la base O y bloquear con la arandela y el tornillo
P. Poner los tres soportes del cable Q en la varilla N. Introducir el cuerpo lámpara A en el alojamiento
adecuado con una rotación y una presión hacia abajo. Hacer pasar el cable de alimentación en los
soportes del cable Q.
N
O
Q
Q
Q
A
P
I
F
EN
D
E
R

SOSTITUZIONE LED
All’apparecchio è abbinata una sorgente caratterizzata da una elevatissima vita utile.
Tuttavia, nel caso fosse necessaria la sostituzione del led, questa dovrà essere effettuata
esclusivamente da nostro personale specializzato.
Siete pregati pertanto di rivolgervi al distributore più vicino.
Per gli indirizzi dei distributori Artemide nel mondo, visitate il sito: www.artemide.com.
I
REMPLACEMENT LED
Une source avec une vie utile très longue est jointe à l’appareil. De toute façon, au cas où
il serait nécessaire de remplacer le led, cette opération devra être effectuée exclusivement
par notre personnel spécialisé.
Vous êtes donc priés de vous adresser au distributeur le plus proche.
Pour les adresses des distributeurs Artemide dans le monde , visite r le site:
www.artemide.com.
LED REPLACEMENT
The fixture is provided with light source having a long life. Anyway, if the led must be
replaced, this operation must be carried out only by our specialized staff.
Therefore, we recommend contacting the nearest dealer.
For the addresses of Artemide dealers in the world, visit our website: www.artemide.com.
ERSATZ LED
Das Gerät ist mit einer Lichtquelle ausgerstet, die eine lange Lebensdauer hat. Falls die
LED ersetzt werden sollte, muss der Ersatz nur von unserem spezialisierten Personal
ausgeführt werden.
Es wird empfohlen den näher Verteiler zu kontaktieren.
Für die Adressen der Verteiler Artemide in der Welt besuchen Sie unsere Internet-Site:
www.artemide.com.
SUSTITUCIÓN LED
El aparato funciona con una fuente luminosa de muy larga duración. Sin embargo, una
sustitución eventual del led debe ser efectuada exclusivamente por nuestro personal
enc argado.
En este caso, por lo tanto, contacte con el distribuidor más cercano.
Para encontrar las direcciones de los distribuidores de Artemide en el mundo, visite
nuestro sitio: www.artemide.com.
EN
D
F
E

Tutti i prodotti ARTEMIDE che rientrano nell’ambito di applicazione della direttiva europea bassa tensione B.T. 2006/95/CE e della
direttiva europea compatibilità elettromagnetica E.M.C. 2004/108/CE soddisfano i requisiti richiesti e recano la marcatura “ ”.
Tous les produits ARTEMIDE appartenant au champ d’application de la directive européenne basse tension B.T. 2006/95/CE et de
la directive européenne compatibilité électromagnétique E.M.C. 2004/108/CE remplissent les conditions prévues et portent le
marquage “ ”.
All ARTEMIDE products falling within the range of application of the European low voltage directive B.T. 2006/95/CE and of the
European electromagnetic compatibility E.M.C. directive 2004/108/EC meet the required specifications and bear “ ” labelling.
Alle Produkte von ART EMIDE, die unter das Anwendungsgebiet der europäischen Richtlinie der Niederspannung B.T. 2006/95/
CE und der elektromagnetischen Kompatibilität E.M.C. 2004/108/EG fallen, entsprechen den erforderlichen Eigenschaften und
tragen das “ ” Kennzeichnen.
Todos los productos ARTEMIDE que pertenencen al ámbito de aplicación de la directiva europea baja tensión B.T. 2006/95/CE
y de la directiva europea compatibilidad electromagnética E.M.C. 2004/108/CE cumplen los requisitos correspondientes y llevan
el marcado “ ”.
In caso di reclamo citare il numero
En cas de réclamation, veuillez citer le numéro
In case of complaint, please quote number
Bei jeder Reklamation geben Sie, bitte folgende Nummer an
En caso de reclamación indicar el número
cod. Y503002077
Via Bergamo, 18
I-20010 Pregnana M.se (MI) - ITALIA
t. +39 02.935.18.1 f. +39 02.935.90.254-496
info@arte mide.com
www.artemide.com
P. Iva IT 00846890150
ARTEMIDE s.p.a. non si assume alcuna responsabilità per prodotti modificati senza preventiva autorizzazione.
ARTEMIDE spa décline toute responsabilité pour les produits modifiés sans autorisation préalable.
ARTEMIDE spa does not shoulder any responsibilities for products which are modified without prior authorisation.
ARTEMIDE s.p.a. nimmt keine Verantwortung für ohne Vorgenehmigung geänderte Produkte an.
ARTEMIDE spa no se asume ninguna responsabilidad ante productos modificados sin autorización.
Nel caso si rendesse necessaria la sostituzione del cavo di alimentazione contattare il centro assistenza ARTEMIDE.
Si le cordon d’alimentation doit être remplacé, contacter le service après vente ARTEMIDE.
For the replacement of the power supply cable, please contact ARTEMIDE service centre.
falls es nötig sein sollte das Speisekabel auszuwechseln, das technische Assistenzzentrum ARTEMIDE kontaktieren.
Si fuera necesario sustituir el cable de alimentación, póngase en contacto con el centro de asistencia técnica ARTEMIDE.
Attenzione: la sicurezza elettrica di questo apparecchio è garantita con l’uso appropriato di queste istruzioni. Pertanto è necessario conservarle.
Attention: la securité de l’appareil n’est garantie que si les instructions sont convenablement suivies. Il est donc nécessaire de les conserver.
Warning: this equipment is guaranteed only when used as indicated in these instructions. Therefore they should be kept for future reference.
Achtung: die Sicherheit der Leuchte wird nur bei sachgerechtem Gebrauch gemäß Anweisungen gewährleistet. Bitte bewahren Sie diese sorgfältig auf.
Atencion: la seguridad del aparato está garantizada solo con el uso apropriado de las instrucciones. Por lo tanto es necesario conservarlas.
Avvertenze generali
apparecchi di illumina-
zione per interni
Avertissements généraux
pour appareils
d’éclairage d’intérieur
General warnings for
indoor light fittings
Generelle Hinweise für
Beleuchtungsgeräte für
Innenräume
Advertecias generales para
aparatos de iluminación para
interior
Gli apparecchi in classe devono essere alimentati da un trasformatore di sicurezza conforme alle norme vigenti.
Les appareils dans la classe doivent être alimentés par un trasformateur de sécurité conforme aux normes en vigueur.
The fixtures in class must be supplied with a transformer in complaince with the regulations in force.
Die Geräte in Klasse müssen durch einen den geltenden Normen entsprechenden Transformator gespeist werden.
Los aparatos de clase deben ser alimentados por un transformador de seguridad que cumpla con las normas vigentes.
L’apparecchio è stato testato secondo la norma IEC 62471:2006 sicurezza fotobiologica delle lampade – l’apparecchio ricade nel gruppo di
rischio: esente
L’appareil a été testé selon la norme IEC 62471:2006 sécurité photobiologique des lampes – l’appareil fait partie dans le groupe de risque: exempt
The fixture has been tested according to the standard IEC 62471:2006 photobiological safety of lamps – the fixture is classified in risk group: exempt
Das Gerät wurde nach der Norm IEC 62471:2006 photobiologische Sicherheit von Lampen getestet – das Gerät fällt unter die Freie Gruppe
El aparato ha sido ensayado según lo previsto por la norma IEC 62471:2006 seguridad fotobiológica de las lámparas– el aparato pertenece al
grupo de riesgo: exento.
-
 1
1
-
 2
2
-
 3
3
-
 4
4


Artemide Tolomeo Midi Tavolo LED Desk Lamp Guida d'installazione
- Tipo
- Guida d'installazione
in altre lingue
Documenti correlati
Altri documenti
-
 NERI LIGHT 500 Istruzioni per l'uso
-
Clay Paky CJ3000 Manuale utente
-
ProLights LED Fresnel pole operated Manuale utente
-
ProLights LED Fresnel Manuale utente
-
-
-
-
