
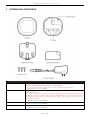
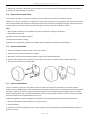
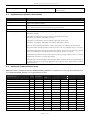
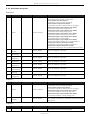
Used in this guide.
Artículos utilizados en este manual / Utilisé dans ce guide / In dieser Gebrauchsanweisung
verwendete Bezeichnungen / Usato in questa guida / Gebruikt in deze handleiding / Används
i den här handboken / Brukt i denne håndboken.
Screws (x 3)
Double-sided tape
Power Adapter
Important safety information.
Please read this and the online guide(s) at support.aeotec.com/siren6 carefully.
Failure to follow the recommendations set forth by Aeotec Limited may be
dangerous or cause a violation of the law. The manufacturer, importer, distributor,
and / or reseller will not be held responsible for any loss or damage resulting from
not following any instruction in this guide or in other materials.
Siren 6 is intended for indoor use in dry locations only. Do not use in damp, moist,
and / or wet locations.
Warning: to prevent possible hearing damage, test only when wearing appropriate
hearing protection.
Quick start.
The following will step you through installing Siren 6 and connecting it to your
Z-Wave network.
1. Power on Siren 6 via the provided power adapter; its LED will blink slowly.
2. Affix Chime in the desired installation location using the provided mounting plate.
a. Affix the mounting plate to the selected surface using either 3 x 20mm
screws or double-sided tape.
b. Lock Chime onto the mounting plate.
3. Set your Z-Wave gateway into its ‘add device’ mode in order to connect Siren 6
to your Z-Wave system. Refer to the gateway’s manual if you are unsure of how
to perform this step.
4. Connect Siren 6 to your Z-Wave gateway; press the Siren 6’s Action Button
once. If your Z-Wave gateway supports S2 encryption, enter the first 5 digits of
DSK into your gateway’s interface if / when requested. The DSK is printed on
Siren 6’s housing.
5. When Siren 6 successfully joins your Z-Wave network its LED will emit a solid
light for 30 seconds and then turn off. Should Siren 6’s LED continue to blink
and has failed to join your Z-Wave network; repeat steps 3 to 4 and please
contact us for further support if needed.
Siren 6 is now a part of your Z-Wave home control system. You can configure Siren
6, along with its automations and sounds, via your Z-Wave system; please refer to
your software’s user guide for precise instructions.
You’re able to test Siren 6’s speaker system manually. Safety: test only when
wearing necessary ear protection. Siren 6’s speaker emits tones up to 105dB that
can cause hearing damage. To test manually, press and hold Action Button for 2
to 5 seconds.
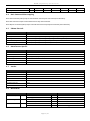
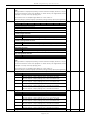
Tone # Name Use
Get help & learn more.
Should you encounter any problem with Siren 6 visit support.aeotec.com/siren6 or
contact our support team via aeotec.com/contact. You can also learn more about
Siren 6 features, configuration options, and technical specifications at the link.
Gateway compatibility.
To see if this device is known to be compatible with your Z-Wave gateway, please
refer to aeotec.com/z-wave-gateways
Español.
Información importante de seguridad.
Por favor, lea cuidadosamente esta información y el manual en support.aeotec.com/siren6. No
cumplir las recomendaciones establecidas por Aeotec Limited puede ser peligroso o constituir
una violación a la ley. El fabricante, importador, distribuidor y / o revendedor no será
considerado responsable por ninguna pérdida o daño que resulte de no cumplir cualquiera de
las instrucciones contenidas en este manual o en otros materiales.
Siren 6 está diseñado para su uso en espacios cerrados y secos. No utilizar en locaciones con
condiciones de humedad y / o en espacios mojados.
Advertencia: para evitar posibles daños de audición, pruebe únicamente si está utilizando
protección a la audición.
Inicio rápido.
El siguiente manual le guiará en la instalación del Siren 6 y su conexión a su red Z-Wave.
Pre-loaded tones. 1. Encienda Siren 6 a través del adaptador de energía ofrecido; la luz LED parpadeará
lentamente.
2. Fije el Timbre en la locación de instalación deseada utilizando la placa de montaje incluida.
a. Fije la placa de montaje a la superficie seleccionada utilizando bien sea 3 tornillos de
20mm o cinta doble cara.
b. Bloquee el Timbre en la placa de montaje.
3. Configure su puerto de acceso Z-Wave en la modalidad de “agregar dispositivo” para
conectar el Siren 6 a su sistema Z-Wave. Revise el manual de puerto de acceso si no está
seguro de cómo realizar este paso.
4. Conecte Siren 6 a su puerta de enlace Z-Wave; presione el Botón de Acción del Siren 6 una
vez. Si su puerta de enlace Z-Wave soporta encriptación S2, ingrese los primeros 5 dígitos
del DSK en la interfaz de su puerta de enlace si/cuando se le solicite. El DSK está impreso
en la caja de su Siren 6.
5. Cuando Siren 6 se haya acoplado exitosamente a su puerta de enlace Z-Wave, su luz LED
emitirá un color sólido durante 30 segundos y después se apagará. En caso de que la luz
LED del Siren 6 continúe parpadeando significa que no se ha podido acoplar a su red
Z-Wave; repita los pasos 3 y 4 y, por favor, contáctenos en caso de que necesite más
apoyo.
El Siren 6 ahora es parte de su sistema de control de hogar Z-Wave. Puede configurar tanto el
dispositivo como las automatizaciones a través de su sistema Z-Wave; por favor, para obtener
instrucciones más precisas revise el manual de usuario del Software.
Puede probar el sistema de bocinas del Siren 6 manualmente. Seguridad: haga las pruebas
únicamente con la protección auditiva necesaria. Las bocinas Siren 6 emiten tonos de hasta
105dB que pueden causar daños auditivos. Para probar manualmente, mantenga presionado
el Botón de Acción entre 2 y 5 segundos.
Français.
Informations importantes concernant la sécurité
Veuillez lire attentivement ce document et le(s) guide(s) à l'adresse support.aeotec.com/siren6.
Le non-respect des recommandations formulées par Aeotec Limited peut être dangereux ou
entraîner une violation de la loi. Le fabricant, l'importateur, le distributeur et / ou le revendeur ne
seront pas tenus responsables de toute perte ou dommage résultant du non-respect des
instructions contenues dans ce guide ou dans d'autres documents.
Siren 6 est destiné à être utilisé à l'intérieur dans des endroits secs uniquement. Ne pas utiliser
dans des endroits humides, mouillés et / ou trempés.
Averstissement: pour éviter d'éventuels dommages auditifs, tester uniquement lorsque vous
portez une protection auditive appropriée.
Démarrage rapide.
Les étapes suivantes vous guideront dans l'installation de Siren 6 et sa connexion à votre réseau
Z-Wave.
1. Allumez Siren 6 à l'aide de l'adaptateur secteur fourni ; son voyant LED clignotera lentement.
2. Fixez le Carillon à l'emplacement de montage souhaité à l'aide de la plaque de montage
fournie.
a. Fixez la plaque de montage sur la surface choisie à l'aide de 3 vis de 20 mm ou de
ruban adhésif double face.
b. Verrouillez le Carillon sur la plaque de montage.
3. Réglez votre passerelle Z-Wave dans son mode 'ajouter un appareil' afin de connecter le
Siren 6 à votre système Z-Wave. Reportez-vous au manuel de la passerelle si vous avez des
doutes quant à la façon d'effectuer cette étape.
4. Connectez Siren 6 à votre passerelle Z-Wave ; appuyez une fois sur le bouton d'action de
Siren 6. Si votre passerelle Z-Wave prend en charge le cryptage S2, entrez les 5 premiers
chiffres du DSK dans l'interface de votre passerelle si / quand vous le souhaitez. Le DSK est
imprimé sur le boîtier de Siren 6.
5. Lorsque Siren 6 rejoint avec succès votre réseau Z-Wave, son voyant LED émet une
couleur unie pendant 30 secondes puis s'éteint. Si la LED de Siren 6 continue à clignoter et
n'a pas réussi à rejoindre votre réseau Z-Wave, répétez les étapes 3 à 4 et veuillez nous
contacter pour plus d'assistance si nécessaire.
Le Siren 6 fait maintenant partie de votre système de contrôle à domicile Z-Wave. Vous pouvez
le configurer ainsi que ses automatismes via votre système Z-Wave; veuillez vous référer au
guide de l'utilisateur de votre logiciel pour des instructions précises.
Vous pouvez tester manuellement le système de haut-parleurs de Siren 6. Sécurité: testez
uniquement lorsque vous portez les protections auditives nécessaires. Le haut-parleur de
Siren 6 émet des tonalités jusqu'à 105dB qui peuvent causer des dommages auditifs. Pour
tester manuellement, appuyez sur le bouton d'action et maintenez-le enfoncé pendant 2 à 5
secondes.
Deutsch.
Wichtige Sicherheitsinformationen.
Bitte lesen Sie dieses Dokument und die Anleitung(en) unter support.aeotec.com/siren6
sorgfältig durch. Den festgelegten Empfehlungen der Aeotec Limited nicht zu folgen, kann
gefährlich sein oder gegen ein Gesetz verstoßen. Der Hersteller, Importeur, Vertreiber
1
2
3
4
5
6
7
8
9
10
11
12
13
14
15
16
17
18
19
20
21
22
23
24
25
26
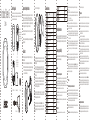
Doorbell
Doorbell
Doorbell
Doorbell
Doorbell
Doorbell
Doorbell
Doorbell
Safety
Safety
Safety
Safety
Safety
Safety
Safety
Safety
Security
Security
Security
Security
Security
Security
Miscellaneous
Miscellaneous
Miscellaneous
Miscellaneous
Ding Dong
Ding Dong Tubular Bell
Traditional Apartment Buzzer
Electric Apartment Buzzer
Westminster Chimes (Hearing Enhanced)
Chimes (Hearing Enhanced)
Cuckoo (Hearing Enhanced)
Traditional Bell
Smoke Alarm (Low)
Smoke Alarm (High)
Fire Evacuation Buzzer
Carbon Monoxide Sensor
Klaxon
Klaxon (Deep)
Warning Tone
Tornado Siren
Alarm
Deep Alarm Tone
Alarm (Archangel tone)
Alarm (Shrill)
Digital Siren
Alert Series
Security
Clock Buzzer
Christmas Tree
Gong
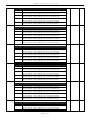
27
28
29
30
Miscellaneous
Miscellaneous
Miscellaneous
Miscellaneous
Single Bell Ting
Tonal Pulse
Upwards Tone
Door Open
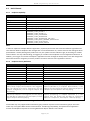
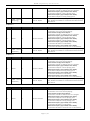
Indoor Siren 6
ZW164
Wall Mount Plate
Chime
Action Button
Botón de acción / Bouton
d'action / Aktionsknopf /
Pulsante di azione /
Actieknop / Åtgärdsknapp /
Handlingsknapp
DC Port
Puerto DC / Port cc /
Gleichstromanschluss /
DC Port / DC-port /
DC-poort / DC-port

Italiano.
Informazioni importanti per la sicurezza.
Si prega di leggere attentamente il presente documento e la guida consultabile all’indirizzo
support.aeotec.com/siren6. La mancata osservanza di queste raccomandazioni indicate da
Aeotec Limited può essere pericoloso oppure violare le leggi vigenti. Il produttore, importatore,
distributore e/o rivenditore non saranno considerati responsabili per alcuna perdita o danno
derivante dal mancato rispetto di qualsiasi istruzione contenuta nella presente guida o in altro
materiale.
Siren 6 è destinato esclusivamente a un uso interno. Non utilizzare in luoghi bagnati o umidi.
Attenzione: Per prevenire eventuali danni all’udito, testare il dispositivo esclusivamente
indossando protezioni appropriate.
Avvio rapido.
Quanto segue accompagnerà l’utente attraverso l’installazione di Siren 6 e la relativa
connessione alla rete Z-Wave.
1. Accendi Siren 6 utilizzando l’alimentatore incluso. Il LED lampeggerà lentamente.
2. Fissa Chime nel luogo di installazione desiderato utilizzando la piastra di montaggio inclusa.
a. Fissa la piastra di montaggio alla superficie scelta; utilizza 3x viti da 20mm oppure del
nastro biadesivo.
b. Fissa Chime sulla piastra di montaggio.
3. Impostare il gateway di Z-Wave sulla modalità “aggiungi dispositivo” al fine di collegare il
Siren 6 al sistema Z-Wave. In caso di dubbi relativi all’esecuzione di questo step, consultare
il manuale del gateway.
4. Collega Siren 6 al tuo gateway Z-Wave; premi una volta il tasto di accensione di Siren 6. Nel
caso il tuo gateway Z-Wave supporti la crittografia S2, inserisci le prime 5 cifre del DSK
nell’interfaccia del gateway se/quando richiesto. Il DSK è stampato sull’alloggiamento del
Siren 6.
5. Una volta che Siren 6 si sarà collegato con successo al tuo network Z-Wave, il LED si
illuminerà per 30 secondi per poi spegnersi. Nel caso in cui il LED del Siren 6 continui a
lampeggiare, la procedura non ha avuto successo. Ripeti i passaggi da 3 a 4 e contattaci nel
caso sia necessario ulteriore supporto.
A questo punto Siren 6 è parte del sistema di controllo domestico di Z-Wave. È possibile
configurarlo e automatizzarlo attraverso il sistema Z-Wave; per istruzioni dettagliate, consultare
la guida utente del software.
È possibile effettuare manualmente un test del sistema di altoparlanti di Siren 6. Sicurezza:
effettua il test esclusivamente indossando le necessarie protezioni acustiche. Gli altoparlanti di
und/oder Verkäufer haftet nicht für den Verlust oder Schaden, der durch die Nichtbeachtung
der Vorschriften in dieser Anleitung oder in anderen Material entsteht.
Siren 6 ist nur für den Innengebrauch bestimmt. Nicht in einer dunstigen, feuchten oder nassen
Umgebung verwenden.
Warnung: Um mögliche Hörschäden vorzubeugen, nur mit geeignetem Gehörschutz testen.
Schnellstart.
Im Folgenden werden Sie Schritt für Schritt durch die Installation und das Verbinden der Siren 6
mit einem Z-Wave Netzwerk geführt.
1. Schließen Sie die Sirene an das mitgelieferte Netzteil an. Die LED der Klingel blinkt nun.
2. Befestigen Sie die Sirene mit der mitgelieferten Montageplatte am gewünschten Montageort.
a. Befestigen Sie die Montageplatte mit 2 x 20 mm Schrauben oder doppelseitigem
Klebeband auf der ausgewählten Oberfläche.
b. Sirene auf der Montageplatte befestigen.
3. Schalten Sie Ihre Z-Wave Zentrale in den „Gerät hinzufügen“ Modus, um die Sirene mit Ihrem
Z-Wave System zu verbinden. Wenn Sie unsicher sind, wie man diesen Schritt durchführt,
nehmen Sie die Anleitung Ihrer Z-Wave Zentrale zur Hilfe.
4. Verbinden Sie die Sirene mit Ihrem Z-Wave-Gateway und drücken Sie die Aktionstaste der
Sirene einmal, um die Klingel zu verbinden. Wenn Ihr Z-Wave-Gateway die
S2-Verschlüsselung unterstützt, geben Sie bei Bedarf die ersten 5 Ziffern des DSK
(Sicherheitscode) in die Schnittstelle Ihres Gateways ein. Der DSK (Sicherheitscode) ist auf
dem Gehäuse der Sirene aufgedruckt.
5. Sobald die Sirene erfolgreich in Ihr Z-Wave-Netzwerk eingebunden ist, wird die LED für 30
Sekunden einfarbig leuchten und dann erlöschen. Sollte die LED der Sirene weiterhin
blinken, konnte sie sich nicht mit Ihrem Z-Wave-Netzwerk verbinden; wiederholen Sie dann
die Schritte 6 und 7 oder kontaktieren Sie uns bitte für weitere Unterstützung, falls
erforderlich.
Die Siren 6 ist jetzt eine Komponente Ihres Z-Wave Smart Home Systems. Sie können das Gerät
und seine Automatisierungen nun über Ihre Z-Wave Zentrale konfigurieren. Nehmen Sie dazu
bitte das Handbuch Ihrer Z-Wave Zentrale zur Hand und folgen Sie den Anweisungen für eine
Automatisierung.
Sie können das Lautsprechersystem der Siren 6 manuell testen. Sicherheitsaspekte: Testen
nur mit erforderlichem Gehörschutz. Der Lautsprecher von Siren 6 gibt Töne von bis zu 105 dB
ab, die Hörschäden verursachen können. Zum manuellen Testen halten Sie die Aktionstaste 2
bis 5 Sekunden lang gedrückt.
Siren 6 emettono suoni fino a 105dB che possono causare danni all’udito. Per effettuare un test
manuale, premere il tasto di accensione dai 2 ai 5 secondi.
Nederlands.
Belangrijke veiligheidsinformatie.
Lees dit en de online handleiding(en) op support.aeotec.com/siren6 zorgvuldig door. Het niet
opvolgen van de aanbevelingen uiteengezet door Aeotec Limited kan gevaarlijk zijn of leiden tot
overtreding van de wet. De fabrikant, importeur, distributeur en/of verkoper kunnen niet
aansprakelijk worden gesteld voor verlies of schade als gevolg van het niet opvolgen van
instructies in deze handleiding of in andere documenten.
Siren 6 is alleen bedoeld voor gebruik binnenshuis, op droge locaties. Niet gebruiken op
vochtige, klamme en/of natte locaties.
Waarschuwing: ter preventie van eventuele gehoorbeschadiging, test enkel met gebruik van
de juiste gehoorbescherming.
Snelstart.
Hieronder volgt een beschrijving van de installatie van Siren 6 en de verbinding met uw
Z-Wave-netwerk.
1. Schakel de Siren 6 in met de meegeleverde oplader; de LED zal langzaam beginnen te
knipperen.
2. Bevestig de Bel op de gewenste installatie locatie met behulp van de meegeleverde
montageplaat.
a. Bevestig de montageplaat op de uitgekozen oppervlakte met behulp van 3 x 20mm
schroeven of dubbelzijdig tape.
b. Klik de Bel vast op de montageplaat
3. Stel uw Z-Wave-gateway in de 'apparaat toevoegen' modus om Siren 6 aan te sluiten op uw
Z-Wave-systeem. Raadpleeg de handleiding van de gateway als u niet zeker weet hoe u
deze stap moet uitvoeren.
4. Bevestig Siren 6 aan uw Z-Wave poort; druk eenmaal op de Siren 6 Actie Knop. Wanneer uw
Z-Wave gateway ondersteuning biedt voor S2 encryptie, voer dan de eerste 5 cijfers van de
DSK in uw interface poort als/wanneer hierom gevraagd wordt. De DSK is afgedrukt op de
Siren 6 behuizing.
5. Wanneer Siren 6 succesvol verbinding maakt met uw Z-Wave netwerk zal het LED
gedurende 30 seconden een effen kleur weergeven voordat deze uitschakelt. Indien de Siren
6 LED blijft knipperen en het niet lukt om met uw Z-Wave netwerk te verbinding te maken;
volg dan stap 3 tot 4 nogmaals en neem contact op met ons als verdere hulp nodig is.
Siren 6 is nu onderdeel van uw Z-Wave thuis beheersysteem. U kunt Siren 6 configureren, in
combinatie met de automatiseringen en geluiden, via uw Z-Wave-systeem; raadpleeg de
gebruikershandleiding van uw software voor gedetailleerde instructies.
U bent in staat het Siren 6 geluidssysteem handmatig te testen. Voor veiligheidsredenen: test
enkel bij het gebruik maken van de benodigde gehoorbescherming. De Siren 6 luidspreker
zendt tonen uit tot 105dB welke gehoorbeschadiging kunnen veroorzaken. Om handmatig te
testen, druk op de Actie Knop en houd deze voor 2 tot 5 seconden ingedrukt.
Svenska.
Viktig säkerhetsinformation.
Vänligen läs denna och guiderna på support.aeotec.com/siren6 noggrant. Underlåtenhet att
följa rekommendationerna från Aeotec Limited kan vara farligt eller leda till brott mot lagen.
Tillverkaren, importören, distributören, och/eller återförsäljaren kan inte hållas ansvariga för
förlust eller skada som uppstår från att inte följa instruktionerna i denna handbok eller i andra
material.
Siren 6 är endast avsedd för inomhusbruk på torra platser. Använd inte i blöta, fuktiga och/eller
våta miljöer.
Varning: Bär lämpligt hörselskydd vid test för att förhindra eventuell hörselskada.
Snabbstart.
Följande kommer att vägleda dig genom installationen av Siren 6 och anslutning till ditt
Z-Wave-nätverk.
1. Slå på Siren 6 via den medföljande strömadaptern; dess LED-lampa kommer att blinka
långsamt.
2. Fäst Klockspelet på den önskade installationsplatsen med hjälp av den medföljande
monteringsplattan.
a. Fäst monteringsplattan på den valda ytan med antingen 3 x 20mm skruvar eller
dubbelsidig tejp.
b. Lås fast Klockspelet på monteringsplattan.
3. Sätt din Z-Wave-Gateway till läget 'lägg till enhet' för att ansluta Siren 6 till ditt
Z-Wave-system. Konsultera gatewayens manual om du är osäker på hur du utför detta steg.
4. Anslut Siren 6 till din Z-Wave gateway; tryck på Siren 6 Action-knapp en gång. Om din
Z-Wave-gateway stödjer S2-kryptering, ange de första fem siffrorna i DSK i din gateways
gränssnitt om / när det begärs. DSK är inpräntat på Siren 6 hölje.
5. När Siren 6 framgångsrikt anslutits till ditt Z-Wave-nätverk kommer dess LED att avge en
solid färg i 30 sekunder och sedan stängas av. Skulle Siren 6 LED fortsätta att blinka och den
har misslyckats med att ansluta till ditt Z-Wave-nätverk; upprepa steg 3 till 4 och kontakta oss
för ytterligare support vid behov.
Siren 6 är nu en del av ditt Z-Wave hemkontrollsystem. Du kan konfigurera den och dess
automationer via ditt Z-Wave-system; Se programvarans bruksanvisning för exakta instruktioner.
Du kan testa Siren 6 högtalarsystem manuellt. Säkerhet: använd alltid nödvändiga öronskydd
vid test. Siren 6 högtalare avger ljud upp till 105 dB som kan orsaka hörselskador. För att testa
manuellt, tryck och håll in Action-knappen i två till fem sekunder.
Declaration of Conformity. Aeotec Limited declares that ZW164 is in compliance with the
essential requirements and other relevant provisions of RED 2014/53/EU, RoHS 2011/65/EU,
IEC62321:2008 and EN50581:2012. The full text of the declaration is available from
support.aeotec.com/siren6/doc
Specifications. Z-Wave devices operate between 868.40 & 926.3 MHz depending on local
restrictions. It uses up to 8.01 dBm ERP transmit power, enabling wireless connectivity. Full
information on device specifications and certifications at support.aeotec.com/siren6/specs
Declaración de conformidad. Aeotec Limited declara que el ZW164 está en cumplimiento con
los requerimientos esenciales y otras provisiones relevantes de RED 2014/53/EU, RoHS
2011/65/EU, IEC 62321:2008, EN 50581:2012. El texto completo de esta declaración está
disponible en support.aeotec.com/siren6/doc
Especificaciones. Los dispositivos Z-Wave operan entre 868,40 y 926,3 MHz dependiendo de
las restricciones locales. Puede encontrar la información completa sobre las especificaciones y
certificaciones del dispositivo en support.aeotec.com/siren6/specs
Déclaration de conformité. Aeotec Limited déclare que le ZW164 est conforme aux exigences
essentielles et autres dispositions pertinentes de RED 2014/53/EU, RoHS 2011/65/EU, IEC
62321:2008, EN 50581:2012. Le texte intégral de la déclaration est disponible sur
support.aeotec.com/siren6/doc
Spécifications. Les appareils Z-Wave fonctionnent entre 868,40 et 926,3 MHz en fonction des
restrictions locales. Informations complètes sur les spécifications et les certifications des
appareils sur support.aeotec.com/siren6/specs
Konformitätserklärung. Aeotec Limited erklärt, dass ZW164 den grundlegenden
Anforderungen und anderen relevanten Bestimmungen von RED 2014/53 / EU, RoHS 2011/65 /
EU, IEC 62321: 2008, EN 50581: 2012. Der vollständige Wortlaut der Erklärung ist unter
folgender Internetadresse support.aeotec.com/siren6/doc abrufbar.
Spezifikationen. Z-Wave Geräte arbeiten zwischen 868.40 und 926.3 Mhz in Abhängigkeit von
lokalen Beschränkungen. Es strahlt bis zu -3.9 dBm ERP Sendeleistung ab, was Verbindungen
über kurze Strecken ermöglicht. Vollständige Informationen über Gerätespezifikationen und
Zertifizierungen finden Sie auf support.aeotec.com/siren6/specs
Dichiarazione di conformità. Aeotec Limited dichiara che ZW164 è conforme ai requisiti
fondamentali e altre disposizioni importanti di RED 2014/53/EU, RoHS 2011/65/EU, IEC
62321:2008, EN 50581:2012. Il testo complete della dichiarazione è disponibile su
support.aeotec.com/siren6/doc
Specifiche tecniche. I dispositivi Z-Wave funzionano tra 868.40 e 926.3 MHz in base alle
restrizioni locali. Informazioni complete sulle specifiche del dispositivo e sulle certificazioni su
support.aeotec.com/siren6/specs
Conformiteitsverklaring. Aeotec Limited verklaart dat ZW164 voldoet aan alle essentiële
vereisten en andere bepalingen van de Richtlijn radioapparatuur 2014/53/EU, Richtlijn
2011/65/EU, IEC 62321:2008, EN 50581:2012. De volledige tekst van de verklaring is
beschikbaar vanaf support.aeotec.com/siren6/doc
Specificaties. Z-Wave-apparaten functioneren tussen 868,40 en 926,3 MHz, afhankelijk van
lokale beperkingen. Meer informatie over specificaties en certificeringen is te vinden op
support.aeotec.com/siren6/specs
Deklaration av Överensstämmelse. Aeotec Limited deklarerar att ZW164 överensstämmer
med de väsentliga kraven och andra relevanta bestämmelser i RED 2014/53/EU, RoHS
2011/65/EU, IEC 62321:2008, EN 50581:2012. Den fullständiga texten för deklarationen är
tillgänglig på support.aeotec.com/siren6/doc
Specifikationer. Z-Wave-enheterna kan fungera mellan 868,40 och 926,3 MHz, beroende på
lokala restriktioner. Fullständig information om enhetsspecifikationer och certifieringar finns på
support.aeotec.com/siren6/specs with Button.
Upgrade Indoor Siren 6
to Doorbell 6
Find out more:
aeotec.com/buy
FCC ID: 2AOGIZW162
In Europe contact Aeotec Group GmbH; Große Johannisstraße 7, 20457 Hamburg, Germany.
© & ™ Aeotec Limited. Version: FT501016400001 - AB

AEOTEC Engineering Specification
Page 1 / 33
Indoor Siren 6

AEOTEC Engineering Specification
Page 2 / 33
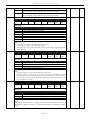
Table of Content
1 INTERFACES & ACCESSORIES .......................................................................................................................................... 3
2 FEATURES & SPECIFICATIONS ......................................................................................................................................... 4
2.1 Chime ............................................................................................................................................................................. 4
2.2 Button ............................................................................................................................................................................ 5
3 PRODUCT QUICK START.................................................................................................................................................. 6
3.1 Important safety information ........................................................................................................................................ 6
3.2 How to add Chime into Z-Wave network ....................................................................................................................... 6
3.3 How to remove Chime from Z-Wave network ................................................................................................................ 6
3.4 How to factory reset Chime ........................................................................................................................................... 7
3.5 How to install Chime ...................................................................................................................................................... 7
3.6 How to install Button ..................................................................................................................................................... 7
3.7 How to pair Button ........................................................................................................................................................ 8
3.8 How to unpair Button .................................................................................................................................................... 9
3.9 How to factory reset Button........................................................................................................................................... 9
4 SOFTWARE FUNCTION DEFINITION .............................................................................................................................. 10
4.1 User Behavior Interaction ............................................................................................................................................ 10
4.2 Supplementary Explanation about Button ................................................................................................................... 12
4.3 Announced Command Classes in NIF ........................................................................................................................... 12
4.4 Basic Command Class mapping ................................................................................................................................... 13
4.5 Z-Wave Plus Info .......................................................................................................................................................... 13
4.6 Manufacturer Specific .................................................................................................................................................. 13
4.7 Version ......................................................................................................................................................................... 13
4.8 Notification .................................................................................................................................................................. 13
4.9 Multi Channel .............................................................................................................................................................. 14
4.9.1 Endpoint Capability ................................................................................................................................................. 14
4.9.2 Endpoint Priority Definition ..................................................................................................................................... 14
4.9.3 Endpoint responses to receiving Notification Report .............................................................................................. 14
4.10 Association Group Info ................................................................................................................................................. 16
4.11 Configuration ............................................................................................................................................................... 18

AEOTEC Engineering Specification
Page 3 / 33
1 INTERFACES & ACCESSORIES
Terminology
Description
Chime
A component based on Z-Wave and 433.92MHz/FSK technology, and it can be used to play
tone when triggered by Z-Wave Command or paired Button.
Note: Chime is equivalent to Indoor Siren 6 in this Engineering Specification.
Refer to Section 2.1 for details.
Button
A component based on 433.92MHz/FSK technology, and it can be used to wireless control
Chime to play tone.
Note: There is no Button in the box. If you want to make your Indoor Siren 6 become a
doorbell, you need to purchase another product, ZW166 Button. Or purchase a set of ZW162
Indoor Siren 6 directly, which is with one Button inside. The function of Indoor Siren 6 is
the same as Doorbell 6.
Refer to Section 2.2 for details.
Action Button
A button in Chime, and it can be used for networking, resetting, and pairing Button, etc.
Refer to Section 4.1 for details.
Ring Button
A button in Button, and it can be used for wireless controlling Chime to play tone.
Refer to Section 4.2 for details.

AEOTEC Engineering Specification
Page 4 / 33
2 FEATURES & SPECIFICATIONS
2.1 Chime
Note: Chime is equivalent to Indoor Siren 6 in this Engineering Specification.
Parameter
Value
Product Identifier
ZW164
Dimensions
76*76*38.5mm
Weight
100g
Color
White
Shell Material
PC-6600
Shell Surface Treatment
Bright scrub
Shell Fire-proof Level
UL94 V-0
Waterproof and Dustproof
Rated IP20 under IEC standard 60529
Operating Temperature
32~104°F (0~40°C)
Relative Humidity
8%~80%
Wireless Technology
Z-Wave (Between Chime and Controller), 433.92MHz/FSK(Between Chime and Button)
Z-Wave Plus
Yes
Z-Wave Module
ZM5101
Z-Wave Version
6.71.03
Z-Wave Library Type
Enhanced 232 Slave
Z-Wave Device Type
Sound Switch
Z-Wave Role Type
Always On Slave
Security Class
Non-Security, S0, S2 Unauthenticated, and S2 Authenticated
Smart Start Compatible
No
Over The Air (OTA)
Support
Multi Channel Device
Yes
Association
Support
Factory Reset
Support
Power-down Memory
Support
Z-Wave Antenna Distance
30m (Indoor) /150m (Outdoor). Between Chime and Controller.
Button Control Distance
120m (Barrier-free sight line distance). Between Chime and Button.
Indicator Light Color
White
Indicator Light
Color Temperature
5500K
Indicator Light Power
2W
Buttons and Connectors
Action Button (x1) DC Port (x1)
Input Voltage
DC 5V/2A Power Adapter
Battery
Quantity: 1
Model: PT502035
Capacity: 400mAh
Detachable: No
Chargeable: Yes. Charging via Power Adapter.
Endurance: 4 hours
Working Current
80mA
Standby Current
70mA
Built-in Sensors
Vibration Sensor
Supported Paired Buttons
Max: 3
Tones Storage Size
16M
Supported Tones
Max: 30. No interface to replace the built-in tones. If you want to change these built-in
tones, please contact us to customize.

AEOTEC Engineering Specification
Page 5 / 33
Tone Effect Configurable
Support
Light Effect Configurable
Support
Volume
Max: 105dB
Volume Adjustable
Support
Safety Certifications
US: FCC ID, FCC SDOC
EU: CE-EMC, CE-RED, CE-LVD, Battery
AU: RCM
2.2 Button
Note: There is no Button in the box. If you want to make your Indoor Siren 6 become a doorbell, you need to purchase
another product, ZW166 Button. Or purchase a set of ZW162 Doorbell 6 directly, which is with one Button inside. The
function of Indoor Siren 6 is the same as Doorbell 6.
Parameter
Value
Product Identifier
ZW166
Dimensions
85*38*14mm
Weight
35g
Color
White
Shell Material
ABS PA757
Shell Surface Treatment
Bright scrub
Shell Fire-proof level
UL94 HB
Waterproof and Dustproof
Rated IP55 under IEC standard 60529
Operating temperature
32~104°F (0~40°C)
Relative Humidity
8%~80%
Wireless Technology
433.92MHz/FSK(Between Chime and Button)
Button Control Distance
120m (Barrier-free sight line distance). Between Chime and Button.
Indicator Light Color
White
Buttons and Connectors
Ring Button(x1)
Input Voltage
3V lithium battery
Battery
Quantity: 1
Model: CR2450
Capacity: 630mAh
Detachable: Yes
Chargeable: No
Endurance: 2 years
Working Current
20mA
Standby Current
0.1uA
Safety Certifications
US: FCC ID
EU: CE-RED, CE-LVD
AU: RCM

AEOTEC Engineering Specification
Page 6 / 33
3 PRODUCT QUICK START
3.1 Important safety information
Please read this Engineering Specification carefully for correct and effective use.
Failure to follow the recommendations set forth by AEOTEC Limited may be dangerous or cause a violation of the law.
The manufacturer, importer, distributor, and/or reseller will not be held responsible for any loss or damage resulting
from not following any instruction in this guide or in other materials.
Chime is intended for indoor use in dry locations only. Do not use in damp, moist, and/or wet locations. Button offers
IP55 water protection and is suitable for outdoor use without direct exposure to heavy and penetrative rain. Button is
constructed with nylon; away from heat and do not expose to flame.
Warning:
To prevent possible hearing damage, test only when wearing appropriate hearing protection.
Contains small parts; keep away from children.
3.2 How to add Chime into Z-Wave network
This product supports Security 2 Command Class. While a Security S2 enabled Controller is needed in order to fully use
the security feature. This product can be included and operated in any Z-Wave network with other Z-Wave certified
devices from other manufacturers and/or other applications. All non-battery operated nodes within the network will
act as repeaters regardless of vendor to increase reliability of the network.
1. Set your Z-Wave Controller into its 'Add Device' mode in order to add Chime into your Z-Wave system. Refer to the
Controller's manual if you are unsure of how to perform this step.
2. Power on Chime via the provided power adapter; its LED will be breathing white light all the time.
3. Click Chime Action Button once, it will quickly flash white light for 30 seconds until Chime is added into the network.
It will become constantly bright white light after being assigned a NodeID.
4. If your Z-Wave Controller supports S2 encryption, enter the first 5 digits of DSK into your Controller's interface if
/when requested. The DSK is printed on Chime's housing.
5. If Adding fails, it will slowly flash white light 3 times and then become breathing white light; repeat steps 1 to 4.
Contact us for further support if needed.
6. If Adding succeeds, it will quickly flash white light 3 times and then become off. Now, Chime is a part of your Z-Wave
home control system. You can configure it and its automations via your Z-Wave system; please refer to your software's
user guide for precise instructions.
Note:
If Action Button is clicked again during the Learn Mode, the Learn Mode will exit. At the same time, Indicator Light will
extinguish immediately, and then become breathing white light.
3.3 How to remove Chime from Z-Wave network
1. Set your Z-Wave Controller into its 'Remove Device' mode in order to remove Chime from your Z-Wave system. Refer
to the Controller's manual if you are unsure of how to perform this step.
2. Power on Chime via the provided power adapter; its LED will be off.
3. Click Chime Action Button 6 times quickly; it will bright white light, up to 2s.
4. If Removing fails, it will keep off; repeat steps 1 to 3. Contact us for further support if needed.

AEOTEC Engineering Specification
Page 7 / 33
5. If Removing succeeds, it will quickly flash white light 3 times and then become breathing white light. Now, Chime is
removed from Z-Wave network successfully.
3.4 How to factory reset Chime
If the primary controller is missing or inoperable, you may need to reset the device to factory settings.
Make sure the Chime is powered. To complete the reset process manually, press and hold the Action Button for at least
20s. The LED indicator will quickly flash white light 3 times and then become breathing white light, which indicates the
reset operation is successful. Otherwise, please try again. Contact us for further support if needed.
Note:
1. This procedure should only be used when the primary controller is missing or inoperable.
2. Factory Reset Chime will:
(a) Remove Chime from Z-Wave network;
(b) Delete the Association setting;
(c) Restore the configuration settings to the default. (Except configuration parameter 51/52/53/54)
3.5 How to install Chime
1. Select an installation location for Chime. Do not yet install it.
2. Power on Chime via the provided power adapter.
3. Affix Chime in the desired installation location using the provided mounting plate.
a. Affix the mounting plate to the selected surface; affix it using either 3 × 20mm screws or double-sided tape.
b. Lock your Chime onto the mounting plate.
3.6 How to install Button
There is no Button in the box. If you want to make your Indoor Siren 6 become a doorbell, you need to purchase
another product, ZW166 Button. Chime and Button communicate wirelessly and can be installed up to 120 meters/393
feet apart. However, the wireless range is reduced by interference from competing wireless signals, doors, and walls.
Before installing Chime, test your desired installation location for both Button and Chime first to ensure that a reliable
wireless connection can be made between the 2 parts.
Avoid exposing Button to direct sunlight where possible to avoid UV damage and reduced battery performance.
1. Select an installation location for Button. Do not yet install it.
2. Power on Button.
a. Remove the 2 screws from Button's rear to open its battery cover and install the provided CR2450 battery with the
positive (+) on top.

AEOTEC Engineering Specification
Page 8 / 33
b. Replace the battery cover and the 2 screws.
3. Test the wireless connection by pressing Ring Button to trigger a doorbell alert. Select an alternative installation
location for Chime if the connection is poor.
4. Install Button.
a. Affix the mounting plate to the selected surface; affix it using either 2 × 20mm screws or double-sided tape.
b. Lock your Button onto the mounting plate.
3.7 How to pair Button
There are two way to trigger pairing Button:
Manually quick click Chime Action Button. Can be done both in and out of the network.
With Configuration Set. Can only be done in the network. Refer to Configuration Parameter 49/50/51 for details.
Below is mainly about manually quick click Chime Action Button to trigger pairing Button.
1. Different click times will trigger different Pairing Button Mode. Please action as shown below.
Click Action Button 3 times quickly will trigger Pairing #1 Button Mode.
Click Action Button 4 times quickly will trigger Pairing #2 Button Mode.
Click Action Button 5 times quickly will trigger Pairing #3 Button Mode.
2. Observe Chime Indicator Light to make sure which Button is waiting for pairing.
When Pairing #1 Button Mode is triggered, Chime Indicator Light will bright 1 time ON 0.5s OFF 1s, and then become
constantly bright white light, indicating that Pairing #1 Button Mode has already triggered. Pairing time is up to 10
seconds. In this time period, user MUST manually click Ring Button 3 times quickly. Otherwise it cannot be paired
successfully.
When Pairing #2 Button Mode is triggered, Chime Indicator Light will bright 2 times ON 0.5s OFF 1s, and then become
constantly bright white light, indicating that Pairing #2 Button Mode has already triggered. Pairing time is up to 10
seconds. In this time period, user MUST manually click Ring Button 3 times quickly. Otherwise it cannot be paired
successfully.
When Pairing #3 Button Mode is triggered, Chime Indicator Light will bright 3 times ON 0.5s OFF 1s, and then become
constantly bright white light, indicating that Pairing #3 Button Mode has already triggered. Pairing time is up to 10
seconds. In this time period, user MUST manually click Ring Button 3 times quickly. Otherwise it cannot be paired
successfully.
3. Determine pairing results.

AEOTEC Engineering Specification
Page 9 / 33
If pairing Button succeeds, Chime Indicator Light will quickly flash white light 3 times and play the corresponding
tone of paired Button, and then become breathing white light (when Chime is out of the Z-Wave network) or off
(when Chime is in the Z-Wave network)
If pairing Button fails, Chime Indicator Light will slowly flash white light 3 times and then become breathing white
light (when Chime is out of the Z-Wave network) or off (when Chime is in the Z-Wave network).
Note:
Only one Button can be paired at one time.
Each successful pairing will overwrite the previous paired Button which has the same Button Number.
This manually quick click Action Button operation can only be used to trigger pairing, not unpairing.
If you want to exit Pairing Button Mode, what you need to do is that click the Action Button once.
3.8 How to unpair Button
There is only one way to trigger unpairing Button:
With Configuration Set. Can only be done in the network. Refer to Configuration Parameter 48 for details.
3.9 How to factory reset Button
There is no way to factory reset Button. If something happens to Button, please try to re-power it. Contact us for
further support if needed.

AEOTEC Engineering Specification
Page 10 / 33
4 SOFTWARE FUNCTION DEFINITION
4.1 User Behavior Interaction
Note: Indicator Light in the table below refers to Chime Indicator Light, but not Button Indicator Light.
User behavior
Out of the Z-Wave network
In the Z-Wave network
Power OFF
Cut the power.
Cut the power.
Power ON
Supply the power:
When powered by battery, Indicator Light
will be breathing white light for 30s (max).
When powered by adapter, Indicator Light
will be breathing white light all the time.
Supply the power:
Indicator Light will become white light for 2s
indicating the product has been powered,
and then extinguish.
Click Action Button once
1.Send Node Info for Adding:
When click Action Button once, Indicator
Light will quickly flash white light for 30s
until Chime is added into the network. It will
become constantly bright white light after
being assigned a NodeID.
If Adding succeeds, it will quickly flash white
light 3 times and then off.
If Adding fails, it will slowly flash white light
3 times and then become breathing white
light.
2.Exit Classic Inclusion Learn Mode:
If Action Button is clicked again during the
Learn Mode, the Learn Mode will exit. At the
same time, Indicator Light will extinguish
immediately, and then become breathing
white light.
3.Exit Paring Button Mode:
Indicator Light will slowly flash white light 3
times and then become breathing white
light.
1.Stop playing tone and light:
Tone will immediately stop, and Indicator
Light will extinguish immediately. Please
note that this function is related to the value
of configuration parameter 0x60(96).
2.Exit Paring Button Mode:
Indicator Light will slowly flash white light 3
times and then become off.
Click Action Button 3 times
quickly
Trigger Pairing #1 Button Mode:
Indicator Light will bright 1 time ON 0.5s OFF
1s, and then become constantly bright white
light, indicating that Pairing #1 Button Mode
has already triggered.
If pairing Button succeeds, Indicator Light
will quickly flash white light 3 times and
then become breathing white light.
If pairing Button fails, Indicator Light will
slowly flash white light 3 times and then
become breathing white light.
Trigger Pairing #1 Button Mode:
Indicator Light will bright 1 time ON 0.5s OFF
1s, and then become constantly bright white
light, indicating that Pairing #1 Button Mode
has already triggered.
If pairing Button succeeds, Indicator Light
will quickly flash white light 3 times and
then become off.
If pairing Button fails, Indicator Light will
slowly flash white light 3 times and then
become off.
Click Action Button 4 times
quickly
Trigger Pairing #2 Button Mode:
Indicator Light will bright 2 times ON 0.5s
OFF 1s, and then become constantly bright
white light, indicating that Pairing #2 Button
Mode has already triggered.
If pairing Button succeeds, Indicator Light
will quickly flash white light 3 times and
then become breathing white light.
If pairing Button fails, Indicator Light will
slowly flash white light 3 times and then
become breathing white light.
Trigger Pairing #2 Button Mode:
Indicator Light will bright 2 times ON 0.5s
OFF 1s, and then become constantly bright
white light, indicating that Pairing #2 Button
Mode has already triggered.
If pairing Button succeeds, Indicator Light
will quickly flash white light 3 times and
then become off.
If pairing Button fails, Indicator Light will
slowly flash white light 3 times and then
become off.

AEOTEC Engineering Specification
Page 11 / 33
Click Action Button 5 times
quickly
Trigger Pairing #3 Button Mode:
Indicator Light will bright 3 times ON 0.5s
OFF 1s, and then become constantly bright
white light, indicating that Pairing #3 Button
Mode has already triggered.
If pairing Button succeeds, Indicator Light
will quickly flash white light 3 times and
then become breathing white light.
If pairing Button fails, Indicator Light will
slowly flash white light 3 times and then
become breathing white light.
Trigger Pairing #3 Button Mode:
Indicator Light will bright 3 times ON 0.5s
OFF 1s, and then become constantly bright
white light, indicating that Pairing #3 Button
Mode has already triggered.
If pairing Button succeeds, Indicator Light
will quickly flash white light 3 times and
then become off.
If pairing Button fails, Indicator Light will
slowly flash white light 3 times and then
become off.
Click Action Button 6 times
quickly
Reserved:
Indicator Light is off from press to release.
Send Node Info for Removing :
Indicator Light will become white light for up
to 2s.
If Removing succeeds, Indicator Light will
quickly flash white light 3 times and then
become breathing white light.
If Removing fails, Indicator Light will become
off, but not breathing white light.
Press and hold Action Button
for [1, 2s)
Reserved:
Indicator Light is off from press to release.
Reserved:
Indicator Light is off from press to release.
Press and hold Action Button
for [2, 5s)
Test the Tone Effect and Light Effect of the
Browse Group:
Indicator Light will become white light when
press, and display in the factory default
Tone Effect and Light Effect of the Browse
Group when release.
Test the Tone Effect and Light Effect of the
Browse Group:
Indicator Light will become white light when
press, and display in the user-defined Tone
Effect and Light Effect of the Browse Group
when release.
Press and hold Action Button
for [5, 10s)
Reserved:
Indicator Light will become brighter white
light when press, and become breathing
white light when release.
Test communication quality:
Indicator Light will become brighter white
light when press, and quickly flash white
light when release, indicating start to test
communication quality between Chime and
Node 1.
At the end of the test, Indicator Light will
become solid white light for 2 seconds.
If the communication quality is Good, it will
quickly flash white light 3 times and then
become off.
If the communication quality is Weak, it will
slowly flash white light 3 times and then
become off.
Press and hold Action Button
for [10, 20s)
Reserved:
Indicator Light will become speedup flashing
white light when press, and become
breathing white light when release.
Reserved:
Indicator Light will become speedup flashing
white light when press, and become off
when release.
Press and hold Action Button
for [20, ∞)
Reserved:
When the time reaches 20s, Indicator Light
will become quickly flash white light 3 times
and then become breathing white light, no
matter it is pressed or released.
Factory Reset:
When the time reaches 20s, Factory Reset is
performed no matter Action Button is
pressed or released.
Chime will send out Device Reset Locally
Notification Report via Lifeline, and it will
perform factory reset no matter the Nodes
in the Lifeline Group receive the Device
Reset Locally Notification from Chime or
not.
Indicator Light will become quickly flash
white light 3 times and then become
breathing white light, which indicates the

AEOTEC Engineering Specification
Page 12 / 33
reset operation is successful. Otherwise,
please try again.
4.2 Supplementary Explanation about Button
Function
Description
Wireless Control Chime
When click Ring Button once, Button can wireless control the corresponding paired Chime.
Pairing Chime
When click Ring Button 3 times quickly, Button can be paired to Chime while Chime
triggers Pairing Button Mode.
Sending Button Info to Chime
When re-power or click Ring Button, Button will send its Button ID, Battery Voltage and
Button Software Version to its corresponding paired Chime.
Automatic sleep
After sending Button Info to Chime, Button will sleep automatically for saving battery life.
Low Battery Light Effect
If #1 Button is low battery, Chime Indicator Light will repeat cycle
(ON 100ms, OFF 5s)
If #2 Button is low battery, Chime Indicator Light will repeat cycle
(ON 100ms, OFF 100ms, ON 100ms, OFF 5s)
If #3 Button is low battery, Chime Indicator Light will repeat cycle
(ON 100ms, OFF 100ms, ON 100ms, OFF 100m,s ON 100ms, OFF 5s)
When the battery voltage of Button is lower than 2.8V, it is judged to be low battery.
When the battery voltage of Button restores to over 2.9V, it is judged to return to normal.
Low Battery Light Effect will be activated when Chime detects the corresponding paired
Button is low battery, and disappears after the battery returns to normal.
Low Battery Light Effect has the lowest priority among all light effects, that is, it will be
displayed when there is no other light effect.
The Light Effect of the 3 Buttons are different. When multiple Buttons is low battery at
the same time, the corresponding light effect of the Button with smaller Button number
is displayed first.
4.3 Announced Command Classes in NIF
Note: When DUT is included on S0 level, MANUFACTURER_SPECIFIC CC is supported non-securely, while included on S2
level, MANUFACTURER_SPECIFIC CC is supported securely only.
Command Class
Version
Not added
Non-secure
added
Securely 0 added
Securely 2 added
Non-secure
Secure
Non-secure
Secure
ZWAVEPLUS_INFO
2
Support
Support
Support
Support
VERSION
2
Support
Support
Support
Support
CONFIGURATION
1
Support
Support
Support
Support
MANUFACTURER_SPECIFIC
2
Support
Support
Support
Support
ASSOCIATION_GRP_INFO
1
Support
Support
Support
Support
ASSOCIATION
2
Support
Support
Support
Support
POWERLEVEL
1
Support
Support
Support
Support
MULTI_CHANNEL_ASSOCIATION
3
Support
Support
Support
Support
MULTI_CHANNEL
4
Support
Support
Support
Support
DEVICE_RESET_LOCALLY
1
Support
Support
Support
Support
TRANSPORT_SERVICE
2
Support
Support
Support
Support
SECURITY
1
Support
Support
Support
Support
SECURITY_2 1 Support Support
Support
Support
SUPERVISION 1 Support Support
Support
Support
FIRMWARE_UPDATE_MD 4 Support Support
Support
Support

AEOTEC Engineering Specification
Page 13 / 33
NOTIFICATION 8 Support Support
Support
Support
SOUND_SWITCH
1
Support
Support
Support
Support
4.4 Basic Command Class mapping
Basic Set Command (Value) maps to Sound Switch Tone Play Set Command (Tone Identifier).
Basic Get Command maps to Sound Switch Tone Play Get Command.
Basic Report Command (Value) maps to Sound Switch Tone Play Report Command (Tone Identifier).
4.5 Z-Wave Plus Info
Parameter
Value
Z-Wave Plus Version
1
Role Type
5 (ZWAVEPLUS_INFO_REPORT_ROLE_TYPE_SLAVE_ALWAYS_ON)
Node Type
0 (ZWAVEPLUS_INFO_REPORT_NODE_TYPE_ZWAVEPLUS_NODE)
Installer Icon Type
0x2200 (ICON_TYPE_GENERIC_SOUND_SWITCH)
User Icon Type
0x2200 (ICON_TYPE_GENERIC_SOUND_SWITCH)
4.6 Manufacturer Specific
Parameter
Value
Manufacturer ID 1
0x03
Manufacturer ID 2
0x71
Product Type ID 1
0x00(EU), 0x01(US), 0x02(AU)
Product Type ID 2
0x03
Product ID 1
0x00
Product ID 2
0xA4
4.7 Version
Parameter
Value
Z-Wave Protocol Library Type
0x03
Z-Wave Protocol Version
0x05
Z-Wave Protocol Sub Version
0x03
Firmware 0 Version
ZM5101 Software Version MSB
Firmware 0 Sub Version
ZM5101 Software Version LSB
Hardware Version
0xA4
Number of firmware targets
0x00
4.8 Notification
Notification Type
Notification Events
Description
Home Security
0x07
State idle
0x00
N/A
Tampering, product moved
0x09
Chime is tampered and moved.
Power Management
0x08
State idle
0x00
Button’s battery comes back to normal.
Replace battery soon
0x0A
Button’s battery is in low battery.
Siren
0x0E
State idle
0x00
Chime alarm is inactive.
Siren active
0x01
Chime alarm is triggered.

AEOTEC Engineering Specification
Page 14 / 33
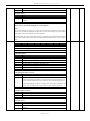
4.9 Multi Channel
4.9.1 Endpoint Capability
Parameter
Value
Individual End Points
8
Aggregated End Points
0
Dynamic
0
Identical
1
Generic Device Class
GENERIC_TYPE_AV_CONTROL_POINT
Specific Device Class
SPECIFIC_TYPE_SOUND_SWITCH
Command Classes
COMMAND_CLASS_ZWAVEPLUS_INFO
COMMAND_CLASS_SECURITY
COMMAND_CLASS_SECURITY_2
COMMAND_CLASS_SUPERVISION
COMMAND_CLASS_ASSOCIATION
COMMAND_CLASS_ASSOCIATION_GRP_INFO
COMMAND_CLASS_MULTI_CHANNEL_ASSOCIATION
COMMAND_CLASS_NOTIFICATION
COMMAND_CLASS_SOUND_SWITCH
Note:
In order to implement multiple different applications, especially the function that customize different Light Effect and
Tone Effect for different Endpoints with Configuration CC and Sound Switch CC, and the function that distinguish which
paired Button is clicked, although this product has only one speaker and one Indicator Light, we still design it as Multi
Channel Device. For easy understanding, we suggest you consider these Endpoints as Virtual Application Resources. In
addition, you may get an overview of Endpoint’s application function through the Group Name in the AGI. Designed as
Multi Channel Device will greatly enrich the product's functions and meet more application scenarios.
4.9.2 Endpoint Priority Definition
Endpoint
Application Function
Priority
1
Browse
1 (Highest)
2
Tampering
4 (Lowest)
3
Doorbell 1
3
4
Doorbell 2
3
5
Doorbell 3
3
6
Environment
2
7
Security
2
8
Emergency
2
Rule Description
Example
An Endpoint is playing tone; at the same time, if another
same-priority or high-priority Endpoint is also triggered,
then the playing tone will be replaced by the new
Endpoint configuration, and the original Endpoint will
stop playing.
The Endpoint 2(Doorbell 1) is playing tone; at the same time, if
Endpoint 4(Doorbell 2) or Endpoint 6(Environment) is also
triggered, then the playing tone will be replaced by Endpoint 4
or Endpoint 6, and Endpoint 2 will stop playing.
An Endpoint is playing tone; at the same time, if another
low-priority Endpoint is also triggered, then the playing
tone will NOT be replaced by the new Endpoint, and the
original Endpoint will keep playing.
The Endpoint 1(Browse) is playing tone; at the same time, if
Endpoint 2(Tampering) or Endpoint 3(Doorbell 1) is also
triggered, then the playing tone will NOT be replaced by
Endpoint 2 or Endpoint 3, and Endpoint 1 will keep playing.
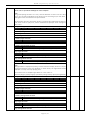
4.9.3 Endpoint responses to receiving Notification Report
Some nodes may only support Lifeline association group, without any other control association groups. And some
nodes may not support Multi Channel communication. Considering compatibility, we implement the application
function that Endpoint responses to receiving Notification Report. Below is more details.

AEOTEC Engineering Specification
Page 15 / 33
When Endpoint receives Notification Report issued from other notification nodes, Endpoint will be triggered to play
tone and light, as long as the Notification Report is listed in the following table. For example, when Endpoint 6
(Environment) receives Notification Report (Smoke detected) or Notification Report (Water Leak detected) issued from
other notification nodes, it will trigger Endpoint 6 to play tone and light corresponding to Endpoint 6’s configuration.
Besides, when Root Device receives Notification Report issued from other notification nodes, Root Device will transfer
the Notification Report to Endpoint 6, 7 or 8 to trigger playing tone and light, as long as the Notification Report is listed
in the following table. For example, when Root Device receives Notification Report (Intrusion), it will trigger Endpoint 7
(Security) to play tone and light corresponding to Endpoint 7’s configuration. In other words, this product is also
compatible with nodes that do not support Multi Channel communication.
In short, notification nodes in the Z-Wave network can operated with this product to make a notable siren alarm for
some environment, security or emergency events.
The table below defines which Notification Report can trigger Endpoint to play tone and light.
Endpoint
Application
Notification Type
Value
Notification Event
Value
1
Browse
N/A
N/A N/A
N/A
2
Tampering
N/A
N/A N/A
N/A
3
Doorbell 1
N/A
N/A N/A
N/A
4
Doorbell 2
N/A
N/A N/A
N/A
5
Doorbell 3
N/A
N/A N/A
N/A
6
Environment
Smoke Alarm
0x01 Smoke detected (location provided)
0x01
Smoke detected
0x02
CO Alarm
0x02 Carbon monoxide detected (location provided)
0x01
Carbon monoxide detected
0x02
CO2 Alarm
0x03
Carbon dioxide detected (location provided)
0x01
Carbon dioxide detected
0x02
Heat Alarm
0x04
Overheat detected (location provided)
0x01
Overheat detected
0x02
Under heat detected (location provided)
0x05
Under heat detected
0x06
Water Alarm
0x05
Water leak detected (location provided)
0x01
Water leak detected
0x02
Gas Alarm
0x12
Combustible gas detected (location provided)
0x01
Combustible gas detected
0x02
Toxic gas detected (location provided)
0x03
Toxic gas detected
0x04
7
Security
Access Control
0x06
Window/door is open
0x16
Home Security
0x07
Intrusion (location provided)
0x01
Intrusion
0x02
Tampering, product cover removed
0x03
Tampering, invalid code
0x04
Glass breakage (location provided)
0x05
Glass breakage
0x06
Motion detection (location provided)
0x07
Motion detection
0x08
Tampering, product moved
0x09
8
Emergency
Emergency Alarm
0x0A
Contact police
0x01
Contact fire service
0x02
Contact medical service
0x03

AEOTEC Engineering Specification
Page 16 / 33
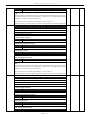
4.10 Association Group Info
Root device
ID
Name
Node count
Profile
Function
1
Lifeline
5
General: Lifeline
Device Reset Locally Notification:
Issued when Factory Reset is performed.
Sound Switch Tone Play Report:
Issued when a tone has started playing.
Sound Switch Configuration Report:
Issued when volume or default tone has changed.
Notification Report (Type=0x0E; Event=0x01):
Issued when Chime starts playing tone.
Notification Report (Type=0x0E; Event=0x00):
Issued when Chime stops playing tone.
Notification Report (Type=0x07; Event=0x09):
Issued when Chime is tampered and moved.
Notification Report (Type=0x08; Event=0x0A):
Issued when Button is low battery.
Notification Report (Type=0x08; Event=0x00):
Issued when Button comes back to normal battery.
Configuration Report (Parameter=0x32):
Issued when Pairing Button Mode is triggered.
Configuration Report (Parameter=0x33):
Issued when Unpairing or Pairing Button Mode finishes.
2
On/Off control
(Browse)
5
Control: Key01
Mirror of endpoint 1, group 2
3
On/Off control
(Tampering)
5
Control: Key02
Mirror of endpoint 2, group 2
4
On/Off control
(Doorbell 1)
5
Control: Key03
Mirror of endpoint 3, group 2
5
On/Off control
(Doorbell 2)
5
Control: Key04
Mirror of endpoint 4, group 2
6
On/Off control
(Doorbell 3)
5
Control: Key05
Mirror of endpoint 5, group 2
7
On/Off control
(Environment)
5
Control: Key06
Mirror of endpoint 6, group 2
8
On/Off control
(Security)
5
Control: Key07
Mirror of endpoint 7, group 2
9
On/Off control
(Emergency)
5
Control: Key08
Mirror of endpoint 8, group 2
Endpoint 1
ID
Name
Node count
Profile
Function
1
Lifeline
0
General: Lifeline
Sound Switch Tone Play Report:
Issued when a tone has started playing.
Sound Switch Configuration Report:
Issued when volume or default tone has changed.
Notification Report (Type=0x0E; Event=0x01):
Issued when Endpoint 1 starts playing tone.
Notification Report (Type=0x0E; Event=0x00):
Issued when Endpoint 1 stops playing tone.
2
On/Off control
(Browse)
5
Control: Key01
When Endpoint 1 starts playing tone or stops playing
tone, Nodes associated are controlled and will receive a
Basic Set CC.
Endpoint 2
ID
Name
Node count
Profile
Function
1
Lifeline
0
General: Lifeline
Sound Switch Tone Play Report:
Issued when a tone has started playing.

AEOTEC Engineering Specification
Page 17 / 33
Sound Switch Configuration Report:
Issued when volume or default tone has changed.
Notification Report (Type=0x0E; Event=0x01):
Issued when Endpoint 2 starts playing tone.
Notification Report (Type=0x0E; Event=0x00):
Issued when Endpoint 2 stops playing tone.
2
On/Off control
(Tampering)
5
Control: Key02
When Endpoint 2 starts playing tone or stops playing
tone, Nodes associated are controlled and will receive a
Basic Set CC.
Endpoint 3
ID
Name
Node count
Profile
Function
1
Lifeline
0
General: Lifeline
Sound Switch Tone Play Report:
Issued when a tone has started playing.
Sound Switch Configuration Report:
Issued when volume or default tone has changed.
Notification Report (Type=0x0E; Event=0x01):
Issued when Endpoint 3 starts playing tone.
Notification Report (Type=0x0E; Event=0x00):
Issued when Endpoint 3 stops playing tone.
Notification Report (Type=0x08; Event=0x0A):
Issued when #1 Button is low battery.
Notification Report (Type=0x08; Event=0x00):
Issued when #1 Button comes back to normal battery.
2
On/Off control
(Doorbell 1)
5
Control: Key03
When Endpoint 3 starts playing tone or stops playing
tone, Nodes associated are controlled and will receive a
Basic Set CC.
Endpoint 4
ID
Name
Node count
Profile
Function
1
Lifeline
0
General: Lifeline
Sound Switch Tone Play Report:
Issued when a tone has started playing.
Sound Switch Configuration Report:
Issued when volume or default tone has changed.
Notification Report (Type=0x0E; Event=0x01):
Issued when Endpoint 4 starts playing tone.
Notification Report (Type=0x0E; Event=0x00):
Issued when Endpoint 4 stops playing tone.
Notification Report (Type=0x08; Event=0x0A):
Issued when #2 Button is low battery.
Notification Report (Type=0x08; Event=0x00):
Issued when #2 Button comes back to normal battery.
2
On/Off control
(Doorbell 2)
5
Control: Key04
When Endpoint 4 starts playing tone or stops playing
tone, Nodes associated are controlled and will receive a
Basic Set CC.
Endpoint 5
ID
Name
Node count
Profile
Function
1
Lifeline
0
General: Lifeline
Sound Switch Tone Play Report:
Issued when a tone has started playing.
Sound Switch Configuration Report:
Issued when volume or default tone has changed.
Notification Report (Type=0x0E; Event=0x01):
Issued when Endpoint 5 starts playing tone.
Notification Report (Type=0x0E; Event=0x00):
Issued when Endpoint 5 stops playing tone.
Notification Report (Type=0x08; Event=0x0A):
Issued when #3 Button is low battery.
Notification Report (Type=0x08; Event=0x00):
Issued when #3 Button comes back to normal battery.

AEOTEC Engineering Specification
Page 18 / 33
2
On/Off control
(Doorbell 3)
5
Control: Key05
When Endpoint 5 starts playing tone or stops playing
tone, Nodes associated are controlled and will receive a
Basic Set CC.
Endpoint 6
ID
Name
Node count
Profile
Function
1
Lifeline
0
General: Lifeline
Sound Switch Tone Play Report:
Issued when a tone has started playing.
Sound Switch Configuration Report:
Issued when volume or default tone has changed.
Notification Report (Type=0x0E; Event=0x01):
Issued when Endpoint 6 starts playing tone.
Notification Report (Type=0x0E; Event=0x00):
Issued when Endpoint 6 stops playing tone.
2
On/Off control
(Environment)
5
Control: Key06
When Endpoint 6 starts playing tone or stops playing
tone, Nodes associated are controlled and will receive a
Basic Set CC.
Endpoint 7
ID
Name
Node count
Profile
Function
1
Lifeline
0
General: Lifeline
Sound Switch Tone Play Report:
Issued when a tone has started playing.
Sound Switch Configuration Report:
Issued when volume or default tone has changed.
Notification Report (Type=0x0E; Event=0x01):
Issued when Endpoint 7 starts playing tone.
Notification Report (Type=0x0E; Event=0x00):
Issued when Endpoint 7 stops playing tone.
2
On/Off control
(Security)
5
Control: Key07
When Endpoint 7 starts playing tone or stops playing
tone, Nodes associated are controlled and will receive a
Basic Set CC.
Endpoint 8
ID
Name
Node count
Profile
Function
1
Lifeline
0
General: Lifeline
Sound Switch Tone Play Report:
Issued when a tone has started playing.
Sound Switch Configuration Report:
Issued when volume or default tone has changed.
Notification Report (Type=0x0E; Event=0x01):
Issued when Endpoint 8 starts playing tone.
Notification Report (Type=0x0E; Event=0x00):
Issued when Endpoint 8 stops playing tone.
2
On/Off control
(Emergency)
5
Control: Key08
When Endpoint 8 starts playing tone or stops playing
tone, Nodes associated are controlled and will receive a
Basic Set CC.
4.11 Configuration
Note: R=Read Only, W=Write Only, WR=Write and Read.
Parameter
Description
W/R
Default
Size
0x01(1)
Configure the Light Effect and Tone Play Mode for Endpoint 1(Browse).
7 6 5 4 3 2 1 0
Light Effect Index
Tone Play Mode
Reserved
Reserved
WR
0x01000000
4
La pagina si sta caricando...
La pagina si sta caricando...
La pagina si sta caricando...
La pagina si sta caricando...
La pagina si sta caricando...
La pagina si sta caricando...
La pagina si sta caricando...
La pagina si sta caricando...
La pagina si sta caricando...
La pagina si sta caricando...
La pagina si sta caricando...
La pagina si sta caricando...
La pagina si sta caricando...
La pagina si sta caricando...
La pagina si sta caricando...
-
 1
1
-
 2
2
-
 3
3
-
 4
4
-
 5
5
-
 6
6
-
 7
7
-
 8
8
-
 9
9
-
 10
10
-
 11
11
-
 12
12
-
 13
13
-
 14
14
-
 15
15
-
 16
16
-
 17
17
-
 18
18
-
 19
19
-
 20
20
-
 21
21
-
 22
22
-
 23
23
-
 24
24
-
 25
25
-
 26
26
-
 27
27
-
 28
28
-
 29
29
-
 30
30
-
 31
31
-
 32
32
-
 33
33
-
 34
34
-
 35
35


Aeotec ZW164-A Manuale utente
- Tipo
- Manuale utente
in altre lingue
- English: Aeotec ZW164-A User manual
- français: Aeotec ZW164-A Manuel utilisateur
Altri documenti
-
 Eedomus eedomus+ Manuale utente
-
 Tiiwee X1 Manuale utente
-
Vanderbilt ISRW6-12 Quick Manual
-
 Tiiwee X3 Home Alarm Kit XL Manuale utente
-
 PATROL LINE HPS 544 Manuale del proprietario
-
Cobra Bridge 4100 Guida d'installazione
-
Elkron HP600 Guida d'installazione
-
Crow RUNNER 8/64 Guida d'installazione
-
König SEC-ALARM100 specificazione
-
Ksenia lares128 IP Guida d'installazione


