
R
R
2322
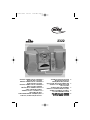
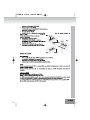
STEREOFONICZNY ZESTAW
MUZYCZNY DESIGN Z
ODTWARZACZEM CD/MP3
EQUIPO DE MÚSICA ESTÉREO DE E
DISEÑO CON REPRODUCTOR
DE CD Y MP3
SISTEMA DE SOM ESTÉREO P
DESIGN COM LEITOR DE CD/ MP3
STEREO HUDEBNÍ SYSTÉM S
CD/ MP3-PŘEHRÁVAČEM
CCDD// MMPP33 ÇÇAALLAARRLLýý DDEESSIIGGNN
SSTTEERREEOO MMUUSSIICC-- CCEENNTTEERR
DESIGN STEREO MUSIC-CENTER D
MIT CD/ MP3- PLAYER
DESIGN STEREO MUSIC CENTER
WITH CD/MP3 PLAYER
DESIGN STEREO MUSIC-CENTER
MET CD/ MP3-SPELER
CHAÎNE HI-FI STÉRÉO DESIGN
AVEC LECTEUR CD/MP3
STEREO MUSIC- CENTER CON I
LETTORE CD/ MP3
FORMATERVEZETT SZTEREÓ MINI H
TORONY, CD/MP3-LEJÁTSZÓVAL
00-2322 Cover 6/20/06 11:48 AM Page 3

D 02.
MODEL: 2322
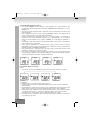
DESIGN STEREO MUSIC- CENTER MIT CASSETTE UND CD/MP3-PLAYER
Das dreieckige Blitzsymbol mit
Pfeilkopf weist den Benutzer auf
das Vorhandensein von nicht-
isolierter "gefährlicher Spannung"
im Inneren des Gerätes hin, die
ausreichen kann, um für Personen
die Gefahr eines elektrischen
Schlages darzustellen.
VORSICHT
GEFAHR EINES ELEKTRISCHEN SCHLAGES,
NICHT ÖFFNEN
VORSICHT: UM DIE GEFAHR EINES
ELEKTRISCHEN SCHLAGES ZU REDUZIEREN
DIE FRONT- (BZW. RÜCK-) ABDECKUNG
NICHT ENTFERNEN ES SIND KEINE VOM
BENUTZER ZU WARTENDEN TEILE IM
INNEREN VORHANDEN
WARTUNGSARBEITEN QUALIFIZIERTEM
FACHPERSONAL ÜBERLASSEN
Das dreieckige Symbol mit dem
Ausrufezeichen weist den Benutzer
auf wichtige Bedienungs- und
Wartungs- (Reparatur-) hinweise hin,
die in dieser Gebrauchsanweisung
enthalten sind.
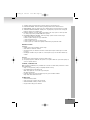
SICHERHEITSMASSNAHMEN
Dieses Gerät muß von der Steckdose getrennt werden, wenn es nicht benutzt wird.
Lassen Sie es nicht zu, dass das Gerät Regen oder Feuchtigkeit ausgesetzt wird.
VORSICHT:
Um das Risiko eines elektrischen Schlages zu reduzieren, entfernen Sie nicht das Gehäuse (oder die
Rückseite).Keine vom Benutzer zu wartende Teile im Geräte inneren. Zur Wartung wenden Sie sich bitte an
qualifiziertes Servicepersonal.
SICHERHEITSANWEISUNGEN
1. LESEN SIE DIE ANWEISUNGEN- Alle Sicherheits- und Bedienungsanweisungen sollten gelesen werden,
bevor Sie das Gerät in Betrieb nehmen.
2. ANWEISUNGEN AUFBEWAHREN - Die Sicherheits- und Bedienungsanweisungen sollten für spätere
Fragen aufbewahrt werden.
3. WARNUNGEN BEHERZIGEN - Sie sollten sich an alle Warnungen auf dem Gerät oder in den
Bedienungsanweisungen halten.
4. FOLGEN SIE DEN ANWEISUNGEN - Alle Bedienungs- und Nutzungsanweisungen sollten befolgt werden.
5. WASSER UND FEUCHTIGKEIT - Das Gerät sollte nicht in der Nähe von Wasser, zum Beispiel in der Nähe
von Badewannen, Waschschüsseln, Küchenbecken, Waschmaschinen, Schwimmbecken oder in feuchten
Kellern.
6. BELÜFTUNG - Das Gerät sollte so platziert werden, so das die Position nicht eine richtige Belüftung
beeinflusst. Zum Bespiel sollte das Gerät nicxht auf Betten, Sofas, Teppichen oder ähnlichen Oberflächen
abgestellt werden, die die Belüftungsöffnungen blockieren können. Bauen Sie das Gerät nicht in
Öffnungen ein, wie zum Besipiel Bücherregale oder Schränke, die, die Lüftung behindern könnten.
7. HITZE - Das Gerät sollte nicht in der Nähe von Wärmequellen, wie Heizstrahlern, Hitzeverzeichnissen,
Herden oder anderen Geräten (auch Verstärker) aufgetsellt werden, die Hitze produzieren.
8. STROMQUELLE - Das Gerät sollte nur mit einem Stromanschluss verbunden werden, wie er in den
Bedienungsanweisungen beschrieben wird oder auf dem Gerät vermerkt ist.
9. ERDUNG UND POLARITÄT - Vorsichtsmaßnahmen sollten eingehalten werden, um sicherzustellen, dass
Erdung und Polarität nicht eingeschränkt sind.
10. NETZKABELSCHUTZ - Das Netzanschlusskabel sollte so verlegt werden, dass man nicht darüberläuft oder
zerknickt durch Dinge auf oder an dem Kabel, widmen Sie besondere Aufmerksamkeit den Steckern am
Kabel, Behältern und der Stelle an der das Kabel aus dem Gerät kommt.
KLASSE 1 LASER
PRODUKT
VORSICHT!
Unsichtbarer Laserstrahlenaustritt, wenn
geöffnet und der Verschluss nicht
eingerastet ist.Vermeiden Sie es, sich
den Strahlen auszusetzen.
01-2322_GE 6/20/06 11:19 AM Page 02


D 04.
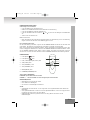
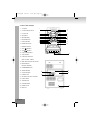
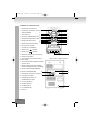
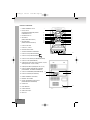
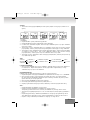
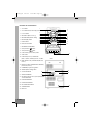
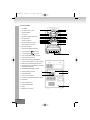
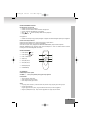
BEDIENUNG UND MERKMALE
1. CD-FACH
2. CD-FACH OPEN/CLOSE [AUF/ZU]
3. LCD ANZEIGE
4. VOLUME UP [LAUTSTÄRKE HOCH]
5. VOLUME DOWN
[LAUTSTÄRKE RUNTER]
6. FOLDER [ORDNER] KNOPF
7. X-BASS [EXTRA BASS] BUTTON
8. LEISTUNGSANZEIGE
9. FERNBEDIENUNGSSENSOR
10. SKIP [SPRINGEN] TASTE
11. SKIP [SPRINGEN] TASTE
12. PLAY/PAUSE [WIEDERGABE/PAUSE] TASTE
13. STOP [STOPP] BUTTON
14. FUNCTION [FUNKTION] WAHLSCHALTER
(TAPE, CD/MP3, TUNER) [KASETTE, CD/MP3,
RADIO]
15. BAND [BANDBREITE] WAHLSCHALTER (AM,
FM, FM ST.)
16. MODE [MODUS] KNOPF(REPEAT, RANDOM)
[WIEDERHOLUNG/ZUFALLSWIEDERGABE]
17. PROGRAMM [PROGRAMM] KNOPF
18. TUNING [ABSTIMMUNGS] KNOPF
19. KASETTENFACH
20. KOPFHÖRERBUCHSE
21. RECORD/PLAY [AUFNAHME/WIEDERGABE]
ABSPIELKONTROLLE
22. FM ANTENNENKABEL
23. LAUTSPRECHER LINKS
24. LAUTSPRECHER RECHTS
25. NETZKABEL
26. BEAT CUT
17
15
13
11
9
7
6
2
3
21
19
1
4
5
8
10
12
14
16
18
22
26
25
23
24
01-2322_GE 6/20/06 11:19 AM Page 04

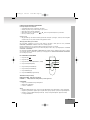
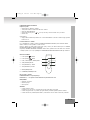
FERNBEDIENUNGSFUNKTIONEN
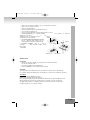
Vorbereitung vor dem Gebrauch
• Legen Sie Batterien in die Fernbedienung ein.
• Entfernen Sie den Batteriefachdeckel auf der Rückseite der Fernbedienung.
• Legen Sie zwei Batterien der Größe „UM4/AAA“ ein.
• Legen Sie die Batterien mit den Anschlüssen und passend zu den Anzeigen in das Batteriefach
ein.
• Setzen Sie den Deckel wieder ein.
Batterien austauschen
• Wenn die Bedienung der Fernbedienung unzuverlässig wird oder die Entfernung von der eine Bedienung
möglich ist, kürzer wird, tauschen Sie die Batterien gegen neue aus.
Die Fernbedienung benutzen
Um die Fernbedienung zu benutzen, zeigen Sie auf den REMOTE SENSOR und drücken Sie die Tasten sanft
und bestimmt. Ein Bedienen der Fernbedienung ist innerhalb von ungefähr 18 ft (6 m) möglich.
Wenn Sie die Fernbedienung angewinkelt verwenden, wird die Reichweite der Fernbedienung geringer, aber
nicht ausschlaggebend. Benutzen Sie sie direkt vor dem REMOTE SENSOR für maximale Reichweite. Setzen
Sie den REMOTE SENSOR keinem starken Licht aus (direktes Sonnenlicht oder künstliches Licht) und
versichern Sie sich, dass sich keine Hindernisse zwischen REMOTE SENSOR und Fernbedienung befinden.
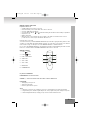
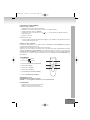
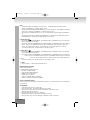
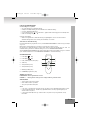
FERNBEDIENUNG
1. Folder [Ordner] Taste
2. Folder [Ordner] Taste
3. PLAY / PAUSE [Wiedergabe/Pause] Taste
4. STOP [STOPP] Taste
5. SKIP [SPRINGEN] + Taste
6. SKIP [SPRINGEN] - Taste
7. MODE [MODUS] Taste
8. PROGRAM [PROGRAMM] Taste
Tasten Funktion BEDIENUNG
POWER Knopf Zum Einschalten des Gerätes
VOLUME +/- - Um die Lautstärke auf- oder absteigend passend einzustellen.
WIEDERGABE/PAUSE
• Wiedergabe aus dem Stoppmodus starten.
• Pause während der Wiedergabe.
• Aus der Pause in die Wiedergabe zurückkehren.
STOPP
• Im Wiedergabe und Pause Modus. In den Stopp Modus oder Programmeintritt wechseln während der
Wiedergabe.
• Im Programmeintritts Modus: Verlassen Sie den Programmeintritt Modus, löschen Sie die gespeicherten
Programme und wechseln Sie in den Stopp Modus.
• Zufallswiedergabe (Mode Knopf) Wechseln Sie in den Stopp Modus und verlassen Sie die
Zufallswiedergabe.
D 05.
+
01-2322_GE 6/20/06 11:19 AM Page 05
1
6
4
7
2
5
8
3

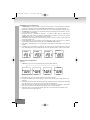
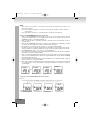
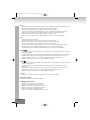
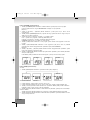
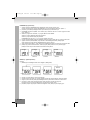
PROGRAM Taste [Funktionserklärung]
1. Wenn die Taste [PROGRAM] gedrückt wird während sich die CD im Stopp Modus befindet, stellt das
System auf Programm Modus um. Im Programm Modus leuchten auf der Anzeige Titel, Nummer und
PROGRAM in einem 500 ms Intervall auf (Anzeige 1).
2. Wenn die Taste [FF/SKIP+] / [FB/SKIP-] gedrückt ist, wählt das System die Titelnummer aus die es
verzeichnen kann.
3. Wenn die Taste [PROGRAM] gedrückt wird, nachdem Sie eine Titelnummer ausgewählt haben, bewahrt
das System den Titel und geht in den nächsten Programm Modus.(Anzeige 2).
4. Das System kann 20 Programme für den CD Modus / 10 Programme für MP3 behalten.
Nachdem das System 20 Programme behalten hat, kann kein weiteres Lied mehr aufgenommen werden.
Solang das System 20 Programme beinhaltet, können keine anderen Programme aufgenommen werden.
Die PROGRAM Anzeige lässt “P 01“in einem 500 ms Intervall aufblitzen.
5. Wenn während des Programm Modus die Taste [STOP] gedrückt wird, entfernt das System die Inhalte des
Programms und streicht den Programm Modus.
6. Wenn die Taste [PLAY/PAUSE] gedrückt wird während das System mehr als ein Programm beinhaltet,
startet es die Programmwiedergabe. Während der Programmwiedergabe zeigt das Display PROGRAM
wird wiedergegeben.(Anzeige 4).
7. Wenn die Taste [FF/SKIP+] / [FB/SKIP-] gedrückt wird während der Programmwiedergabe, springt das
System zum nächsten / vorherigen Programm.
8. Wenn dieTaste [STOP] gedrückt wird während der Programmwiedergabe, stoppt das System und wechselt
in den Stopp Modus. Bis die Taste [STOP] im Stopp Modus gedrückt ist, bewahrt das System die
Programminhalte.
Die Taste MODE [Funktionserklärung]
CD Modus:
1. Wenn die Taste [MODE] gedrückt wird wechselt das system den Modus (in folgender Weise).
2. Innerhalb des Modus Repeat-1 wiederholt das System den aktuell gespielten Titel einer CD.
3. Wenn im Modus Repeat-all der letzte Titel eines Programms erreicht ist, springt es für gewöhnlich zum
ersten Titel zurück.
4. Wenn ein ganzer Titel während der Zufallswiedergabe endet oder die Taste [STOP] während der
Zufallswiedergabe gedrückt wird, geht das system in den Stoppmodus und setzt den Modus
Zufallswiedergabe zurück.
5. Wenn die Taste [FF/SKIP+] im Modus Zufallswiedergabe gedrückt wird, springt das System zum nächsten
Zufallstitel. Wenn die Taste [FF/SKIP+] während des letzten Titels eines gedrückt wird, sucht das System
nach der nächsten Runde Zufallstitel.
D 06.
PROGRAM
(ANZEIGE 1 )
(ANZEIGE 2 )
(ANZEIGE 3)
(ANZEIGE 4)
PROGRAM
PROGRAM
PROGRAM
REP
REP
ALL
RANDOM
KEINE WIEDERHOLUNG
& ZUFALLSWIEDERGABE
WIEDERHOLE ALLE
WIEDERHOLE-1
ZUFALLSWIEDERGABE
01-2322_GE 6/20/06 11:19 AM Page 06

6. Wenn die Taste [FF/SKIP-] während des Modus Zufallswiedergabe gedrückt wird, sucht das System den
Anfang des aktuellen Titels, springt aber keinen Titel zurück.
MP3 Modus
1. Wenn die Taste [MODE] gedrückt wird wechselt das System den Modus. (in folgender Weise).
2. Innerhalb des Modus Repeat-1 wiederholt das System den aktuell gespielten Titel einer MP3.
3. Innerhalb des Modus Repeat-folder wiederholt das system den aktuellen Titel des MP3 Ordners.
4. Wenn im Modus Repeat-all der letzte Titel eines Programms erreicht ist, springt es für gewöhnlich zum
ersten Titel zurück.
5 Wenn ein ganzer Titel während der Zufallswiedergabe endet oder die Taste [STOP] während der
Zufallswiedergabe gedrückt wird, geht das System in den Stoppmodus und setzt den Modus
Zufallswiedergabe zurück.
6. Wenn die Taste [FF/SKIP+] im Modus Zufallswiedergabe gedrückt wird, springt das System zum nächsten
Zufallstitel. Wenn die Taste [FF/SKIP+] während des letzten Titels eines Ordners gedrückt wird, sucht das
System nach der nächsten Runde Zufallstitel.
7. Wenn die Taste [FF/SKIP-] während des Modus Zufallswiedergabe gedrückt wird, sucht das System den
Anfang des aktuellen Titels, springt aber keinen Titel zurück.
MODUS
CD: Keine Wiederholung Wiederhole 1 Wiederhole alle Zufallswiedergabe Keine
Wiederholung.
MP3:Keine Wiederholung Wiederhole 1 Wiederhole alle Zufallswiedergabe Keine
Wiederholung.
ZUFALLSWIEDERGABE
1. Drücken Sie den Knopf RANDOM, um mit dem Anhören zu beginnen. Alle Titel der Disc sollen zufällig
wiedergegeben werden. Wählen sie die Funktion Random. Dafür drücken Sie den Knopf Mode und
wählen Random to start aus, um die Zufallswiedergabe zu starten.
MP3’S EINPROGRAMMIEREN
Die MP3 Wiedergabe ermöglicht es 10 Titel in der Reihenfolge Ihrer Wahl einzuprogrammieren.
1. Drücken Sie den Knopf PROGRAM im Stoppmodus. Die Anzeige wird “P01” und “PROGRAM anzeigen
und blinken.”
2. Drücken Sie die Knöpfe FF/SKIP+ und FF/SKIP- um den gewünschten Titel zu einprogrammieren
auszuwählen Oder Drücken sie die Knöpfe FOLDER DN und FOLDER UP auf der Fernbedienung, um die
Auswahl des nächsten gewünschten Titel eines Ordners zu kontrollieren.
3. Drücken Sie den Knopf PROGRAM um in den Speicher zu gelangen.
4. Um weiter einzuprogrammieren, wiederholen sie die Schritte 2 und 3.
5. Drücken Sie den Knopf PLAY / PAUSE im Modus Programm, um die einprogrammierten Titel
wiederzugeben.
D 07.
KEINE
WIEDERHOLUNG
& ZUFALLSWIEDERGABE
ALBUM
MP3
WIEDERHOLE
ORDNER
MP3
MP3
RANDOM
WIEDERHOLE
ALLEL
WIEDERHOLE-1
ZUFALLSWIEDERGABE
MP3
MP3
REP
REP
REP
ALL
01-2322_GE 6/20/06 11:19 AM Page 07

SKIP +
• Wenn Sie die beginnende Titelwiedergabe im Stoppmodus wechseln, zirkuliert es zum ersten Titel zurück
sofern es der letzte Titel ist.
• Springen Sie zum nächsten Titel ind er normalen Wiedergabe.
Es zirkuliert zum ersten Titel zurück, wenn es der letzte Titel ist.
• Wenn die Taste länger als 0,5 sec. gedrückt wird, wird ein schnelles Vorspulen ausgeführt.
• Springen sie zum nächsten einprogrammierten Titel während der Programmwiedergabe. Es zirkuliert zum
ersten programmierten Titel zurück.
• Springen Sie zum nächsten Zufallstitel innerhalb der Zufallswiedergabe
SKIP -
• Wechseln Sie die beginnende Titelwiedergabe innerhalb des Stoppmodus. Es zirkuliert zurück zum letzten
Titel, wenn es der erste Titel ist.
• Springen Sie zum vorherigen Track innerhalb der normalen Wiedergabe. Zirkuliert zum letzten Titel, wenn
es der erste Titel ist.
• Wenn die Taste länger als 0,5 sec. gedrückt wird, wird ein schnelles zurückspulen eingeleitet.
• Springen Sie zum vorherigen einprogrammierten Titel der Programmwiedergabe. Es zirkuliert zum ersten
einprogrammierten Titel.
FOLDER
• Wenn sich das System im Stoppmodus befindet: Für MP3, springt zum nächsten Ordner in aufsteigender
Reihenfolge und zeigt die ältere Nummer an.
• Wenn Sich das System im Wiedergabemodus befindet: Für MP3, springt zum nächsten Ordner in
aufsteigender Reihenfolge. Startet die Wiedergabe des ersten Titels im Ordner und zeigt den aktuellen
Ordner und die Nummer an. Taste einmal drücken. Aktuelle Ordnernummer leuchtet auf für 3 sec.
Taste nochmals drücken. Ein Ordner höher wird ausgeführt.
+/= BASS
• Drücken sie den Knopf X-BASS und wählen Sie den Bass Boost Effekt aus.
KASSETTENFUNKTION
Bewegen um die Kassetenfunktion auszuwählen
RECORD/PLAY ABSPIELKONTROLLE
• RECORD: Aufnahme starten.
• PLAY: Kassetenwiedergabe starten.
• REWIND: Schnelles Zurückspulen der Kassete.
• F.FWD: Scnelles Vorspulen der Kassete
• STOP/EJ: Stoppen und Auswerfen der Kassete.
• PAUSE: Unterbrechen der Aufnahme und Wiedergabe.
D 08.
01-2322_GE 6/20/06 11:19 AM Page 08

KASSETENDECK
Versichern Sie sich bevor Sie das Kassetendeck betreiben, ob der Wahlschalter Function sich im Modus
Kassete befindet.
WIEDERGABE
• Stellen Sie den Wahlschalter Function auf den Modus Kassette.
• Drücken Sie den Knopf Eject um das Kassetenfach zu öffnen.
• Platzieren Sie das Kassetenband mit der abzuspielenden Seite Richtung Fenster.
• Schliessen Sie das Kassetenfach.
• Drücken Sie den Knopf Play um die Wiedergabe zu starten.
• Die wiedergabe stoppt, wenn das Band sein Ende erreicht.
• Drücken Sie die Taste Stop, wenn Sie die Wiedergabe vor dem Bandende stoppen möchten.
AUFNEHMEN VON RADIO / CD
• Drücken sie den Knopf Function, wählen Sie “RADIO” oder “CD” um die Aufnahmequelle zu wählen.
• Bitte legen sie eine Leerkassete ein
• Drücken sie zuerst den Knopf PAUSE.
• Dann drücken Sie die Knöpfe PLAY und RECORD zusammen.
• Spielen Sie die gewählte Aufnahmequelle ab.
• Während der Aufnahme den Knopf PAUSE lösen.
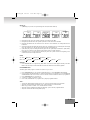
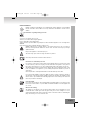
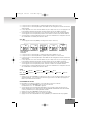
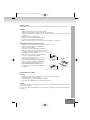
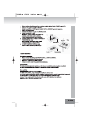
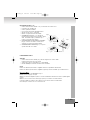
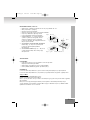
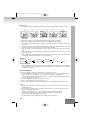
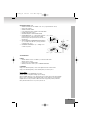
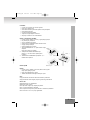
1. LEIERNDES BAND (Abb.1) ---- Überprüfen Sie
leierndes Band und ziehen Sie es mit einem Bleistift
oder ähnlichen wieder fest auf. Leierndes Band
könnte zerissen oder eingeklemmt werden im
Mechanismus.
2. VERSEHENTLICHES LÖSCHEN VERHINDERN
(Abb.2) ---- Benutzen Sie einen Schraubenzieher oder
anderes spitzes Werkzeug um den kleinen Plastikstift
herauszubrechen.
3. ÜBERSPIELEN (Abb.3) ---- Bedecken Sie die
Stiftöffnung mit etwas Klebeband.
RADIOBETRIEB
SENDEREINSTELLEN
• Drücken sie den Knopf Function, um das Gerät auf “RADIO” oder Radio Modus zu stellen.
Die Radiofunktionsanzeige wird aufleuchten.
• Wählen Sie den Empfangsbereich mit dem Knopf BAND aus.
• Drehen Sie den Schalter TUNING auf den gewünschten Sender.
ANMERKUNG:
Wenn Sie FM Radioprogramm hören ist es ratsam die FM Antenne auf der Gehäuserückseite voll auszuziehen.
Wenn Sie AM Radioprogramm hören ist es ratsam die Position des Helmes einzustellen für einen optimalen
Empfang.
D 09.
Seite A
Stift für Seite A
Klebeband
Abb.1
Abb.2
Abb.3
01-2322_GE 6/20/06 11:19 AM Page 09

Was ist MP3?
MP3 ist die Abkürzung für MPEG Audio Layer 3. MPEG bezeiht sich auf Moving Pictures Experts Group.
MP3 sind digitalisierte Audiodateien die geschrumpft wurden aber immer noch ihre originale Klangqualität
bewahren. MP3 werden weitestgehend als das populärste Speicher- und Abspielformat erkannt.
Die digitalen Audiodateien, gespeichert auf MP3 Disc, können auf MP3 Playern abgespielt werden.
MP3 Discs können 150-200 Lieder auf einer Cd speichern.
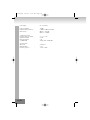
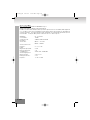
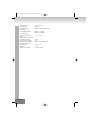
Energieversorgung: AC
~
230V 50Hz
Stromverbrauch: 15 Watts
Ausgangsleistung: 2 Watts X 2 RMS into 8 OHM
(Je Kanal):
Radioabschnitt: AM 525 – 1615 kHz
FM 87,5 – 108 MHz
Compact Disc – Abschnitt:
Übertragungsbereich (-3dB): 60 – 16,000 Hz
Signal-Rausch-
Leistungsverhältnis: 60 dB
Klirrfaktor: 0.4%
Kompatibel mit: CD-DA, CD-R, CD-RW, MP3
Kassetenabschnitt:
Bandgeschwindigkeit: 4.75 cm / sec.
Tonhöhenschwankung: < 0.4%
Übertragungsbereich: 100 Hz - 6.3 KHz
D 010.
01-2322_GE 6/20/06 11:19 AM Page 010

D 011.D 01.
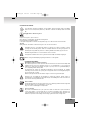
WEITERE INFORMATIONEN
Achtung bei Kleinteilen und Batterien, bitte nicht Verschlucken, dies kann zu ernsthaften
Schädigungen oder Erticken führen. Achten Sie inbesondere bei Kindern darauf, dass Kleinteile
und Batterien ausserhalb deren Reichweite sind.
Wichtige Hinweise zum Gehörschutz
Vorsicht:
Ihr Gehör liegt Ihnen und auch uns am Herzen.
Deshalb seien Sie bitte vorsichtig beim Gebrauch dieses Gerätes.
Wir empfehlen: Vermeiden Sie hohe Lautstärken.
Sollte das Gerät von Kindern verwendet werden, achten Sie darauf, dass das Gerät nicht zu laut eingestellt wird.
Achtung! Zu hohe Lautstärken können bei Kindern irreparable Schäden hervorrufen.
Lassen Sie NIEMALS Personen, und insbesondere keine Kinder, Gegenstände in Löcher,
Schächte oder andere Öffnungen des Gehäuses stecken; dies könnte zu einem tödlichen
elektrischen Schlag führen. Das Gerätegehäuse, darf nur von ausgebildetem Fachpersonal
geöffnet werden.
Bitte verwenden Sie das Gerät nur seiner vorhergesehenen Bestimmung entsprechend.
Bitte bewahren Sie die Bedienungsanleitung auch für eine spätere Verwendung sorgfältig auf.
Hinweise zum Umweltschutz
Dieses Produkt darf am Ende seiner Lebensdauer nicht über den normalen Haushaltsabfall
entsorgt werden, sondern muss an einem Sammelpunkt für das Recycling von elektrischen und
elektronischen Geräten abgegeben werden. Das Symbol auf dem Produkt, der
Gebrauchsanleitung oder der Verpackung weist darauf hin.
Die Werkstoffe sind gemäß ihrer Kennzeichnung wiederverwertbar. Mit der Wiederverwendung,
der stofflichen Verwertung oder anderen Formen der Verwertung von Altgeräten leisten Sie einen
wichtigen Beitrag zum Schutze unserer Umwelt.
Bitte erfragen Sie bei der Gemeindeverwaltung die zuständige Entsorgungsstelle.
Behindern Sie nicht die Belüftung des Gerätes, wie etwa mit Vorhängen, Zeitungen, Decken oder
mit Möbelstücken, die Belüftungsschlitze müsssen immer frei sein. Überhitzung kann Schäden
verursachen und die Lebensdauer des Gerätes verkürzen.
Hitze und Wärme
Setzen Sie das Gerät nicht direkter Sonnenstrahlung aus. Achten Sie darauf, das das Gerät keinen
direkten Wärmequellen wie Heizung oder offenem Feuer ausgesetzt ist. Achten Sie darauf, das die
Lüftungsschlitze des Gerätes nicht verdeckt sind.
Feuchtigkeit und Reinigung
Dieses Produkt ist nicht wasserfest! Tauchen Sie den Player nicht in Wasser ein und lassen ihn
auch nicht mit Wasser in Berührung kommen. In den Player eindringendes Wasser kann ernsthafte
Schäden verursachen. Verwenden Sie keine Reinigungsmittel, die Alkohol, Ammoniak, Benzen
oder Schleifmittel enthalten, da diese den Player beschädigen können.
01-2322_GE 6/20/06 11:19 AM Page 011

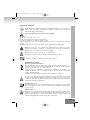
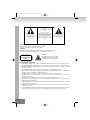
SAFETY PRECAUTION
This appliance must be disconnected from the mains when not in use. Do not allow this appliance to be
exposed to rain or moisture.
CAUTION : To reduce the risk of electric shock, do not remove cover (or back). No user-serviceable parts
inside. Refer servicing to qualified service personnel.
SAFETY INSTRUCTIONS
1. READ INSTRUCTIONS – All the safety and operating instructions should be read before the appliance is
operated.
2. RETAIN INSTRUCTIONS – The safety and operating instruction should be retained for future reference.
3. HEED WARNINGS – All warnings on the appliance and in the operating instructions should be adhered to
.
4. FOLLOW INSTRUCTIONS – All operating and use instructions should be followed.
5. WATER AND MOISTURE – The appliance should not be used near water, for example, near a bathtub,
washbowl, kitchen sink, laundry tub, swimming pool or in a wet basement.
6. VENTILATION – The appliance should be situated so that its location or position does not interfere with its
proper ventilation, for example, the appliance should not be situated on a bed, sofa , rug or similar surface
that may block the ventilation openings; Do not place in built–in installation openings; such as a bookcase
or cabinets that may impede the flow of air through the ventilation openings.
7. HEAT – The appliance should be situated away from heat sources such as radiators, heat registers, stoves,
or other appliance (including amplifiers) that produce heat.
8. POWER SOURCES – The appliance should be connected to a power supply only of the type described in
the operating instructions or as marked on the appliance.
9. GROUNDING AND POLARISATION – Precautions should be taken to ensure that the grounding or
polarisation means of the appliance are not defeated.
10. POWER CORD PROTECTION – Power supply cords should be routed so that they are not likely to be
walked on or pinched by items placed upon or against them, paying particular attention to cords at plugs,
convenience receptacles, and the point at which they exit from the appliance.
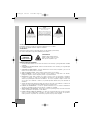
012.
The triangular symbol with the
lightning Bolt warns the user to the
presence of dangerous non-isolated
voltage on the inside of this device
which may cause an electric shock.
WARNING
DANGER OF A HAZARDOUS ELECTRIC
SHOCK. DO NOT OPEN
WARNING: TO REDUCE THE RISK OF AN
ELECTRIC SHOCK, DO NOT REMOVE THE
FRONT OR BACK COVER. INSIDE THE UNIT,
THERE ARE NO PARTS THAT CAN BE
REPAIRED OR ADJUSTED BY THE USER.
PLEASE REFER TO QUALIFIED TECHNICIANS.
The triangular symbol with the
exclamation highlights important
points of which the user should refer
to the manual regarding maintenance
and repair.
CLASS 1
LASER PRODUCT
CAUTION !
Invisible laser radiation when open and
interlocks defeated. Avoid exposure
to beam.
02-2322_EN 6/20/06 11:20 AM Page 02

013.
11. CLEANING – The appliance should be cleaned only as recommended by the manufacturer.
12. POWER LINES – An outdoor antenna should be located away from power lines.
13. NONUSE PERIODS – The power cord of the appliance should be unplugged from the outlet when
the appliance is to be left unused for a long period of time.
14. OBJECT and LIQUID ENTRY – Care should be taken so that objects do not fall and liquids are not
spilled into the enclosure through openings.
15. SERVICING – The user should not attempt to service the appliance beyond that described in the
user’s operating instructions. All other servicing should be referred to qualified service personnel.
16. DAMAGE REQUIRING SERVICE – The appliance should be serviced by qualified service personnel
when:
A. The power-supply cord or plug has been damaged.
B.Objects have fallen into, or liquid has been spilled into the appliance enclosure.
C.The appliance has been exposed to rain.
D.The appliance has been dropped, or the enclosure damaged.
E. The appliance does not appear to operate normally or exhibits a marked change in performance
PREPARATION FOR USE
INSTALLATION
• Unpack all parts and remove protective material.
• Insert the batteries into the remote control transmitter.
• Do not connect the unit to the mains before checking the mains voltage and before all other
connections have been made.
• Do not cover any vents and make sure that there is a space of several centimeters around the unit
for ventilation.
CONNECTIONS
1) Connect left and right speaker to left and right speaker jacks.
2) Before connecting the unit to the mains, make sure that the AC voltage printed on the back plate is
the same as the AC voltage from your wall outlet.
OPERATION / COMPACT DISC
Bear in mind the following points since any dirt; scratches or warping of the disc can cause broken or
intermittent sound and also noise.
• When holding the discs, take care not to touch the playing surface.
• Do not place discs in the following locations:
Near a heating device or place where the temperature is high;
In damp or dusty areas.
• Wipe away any fingerprints or dust on the playing surface of a disc using a soft cloth. Always wipe
from the inside toward the outside of the disc.
LOADING THE DISC
• Press OPEN/CLOSE
• Insert a CD (printed side up) in the tray.
• Press OPEN/CLOSE to close the CD door.
• The display shows the CD’s total number of tracks.
02-2322_EN 6/20/06 11:20 AM Page 03

014.
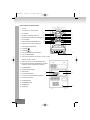
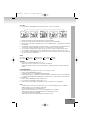
CONTROLS AND FEATURES
1. CD DOOR
2. CD DOOR OPEN/CLOSE
3. LCD DISPLAY
4. VOLUME UP
5. VOLUME DOWN
6. FOLDER BUTTON
7. X-BASS BUTTON
8. POWER INDICATOR
9. REMOTE SENSOR
10. SKIP BUTTON
11. SKIP BUTTON
12. PLAY/PAUSE BUTTON
13. STOP BUTTON
14. FUNCTION SELECTOR
(TAPE, CD/MP3, TUNER)
15. BAND SELECTOR (AM, FM, FM ST.)
16. MODE BUTTON
(REPEAT, RANDOM)
17. PROGRAMM BUTTON
18. TUNING BUTTON
19. CASSETTE DOOR
20. PHONES JACK
21. RECORD/PLAY DECK CONTROL
22. FM ANT. WIRE
23. SPEAKER LEFT
24. SPEAKER RIGHT
25. POWER CORD
26. BEAT CUT
17
15
13
11
9
7
6
2
3
21
19
1
4
5
8
10
12
14
16
18
22
26
25
23
24
02-2322_EN 6/20/06 11:20 AM Page 04

REMOTE CONTROL FUNCTIONS
Preparation before use
• Installing batteries in the remote control unit
• Remove the battery cover from the back of the remote control unit.
• Insert two “UM4/AAA” size batteries.
• Insert the batteries with the and terminals matching the indication inside the battery compartment.
• Replace the cover.
• Battery replacement
• When the remote control operation becomes unstable or the distance from which remote control is
possible becomes shorter, replace the batteries with new ones.
Using the remote control unit
To use the remote unit, point at the REMOTE SENSOR and press the buttons gently and firmly. Remote control
operation is possible within approximate 18ft(6m). However, since the remote control range is less when the
unit is used at an angle, use directly in front of the REMOTE SENSOR, for maximum distance.
Do not expose the REMOTE SENSOR to strong light (direct sunlight or artificial lighting) and make sure that
there are no obstacles between the REMOTE SENSOR and the remote control unit.
REMOTE CONTROL
1. Folder button
2. Folder button
3. PLAY / PAUSE button
4. STOP button
5. SKIP + button
6. SKIP – button
7. MODE button
8. PROGRAM button
Key Function OPERATION
POWER BUTTON - To turn on the Unit
VOLUME +/- - To increase and decrease the volume sound to suitable level
PLAY/PAUSE
• Start playing from stop mode.
• Start pause during play.
• Return to play mode from a pause.
STOP
• In Play mode or Pause mode: Changing to Stop mode or Program Entry mode during program play.
• In Program Entry mode: Exit the Program Entry mode, clear program memory and change to Stop mode.
• In Random Play (Mode Button): Changing to Stop mode and release Random function.
015.
+
02-2322_EN 6/20/06 11:20 AM Page 05
1
6
4
7
2
5
8
3

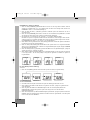
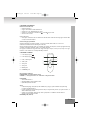
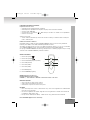
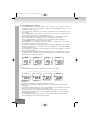
PROGRAM key [Function Explanation]
1. If [PROGRAM] key is pressed during the CD stop mode, the system goes to the program mode. During the
program mode, the track number and PROGRAM display will flash in the 500[ms] interval (Display 1).
2. If [FF/SKIP+] / [FB/SKIP-] key is pressed, the system chooses the track number which it wants to register.
3. If [PROGRAM] key is pressed after choosing a track number, the system keeps the track number, and goes
to next program mode (Display 2).
4. The system can hold 10 programs for CD Mode / 10 programs for MP3. After the system held 20
programs, it can’t keep another song. During the system holding 20 programs, it can't keep other program.
PROGRAM display and “P 01“ will flash in the 500[ms] interval
5. If [STOP] key is pressed during the program mode, the system removes the contents of the program, and
cancels the program mode.
6. If [PLAY/PAUSE] key is pressed during the system holding the program of more than one, it starts the
program play. During the program play, Display shows PROGRAM is play (display 4).
7. If [FF/SKIP+] / [FB/SKIP-] key is pressed during the program play, the system skips to next / previous
program.
8. If [STOP] key is pressed during the program play, the system stops the program play, and goes the stop
mode. Until [STOP] key is pressed during the stop mode, the system keeps the contents of the program.
MODE key [Function Explanation]
CD Mode:
1. If [MODE] key is pressed, the system changes the mode(as follows intention).
2. During the repeat-1 mode, the system repeats the current track of the CD.
3. During the repeat-all mode, if it reaches the end of the tune of the final track, it is usually returned to the
head track.
4. If whole track was finished during the random play mode or if [STOP] key is pressed during the random play
mode, the system goes to the stop mode and cancels the random play mode.
5. If [FF/SKIP+] key is pressed during the random play mode, the system skips next at random. If [FF/SKIP+]
key is pressed on the tune of the final track, the system searches next lap at random.
6. If [FB/SKIP-] key is pressed during the random play mode, the system searches the beginning of the
current track, but doesn’t skip track down.
016.
PROGRAM
(DISPLAY 1 )
(DISPLAY 2 )
(DISPLAY 3 )
(DISPLAY 4 )
PROGRAM
PROGRAM
PROGRAM
REP
REP
ALL
RANDOM
NO REPEAT& RANDOM REPEAT ALL
REPEAT-1 RANDOM
02-2322_EN 6/20/06 11:20 AM Page 06

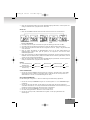
MP3 Mode:
1. If [MODE] key is pressed, the system changes the mode(as follows intention).
2. During the repeat-1 mode, the system repeats the current track of the MP3
3. During the repeat-folder mode, the system repeats the current folder track of the MP3
4. During the repeat-all mode, if it reaches the end of the tune of the final track, it is usually returned to the
head track.
5. If whole track was finished during the random play mode or if [STOP] key is pressed during the random play
mode, the system goes to the stop mode and cancels the random play mode.
6. If [FF/SKIP+] key is pressed during the random play mode, the system skips next at random. If [FF/SKIP+]
key is pressed on the tune of the final track, the system searches next lap at random.
7. If [FB/SKIP-] key is pressed during the random play mode, the system searches the beginning of the
current track, but doesn’t skip track down.
MODE
CD: None Repeat 1 Repeat all Random None.
MP3: None Repeat 1 Repeat folder Random all Random None.
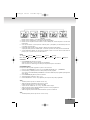
RANDOM
1. Press RANDOM button to begin listening, all the tracks on the disc should be played randomly. Select the
Random function and press the Mode button and selection Random to start random playback.
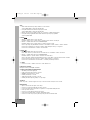
PROGRAMMING MP3
The MP3 player enable program 10 tracks in a sequence of your choice.
1. Press PROGRAM button in stop mode the display will show “P01” and “PROGRAM” will be blinking.
2. Press FF/SKIP+ and FB/SKIP- button to select the desired track to be programmed. or Press FOLDER DN
and FOLDER UP button on the remote control to select the desired next folder’s track to be programmed.
3. Press PROGRAM button to entry memory.
4. Continue to program, repeat steps 2 and 3.
5. Press PLAY / PAUSE button on program mode to play the programmed tracks.
SKIP +
• Change the starting play track during stop mode, cyclic to the first track if it is in the last track.
• Skip to the next track during Normal Play, cyclic to the first track if it is in the last track.
• When Key is pushed more than 0.5sec, Fast-Forward is executed.
• Skip to the next programmed track during Program play, cyclic to the first programmed track.
• Skip to the next random track during Random play.
017.
NO REPEAT& RANDOM
ALBUM
MP3
REPEAT FOLDER
MP3
MP3
RANDOM
REPEAT ALL
REPEAT-1
RANDOM
MP3
MP3
REP
REP
REP
ALL
02-2322_EN 6/20/06 11:20 AM Page 07

SKIP -
• Change the starting play track during stop mode, cyclic to the last track if it is in the first track.
• Skip to the previous track during Normal play, cyclic to the last track if it in the first track.
• When key is pushed more than 0.5 sec, Fast – reverse is executed.
• Skip to the previous programmed track during Program play, cyclic to the first programmed track.
FOLDER
• When the system is STOP mode, For MP3, Skip up to next folder in increasing order and display folder
number.
• When the system is PLAY mode, For MP3, Skip up to next folder number in increasing order, start play
head track of the folder and display current folder and track number Press key once, current folder number
is flashing for 3s, press key again folder up is executed.
FOLDER
• When the system is STOP mode, For MP3, Skip up to next folder in decreasing order and display folder
number.
• When the system is PLAY mode, For MP3, Skip up to next folder number in decreasing order, start play
head track of the folder and display current folder and track number Press key once, current folder number
is flashing for 3s, press key again folder up is executed.
+/= BASS
• Press the +/- BASS button and select the Bass Boost effect.
TAPE FUNCTION
Move to select TAPE FUNCTION
RECORD/PLAY DECK CONTROLS
• RECORD : to start recording.
• PLAY : to start cassette playback.
• REWIND : to fast rewind the cassette.
• F.FWD : to fast forward the cassette.
• STOP/EJ : to stop and eject the cassette.
• PAUSE : to interrupt recording or playback
CASSETTE DECK
Before operating the cassette deck, make sure Function Selector is in the Tape mode.
PLAYBACK
• Set Function Selector to Tape mode.
• Press Eject button to open the cassette door
• Place the cassette tape into Deck, with the side to be played facing the window.
• Close cassette door and Press Play button to start playback.
• Playback stops when the tape reaches the end.
• Press Stop button if you want to stop playback before the end of the tape
02-2322_EN 6/20/06 11:20 AM Page 08
018.

RECORDING FROM RADIO / CD
• Push function button “RADIO”, or “CD” to select the sound source.
• Place a blank tape into Deck
• Press PAUSE button first and then Press PLAY and RECORD buttons together.
• Play the selected sound source.
• When recording, release PAUSE button
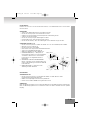
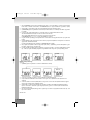
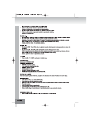
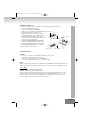
1. TAPE SLACK (Fig.1) ---- Check and tighten slack
tape before use with a pencil or similar tool. Slack
tape may possibly break or get jammed in the
mechanism.
2. TO PREVENT ACCIDENTAL ERASURE (Fig.2)----
Use a screwdriver or other pointed tool to break off
the plastic tabs.
3. TO RECORD AGAIN (Fig.3) ---- Cover the tab
openings with cellophane tape.
RADIO OPERATION
TUNING
• Push function button “RADIO” to set unit to Radio mode. Radio Function Indicator will light up
• Select the tuning range with the BAND button.
• Rotate TUNING CONTROL to select the desired station.
NOTE:
When listening to FM broadcasts it is advisable to extend fully the wire FM antenna on the rear cover.
When listening to AM broadcasts it is advisable to adjust the position of the helmet for optimum reception.
What is MP3?
MP3 is a short form for MPEG Audio Layer 3. MPEG refers to the Moving Pictures Experts Group. MP3s are
digital audio files that have been shrunken down while still maintaining their original sound quality. MP3s are
widely recognized as the most popular format for Storing and listening to music. The digital audio files stored
on MP3 disc can be played on MP3 player. MP3 disc can have 150-200 songs in one CD.
019.
Side A
Tab for side A
Cellophane tape
Fig.1
Fig.2
Fig.3
02-2322_EN 6/20/06 11:20 AM Page 09

Power Supply : AC
~
230V 50Hz
Power Consumption : : 15 watts
Output Power (Per channel) : 2 Watts X 2 RMS into 8 OHM
Radio Section : AM 525 – 1615 KHz
: FM 87.5 – 108 MHz
Compact Disc Section
Frequency Response (-3dB) : 60 – 16,000 Hz
Signal-to-noise Ratio : 60 dB
Harmonic Distortion : 0.4%
Compatible with : CD-DA, CD-R, CD-RW, MP3
Cassette section :
Tape speed : 4.75cm/sec.
Wow and Flutter : < 0.4%
Frequency response : 100Hz - 6.3KHz
02-2322_EN 6/20/06 11:20 AM Page 010
020.
La pagina si sta caricando...
La pagina si sta caricando...
La pagina si sta caricando...
La pagina si sta caricando...
La pagina si sta caricando...
La pagina si sta caricando...
La pagina si sta caricando...
La pagina si sta caricando...
La pagina si sta caricando...
La pagina si sta caricando...
La pagina si sta caricando...
La pagina si sta caricando...
La pagina si sta caricando...
La pagina si sta caricando...
La pagina si sta caricando...
La pagina si sta caricando...
La pagina si sta caricando...
La pagina si sta caricando...
La pagina si sta caricando...
La pagina si sta caricando...
La pagina si sta caricando...
La pagina si sta caricando...
La pagina si sta caricando...
La pagina si sta caricando...
La pagina si sta caricando...
La pagina si sta caricando...
La pagina si sta caricando...
La pagina si sta caricando...
La pagina si sta caricando...
La pagina si sta caricando...
La pagina si sta caricando...
La pagina si sta caricando...
La pagina si sta caricando...
La pagina si sta caricando...
La pagina si sta caricando...
La pagina si sta caricando...
La pagina si sta caricando...
La pagina si sta caricando...
La pagina si sta caricando...
La pagina si sta caricando...
La pagina si sta caricando...
La pagina si sta caricando...
La pagina si sta caricando...
La pagina si sta caricando...
La pagina si sta caricando...
La pagina si sta caricando...
La pagina si sta caricando...
La pagina si sta caricando...
La pagina si sta caricando...
La pagina si sta caricando...
La pagina si sta caricando...
La pagina si sta caricando...
La pagina si sta caricando...
La pagina si sta caricando...
La pagina si sta caricando...
La pagina si sta caricando...
La pagina si sta caricando...
La pagina si sta caricando...
La pagina si sta caricando...
La pagina si sta caricando...
La pagina si sta caricando...
La pagina si sta caricando...
La pagina si sta caricando...
La pagina si sta caricando...
La pagina si sta caricando...
La pagina si sta caricando...
La pagina si sta caricando...
La pagina si sta caricando...
La pagina si sta caricando...
La pagina si sta caricando...
La pagina si sta caricando...
La pagina si sta caricando...
La pagina si sta caricando...
La pagina si sta caricando...
La pagina si sta caricando...
La pagina si sta caricando...
La pagina si sta caricando...
La pagina si sta caricando...
La pagina si sta caricando...
La pagina si sta caricando...
La pagina si sta caricando...
La pagina si sta caricando...
La pagina si sta caricando...
La pagina si sta caricando...
La pagina si sta caricando...
La pagina si sta caricando...
La pagina si sta caricando...
La pagina si sta caricando...
La pagina si sta caricando...
La pagina si sta caricando...
La pagina si sta caricando...
La pagina si sta caricando...
-
 1
1
-
 2
2
-
 3
3
-
 4
4
-
 5
5
-
 6
6
-
 7
7
-
 8
8
-
 9
9
-
 10
10
-
 11
11
-
 12
12
-
 13
13
-
 14
14
-
 15
15
-
 16
16
-
 17
17
-
 18
18
-
 19
19
-
 20
20
-
 21
21
-
 22
22
-
 23
23
-
 24
24
-
 25
25
-
 26
26
-
 27
27
-
 28
28
-
 29
29
-
 30
30
-
 31
31
-
 32
32
-
 33
33
-
 34
34
-
 35
35
-
 36
36
-
 37
37
-
 38
38
-
 39
39
-
 40
40
-
 41
41
-
 42
42
-
 43
43
-
 44
44
-
 45
45
-
 46
46
-
 47
47
-
 48
48
-
 49
49
-
 50
50
-
 51
51
-
 52
52
-
 53
53
-
 54
54
-
 55
55
-
 56
56
-
 57
57
-
 58
58
-
 59
59
-
 60
60
-
 61
61
-
 62
62
-
 63
63
-
 64
64
-
 65
65
-
 66
66
-
 67
67
-
 68
68
-
 69
69
-
 70
70
-
 71
71
-
 72
72
-
 73
73
-
 74
74
-
 75
75
-
 76
76
-
 77
77
-
 78
78
-
 79
79
-
 80
80
-
 81
81
-
 82
82
-
 83
83
-
 84
84
-
 85
85
-
 86
86
-
 87
87
-
 88
88
-
 89
89
-
 90
90
-
 91
91
-
 92
92
-
 93
93
-
 94
94
-
 95
95
-
 96
96
-
 97
97
-
 98
98
-
 99
99
-
 100
100
-
 101
101
-
 102
102
-
 103
103
-
 104
104
-
 105
105
-
 106
106
-
 107
107
-
 108
108
-
 109
109
-
 110
110
-
 111
111
-
 112
112


in altre lingue
- English: Elta 2322 User manual
- français: Elta 2322 Manuel utilisateur
- español: Elta 2322 Manual de usuario
- Deutsch: Elta 2322 Benutzerhandbuch
- Nederlands: Elta 2322 Handleiding
- português: Elta 2322 Manual do usuário
- čeština: Elta 2322 Uživatelský manuál
- polski: Elta 2322 Instrukcja obsługi
- Türkçe: Elta 2322 Kullanım kılavuzu
Documenti correlati
Altri documenti
-
MPMan CSD18 Manuale del proprietario
-
Sony CMT-WS2D Manuale del proprietario
-
Denon DVD-M330 Manuale del proprietario
-
-
Sony CMT-CP555 Manuale del proprietario
-
Trevi CMP 570 BT Guida utente
-
Silvercrest KH 2280 Manuale del proprietario
-
Denon DVD-2800MKII Manuale del proprietario
-
basicXL BXL-JB10 Jukebox Manuale utente
-
Anki 2AAIC00003 Manuale utente