
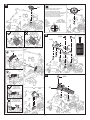
Bedienungsanleitung
Assembly & Instruction Manual
Manual de instrucciones
Instructions de montage
Manuale di assemblaggio e istruzioni
Montagehandleiding
Instrukcja montażu i obsługi
Manual de Instruções & Montagem
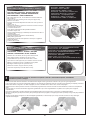
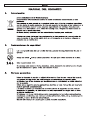
DE ROBOTERIGEL REAGIERT AUF GERÄUSCHE
EN ROBOTIC HEDGEHOG SOUND DETECTING ROBOT
ES ERIZO ROBÓTICO ROBOT QUE REACCIONA AL SONIDO
FR ROBOT HÉRISSON ROBOT CONTRÔLÉ PAR LE SON
IT ROBOT RICCIO ROBOT CHE RIVELA IL SUONO
NL ROBOT-EGEL GELUIDGESTUURDE ROBOT
PL ROBOTYCZNY JEŻ ROBOT WYKRYWAJĄCY DŹWIĘK
PT OURIÇO-ROBOT ROBOT DETECTOR DE SOM
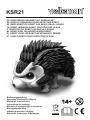
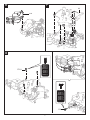
KSR21


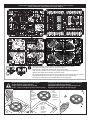
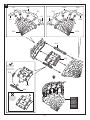
LIEFERUMFANG / CONTENTS / INCLUYE / CONTENU
INDICE / INHOUD / SPIS TREŚCI / INCLUI
Einführung / Product Introduction / Introducción / Introduction / Introduzione / Inleiding / Opis produktu
Apresentação do Produto
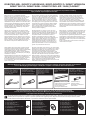
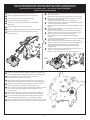
Benötigte Werkzeuge / Tools You May Need / Herramientas necesarias / Outillage nécessaire
Attrezzi che potrebbero servire / Benodigde gereedschappen / Niezbędne narzędzia
Ferramentas Que Vai Necessitar
Liste mit mechanischen Teilen / Mechanical Parts List / Lista de componentes mecánicos
Liste des composants mécaniques / Elenco delle parti meccaniche / Lijst met mechanische onderdelen
Lista części mechanicznych / Lista das Peças Mecânicas
Kunststoffteile / Plastic Parts / Piezas de plástico / Pièces en plastique / Parti in plastica / Plastic onderdelen
Elementy plastikowe / Peças em Plástico
Hinweis: Schneiden Sie die Grate vor Montage ab / Tip: Cut Off The Burrs Before Assembly
Consejo: Corte las rebabas antes del montaje. / Conseil : Couper les ébarbures des pièces avant le montage
Suggerimento: Tagliare via le sbavature prima di assemblare / Tip: Knip de bramen af voor de montage
Wskazówka: Przed montażem usunąć pozostałości ramki
Sugestão: Cortar as Rebarbas Antes da Montagem.
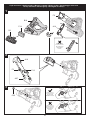
1
1
1
3
3
4
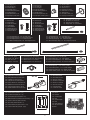
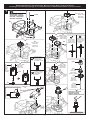
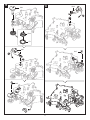
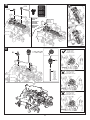
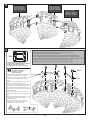
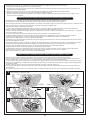
Montage der Getriebe-Box / Gear Box Assembly / Montar el engranaje / Monter la boîte de transmission
Assemblaggio della scatola degli ingranaggi / De tandwielen monteren / Montaż zespołu przekładni
Caixa de Velocidades
Achtung / Warning / Advertencia / Avertissement / Avvertenza / Waarschuwing / Uwaga / Advertência
Wie funktioniert das Gerät / How To Play / Funcionamiento / Jouer / Come giocare / Spelen / Używanie robota
Como Divertir-se
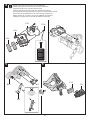
Die hintere Getriebebox testen / Rear Gear Box Testing / Probar el engranaje trasero
Tester la boîte de transmission arrière / Test della scatola degli ingranaggi posteriore
Het achterste tandwiel testen / Test tylnego zespołu przekładni / Testar a Caixa de Velocidades
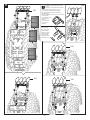
Körper montieren / Body Assembly / Montar el cuerpo / Monter le corps / Assemblaggio della corazza
De romp monteren / Montaż pancerza / Montagem do Corpo
8
17
24
28
29
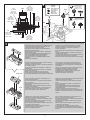
Die Batterien austauschen / How To Replace Batteries / Reemplazar las pilas / Remplacer les piles
Come sostituire le batterie / De batterijen vervangen / Wymiana baterii / Como Substituir As Pilhas 33
Problemlösung / Trouble Shooting / Solución de problemas / Problèmes et solutions / Risoluzione dei problemi
Probleemoplossing / Wykrywanie i usuwanie usterek / Resolução de Problemas 35
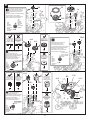
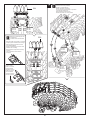
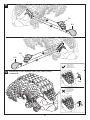
Kopf montieren / Head Assembly / Montar la cabeza / Monter la tête / Assemblaggio della testa
De kop monteren / Montaż głowy / Montagem da Cabeça

Einführung / Product Introduction / Introducción / Introduction / Presentazione del prodotto / Inleiding
Opis produktu / Apresentação do Produto
Liste mit mechanischen Teilen / Mechanical Parts List / Lista de componentes mecánicos
Liste de pièces mécaniques / Elenco delle parti Meccaniche / Lijst met mechanische onderdelen
Lista części mechanicznych / Lista das Peças Mecânicas
Das Produkt enthält scharfe Ecken und Spitzen. / Product contains functional edges and sharp points. / El producto incluye bordes funcionales y puntos afilados.
Certaines pièces sont pointues ou coupantes. / Il prodotto presenta bordi e spigoli appuntiti. / Dit product bevat functionele scherpe hoeken en punten.
Produkt zawiera ostre krawędzie i zakończenia. / O produto tem arestas funcionais e pontos afiados.
ROBOTER-IGEL / ROBOTIC HEDGEHOG / ERIZO ROBÓTICO / ROBOT HÉRISSON
ROBOT RICCIO / ROBOT-EGEL / ROBOTYCZNY JEŻ / OURIÇO-ROBOT
1
Alkali-Mangan-Batterien empfohlen
Alkaline batteries are Recommended
Pilas alcalinas recomendadas
Les piles alcalines sont
Si consigliano batterie alcaline
Seitenschneider / Diagonal Cutter
Alicates de corte en diagonal
Pince coupante / Tronchesino
Zijkniptang / Obcinak boczny
Cortador Diagonal
AAA-Batterie x 4 / Battery(AAA) x 4
Pila (AAA) x 4 / Pile AAA x 4
4 Batterie (AAA) / 4 x AAA-batterij
4 baterie (AAA) / 4 pilhas (AAA)
Schraubendreher / Screwdriver
Destornillador / Tournevis
Cacciavite / Schroevendraaier
Wkrętak / Chave de Fendas
P1 - Ritzel (weiß) x 1
P1 - Pinion Gear (White) Qty 1
P1 - Piñon (blanco) x 1
P1 - Pignon-engrenage (blanc) x
P1 - Ingranaggio a pignone (bianco) Q.tà 1
P1 - Rondsel (wit) x 1
P1 - Wałek zębaty (biały) 1 szt.
P1 - Pinhão (Branco) Quant. 1
P2 - Zahnrad (gelb) x 3
P2 - Gear (Yellow) Qty 3
P2 - Corona (amarillo) x 3
P2 - Engrenage (Jaune) x 3
P2 - Ruota dentata (gialla) Q.tà 3
P2 - Tandwiel (geel) x 3
P2 - Koło zębate (żółte) 3 szt.
P2 - Engrenagem (Amarelo) Quant. 3
P3 - Zahnrad (schwarz) x 1
P3 - Gear (Black) Qty 1
P3 - Corona (negro) x 1
P3 - Engrenage (Noir) x 1
P3 - Ruota dentata (nera) Q.tà 1
P3 - Tandwiel (zwart) x 2
P3 - Koło zębate (czarne) 1 szt.
P3 - Engrenagem (Amarelo) Quant. 1
Textmarker (fein) / Marker Pen (Fine)
Marcador (fino) / Feutre (Fin)
Evidenziatore (a punta fine)
Markeerstift (fijn) / Cienkopis
Marcador (Fino)
Lineal / Ruler / Regla / Règle
Righello / Liniaal / Linijka
Régua
Erleben Sie viel Lern- und Spielspaß mit diesem
interaktiven Igel. Im Gegensatz zu einem echten Igel rollt
dieser sich bei Gefahr nicht zusammen, um sich so vor
Feinden zu schützen. Dieser interaktive Igel ist ein
liebevoller Spielgefährte, der jede Menge Spaß machen
wird! Er verfügt über einen integrierten Schallsensor, der auf
Händeklatschen reagiert. Klatschen Sie in die Hände, dann
wird der Igel einige tolle Bewegungen ausführen: Abhängig
von wie viel Mal Sie in die Hände klatschen, wird er die
Stacheln aufrichten, sich zusammenrollen oder eine Rolle
rückwärts ausführen. Dieser Roboter-Igel verfügt über 3
verschiedene Betriebsmodi.
Have fun learning and playing with your Robotic Hedgehog.
Thankfully, it’s unlike a real Hedgehog, being defensive and
rolling up in a prickly ball all the time. This robotic pet is
friendly and will provide you hours of fun and fascination.
The roly-poly Hedgehog robot has a built-in sound sensor
which responds to claps. When a clap sound is detected,
the hedgehog goes into the programmed mode and carries
out extraordinary movements. Following different clapping
commands, the Hedgehog will extend its spines, curl its
body, or perform a perfectly executed backward roll.
There are 3 different ways to interact and play with this
amazing AI Robotic Hedgehog.
Aprenda y diviértase jugando con este erizo robótico.
A gran diferencia de un erizo de verdad, este no se
enrollará sobre sí mismo formando una bola de púas
cuando se vea amenazado. Esta encantadora mascota
robot hará las delicias de grandes y pequeños.
Lleva un sensor que reacciona ante las palmadas. Al dar
unas palmadas el erizo realizará movimientos divertidos:
Dependiendo del número de palmadas, el erizo sacará sus
púas, se enrollará sobre sí mismo efectuará una perfecta
voltereta hacia atrás. Este erizo robótico lleva 3 modos de
funcionamiento.
Apprenez en vous amusant avec ce hérisson interactif.
Heureusement, contrairement à un vrai hérisson, le robot
hérisson ne se roule pas en boule pour se protéger. Cet
animal robot est gentil et vous offrira des heures de plaisir.
Le robot hérisson potelé intègre un capteur sonore qui
réagit au battement de mains. Tapez dans vos mains et le
hérisson répond avec des mouvements rigolos. Le hérisson
dresse ses épines, se roule en boule ou fait une roulade
arrière en fonction du nombre de battements de mains. Le
robot hérisson AI dispose de 3 différents modes de jeu.
Divertiti ad imparare e a giocare con il tuo robot riccio.
Fortunatamente non si comporta come un vero riccio, che
sta sempre in posizione difensiva appallottolandosi in una
pallina pungente. Questo animale robotico amichevole è
una garanzia di tante ore di divertimento e diletto. Il
simpatico e rotondeggiante robot riccio è dotato di un
sensore acustico integrato che risponde ai battiti delle mani.
Quando rileva un battito delle mani, il riccio imposta la
modalità programmata e compie movimenti divertenti. A
seconda dei comandi impartiti con il battito delle mani, il
riccio drizzerà le spine, arriccerà il corpo o eseguirà una
perfetta capriola all'indietro. Ci sono i tre modi diversi per
giocare con questo fantastico robot riccio.
Beleef veel leer- en speelplezier met deze interactieve egel.
In tegenstelling tot een echte egel rolt deze zich niet op tot
een stekelige bol om zich te verdedigen. Dit robotdiertje is
lief en zorgt voor urenlang speelplezier. De rollende
robot-egel heeft een ingebouwde geluidssensor die reageert
op handgeklap. De egel maakt grappige bewegingen en zal,
afhankelijk van het aantal keren dat u in uw handen klapt ,
zijn stekels recht zetten, zich oprollen of een achterwaartse
koprol maken.
Er zijn 3 verschillende modi om met deze AI robot-egel te
communiceren en te spelen.
Nauka i zabawa robotycznym jeżem to świetna rozrywka.
Na szczęście nie zachowuje się jak prawdziwy jeż, który
ciągle przyjmuje pozycję obronną i zwija się w kłującą kulkę.
Ten przyjacielski robotyczny zwierzak gwarantuje
użytkownikowi wiele godzin zabawy i rozrywki. Okrąglutki
robot-jeż ma wbudowany czujnik akustyczny, który reaguje
na klaskanie. Po wykryciu
dźwięku klaskania jeżyk przechodzi w zaprogramowany tryb
i zaczyna wykonywać śmieszne ruchy W zależności od
rodzaju klaśnięcia, jeżyk może wysunąć kolce, zwinąć się
lub wykonać doskonały technicznie przewrót do tyłu.
Z tym niesamowitym robotycznym jeżykiem można bawić
się na 3 różne sposoby.
Divirta-se e aprendendo e brincando com o seu Ouriço-Robot.
Felizmente, não é parecido com um verdadeiro ouriço, sempre
desconfiado e enrolando-se numa bola de espinhos o tempo
todo. Este animal de estimação robótico é amigável e
proporcionará horas de diversão e deslumbramento. Este
rechonchudo Ouriço-robot tem um sensor de som embutido que
responde o bater das palmas. Sempre que detecta o som do
bater da palmas, o ouriço entra num dos modos programados e
executa movimentos extraordinários. Seguindo as várias ordens
através das palmas, o Ouriço irá levantar os espinhos, enrolar o
corpo ou executar uma perfeita cambalhota para trás.
Existem 3 diferentes formas de interagir e de brincar com este
extraordinário Ouriço Robótico AI.
Benötigte Werkzeuge / Tools You May Need / Herramientas necesarias / Outillage nécessaire / Attrezzi che potrebbero
servire / Benodigde gereedschappen / Niezbędne narzędzia / Ferramentas Que Pode Necessitar
Alkalinebatterijen zijn
Zalecane są baterie
Recomenda-se a utilização de
pilhas alcalinas.

1:1 1:1
1:1
1:1
1:1
2
DC 6V
P16 - Batteriehalter mit Anschluss (DC 6V)
P16 - Battery Holder With Connector DC 6V
P16 - Portapilas con conector (DC 6V)
P16 - Porte-piles avec connecteur (DC 6C)
P16- Presa per batterie con connettore DC 6V
P16 - Batterijhouder met connector (DC 6 V)
P16 - Uchwyt do baterii ze złączem DC 6V
P16 - Suporte de Bateria Com Conetor DC 6V
P17 - Motor mit Anschluss
P17 - Motor With Connector
P17 - Motor con conector
P17 - Moteur avec connecteur
P17 - Motore con connettore
P17 - Motor met connector
P17 - Silnik ze złączem
P17 - Motor Com Conetor
P4 - Zahnrad (grün) x 1
P4 - Gear (Green) Qty 1
P4 - Corona (verde) x 1
P4 - Engrenage (Vert) x 1
P4 - Ruota dentata (verde) Q.tà 1
P4 - Tandwiel (groen) x 1
P4 - Koło zębate (zielone) 1 szt.
P4 - Engrenagem (Verde) Quant. 1
P7 - Blechschraube
P7 - Tapping Screw
P7 - Tornillo autoroscante
P7 - Vis taraudeuse
P7 - Vite autofilettante
P7 - Zelftappende schroef
P7 - Wkręt samogwintujący
P7 - Parafuso de Rosca
P8 - Blechschraube
P8 - Tapping Screw
P8 - Tornillo autoroscante
P8 - Vis taraudeuse
P8 - Vite autofilettante
P8 - Zelftappende schroef
P8 - Wkręt samogwintujący
P8 - Parafuso de Rosca
P9 - Runde Welle / P9 - Round Shaft
P9 - Eje redondo / P9 - Arbre rond
P9 - Rullo rotondo / P9 - Ronde as
P9 - Okrągły wałek / P9 - Eixo Redondo
P10 - Sechskantwelle (kurz) / P10 - Hex Shaft (Short)
P10 - Eje hexagonal (corto) / P10 - Arbre hexagonal (court)
P10 - Rullo esagonale (corto) / P10 - Zeskant-as (Kort)
P10 - Wałek sześciokątny (krótki) / P10 - Eixo Hexagonal (Curto)
P12 - Feder / P12 - Spring
P12 - Resorte / P12 - Ressort
P12 - Molla / P12 - Veer
P12 - Sprężyna / P12 - Mola
P13 - Torsionsfeder / P13 - Torsion Spring
P13 - Resorte de torsión / P13 - Ressort de torsion
P13 - Molla di torsione / P13 - Torsieveer
P13 - Sprężyna skrętna / P13 - Mola de Torção
P14 - Metallteil (Würfel) / P14 - Iron Bar (Cube)
P14 - Pieza metálica (cubo) / P14 - Cube métallique
P14 - Elemento di metallo (blocco) / P14 - Metalen blokje
P14 - Element metalowy (bloczek) / P14 - Barra de Ferro (Cubo)
P15 - Metallteil (Zylinder) / P15 - Iron Bar (Cylinder)
P15 - Pieza metálica (cilindro) / P15 - Cylindre métallique
P15 - Elemento di metallo (rullo) / P15 - Metalen cilinder
P15 - Element metalowy (walec) / P15 - Barra de Ferro (Cilindro)
P11 - Sechskantwelle (lang) / P11 - Hex Shaft (Long)
P11 - Eje hexagonal (Largo) / P11 - Arbre hexagonal (long)
P11 - Rullo esagonale (lungo) / P11 - Zeskant-as (Lang)
P11 - Wałek sześciokątny (długi) / P11 - Eixo Hexagonal (Comprido)
P5 - Zahnrad (rot) x 1
P5 - Gear (Red) Qty 1
P5 - Corona (rojo) x 1
P5 - Engrenage (Rouge) x 1
P5 - Ruota dentata (rossa) Q.tà 1
P5 - Tandwiel (rood) x 1
P5 - Koło zębate (czerwone) 1 szt.
P5 - Engrenagem (Vermelho) Quant. 1
P6 - Zahnrad mit Welle x 1
P6 - Gear With Shaft Qty 1
P6 - Corona con eje x 1
P6 - Engrenage avec arbre x 1
P6 - Ruota dentata con rullo Q.tà 1
P6 - Tandwiel met as x 1
P6 - Koło zębate z wałkiem 1 szt.
P6 - Engrenagem Com Eixo Quant. 1
P18 - Kunststoffstreifen (Ersatzteil : 1 St.)
P18 - PP Plastic Sheet (Spare part : 1 pc)
P18 - Tira de plástico (pieza de repuesto :1 ud.)
P18 - Bandes de fixation en plastique (pièce de rechange : 1 pc)
P18 - Striscia in plastica PP (parte di ricambio)
P18 - plastic strips (reserveonderdeel : 1 x)
P18 - Pasek plastikowy PP (część zamienna : 1 szt.)
P18 - Folha em Plástico PP (reposição :1 peça)
P19 - Platine
P19 - PC Board
P19 - Circuito impreso
P19 - PCB
P19 - Circuito stampato
P19 - PCB
P19 - Płytka drukowana
P19 - Placa de Circuitos
Impressos

2
2 1
E
F
12
3
MADE IN TAIWAN
B
1 5
6
18
13
10
14 15 16
17 21
19
11
12
20
8
9
2
3
74
MADE IN TAIWAN
A
1312
23 24
20 21
22
25 26 27
87
6
5
4
1 3
2
MADE IN TAIWAN
11
17 18
19
15 1614
10
9
D
1
1
10 12
16
14
11 13
17
15 18
20
19
2 4
5
6 8 9
7
3
MADE IN TAIWAN
C
31 31
31 31 31
31
31
33
33
15 30
35 36
37
34
32
32
1 2 3 4 5 6 7 8 9
MADE IN TAIWAN
10 11 12 13 14
16 17 18 19 20 21 22 23 24 25 26 27 28 29
Kunststoffteile / Plastic Parts / Piezas de plástico / Pièces en plastique / Parti in plastica
Plastic onderdelen / Części plastikowe / Peças Plásticas
3
Schneiden Sie gegebenenfalls die Kunststoffteile. Schneiden Sie diese aber nicht im Voraus.
Cut the plastic parts when they are required. Do not cut them in advance.
Si fuera necesario, corte las piezas de plástico, pero no las corte de antemano.
Couper les pièces en plastique au fur et à mesure du montage. Ne pas couper les pièces en avance.
Tagliare le parti in plastica quando necessario. Non tagliarle in anticipo.
Knip de plastic onderdelen pas uit op het moment dat u ze nodig hebt. Knip de onderdelen niet uit op voorhand uit.
Części plastikowe należy wycinać w momencie, gdy są potrzebne. Nie wycinać z wyprzedzeniem.
Corte as peças em plástico quando for recomendado. Não as corte antecipadamente.
Hinweis: Schneiden Sie die Grate vor Montage ab.
Tip: Cut off the burrs before assembly
Consejo: Corte las rebabas antes del montaje
Conseil : Couper les ébarbures des pièces avant le montage
Suggerimento: tagliare via le sbavature prima di assemblare
Tip: Knip de bramen af voor de montage
Wskazówka: Przed montażem usunąć pozostałości ramki
Sugestão: Corte as rebarbas antes da montagem.
Grat
Burr
Rebaba
Ebarbure
Sbavatura
Braam
Pozostałość
Rebarba
Grat
Burr
Rebaba
Ebarbure
Sbavatura
Braam
Pozostałość
Rebarba
Grat
Burr
Rebaba
Ebarbure
Sbavatura
Braam
Pozostałość
Rebarba

EINDRÜCKEN / PUSH DOWN
PRESIONAR / PRESSER
PREMERE / INDRUKKEN
WCISNĄĆ / EMPURRE PARA BAIXO
4
1
B5
P9x2
P6
P2
P2
P2
P1
A24
P5
P10
P4
P17
P3
EINSTECKEN! / !PUSH IN
¡INTRODUCIR! / PRESSER
INFILARE! / ! INDRUKKEN
WETKNĄĆ! / EMPURRE
Montage der Getriebe-Box / Gear Box Assembly / Montar el engranaje / Monter la boîte de transmission
Assemblaggio della scatola degli ingranaggi / De versnellingsbak monteren / Montaż zespołu przekładni / Caixa de Velocidades
Schwarz / Black
Negro / Noir
Nero / Zwart
Czarne / Preto
gelb / Yellow
amarillo / Jaune
giallo / Geel
żółte / Amarelo
Gelb / Yellow
Amarillo / Jaune
Giallo / Geel
Żółte / Amarelo
Schwarz / Black
Negro / Noir
Nero / Zwart
Czarne / Preto
Rot
Red
Rojo
Rouge
Rosso
Rood
Czerwone
Vermelho
Falsch / Incorrect
Incorrecto / Incorrect
Non corretto / Fout
Nieprawidłowo
Incorreto
Falsch / Incorrect
Incorrecto / Incorrect
Non corretto / Fout
Nieprawidłowo
Incorreto
Korrekt / Correct
Correcto / Correct
Corretto / Goed
Prawidłowo / Correto
Korrekt / Correct
Correcto / Correct
Corretto / Goed
Prawidłowo / Correto
Gelb / Yellow
Amarillo / Jaune
Giallo / Geel
Żółte / Amarelo
Rot / Red
Rojo / Rouge
Rosso / Rood
Czerwone / Vermelho
grün / Green
verde / Vert
verde / Groen
zielone / Verde
Kurz / Short
Corto / Court
Corto / Kort
Krótki / Curto

Falsch / Incorrect
Incorrecto / Incorrect
Non corretto / Fout
Nieprawidłowo / Incorreto
Korrekt / Correct
Correcto / Correct
Corretto / Goed
Prawidłowo / Correto
P16
AAA(x4)
˙Das Herausnehmen oder Austauschen der Batterien sollte nur
von einer erwachsenen Person oder unter Aufsicht einer
erwachsenen Person durchgeführt werden.
˙Vermeiden Sie einen Kurzschluss der Kontaktpunkte des
Batteriefachs oder der Batterien.
˙Mischen Sie keine alten und neuen Batterien oder Batterien
unterschiedlicher Typen.
˙Mischen Sie weder Alkali-Mangan, Standard (Karbon-Zink),
noch wiederaufladbare (Nickel-Cadmium) Batterien.
˙Legen Sie die Batterien immer polungsrichtig ein.
Versuchen Sie niemals, nichtaufladbare Batterien wieder
aufzuladen.
˙Entfernen Sie leere Batterien.
˙La rimozione e la sostituzione delle batterie deve essere
eseguita da un adulto o sotto la supervisione di un adulto.
˙Evitare di cortocircuitare i contatti nel vano batterie o i
terminali delle batterie.
˙Non mescolare batterie usate e batterie nuove o batterie di tipi
diversi.
˙Non mescolare batterie alcaline, standard (zinco-carbonio) o
ricaricabili (nichel-cadmio).
˙Le batterie devono essere inserite secondo la polarità corretta.
Non tentare di ricaricare batterie non ricaricabili.
˙Rimuovere le batterie esaurite dal prodotto per evitare perdite.
˙Removals and replacement of batteries should be carried out
by adults or under adult supervision.
˙Avoid short circuiting the contacts in the battery compartment
or the battery terminals.
˙Do not mix used batteries and new batteries or batteries of
different types.
˙Do not mix alkaline, standard (carbon-zinc), or rechargeable
(nickel-cadmium) batteries.
˙Batteries are to be inserted with the correct polarity.
Do not attempt to recharge non-rechargeable batteries.
˙Remove exhausted batteries from the product to avoid leakage.
˙Het verwijderen en vervangen van batterijen dient door of
onder toezicht van een volwassene te worden uitgevoerd.
˙Vermijd kortsluiting bij de contactpunten in het batterijvak of
van de batterij.
˙Gebruik geen oude (lege) en nieuwe of batterijen door elkaar.
˙Gebruik geen alkalische, standaard (carbon-zink) of
oplaadbare (nikkel-cadmium) batterij door elkaar.
˙De batterijen moeten volgens de juiste polariteit worden
geplaatst.Herlaad geen alkalinebatterijen.
˙ Verwijder lege batterijen uit het product.
˙Las pilas sólo deben ser quitadas o reemplazadas por un
adulto o bajo su supervisión.
˙Evite los cortocircuites en los contactos del compartimiento
de pilas o las pilas.
˙Nunca mezcle pilas agotadas y pilas nuevas o pilas de
diferentes tipos.
˙No mezcle pilas alcalinas, estándar (carbón-zinc) o baterías
recargables (níquel-cadmio).
˙Introduzca las pilas correctamente. Compruebe siempre la
polaridad.Nunca intente recargar pilas no recargables.
˙Saque las pilas agotadas para evitar derrames.
˙Wyjmowanie i wymiana baterii powinny być dokonywane przez
osoby dorosłe lub pod ich nadzorem.
˙Unikać zwierania styków w gnieździe baterii lub końcówek
baterii.
˙Nie stosować jednocześnie zużytych i nowych baterii, ani
baterii różnych typów.
˙Nie należy łączyć baterii alkalicznych ze standardowymi
(węglowo-cynkowymi) ani z bateriami doładowywanymi
(niklowo-kadmowymi).
˙Podczas montażu baterii należy zwrócić uwagę na
biegunowość. Nie ładować baterii, które nie są akumulatorami.
˙Zużyte baterie należy wyjąć z produktu, aby nie dopuścić do
wycieku.
˙L'enlèvement et le remplacement des piles doivent être
effectués par un adulte ou sous sa surveillance.
˙Eviter de court-circuiter les contacts du compartiment à piles
ou les bornes des piles.
˙Ne pas utiliser simultanément des piles neuves et des piles
usagées, de même que des piles différentes.
˙Ne pas mélanger les piles alcalines, standard (carbone-zinc) et
rechargeables (nickel-cadmium).
˙Les piles doivent être insérées en respectant la polarité.
Ne jamais recharger des piles alcalines.
˙Oter les piles usagées du produit.
˙Retirar e substituir as pilhas deve ser sempre feito por um
adulta, ou sob a supervisão de um adulto.
˙Evite provocar curto-circuitos no compartimento das pilhas ou
nos terminais das mesmas.
˙Não não misture pilhas gastas e pilhas novas ou pilhas de
tipos diferentes
˙Não misture pilhas alcalinas, vulgares (carbono-zinco), ou
recarregáveis (níquel-cádmio).
˙As pilhas têm de ser colocadas respeitando sempre a
polaridade.Não tente recarregar baterias não recarregáveis
˙Retire as pilhas gastas do aparelho para evitar que comecem a
derramar.
5
3
2
P3
P4
P2
P2
P2
P6
A24
B6
B16
grün / Green
verde / Vert
verde / Groen
zielone / Verde
weiß / White
blanco / Blanc
bianco / Wit
białe / Branco
Gelb / Yellow
Amarillo / Jaune
Giallo / Geel
Żółte / Amarelo
Gelb / Yellow
Amarillo / Jaune
Giallo / Geel
Żółte / Amarelo
Gelb / Yellow
Amarillo / Jaune
Giallo / Geel
Żółte / Amarelo
Schwarz / Black
Negro / Noir
Nero / Zwart
Czarne / Preto
Draufsicht
Top View
Vista desde arriba
Vue supérieure
Vista superiore
Bovenkant
Widok z góry
Vista de Cima

P16
Textmarker (fein) / Marker Pen (Fine) / Marcador (fino) / Feutre (Fin)
Evidenziatore (a punta fine) / Markeerstift (Fijn) / Cienkopis
Marcador (Fino)
1 2 3 4 5 6 7 8 9 12 13 14 15 16 17 18 19 20 21 22 23 24 25 26 27 28 29 3010
cm
4.5 cm
16.5 cm
5
DRÜCKEN / PUSH / PRESIONAR / PRESSER / SPINGERE / INDRUKKEN / WCISNĄĆ / PUSH
Befestigen Sie das Kabel so, dass die Markierung mit der gestrichelten Linie übereinstimmt.
Align the mark with the dashed line
Coloque el cable de tal manera que la marca coincida con la línea discontinua.
Aligner le câble avec la ligne en pointillés.
Inserire il contrassegno rispettivamente alla
Leg de kabel zo dat de markering op één lijn ligt met de stippellijn
Oznaczenie musi znajdować się równo z linią przerywaną
Alinhe a marca com a linha tracejada
12
Markierung
Mark
Marca
Marquage
Contrassegno
Markering
Oznaczenie
Marca
Falsch / Incorrect
Incorrecto / Incorrect
Non corretto / Fout
Nieprawidłowo
Incorreto
Korrekt / Correct
Correcto / Correct
Corretto / Goed
Prawidłowo / Correto
6
4Messen und markieren / Measuring & making a mark
Medir y marcar / Mesurer & marquer
Misurazione e contrassegno / Meten & markeren
Pomiar i oznaczenie / Medir & marcar
Batteriehalter mit Anschluss
Battery Holder With Connector
Portapilas con conector
Porte-piles avec connecteur / Presa per batterie con connettore / Batterijhouder met connector / Uchwyt do baterii ze złączem / Suporte de Bateria Com Conetor
Skala 1:1 / Scale 1:1
Escala 1:1 / Échelle 1:1
Scala 1:1 / Schaal 1:1
Skala 1:1 / Escala 1:1

P7x3
Scale 1:1
8
P8
Skala 1:1
Scale 1:1
Escala 1:1
Échelle 1:1
Scala 1:1
Schaal 1:1
Skala 1:1
Escala 1:1
Skala 1:1
Scale 1:1
Escala 1:1
Échelle 1:1
Scala 1:1
Schaal 1:1
Skala 1:1
Escala 1:1
Klicken / Click
Clic / Clic
Clic / Klik
Klik / Clicar
Klicken / Click
Clic / Clic
Clic / Klik
Klik / Clicar
7
6 7
A23
B7

8
Die hintere Getriebebox testen / Rear Gear Box Testing / Probar el engranaje trasero
Tester la boîte de transmission arrière / Test della scatola degli ingranaggi posteriore
De achterste versnellingsbak testen / Test tylnego zespołu przekładni
Testar a Caixa de Velocidades
Verbinden Sie die zwei Kabel mit der Platine (siehe Abb.).
Insert two terminals into the PC board, as shown in the picture.
Conecte los dos cables al circuito impreso (véase fig.).
Connecter les deux câbles au PCB (voir ill.).
Allacciare i due connettori al circuito stampato, come dimostrato
nell’immagine.
Sluit de twee kabels aan op de printplaat (zie afb.).
Podłączyć dwa złącza do płytki drukowanej, jak pokazano na ilustracji.
Insira dois terminais na placa de circuitos impressos, conforme
indicado na imagem.
Lassen Sie das Getriebe während 10 Sekunden funktionieren. Klatschen Sie
dann ein Mal in die Hände. Das Getriebe dreht nun gegen den Uhrzeigersinn.
After the gear started running 10 seconds, clap your hands once.
It is considered normal if the gear runs reversely.
Deje que el engranaje funcione durante 10 segundos. Luego, dé una sola
palmada. Ahora, el engranaje girará en sentido contrario a las agujas del reloj.
Laisser tourner l'engrenage pendant 10 secondes et taper une fois dans vos
mains. Il est normal que l'engrenage tourne dans le sens inverse.
Dopo 10 minuti di funzionamento della scatola di ingranaggi, battere le mani una
volta. La scatola di ingranaggi cambierà la direzione di lavoro, che è un
fenomeno normale.
Laat het tandwiel gedurende 10 seconden draaien en klap éénmaal in uw
handen. Het is normaal dat het tandwiel in de omgekeerde richting draait.
Po 10 sekundach pracy zespołu przekładni, jednokrotnie klasnąć w dłonie.
Zespół przekładni zmieni kierunek pracy, co jest zjawiskiem normalnym.
Após a engrenagem estar a funcionar durante uns 10 segundos, bata as palmas
uma vez. Considera-se normal se esta começar a funcionar no sentido inverso.
1. Halten Sie die schwarze Taste (Platine) während 2 Sekunden gedrückt. Die
LEDs (Auge) leuchten.
2. Drücken Sie die Taste wieder und die LEDs leuchten grün und orange.
1. Long-press the black switch in the middle of PC board for 2 seconds.
Hedgehog eyes (LED) will light up.
2. Press the button again and LED (green & orange) will light up.
1. Mantenga pulsado el botón negro (circuito impreso) durante 2 segundos.
Los ojos del erizo (LEDs) se iluminarán.
2. Vuelve a pulsar brevemente el botón y los LEDs se iluminarán en verde y
naranja.
1. Maintenir enfoncé le bouton sur le PCB pendant 2 secondes. Les yeux
(LED) du hérisson s'allument.
2. Appuyer à nouveau sur le bouton et la LED (vert & orange) s'allume
1. Premere per due minuti il tasto nero che si trova in mezzo al circuito
stampato. Gli occhi del riccio si illumineranno (diodi LED).
2. Premere il tasto di nuovo – si illumineranno i diodi LED (verde e
arancione).
1. Houd de zwarte knop op de printplaat gedurende 2 seconden ingedrukt. De
ogen (leds) van de egel lichten op.
2. Druk nogmaals kort op de knop en de leds (groen & oranje) lichten op.
1. Wcisnąć i przytrzymać przez 2 sekundy czarny przycisk znajdujący się na
środku płytki drukowanej. Zaświecą się oczy jeżyka (diody LED).
2. Nacisnąć przycisk ponownie - zaświecą się diody LED (zielona i
pomarańczowa).
1. Pressione o interruptor preto da placa de circuitos impressos durante 2
segundos. Os olhos (LED) do ouriço acendem.
2. Pressione o botão novamente e o LED (verde & laranja) acende.
12
2
2
2
2
2
2
2
3
3
3
3
3
3
3
3
1
1
1
1
1
1
1
Reverse
LED
LED

9
10
9
C36
B17
B17
B18
1
B21
1
2
2
E1
D19

10
11
12
A6
P13
12
Führen Sie diesen Schritt sorgfältig aus.
Please execute this step accurately.
Efectúe con cuidado este paso.
Effectuer cette étape correctement.
Occorre eseguire questo passaggio con precisione.
Voer deze stap nauwkeurig uit.
Należy dokładnie wykonać ten krok.
Execute este passo com a maior precisão.
Korrekt / Correct
Correcto / Correct
Corretto / Goed
Prawidłowo / Correto
Falsch / Incorrect
Incorrecto / Incorrect
Non corretto / Fout
Nieprawidłowo / Incorreto
Falsch / Incorrect
Incorrecto / Incorrect
Non corretto / Fout
Nieprawidłowo / Incorreto

8
11
13
14
15
A1
A2
Schneiden Sie die Grate vor Montage ab.
Cut off the burrs before assembly.
Corte las rebabas antes del montaje.
Couper les ébarbures des pièces avant le montage.
Eliminare le sbavature prima dell'assemblaggio.
Knip de bramen af voor de montage.
Przed montażem usunąć pozostałości ramki.
Cortar as rebarbas antes da montagem.
P7x2
A7
A19
A26
B3
P12
1
2
Korrekt / Correct
Correcto / Correct
Corretto / Goed
Prawidłowo / Correto
Falsch / Incorrect
Incorrecto / Incorrect
Non corretto / Fout
Nieprawidłowo / Incorreto
Falsch / Incorrect
Incorrecto / Incorrect
Non corretto / Fout
Nieprawidłowo / Incorreto
Korrekt / Correct
Correcto / Correct
Corretto / Goed
Prawidłowo / Correto
Skala 1:1
Scale 1:1
Escala 1:1
Échelle 1:1
Scala 1:1
Schaal 1:1
Skala 1:1
Escala 1:1
Grat / Burr
Rebaba / Ebarbure
Sbavatura / Braam
Pozostałość / Rebarba
Grat
Burr
Rebaba
Ebarbure
Sbavatura
Braam
Pozostałość
Rebarba

17
P8
B2
C32
P11
D9
12
16
1
1
2
2
Skala 1:1
Scale 1:1
Escala 1:1
Échelle 1:1
Scala 1:1
Schaal 1:1
Skala 1:1
Escala 1:1
Klicken / Click
Clic / Clic
Clic / Klik
Klik / Clicar
DRÜCKEN
PUSH
PRESIONAR
PRESSER
SPINGERE
INDRUKKEN
WCISNĄĆ
PUSH
Lang
Long
Largo
Long
Lungo
Lang
Długi
Comprido
Korrekt / Correct
Correcto / Correct
Corretto / Goed
Prawidłowo / Correto
Falsch / Incorrect
Incorrecto / Incorrect
Non corretto / Fout
Nieprawidłowo / Incorreto
Falsch / Incorrect
Incorrecto / Incorrect
Non corretto / Fout
Nieprawidłowo / Incorreto

P8
A4
13
18
19 20
B17
Scale 1:1
D17
E2
B14
B1
A20
B12
Falsch / Incorrect
Incorrecto / Incorrect
Non corretto / Fout
Nieprawidłowo
Incorreto
Falsch / Incorrect
Incorrecto / Incorrect
Non corretto / Fout
Nieprawidłowo
Incorreto
Korrekt / Correct
Correcto / Correct
Corretto / Goed
Prawidłowo / Correto
Skala 1:1 / Scale 1:1
Escala 1:1 / Échelle 1:1
Scala 1:1 / Schaal 1:1
Skala 1:1 / Escala 1:1

Klicken / Click
Clic / Clic
Clic / Klik
Klik / Clicar
14
A18
B15
B9
A15
B9
C35
B9x2
A5
D18
E2
B9 C35
A15
A18
B9
B9
B15
1
2
Grat
Burr
Rebaba
Ebarbure
Sbavatura
Braam
Pozostałość
Rebarba
Grat / Burr / Rebaba
Ebarbure / Sbavatura
Braam / Pozostałość
Rebarba
Grat / Burr / Rebaba
Ebarbure / Sbavatura
Braam / Pozostałość
Rebarba
Grat / Burr / Rebaba
Ebarbure / Sbavatura
Braam / Pozostałość
Rebarba
Grat
Burr
Rebaba
Ebarbure
Sbavatura
Braam
Pozostałość
Rebarba
Schneiden Sie die Grate vor Montage ab.
Cut off the burrs before assembly.
Corte las rebabas antes del montaje.
Couper les ébarbures des pièces avant le montage.
Eliminare le sbavature prima dell'assemblaggio.
Knip de bramen af voor de montage.
Przed montażem usunąć pozostałości ramki.
Cortar as rebarbas antes da montagem.
Korrekt / Correct
Correcto / Correct
Corretto / Goed
Prawidłowo / Correto
Korrekt / Correct
Correcto / Correct
Corretto / Goed
Prawidłowo / Correto
Korrekt / Correct
Correcto / Correct
Corretto / Goed
Prawidłowo / Correto
Korrekt / Correct
Correcto / Correct
Corretto / Goed
Prawidłowo / Correto
21
Schneiden Sie die Grate vor Montage ab.
Cut off the burrs before assembly.
Corte las rebabas antes del montaje.
Couper les ébarbures des pièces avant le
montage.
Eliminare le sbavature prima dell'assemblaggio.
Knip de bramen af voor de montage.
Przed montażem usunąć pozostałości ramki.
Cortar as rebarbas antes da montagem.
Falsch / Incorrect
Incorrecto / Incorrect
Non corretto / Fout
Nieprawidłowo
Incorreto
Falsch / Incorrect
Incorrecto / Incorrect
Non corretto / Fout
Nieprawidłowo
Incorreto
Falsch / Incorrect
Incorrecto / Incorrect
Non corretto / Fout
Nieprawidłowo
Incorreto
Falsch / Incorrect
Incorrecto / Incorrect
Non corretto / Fout
Nieprawidłowo
Incorreto
Schneiden Sie die Grate vor Montage ab.
Cut off the burrs before assembly.
Corte las rebabas antes del montaje.
Couper les ébarbures des pièces avant le montage.
Eliminare le sbavature prima dell'assemblaggio.
Knip de bramen af voor de montage.
Przed montażem usunąć pozostałości ramki.
Cortar as rebarbas antes da montagem.
Grat
Burr
Rebaba
Ebarbure
Sbavatura
Braam
Pozostałość
Rebarba
Grat
Burr
Rebaba
Ebarbure
Sbavatura
Braam
Pozostałość
Rebarba
Grat
Burr
Rebaba
Ebarbure
Sbavatura
Braam
Pozostałość
Rebarba

Korrekt / Correct
Correcto / Correct
Corretto / Goed
Prawidłowo / Correto
Falsch / Incorrect
Incorrecto / Incorrect
Non corretto / Fout
Nieprawidłowo
Incorreto
Falsch / Incorrect
Incorrecto / Incorrect
Non corretto / Fout
Nieprawidłowo
Incorreto
P8
C32
8
15
23
24
24
25
B4
A8
B2
D8
A22
P8
P7
P7
B17
Skala 1:1 / Scale 1:1
Escala 1:1 / Échelle 1:1
Scala 1:1 / Schaal 1:1
Skala 1:1 / Escala 1:1
Skala 1:1 / Scale 1:1
Escala 1:1 / Échelle 1:1
Scala 1:1 / Schaal 1:1
Skala 1:1 / Escala 1:1
22
Skala 1:1
Scale 1:1
Escala 1:1
Échelle 1:1
Scala 1:1
Schaal 1:1
Skala 1:1
Escala 1:1

A26
P8
B2 B2
28
27
B11
A9
26
A21
ENTFERNEN!
REMOVE
iQUITAR!
!RETIRER
RIMUOVERE!
!VERWIJDER
USUNĄĆ!
!RETIRAR
ENTFERNEN!
REMOVE
iQUITAR!
!RETIRER
RIMUOVERE!
!VERWIJDER
USUNĄĆ!
!RETIRAR
16
Skala 1:1
Scale 1:1
Escala 1:1
Échelle 1:1
Scala 1:1
Schaal 1:1
Skala 1:1
Escala 1:1
Korrekt / Correct
Correcto / Correct
Corretto / Goed
Prawidłowo / Correto
Falsch / Incorrect
Incorrecto / Incorrect
Non corretto / Fout
Nieprawidłowo
Incorreto
Falsch / Incorrect
Incorrecto / Incorrect
Non corretto / Fout
Nieprawidłowo
Incorreto

Körper 01
Body 01
Cuerpo 01
Corps 01
Corazza 01
Romp 01
Pancerz 01
Corpo 01
Korrekt / Correct
Correcto / Correct
Corretto / Goed
Prawidłowo / Correto
Falsch / Incorrect
Incorrecto / Incorrect
Non corretto / Fout
Nieprawidłowo
Incorreto
Grat / Burr / Rebaba
Ebarbure / Sbavatura
Braam / Pozostałość
Rebarba
17
1
1
1
2
2
3
3
4
45
5
C12
C27
C28
C29 C14
C15
C30
C13
C11
C26
D10
A13
C32
C32
D6
D7
A3
A3
A3
D10
D10
D10 D10
D10
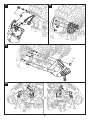
Körper montieren / Body Assembly / Montar el cuerpo / Monter le corps / Assemblaggio della corazza
De romp monteren / Montaż pancerza / Montagem do Corpo
Falsch / Incorrect
Incorrecto / Incorrect
Non corretto / Fout
Nieprawidłowo
Incorreto
Bemerkung: die Löcher von D6 und D7 sind nicht
ganz rund. Stecken Sie A3 richtig in die Löcher.
Please note the marked holes at the edge of D6
and D7 are not completely circular. Kindly place A3
in a right position to precisely connect to the holes.
Observación: los agujeros de D6 y D7 no son
completamente redondos. Introduzca A3
correctamente en los agujeros. corte las rebabas
Noter que les trous marqués dans D6 et D7 ne sont
pas complètement ronds. Positionner A3 de façon
à ce que les extrémités sont alignées avec les
trous.
Notate che i buchi marcati sul bordo D6 e D7 non
sono rotondi. Mettere A3 in posizione giusta, per
collegare precisamente con i buchi.
Merk op dat de gemarkeerde gaten in D6 en D7
niet helemaal rond zijn. Plaats A3 zodanig dat de
uiteinden uitgelijnd zijn met de gaten.
Należy zwrócić uwagę, że otwory zaznaczone na
krawędzi D6 i D7 nie są okrągłe. Umieścić A3 we
właściwej pozycji, aby dokładnie połączyć z
otworami.
Repare que os furos
marcados na borda de
D6 e D7 não são
completamente
circulares. Coloque o A3
na posição correta para
uma conexão perfeita
com os furos.
Schneiden Sie die Grate vor Montage ab.
Cut off the burrs before assembly.
Corte las rebabas antes del montaje.
Couper les ébarbures des pièces avant le montage.
Eliminare le sbavature prima dell'assemblaggio.
Knip de bramen af voor de montage.
Przed montażem usunąć pozostałości ramki.
Cortar as rebarbas antes da montagem.
La pagina sta caricando ...
La pagina sta caricando ...
La pagina sta caricando ...
La pagina sta caricando ...
La pagina sta caricando ...
La pagina sta caricando ...
La pagina sta caricando ...
La pagina sta caricando ...
La pagina sta caricando ...
La pagina sta caricando ...
La pagina sta caricando ...
La pagina sta caricando ...
La pagina sta caricando ...
La pagina sta caricando ...
La pagina sta caricando ...
La pagina sta caricando ...
La pagina sta caricando ...
La pagina sta caricando ...
La pagina sta caricando ...
La pagina sta caricando ...
La pagina sta caricando ...
La pagina sta caricando ...
La pagina sta caricando ...
La pagina sta caricando ...
La pagina sta caricando ...
La pagina sta caricando ...
La pagina sta caricando ...
La pagina sta caricando ...
La pagina sta caricando ...
La pagina sta caricando ...
La pagina sta caricando ...
La pagina sta caricando ...
La pagina sta caricando ...
La pagina sta caricando ...
La pagina sta caricando ...
-
 1
1
-
 2
2
-
 3
3
-
 4
4
-
 5
5
-
 6
6
-
 7
7
-
 8
8
-
 9
9
-
 10
10
-
 11
11
-
 12
12
-
 13
13
-
 14
14
-
 15
15
-
 16
16
-
 17
17
-
 18
18
-
 19
19
-
 20
20
-
 21
21
-
 22
22
-
 23
23
-
 24
24
-
 25
25
-
 26
26
-
 27
27
-
 28
28
-
 29
29
-
 30
30
-
 31
31
-
 32
32
-
 33
33
-
 34
34
-
 35
35
-
 36
36
-
 37
37
-
 38
38
-
 39
39
-
 40
40
-
 41
41
-
 42
42
-
 43
43
-
 44
44
-
 45
45
-
 46
46
-
 47
47
-
 48
48
-
 49
49
-
 50
50
-
 51
51
-
 52
52
-
 53
53
-
 54
54
-
 55
55


in altre lingue
- français: Velleman KSR21 Manuel utilisateur
- español: Velleman KSR21 Manual de usuario
- Deutsch: Velleman KSR21 Benutzerhandbuch
- Nederlands: Velleman KSR21 Handleiding
- português: Velleman KSR21 Manual do usuário
- polski: Velleman KSR21 Instrukcja obsługi
Documenti correlati
Altri documenti
-
MOB CX1514 Manuale utente
-
Haba 4208 Manuale del proprietario
-
-
-
MD Sports TTT215_138M Guida utente
-
Hoover TFB2011013FREEM Manuale utente
-
-
-
-