
THIS INSTRUCTION BOOKLET CONTAINS IMPORTANT SAFETY INFORMATION. PLEASE READ AND KEEP FOR FUTURE REFERENCE.
EN DE FR ES IT PL
USER'S MANUAL/HANDBUCH
/MANUEL DE L'UTILISATEUR/MANUAL DEL USUARIO
/MANUALE UTENTE/INSTRUKCJA OBSŁUGI
NP10679DK
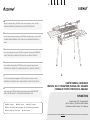
Propane Gas Grill / Propangasgrill
/ Gril à Charbon / Parrilla de Gas Propano
/ Barbecue a Gas Propano / Grill gazowy
EN
DE
FR
ES
IT
PL
With your inspiring rating, COSTWAY will be more consistent to offer you EASY
SHOPPING EXPERIENCE, GOOD PRODUCTS and EFFICIENT SERVICE!
Mit Ihrer inspirierenden Bewertung wird COSTWAY konsistenter sein, um Ihnen EIN
SCHÖNES EINKAUFSERLEBNIS, GUTE PRODUKTE und EFFIZIENTEN SERVICE zu
bieten!
Avec votre évaluation inspirante, COSTWAY continuera à fournir une EXPÉRIENCE
D’ACHAT PRATIQUE, des PRODUITS DE QUALITÉ et un SERVICE EFFICACE !
Con su calificación inspiradora, COSTWAY será más consistente para ofrecerle
EXPERIENCIA DE COMPRA FÁCIL, BUENOS PRODUCTOS y SERVICIO EFICIENTE.
Con la tua valutazione incoraggiante, COSTWAY sarà più coerente per offrirti
ESPERIENZA DI ACQUISTO FACILE, BUONI PRODOTTI e SERVIZIO EFFICIENTE!
Dzięki twojej opinii COSTWAY będzie mógł oferować jeszcze WYGODNIEJSZE
ZAKUPY, LEPSZE PRODUKTY i SPRAWNIEJSZĄ OBSŁUGĘ KLIENTA.
US office: Fontana UK office: Ipswich AU office: Truganina
DE office: FDS GmbH, Neuer Höltigbaum 36, 22143 Hamburg, Deutschland
FR office: Saint Vigor d'Ymonville
PL office: Gdańsk

02 03
Operation / Bedienung / Opération
/ Operación / Operazione / Użytkowanie
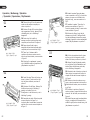
EN : Take out the grill from the carton and
make sure all parts are complete, as
shown in picture 1.
DE : Nehmen Sie den Grill aus dem Karton
und vergewissern Sie sich, dass alle Teile
vollständig sind, wie in Abbildung 1
dargestellt.
FR : Sortez le gril de la boîte et
assurez-vous que toutes les pièces sont
complètes, comme illustré à la figure 1.
ES : Saque la parrilla de la caja y
asegúrese de que todas las piezas estén
completas, como se muestra en la Fig.1.
IT : Tirare fuori il barbecue dalla
confezione di cartone e assicurare che
tutte le parti siano intatte, come mostrato
in Figura 1.
PL : Wyjmij grill z opakowania i upewnij
się, że wszystkie części są kompletne, tak
jak pokazano na rysunku 1.
EN : Install the legs. Take out the legs, as
shown in picture 2, and insert the legs
into the frame clockwise, as shown in
picture 3.
DE : Montieren Sie die Beine. Nehmen Sie
die Beine heraus, wie in Abbildung 2
gezeigt, und setzen Sie sie im
Uhrzeigersinn in den Rahmen ein, wie in
Abbildung 3 gezeigt.
FR : Assemblez les pieds. Retirez les pieds
comme indiqué sur la figure 2 et
insérez-les dans le cadre dans le sens des
aiguilles d'une montre comme indiqué sur
la figure 3.
ES : Instale las patas. Saque las patas,
como se muestra en la Fig.2, e inserte las
patas en el marco en el sentido de las
agujas del reloj, como se muestra en la
Fig.3.
IT : Installare le gambe. Tirare fuori le
gambe come mostrato in Figura 2 e
inserire le gambe nel telaio in senso orario
come mostrato in Figura 3.
PL : Montaż nóg. Wysuń nogi, tak jak
pokazano na rysunku 2. Następnie włóż
nogi do dedykowanych otworów w ramie,
obracając je zgodnie z ruchem wskazówek
zegara, tak jak pokazano na rysunku 3.
EN : Put the charcoal basin back in place
and turn up the fork supports on both
sides of the frame, as shown in picture 4.
DE : Setzen Sie das Kohlebecken wieder
ein und drehen Sie die Gabelstützen auf
beiden Seiten des Rahmens nach oben,
wie in Abbildung 4 dargestellt.
FR : Remettez le bac à charbon en place et
faites pivoter les supports de fourche de
chaque côté du cadre comme indiqué sur
la Figure 4.
ES : Vuelva a colocar la carbonera en su
lugar y suba los soportes de la horquilla a
ambos lados del marco, como se muestra
en la Fig.4.
IT : Rimettere in posizione il bacino di
carbone e alzare i supporti della forcella su
entrambi i lati del telaio, come mostrato in
Figura 4.
PL : Umieść tacę na węgiel w odpowiednim
miejscu, a następnie unieś wsporniki na
widełki do grilla po obu stronach ramy, tak
jak pokazano na rysunku 4.
pic 1 / Abb.1 / Fig.1
/ Fig.1 / Figura 1 / rys.1
pic 2 / Abb.2 / Fig.2
/ Fig.2 / Figura 2 / rys.2
pic 3 / Abb.3 / Fig.3
/ Fig.3 / Figura 3 / rys.3
pic 4 / Abb.4 / Fig.4
/ Fig.4 / Figura 4 / rys.4
01
02
03

04 05
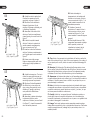
EN : Install the electric roasting fork.
Combine the separate grill poles
completely, as shown in picture 5.
DE : Montieren Sie die elektrische
Bratgabel. Kombinieren Sie die
einzelnen Grillstangen vollständig, wie
in Abbildung 5 dargestellt.
FR : Assemblez la fourchette à rôtir
électrique. Combinez complètement
chaque tige de gril comme illustré à la
Figure 5.
ES : Instale la horquilla de asado
eléctrica. Combine los postes de la
parrilla separados completamente,
como se muestra en la Fig.5.
IT : Installare la forcella di barbecue
elettrica. Combinare completamente i
pali di griglia sperati come mostrato in
Figura 5.
PL : Montaż rożna elektrycznego.
Połącz ze sobą wszystkie części rożna
elektrycznego, tak jak pokazano na
rysunku 5.
EN : Install the storage tray. The tray is
divided into upper and lower gear, as
shown in picture 6.7, it can be installed
according to personal requirements.
DE : Montieren Sie das Ablagetablett.
Das Tablett ist in einen oberen und
einen unteren Gang unterteilt, wie in
Abbildung 6.7 gezeigt, und kann je
nach persönlichen Bedürfnissen
montiert werden.
FR : Assemblez le plateau de stockage.
Le plateau est divisé en partie
supérieure et inférieure, comme illustré
à la Figure 6,7, et peut être assemblé
selon les besoins personnels.
EN : Tips: friction of components during installation will lead to a small white
mark on the surface of the grill, which is the normal property of the coating, it
can be wiped up with a cloth, and do not scratch hard to avoid damaging the
coating.
DE : Hinweise: Die Reibung der Teile während der Montage wird zu einem
kleinen weißen Fleck auf der Oberfläche des Grills führen, das ist die normale
Eigenschaft der Beschichtung, es kann mit einem Tuch abgewischt werden,
und kratzen Sie nicht hart, um die Beschichtung nicht zu beschädigen.
FR : Remarques: Le frottement des pièces lors de l'assemblage provoquera
une petite marque blanche sur la surface du gril, c'est la propriété normale du
revêtement, il peut être essuyé avec un chiffon et ne pas rayer fort pour ne
pas endommager le revêtement.
ES : Nota: La fricción de los componentes durante la instalación dará lugar a
una pequeña marca blanca en la superficie de la parrilla, que es la propiedad
normal del recubrimiento, puede limpiarla con un paño, y por favor, no raye
con fuerza para evitar dañar el recubrimiento.
IT : Consigli: l'attrito fra i componenti durante l'installazione porterà a un
piccolo segno bianco sulla superficie del barbecue, che è la caratteristica
normale del rivestimento, può essere pulito con un panno e non graffiarlo forte
per evitare di danneggiare il rivestimento.
PL : Uwaga: Tarcie części podczas montażu spowoduje powstanie małego
białego śladu na powierzchni grilla, co jest zjawiskiem normalnym. Ślad można
usunąć za pomocą ściereczki, uważając aby nie pocierać zbyt mocno i nie
uszkodzić powłoki.
ES : Instale la bandeja de
almacenamiento. La bandeja está
dividida en nivel superior e inferior,
como se muestra en la Fig.6 y 7, se
puede instalar de acuerdo con las
necesidades personales.
IT : Installare il vassoio di
archiviazione. Il vassoio è diviso in
livello superiore e inferiore, come
mostrato nella Figura 6 e 7, può
essere installato in base alle esigenze
personali.
PL : Montaż półek bocznych. Półki
mogą zostać zamocowane na jednej z
dwóch wysokości, zależnie od
indywidualnych potrzeb, tak jak
pokazano na rysunkach 6 i 7.
pic 5 / Abb.5 / Fig.5
/ Fig.5 / Figura 5 / rys.5
pic 6 / Abb.6 / Fig.6
/ Fig.6 / Figura 6 / rys.6
pic 7 / Abb.7 / Fig.7
/ Fig.7 / Figura 7 / rys.7
04
05
-
 1
1
-
 2
2
-
 3
3


in altre lingue
- français: Costway NP10679DK Manuel utilisateur
- español: Costway NP10679DK Manual de usuario
- Deutsch: Costway NP10679DK Benutzerhandbuch
- polski: Costway NP10679DK Instrukcja obsługi
Documenti correlati
Altri documenti
-
Cadac 8910 Manuale del proprietario
-
Clatronic BQS 2794 Manuale del proprietario
-
Dometic CONSUL Manuale del proprietario
-
Campingaz Compact L 2 Series Manuale del proprietario
-
-
Barbecook Optima Midnight Manuale del proprietario
-