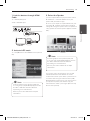
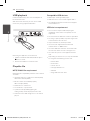
LG NB4530A Manuale utente
- Categoria
- Altoparlanti della soundbar
- Tipo
- Manuale utente

OWNER’S MANUAL
Sound Bar System
Please read this manual carefully before operating your set and retain it
for future reference.
NB4530A (NB4530A, S43A1-D)
DEUTSCH
ENGLISH
FRANÇAIS
NEDERLANDS
SLOVENŠČINA
ITALIANO ESPAÑOL
ΕΛΛΗΝΙΚΑ
PORTUGUÊS
NB4530A-NE.BDEULLB_ENG_4388.indd 1 2015-03-18 10:29:26

1 Getting Started
Getting Started2
Getting Started
1
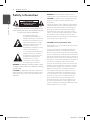
Safety Information
CAUTION
RISK OF ELECTRIC SHOCK
DO NOT OPEN
CAUTION: TO REDUCE THE RISK OF ELECTRIC
SHOCK DO NOT REMOVE COVER (OR BACK) NO
USER-SERVICEABLE PARTS INSIDE REFER SERVICING
TO QUALIFIED SERVICE PERSONNEL.
This lightning ash with
arrowhead symbol within an
equilateral triangle is intended to
alert the user to the presence of
uninsulated dangerous voltage
within the product’s enclosure
that may be of sucient
magnitude to constitute a risk of
electric shock to persons.
The exclamation point within an
equilateral triangle is intended
to alert the user to the presence
of important operating and
maintenance (servicing)
instructions in the literature
accompanying the product.
WARNING: TO PREVENT FIRE OR ELECTRIC SHOCK
HAZARD, DO NOT EXPOSE THIS PRODUCT TO RAIN
OR MOISTURE.
CAUTION: The apparatus shall not be exposed to
water (dripping or splashing) and no objects lled
with liquids, such as vases, shall be placed on the
apparatus.
WARNING: Do not install this equipment in a
conned space such as a book case or similar unit.
CAUTION: Do not block any ventilation openings.
Install in accordance with the manufacturer’s
instructions.
Slots and openings in the cabinet are provided for
ventilation and to ensure reliable operation of the
product and to protect it from over heating. The
openings shall be never be blocked by placing
the product on a bed, sofa, rug or other similar
surface. This product shall not be placed in a built-
in installation such as a bookcase or rack unless
proper ventilation is provided or the manufacturer’s
instruction has been adhered to.
CAUTION concerning the Power Cord
Most appliances recommend they be placed upon
a dedicated circuit;
That is, a single outlet circuit which powers only
that appliance and has no additional outlets or
branch circuits. Check the specication page of this
owner’s manual to be certain. Do not overload wall
outlets. Overloaded wall outlets, loose or damaged
wall outlets, extension cords, frayed power cords, or
damaged or cracked wire insulation are dangerous.
Any of these conditions could result in electric
shock or re. Periodically examine the cord of your
appliance, and if its appearance indicates damage
or deterioration, unplug it, discontinue use of the
appliance, and have the cord replaced with an
exact replacement part by an authorized service
center. Protect the power cord from physical or
mechanical abuse, such as being twisted, kinked,
pinched, closed in a door, or walked upon. Pay
particular attention to plugs, wall outlets, and
the point where the cord exits the appliance. To
disconnect power from the mains, pull out the
mains cord plug. hen installing the product, ensure
that the plug is easily accessible.
NB4530A-NE.BDEULLB_ENG_4388.indd 2 2015-03-18 10:29:26

Getting Started 3
Getting Started
1
This device is equipped with a portable battery or
accumulator.
Safety way to remove the battery or the
battery from the equipment: Remove the
old battery or battery pack, follow the steps
in reverse order than the assembly. To prevent
contamination of the environment and bring on
possible threat to human and animal health, the
old battery or the battery put it in the appropriate
container at designated collection points. Do
not dispose of batteries or battery together with
other waste. It is recommended that you use
local, free reimbursement systems batteries and
accumulators. The battery shall not be exposed to
excessive heat such as sunshine, re or the like.
Disposal of your old appliance
1. When this crossed-out wheeled bin
symbol is attached to a product it
means the product is covered by
the European Directive 2002/96/EC.
2. All electrical and electronic products
should be disposed of separately
from the municipal waste stream
via designated collection facilities
appointed by the government or
the local authorities.
3. The correct disposal of your
old appliance will help prevent
potential negative consequences
for the environment and human
health.
4. For more detailed information about
disposal of your old appliance,
please contact your city office,
waste disposal service or the shop
where you purchased the product.
Disposal of waste batteries/accumulators
1. When this crossed-out wheeled
bin symbol is attached to batteries/
accumulators of Your product
it means they are covered by
European Directive 2006/66/EC.
2. This symbol may be combined with
chemical symbols for mercury(Hg),
cadmium(Cd) or lead(Pb) if the
battery Contains more that 0.0005%
of mercury,0.002% of cadmium or
0.004% of lead.
3. All batteries/accumulators should
be disposed separately from
the municipal waste stream via
designated collection facilities
appointed by the government or
the local authorities.
4. The correct disposal of Your old
batteries/accumulators will help
to prevent potential negative
consequences for the environment,
animal and human health.
5. For more detailed information
about disposal of Your old batteries/
accumulators, please contact Your
city office, waste disposal service or
the shop where You purchased the
product.
NB4530A-NE.BDEULLB_ENG_4388.indd 3 2015-03-18 10:29:26

Getting Started4
Getting Started
1
Europe Notice
LG Electronics hereby declares that this/these
product(s) is/are in compliance with the essential
requirements and other relevant provisions of
Directive 1999/5/EC, 2004/108/EC, 2006/95/EC,
2009/125/EC and 2011/65/EU.
Please contact to the following address for
obtaining a copy of the DoC (Declaration of
Conformity).
Contact oce for compliance of this product :
LG Electronics Inc.
EU Representative, Krijgsman 1,
1186 DM Amstelveen, The Netherlands
y
Please note that this is NOT a Customer Service
contact point. For Customer Service Information,
see Warranty Card or contact the dealer that you
purchased this product.
Indoor Use Only
RF Radiation Exposure Statement
This equipment should be installed and operated
with minimum distance 20 cm between the
radiator and your body.
Italy Notice
A general authorization is requested for outdoor
use in Italy.
The use of these equipments is regulated by:
1. D.L.gs 1.8.2003, n. 259, article 104 (activity
subject to general authorization) for outdoor
use and article 105 (free use) for indoor use, in
both cases for private use.
2. D.M. 28.5.03, for supply to public of RLAN access
to networks and telecom services.
L’uso degli apparati è regolamentato da:
1. D.L.gs 1.8.2003, n. 259, articoli 104 (attività
soggette ad autorizzazione generale) se utilizzati
al di fuori del proprio fondo e 105 (libero uso) se
utilizzati entro il proprio
fondo, in entrambi i casi per uso private.
2. D.M. 28.5.03, per la fornitura al pubblico
dell’accesso R-LAN alle reti e ai servizi di
telecomunicazioni.
Brazil Notice
Este equipamento opera em caráter secundário, isto
é, não tem direito a proteção contra interferência
prejudicial, mesmo de estações do mesmo tipo, e
não pode causar interferência a sistemas operando
em caráter primário.
NB4530A-NE.BDEULLB_ENG_4388.indd 4 2015-03-18 10:29:27

Table of Contents 5
1
2
3
4
5
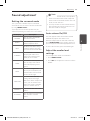
Table of Contents
1 Getting Started
2 Safety Information
6 Unique features
6 – Auto power down
6 – Portable In
6 – Speaker ez (easy) setup
6 Introduction
6 – Symbols used in this manual
6 Accessories
7 Remote control
8 Front panel
8 Rear panel
9 Installing the sound bar
9 Installing the cover foot
2 Connecting
10 Mounting the main unit on a wall
12 Connecting the AC adapter
12 Setting up
12 – Pairing wireless subwoofer
13 Connecting to your TV
13 – Using an OPTICAL cable
14 – Connecting with this unit and TV
using an HDMI cable
14 – HDMI cable Checklist
14 – Enjoy rich sound broadcast of the
channel by the sound bar
16 – ARC (Audio Return Channel) function
16 – Additional information for HDMI
17 – What is SIMPLINK?
18 Optional equipment connection
18 – HDMI connection
19 – PORT. (Portable) IN connection
19 – Listening to music from your portable
player
19 – OPTICAL IN connection
19 – Speaker ez (easy) setup
20 – USB playback
20 – Playable file
3 Operating
21 Basic operations
21 – USB operation
21 Other operations
21 – DRC (Dynamic Range Control)
21 – AV Sync
21 – Turn off the sound temporarily
21 – Displaying file and input source
22 – AUTO POWER On/Off
22 – Auto power down
22 – Sleep timer setting
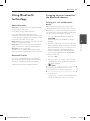
23 Using Bluetooth technology
23 – Listening to music stored on the
Bluetooth devices
25 Sound adjustment
25 – Setting the surround mode
25 – Auto volume On/Off
25 – Adjust the woofer level settings
26 Controlling a TV with the supplied remote
control
26 – Setting up the remote to control your
TV
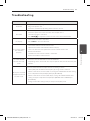
4 Troubleshooting
27 Troubleshooting
5 Appendix
28 Trademarks and licenses
29 Specifications
30 Maintenance
30 – Handling the unit
NB4530A-NE.BDEULLB_ENG_4388.indd 5 2015-03-18 10:29:27

Getting Started6
Getting Started
1
Unique features
Auto power down
This unit supports to turn o by itself for saving
energy consumption.
Portable In
Listen to music from your portable device. (MP3,
Notebook, etc)
Speaker ez (easy) setup
Listen to sound from TV, DVD or Digital device with
vivid 2.1 or 2.0 ch mode.
Introduction
Symbols used in this manual
,
Note
Indicates special notes and operating features.
>
Caution
Indicates cautions for preventing possible damages
from abuse.
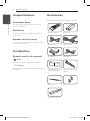
Accessories
Please check and identify the supplied accessories.
Remote control (1) Batteries (2)
Optical cable (1) Power cord (1)
AC adapter (1) USB Cable (1)
Wall Mount Bracket
Installation Template
(1)
Cable ties for arranging
cables (2)
Wall bracket (1) Shaft wall mount (2)
Cover foot_19mm (1)
NB4530A-NE.BDEULLB_ENG_4388.indd 6 2015-03-18 10:29:28

Getting Started 7
Getting Started
1
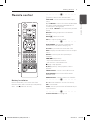
Remote control
Battery Installation
Remove the battery cover on the rear of the
Remote Control, and insert two (size AAA) battery
with and matched correctly.
• • • • • • • • • •
a
• • • • • • • • •
1
(Power) : Switches the unit ON or OFF.
FUNCTION : Selects the function and the input
source.
W/S
FOLDER : Searches for a folder of MP3/WMA
les. When a USB containing MP3/WMA les in
several folders is being played,
press
W/S
FOLDER to select the folder you want
to play.
OPTICAL : Changes input source to OPTICAL
directly.
MUTE
@
: Mutes the sound.
VOL +/- : Adjusts speaker volume.
• • • • • • • • • •
b
• • • • • • • • •
AUTO POWER : This function is automatically
turned on the unit. (Refer to the page 22)
AV SYNC : Synchronizes the audio and video.
INFO : Displays the information of a le or an input
source.
REPEAT : Listens to your les repeatedly or
randomly.
C/V
(Skip/Search) :
- Skips Fast backward or Forward.
- Searches for a section within a le.
Z
(Stop) : Stops playback.
d/M
(Play/Pause) : Starts playback. / Pauses
playback.
SOUND EFFECT : Selects a sound eect mode.
AUTO VOLUME : Turns on and o the AUTO
VOLUME mode.
WOOFER LEVEL : Sets the sound level of woofer.
• • • • • • • • • •
c
• • • • • • • • •
0 to 9 numerical buttons : Selects a le directly.
DRC : Sets the DRC.
SLEEP : Sets the system to turn o automatically at
a specied time.
• • • • • • • • • •
d
• • • • • • • • •
TV Control buttons : See page 26.
NB4530A-NE.BDEULLB_ENG_4388.indd 7 2015-03-18 10:29:29

Getting Started8
Getting Started
1
A
1/!
B
- / + (Volume -/+)
Adjusts volume level.
C
T
(Play/Pause)
D
I
(Stop)
E
F (Function)
Selects the function and input source.
F
Display window
Precautions in using the touch buttons
y
Use the touch buttons with clean and dry
hands.
- In a humid environment, wipe out any
moisture on the touch buttons before
using.
y
Do not press the touch buttons hard to
make it work.
- If you apply too much strength, it can
damage the sensor of the touch buttons.
y
Touch the button that you want to work in
order to operate the function correctly.
y
Be careful not to have any conductive
material such as metallic object on the
touch buttons. It can cause malfunctions.
>
Caution
Front panel
A
DC. IN 25V
0
2A
B
USB port
C
PORT.(Portable) IN
D
OPT.(Optical) IN
E
HDMI IN/ OUT
Rear panel
NB4530A-NE.BDEULLB_ENG_4388.indd 8 2015-03-18 10:29:29

Getting Started 9
Getting Started
1
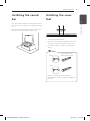
Installing the sound
bar
You can hear the sound by connecting the unit to
the other device : TV, Blu-ray disc player, DVD player,
etc.
Place the unit in front of the TV and connect it to
the device you want. (Refer to pp.13 - 20)
Installing the cover
foot
1. Turn the unit upside down.
2. Place the cover foot on the bottom of the unit
to match screw holes with those on the unit.
3. Fix it with screws as shown in the illustration
above.
You can exchange 26 mm foot (factory
installed) with 19 mm to change the height of
your unit.
(It has been already
installed to the unit.)
26mm
19mm
,
Note
NB4530A-NE.BDEULLB_ENG_4388.indd 9 2015-03-18 10:29:30

2 Connecting
Connecting10
Connecting
2
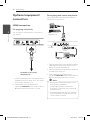
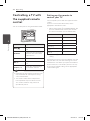
Mounting the main
unit on a wall
You can mount the main unit on a wall.
Detach the cover foot of the unit, keep the
detached cover foot for later installation and use
the screws to hang the unit on the wall.
Prepare shaft wall mount and bracket.
Unit
Wall bracket
Wall Mount Bracket
Installation Template
Shaft wall mount
1. Locate the shaft wall mount on the screw hole
of the unit's back and then fix it onto the unit
with the screw.
2. Match the TV’s BOTTOM EDGE of Wall Mount
Bracket Installation Template with the bottom
of TV and attach to the position.
TV
3. When you mount it on a wall (concrete), use the
wall plugs. You should drill some holes. A guide
sheet (Wall Mount Bracket Installation Template)
is supplied to drill. Use the sheet to check the
point to drill.
NB4530A-NE.BDEULLB_ENG_4388.indd 10 2015-03-18 10:29:30

Connecting 11
Connecting
2
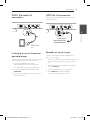
4. Remove the Wall Mount Bracket Installation
Template.
5. Fix it with screws as shown in the illustration
below.
6. Hang the main unit onto the bracket as shown
below.
y
Do not install this unit upside down. It can
damage the parts of this unit or be the
cause of personal injury.
y
Do not hang onto the installed unit and
avoid any impact to the unit.
y
Secure the unit rmly to the wall so that it
does not fall o. If the unit falls o, it may
result in an injury or damage to the product.
y
When the unit is installed on a wall, please
make sure that a child does not pull any of
connecting cables, as it may cause it to fall.
>
Caution
Detach the unit from the bracket as shown
below.
,
Note
NB4530A-NE.BDEULLB_ENG_4388.indd 11 2015-03-18 10:29:31

Connecting12
Connecting
2
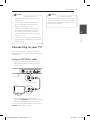
Connecting the AC
adapter
1. Connect the supplied AC power cord to the AC
adapter.
2. Connect the AC adapter cable to DC. IN adapter
input.
3. Plug the AC power cord into an AC outlet.
Only use the AC adapter supplied with this
device. Do not use a power supply from
another device or manufacturer. Using any
other power cable or power supply may cause
damage to the device and void your warranty.
>
Caution
Setting up
Pairing wireless subwoofer
LED indicator of wireless subwoofer
LED Color Status
Yellow The wireless subwoofer is
receiving the signal of the unit.
Yellow (blink) The wireless subwoofer is trying
to connect.
Red The Wireless subwoofer is in
standby mode.
O (No
display)
The power cord of wireless
subwoofer is disconnected.
Setting up the wireless subwoofer
for the first time
1. Connect the power cord of the Wireless
subwoofer to the outlet.
2. Turn on the main unit : The main unit and
wireless subwoofer will be automatically
connected.
Manually pairing wireless subwoofer
When your connection is not completed, you can
see the red LED on the woofer and woofer is not
made sound. To solve the problem, follow the
below steps.
1. Press and hold
I
STOP button on the unit
and MUTE
button on the remote control
simultaneously.
- Displays the “REMATE”.
2. Press PAIRING on back of the woofer.
- The yellow LED will flicker.
3. Turn off and on the unit.
- If you see “Yellow” LED, it’ s successful.
4. If you don’t see “Yellow” LED, try again Step 1 -
Step 3.
NB4530A-NE.BDEULLB_ENG_4388.indd 12 2015-03-18 10:29:31

Connecting 13
Connecting
2
y
If you operate main unit then wireless
subwoofer sound within a few seconds in
standby mode.
y
Set the distance between this unit and
wireless subwoofer within 10 m (32 ft.).
y
Optimum performance can be
implemented only when the unit and
the Wireless subwoofer within distance
of 2 m (6 ft.) to 10 m (32 ft.) is used since
communication failure may occur if longer
distance is used.
y
It takes a few seconds (and may take longer)
for the unit and subwoofer to communicate
with each other.
,
Note
Connecting to your TV
Please connect with this unit and TV using the
optical digital cable or HDMI cable considering the
state of the TV.
Using an OPTICAL cable
1. Connect the OPT. IN jack on the back of the
unit to OPTICAL OUT jack on the TV using an
OPTICAL cable.
Optical cable
2. Set the INPUT source to OPTICAL. Press
repeatedly FUNCTION on the remote control or
F on the unit until the function is selected.
For selecting directely the OPTICAL function, press
OPTICAL on the remote control.
You can enjoy the TV sound through the
speakers of this unit. But in the case of some
TV models, you must select external speakers
state of the TV on the menu. (For details, refer
to your TV user manual.)
,
Note
NB4530A-NE.BDEULLB_ENG_4388.indd 13 2015-03-18 10:29:32

Connecting14
Connecting
2
Connecting with this unit and
TV using an HDMI cable
If you connect with this unit and TV that supports
HDMI CEC and ARC (Auto Return Channel) , you can
enjoy the TV sound through the speakers of this
unit without connecting optical cable.
HDMI cable
HDMI CEC (Consumer Electronic Control) :
With a single remote control is the ability to
operating.The CEC compatible devices (TV,
Sound Bar, Blu-ray player, etc.)
,
Note
HDMI cable Checklist
Some HDMI cables do not support the ARC
function, sound output can cause problems.
When connecting this unit and the TV is there no
sound or sound in the event of interruption and
noise, there is a problem with the HDMI cable.
Therefore connect with this unit and TV after check
whether the Type A, High speed HDMI TM Cable
with Ethernet.
STANDARD HDMI CABLE WITH ETHERNET
HIGH SPEED HDMI CABLE
HIGH SPEED HDMI CABLE WITH ETHERNET
(X)
(X)
(O)
Enjoy rich sound broadcast of
the channel by the sound bar
Connection through HDMI Cable
Your television that you own should support
the newest HDMI features (
1)
HDMI CEC / ARC
(Audio Return Channel)) to fully enjoy the Live
broadcasting channel with audio system through
a HDMI cable. Unless your TV support these HDMI
features, this audio system should be connected
through an OPTICAL cable instead of a HDMI cable
to your TV to enjoy the sound of TV channel.
1) HDMI CEC (High-Denition Multimedia Interface
Consumer Electronics Control)
Consumer Electronics Control (CEC) is an HDMI
feature designed to allow the user to command
and control the CEC-enabled devices, that are
connected through HDMI by using only one of
their remote controls.
※
Trade names for CEC are SimpLink G) , Anynet+
(Samsung), BRAVIA Sync (Sony), EasyLink (Philips),
etc.
NB4530A-NE.BDEULLB_ENG_4388.indd 14 2015-03-18 10:29:32

Connecting 15
Connecting
2
1. Link the devices through HDMI
Cable
TV : HDMI IN (ARC) port
Audio : HDMI OUT port
2. Activate ARC mode
TV : Setup
D
Audio or Sound
D
ARC mode (must be
ON)
All of the graphical user Interface (GUI) and
accessing steps (Step 02
D
Step 03) to activate
the ARC / HDMI CEC would be dierent
depending on TV manufacture.
Refer to your TV User Manual for in-depth
information.
,
Note
3. Select the Speaker
TV : Press ‘Input’ button on your TV remote control
D
HDMI CEC :
should be ON
D
Select your
speaker that you want to enjoy.
※
LG TV : Press ‘Input’ or ‘Simplink’ button on your
TV remote.
D
Simplink must be ‘ON’ at Simplink
setting
D
Change the speaker from ‘TV Speaker’ to
‘HT(S) Speaker’ or ‘External Speaker (Optical / HDMI
ARC)’
All of the graphical user Interface (GUI) and
accessing steps (Step 02
D
Step 03) to activate
the ARC / HDMI CEC would be dierent
depending on TV manufacture.
Refer to your TV User Manual for in-depth
information.
,
Note
You can also enjoy extra functions such as USB
/ Bluetooth with ‘Function’ button on remote
control of this audio system. When you back to live
TV channel after using the extra functions (USB /
Bluetooth)of this audio system, you should choose
your preferred speaker you want to enjoy the
sound from this audio system again. (Refer to Step
03 Select the Speaker)
NB4530A-NE.BDEULLB_ENG_4388.indd 15 2015-03-18 10:29:32

Connecting16
Connecting
2
ARC (Audio Return Channel)
function
The ARC function enables an HDMI capable TV to
send the audio stream to HDMI OUT of the unit.
To use this function :
-
Your TV must support the HDMI-CEC and ARC
function and the HDMI-CEC and ARC must be
set to On.
-
The setting method of HDMI-CEC and ARC may
dier depending on the TV. For details about
ARC function, refer to your TV manual.
-
You must use the HDMI cable (Type A, High
Speed HDMI™ cable with Ethernet).
-
You must connect the HDMI OUT on the unit
with HDMI IN of the TV that supports ARC
function using an HDMI cable.
-
You can connect only one Sound bar to TV
compatible with ARC.
Additional information for
HDMI
y
When you connect a HDMI or DVI compatible
device make sure of the following:
- Try switching off the HDMI/DVI device and this
player. Next, switch on the HDMI/DVI device
and leave it for around 30 seconds, then switch
on this player.
- The connected device’s video input is set
correctly for this unit.
- The connected device is compatible with
720 x 576p, 1280 x 720p, 1920 x 1080i or
1920 x 1080p video input.
y
Not all HDCP-compatible HDMI or DVI devices
will work with this player.
- The picture will not be displayed properly with
non-HDCP device.
NB4530A-NE.BDEULLB_ENG_4388.indd 16 2015-03-18 10:29:32

Connecting 17
Connecting
2
y
If a connected HDMI device does not accept
the audio output of the player, the HDMI
device’s audio sound may be distorted or
may not output.
y
Changing the resolution when the
connection has already been established
may result in malfunctions. To solve the
problem, turn o the player and then turn it
on again.
y
When the HDMI connection with HDCP
is not veried, TV screen is changed to
black screen. In this case, check the HDMI
connection, or disconnect the HDMI cable.
y
If there are noises or lines on the screen,
please check the HDMI cable (length is
generally limited to 4.5 m(15 ft).
y
You cannot change the video resolution
in the HDMI IN mode. Change the video
resolution of the connected component.
y
If the video output signal is abnormal when
your personal computer is connected to
HDMI IN jack, change the resolution of your
personal computer to 576p, 720p, 1080i or
1080p.
,
Note
What is SIMPLINK?
Some functions of this unit are controlled by the
TV’s remote control when this unit and LG TV’s with
SIMPLINK are connected through HDMI connection.
Controllable functions by LG TV’s remote control :
Power on/o, volume up/down, etc.
Refer to the TV owner’s manual for the details of
SIMPLINK function.
LG TV’s with SIMPLINK function has the logo as
shown above.
Depending on the state of the unit, some
SIMPLINK operation may dier from your
purpose or not work.
,
Note
NB4530A-NE.BDEULLB_ENG_4388.indd 17 2015-03-18 10:29:32

Connecting18
Connecting
2
Optional equipment
connection
HDMI connection
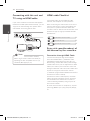
For enjoying sound only
You can enjoy the sound from the external device
you connect.
To the Blu-ray disc player,
DVD player, etc.
1. Connect HDMI IN jack on the back of the unit to
HDMI OUT jack on the audio device such as Blu-
ray disc player, DVD player, etc.
2. Set the INPUT source to HDMI IN. Press
repeatedly FUNCTION on the remote control or
F on the unit until the function is selected.
For enjoying both sound and picture
You can enjoy both sound and picture from the
external device you connect.
Blu-ray disc player,
DVD player, etc.
1. Connect HDMI IN jack on the back of the unit to
HDMI OUT jack on the external device such as
Blu-ray disc player, DVD player, etc.
2. Connect HDMI OUT jack on the back of the unit
to HDMI IN jack on the TV.
3. Set the INPUT source to HDMI IN. Press
repeatedly FUNCTION on the remote control or
F on the unit until the function is selected.
y
With the unit connected to external devices
and TV as above illustration,
TV will output picture and sound from
external devices when the unit is turned o
in HDMI IN mode.
y
Even though PCM multi channel is inputted
to the unit through an HDMI cable, the unit
can only output 2 channel.
,
Note
NB4530A-NE.BDEULLB_ENG_4388.indd 18 2015-03-18 10:29:33

Connecting 19
Connecting
2
PORT. (Portable) IN
connection
MP3 player,
etc...
Listening to music from your
portable player
The unit can be used to play the music from many
types of portable players or external devices.
1. Connect the portable player to the
PORT. (Portable) IN connector of the unit.
2. Turn the power on by pressing
1
(Power).
3. Select the PORTABLE function by pressing
FUNCTION.
4. Turn on the portable player or external device
and start playing it.
OPTICAL IN connection
Connect an optical output jack of external devices
to the OPT. IN jack.
To the digital
optical output jack
of external device
Speaker ez (easy) setup
Listens to sound from TV, DVD or Digital Device
with 2.1 or 2ch mode.
1. Connect the OPT. IN jack on the back of the unit
to optical out jack of your TV (or digital device
etc.)
2. Select the input source to OPTICAL directly by
pressing OPTICAL.
3. Listen to sound with 2.1 or 2ch speaker.
4. Press OPTICAL to exit from OPTICAL.
Function is retuned to previous one.
NB4530A-NE.BDEULLB_ENG_4388.indd 19 2015-03-18 10:29:33

Connecting20
Connecting
2
USB playback
Connect USB memory device to the USB port on
the back of the unit.
With the unit on the wall, you can connect USB
more easily using supplied USB cable.
Removing the USB Device from the unit.
1.
Choose a different function/mode or press
Z
twice in a row.
2. Remove the USB device from the unit.
Playable file
MP3/ WMA file requirement
MP3/ WMA le compatibility with this unit is limited
as follows :
y
Sampling frequency : within 32 to 48 kHz (MP3),
within 32 to 48 kHz (WMA)
y
Bit rate : within 32 to 320 kbps (MP3),
40 to 192 kbps (WMA)
y
Maximum les : Under 999
y
File extensions : “.mp3”/“.wma”
y
A protected le by DRM(Digital rights
management) cannot be played on the unit.
y
Video les in the USB storage device can not be
played.
Compatible USB devices
y
MP3 Player : Flash type MP3 player.
y
USB Flash Drive : Devices that support USB1.1.
y
The USB function of this unit does not support
some USB devices.
USB device requirement
y
Devices which require additional program
installation connected to a computer, are not
supported.
y
Do not extract the USB device while in operation.
y
For a large capacity USB, it may take longer than
a few minutes to be searched.
y
To prevent data loss, back up all data.
y
This unit is not supported when the total
number of les is 1000 or more.
y
The unit’s USB Port cannot be connected to PC.
The unit can not be used as a storage device.
y
The exFAT le system is not supported on this
unit.
y
Depending on some devices, it may not available
to recognize the followings on this unit.
-
External HDD
-
Card readers
-
Locked devices
-
Hard type USB devices
-
USB hub
-
Using USB extension cable
NB4530A-NE.BDEULLB_ENG_4388.indd 20 2015-03-18 10:29:33
La pagina si sta caricando...
La pagina si sta caricando...
La pagina si sta caricando...
La pagina si sta caricando...
La pagina si sta caricando...
La pagina si sta caricando...
La pagina si sta caricando...
La pagina si sta caricando...
La pagina si sta caricando...
La pagina si sta caricando...
La pagina si sta caricando...
La pagina si sta caricando...
-
 1
1
-
 2
2
-
 3
3
-
 4
4
-
 5
5
-
 6
6
-
 7
7
-
 8
8
-
 9
9
-
 10
10
-
 11
11
-
 12
12
-
 13
13
-
 14
14
-
 15
15
-
 16
16
-
 17
17
-
 18
18
-
 19
19
-
 20
20
-
 21
21
-
 22
22
-
 23
23
-
 24
24
-
 25
25
-
 26
26
-
 27
27
-
 28
28
-
 29
29
-
 30
30
-
 31
31
-
 32
32


LG NB4530A Manuale utente
- Categoria
- Altoparlanti della soundbar
- Tipo
- Manuale utente
in altre lingue
- English: LG NB4530A User manual